Embedded Programming
this weeks assignment was to simulate and test different toolchains, and to browse our microcontrollers dataasheet. We also had to as a group compare our microcontrollers
During this week, I also worked on my final project by getting the basics of moving the stepper and seeing the camera over a webserver working

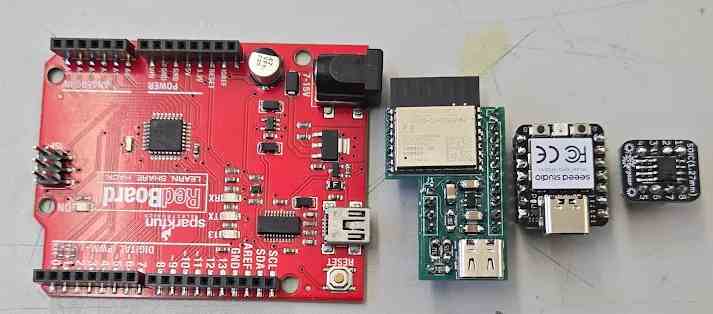
all of the boards I ended up simulating and using
Toolchains
I plan on using a arduino uno/atmel chip, rp2040, esp32-c3, and an attiny. While they are different boards and even different architectures (arm, RISCV), they still all support arduino c++, and most support micropython.
C++ vs Micropython
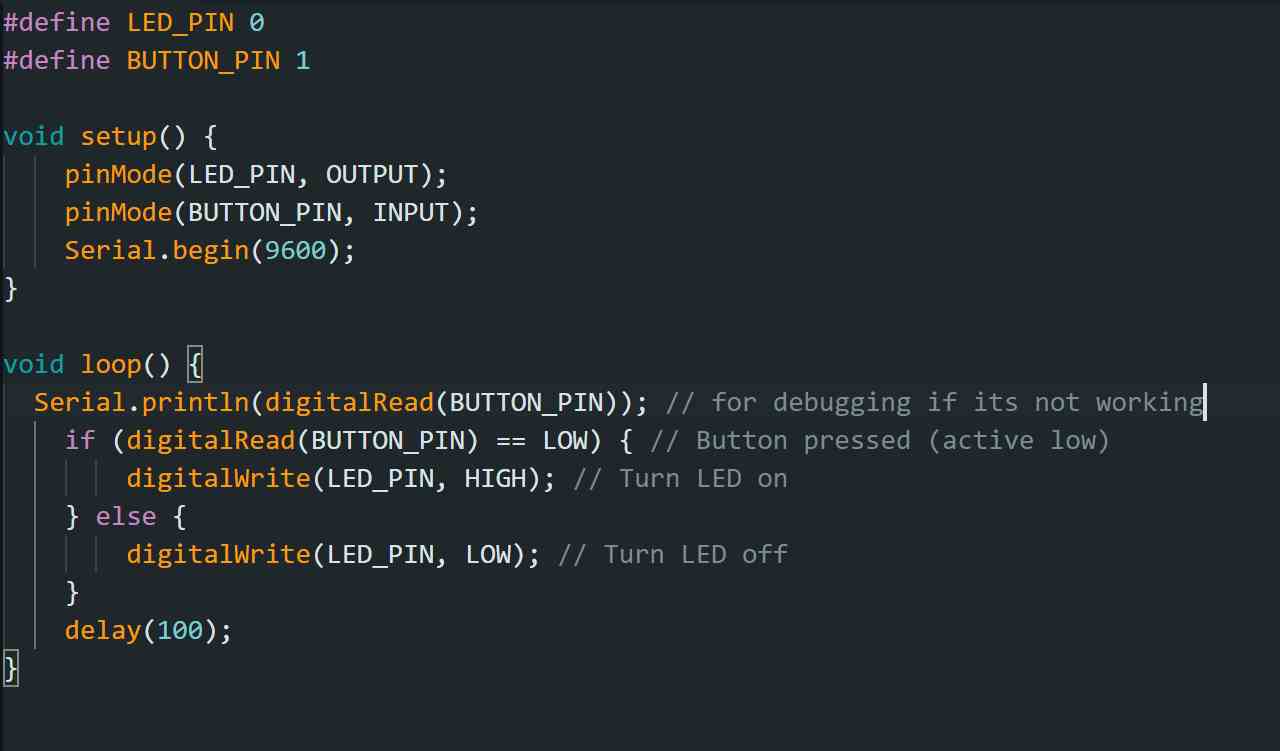
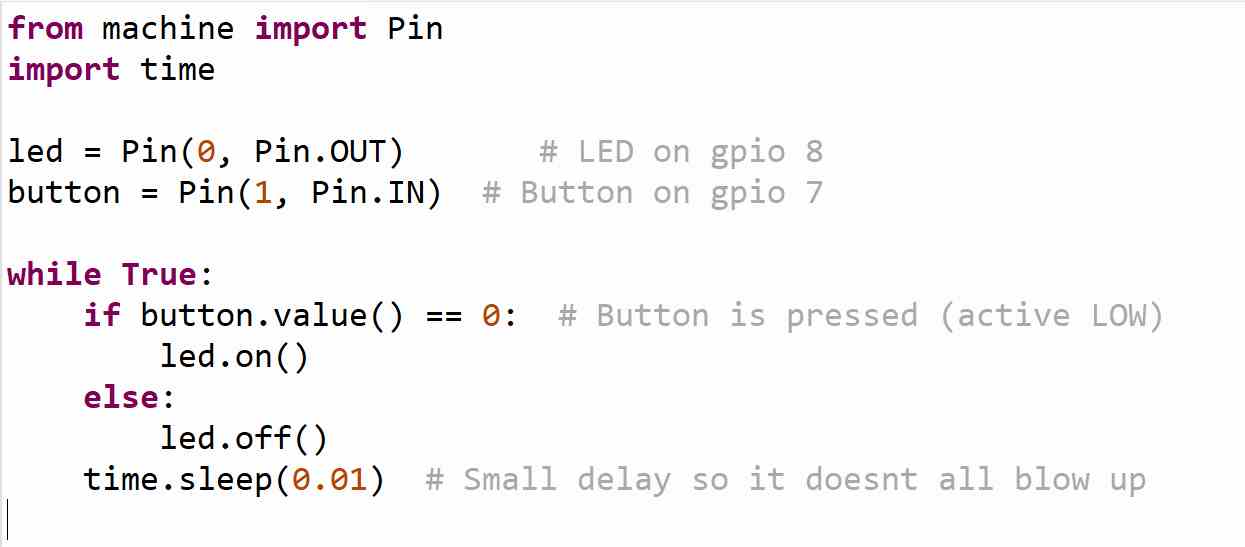
arduino c++ is based on c++, while micropython is based on python, meaning that micropython is generally easier and faster to work with. Micropython does not have the same preformance as c++, which is why it isnt availble on the ATTiny Here is an image of the code I used throughout testing these microcontrollers, in order to compare the structure of arduino to micropython
C++ Code
Micropython
in general, the micropython would be more readable by someone who has never programmed before, while the c++ is more code, but preforms faster and can fit on the smaller boards
Simulating
While I do have a lot of experience with all of these microcontroller except for the ATTiny, I wanted to start with a simulation in wokwi, one of the best website based electronic simulation apps
The good thing about all 4 of these chips, is that they all were made for or have community driven efforts to support the arduino IDE and it's programming language. This means that will a simple board install, I can work with all of these microcontrollers.
Arduino Uno
The Uno is The microcontroller, so much so that when searching up microcontroller on my browser, 1/3 of the pictures include an uno 
It is safe to say that it is the first microcontroller 70&% of new learners use, and for good reason. It is incredibly easy to work with, very hard to blow up, and is the single most well supported microcontroller by the community and the company behind it. For the simulation, I just did a simple button as an input, and a LED as an output. the link to the wokwi project is here

ESP32-C3
The esp32-c3 is my favorite microcontroller, and for that reason I also think that it is probably the single best microcontroller that exists. It combines high computing power, wireless, decent power consumption, good community support, and built in USB support. All of these are the reasons why I built my own. Before doing anything advanced with the ESP32-C3, I needed just to test a simple button and LED. and before building anything, I needed to simulate it online. The Wokwi Project can be found here

RP2040
The RP2040 is the darling of the open source community. Nobody can hate on a 1$ microcontroller with some of the fastest specs for its price. The only reason I don't use it is that the esp32 series has been supported for longer, and it has all the fancy wireless specs. A custom rp2040 board that I found one day was the inspiration for me finally getting around to building my custom esp32-c3 The Wokwi Project can be found here

Attiny
While the simulator did not have the exact version of the attiny I was using, the attiny412, It had the Attiny85, which is almost the same once code has been uploaded, but in real life would require a much more complicated uploading process featuring 6 wires instead of the 1 that the 412 uses. In general, the Attiny series was created to fill the niche of really small circuits that still required more logic than a 555 timer. It has an incredibly cheap price, which is the main factor that lead to its widespread use. The other main reason for its usage is in its name, it is very very small while still being able to be worked on by a hobbyist. The Wokwi Project can be found here

Building
Arduino Uno
Ive talked about the popularity of the uno, but not its features. It's features honestly are not the selling point of it, as it only has a 16mhz clock (atleast 10x worse than esp and rp2040), 32kb of program memory, 2 kb of ram, and one of the largest profiles that a microcontroller can have and still be considered "Micro." It should not be talked bad about however, as the uno was made available in 2010, and the chip it uses was released in 2008. Although its hardware has flaws with computing, it size is due to the purpose of the arduino, not as a professional grade tool, but a educational tool. Its ubiquity is also thanks to its old age, as it was highly advanced in 2010.
As I described in my ATTiny portion, I had an issue uploading to it, but managed to fix it there. Once I successfully uploaded the first time, it was similar to the esp32-c3 in that it did not require a boot button being held down with the next uploads.

ESP32-C3
The esp32-c3 microcontroller is probably the single best microcontroller that exists. It combines high computing power, wireless, decent power consumption, good community support, and built in USB support. All of these are the reasons why I built my own. Working with my custom board is fine, except for the fact that it uses the C3s built in USB JTAG adapter, and therefore requires me to turn on the setting "USB CDC at boot" in order for all of the serial functions (serial.begin, serial.println, etc) to work. I've just learned to set that setting before I do anything else while coding with it.

Wifi Webserver
The outstanding feature of the esp32 is it's wifi capability, so why not use it? The esp32 series is really easy to use, by using old at commands or the WiFi library included in the esp32 arduino core. As this related to my final project, I worked on that. My final project is hopefully going to be a camera that can look around, and I needed some way to look around wirelessly and see the camera view wirelessly. I decided to do wireless as I have experience in it and what the final project is based on uses a phone to operate it.
Camera
I found that the (seeed xiao esp32-s3 sense)[https://www.seeedstudio.com/XIAO-ESP32S3-Sense-p-5639.html] was my best bet at both wifi and camera support. In getting the camera working, I followed this tutorial by the seeed studio team, and it worked flawlessly. However, I found that although the camera worked, adding a joystick onto the same page would be very hard. in troubleshooting this, I found that the video stream used a motion jpeg, basically just a bunch of pictures being sent fast enough to become a video. I also found that it got these pictures through a request to 6.6.6.6/stream, with the ip address being the one of the microcontroller and not 6.6.6.6. Im pretty certain that I will be able to combine the joystick and the camera by making my own webpage, and plan on getting that done next week, during 3d printing and scanning week, which I heard was a bit easier
Networking
Since I needed 2 steppers, I didnt just need connection from the phone to the stepper, but some way to communicate between the microcontrollers. For this, I discovered MDNS, which is essentially is a custom dns server that can run locally, so that instead of typing 192.168.4.1 to connect to the esp, I could type maestro.local. MDNS is very easy to set up, requiring just the line MDNS.begin( name of network), and then name of network.local can connect to it. Once I had communication between the two esp32-c3. After getting that working, I needed to figure out how I wanted to send data between the two. I decided on using html forms, which is essentially the same thing that your browser uses when communicating with a simple website. When combining this together, it worked nearly flawlessly, with the exception of an error I had for 2 hours straight, of me trying to ping the webserver using maestro.local instead of maestro. for some reason, when using mdns the way to connect to another server is to drop the .local on the end of it, and that issue caused 2 hours of hair pulling.
Steppers
As for the stepper control, I was unaware of any premade solution for it, so I had to make it myself. I decided on using my custom board to control it, as I planned on designing a custom board later, for whatever fab academy week that requires custom boards, that would fit to the base of the stepper or similar. In using the stepper, I decided on the A4988 driver as I had used it in the past on a project that reached nowhere near completion. While the a4988 highly suggested a voltage of atleast 8v, I found that 5v from my battery packs worked fine, with only a loss of a bit of torque, which I hope won't come back to bite me. Using the stepper is very simple, on the microcontroller you just set a pin high or low to show direction, and then pulse it on and off to move it one step, which is about 2 degrees. By combining the work of the networking section and stepper section, I was able to make an interactive joystick webpage that would move the stepper, all run off of the custom esp32-c3 board.
RP2040
I've already talked about the benefits of the rp2040 above, so now im going to talk about the benefits of the Seeed Studio xiao series. Im using a xiao rp2040, as my lab are big fans of the xiao series in general. While it does support Arduino C++, the rp2040 chip is special in being made for the largest arduino C++ competitor, Micropython. The toolchain for a pi pico is easy to work with, as it just either requires following this tutorial for c++ or this one for micropython

ATTiny412
The ATTiny is the best low price microcontroller, at a cost of about 0.09$ per gpio. It isn't even that slow a microcontroller, as it runs faster than some of the versions of the Arduino Uno. It is also compact, which makes it pretty good for specific projects.

Uploading Workflow
Using the ATTiny is not easy, as it uses UDPI to program it. for this, I followed Fab Academy Graduate, Teddy Warner's Documentation.
Troubleshooting
To get started however, I needed to fix my computer so that it works with arduino uno's, and specifically their usb to serial converter chip. While they usally feature a ch232 or similar, I found that those dont work even with the correct drivers. I found a sparkfun redboard and used that, as it featured a ft231x chip. Installing the drivers was as simple as navigating to the FTDI drivers pages, downloading the arm VCP driver, found here. once I had the files I needed, I connected my redboard using it's usb mini port. inside windows device manager, I went to "other devices" and found the malfunctioning FT231X driver. I installed the driver using the files I downloaded earlier, and once unplugging and plugging back in, it worked.
Continued Uploading Workflow
After getting the arduino successfully working, I went back to following Teddy Warners guide. Essentially, UDPI uses only one wire for uploading, but requires some special hardware that only the arduino uno had. It also requires to upload what essentially is a bootloader to the entire arduino, to make it a programmer for the attiny. This means that the workflow is 1. upload JTAG2UDPI sketch to Arduino 2. upload Code to Attiny, using the arduino as a programmer all of this is outlined and way more clear in teddy's documentation.
Computer troubles
While I was able to simulate this all through arduino, im also need to use micropython. The problem with micropython is that this simulator does not support it, and my laptop does not support it. My laptop is a snapdragon chip, and they are still relatively new. They are also a completely new architecture, being arm instead of the traditional x86. Although this is the exact same thing mac's use, even software that works on mac often doesn't work on windows, or works only through emulation
Datasheet
For my chip, even though I talk about 3 different chips here, I decided to focus on the ESP32-C3
The datasheet can be found here, with a backup in my files found at the bottom of the page
I'm a big fan of the esp series, and have spent a while in their datasheet, especially when looking at which chip I should use for my custom esp32-c3 board
How to read datasheets
Espressif Specific
All espressif datasheets are standardized, which makes it really easy to compare chips. For example, while I was looking for which chip I should use, I factored in power consumption alot. what made searching for the power consumptions easy was that all of the datasheets have a section on current consumption, and the name is always "current consumption." This also applies for the other blocks, like the "pin layout" showcasing an illustration of the chip, and "packaging" showing the dimensions of the chip
general
Don't use google or a general search engine to find a datasheet. Instead, go to a supplier like Digikey, finding the componet, and finding the datasheet linked on its page.
ESP32-C3 Features
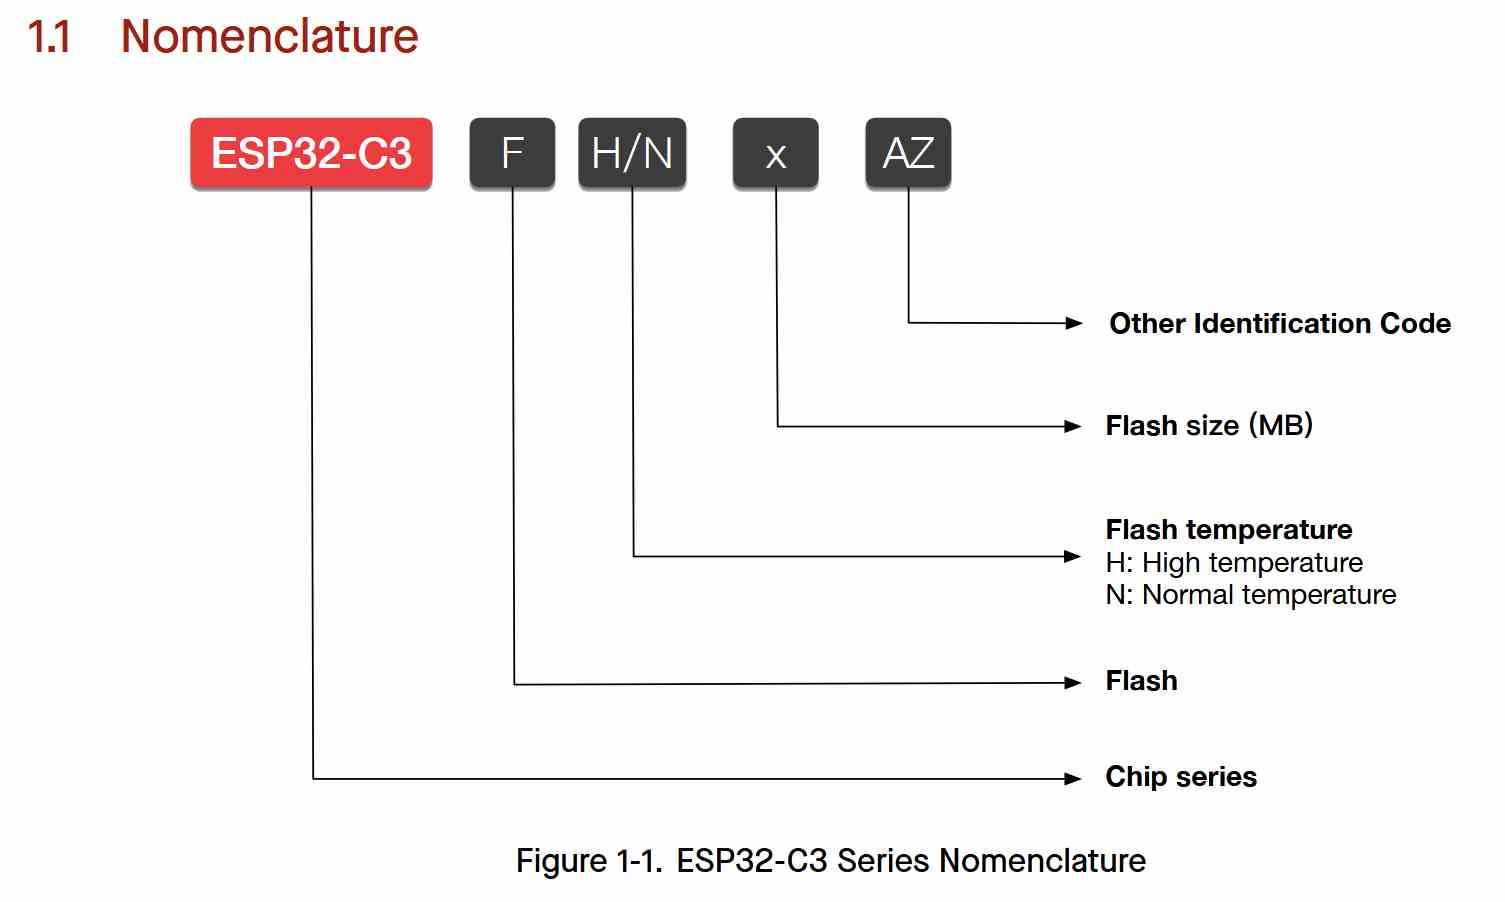
 The ESP32-C3 a single 160 mhz core RISC-V microcontroller with best in class cost for wifi and bluetooth support. While it doesn't feature the best current consumption, with 23 ma with no wireless, and over 330 ma while using wireless. It does feature a light and deep sleep mode, that allow for the processer to be shut down untill a pin receives a high signal or the clock reaches a editable time. It has built in peripherals including USB, 3 different SPI channels, 2 UART channels, most pins can be used as an I2C or I2S, and 2 12bit ADCs. there are multiple versions of the chip, including ones with built in flash and higher temperature versions.
The main points of it are:
- Single 160 mhz core
- 384 KB ROM
- 384 KB SRAM
- RISC-V
- Wifi
- Bluetooth (LE)
- Built in flash
- Cheapest of the esp series (1.3$ chip+4mb built in ram)
- 23 ma current consumption no wireless
- 335 ma current consumption max
- Low Power Modes
- 2 12 Bit ADCs
The ESP32-C3 is capable of:
- I2C
- UART
- SPI
- I2S
- USB
- JTAG
Different versions
while the esp32-c3 described in this datasheet is a qfn chip, there are other easy available versions of it. there are two main modules, the easy to use wroom series and the smaller mini series
Wroom
The esp32-c3-wroom-02 module features 15 gpios, with 12 usable during normal operation due to 2 required for usb and one required for boot option. Inside the module is a esp32-c3 chip, so it has all the features of above, but does have the option of a more expensive version featuring 8mb of flash

Mini
Functionally, the mini is identical to the wroom. its only difference is its size. While the wroom is 18x20mm, the mini is only 16.6 by 13.2mm.

Both Modules feature a pcb antenna version, and an RFL antenna connector version
Group Work
my group work can be found here, once it is merged
a copy of the work without images is below:
ATTiny412 - Noah Smith
Step 1: Wokwi Simulation
while wokwi doesn't display the fact that it supports an attiny chip, a google search reveals that it has simulator using an ATTiny85 chip. While this chip is not the same as the one im going in depth on, it has the same pins and therefore can be used as a rough simulation in wokwi. In a simulator, the ATTiny is very easy to work with, however in real life that isn't the case.
Development flow with arduino
If you actually want to do this, please check out Teddy Warner's documentation on it, but im going to give a very summarized explanation of the first upload to an attiny
pinout image
If you look at the attiny, you can see that it has 8 pins, and 2 are required for power. the ATTiny is special in that it uses UDPI to upload, instead of a simple usb to serial converter like the other three microcontrollers here. this means that it only needs one wire for communication (yay) but requires a much more complicated uploading process (boo)
Again, look at Teddy Warners documentation for how to actually do this, but here is a very generalized workflow
1. Install MegaTinyCore. just like esp32 core or the pico-sdk it is what allows the attiny to be coded using c++ instead of straight assembly.
2. Upload the JTAG2UDPI sketch to a supporting device. In our testing, we used an Arduino uno, but it just has to be any board that supports UDPI physically.
3. Wire the board with the JTAG2UDPI to the ATTiny. this means connecting their ground and vcc, and then connecting pin 6 to UDPI, which is the pin two spaces away from the GND pin
Comparison with the others
compared to the other boards in this page, the ATTiny is the slowest, most annoying to work with, and smallest chip.
Pros:
- low power, around 11 ma when running full speed
- small, its limited io also allows it to be very compact
- cheap, around 50 cents per chip
Cons:
- slow, only 20mhz, nothing compared to the over 200's that the newest esp32 and pico chips can get
- really annoying to work with
- 4 gpio pins
- limited connectivity, only supports i2c, spi, uart
- limited storage, 2kb of program memory, 128 bytes of flash Overall, the ATTiny is perfect for small projects that require the smallest amount of logic or special peripherals
Micropython with the ATTiny
While the rp2040 and esp32-c3 support micropython, the arduino uno and ATTiny do not. This is due to the fact that micropython is about 400kb to just have the basic commands with no actual program, and the both chips have way less then 400kb of program memory
Reflection
Its fun to see how entirely different chips can be used in such similar ways. Overall, I think what im getting from this is to stick with what I know. Thats a esp series device running off the arduino IDE. honestly, micropython is easier to use, but im just in too deep now, and as far as I could tell there was no ESP micropython core like there is a ESP arduino core. Im hoping to learn the espressif idf, which is as close to native code built for the system that you can get, without having to do the really annoying stuff. It looks like it would be useful to learn, as it also has access to alot of things that the arduino core doesn't. A project im hoping to work on at some point in my life is like an apple air tracker based off an esp32, basically tracking an esp by seeing the time of flight of the wifi packets between boards. basically this but not for visualizing, just for tracking an object. For that project, I need deeper level access to the esp than whats possible on the arduino ide.
For the group work, while I did attiny, I read through coopers part of the group work, and it reaffirmed mmy belief in esp supremacy. Also, comparing the attiny to the arduino uno shows just how outdated the chip on the uno is. It has virtually the same specs, for 1/20th the price and no extra required components.
Design Files
All code, aswell as a time capsule of the code for my final project from this week can be found here
The wokwi projects can be found below

