Final Project Idea
For my final Fab Academy project, I want to attempt to make the "Evil Eye" from Rainbow Six Siege, a very popular shooter known for its operators, who each have unique gadgets. The "Evil Eye", which I might also refer to as the maestro camera, is Maestro's gadget. seen below, it is a camera that can look around, and open the frontal black window to get a clearer view.
If you click on the embedded 3d model above, and change the pose at the bottom to moving pose, you can see how it moves in game, and how I want it to be able to eventually move.
The big challenge with this movement is that it can infinity rotate its base left or right, as well as as being able to rotate its "head" (the main white part) around 120 degrees. I also am confident that I can make it portable, as I have experience building my own custom battery packs using 18650 battery cells. I also am confident that I can make the electronics small as I have designed and made my own custom compact esp32-c3 board
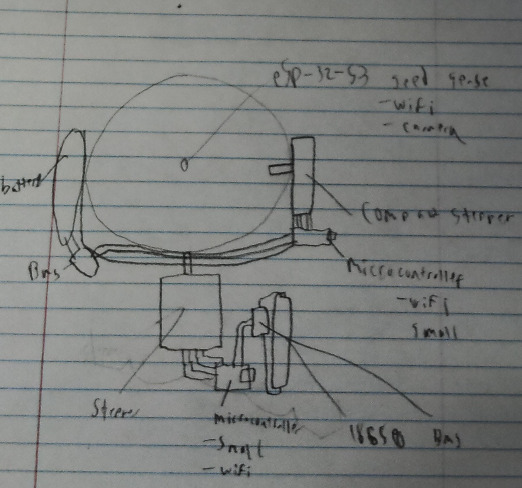 Here's my rough sketch of the insides of the camera. Essentially it would have a stepper motor in the base, battery powered and controlled by a wifi enabled microcontroller. and in the "neck" there will be that same board, which will control the smaller stepper motor that allows it to look up and down in the head there will be another microcontroller, probably the xiao esp32-s3 board, with wifi and camera support. All of this will be powered by integrated batteries, probably a 18650 or smaller cell
The Camera will use a webserver running off the esp32, to both show the camera feed and have a joystick or similar to control it. there will be multiple esp32s inside of it, so they will also need to communicate between eachother. It will probably work something like the camera board will be the main, that will get the movement request and send it out to the microcontrollers on the two steppers
It will be created using fusion, as that is what im most used to and I hope to learn the fusion 360 "joints" feature in order to be able to see how the design would move before I make it.
Setting up Gitlab and documentation
This week's assignment
For the first week of Fab Academy, the task was to setup our computers for Gitlab, setup our documentation sites, and sign the student agreement.
To get Started, My teacher and fab academy graduate, Dr. Taylor made and presented a really good set of slides, found here
Getting the Repository onto my computer
Installing Git Bash
Git terms
- Repository A repository is the git project that contains all of the files and version history. It is what is worked on by developers, who then use commits to add onto or remove from the repository
- Branch / Merge In git, the repositories always have a main branch, this is the branch that is essentially the final product. There can be other branches though, that allow for multiple things to be worked on at the same time without conflicting with another, or rendering the final product unusable while they are being made
- Pull / Push git pull and git push are how files are received and sent to a branch. They are the commands that the developer uses, either pushing new files or pulling from the repo to stay up to date
- Commit after making changes, commit is used to move those changes onto the remote
- Remote / Local For every repo, there are 2 versions. there is the remote version, which is on the server and in this context this means that the server hosts the
Why Git?
Git is a version control software, basically a way to store a lot of changes to a lot of files and be able to go back on the timeline, and also the only way a large group of people can work together on the same software, via branches.
Git is a "distributed" version control system, which means that everytime you want to work on a git repo, you have every file in that repo downloaded. The alternative to a "distributed" model is a "centralized" version control system, which essentially means that there is one server with all the files on it, and you only work on a couple at a time before pushing the files back into that main server.
Installing Git Bash
In order to work with Github or Gitlab, I had to install a program called Git Bash, which allows me to run the commands required to interface with remote repositories from my computer.
Installing it is as easy as navigating to the git website and downloading for windows. Running the installer, the only setting I changed was to the default editor for git, which I set to Visual Studio Code. Once It was installed, I could press my Win+R and search Git Bash, and open it. 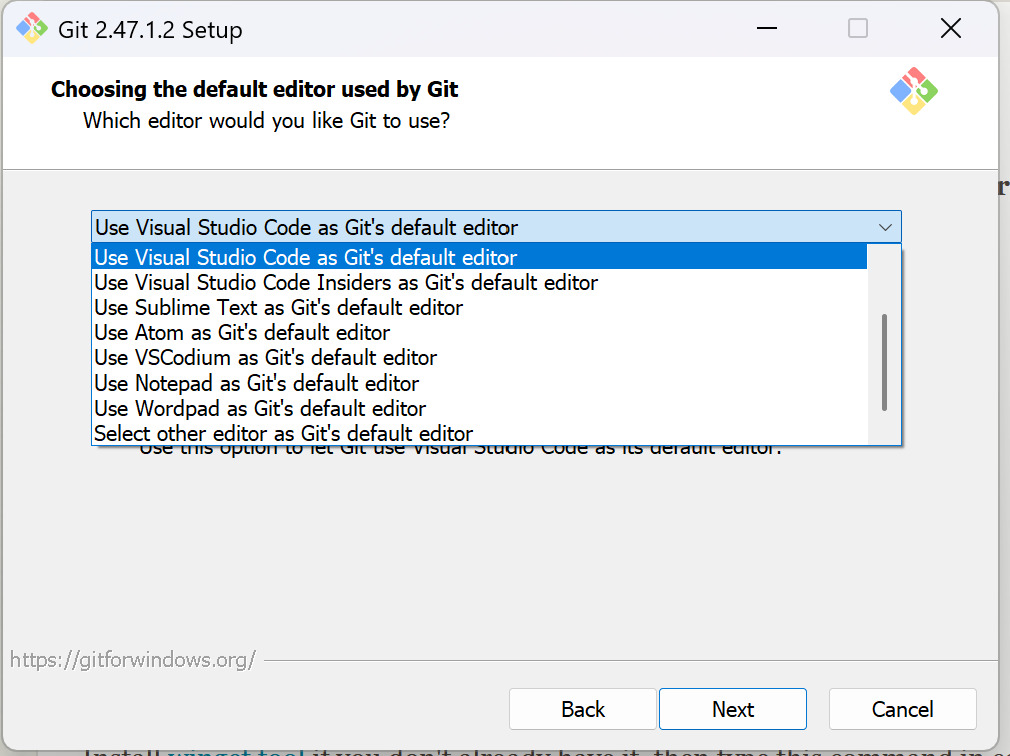
Generating and adding a SSH key to my account
In order to work with my Gitlab repository, I needed to add an ssh key to my computer. I followed Github's official documentation for this, but it is unclear on some things, so im making a new tutorial here
Start off by navigating to the command prompt, through the keybind of Win+R and then typing cmd Once inside command prompt, right click to paste in this command, changing the email to the email associated with your gitlab account
ssh-keygen -t ed25519 -C "your_email@example.com"
once it asks for which file to save it to, click enter and it will automatically save to it will then ask for a passphrase, which will be the passcode required to use the key After doing all this, it should show a weird looking square with some dots in it, this is the end of generating the ssh key After generating it, use Win+R again and type in
%USERPROFILE%\.ssh
Open the file that has .pub at the end of it, and copy the contents of that file Then go to gitlab, click on your profile picture, and go to preferences inside preferences, navigate to SSH keys on the left Click "Add new key" in the key box, paste in the contents of the .pub file set the title to what computer will be using it set the usage type to Authentication & Signing Optionally, set the key to never expire add the key Your computer is now setup with the correct ssh key to be able to commit to your repository
Installing Visual Studio Code
While I already had it installed, Visual studio code is the easiest way to edit all of the documentation and any other code required for Fab Academy, and therefore is your best choice of an IDE, or Integrated Development Environment. Installing VS code is as simple as downloading from the download page, and then running the install script.
Why Visual Studio Code?
I used visual studio code for editing mkdocs because I already used it for everything else, and it has some useful extensions for mkdocs. For example, in this writing, I installed a spellchecker extension, which highlights any misspellings in markdown files.
Combining all of this
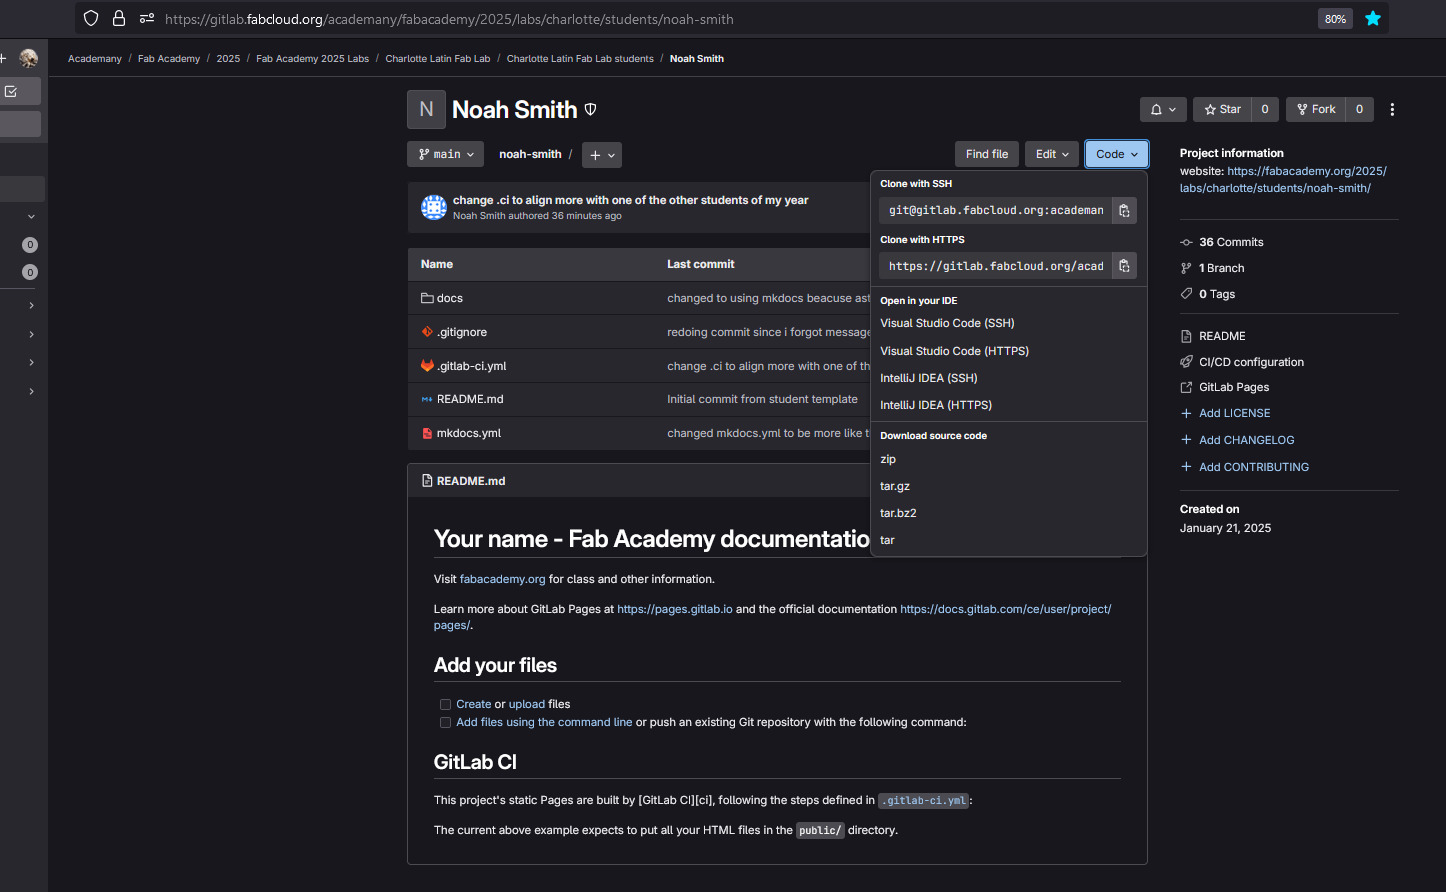 Once Visual Studio Code, Git Bash, and my SSH key were installed and configured, I could start working on my first commit. In order to "clone" my remote repository onto my computer, I went to the page for it, and then clicked on the blue code button, and finally clicked the clipboard button under Clone with SSH
Once I had the SSH command copied, I opened up Git bash and cloned the repository onto my computer, On the first time running this, I was asked for my SSH passphrase, which I set earlier. I then opened the fab folder, by again using the keybind Win+R and typing fab.
After getting the repo onto my computer, I cleared it so that I could start using a different framework with it. Choosing the framework was a big time sink for me, as I looked into Astro, which looked good on paper but after 2 days of attempting to get it to work I realized that, while it did have the potential to look better, but the benefits did not outweigh the drawbacks, especially with the drawbacks of how long it took to edit it. Instead, I went with something I had researched before but never used, Material for MkDocs. I choose it due to my previous experience of researching it for a website in the past that never came to be, along with my brother, Graham Smith who has done fab in the past. Additionally, Teddy Warner is another student from my brothers year who Graham recommended as having the best documentation.
Mkdocs setup
After choosing MkDocs, I followed this guide for installing MkDocs-material, and this guide for creating the MkDocs template. Part of creating the MkDocs was clearing my github repo.
For designing my site, I first would look to the MkDocs-Materials Reference especially for my images and aligning them. If this did not have a good reference, I went to ask AI for guidance. during making this page, I tried the new DeepSeek model and the tried and true Chatgpt. I found that, while helpful, the AI could not understand that I was using materials for MkDocs, and would constantly recommend raw HTML that would not interface with markdown well. Another problem was the hallucinations, where it would think some command is true that isn't. for example, I asked it how I could lay images side by side on my website, and it replied first in a pure HTML code that would overlap with the markdown text, then it just started hallucinating markdown syntax.
One Useful AI was github copilot, which was integrated into vscode recently and now acts as an extremely powerful autocomplete. While it is not made for markdown files (.md), it works extremely well for when I am styling my site using the custom.css file. At its worst, it finds patterns in a css and is able to apply it to others, and at its best I can write a comment and it will style for me.
Mkdocs problems and solutions
Aligning images
The only experience I have with Web development prior to this is google sites, which is a very simple website builder by google that is all about dragging images and text where you want it, no coding required. I wanted to be able to recreate this immage below, which is taken from my (bad and old) digital portfolio I did as part of my middle and high school engineering classes below, but in mkdocs
doing research, I found that mkdocs has a built in style option to align images, and so I tried that. however, these images would not have their sizes changed, and so all of the images would by default take up the whole page, as seen below with an example image.
this text should be on the right side of this image
in order to fix this, I had to use custom css, that would act just like the {align = left} that mkdocs has built in my default, but also resize the image to around 50% to give it room on the left or right. Heres what i eventually figured out worked best by constantly tweaking values. the .il and .ir mean image on the left or image on the right.
{.il}
CSS
.ir {
  float: right;
  margin-left: auto;
  margin-right: 20px;
  width: 40%;
}

.il {
  float: left;
  margin-left: 20px;
  margin-right: auto;
  width: 40%;
}
in order for custom css to work, I had to add in this like to my mkdocs.yml
extra_css:
  - custom.css
and create a css file called custom.css inside the first level of my docs directory.
Reflection
Overall, once I became sufficient in mkdocs, it allows me to create custom websites with greater freedom then google sites, while also allowing me to do more in vscode