11. Input devices
## Group Assignment
Probe an input device(s)’s analog and digital signals
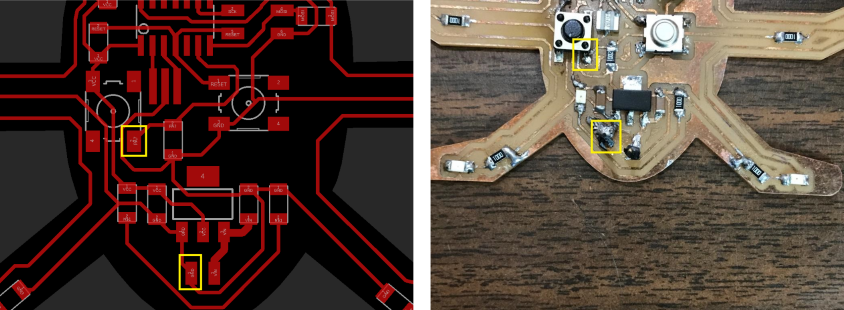
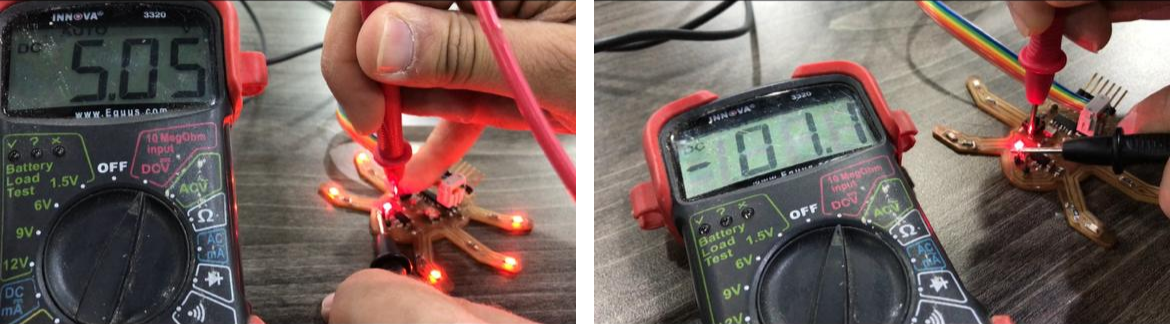
we used the Karam’s board in which it includes a Push button as input device, so we measured the level of a Push Button in its two states : Normal(un-pressed) and Pressed. The push button (normally open) is connected to Vcc through a pull up 10kOhm resistor, so in its normal state the level will be 5 V (digitally high). When pressed the level will be 0 V (digitally low).
Using the Digital Multimeter, in the normal state the measured value is 5.05 V (digitally 1 or high), and when pressed, the measured value is -1.1 mV (digitally 0 or low).
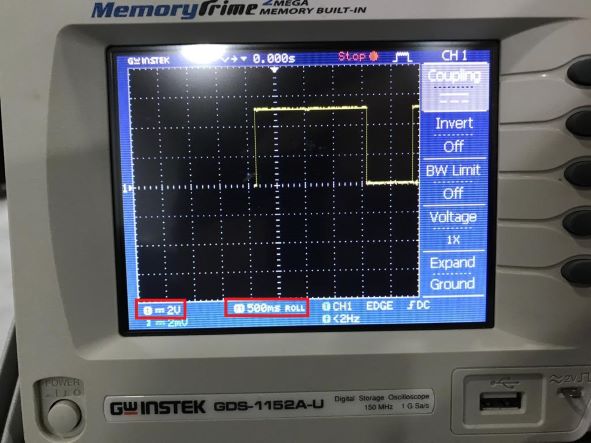
We used Oscilloscope to measure the same input signal. To connect the oscilloscope probe, connect the spring loaded end (hock or clamp) to GND and the pin head to test point, which is the push button signal.
Note :The voltage scale is 2 V/division and time scale is 500 ms/division.
In the normal state, the signal height is 2.5 vertical divisions, which equals to 5V (2.5 divisions x 2 V/division). When the button is pressed, the level drop to fit over the zero line. The button had been pressed for 2 seconds (4 horizontal divisions x 500 ms/division).
Individual Assignment
Files
input device schematic eagle file
Circuit design
schematic design
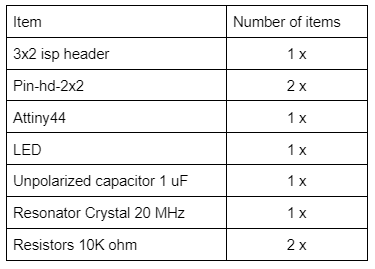
The following parts are needed to make a circuit that receives signals an input device :
using Eagle software , I designed the schematic circuit bu adding the above parts to the skectch , and then switch to the board file .
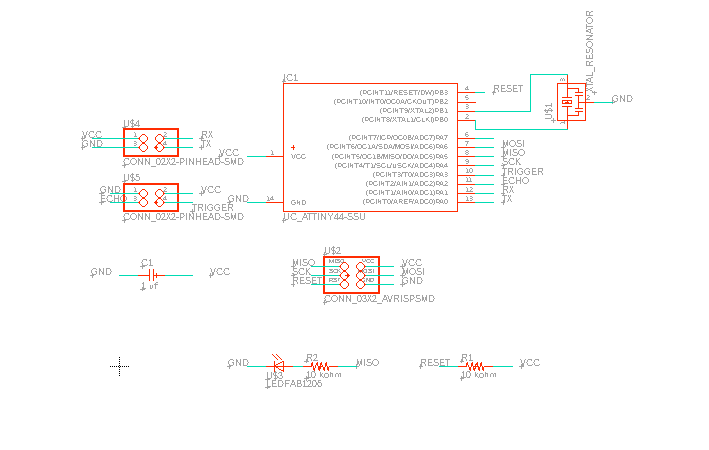
I attached Echo pin of Ultrasonic to pin 11 at attiny44 , and I attached Trigger pin to pin 10 at attiny44.
In this circuit I made 2 of 2x2 header pins , one for Bluetooth and the other for the Ultrasonic sensor .
there is a Led connected to the MISO pin of ISP , this is to test that there is data sent or signal .
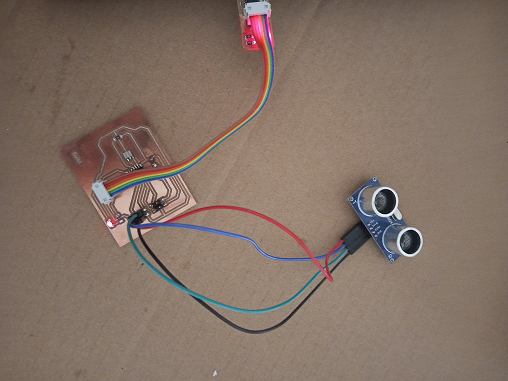
Here I used an ultrasonic sensor to as input device .
How an ultrasonic sensor works ?
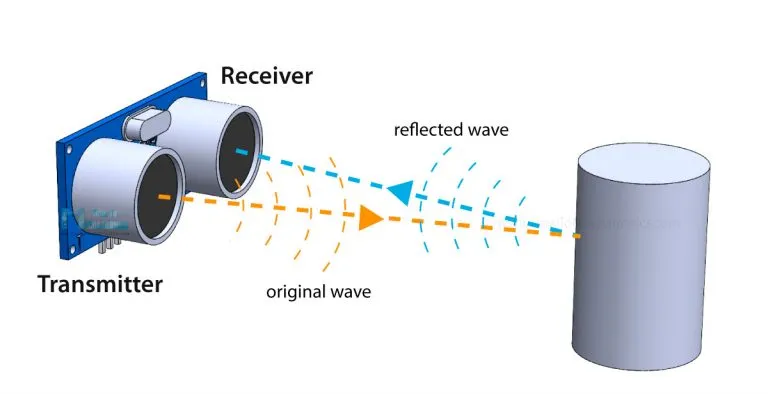
It emits an ultrasound at 40 000 Hz which travels through the air and if there is an object or obstacle on its path It will bounce back to the module. Considering the travel time and the speed of the sound you can calculate the distance.Source
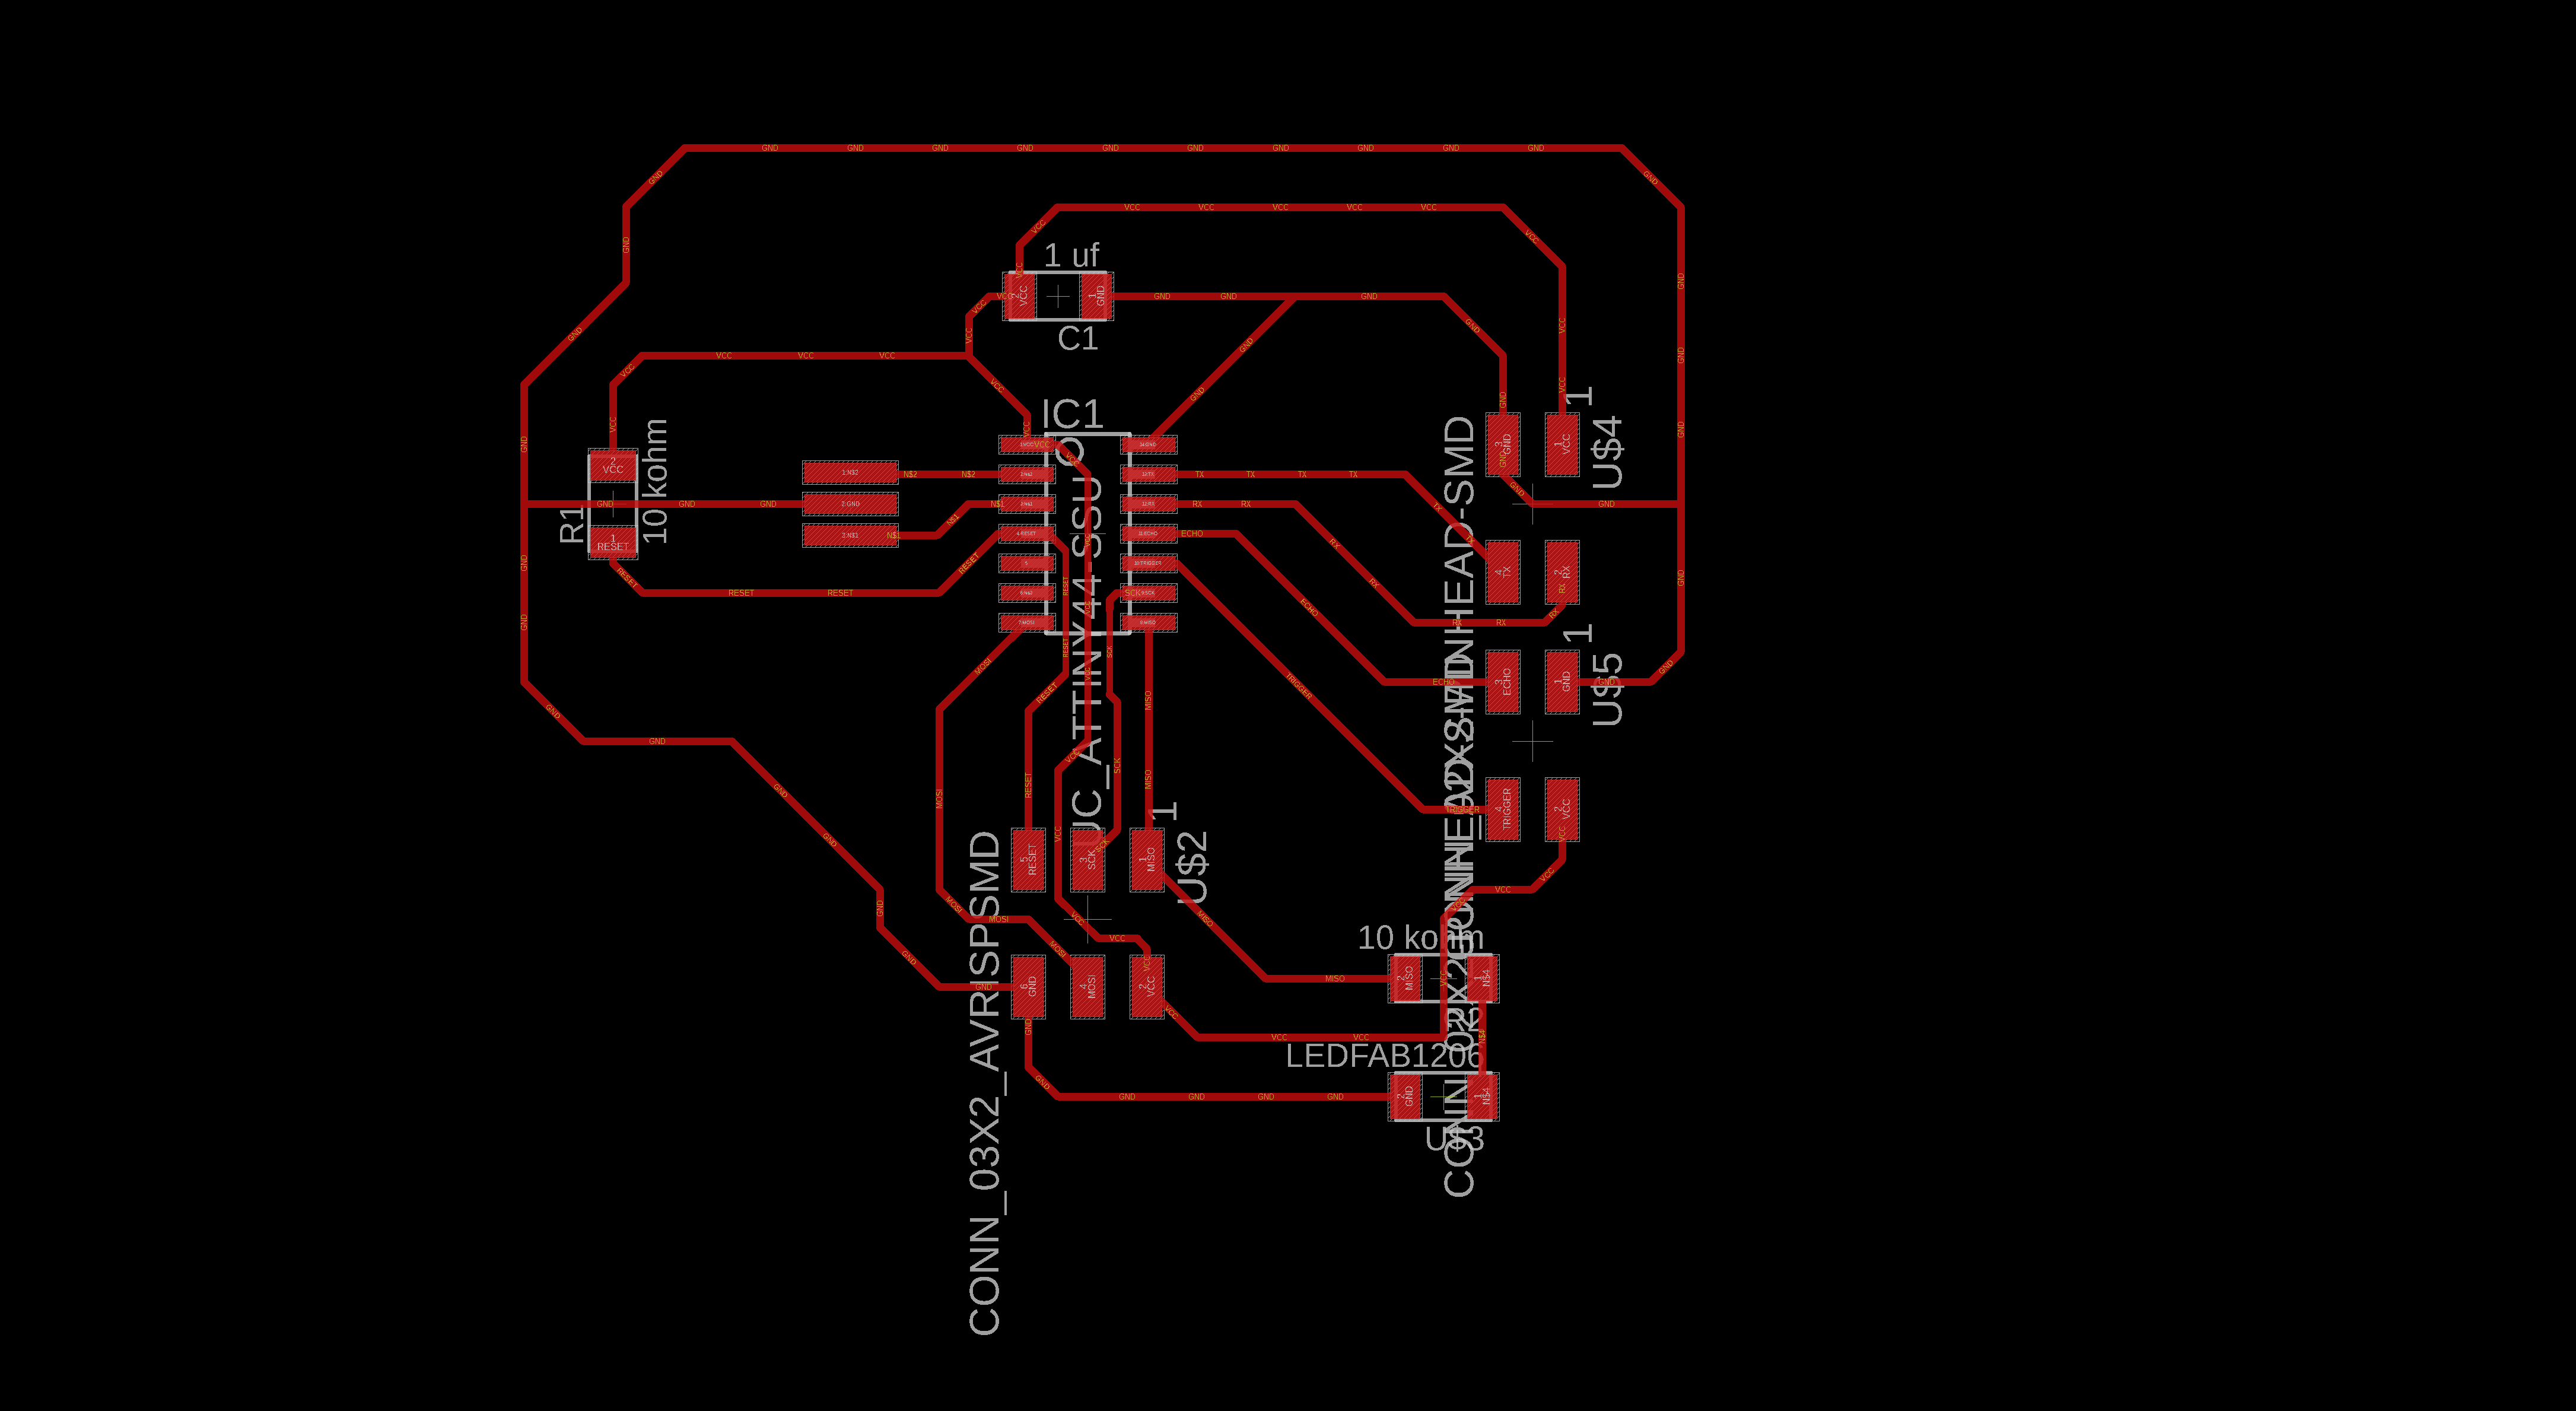
board design
after finishing the schematic design , I will make the routing for the circuit by using the “Route wires” button .
the final circuit will be like the following :
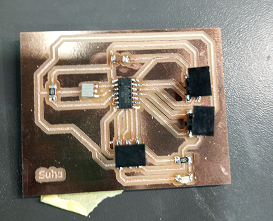
PCB Milling using Roland SRM-20
using the gimp software , I made the traces image and outline image as follows :


for traces and outline we used the MOD site
Traces mods
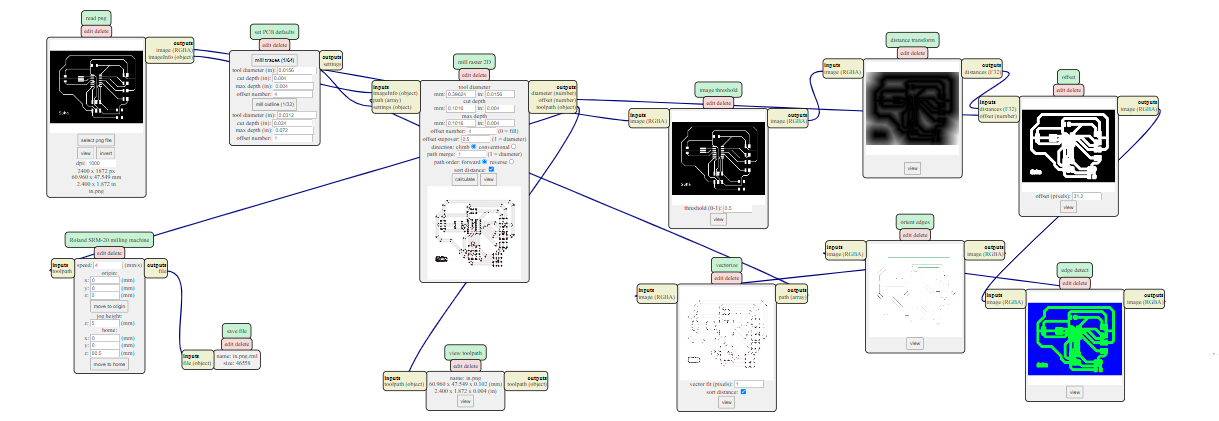
Outline mods
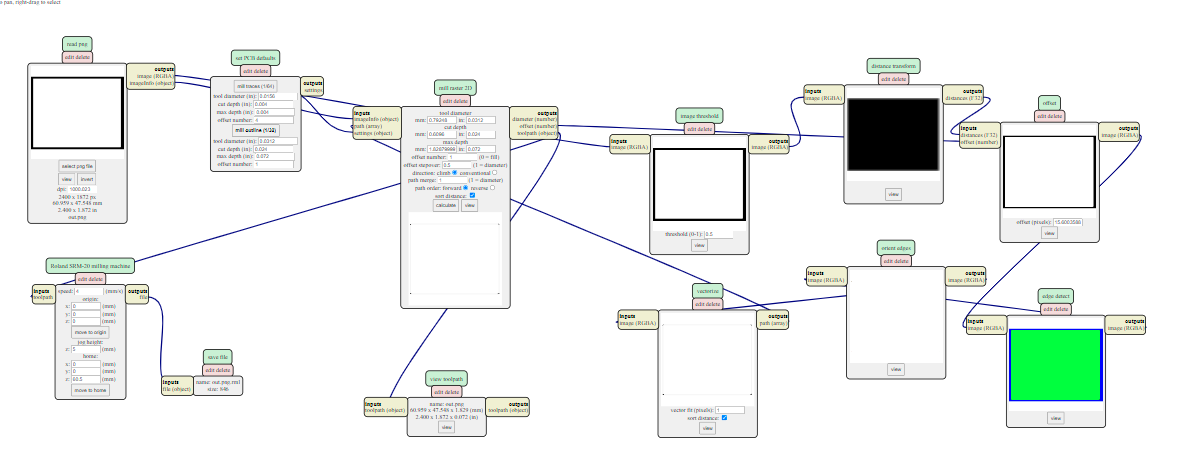
then we move to soldering part and the result is as follows :
Code
once I passed my hand a front of ultrasonic , the led is turned off and vice versa.
// ---------------------------------------------------------------- //
// Arduino Ultrasoninc Sensor HC-SR04
// Re-writed by Arbi Abdul Jabbaar
// Using Arduino IDE 1.8.7
// Using HC-SR04 Module
// Tested on 17 September 2019
//re-written by Suha Mohammad Al-Habashneh 2022


#define echoPin 2 // attach pin D2 of programmer to pin Echo of HC-SR04
#define trigPin 3 //attach pin D3 of programmer to pin Trig of HC-SR04

// defines variables
long duration; // variable for the duration of sound wave travel
int distance; // variable for the distance measurement

void setup() {
  pinMode(trigPin, OUTPUT); // Sets the trigPin as an OUTPUT
  pinMode(echoPin, INPUT); // Sets the echoPin as an INPUT
  pinMode(5, OUTPUT); // Sets the echoPin as an INPUT

}
void loop() {
  // Clears the trigPin condition
  digitalWrite(trigPin, LOW);
  delayMicroseconds(2);
  // Sets the trigPin HIGH (ACTIVE) for 10 microseconds
  digitalWrite(trigPin, HIGH);
  delayMicroseconds(10);
  digitalWrite(trigPin, LOW);
  // Reads the echoPin, returns the sound wave travel time in microseconds
  duration = pulseIn(echoPin, HIGH);
  // Calculating the distance
  distance = duration * 0.034 / 2; // Speed of sound wave divided by 2 (go and back)
  // Displays the distance on the Serial Monitor
 // Serial.print("Distance: ");
  //Serial.print(distance);
  //Serial.println(" cm");
 if(distance <=5){
  digitalWrite(5,LOW);
 }
 else{

 digitalWrite(5,HIGH);

 }
}
Hero Shots
Note :
I worked on Input devices as part of my “Final Project”, the Input device is Ultrasonic .
I described all the details in “Final Project” page
Here is a video that explains that the readings of ultrasonic sensor goes to LCD and mobile app , and this is part of my final project :
and here is its code :
# include <SoftwareSerial.h>
//YWROBOT
//Compatible with the Arduino IDE 1.0
//Library version:1.1
#include <Wire.h>
#include <LiquidCrystal_I2C.h>

SoftwareSerial mySerial (0,1); // RX, TX
LiquidCrystal_I2C lcd(0x27,20,4);  // set the LCD address to 0x27 for a 16 chars and 2 line display
// Suha edit : ultrasonic start
#define echoPin 5 // attach pin D2 Arduino to pin Echo of HC-SR04
#define trigPin 6 //attach pin D3 Arduino to pin Trig of HC-SR04


  //Suha edit :ultrasonic end
long duration; // variable for the duration of sound wave travel
int distance; // variable for the distance measurement

void setup() {
//Serial.begin(9600);
 mySerial.begin(9600);
 //pinMode(5, OUTPUT); // put your setup code here, to run once:

  lcd.init();
  // Print a message to the LCD.
  lcd.backlight();
  lcd.setCursor(3,0);
  lcd.print("water_saver");
  lcd.setCursor(2,1);
  lcd.print("Suha Mohammad");
   lcd.setCursor(0,2);
  //lcd.print("2022");
   //lcd.setCursor(2,3);
//  lcd.print("FabAcademy2022");
delay(1000);
//Suha ultrasonic start
   pinMode(trigPin, OUTPUT); // Sets the trigPin as an OUTPUT
  pinMode(echoPin, INPUT); // Sets the echoPin as an INPUT
//  Serial.begin(9600); // // Serial Communication is starting with 9600 of baudrate speed


  //Suha ultrasonic end
long duration; // variable for the duration of sound wave travel
int distance; // variable for the distance measurement

 }
void loop() {

 // Clears the trigPin condition
  digitalWrite(trigPin, LOW);
  delayMicroseconds(2);
  // Sets the trigPin HIGH (ACTIVE) for 10 microseconds
  digitalWrite(trigPin, HIGH);
  delayMicroseconds(10);
  digitalWrite(trigPin, LOW);
  // Reads the echoPin, returns the sound wave travel time in microseconds
  duration = pulseIn(echoPin, HIGH);
  // Calculating the distance
  distance = duration * 0.034 / 2; // Speed of sound wave divided by 2 (go and back)
  // Displays the distance on the Serial Monitor

   lcd.clear();
  lcd.setCursor(0,0);
  lcd.print("distance");
    lcd.setCursor(0,1);
     lcd.print(distance);
delay(500);

 if(mySerial.available()>0)
   {
      char data= mySerial.read(); // reading the data received from the Bluetooth module
      switch(data)
      {
        case '1':
          mySerial.println(String(distance));

      }
    }
  }