10. Molding and casting
Objectives
Individual
- design a mold around the stock and tooling that’s available, mill it (rough cut + three-axis finish cut), and use it to cast parts
- extra credit: use more then two mold parts
- use the programmer to program the board.
- extra credit: trying programming languages and development environments.
Group (To redirect to group assigment page Click here)
- review the safety data sheets for each of your molding and casting materials, then make and compare test casts with each of them
- extra credit: try other molding and casting processes
Safety Data Sheets
According to datasheets, there are certain typical safety and first-aid measures to be remembered.
Safty measures
Please read the datasheet before using any of the substances, because Some may be extremely dangerous and necessitate the use of specialised equipment.
Always ensure that the space you are utilising is not enclosed and that appropriate ventilation is provided.
Check FDA certification before casting any edible meterials.
Make sure you use heat resistant gloves as most of the mixing process involved is exothermic reaction and also make sure you don’t make any contact with the chemicals bare handedly.
You can also use Safety glasses to avoid eye splashes during mixing and pouring.
Use mask and wash hands properly.
Do not throw any mix or chemicals in the basin as it may clot the pipeline. and makesure the wast are disposed properly.
Close all the lids after use as the chemicals may not be reusable if left it open in atmosphere.
First-Aid
Inhalation: Remove affected person from source of contamination. Move affected person to fresh air and keep warm and at rest in a position comfortable for breathing. Maintain an open airway. Loosen tight clothing such as collar, tie or belt. When breathing is difficult, properly trained personnel may assist affected person by administering oxygen. Place unconscious person on their side in the recovery position and ensure breathing can take place.
Ingestion: Rinse mouth thoroughly with water. Remove any dentures. Give a few small glasses of water or milk to drink. Stop if the affected person feels sick as vomiting may be dangerous. Do not induce vomiting unless under the direction of medical personnel. If vomiting occurs, the head should be kept low so that vomit does not enter the lungs. Never give anything by mouth to an unconscious person. Move affected person to fresh air and keep warm and at rest in a position comfortable for breathing. Place unconscious person on their side in the recovery position and ensure breathing can take place. Maintain an open airway. Loosen tight clothing such as collar, tie or belt.
Skin contact: Rinse with water and soap.
Eye contact: Rinse immediately with plenty of water. Remove any contact lenses and open eyelids wide apart. Continue to rinse for at least 10 minutes.
Protection of first aiders: First aid personnel should wear appropriate protective equipment during any rescue. Wash contaminated clothing thoroughly with water before removing it from the affected person, or wear gloves. It may be dangerous for first aid personnel to carry out mouth-to-mouth resuscitation.
ref: rs-online.com
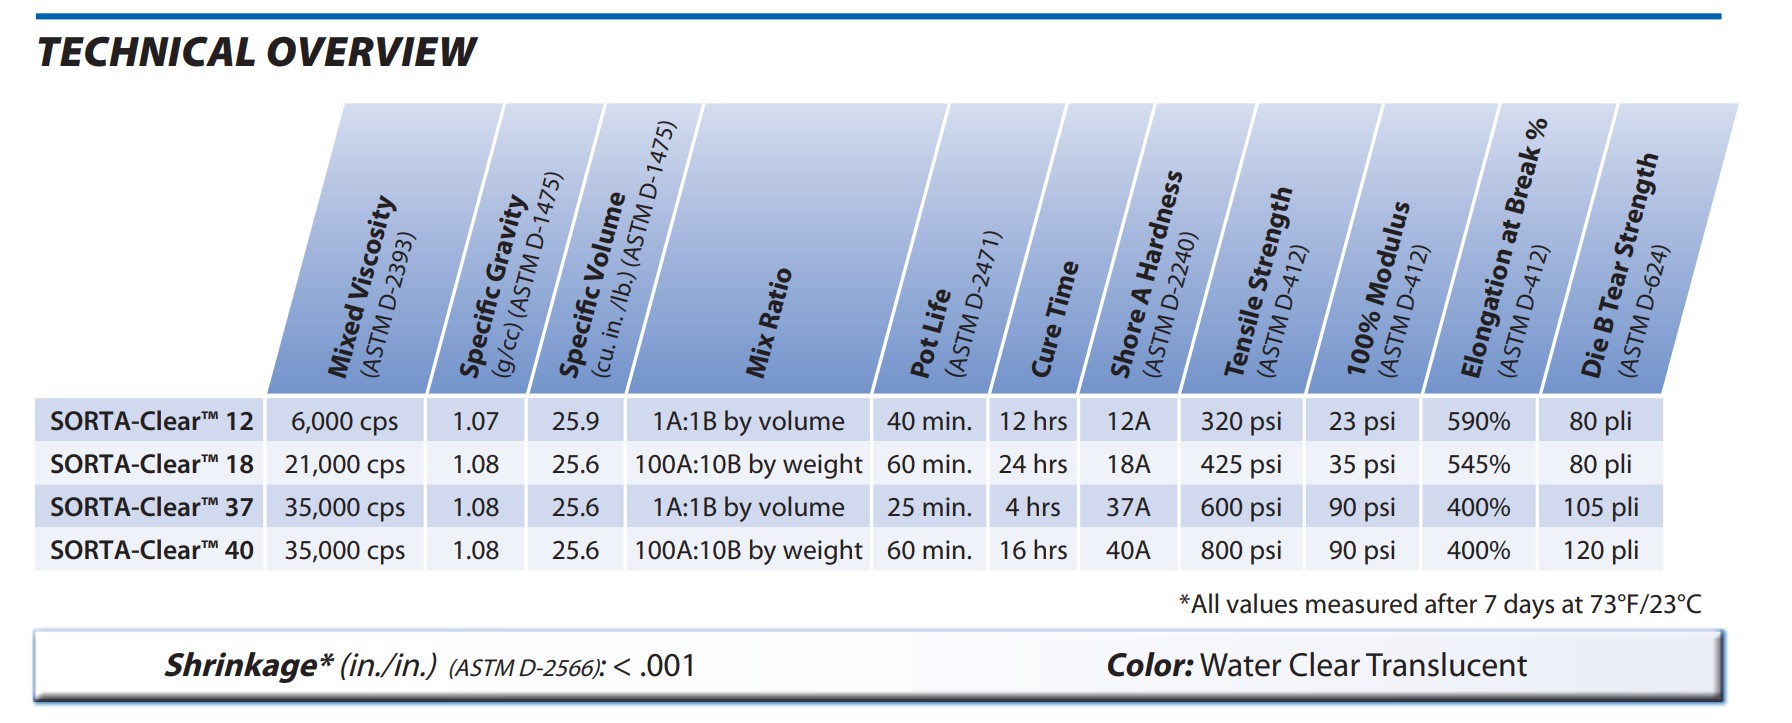
SORTA-Clear™ 37
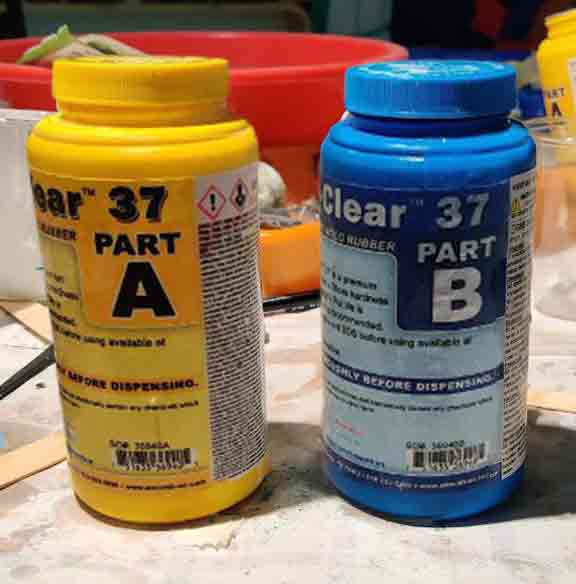
SORTA-Clear™ Series rubbers are premium water white translucent silicone rubbers (platinum catalyst) which cure at room temperature with negligible shrinkage.these rubbers feature high tensile and tear strength.This is ideal for making prototype. Materials such as urethane, epoxy or polyester resins can then be cast into SORTA-Clear™ silicone without application of a release agent. Other materials such as wax and low melt metal alloys can also be cast into SORTA-Clear™.
 For technical datasheet of SortA-Clear 37 Click here, And for safety datasheet Click here.
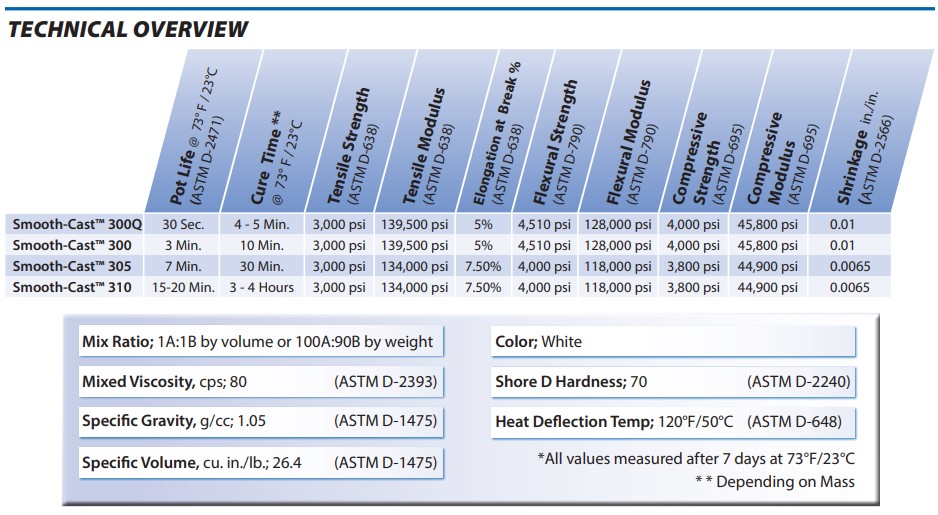
Smooth-Cast™ 305
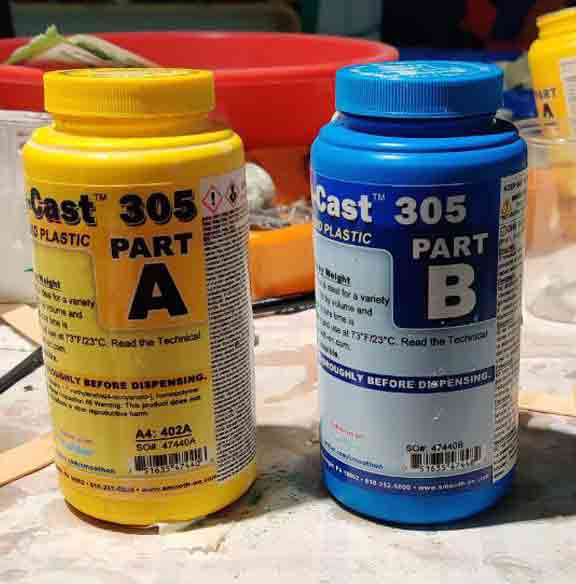
The Smooth-Cast™ 300 Series of liquid plastics are ultra-low viscosity casting resins that yield castings that are bright white and virtually bubble free. Vacuum degassing is not necessary. They offer the convenience of a 1A:1B by volume or 100A:90B by weight mix ratio. The differences between them are pot life and demold time.
These resins readily accept fillers (such as URE-FIL™ 3 from Smooth-On) and can be colored with SO-Strong™, UVO™ or Ignite™ color tints (Smooth-Cast™ 325 series accepts pigments better than the Smooth Cast™ 300 series). Fully cured castings are tough, durable, machinable and paintable. They resist moisture and mild solvents. plications for Smooth-Cast™ 300 Series Liquid Plastics include reproducing small to medium size sculptures, making prototype models, special effect props and decorative jewelry
 For technical datasheet of Smooth-Cast 305 Click here. And for safety datasheet Click here.
Test Cast
we used an alrady milled negative die made by mr saarang sumesh
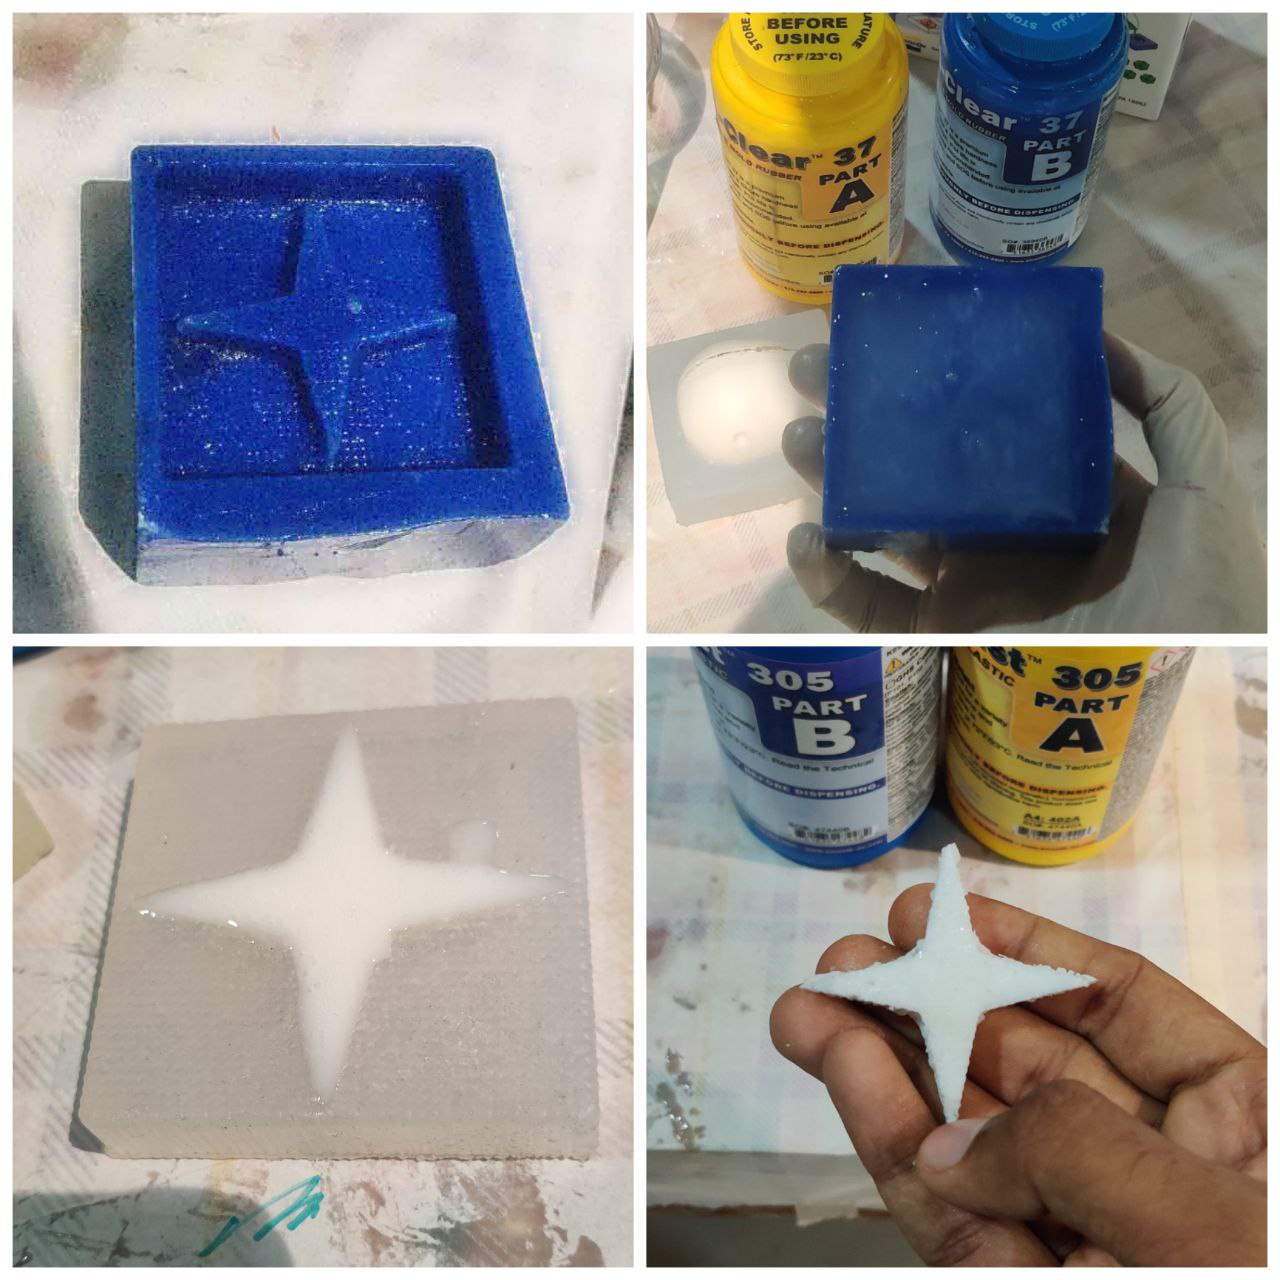
and made the mold for casting using SORTA-Clear™ 37 and kept overnight to cure the mold and the next day we casted out the star using Smooth-Cast™ 305 and found out it will take more than 3 hrs to cast the product using it.
Spinning Top
Designing
The individual assignment was to design a mold around the stock and tooling that’s available, mill it, and use it to cast parts, therefore I decided to make a simple spinning top becouse it will be simple and easy to design and mold.
I started my design using fusion
Creating CAM
For creating CAM I used Fusion 360 now we can look how to create CAM. for this go to Change Workspce > Select MANUFACTURE
-
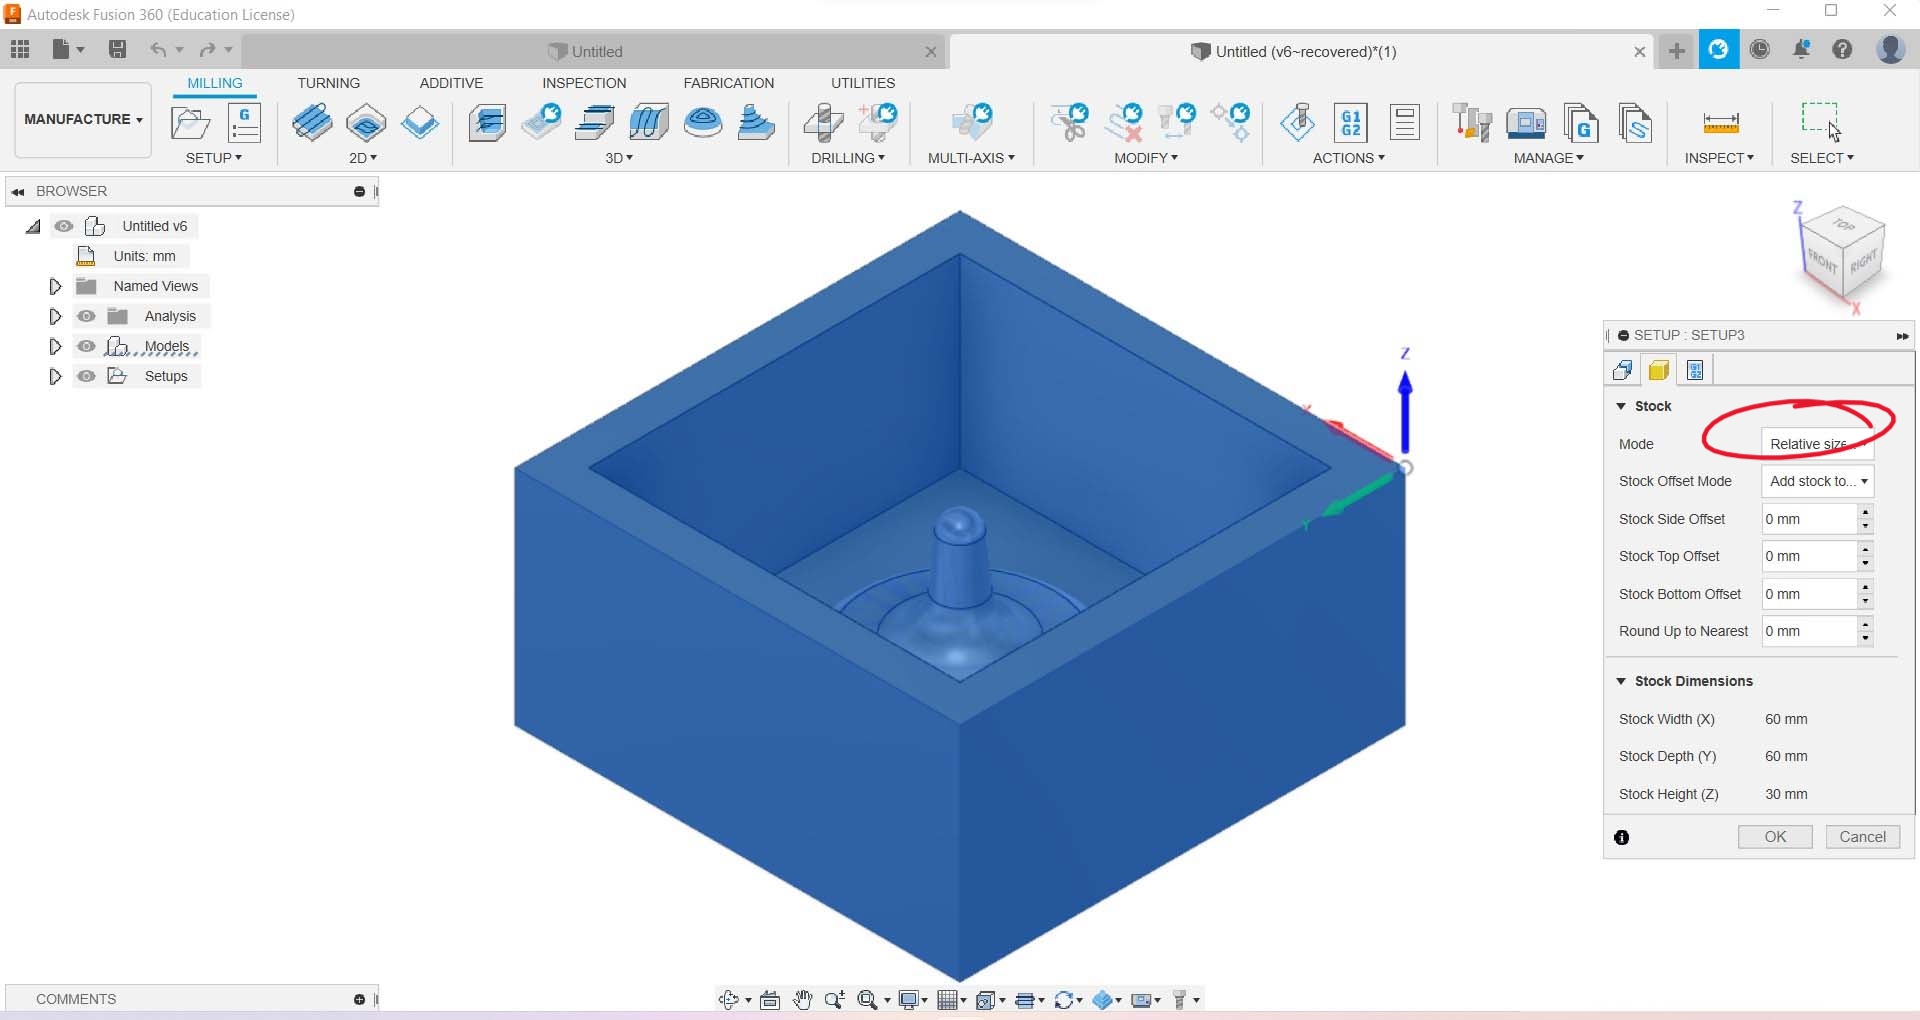
Frist we need to setup the STOCK.
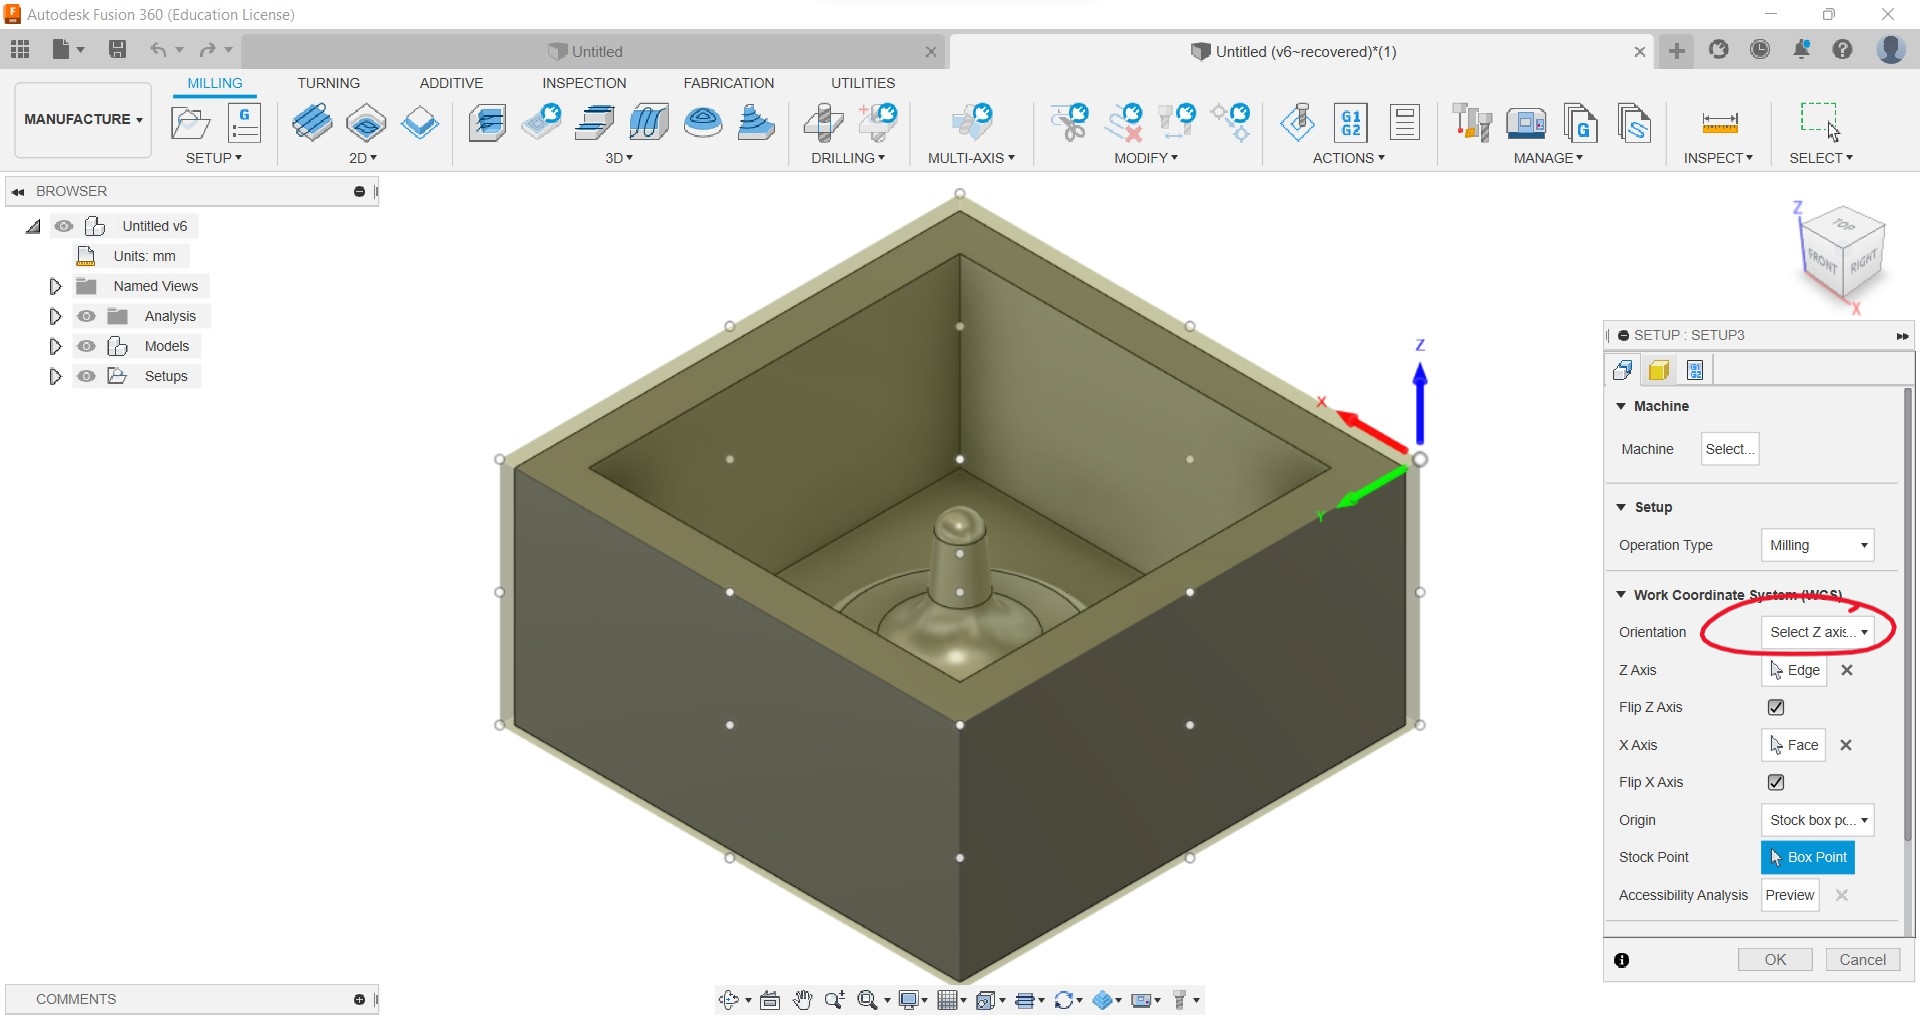
For this go to New Setup a dialogue box will appear to the left, In SETUP section > Change the orientation accordingly here I have selected Select Z axis/plane & X axisNow in Stock section > Change the mode as Relative size box, Stock Offset Mode to Add stock to sides and top-bottom and changed all offset to zero as we had already measured the stock and made the model us per that.
-
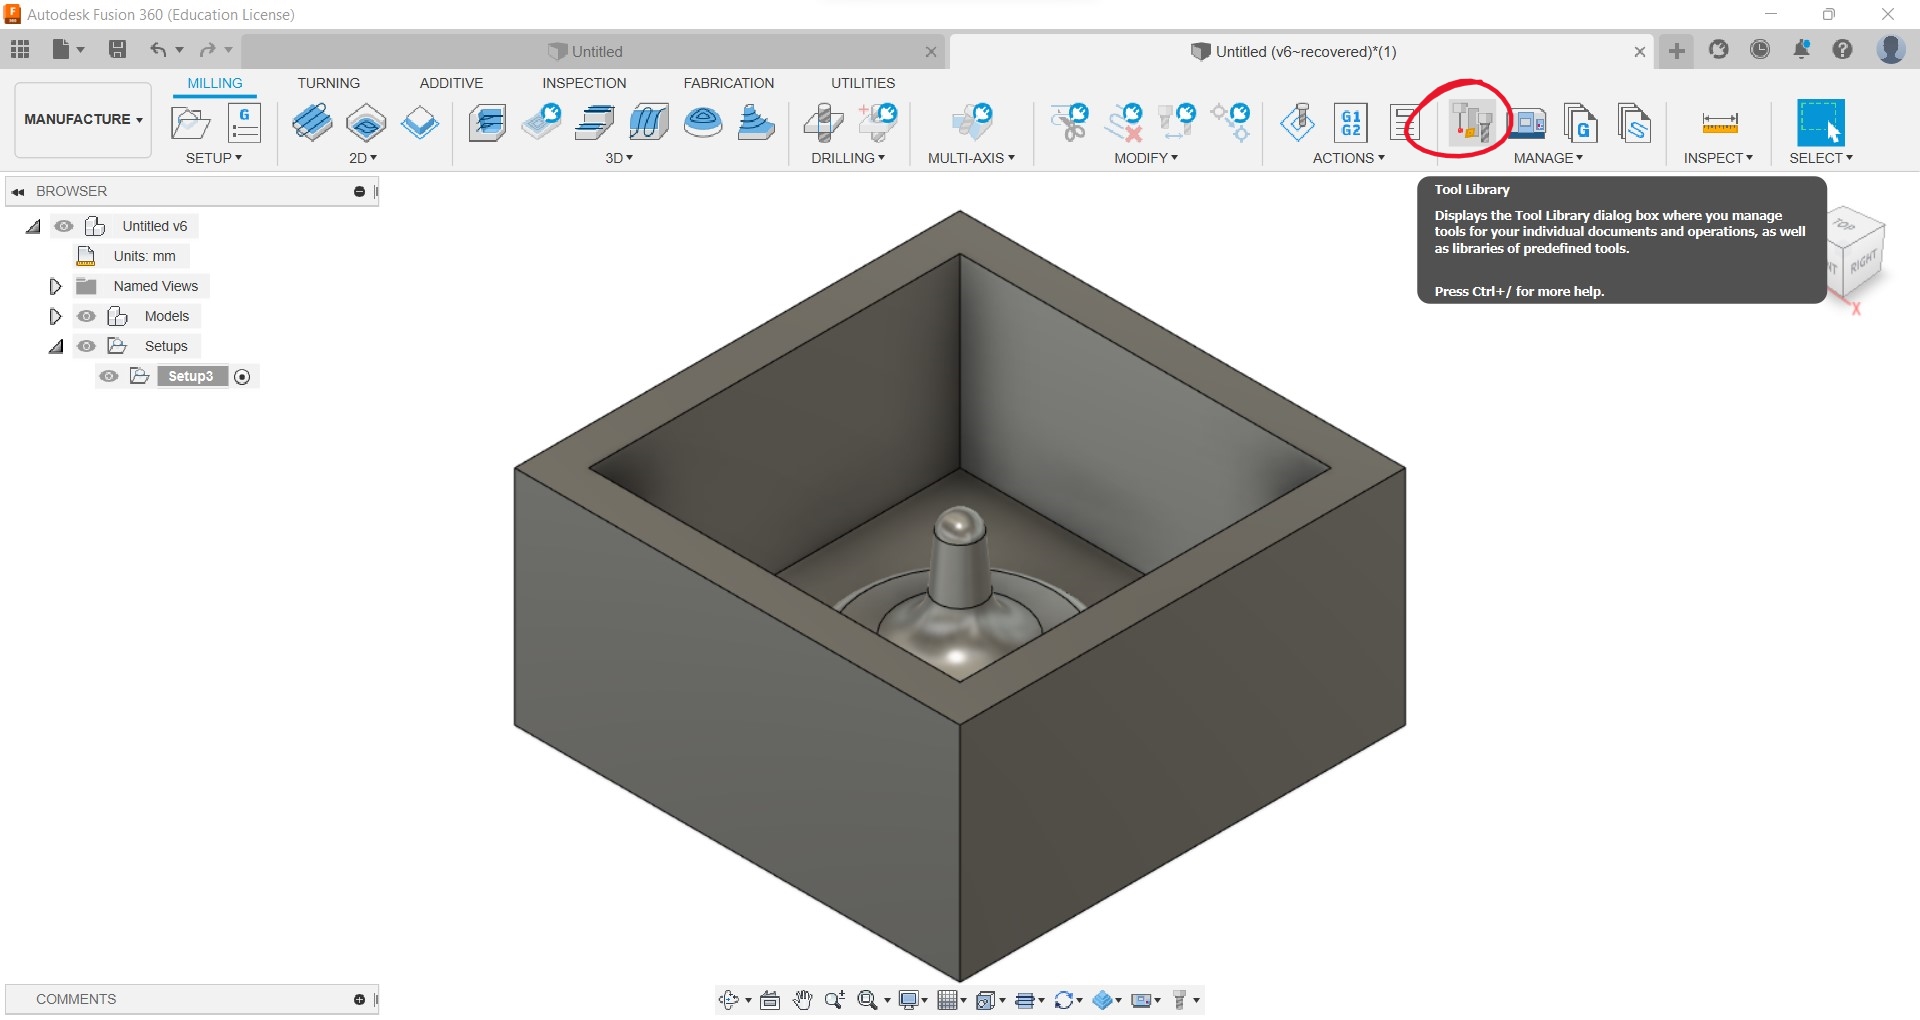
So now let us setup the tools needed for the job.
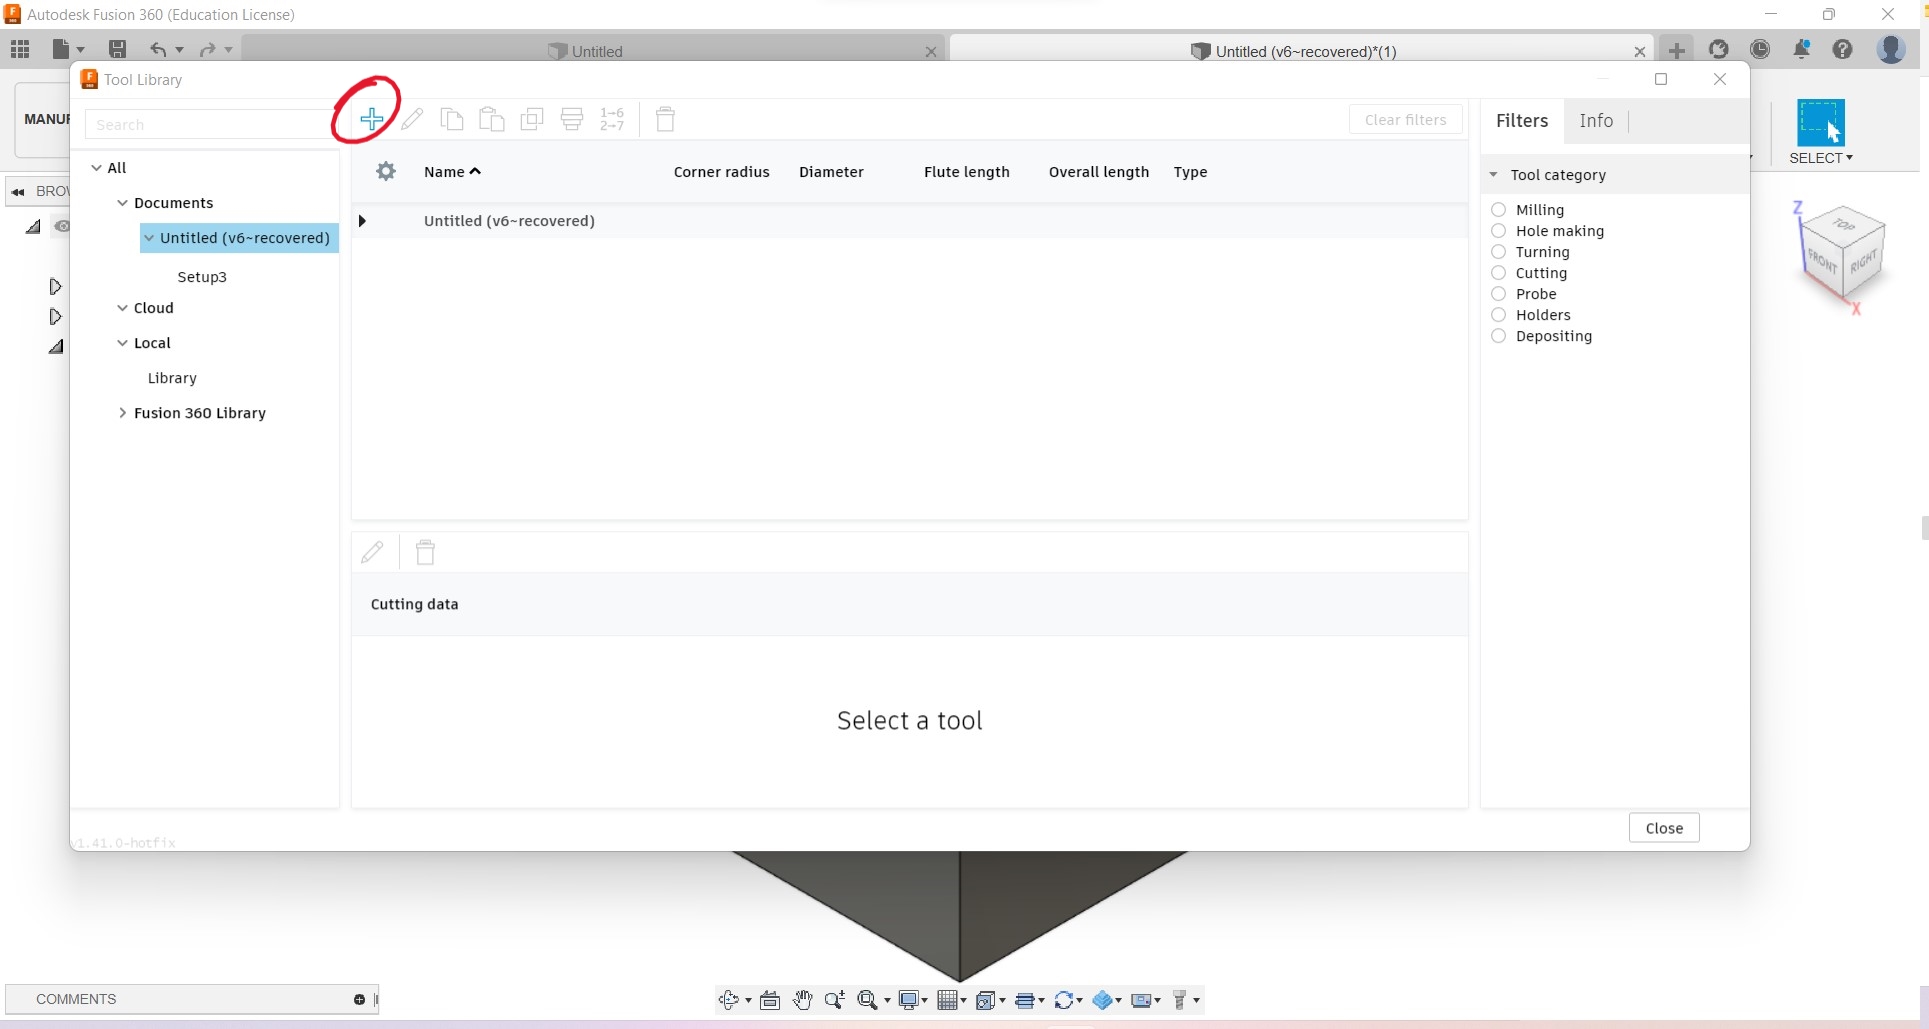
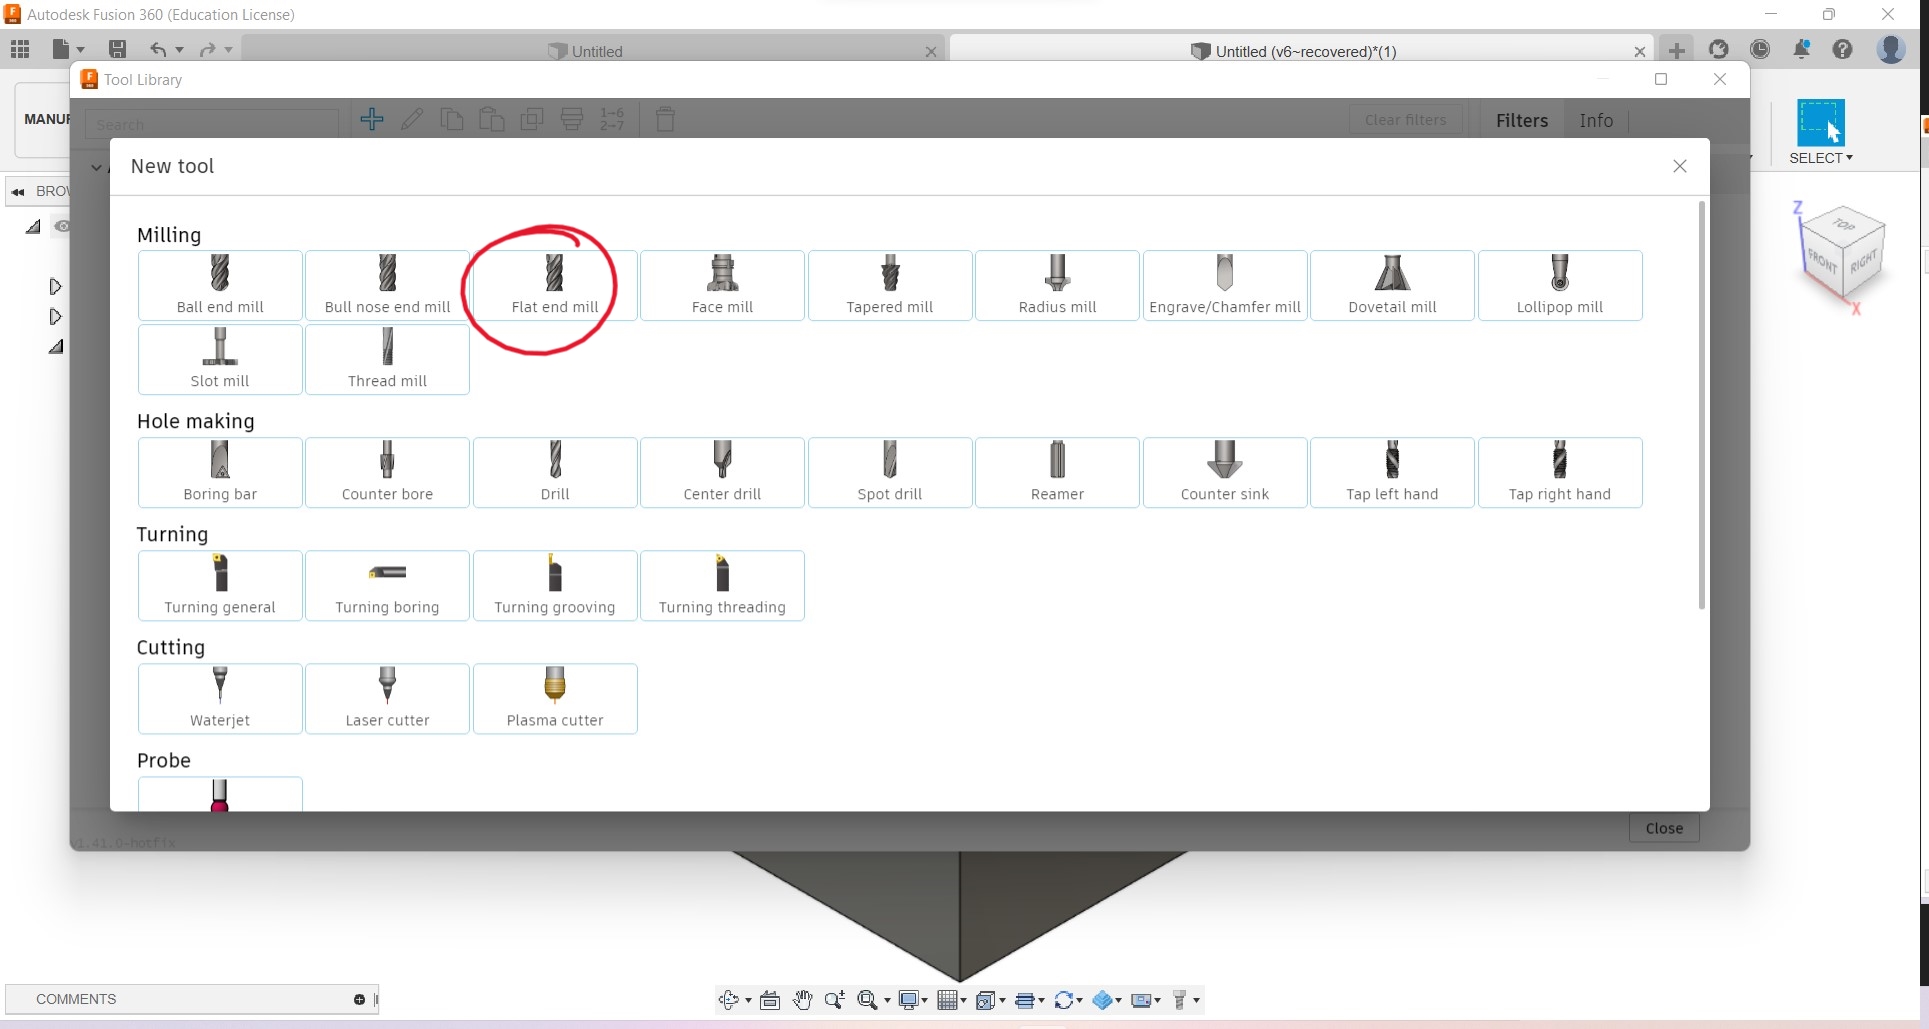
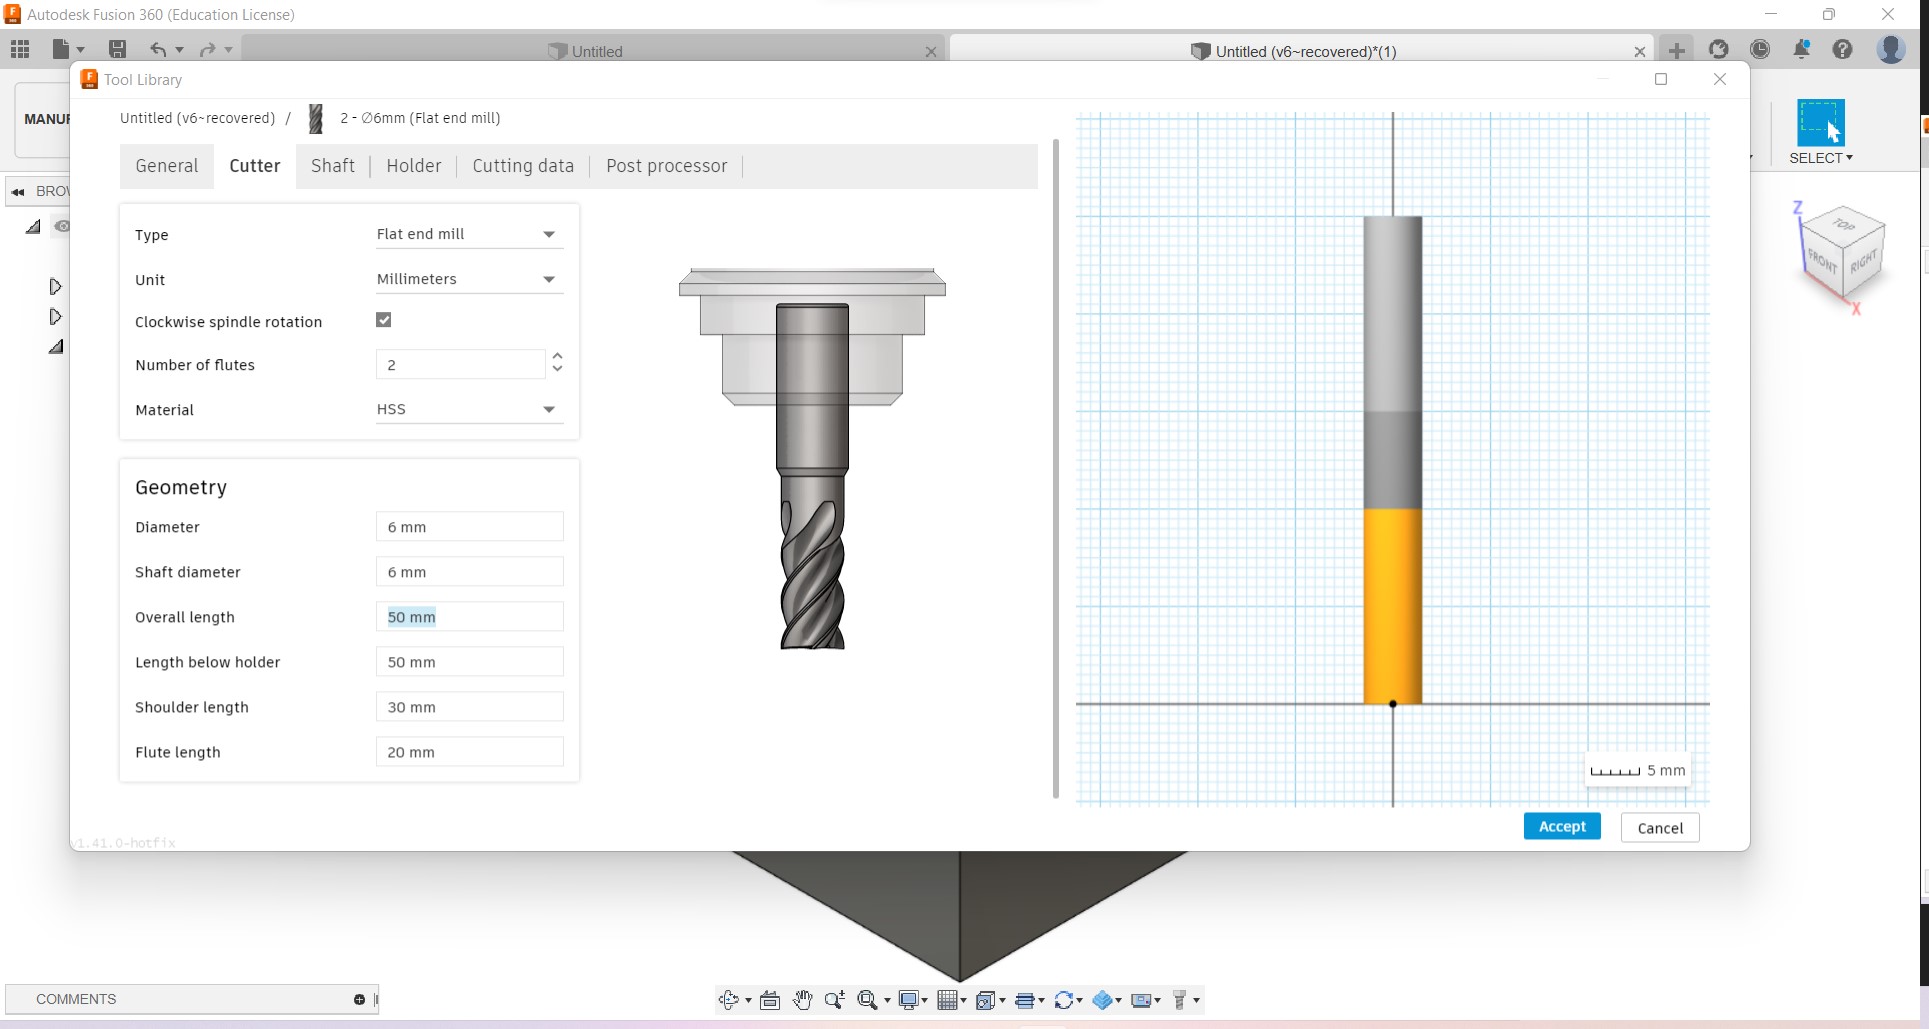
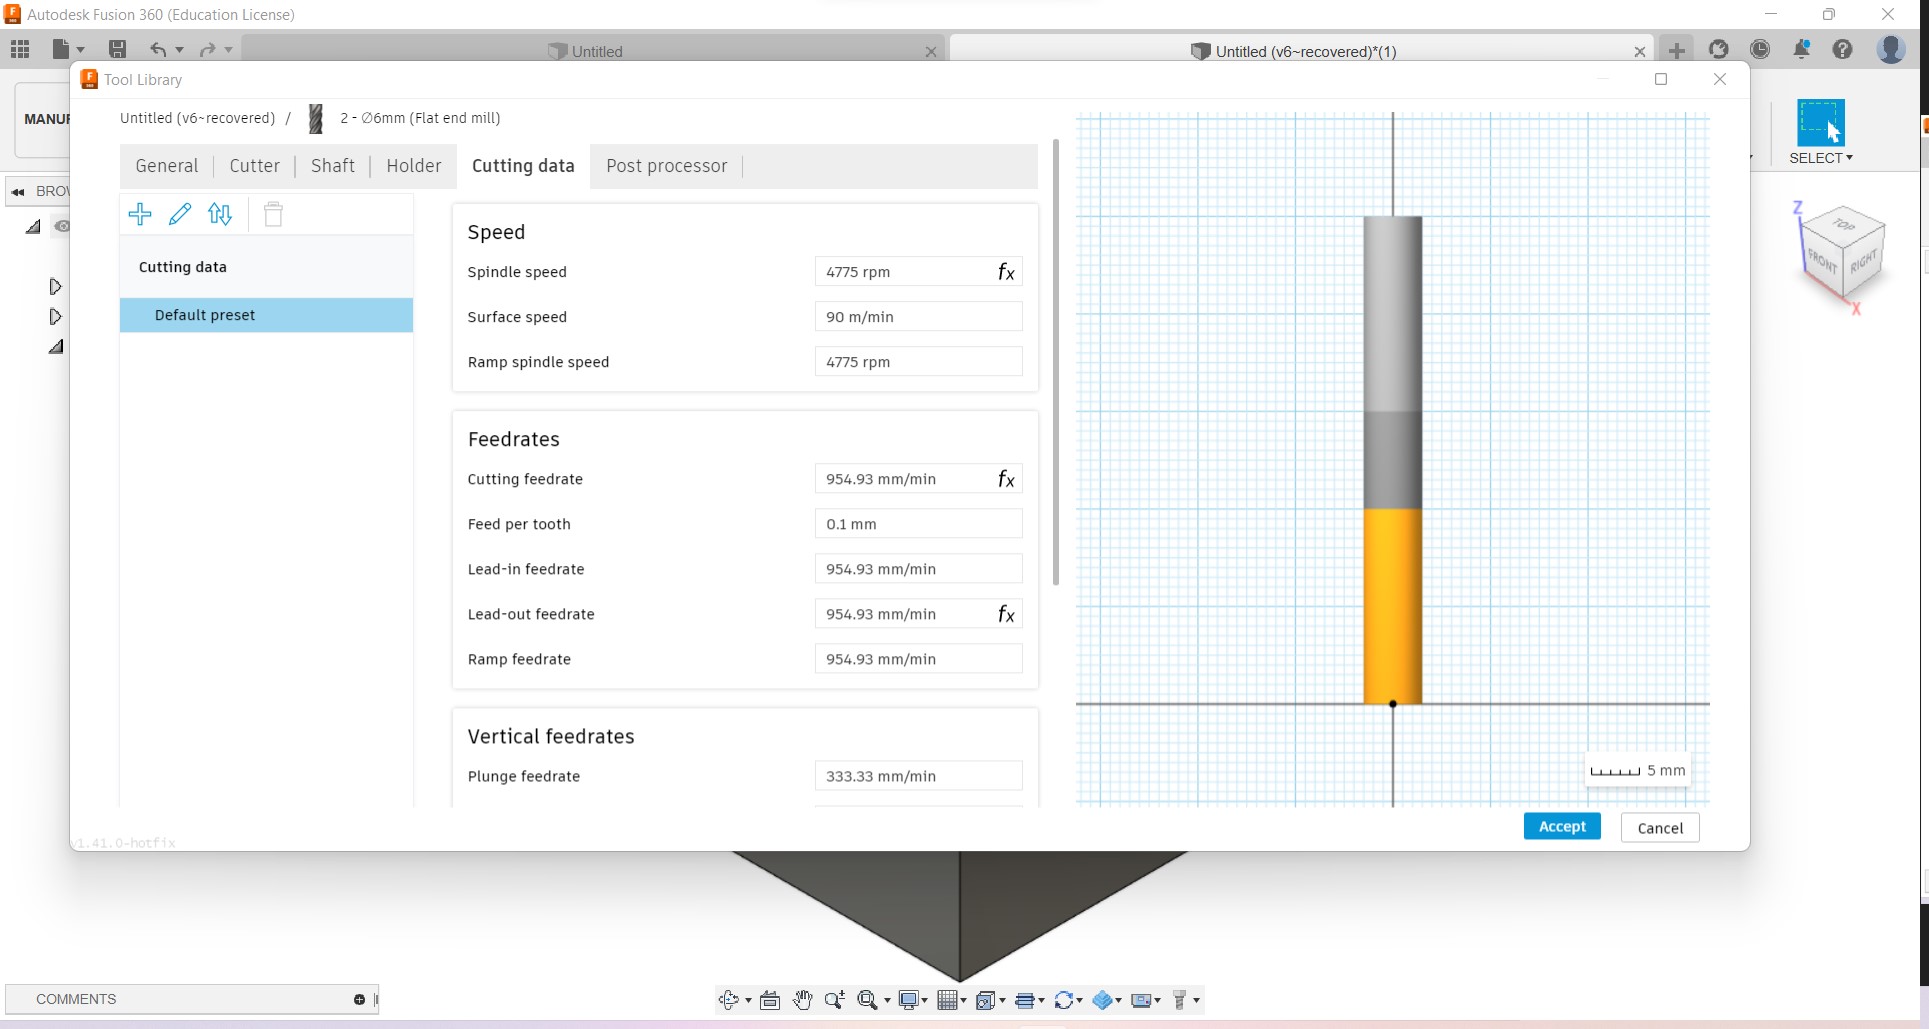
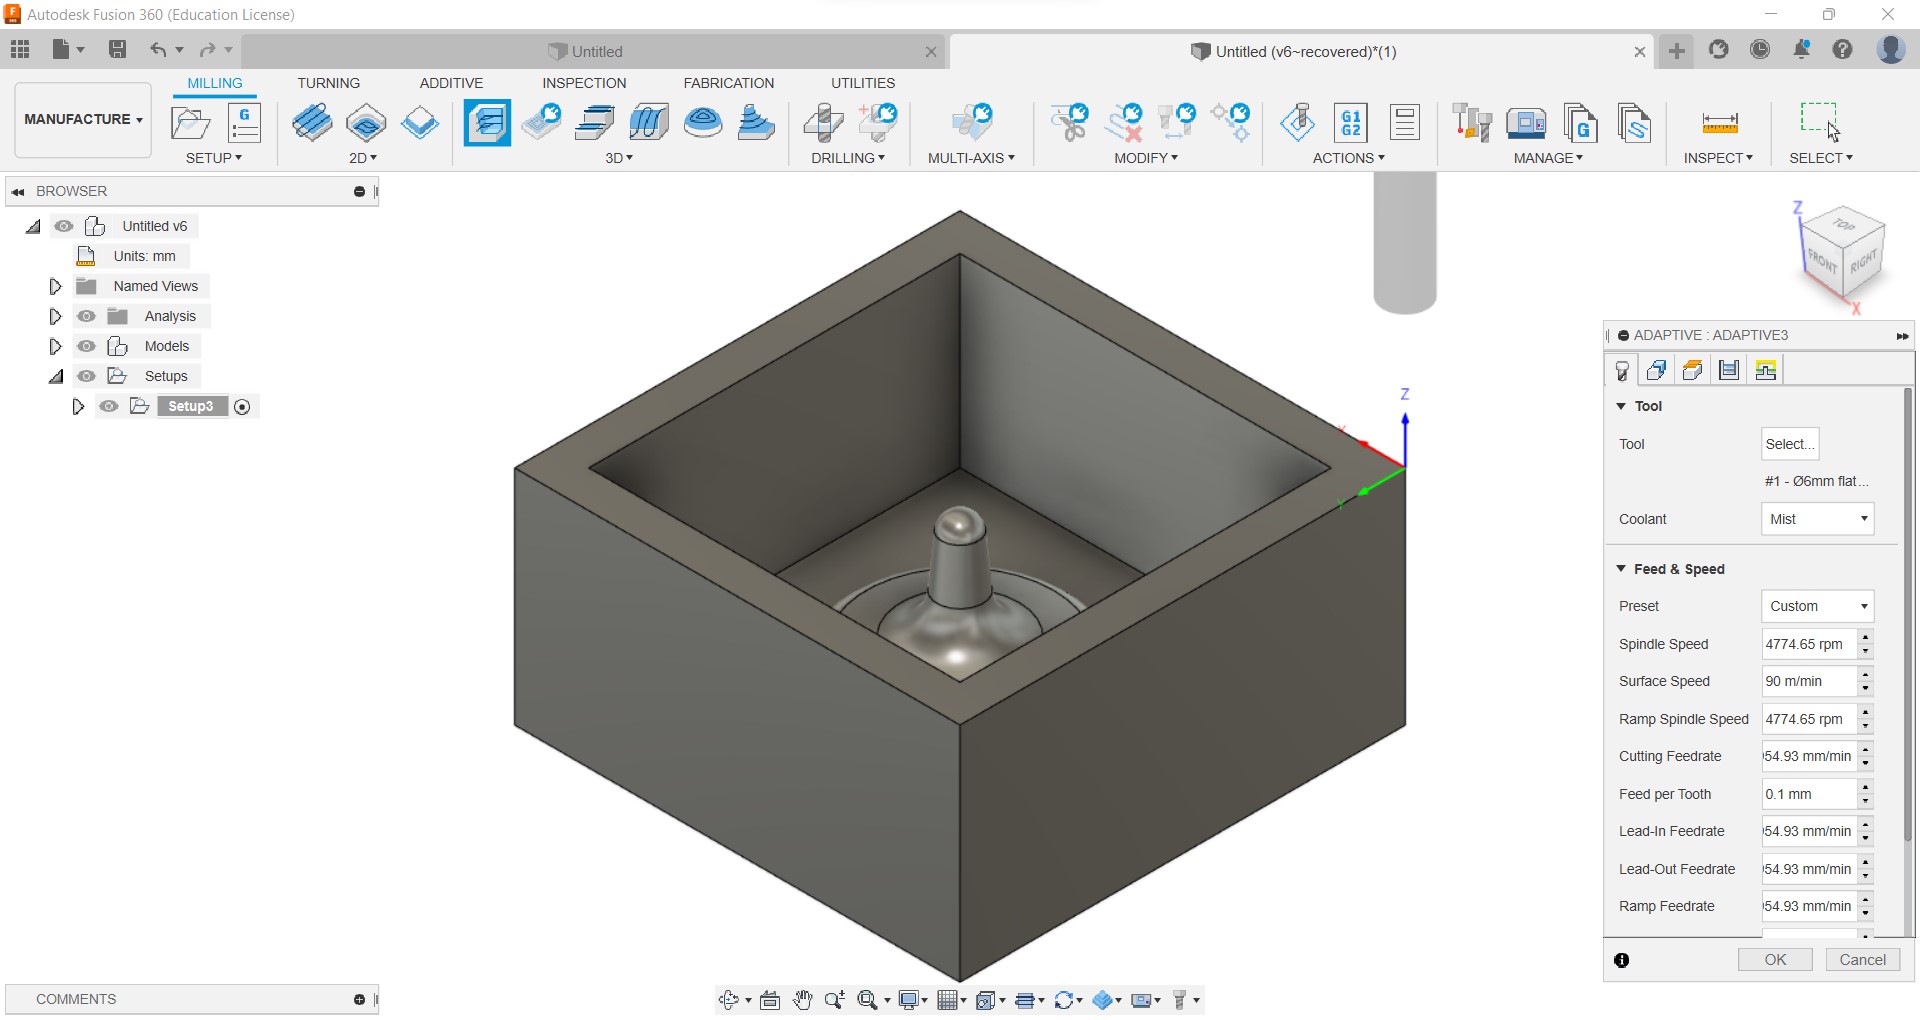
Go to Tool Library in the top ribbon.In the new window that appered click on the + (Fig.2 on slider) > Select the needed tool from New tool here Flat end mill(Fig.3 on slider) > measure the tool or read the tool datasheet and enter the dimension and tool features in Cutter section (Fig.3 on slider) say Number of flutes as 2 and Material as HSS and Geometry can be set as per the tool dimension. > In Cutting data section the following data were updated as per our instructor’s instructionSpeed Spindle speed 4775 rpm Surface speed 90 m/min (rounded off) Feedrates Feed per tooth 0.1 mm do the same for all the other required tools.
-
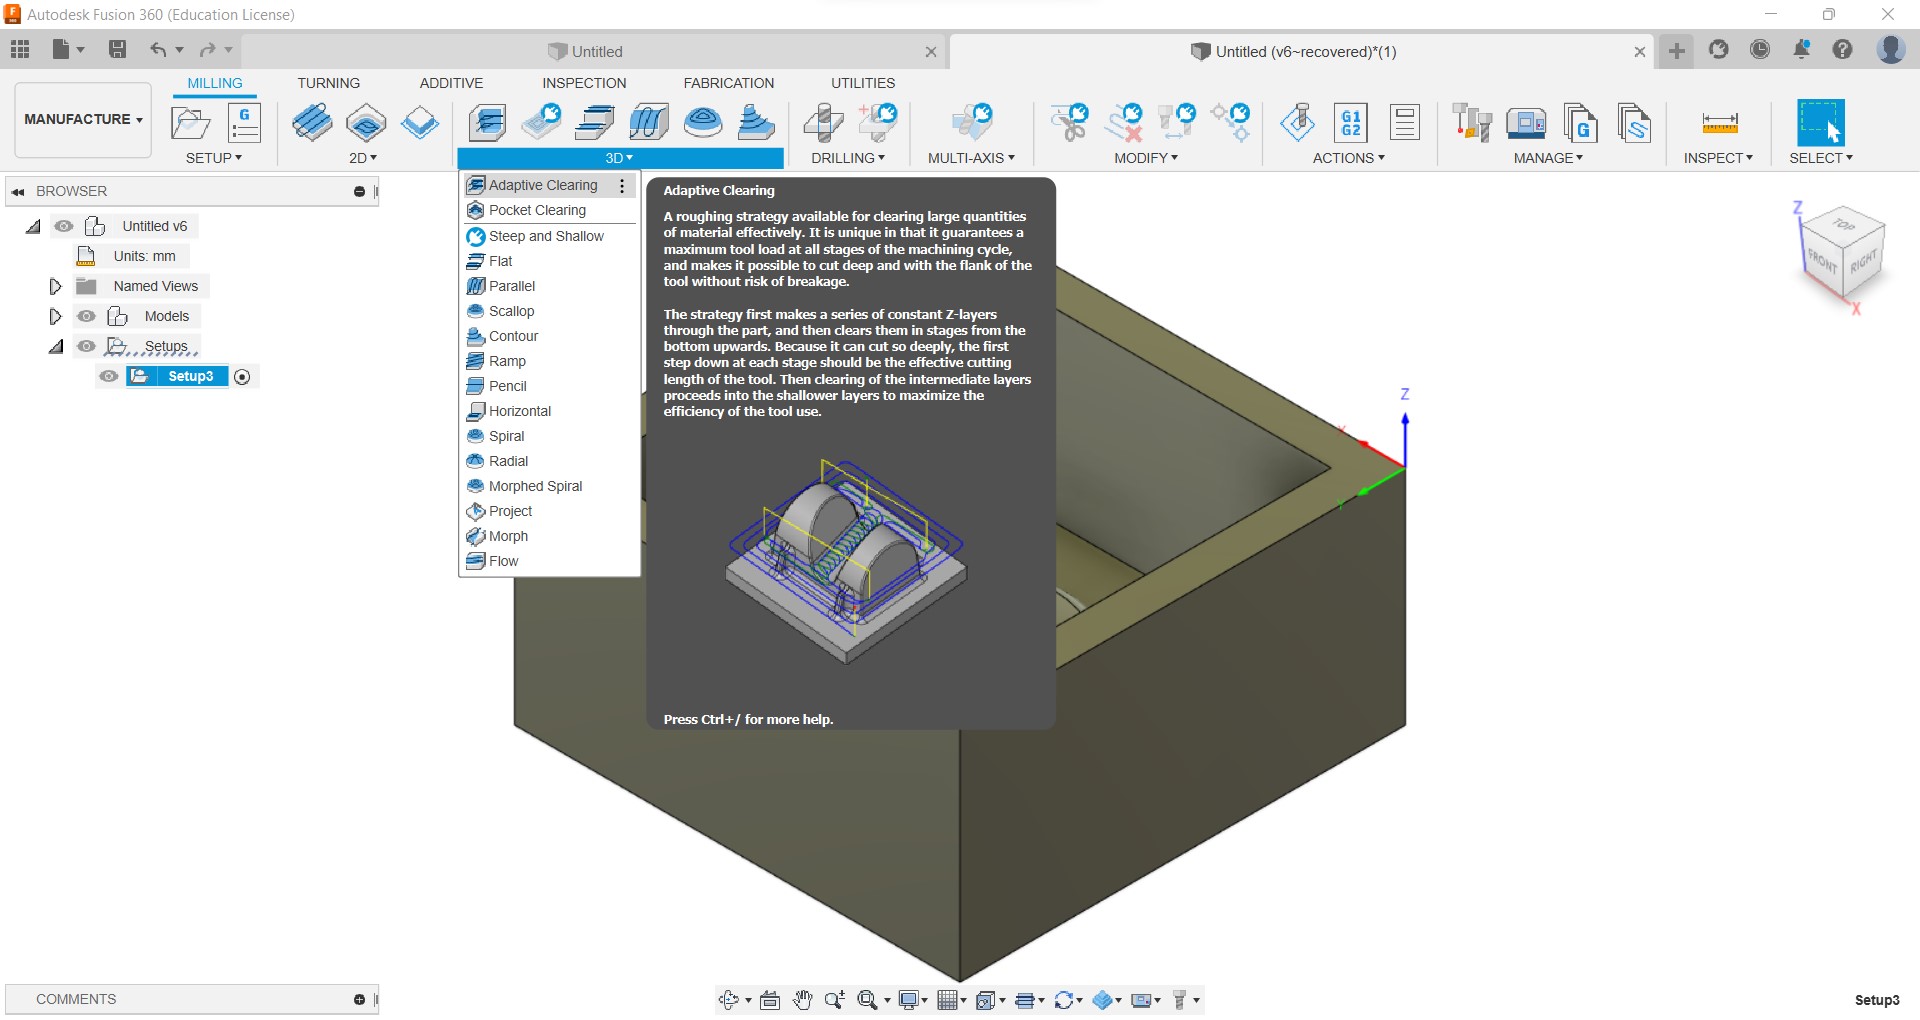
Meterial Removing for inital rough pass we are doing Adaptive Clearing.
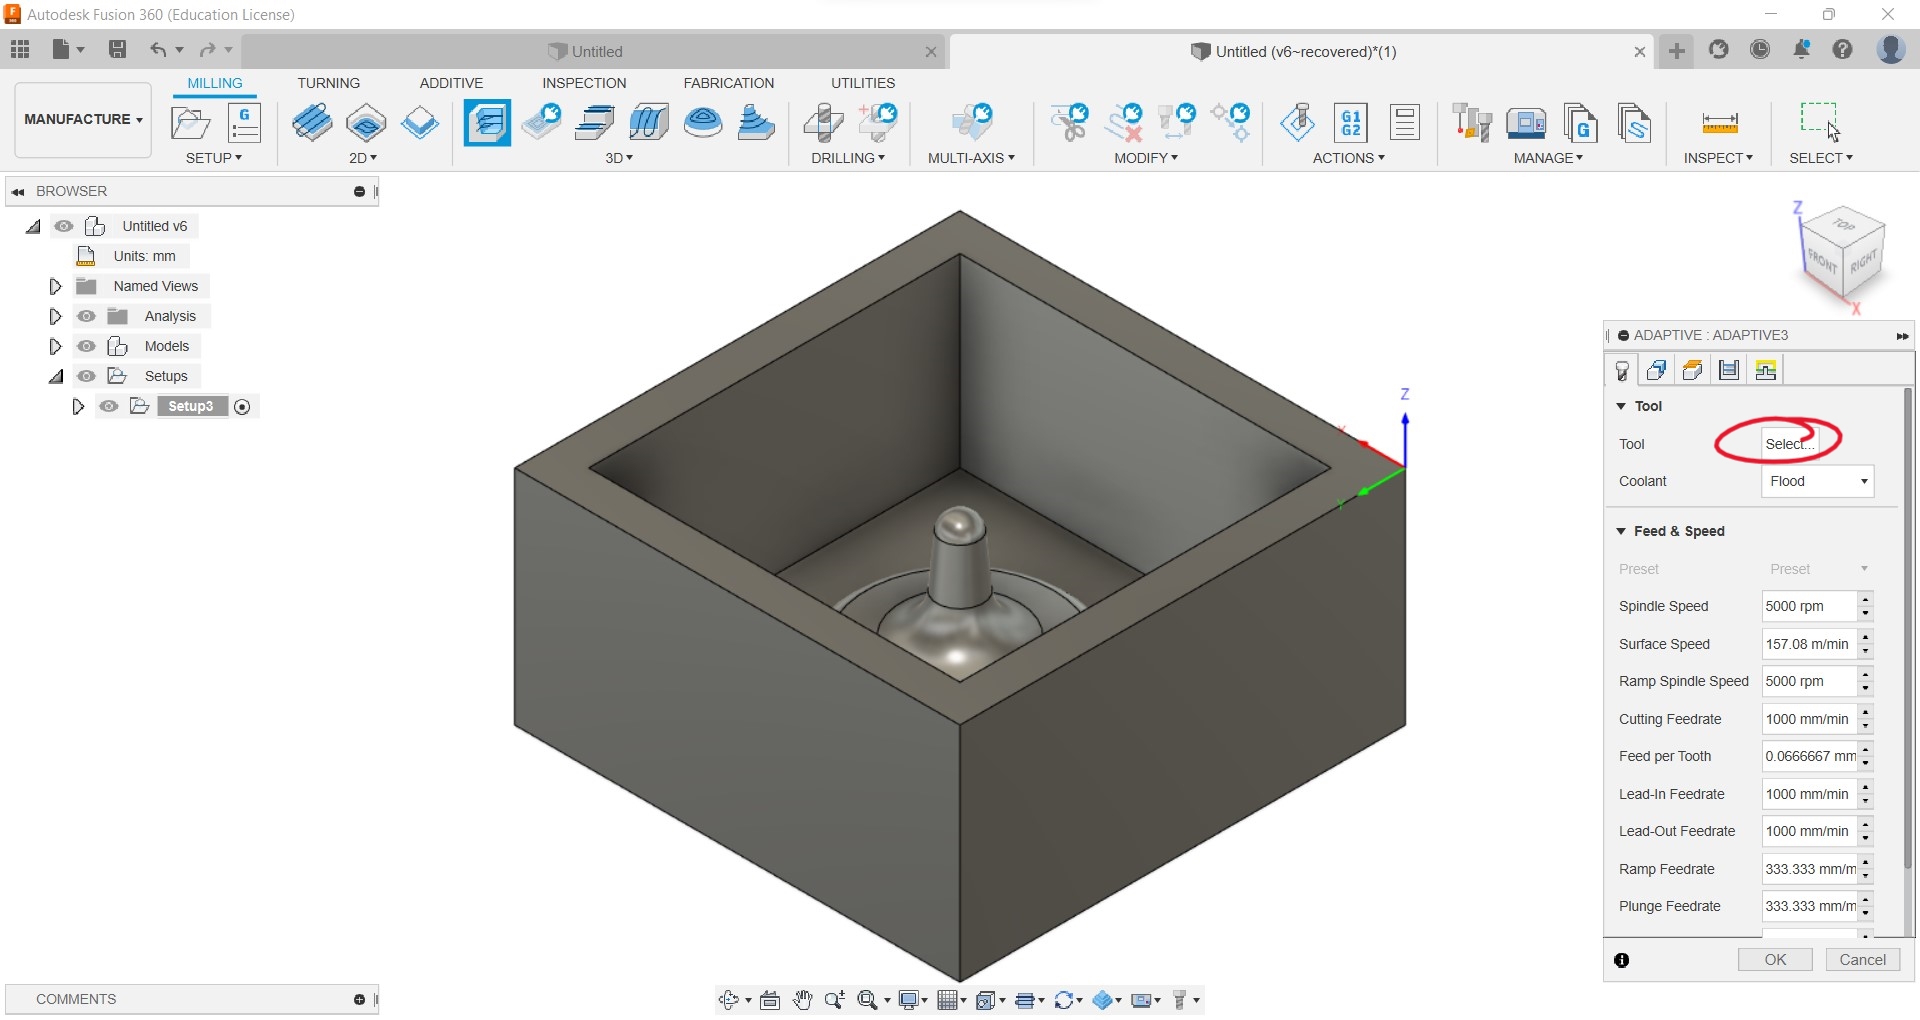
For this Select Adaptive Clearing from 3D milling part of the ribbon. > Select the required Tool > Coolant as Mist from Tool section (Fig.3 on slider). >
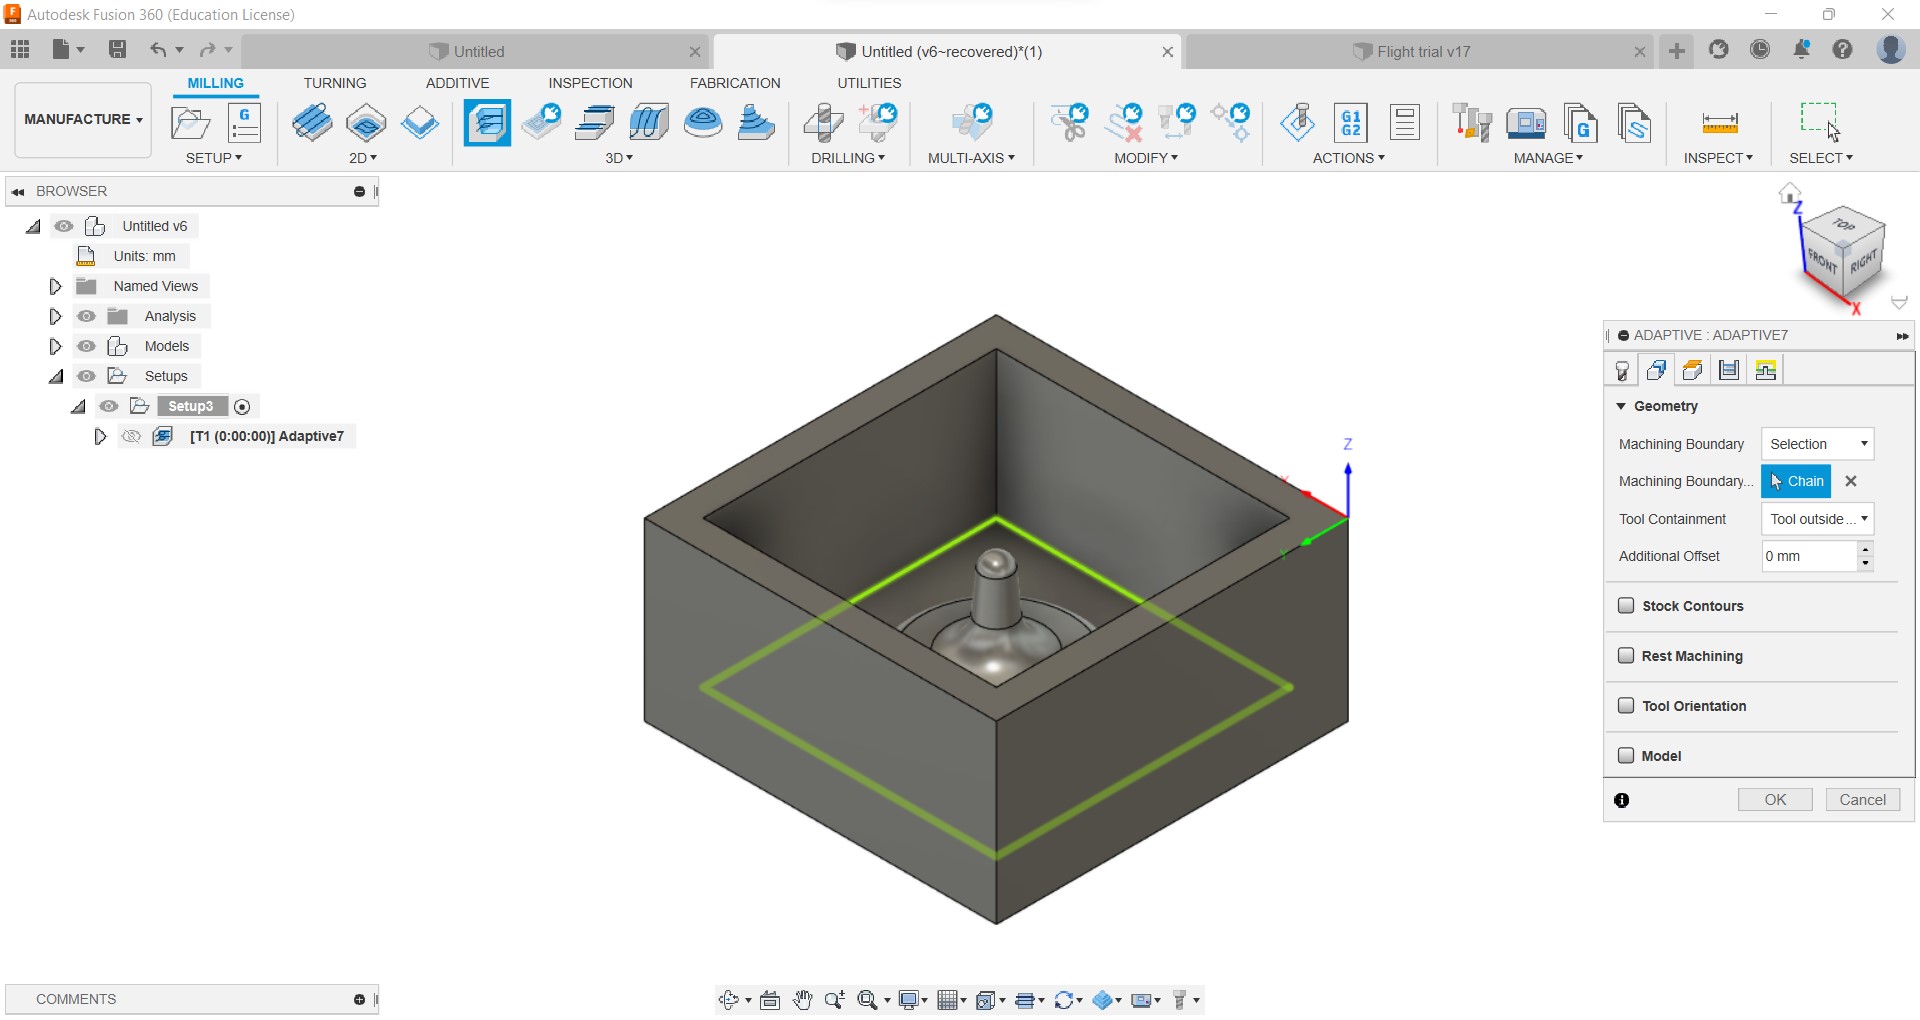
In Geometry section. select Selection in Machining Boundary and select the baundary to make the Rough pass in Machining Boundary Selection (Fig.4 on slider). >
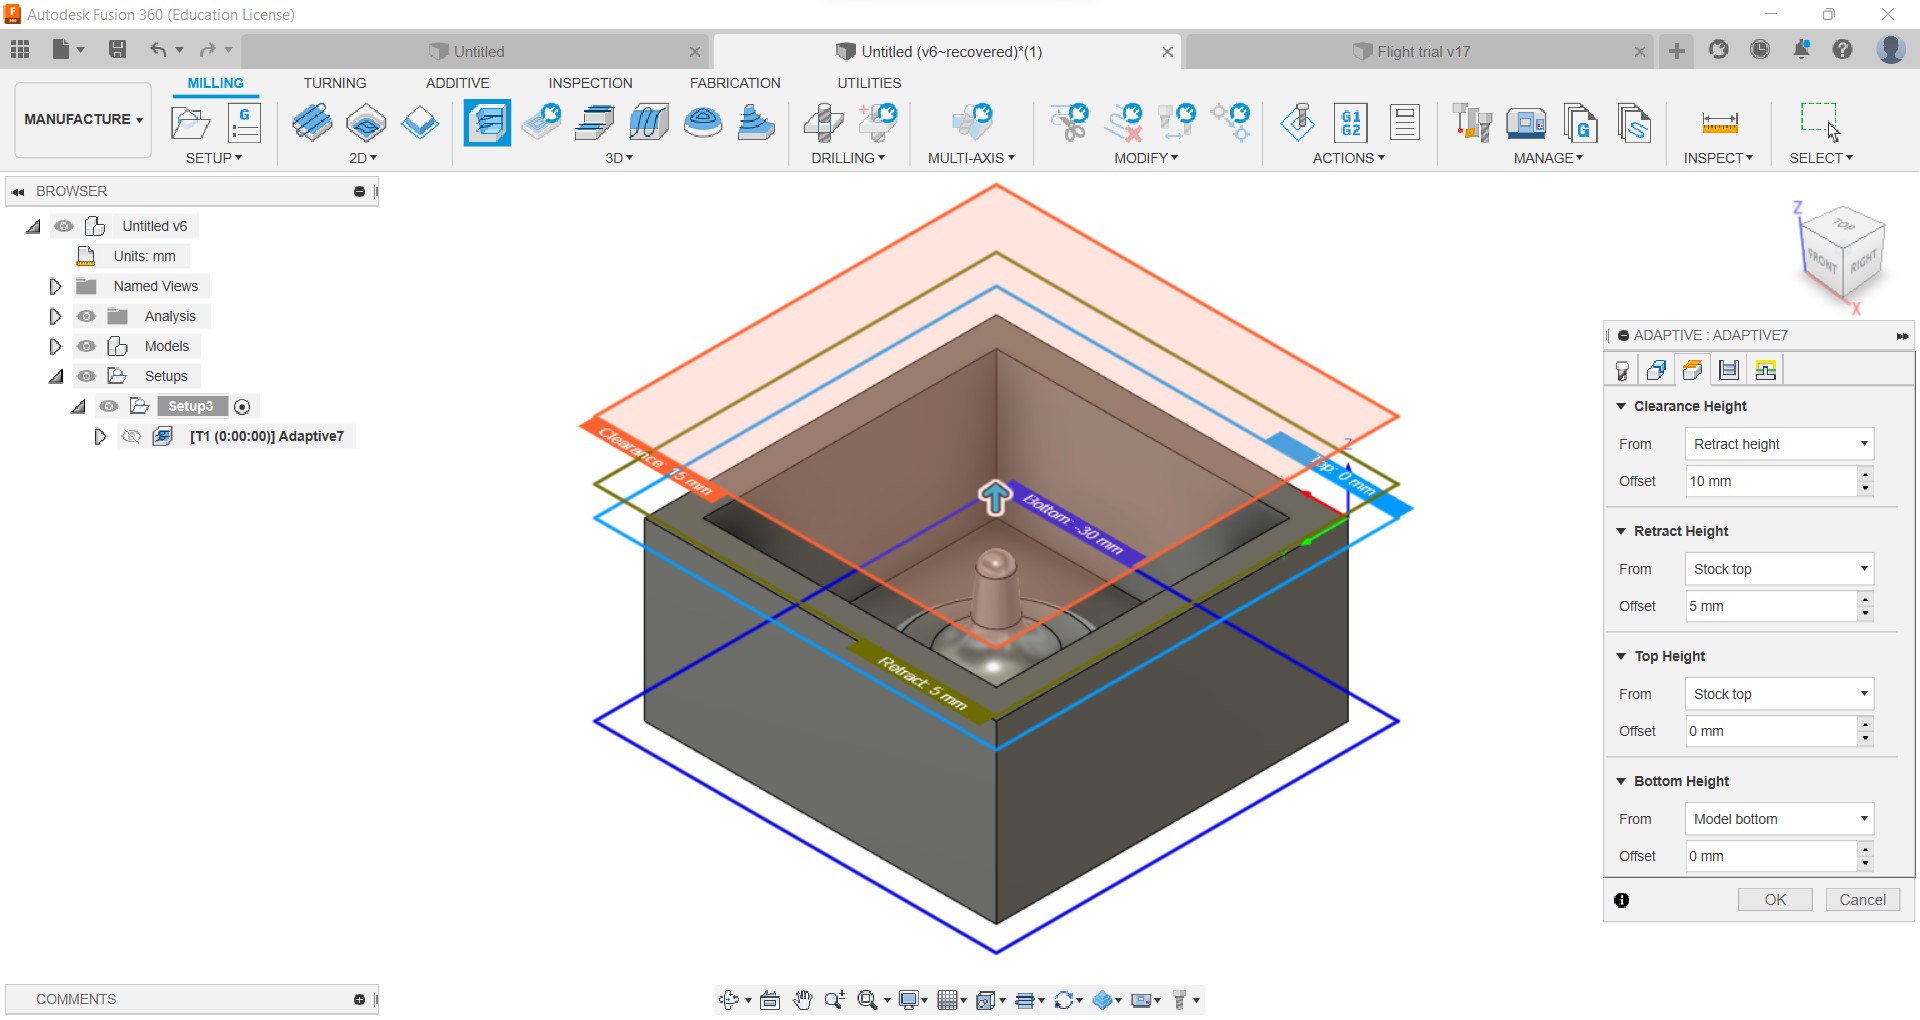
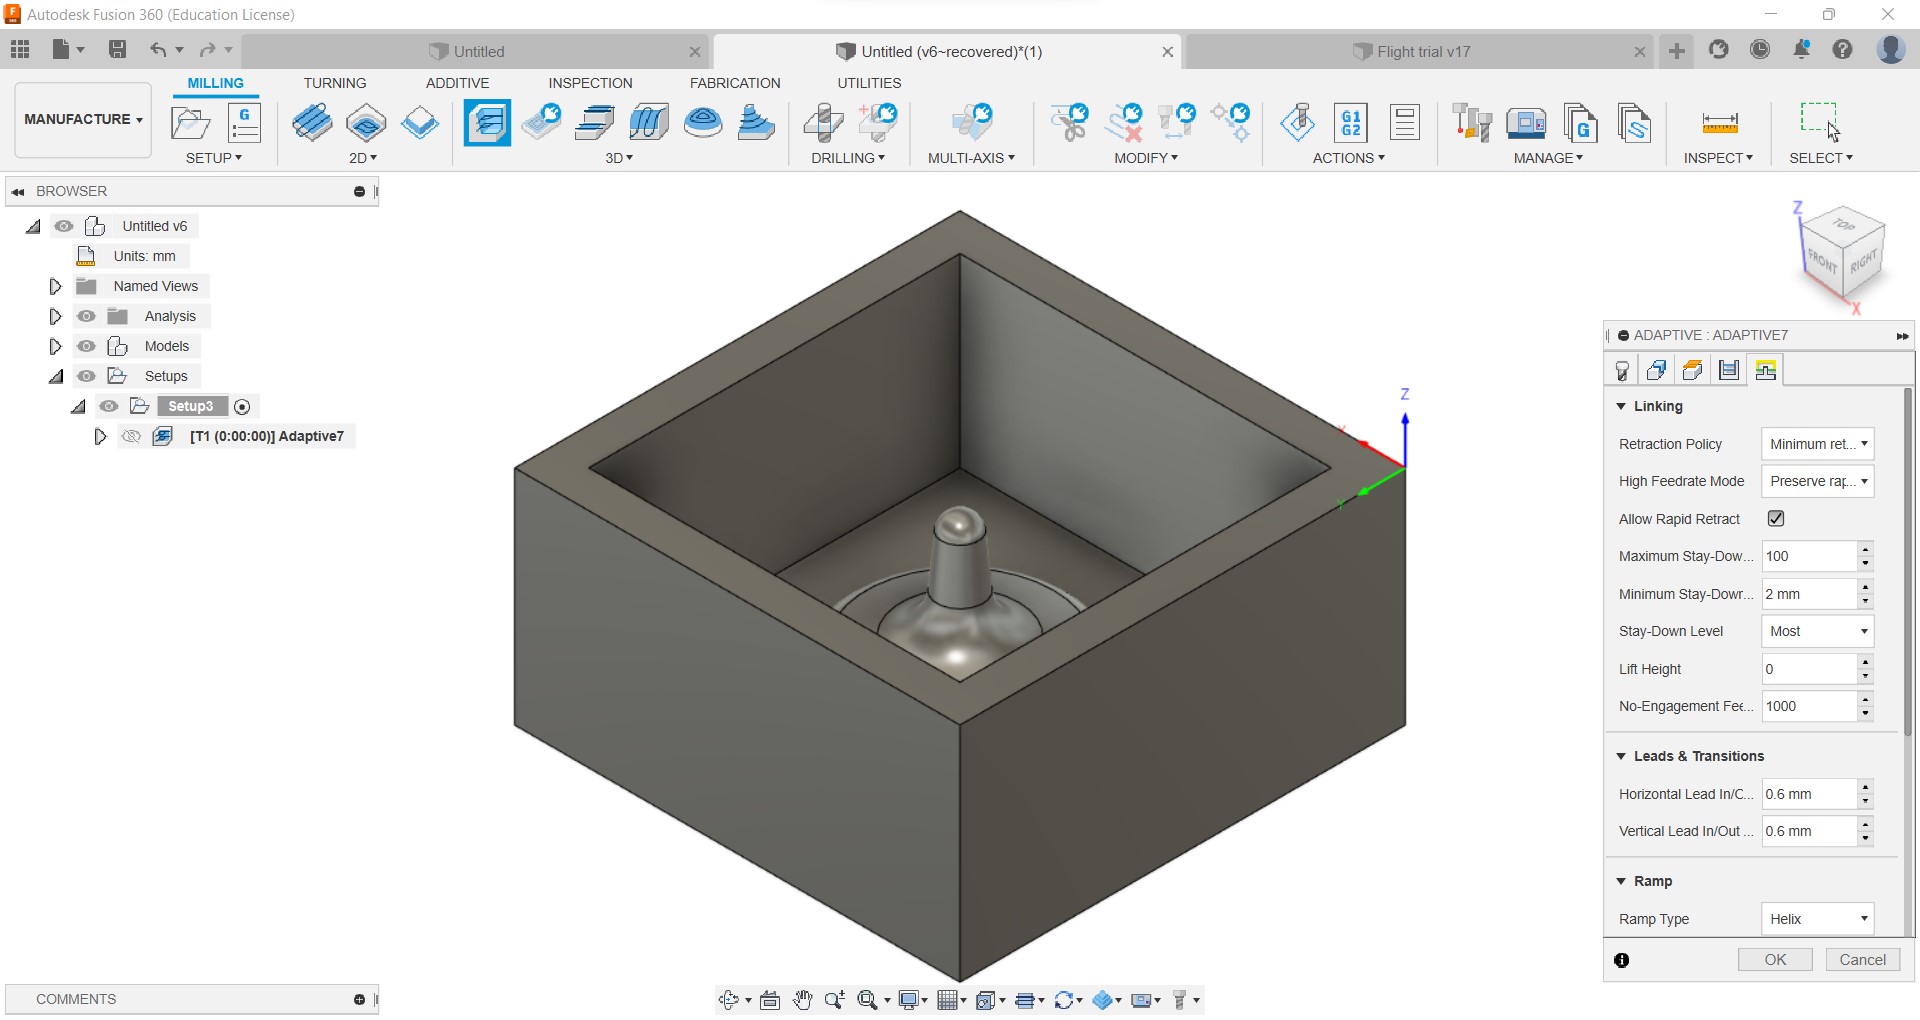
In Highte Section make changes if any needed (Fig.5 on slider). > Do the same for Passes (Fig.6 on slider) and Linking (Fig.7 on slider).
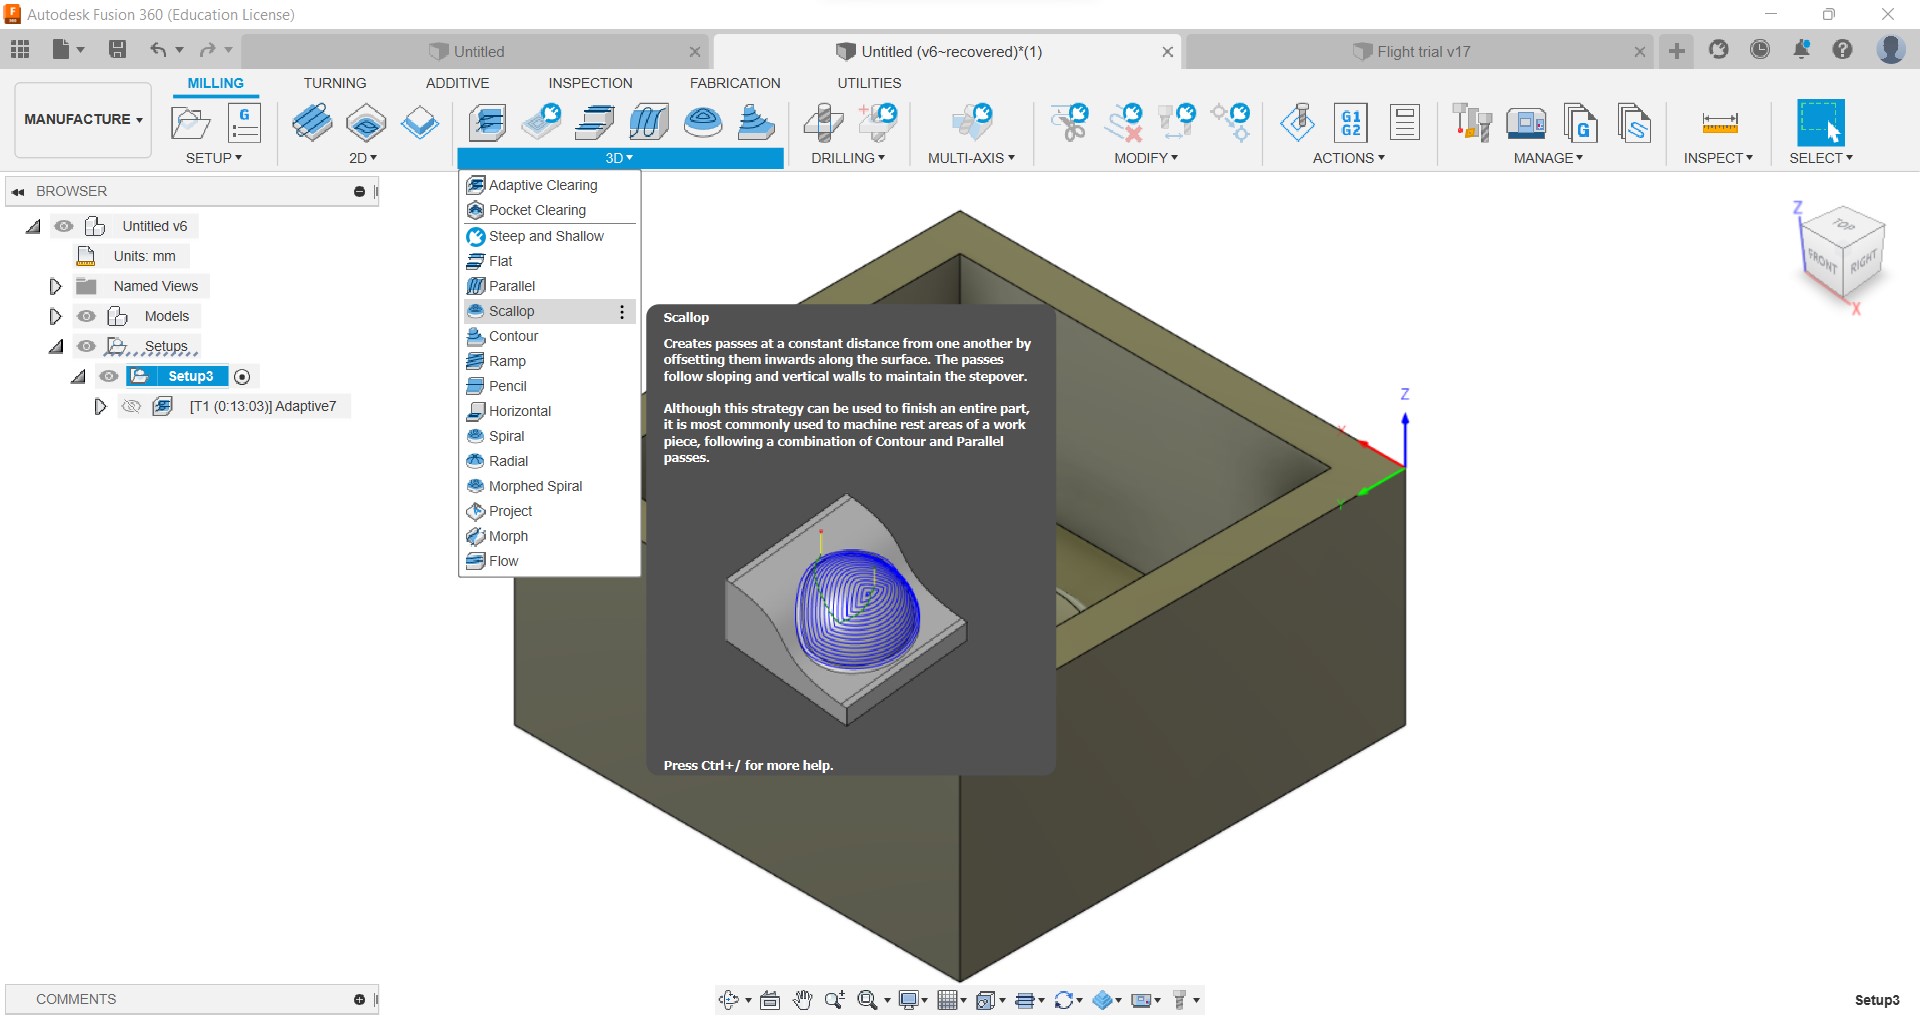
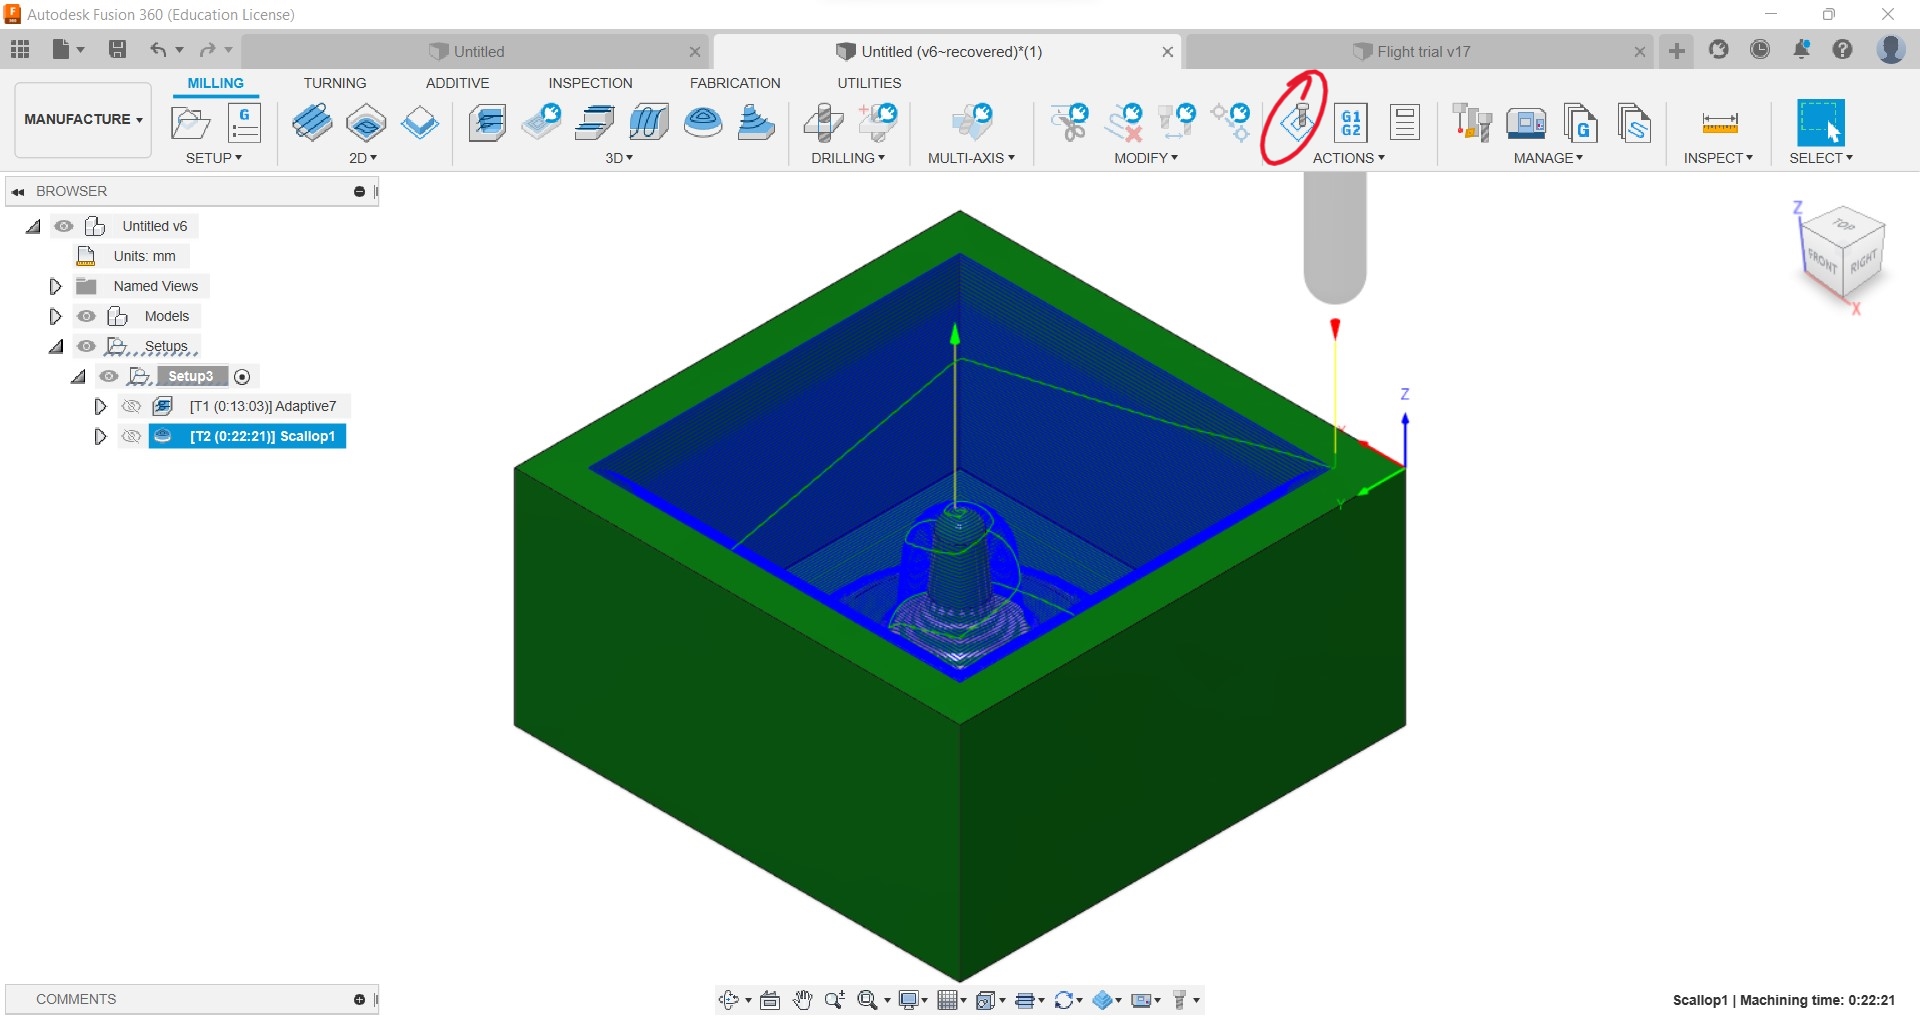
Now for the finishing pass i used Scallop and repeated the above mentioned steps again with changed settings accordingly.
-
For simulating the results virtualy we can use the SIMULATE from the top ribbon.
 The simulation will allow you to check for any errors on the part, including machine, tool and tool holder collisions.
-
Exporting G code.
click on Post proceses in ACTIONS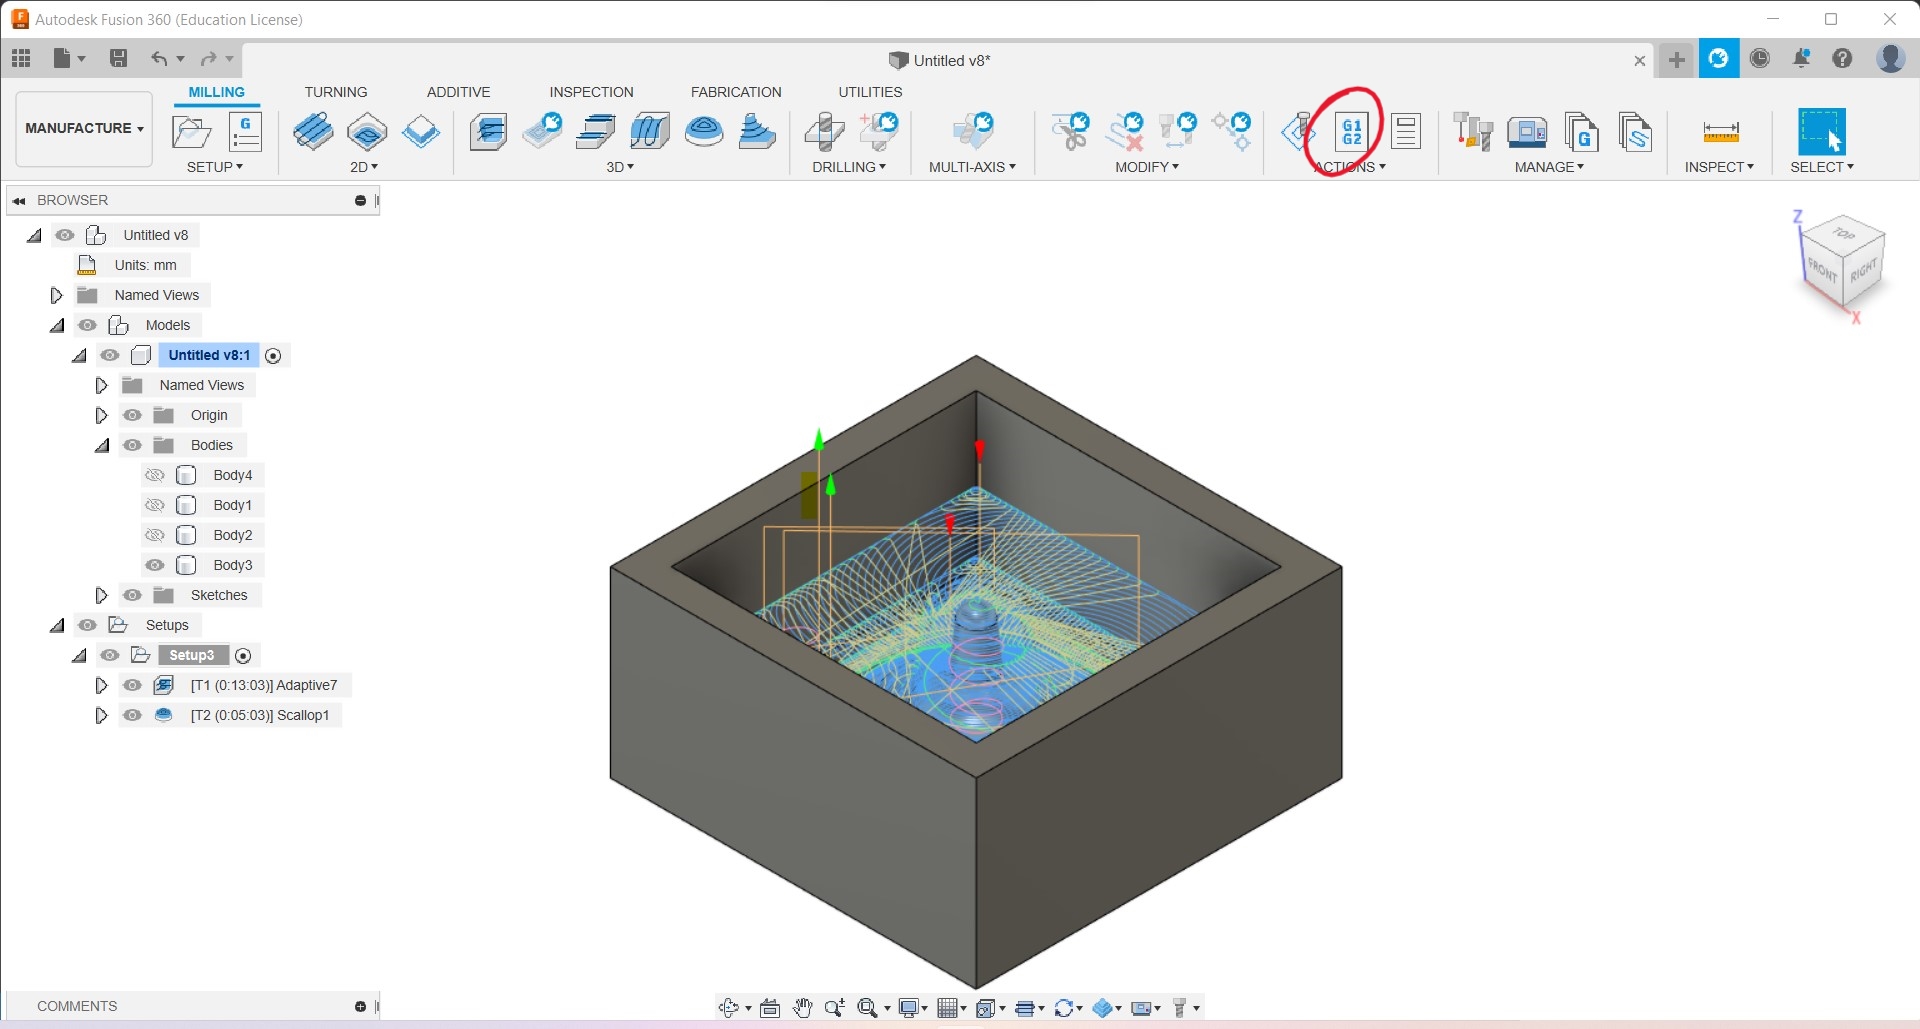 Select the machine from library in Post and finally click Post at the bottom left corner.
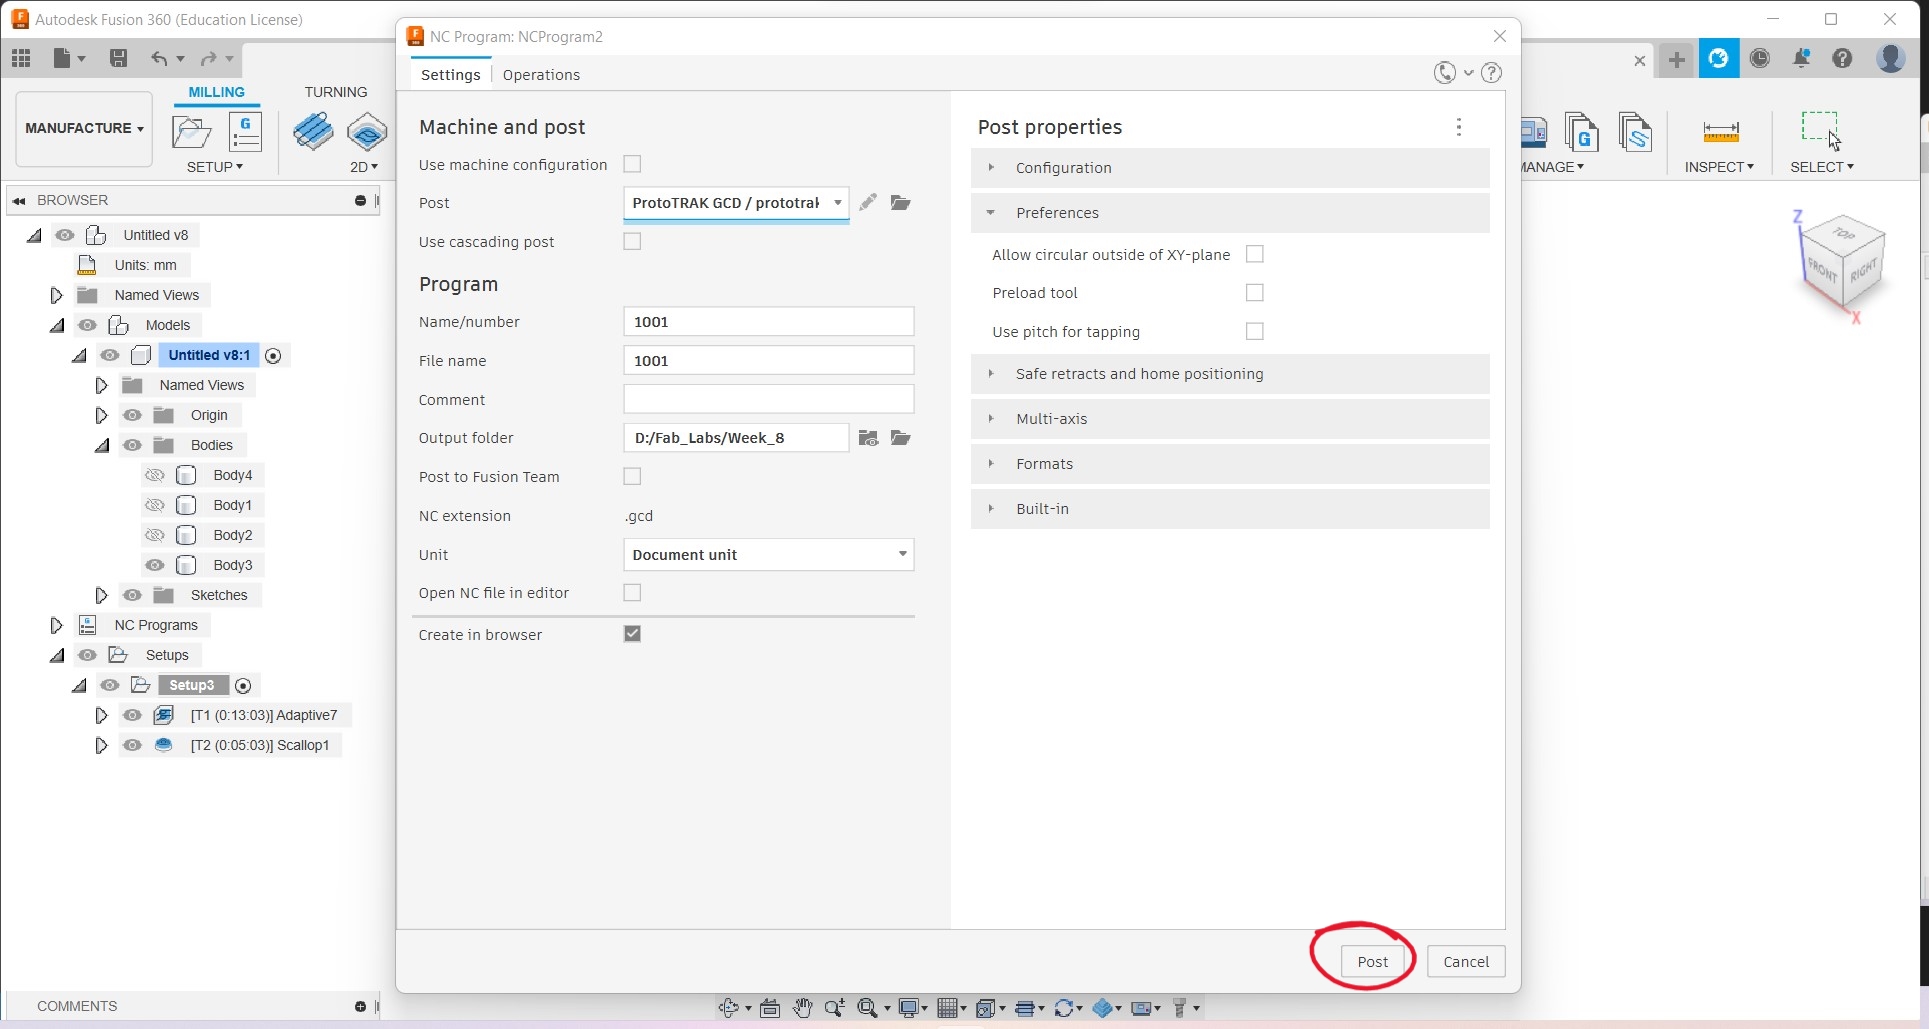 and copy this G-code to the machine.


for downloading file Click here
Setting Up machine
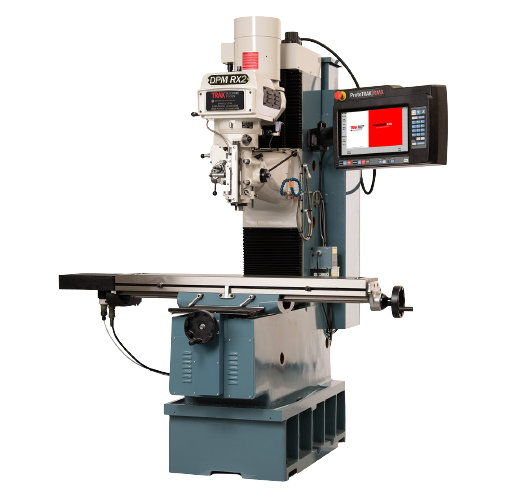
I used ProtoTRAK RMX CNC is Knee milling machine with 3 axis wich can be operatted both manualy and by programming.
- First thing first place the Workpiece on the vise and fix it.
-
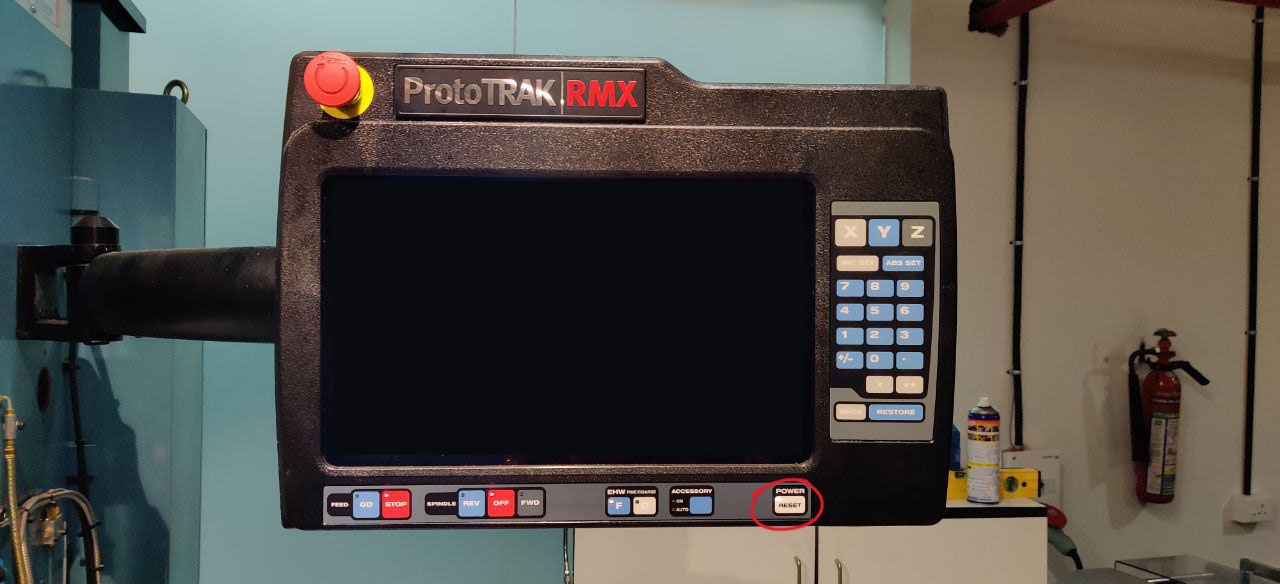
Turn on the machine by long pressing the POWER button.
-
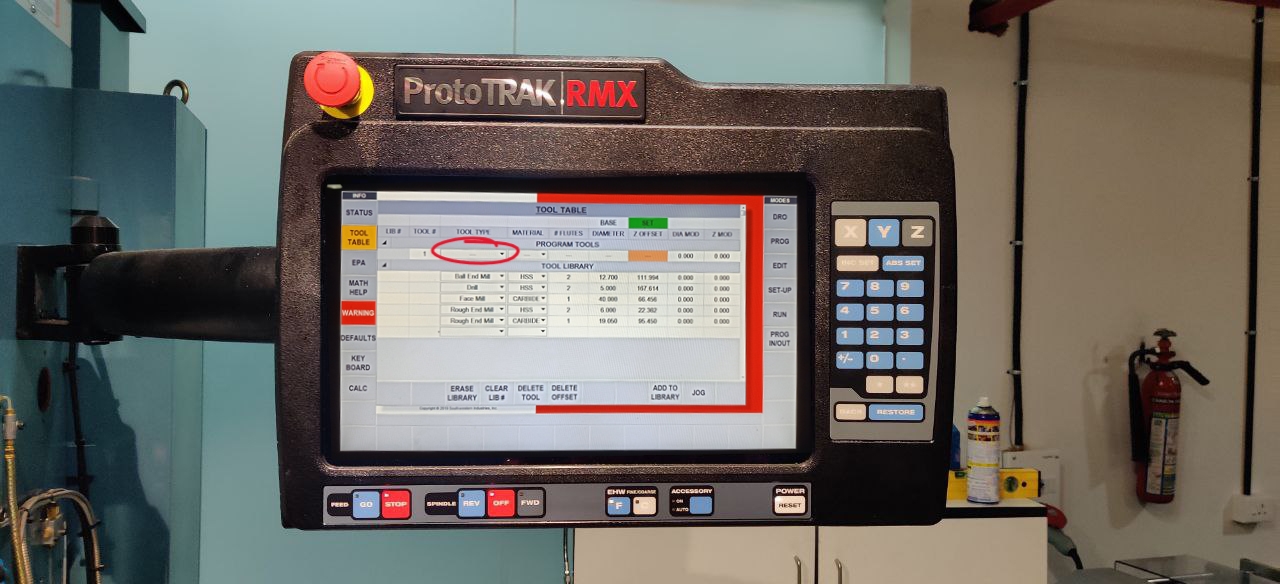
Setting Tool offset
Go to Tool Table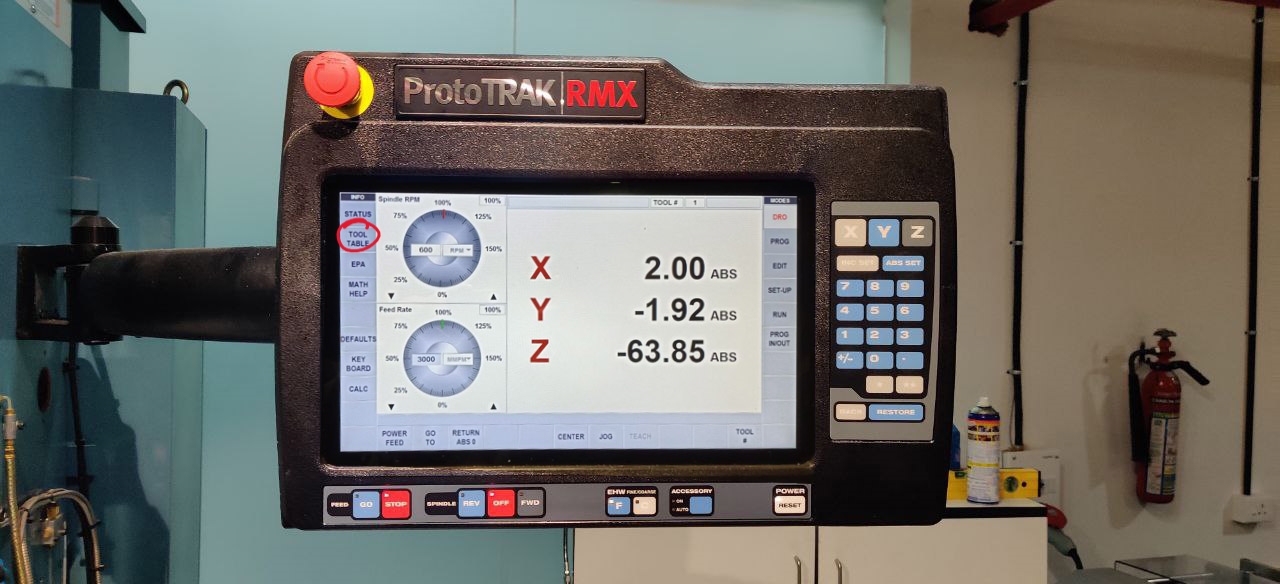 Remove any tool holder/tool in the spindle
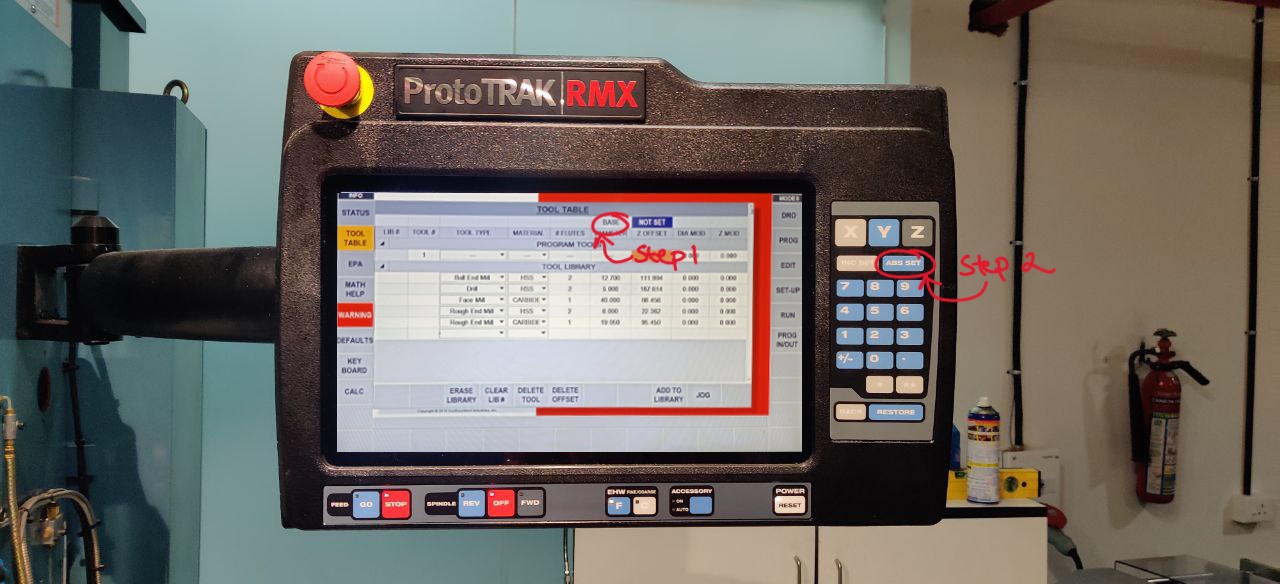 select the tool/create a new one for the operation in PROGRAM TOOL section.
 Insert the tool in the spindle
-
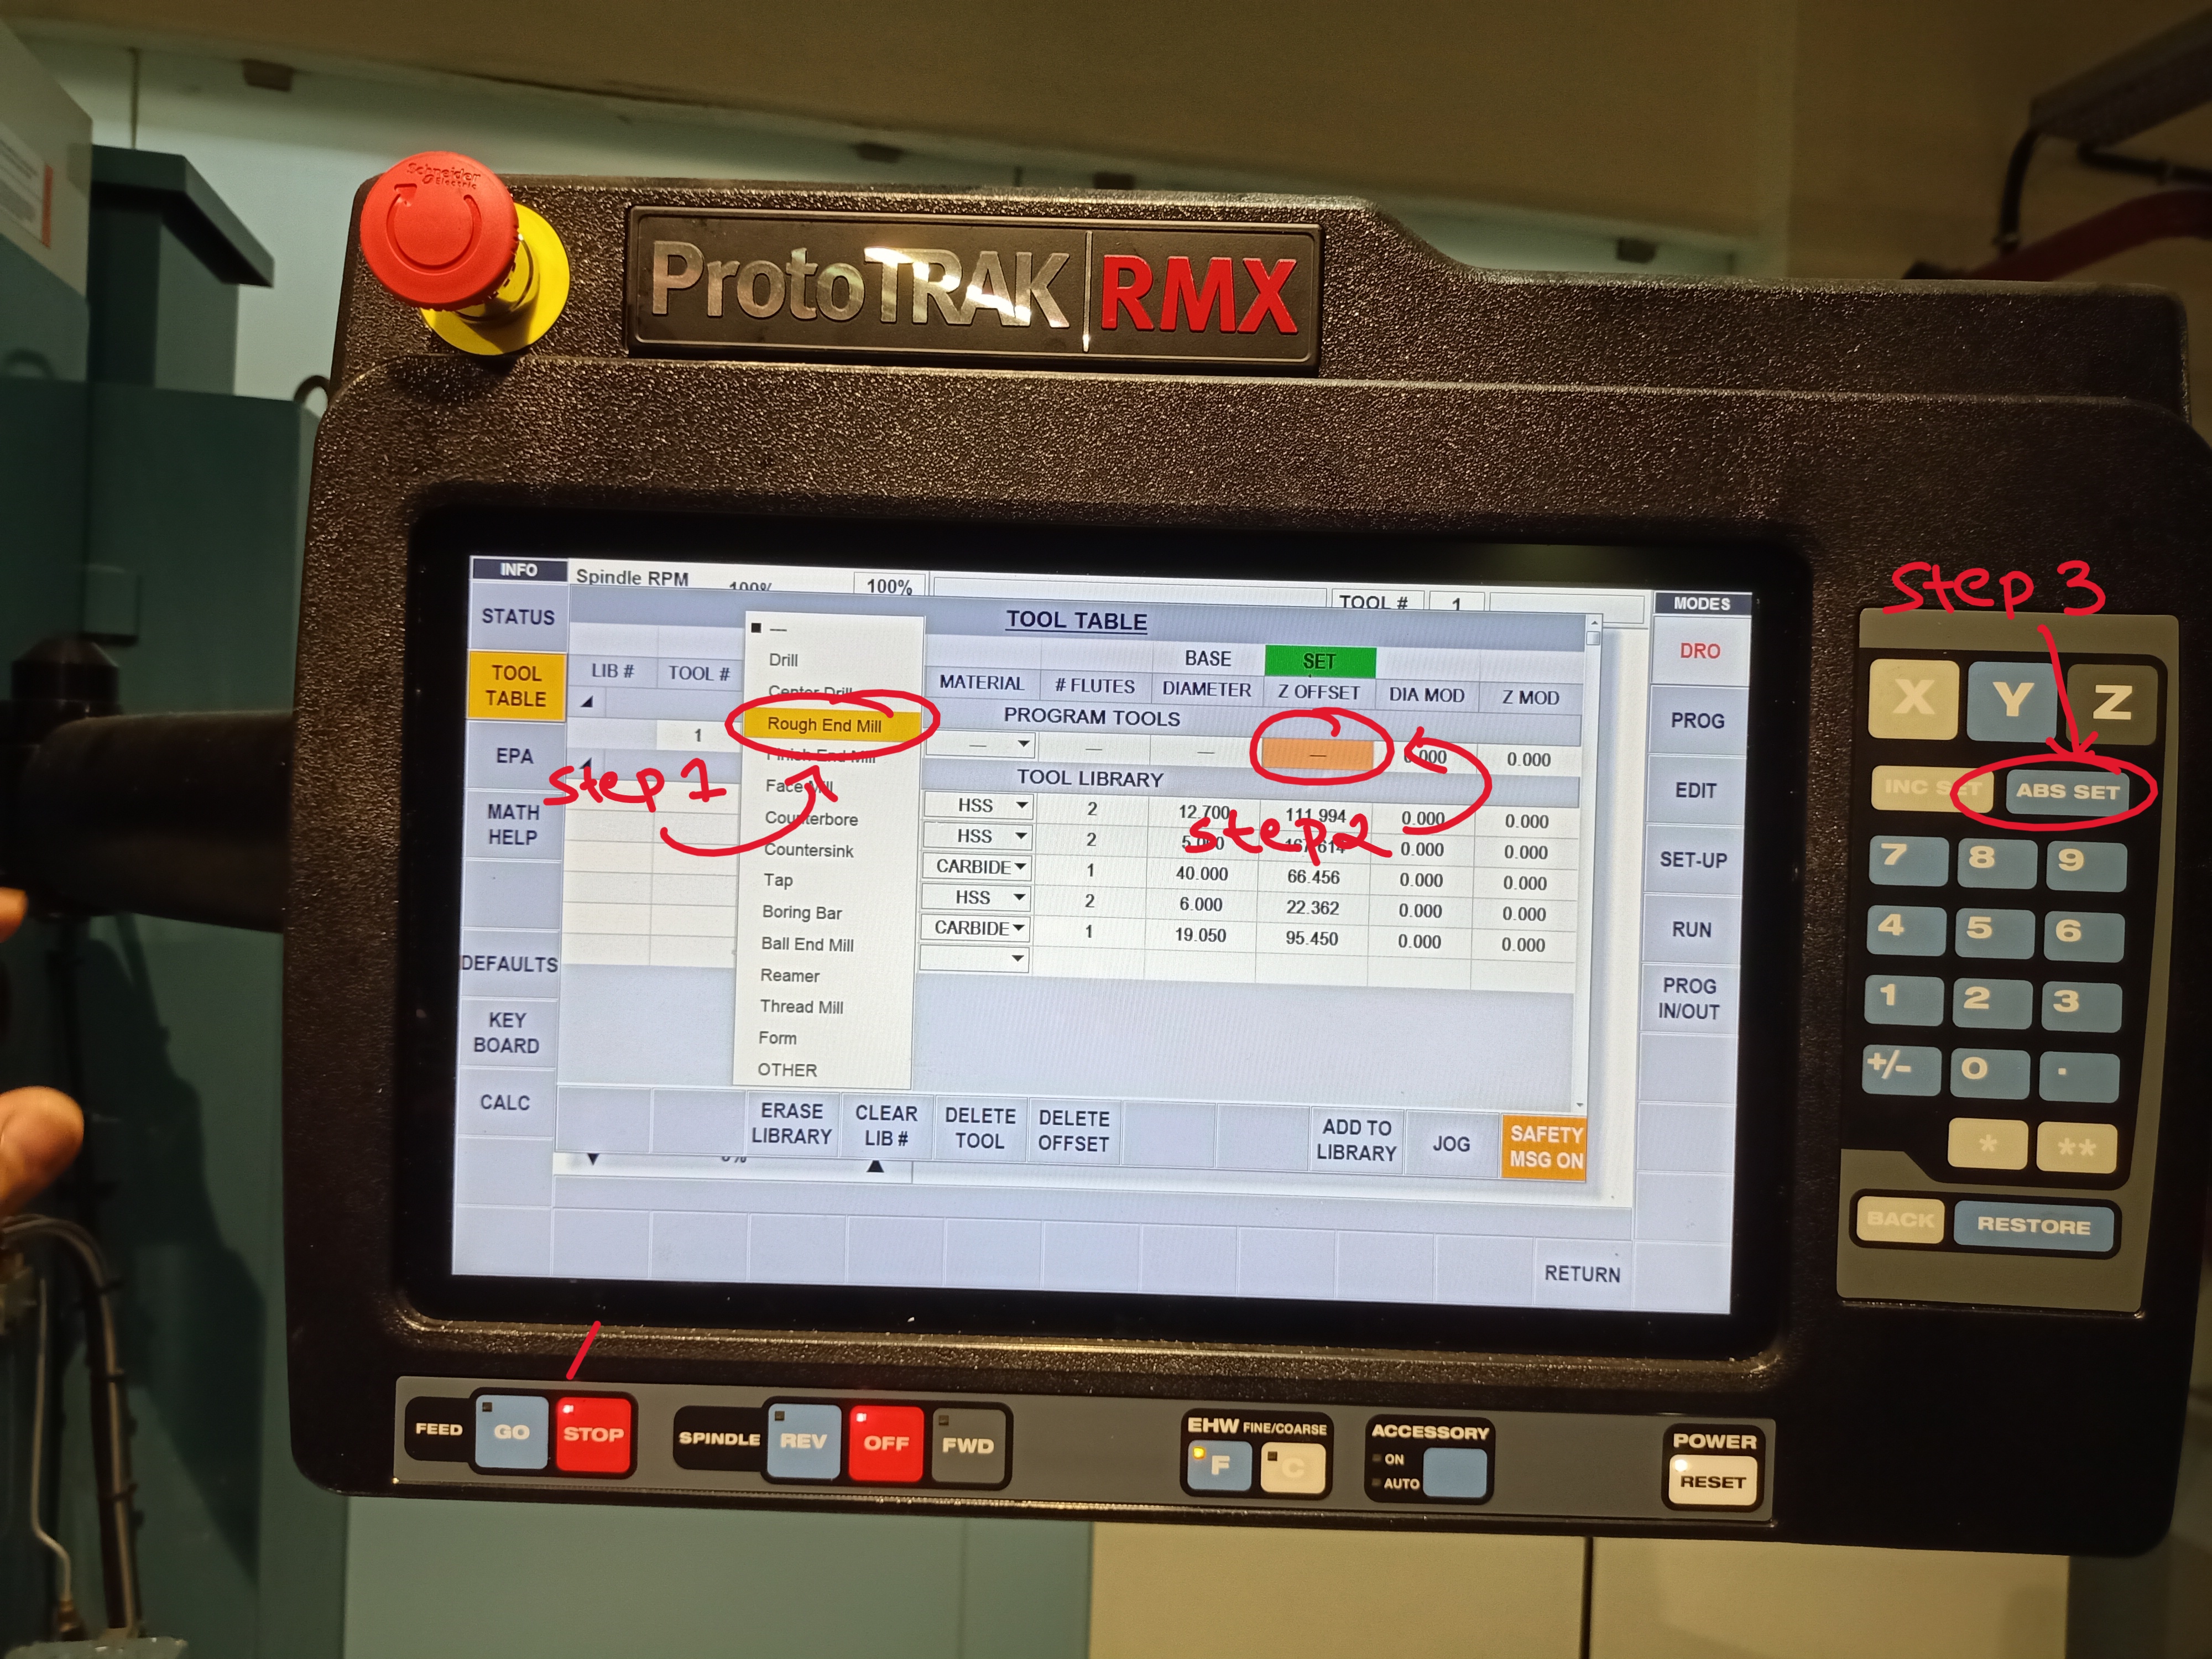
Setting Orgins
X, Y and Z orgins > Change the tool to edge finder
.png) Start spindle at 600 rpm
Start spindle at 600 rpm
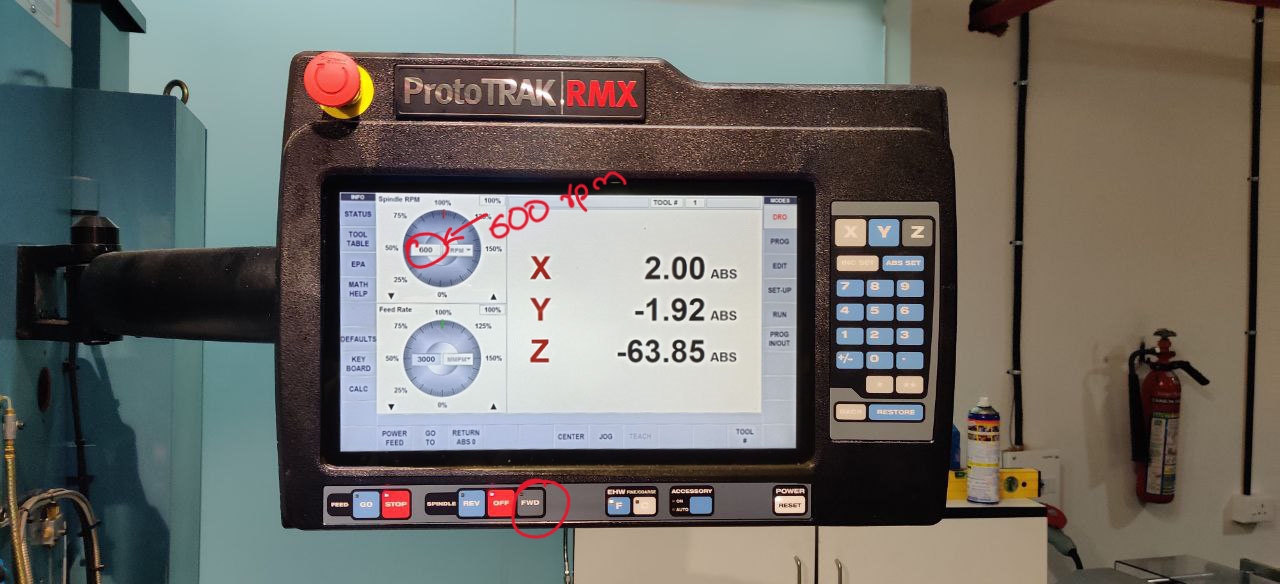 now move the jogs and find the outer most points of the work make sure the edge finder dislocates at the edge bring it 10um back to the original point
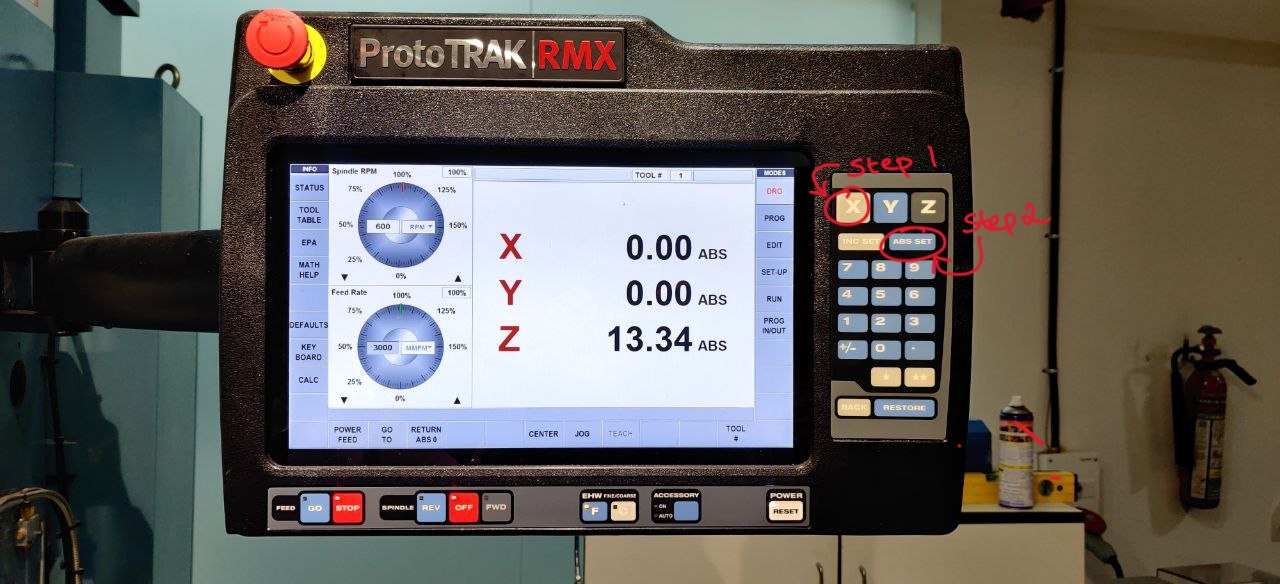 Do the same for Y axis to set orgin. While for Z axis we need to use the tool which we are suppose to use in the program and press it against the top of work piece and press the Z button then set absolute button.
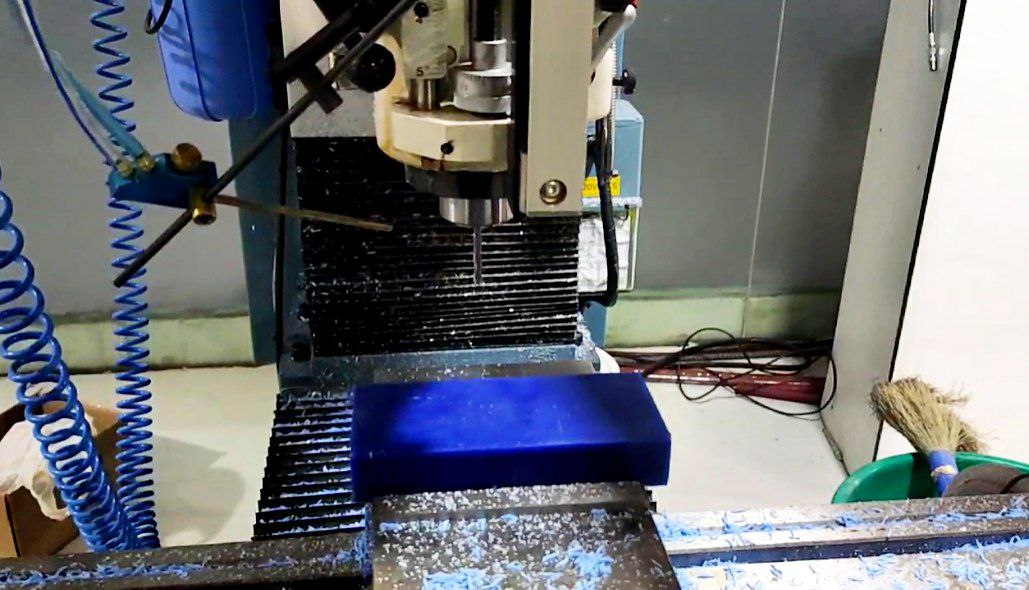
Running G-Code for Milling
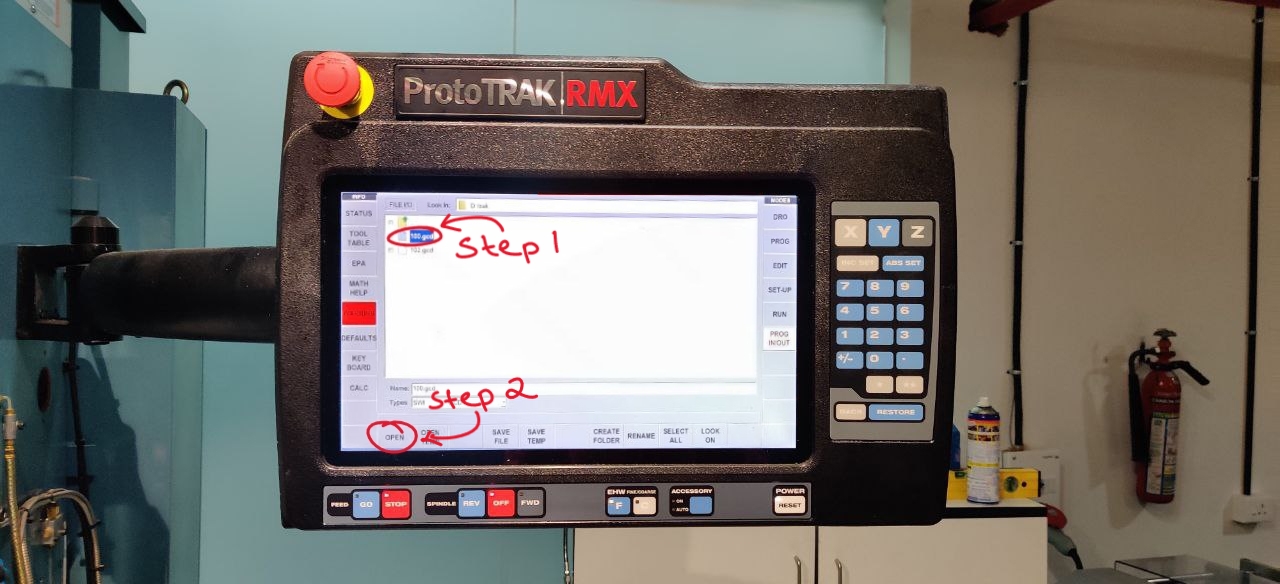
- Importing the Program
Press program In/Out(Fig.1 on slider) > Select G-Code file(Fig.2 on slider) > Now click OPEN -
Running the Program on Tracking
In the RUN window click on Tracking > as we are using CCW bit Press Spindle REV > Press GO Rotate the jog wheel to manually feed the machine (Rotate CW to advance in G-Code rotate CCW to travel backward in G-Code) if everything is okay press STOP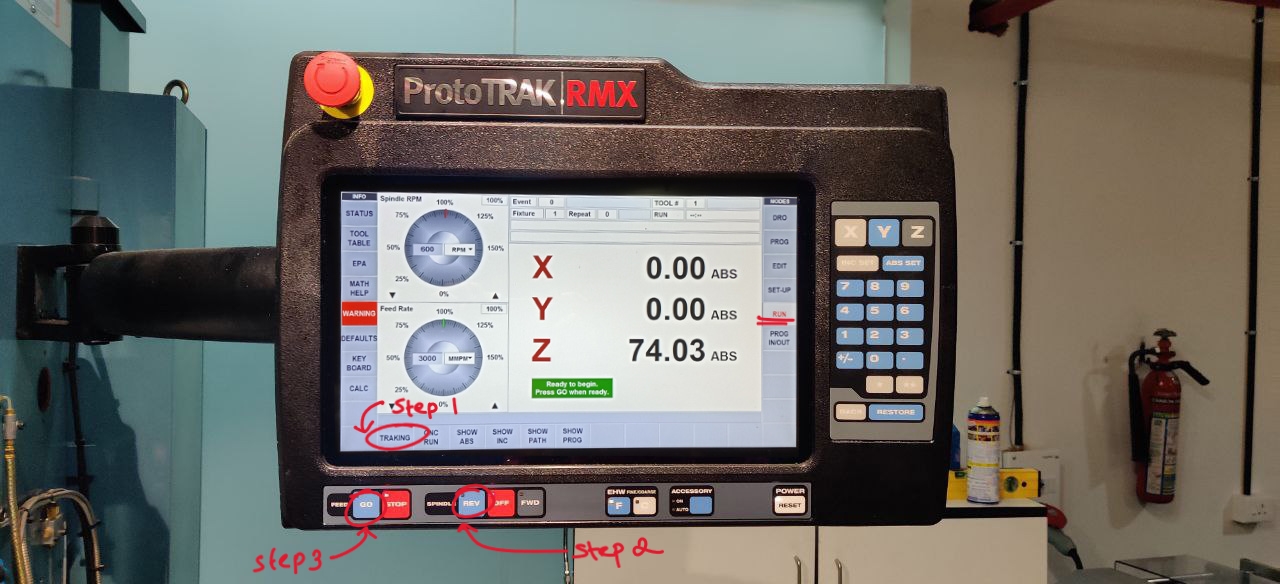
-
Running the Program on CNC RUN
Press CNC Run > Press GO and we can press SHOW PATH to view tool path on display.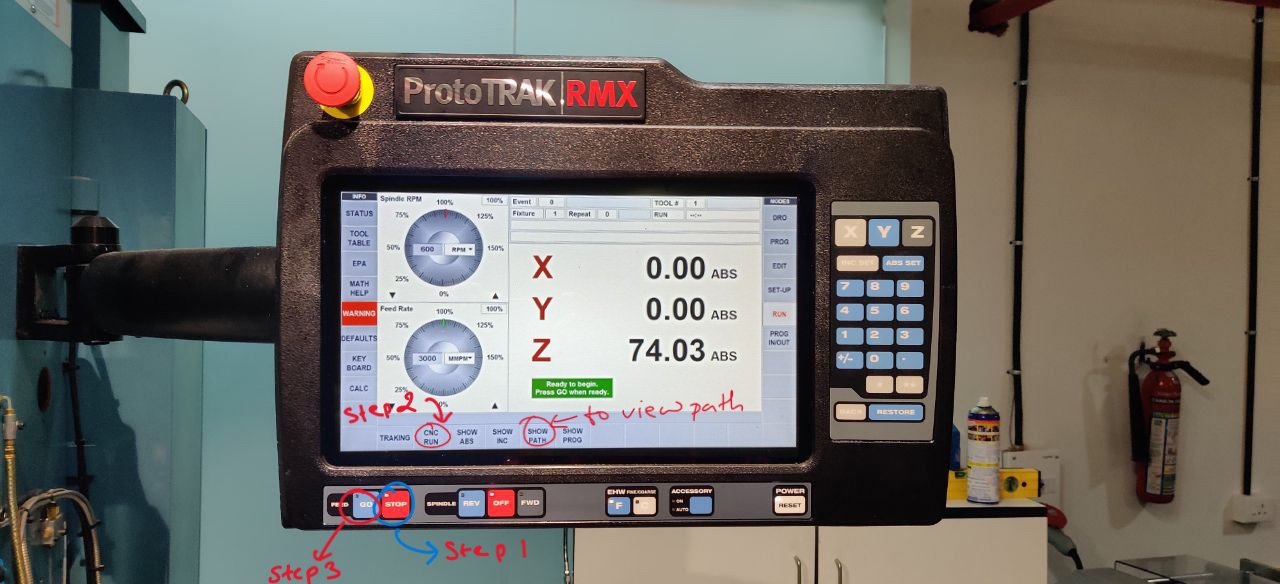
- Tool was changed to 6 mm ball endmill for finishing pass and above mentioned procedures were repeated.
.jpg)
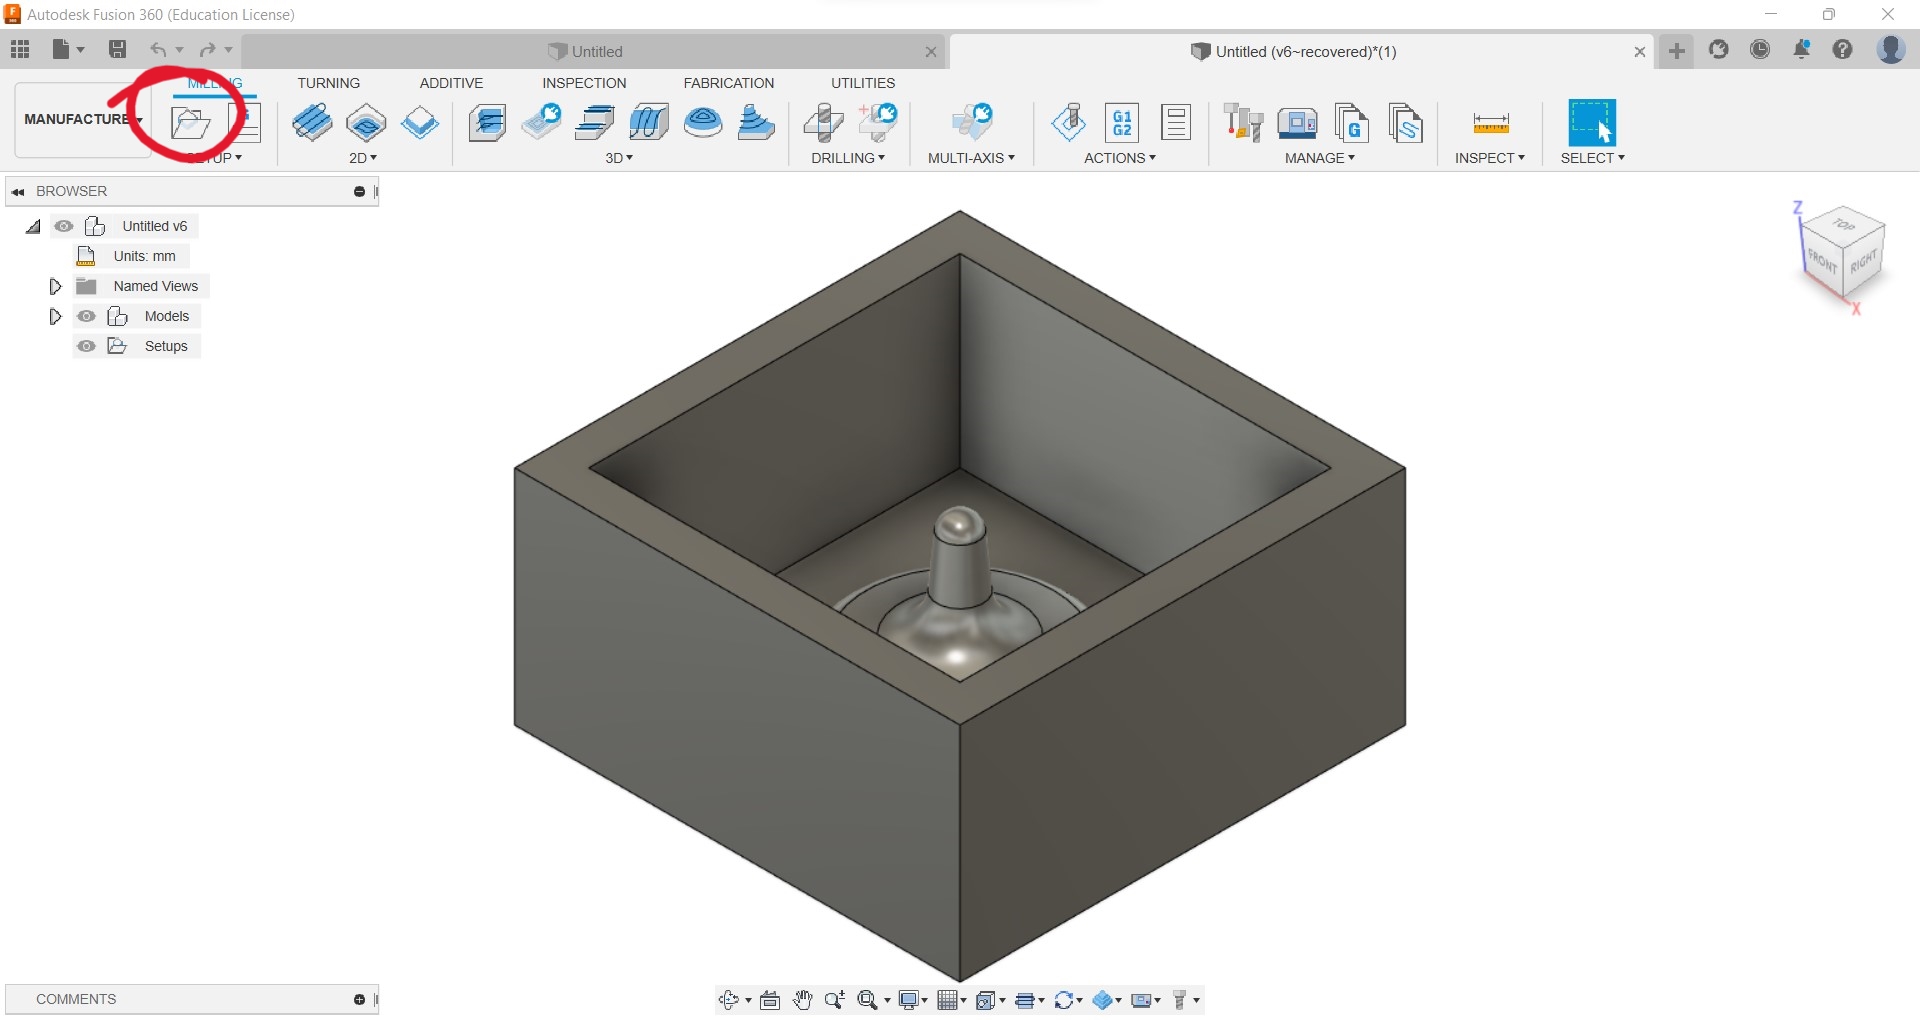
Output
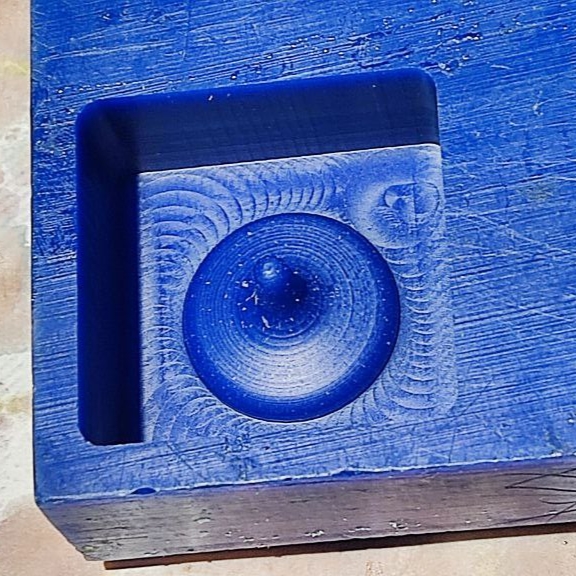
This is the milled output I got.
Molding and Casting
-
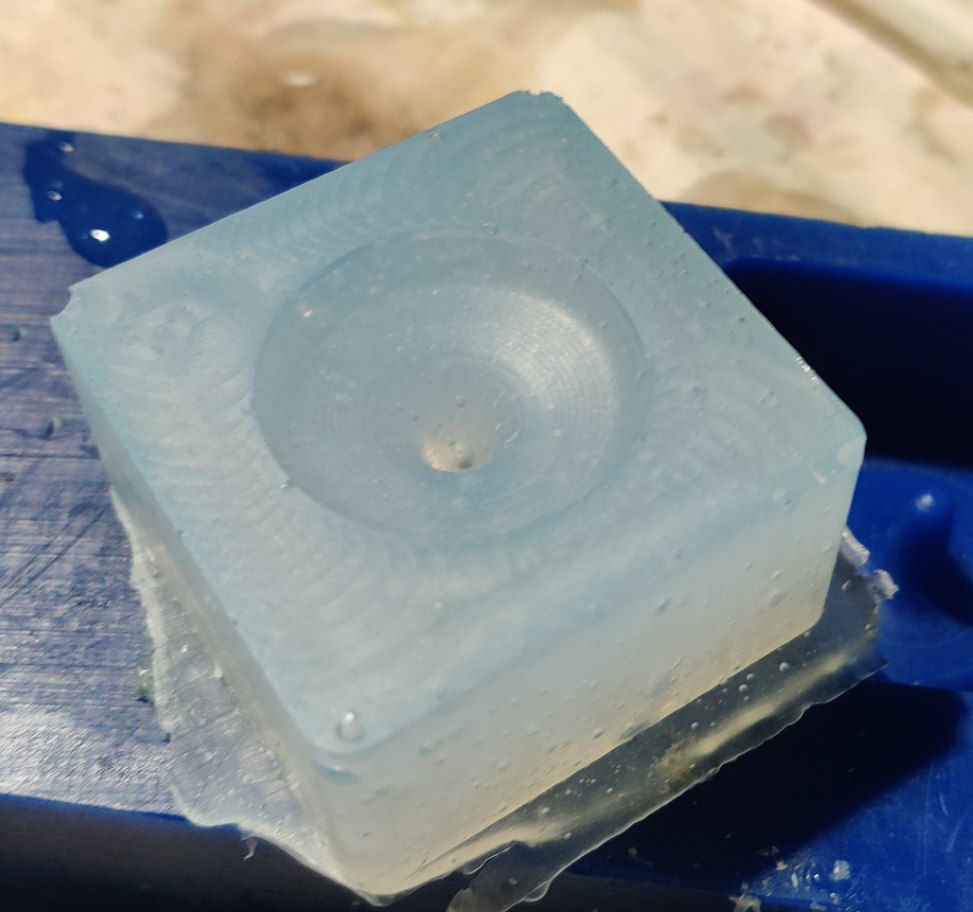
For Making mold I used SORTA-Clear™ 37 at first, I calculate the volume for mixing by taking water in the milled negative mold and pouring it into 2 glass and leveling it equally and mark a level. Checked the proportion for mixing the parts in datasheet (1A:1B).Remove the water and pour parts A and B in different glasses up to the level marking. Mix both parts thoroughly. pour it to the negative mold.
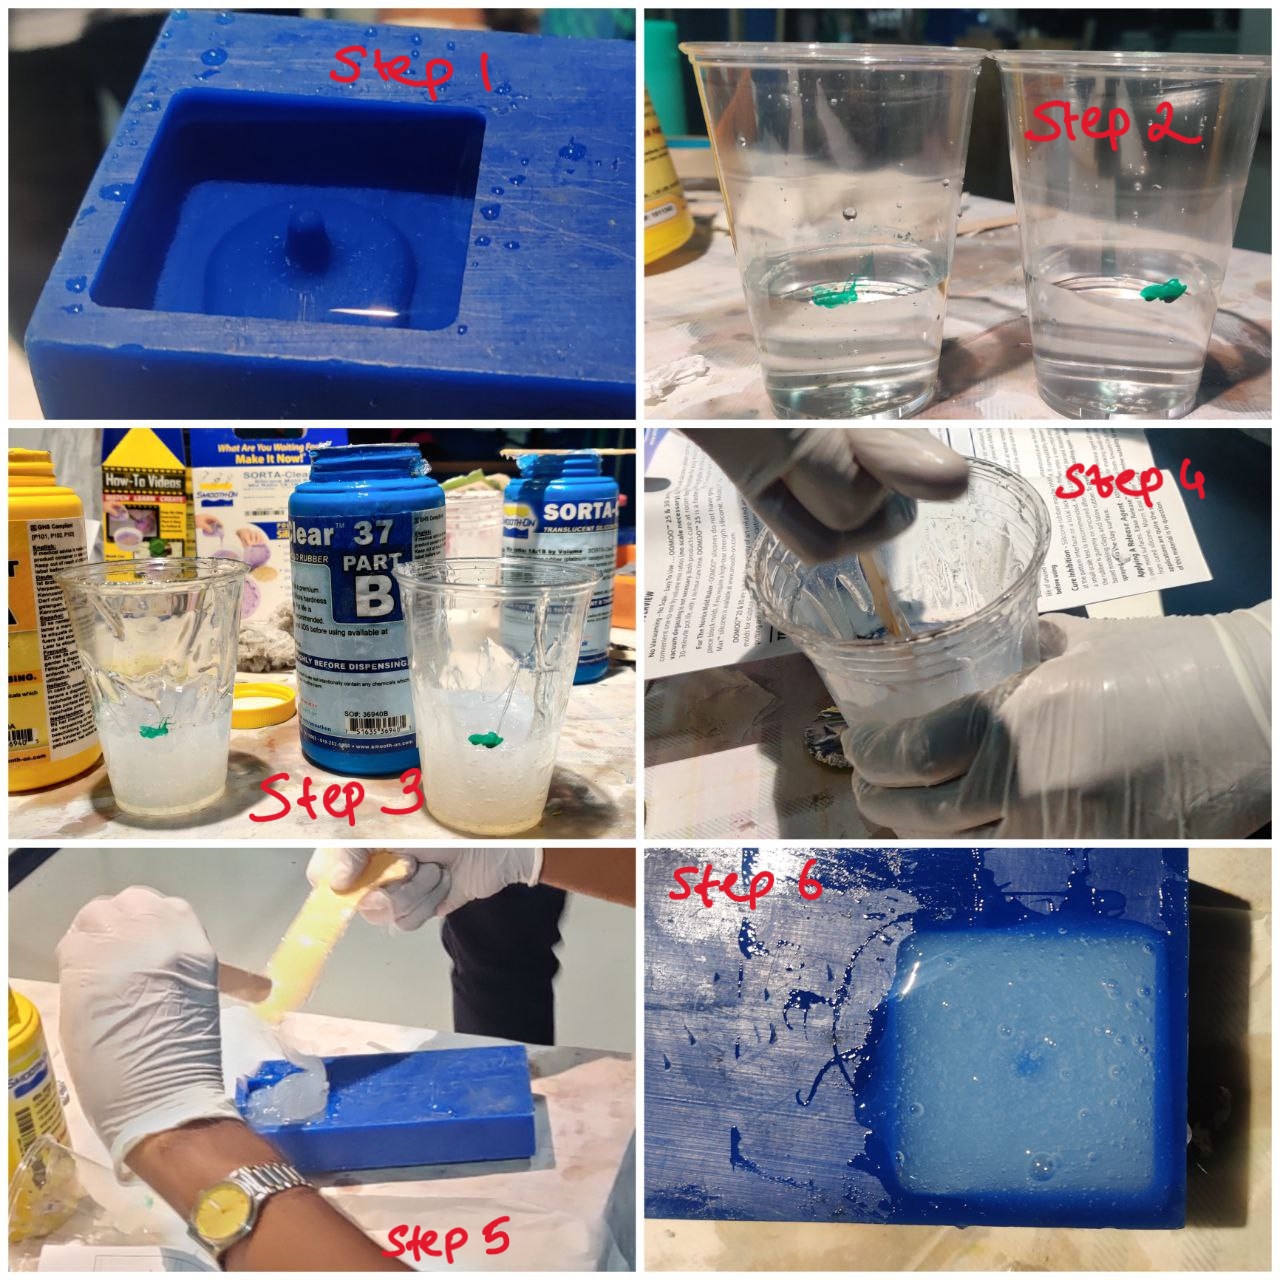 Wait for 24 hours i got a result like this.
-
For casting I used Smooth-Cast™ 305 same procedures mentioned above was done Measuring, Mixing.
.jpg) After mixxing thoroughly. Pour it to the mold prepared earlier. Wait for like around 3-4 hours. then remove the cast out of the mold
After mixxing thoroughly. Pour it to the mold prepared earlier. Wait for like around 3-4 hours. then remove the cast out of the mold
.jpg) this will be easy as we had made a flexible mold.
this will be easy as we had made a flexible mold.