12. Output devices
Objectives
Individual
- Add an output device to a microcontroller board designed by me, and program it to do something
Group (To redirect to group assigment page Click here)
- measure the power consumption of an output device.
RGB LED
Before I get into all of the programs and everything, I built another PCB with a switch and an RGB LED for fun. The footprint for the bord and schematics are given below.
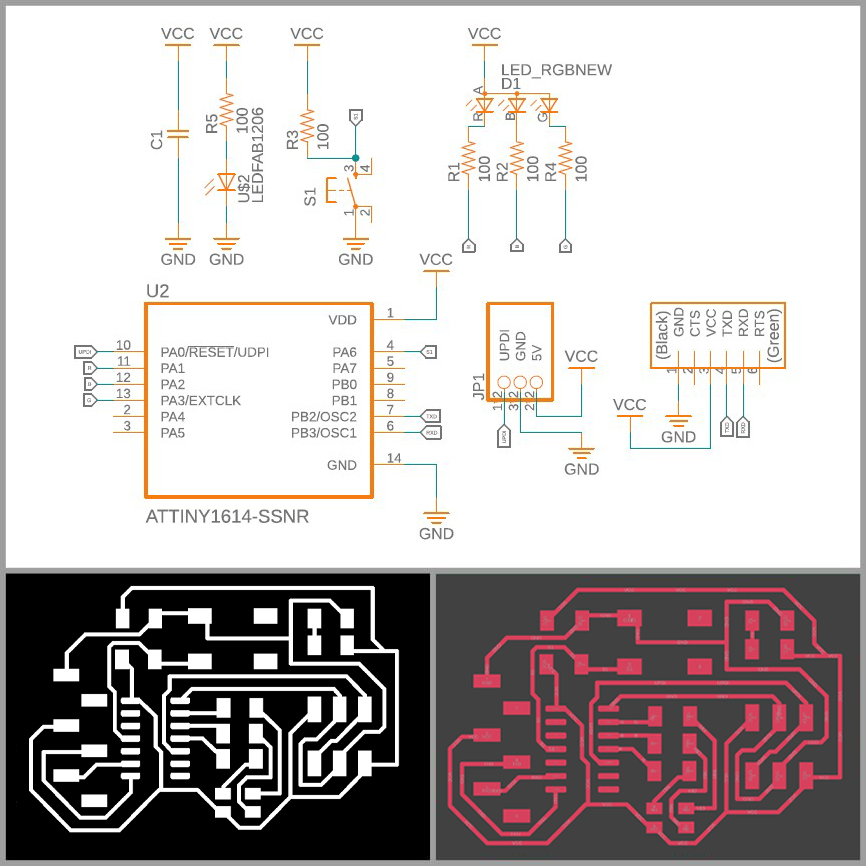
for downloading file Click here
Components used
| SI.No | Device | Value | QTY |
| 1 | CAPASITOR | 1uf | 1 |
| 2 | LED | RGB | 1 |
| 3 | 03X2-CONNECTION PINHEAD-SMD | 1 | |
| 4 | RESISTOR | 499k | 5 |
| 5 | TACTILE_SWITCH_6MM6MM | 1 | |
| 6 | 06_CONNECTION-HEADER_2SIDE | 1 | |
| 7 | LED | RED | 1 |
| 8 | ATTINY1614 | 1 |
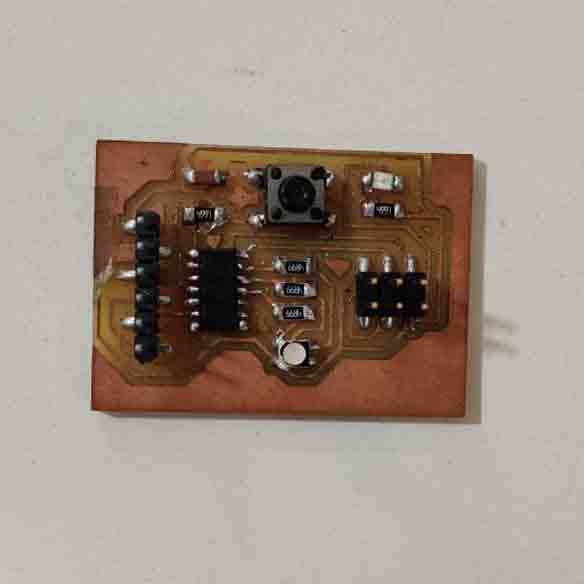
- Now it's time to have some fun with the RGB light. Click here to learn more about the milling and soldering processes.This was the end outcome of my work.
//I completely forget where I got this code, so am sorry for not providing credit. const byte COLOR_BLACK = 0b000; const byte COLOR_RED = 0b100; const byte COLOR_GREEN = 0b010; const byte COLOR_BLUE = 0b001; const byte COLOR_MAGENTA = 0b101; const byte COLOR_CYAN = 0b011; const byte COLOR_YELLOW = 0b110; const byte COLOR_WHITE = 0b111; const byte PIN_LED_R = 8; const byte PIN_LED_G = 10; const byte PIN_LED_B = 9; void setup() { pinMode(PIN_LED_R, OUTPUT); pinMode(PIN_LED_G, OUTPUT); pinMode(PIN_LED_B, OUTPUT); displayColor(COLOR_BLACK); } void loop() { displayColor(COLOR_RED); delay(1000); displayColor(COLOR_GREEN); delay(1000); displayColor(COLOR_BLUE); delay(1000); displayColor(COLOR_MAGENTA); delay(1000); displayColor(COLOR_CYAN); delay(1000); displayColor(COLOR_YELLOW); delay(1000); displayColor(COLOR_WHITE); delay(1000); } void displayColor(byte color) { digitalWrite(PIN_LED_R, !bitRead(color, 2)); digitalWrite(PIN_LED_G, !bitRead(color, 1)); digitalWrite(PIN_LED_B, !bitRead(color, 0)); } - Random colors in RGB LED
int rr_light_pin = 8; int rg_light_pin = 10; int rb_light_pin = 9; int buttonPin = 2; void setup() { pinMode(rr_light_pin, OUTPUT); pinMode(rg_light_pin, OUTPUT); pinMode(rb_light_pin, OUTPUT); pinMode(buttonPin, INPUT_PULLUP); } void loop() { analogWrite(rr_light_pin, random(255)); analogWrite(rg_light_pin, random(255)); analogWrite(rb_light_pin, random(255)); delay(1000);; } - Button to control the RGB LED
int rr_light_pin = 8; int rg_light_pin = 10; int rb_light_pin = 9; int buttonPin = 2; long rr,rb,rg; void setup() { pinMode(rr_light_pin, OUTPUT); pinMode(rg_light_pin, OUTPUT); pinMode(rb_light_pin, OUTPUT); pinMode(buttonPin, INPUT_PULLUP); } void loop() { if (digitalRead(buttonPin) == LOW ) { rr = random(255); rg = random(255); rb = random(255); color(rr,rg,rb); delay(1000);; } } void color(int rr, int rg, int rb) { analogWrite(rr_light_pin, rr); analogWrite(rg_light_pin, rg); analogWrite(rb_light_pin, rb); } - Using serial port for controlling RGB LED
int red_light_pin = 8;
int green_light_pin = 10;
int blue_light_pin = 9;
const byte inPin = 2;
const int buttonPin = 2;
long rr, rb, rg;
String readSerial;
String del = " | ";
void setup()
{
  Serial.begin(9600);
  pinMode(red_light_pin, OUTPUT);
  pinMode(green_light_pin, OUTPUT);
  pinMode(blue_light_pin, OUTPUT);
  pinMode(buttonPin, INPUT_PULLUP);
}
void loop()
{


  if (Serial.available() > 0)
  {
    readSerial = Serial.readString();
    String readSerial1 = readSerial.substring(0, 2);
    String readSerial2 = readSerial.substring(2, 4);
    String readSerial3 = readSerial.substring(4, 6);

rr = strtol(readSerial1.c_str(), NULL, 16);
rg = strtol(readSerial2.c_str(), NULL, 16);
rb = strtol(readSerial3.c_str(), NULL, 16);

  analogWrite(red_light_pin, (255-rr));
  analogWrite(green_light_pin, (255-rg));
  analogWrite(blue_light_pin, (255-rb));
  }
Serial.flush();
}
SERVO MOTOR
- Running a servo motor I thought it will be cool if the servo runs with RGB LED changing color after each cycle
int rr_light_pin = 8; int rg_light_pin = 10; int rb_light_pin = 9; int buttonPin = 2; #includeServo myservo; int pos = 0; void setup() { pinMode(rr_light_pin, OUTPUT); pinMode(rg_light_pin, OUTPUT); pinMode(rb_light_pin, OUTPUT); pinMode(buttonPin, INPUT_PULLUP); myservo.attach(4); } void loop() { for (pos = 0; pos <= 180; pos += 1) { myservo.write(pos); delay(15); } analogWrite(rr_light_pin, random(255)); analogWrite(rg_light_pin, random(255)); analogWrite(rb_light_pin, random(255)); delay(1000);; for (pos = 180; pos >= 0; pos -= 1) { myservo.write(pos); delay(15); } } - Running a servo motor with a push button input.
#includeServo myservo; int servoPin = 4; int pushButtonPin =2; int angle =25; int angleStep =5; void setup() { myservo.attach(servoPin); pinMode(pushButtonPin,INPUT_PULLUP); } void loop() { while(digitalRead(pushButtonPin) == LOW){ angle = angle + angleStep; if (angle <= 0 || angle >= 180) { angleStep = -angleStep; } myservo.write(angle); delay(100); } }
SPEAKER
-
I wanted to play some music using a speaker as an output device. Connecting the speaker to the bored was simple; one pin was connected as the output pin and the other was connected to ground. I started by making a beep sound by refering Programming Electronics Academy's USE TONE() WITH ARDUINO FOR AN EASY WAY TO MAKE NOISE page
//A sketch to demonstrate the tone() function //Specify digital pin on the Arduino that the positive lead of piezo buzzer is attached. int piezoPin = 2; void setup() { }//close setup void loop() { /*Tone needs 2 arguments, but can take three 1) Pin# 2) Frequency - this is in hertz (cycles per second) which determines the pitch of the noise made 3) Duration - how long teh tone plays */ tone(piezoPin, 1000, 500); //tone(piezoPin, 1000, 500); delay(1000); } -
I considered creating an amplifier after discovering that the sounds were not clear enough and were too low in volume.
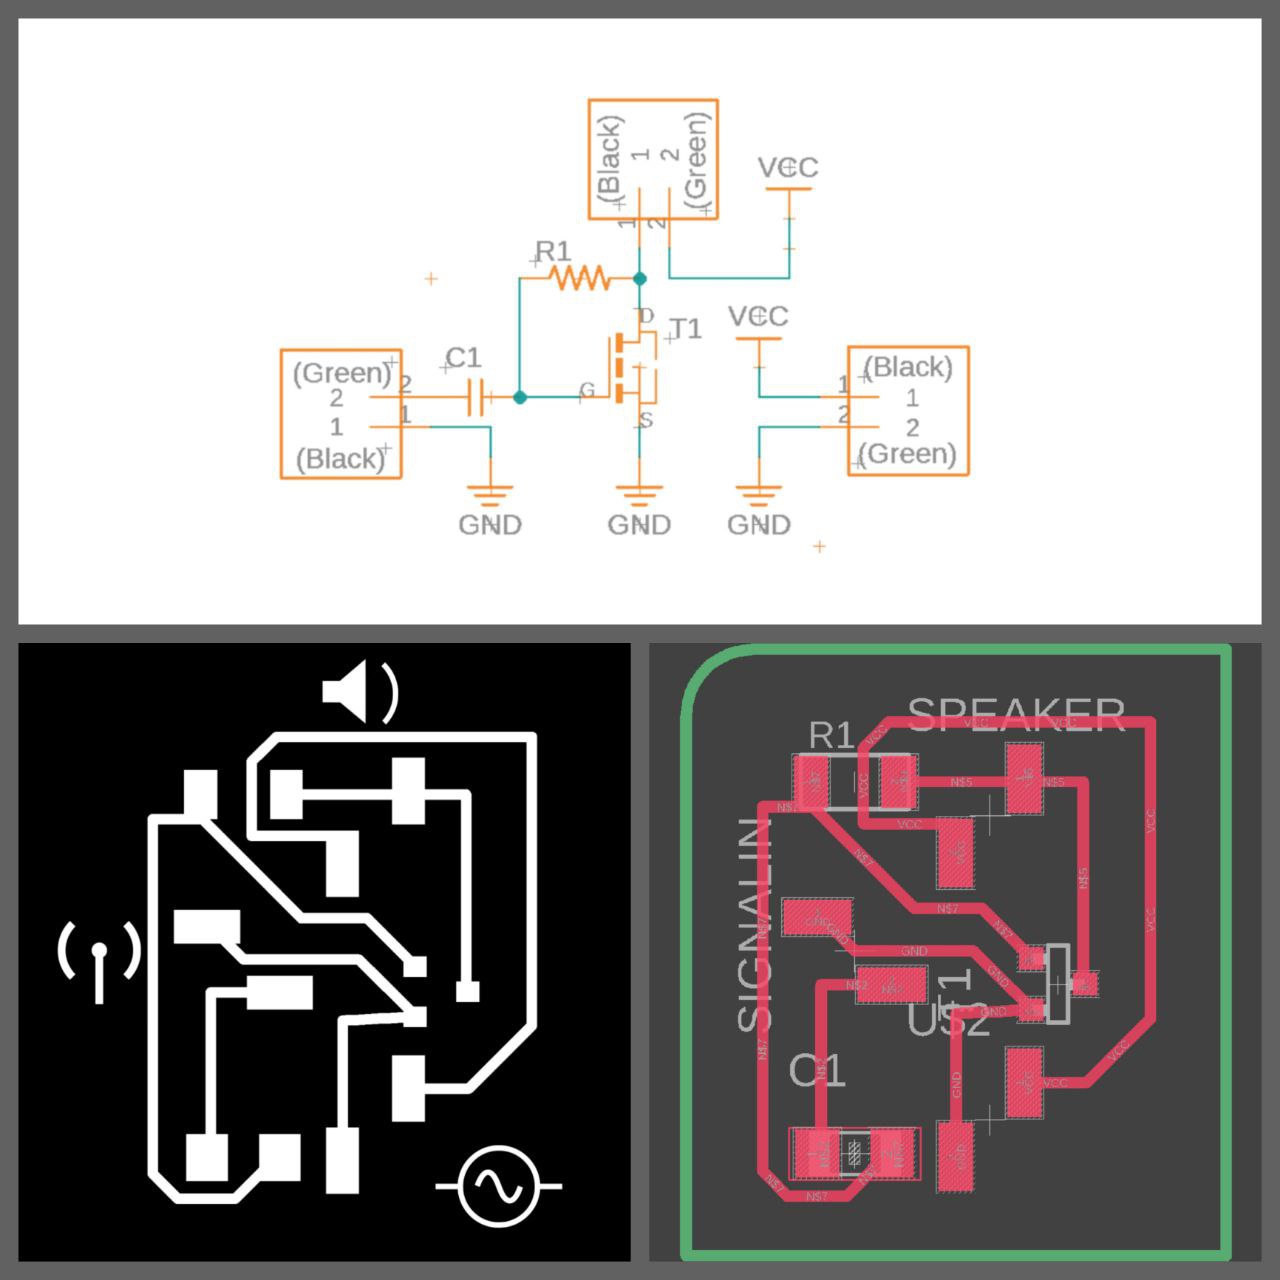 for downloading file Click here
Click here to learn more about the milling and soldering processes.This was the end outcome of my work.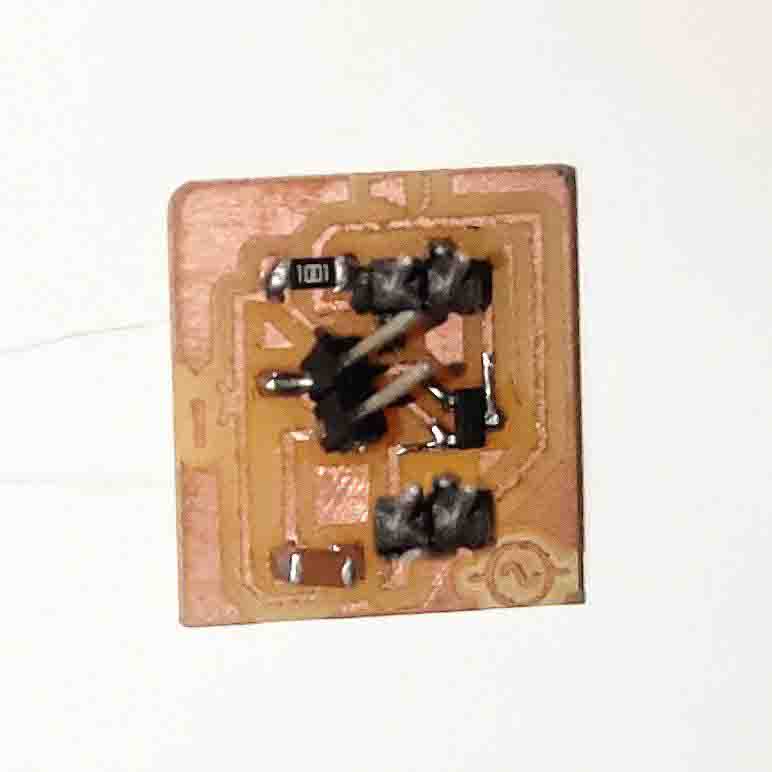
-
how about playing a song now, I used the below mentioned code to play my first song.
// * Twinkle Twinkle Little Star // * Original Composition : // * Composed by : (cleft) 2005 D. Cuartielles for K3 // * Coded By GitHub User @baojie - https://gist.github.com/baojie/4522173 // * Use BSD Clause 2 License for Distribution // * Collection by GitHub User @abhishekghosh - https://github.com/AbhishekGhosh/Arduino-Buzzer-Tone-Codes int speakerPin = 10; int length = 15; // the number of notes //twinkle twinkle little star char notes[] = "ccggaag ffeeddc ggffeed ggffeed ccggaag ffeeddc "; // a space represents a rest int beats[] = { 1, 1, 1, 1, 1, 1, 2, 1, 1, 1, 1, 1, 1, 2, 4 }; int tempo = 1000; void playTone(int tone, int duration) { for (long i = 0; i < duration * 1000L; i += tone * 2) { digitalWrite(speakerPin, HIGH); delayMicroseconds(tone); digitalWrite(speakerPin, LOW); delayMicroseconds(tone); } } void playNote(char note, int duration) { char names[] = { 'c', 'd', 'e', 'f', 'g', 'a', 'b', 'C' }; int tones[] = { 1915, 1700, 1519, 1432, 1275, 1136, 1014, 956 }; // play the tone corresponding to the note name for (int i = 0; i < 8; i++) { if (names[i] == note) { playTone(tones[i], duration); } } } void setup() { pinMode(speakerPin, OUTPUT); } void loop() { for (int i = 0; i < length; i++) { if (notes[i] == ' ') { delay(beats[i] * tempo); // rest } else { playNote(notes[i], beats[i] * tempo); } // pause between notes delay(tempo / 2); } } -
After some additional browsing, I discovered a way to make notes on my own, from arduino.cc However, there is relatively little information on how to read sheet music and convert it accordingly. I edited the codes from the website to a more understandable form and made it as a library Click Here to downlod the library
What is in the Library
Normally a piano is divided into Octaves. Octaves are musical intervals between two notes that have the same name but have twice the frequency as the former note.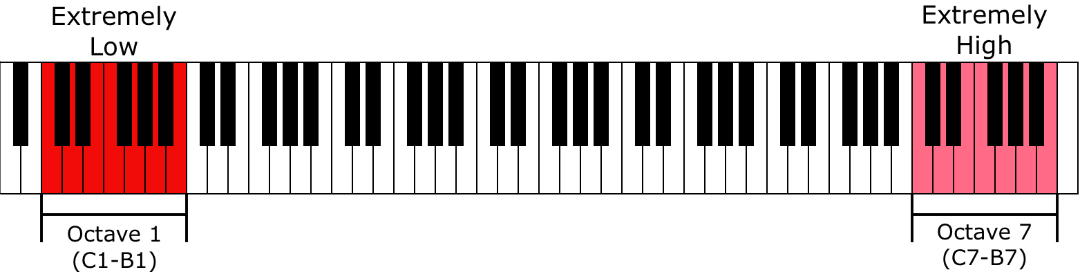 ie. each musical notes have diffent frequency here in the below given image there are 2 keys named C, here the frequency of the 2nd C is twice that of the first one. distance span between those two Cs are eight.The 'oct-' in octave is derived from a Latin prefix that means 'eight.' That is where the term "octave" comes from.
 so to make it simple i defined the frequency for the notes in the library from C1 to C8 as mentioned below.
#define C1  33
#define CS1 35
#define D1  37
#define DS1 39
#define E1  41
#define F1  44
#define FS1 46
#define G1  49
#define GS1 52
#define A1  55
#define AS1 58
#define B1  62
#define C2  65
#define CS2 69
#define D2  73
#define DS2 78
#define E2  82
#define F2  87
#define FS2 93
#define G2  98
#define GS2 104
#define A2  110
#define AS2 117
#define B2  123
#define C3  131
#define CS3 139
#define D3  147
#define DS3 156
#define E3  165
#define F3  175
#define FS3 185
#define G3  196
#define GS3 208
#define A3  220
#define AS3 233
#define B3  247
#define C4  262
#define CS4 277
#define D4  294
#define DS4 311
#define E4  330
#define F4  349
#define FS4 370
#define G4  392
#define GS4 415
#define A4  440
#define AS4 466
#define B4  494
#define C5  523
#define CS5 554
#define D5  587
#define DS5 622
#define E5  659
#define F5  698
#define FS5 740
#define G5  784
#define GS5 831
#define A5  880
#define AS5 932
#define B5  988
#define C6  1047
#define CS6 1109
#define D6  1175
#define DS6 1245
#define E6  1319
#define F6  1397
#define FS6 1480
#define G6  1568
#define GS6 1661
#define A6  1760
#define AS6 1865
#define B6  1976
#define C7  2093
#define CS7 2217
#define D7  2349
#define DS7 2489
#define E7  2637
#define F7  2794
#define FS7 2960
#define G7  3136
#define GS7 3322
#define A7  3520
#define AS7 3729
#define B7  3951
#define C8  4186
#define END -1
Playing a custom music
now during programming we can directly use any of the difined keywords make a note with a spesific frequency. So I tried writing a code for playing one of my favorite song k'naan wavin flag#include"pitch.h" int melody[] = { E4, C4, D4, E4, C4, C4, G4, F4, E4, D4, E4, C4, D4, E4, D4, 0, E4, C4, D4, E4, C4, C4, G4, F4, E4, D4, E4, C4, D4, E4, D4, 0, E4, D4, E4, D4, C4, 0, A3, C4, A3, G3, 0, E4, E4, G4, G4, 0, D4, D4, E4, D4, C4, 0, E4, D4, E4, D4, C4, 0, A3, C4, A3, G3, 0, E4, E4, G4, G4, 0, D4, D4, E4, D4, C4, 0, C4, C4, C4, E4, G4, A4, 0, A4, A4, A4, A4, A4, G4, E4, D4, 0, C4, C4, C4, C4, C4, E4, E4, G4, A4, 0, A4, A4, A4, A4, A4, G4, G4, E4, D4, 0, F4, E4, D4, C4, 0, C4, C4, D4, E4, D4, C4, F4, F4, F4, E4, D4, E4, E4, E4, D4, C4, D4, D4, E4, D4, C4, B3, C4, C4, D4, E4, D4, C4, F4, F4, F4, E4, D4, E4, E4, E4, D4, C4, D4, D4, E4, D4, C4, B3, C4, C4, D4, B3, C4, C4, D4, B3, C4, C4, D4, B3, C4, 0, END }; // note durations: 8 = quarter note, 4 = 8th note, etc. int noteDurations[] = { //duration of the notes 4, 4, 4, 2, 2, 2, 2, 2, 2, 2, 4, 4, 4, 2, 8, 1, 4, 4, 4, 2, 8, 2, 2, 2, 2, 2, 4, 4, 4, 2, 12, 6, 4, 2, 2, 2, 4, 1, 4, 2, 4, 4, 1, 4, 2, 4, 4, 1, 4, 2, 2, 2, 4, 1, 4, 2, 2, 2, 4, 1, 4, 2, 4, 4, 1, 4, 2, 4, 4, 1, 4, 2, 2, 2, 4, 1, 2, 4, 2, 4, 4, 8, 1, 2, 2, 4, 2, 2, 2, 4, 6, 1, 2, 2, 4, 2, 2, 2, 2, 2, 6, 1, 2, 2, 4, 2, 2, 2, 2, 2, 6, 1, 2, 2, 2, 4, 1, 2, 4, 2, 2, 2, 4, 2, 4, 2, 4, 4, 2, 4, 2, 4, 4, 2, 4, 2, 2, 2, 4, 2, 4, 2, 2, 2, 4, 2, 4, 2, 4, 4, 2, 4, 2, 4, 4, 2, 4, 2, 2, 2, 4, 6, 2, 4, 4, 6, 2, 4, 4, 6, 2, 4, 4, 8, 1, }; int speed = 90; //higher value, slower notes void setup() { delay(5000); } void loop() { Serial.begin(9600); for (int thisNote = 0; melody[thisNote] != -1; thisNote++) { int noteDuration = speed * noteDurations[thisNote]; tone(4, melody[thisNote], noteDuration * .95); Serial.println(melody[thisNote]); delay(noteDuration); noTone(4); } }How to write your own music notes
So normally we can easly get sheet music from internet like the one below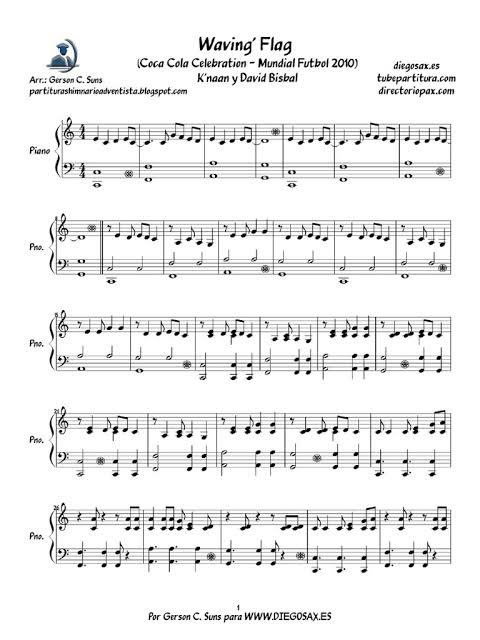 So for illustration we will be concidering a small part from the song
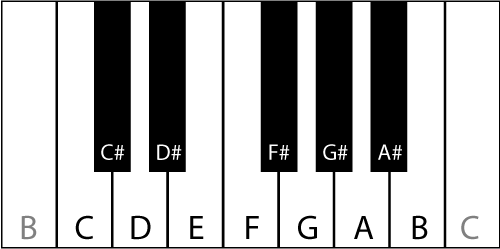
 Firstly we can learn what symbol denote what in the music sheet.
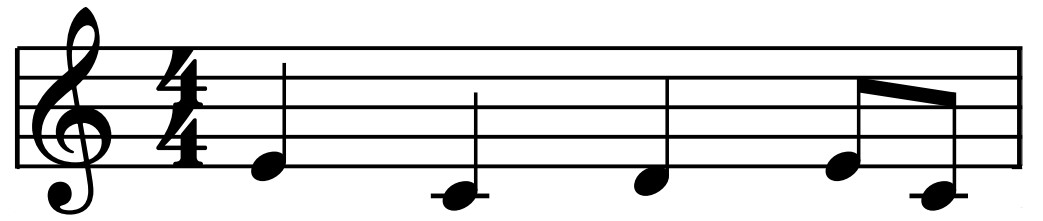
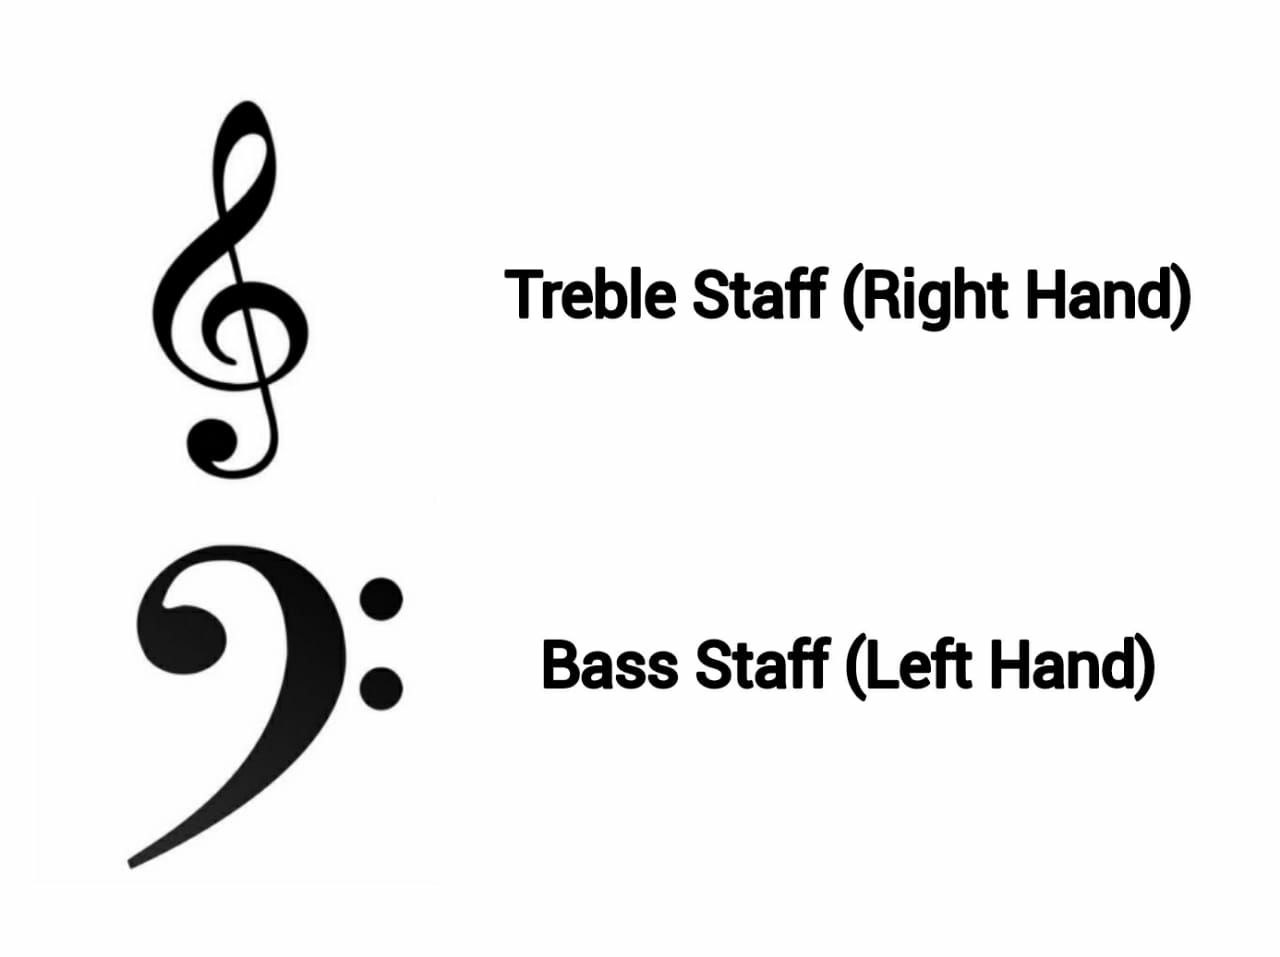 The treble clef symbol is usually shows the notes that should be played by right hand, whereas bass clef symbol is all about the codes with left hand. here we will be concentrating more on right hand as we are playing that.
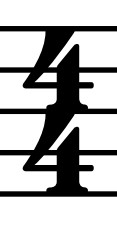 This is called a time signature. It indicates the number of beats. Every time signature includes two digits that are placed one on top of the other. The number of beats is indicated by the top note. The bottom number represents the full value.
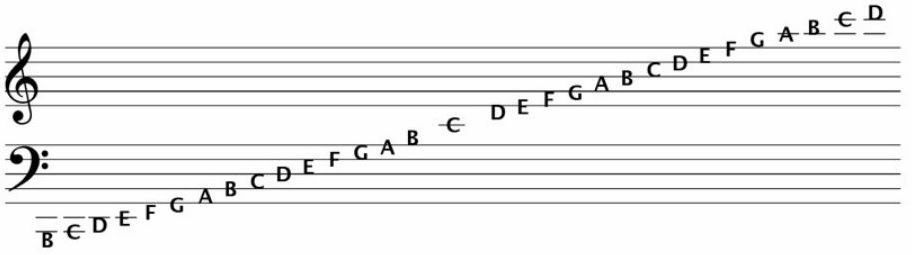
Now lets look how each notes are represented in the sheet. in the image you can see where the notes will be placed.
 so knowing this we can start writing the first part of the code the array melody[] can be defined
We can see from the images that
so knowing this we can start writing the first part of the code the array melody[] can be defined
We can see from the images thatint melody[] = { E4, C4, D4, E4, C4, }- The 1st note is E and it is in 4th Octave
- The 2nd note is C and it is in 4th Octave
- The 3ed note is D and it is in 4th Octave
- The 4th note is E and it is in 4th Octave
- The 5th note is C and it is in 4th Octave
.jpg) for second part of the code the array noteDurations[] can be defined
We can see from the images that
for second part of the code the array noteDurations[] can be defined
We can see from the images thatint noteDurations[] = { 4, 4, 4, 2, 2, }- The 1st note is 1 beat according to program it corresponds to 4
- The 2st note is 1 beat ie. 4
- The 3ed note is 1 beat ie. 4
- The 4th note is 1/2 beat according to program it corresponds to 8
- The 5th note is 1/2 beat ie. 8
HAVE FUN!!!
Special thanks to my friend Irene Prakash for her great informations about music sheets.
Group Assignment
For group assignment, it was to find power consumption of output devices. We attempted to determine the servo motor’s power usage. For this, I used the following script to see the current difference and then calculate the power consumption.
#include

Servo myservo;

int angle = 0;

void setup() {

myservo.attach(2);

}

void loop() {
for (angle = 0; angle <= 180; angle += 1) {
myservo.write(angle);
delay(20);
}
delay(100);
for ( angle = 180; angle >= 0; angle -= 1) {
myservo.write(angle);
delay(20);
}
}
Then the current for output device was measured as shown below. For servo motor since the current was fluctuating, I found the mean of the fluctuating current was taken to find the power.
Given V = 5V
Given I = 1A
Fluctuating I = 0.02420A > 0.04635A
Mean I = 0.032145A
Diffrence in I = 0.967855A
Power = V*I = 4.839275W