14. Interface and Application Programming
This week we focused on building applications that communicate with the boards we built in previous weeks. Graphical User interfaces are useful for displaying data in a human readable way. During this week I rewrote some programs for communicating with my boards using Websockets.
Applications
I already built many circuit boards during the Fab Academy but… I also broke some of them… So the boards I have available at this point are: The programmer, the light/temp sensors and the hello.serial board.
Light
This board was built during the output devices week and at that time I used Neil’s python script to display data on my computer.
The script shows data using the Tk graphical user interface toolkit… So I modified Neil’s script to stop using that and send data to the browser using WebSockets.
#!/usr/bin/python

import serial
import asyncio
import datetime
import random
import websockets
from numpy import log
import time

ser = serial.Serial(
port='/dev/ttyUSB0',\
baudrate=9600)
# ser.setDTR()

eps = 0.5 # filter time constant
filter = 0.0 # filtered value

print("connected to: " + ser.portstr)


async def tx(websocket, path):
    line = []
    global filter, eps
    while True:
        #
        # idle routine
        #
        byte2 = 0
        byte3 = 0
        byte4 = 0
        ser.flush()
        try:
            while 1:
               #
               # find framing
               #
               byte1 = byte2
               byte2 = byte3
               byte3 = byte4
               byte4 = ord(ser.read())
               if ((byte1 == 1) & (byte2 == 2) & (byte3 == 3) & (byte4 == 4)):
                  break
            low = ord(ser.read())
            high = ord(ser.read())
            value = 256*high + low
            filter = (1-eps)*filter + eps*value
            print(filter)
            await websocket.send(str(filter))
            await asyncio.sleep(0.05)

        except:
            ser.flush()
            await asyncio.sleep(0.05)
            print('except')

start_server = websockets.serve(tx, "127.0.0.1", 5678)

asyncio.get_event_loop().run_until_complete(start_server)
asyncio.get_event_loop().run_forever()

ser.close()
The code still uses the same Serial comunication logic, but I started a websocket instance to send temperature data to the browser. This is posible thanks to the websocket and asyncio packages.
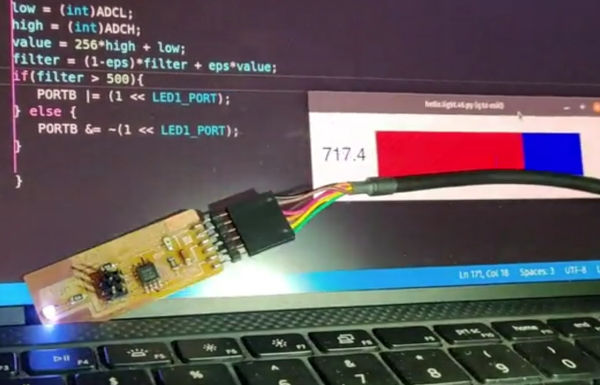
Then, I had to write code for the client side. I consists in a html file with two div elements and a script tag. Inside the script tag I added javascript code to start a websocket client and modify the page appearance depending on the data received.
<script>

  ...

  var ws = new WebSocket("ws://127.0.0.1:5678/")
    ws.onmessage = function (event) {
            content = document.createTextNode(event.data);
            const data = Number(event.data);
            const opacity = data/1000;
            document.getElementById("darkness").style.opacity = `${opacity}`;
    };

</script>
This script basically updates the opacity of a dark element in the web page depending on the data received from the light sensor. If there is low light in the environment, the dark element has high opacity. Otherwise, the dark element has low opacity and a secret image is revealed.
Temp
Similarly, I modified Neil’s python script for temp sensor to start using websockets:
import serial
import asyncio
import datetime
import random
import websockets
from numpy import log
import time

ser = serial.Serial(
port='/dev/ttyUSB0',\
baudrate=9600)
# ser.setDTR()

eps = 0.5 # filter time constant
filter = 0.0 # filtered value

print("connected to: " + ser.portstr)


async def tx(websocket, path):
    line = []
    global filter, eps
    while True:
        #
        # idle routine
        #
        byte2 = 0
        byte3 = 0
        byte4 = 0
        ser.flush()
        try:
            while 1:
                #
                # find framing
                #
                byte1 = byte2
                byte2 = byte3
                byte3 = byte4
                s = ser.read()
                print(s)
                byte4 = ord(s) if s else 0
                if ((byte1 == 1) & (byte2 == 2) & (byte3 == 3) & (byte4 == 4)):
                    break
            low = ord(ser.read())
            high = ord(ser.read())
            value = 256*high + low
            if (value > 511):
                value -= 1024
            V = 2.5 - value*5.0/(20.0*512.0)
            R = 10000.0/(5.0/V-1.0)
            # NHQ103B375R5
            # R25 10000 (O)
            # B (25/85) 3750 (K)
            # R(T(C)) = R(25)*exp(B*(1/(T(C)+273.15)-(1/(25+273.15))))
            B = 3750.0
            R25 =  10000.0
            T = 1.0/(log(R/R25)/B+(1/(25.0+273.15))) - 273.15
            filter = (1-eps)*filter + eps*T
            print(filter)
            await websocket.send(str(filter))
            await asyncio.sleep(0.05)

        except:
            ser.flush()
            await asyncio.sleep(0.05)
            print('except')

start_server = websockets.serve(tx, "127.0.0.1", 5678)

asyncio.get_event_loop().run_until_complete(start_server)
asyncio.get_event_loop().run_forever()

ser.close()
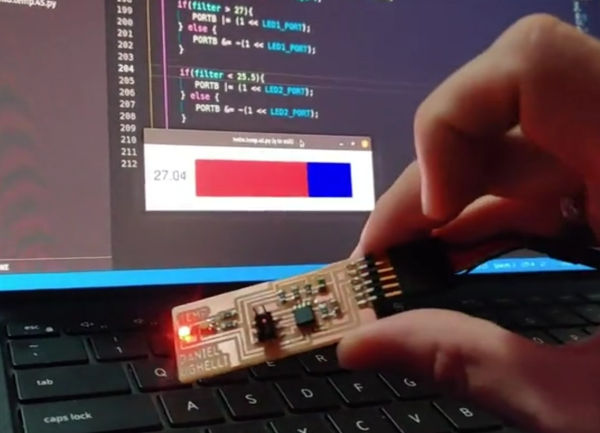
This code follows the same structure of the code I shown in the light sensor section. However, the client code is slighty different, because I adapted a code written by Matt Magoffin’s that uses a data visualization library called D3.js.
<script>
function onDocumentReady() {
    var powerGauge = gauge('#power-gauge', {
        size: 500,
        clipWidth: 500,
        clipHeight: 500,
        ringWidth: 60,
        maxValue: 30,
        transitionMs: 4000,
    });
    powerGauge.render();


    var ws = new WebSocket("ws://127.0.0.1:5678/");
    ws.onmessage = function (event) {
            content = document.createTextNode(event.data);
            powerGauge.update(event.data);
    };

}

if ( !window.isLoaded ) {
    window.addEventListener("load", function() {
        onDocumentReady();
    }, false);
} else {
    onDocumentReady();
}
</script>
To update Matt’s visualization with the temperature sensor data I initializad a Websocket instance and added handler to call the update method of his component each time data is received.
Button
During the Embedded Programming week I used my hello.echo board to send data over serial every time the button was pressed. I used the Web Serial API to receive the data directly on the browser. The main downside of this method is that the Web Serial API only works on Chrome.
This week I decided to rewrite this code using Websockets. This time I wrote code in NodeJS for the websocket server:
const { SerialPort } = require('serialport')
const { ReadlineParser } = require('@serialport/parser-readline')
const WebSocket = require('ws');
const wss = new WebSocket.Server({ port: 7071 });
const clients = new Map();

function uuidv4() {
  return 'xxxxxxxx-xxxx-4xxx-yxxx-xxxxxxxxxxxx'.replace(/[xy]/g, function(c) {
    var r = Math.random() * 16 | 0, v = c == 'x' ? r : (r & 0x3 | 0x8);
    return v.toString(16);
  });
}


wss.on('connection', (ws) => {
  const id = uuidv4();
  const color = Math.floor(Math.random() * 360);
  const metadata = { id, color };

  clients.set(ws, metadata);
});

wss.on("close", () => {
  clients.delete(ws);
});

// Create a port
const port = new SerialPort({
  path: '/dev/ttyUSB0',
  baudRate: 9600,
})


const parser = port.pipe(new ReadlineParser());

parser.on('data', function (data) {
console.log('Data:', data);

[...clients.keys()].forEach((client) => {
client.send(data);
});

});
I used both the SerialPort and ws libraries for implementing the websocket server. Most ports of the code were taken from this article.
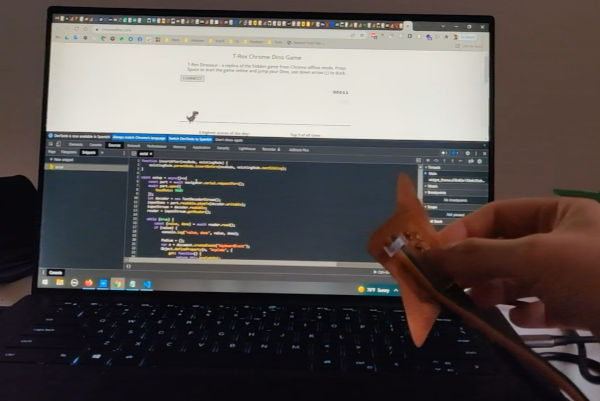
Chromedino
During the Embedded Programming week I used a code snippet in the https://chromedino.com/ site to enable Web Serial connection and generate keyboard events. This time I simplified the code snippet to use a websocked client:
var ws = new WebSocket("ws://127.0.0.1:7071/")
ws.onmessage = function (event) {
        content = document.createTextNode(event.data);
        const data = Number(event.data);


var n = document.createEvent("KeyboardEvent");
        Object.defineProperty(n, "keyCode", {
            get: function() {
                return this.keyCodeVal;
            },
        }),
        n.initKeyboardEvent ? n.initKeyboardEvent("keydown", !0, !0, document.defaultView, 32, 32, "", "", !1, "") : n.initKeyEvent("keydown", !0, !0, document.defaultView, !1, !1, !1, !1, 32, 0),
        (n.keyCodeVal = 32),
        document.body.dispatchEvent(n);


};
The Escape of the Attiny
Last year, I started (and never ended) an online course about HTML5 Game development using a javascript library called Phaser. During the course (Taught by Filip Jerga) I learned how to create a Flappy Bird Clone.
I decided to modify the code of the game to add a websocket client in order to control the character with my hello.echo board. I also updated the assets to show an Attiny sprite instead of the original bird character, and also update the obstacles sprites to show breadboards.