16. Wildcard Week
Week 16 - May 11
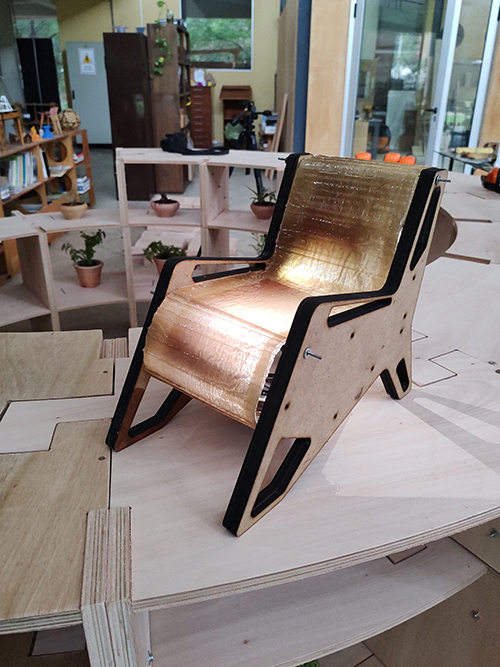
The frozen veil chair A piece of furniture with Composite Materials & Art from Scraps.
What I did:
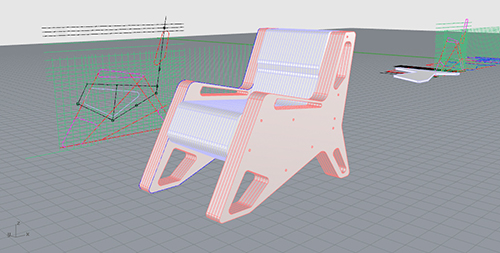
I designed a sofa, to be fabricated with CNC Router machine and composite materials. This week I have developed a 1:3 scale prototype, to test all stages of the fabrication process. We have tried this dynamic of prototyping several times before at CIDi, when designing furniture, because a 1:3 scale is big enough to allow us to see and face all the problems and complexities that arise from the fabrication and assembly process.
During the class, Neil presented us with a large number of possible topics for this week’s exercise. Personally, I was immediately drawn to the possibilities of composite materials. I felt it could be a medium to create translucent free forms. In a matter of minutes I drew the first sketch of a curvilinear chair that could be either coated or formed with a composite translucent material. After hearing about the hazard involved in using fiberglass, I decided to make this first iteration on composite materials, using a vegetal fabric and a resin.
Fabrication process 1: Design and fabrication of the two-parts formwork.
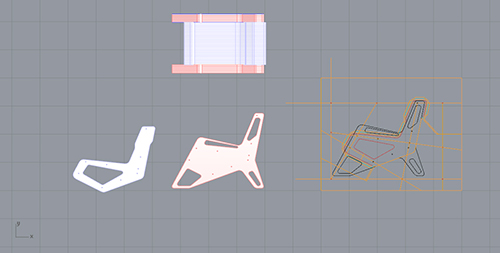
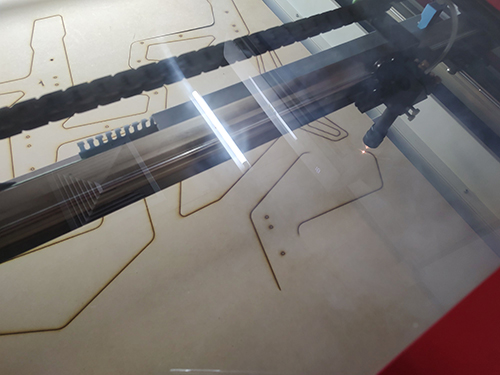
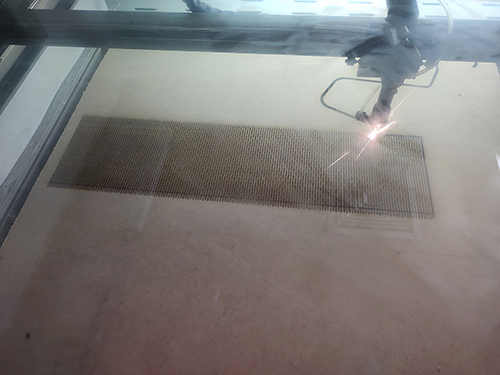
I designed the sofa on Rhinoceros(https://www.rhino3d.com/), and then cut its parts on the laser cutter. It was a long and time consuming process because in the end I was fabricating a complex two-part mold by layering laser cutted pieces. The idea of making such a mold was to test the viability for a full scale model, to be cutted on the CNC. This logic was perhaps closer to building the formwork for pouring concrete than to make a mold for casting.
I follow this path because the curvilinear and relatively large form I had in mind did not lend itself to be fabricated using a simpler method such as, let’s say, vacuum compression. Vacuum compression seemed highly effective on the examples shown by Neil in class, but in general more suitable for simpler forms, such as an oar blade.
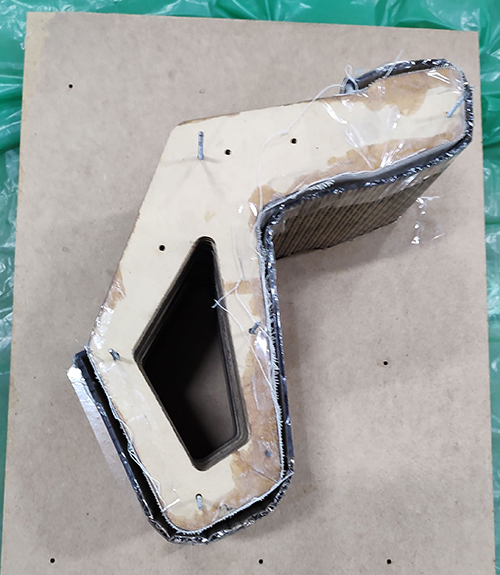
Thus, I drew and cutted the pieces for the main formwork (the chair itself) and for the secondary formwork which should involve the chair and hold the resin on the process of pouring. The idea was that this complex and time-expensive two part mold would make sense because it would allow for the fabrication of multiple resin curvilinear and translucent shapes.
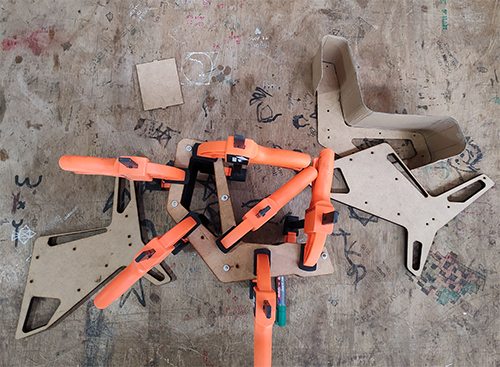
It took a few afternoons of meticulous assembly with the help of Claudio Coronel to finally assemble the two parts of the mold, and get everything ready for pouring the resin.
Fabrication process 2: Pouring the resin, tests and attempt 1
(You know Nothing Juan Cristaldo!)
All the meticulous work of cutting, assembling and preparing the inner mold and the secondary formwork we developed a series of rapid tests with resin and textiles. Since it was my first time working with resins I wanted to find about the proportions of the components, the time to obtain full cured resin, how smelly the resin was, etc.
The dosage is as follows:
100 grams of polyester resin and 20 drops of catalyzer
With the help of Claudio Coronel and Cristina Santacruz we poured a few samples using different fabrics. As mentioned, we avoided using fiberglass, the material normally coupled with polyester resin, due to health and safety concerns. Furthermore, we were also interested in the aesthetic result of combining organic textiles with the resin, and to “freeze in translucent ambar” the texture of the fabric.
The material did indeed have a strong smell and we had to take the samples outside the lab, while hardening, or keep them in the CNC cabin, which has air extractor fans. The hardening time was short, around 2 hours, with a clear increase in temperature and viscosity around 25 minutes after mixing resin and catalyzer.
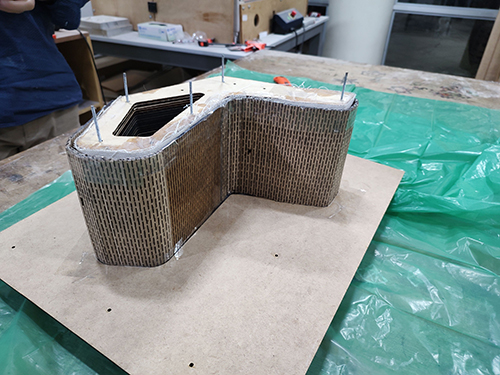
After this first round of tests, and armed with some knowledge on the behavior of the material, we were ready to make the first attempt. The fabric was carefully put in place, over the surface of the inner mold. The exterior mold was put in place, and the resin was poured.
It was a complete disaster.
The mold was leaking everywhere, and the resin poured outside to the table. Luckily we have had the foresight to cover the table with plastic. But in general terms, what we obtained after a lot of hours of hard work was a few nice (but unimpressive) resin circles, and a total fiasco on how the complex mold should function.
Fabrication process 3: Pouring the resin, attempt 2
After the first attempt, we had to rethink the mold. There was not enough time to reconsider the inner mold, thus, the alternative was to work again with the secondary mold. Working alongside Claudio, we developed a much simpler idea. A bottom plane with just a small subtraction for the space of a folded sheet of cardboard and the space for the resin to be poured.
Easier and simpler it was, at least by comparison with the previous idea. But again, it took a long time to make it. After the textile - canvas - was again put in place and the mold ready we made another attempt. This time, we sealed the mold with hot silicone before pouring. Also, we poured the resin in thin layers over three work sessions in two days, working alongside Cristina. The material kept on leaking, but significantly less so. By the end of the first session, when the inferior layer solidified correctly, reducing the leaking of the future layers even more, we knew we might just be on the path to something.
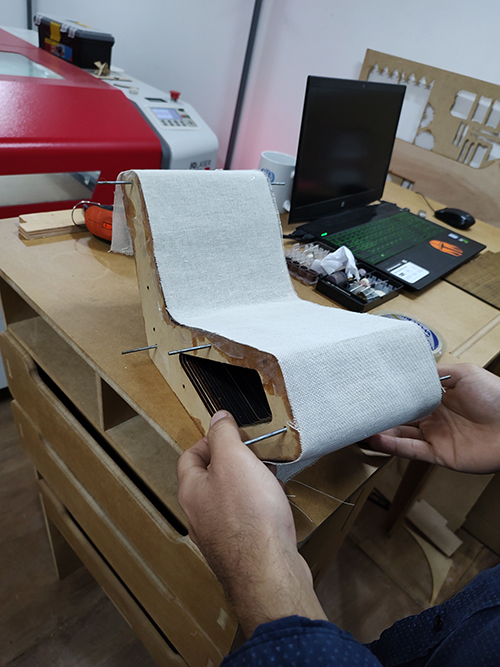
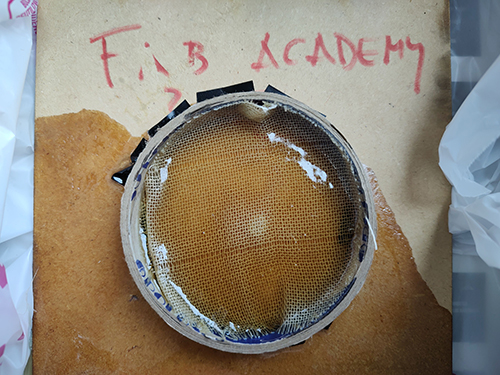
When the pouring and hardening concluded, we faced the final step of the process: disassemble the mold, and see if the resin could actually be separated from the inner mold. It took some time, but it worked well. In the end we obtained what we were looking for, a curvilinear, geometrically complex shape which was translucent.
What I have learned
I learned how to work with polyester resin and textiles to produce translucent pieces of “frozen veil”. Furthermore I explored new methods to produce molds in complex geometries, suitable mostly for furniture design, and perhaps, for wearables. Perhaps the most important, I learned that complex and carefully drawn and assembled systems can simply not work at all, and that sometimes, the simpler choice is the better choice.
Final Result:
I have a 1:3 scale model of a new sofa designed by myself. This model is made of MDF and a composite material combining polyester resin and fabric.
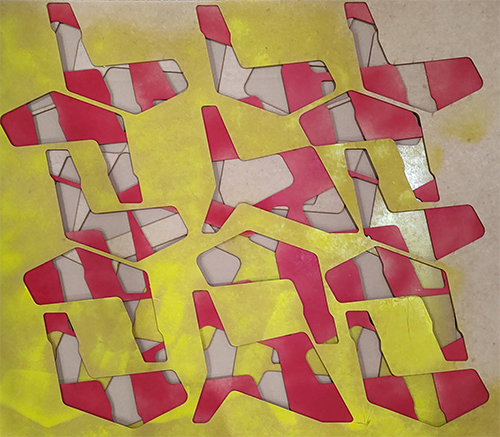
Bonus track - Art from scraps:
I also developed a collage / painting using the scrap pieces of the fabrication process. I find that this is a great way to repurpose large size scraps and leftover materials that are the result of subtractive fabrication processes, both at the CNC and at the Laser Cutter. I have long been interested in the visual properties of the leftover boards after the process of subtraction. I feel that there is a great potential to explore here, in the simple layering, and combination of colors. Looking forward to more opportunities to work with these materials.
Design and fabrication files here: