1. Project Management
I. Project Documentation
A. Introduction
The first assignment was to create a website which would act as a framework used to document and present the work I will complete during the next 5 months. My goal is to produce a layout that would allow each project to be accessed easily while ensuring the important content is displayed clearly. Seeing as I have no knowledge in HTML, CSS or any tool used to build webpages, I first focused on familiarising myself with the Static Site Generator (SSG) MkDocs.
B. MkDocs setup
Having already installed Python, I manually downloaded and installed Mkdocs on my computer using the following command in my terminal emulator:
I then began editing the site template provided by FabAcademy, starting with the MkDocs.yml file. Changes to the initial file were minimal and only aimed to test the various features of an Mkdocs website. I defined the theme, fonts and colors of my documentation site (See code below). While easy to use, the framework provided by Mkdocs is quite rigid. I therefore decided to learn how to develop my own website using more rudimentary tools, namely HTML, CSS, Java etc. My goal is to achieve this throughout the next few weeks. I’ll be documenting my progress on the following page.
mkdocs.yml
 1
 2
 3
 4
 5
 6
 7
 8
 9
10
11
12
13
14
15
16
17
18
19
20
21
22
23
24
25
26
27
28
29
30
31
32
33
34
35
36
37
38
39
40
41
42
43
44
45 | # Replace the text below to customize your site
site_name: Tarek Mahmoud
site_description: Fab Academy documentation site for Tarek Mahmoud
site_author: Tarek Mahmoud
copyright: Copyright 2021 Tarek Mahmoud - Creative Commons Attribution Non Commercial
site_url: http://fabacademy.org/2021/labs/barcelona/students/tarek-galal
extra:
social:
# For other social icons at https://squidfunk.github.io/mkdocs-material/setup/adding-social-links/
- icon: fontawesome/brands/linkedin
link: "https://linkedin.com/in/tarekcmahmoud"
theme:
name: material
palette:
# try other colors https://squidfunk.github.io/mkdocs-material/getting-started/#primary-colors
primary: amber
accent: black
font:
# See available fonts at https://fonts.google.com/
text: Inter
code: Ubuntu Mono
icon:
logo: material/ethereum
favicon: material/ethereum.svg
features:
- navigation.tabs
- navigation.instant
plugins:
- search
- git-revision-date-localized:
fallback_to_build_date: true
markdown_extensions:
- extra
- smarty
- admonition
- codehilite:
guess_lang: false
- toc:
permalink: true
|
Once done, I added content to the relevant pages, using this guide to learn the Markdown Syntax.
C. Markdown Syntax | Cheat-Sheet
1. Text Styling
*italic* or _italic_
**bold**
***Bold & Italic***
~~Strikethrough~~
| # Heading 1
## Heading 2
### Heading 3
#### Heading 4
##### Heading 5*
###### Heading 6*
|
| For a code box, wrap text with 3 (`)
|
For a blockquote, include a ‘>’ at the start of a line
D. Work Environment
Computer | Macbook Pro 2017
Text-Editor |
E. Useful links
II. git
A. Description
Git is a distributed version control system for tracking changes in source code during software development. It is designed for coordinating work among programmers, but it can be used to track changes in any set of files. Its goals include speed, data integrity, and support for distributed, non-linear workflows.
B. Installation
Git was already availale on my Macbook as I had Xcode installed. I checked its version using:
The version of git installed on my computer was 2.24.3, a couple editions behind the latest release 2.27.0. I upgraded it using Tim Charper’s installer.
I then generated an SSH key with a size of 2048 and added its public version to my gitlab account. Key generation was achieved using:
| $ ssh-keygen -t rsa -b 2048 -C "tarekcmahmoud@gmail.com"
|
Once completed, I cloned the provided online repository to my system with:
| $ git clone git@gitlab.fabcloud.org:academany/fabacademy/2021/labs/barcelona/students/tarek-galal.git
|
To familiarize myself with the basic git commands and procedures. I completed the tutorial found on git’s official site noting all commands I deemed to be important at my level, all of whoch can be foind in the below cheat sheet.
C. Git Commands Cheat Sheet
1. Creating or Importing a New project
| $ tar xzf project.tar.gz
$ cd projectdirectory
$ git init
|
Chain of terminal commands allowing to create a new git project in a specified directory.
| $ git clone repository/link/
|
Creates an exact copy of an online repository
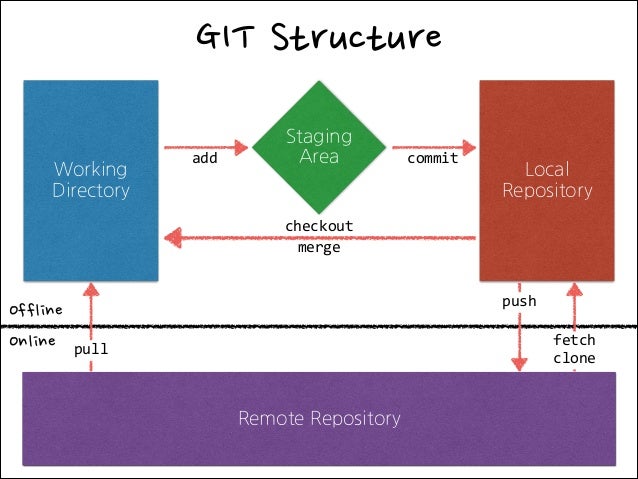
2. Making and Pushing Changes to a Project
Summarises the changes made to the offline repository by comparing files to those on the online repository.
| $ git add file1 file2 file3
|
Adds specified modified/untracked file to staging area.
Adds all modified/untracked files to staging area
| $ git commit -m "Commit message"
|
Commits changes placed in the staging area to the offline repository.
Commits all untracked files to the offline repository.
Push commited changes to the online repository.
3. Tracking changes
Displays changes made but not added to index.
Displays changes about to be commited.
Displays history of changes made to online repository.
Shows Complete differences for each of the past changes.
| $ git log --stat --summary
|
Overview of all modifications made.
4. Branching
List of existing branches.
Creates new branch with specified branch name.
Switches to specified branch.
Merges current branch with specified branch.
| $ git branch -d branchname
|
Delete specified branch.
5. Collaboration
Fetches changes made in a remote branch and merges them with local branch.
D. Managing my repository
FabAcademy provided us with our own repo containing the base files for us to set up our mkdocs documentation site. I cloned the repo to a folder on my computer using the following sequence of command:
| 1. $ cd repo/directory/path/oh/yeah/baby
# Sets the active terminal directory to the one where I wish to copy my repo.
2. $ git clone https://gitlab.fabcloud.org/academany/fabacademy/2021/labs/barcelona/students/tarek-galal.git
# Copies the repo to the specified directory.
|
Having made the modifications I wanted, I then pushed the local copy of my repository to its remote site on gitlab through the following sequence of commands.
1
2
3
4
5
6
7
8
9
10
11
12
13
14
15 | 3. $ git status
# Displays a list of files that have been modified in the working directory.
4. $ git add modified_files
# places the specified file to the staging area.
5. $ git commit -m "Commit Message"
# Commits the changes to the local repository.
6. $ git push
# Pushes and applies all changes to the remote repository.
|
E. Summary
From this introduction to distributed version control, I can tell that it is a great system to seamlessly collaborate and share projects with a great audience. It will take some time to get used to. I will need to make sure I do not make any mistakes pushing changes to the remote repo as this might brake it. Below are a few rules I’ll follow to make sure things run as smooth as possible. I’ll update them throughout the course with new things I’ll learn.
Verify what files have been modified
Always check what files have been registered as altered by git before proceeding to a push, using git status.
Add files individually
Refrain from using “git add .” to stage multiple files as certain unwanted modifications might end up being pushed. Instead, use “git add file1 file2 file3 .... fileX”.
Last update: June 16, 2021