Tenth Week
Tenthclass
In our tenth class at Fab Academy we had a nice experience presenting our latest work in machine design, it took more than half of the class to do the review of all the equipment but it was great. I found it very interesting to see all the other submissions as well, with digital fabrication you can really invent a lot of things. 🥰
As a new topic we saw what Input Devices are, once again we return to the topic of electronics, now I recognize better many of the components and concepts about the world of electronic design, this section will be about my own research and learning as I still feel that it is still complex but I think that step by step I will manage to handle more and more these tools. 💪

Last week
My experience
Returning to electronics
After some explorations I chose to make a protoboard circuit for my final project, my final project is called Quentino and it is still in the process of creation. Quentino is a device that allows families to provide support in the cognitive development of children, this is given through the connection between the prototype and children specifically through educational storytelling. To understand a little about the project you can visit my page here.
Since my project aims to interact with children and vice versa, it will contain some sensors that will make the experience fun and useful. One of the ideas I have is that this project will work in a considerable improvement in the issue of hyperactivity in children or at least that it will help to manage it with better results, how would this be possible? Thanks to some meetings with specialists we came to the conclusion that if we allow Quentino to communicate in certain circumstances of a lot of movement we will make the children reflect and understand that for Quentino to be happy and to be able to function he needs to have an average distance from the listener.
So I decided to use a first sensor which is the Ultrasonic, then I will show some research I did and my tests to know how it works. But before I start on this journey of sensors I will show some concepts that I learned and that were very useful to understand the reason for this week in the Fab Academy. 💪
What is a sensor?
A sensor is a device that detects change in the environment and responds to some output in the other system. A sensor converts a physical phenomenon into a measurable analog voltage (or, sometimes, a digital signal) converted to a human-readable display or transmitted for readout or further processing.
What do I need to know to learn from sensors?
First it was important to know the subject of circuits, when doing a review I realized that there were still many concepts that I did not understand, I did some exploration in some videos on YouTube that helped me a lot to review and see some prototypes of sensors on protoboards. The hardest thing for me was to understand about the necessary code to use and the connections of the arduino pins to the sensor, here I also ventured to explore a digital program called Tinkercad, I highly recommend it to all beginners like me.

About protoboards
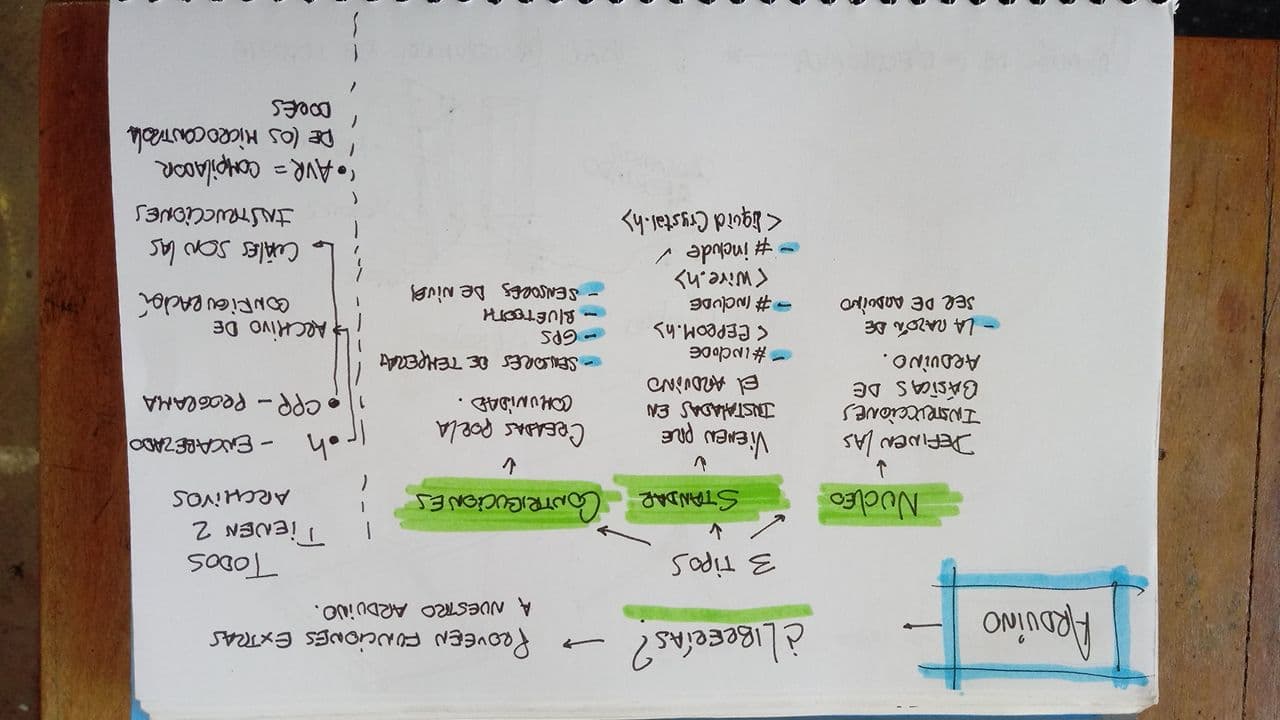
Arduino libraries
Tinkercad
Tinkercad
My exploration
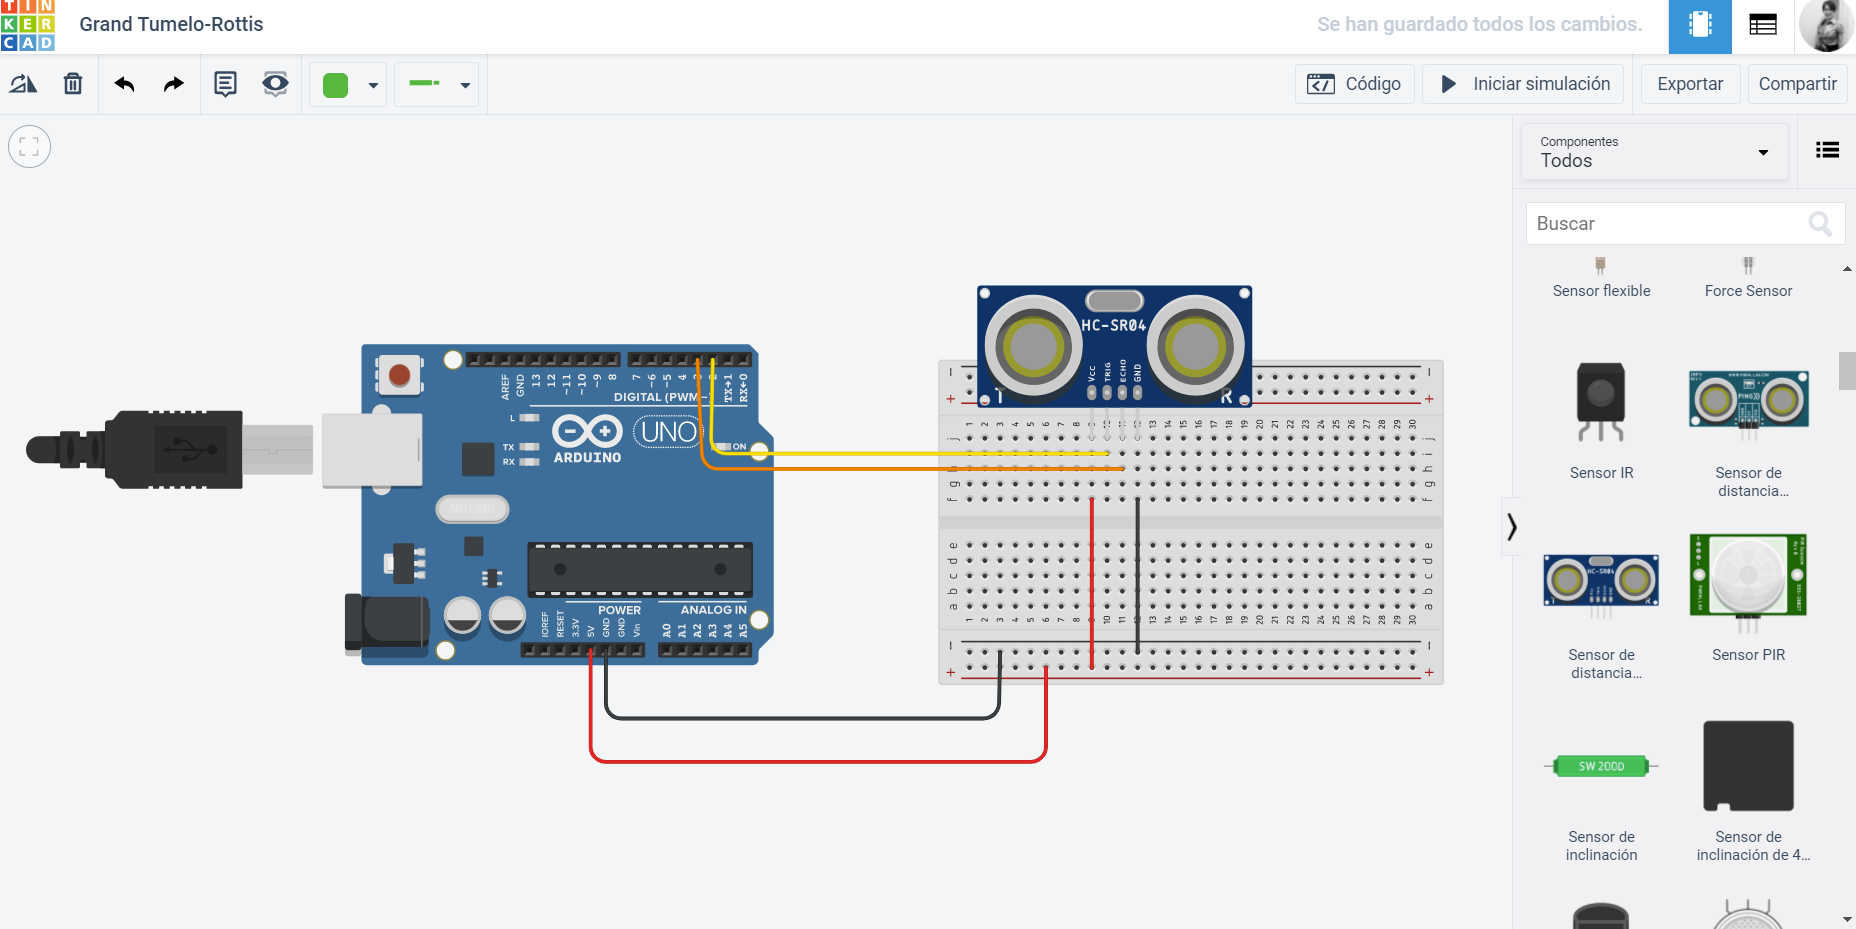
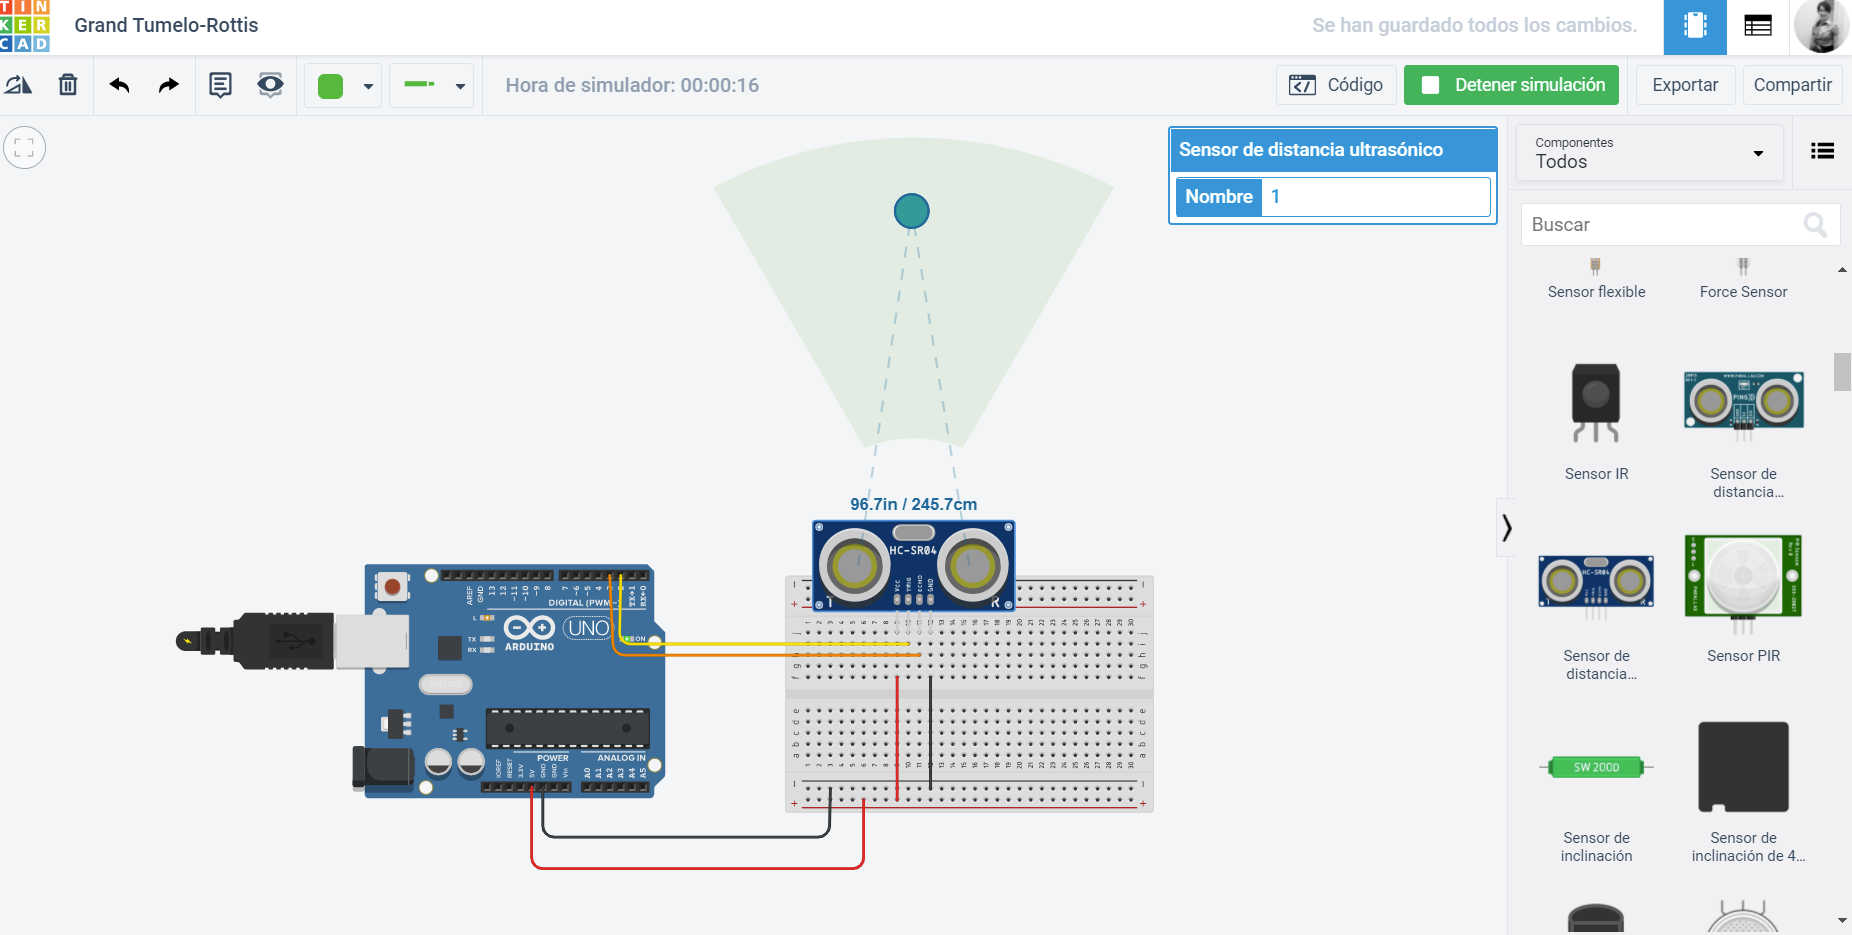
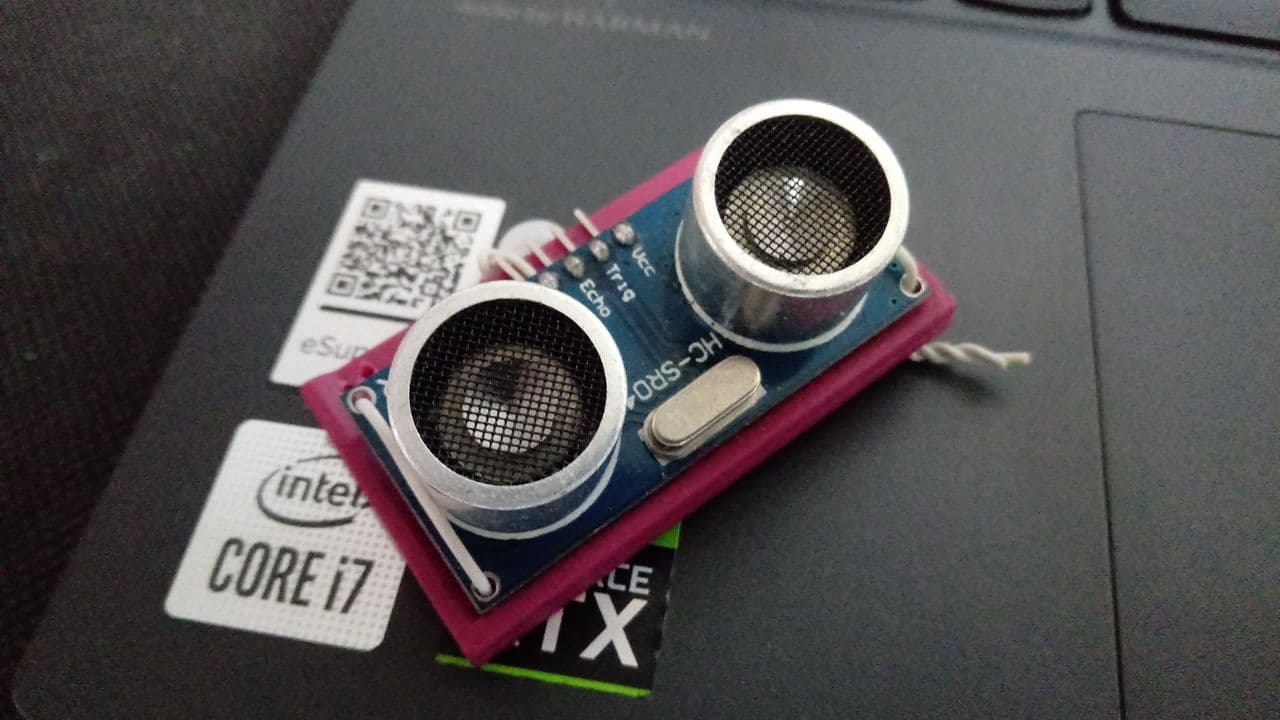
To make my prototype I got the HC-SR04: Ultrasonic distance sensor, this is able to detect objects and calculate the distance at which it is located in a range of 2 to 450 cm. The sensor works by ultrasound and contains all the electronics responsible for making the measurement. Its use is as simple as sending the start pulse and measuring the width of the return pulse. This sensor stands out for its low power consumption and high accuracy.
Specifications HC-SR04:
- Circuit dimensions: 43 x 20 x 17 mm.
- Supply voltage: 5 Vdc
- Working frequency: 40 KHz
- Maximum range: 4.5 m
- Minimum range: 1.7 cm
- Minimum trigger pulse duration (TTL level): 10 μS.
- Duration of the output echo pulse (TTL): 100-25000 μS.
I also used an arduino NANO, UNO and MEGA but the first two did not work, I found it interesting and stressful because I realized that both had problems on the board and connections on the breadboard, I recommend to check very well the wires to be used and connections because sometimes with so many wires we can get confused. Finally I used the arduino MEGA and thanks to my research I managed to connect and program it, then I show the images.
Sensor
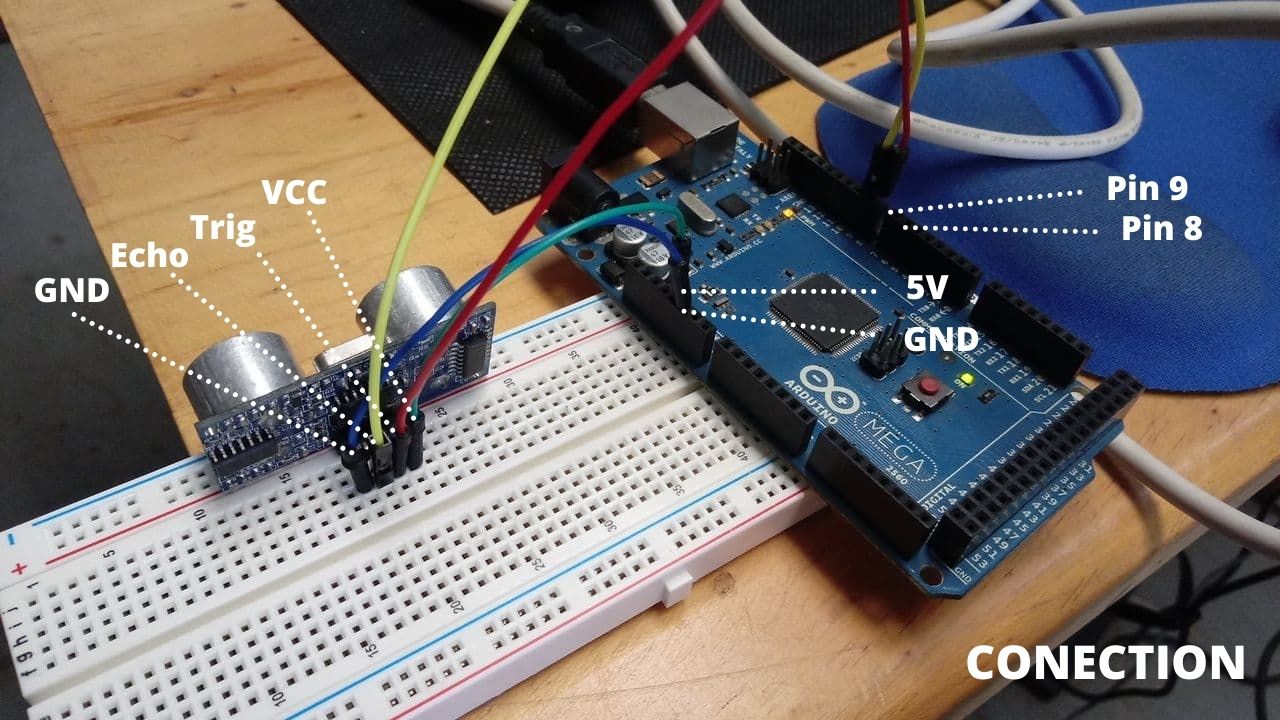
How to connect
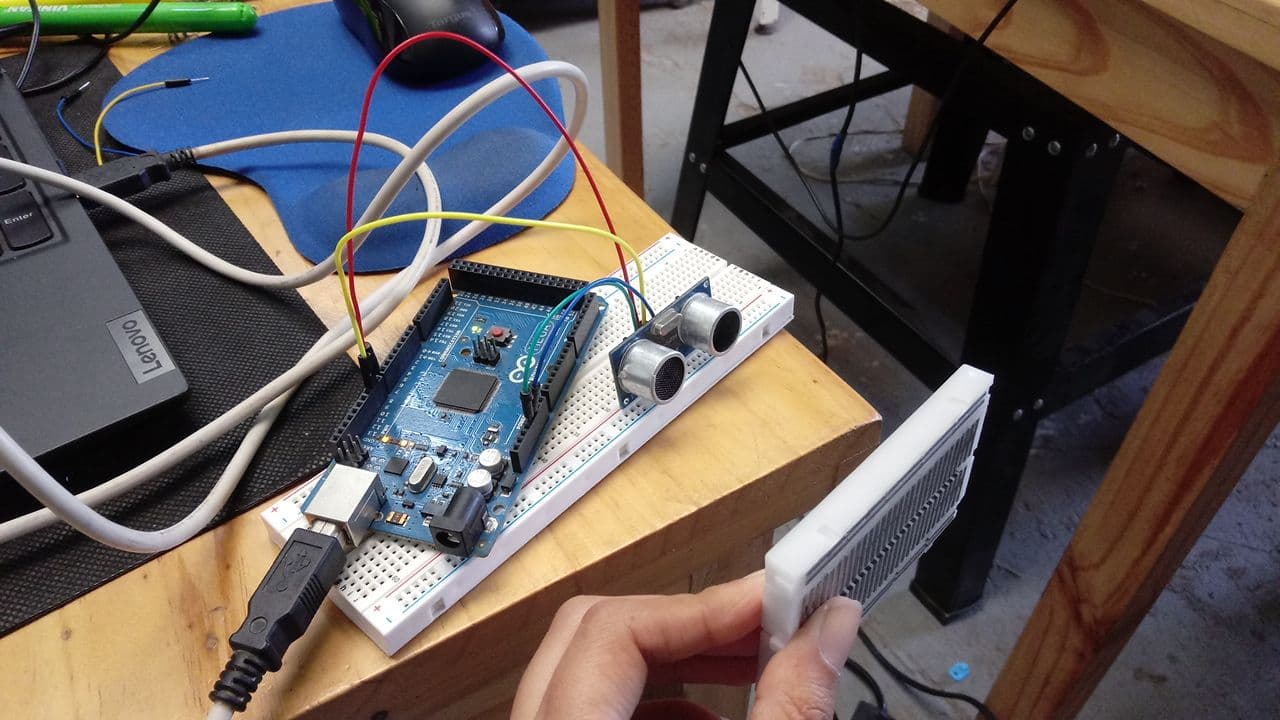
Attempt
Attempt
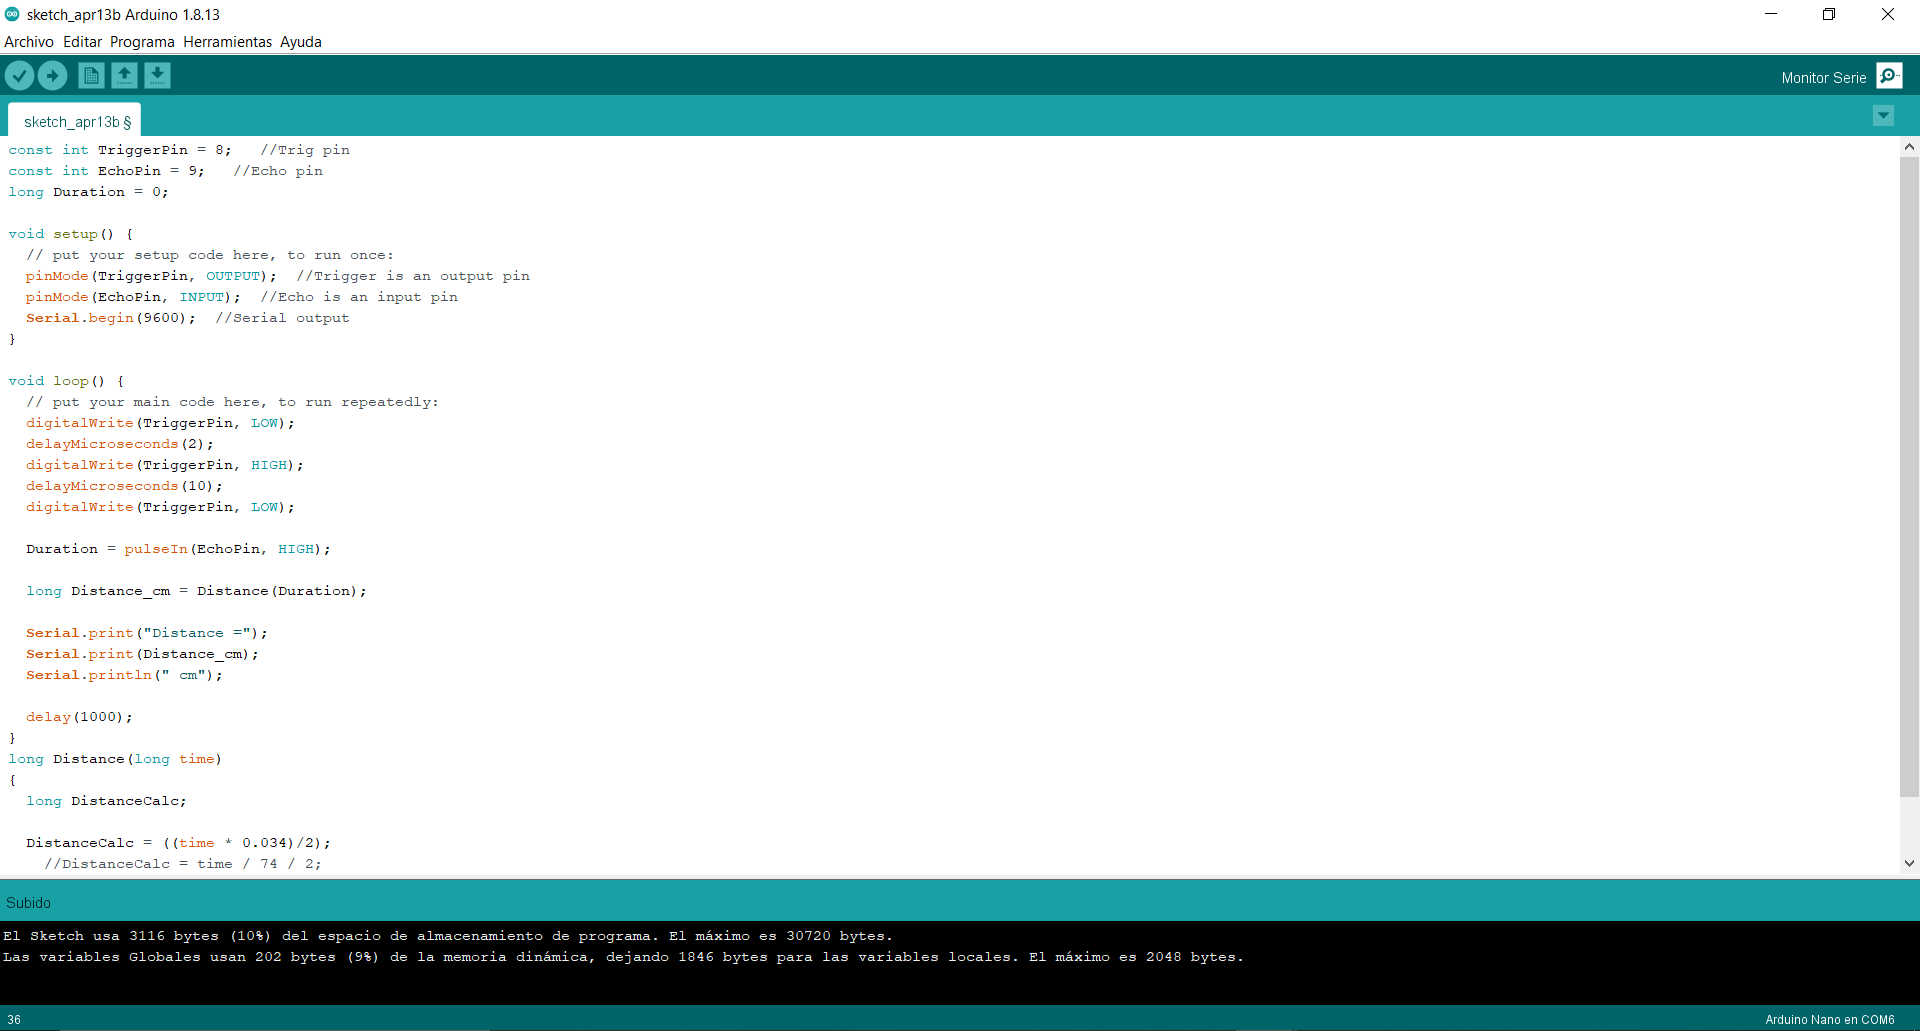
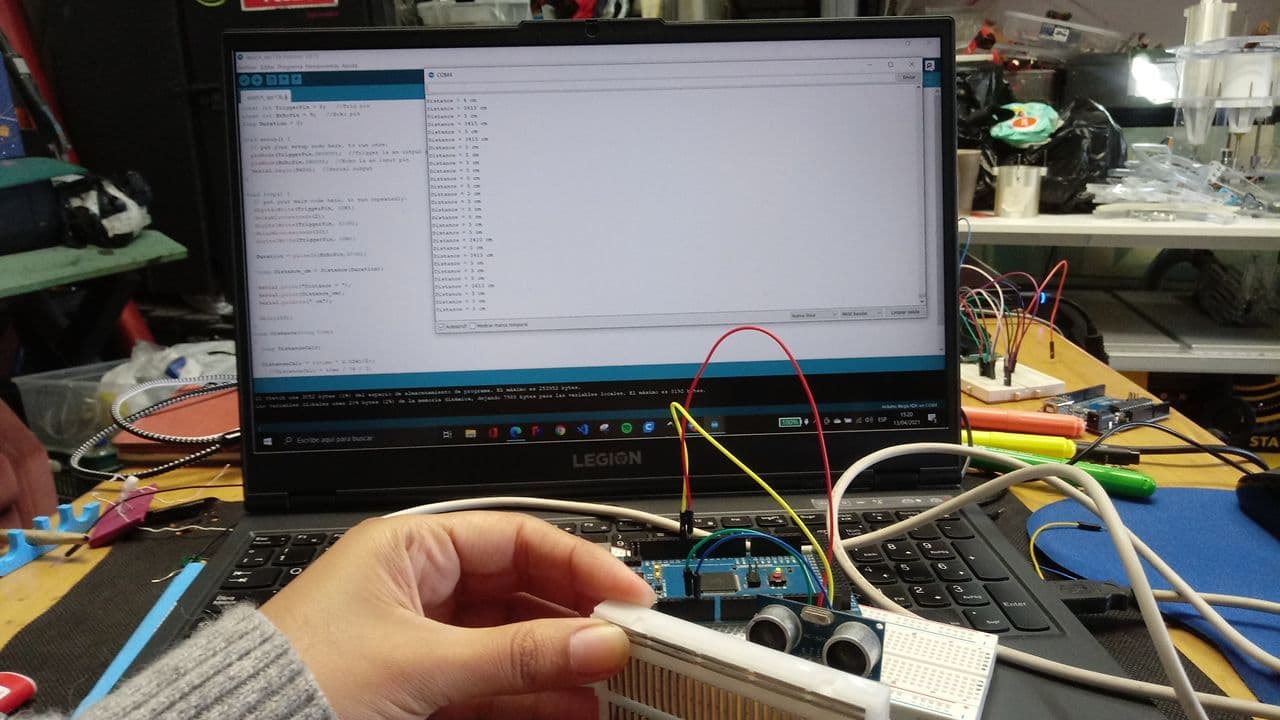
Code
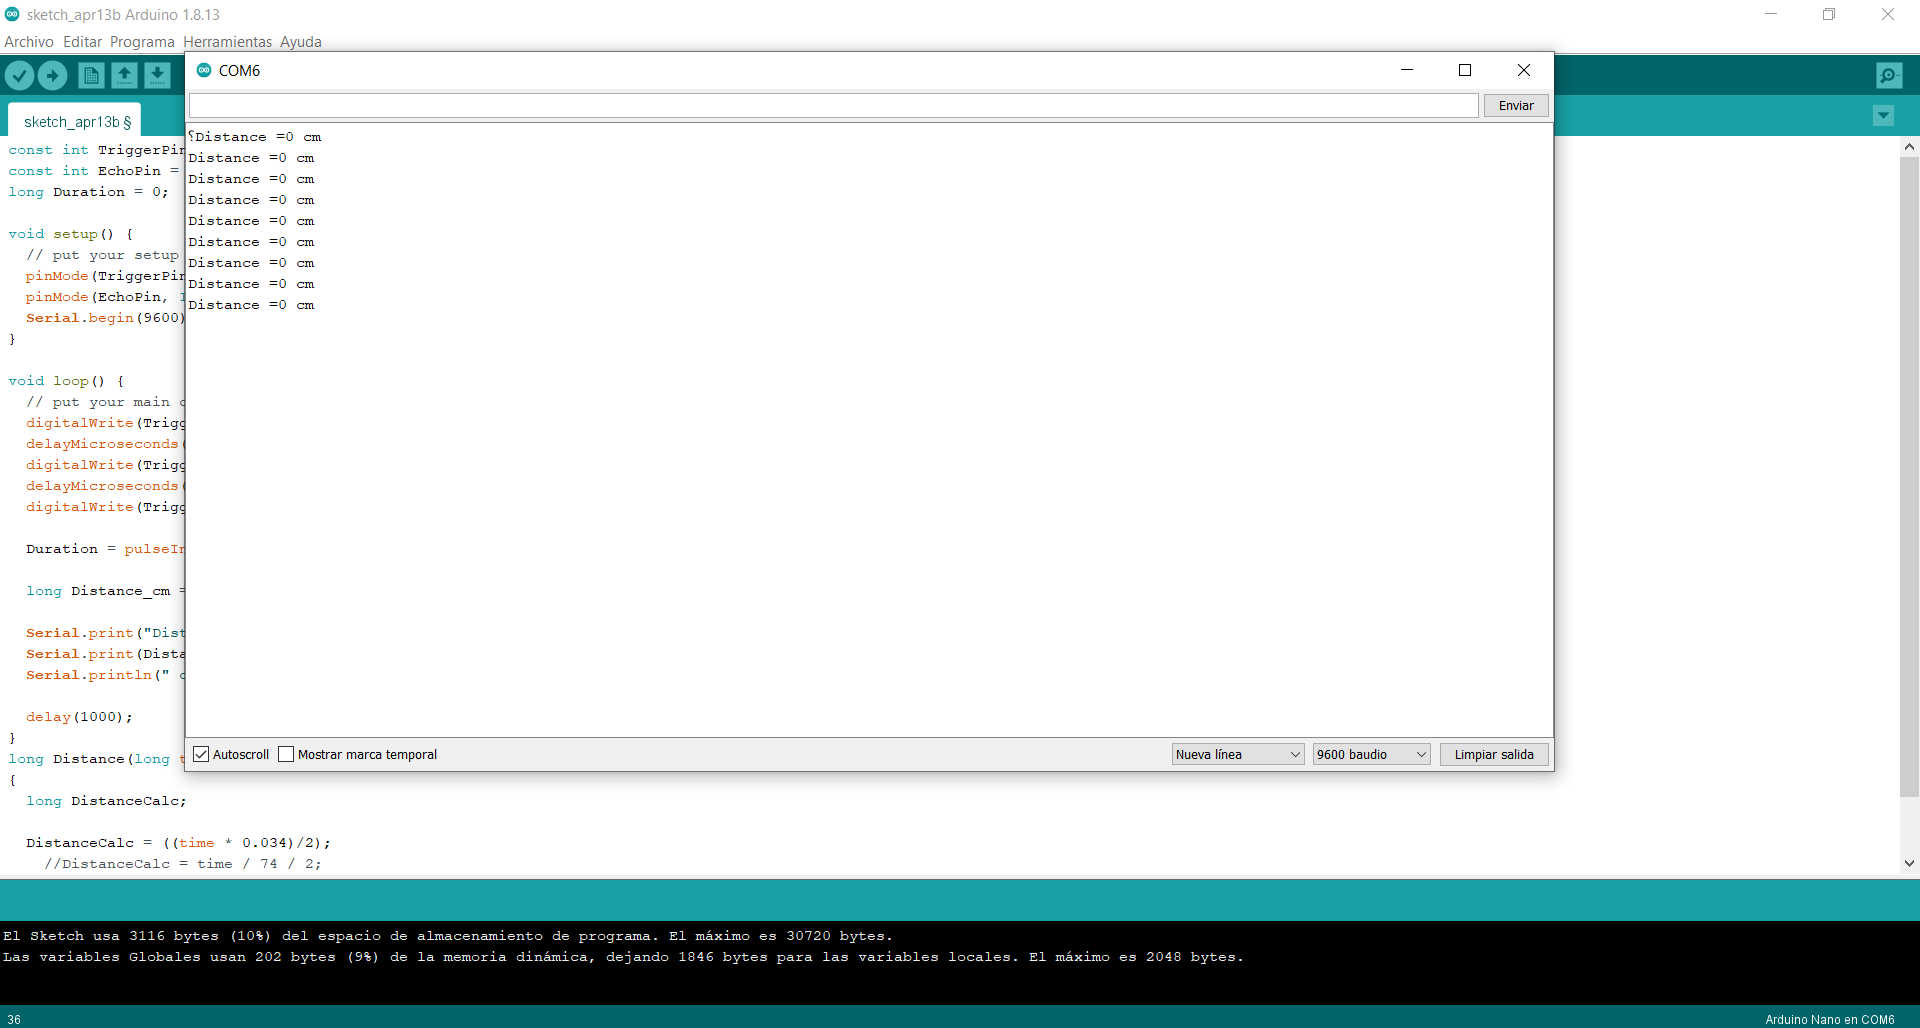
Monitor serie
	//Mayra Ascencio Calderón
	//Fab Academy 2021
	//Code

	const int TriggerPin = 8;   //Trig pin

	const int EchoPin = 9;   //Echo pin
	long Duration = 0;

	void setup() {
	// put your setup code here, to run once:
	pinMode(TriggerPin,OUTPUT);  //Trigger is an output pin
	pinMode(EchoPin,INPUT);  //Echo is an input pin
	Serial.begin(9600);  //Serial output
	}
	void loop() {
	// put your main code here, to run repeatedly:
	digitalWrite(TriggerPin, LOW);
	delayMicroseconds(2);
	digitalWrite(TriggerPin, HIGH);
	delayMicroseconds(10);
	digitalWrite(TriggerPin, LOW);

	Duration = pulseIn(EchoPin,HIGH);

	long Distance_cm = Distance(Duration);

	Serial.print("Distance = ");
	Serial.print(Distance_cm);
	Serial.println(" cm");

	delay(10);
	}
	long Distance(long time)
	{
	long DistanceCalc;

	DistanceCalc = ((time * 0.034)/2);
		//DistanceCalc = time / 74 / 2;
	return DistanceCalc;
}
Finally I show a video of the moment I tested the distance measured by the sensor, I used a small breadboard as an object and it worked. 🤩
Another sensor
I also made a test with the sensor that will serve me for my final project. To understand a little of how it works I will explain about it.
Infrared PIR motion sensor // HC-SR501
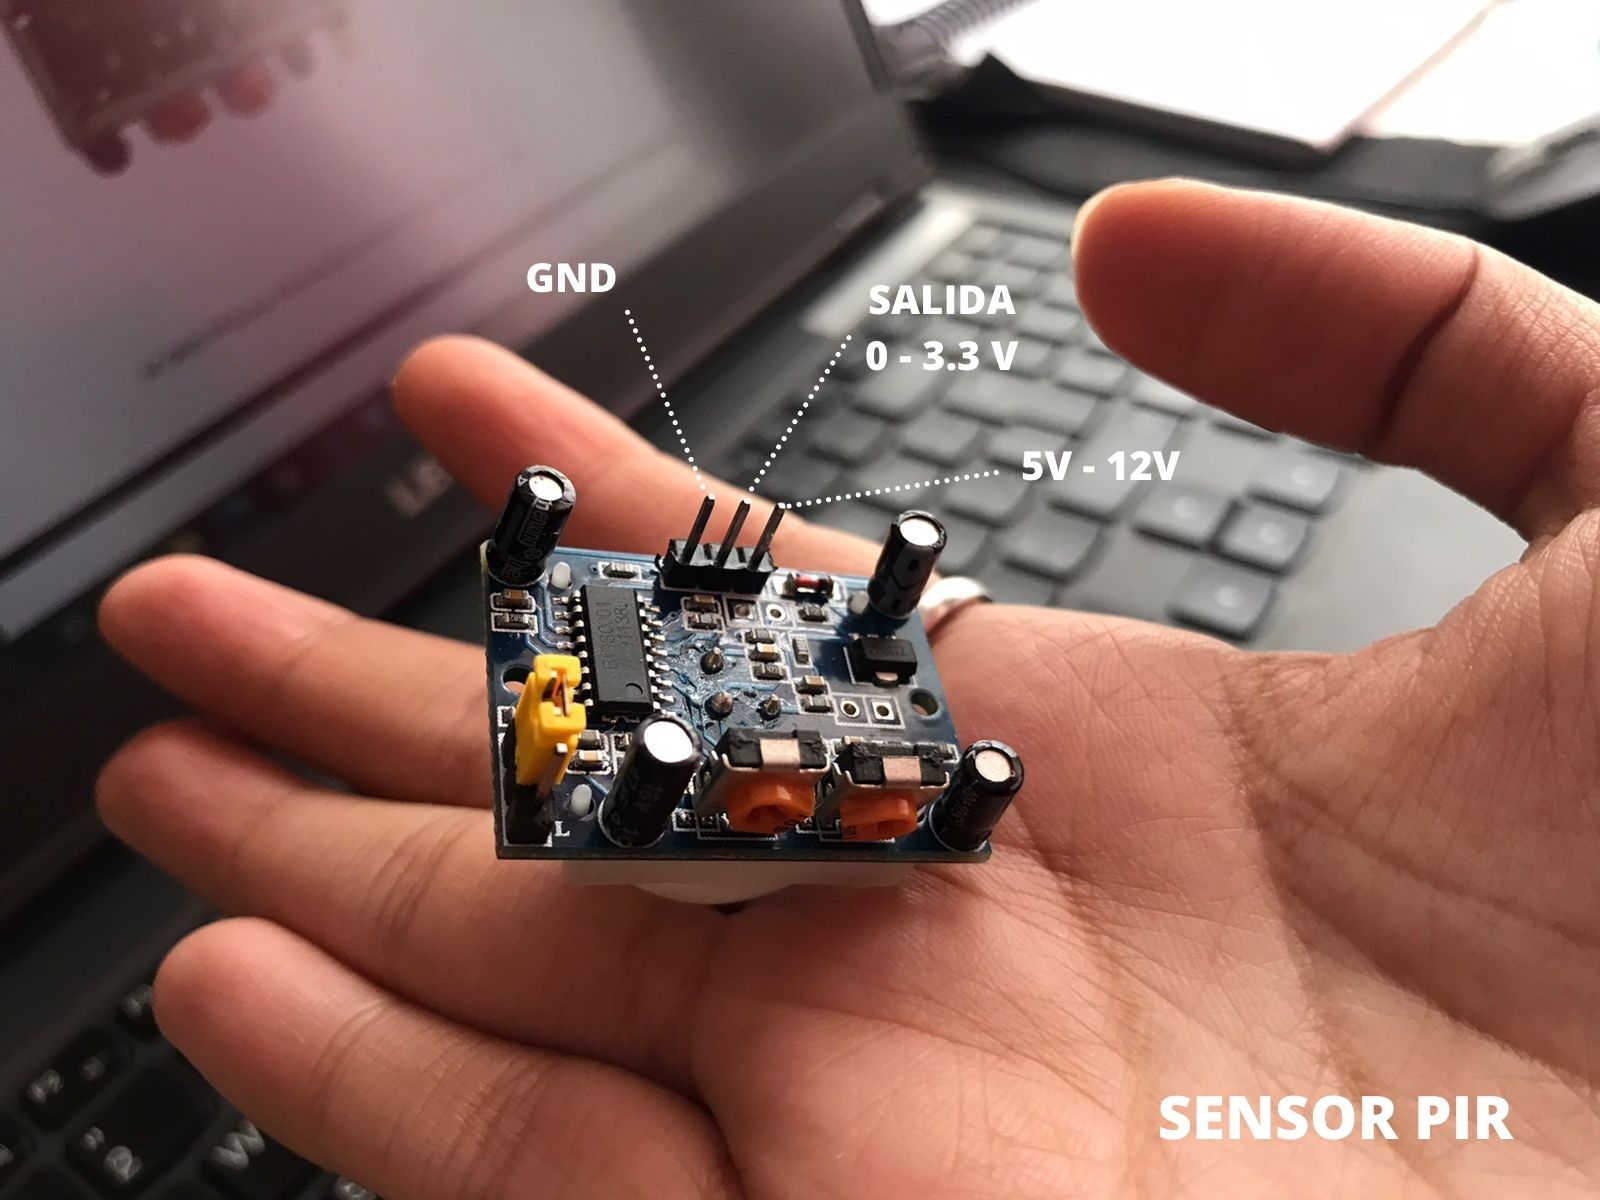
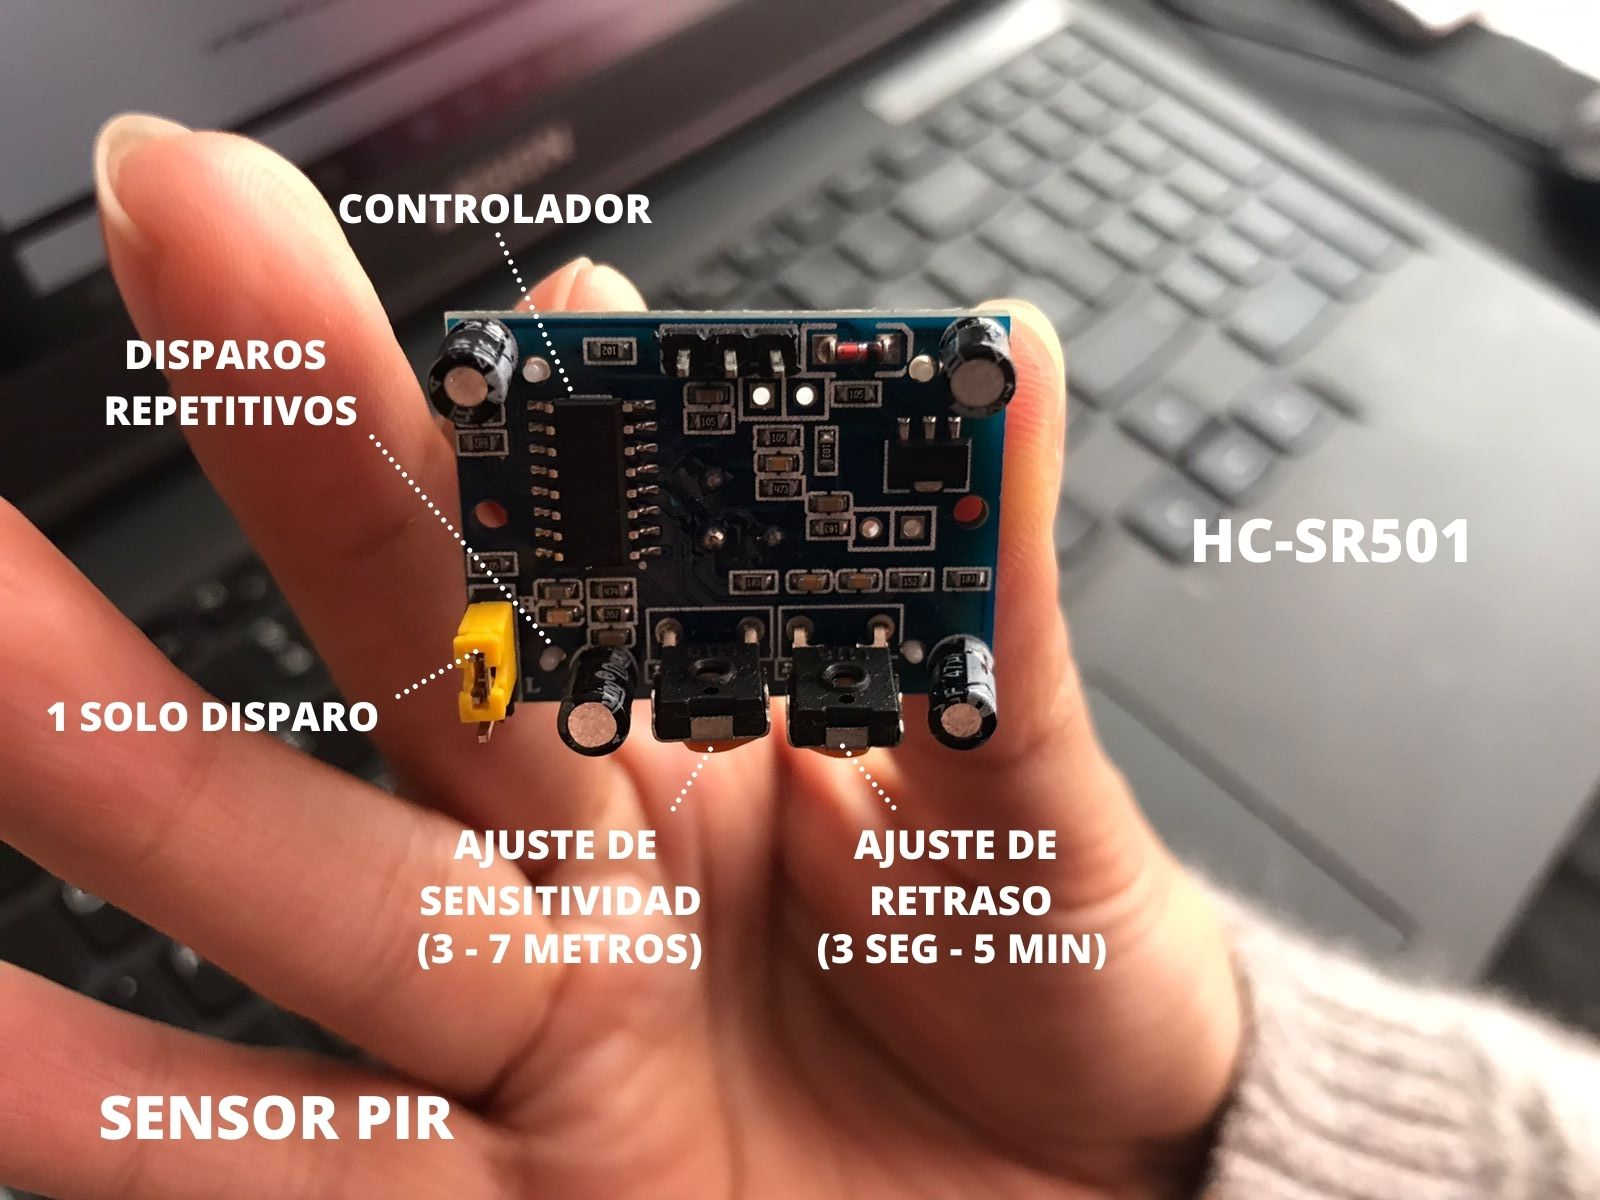
PIR sensor (pyroelectric infrared // passive infrared). The sensor uses two potentiometers and a jumper to modify its parameters and adapt it to the needs of the application: detection sensitivity, activation time and response to repetitive detections.
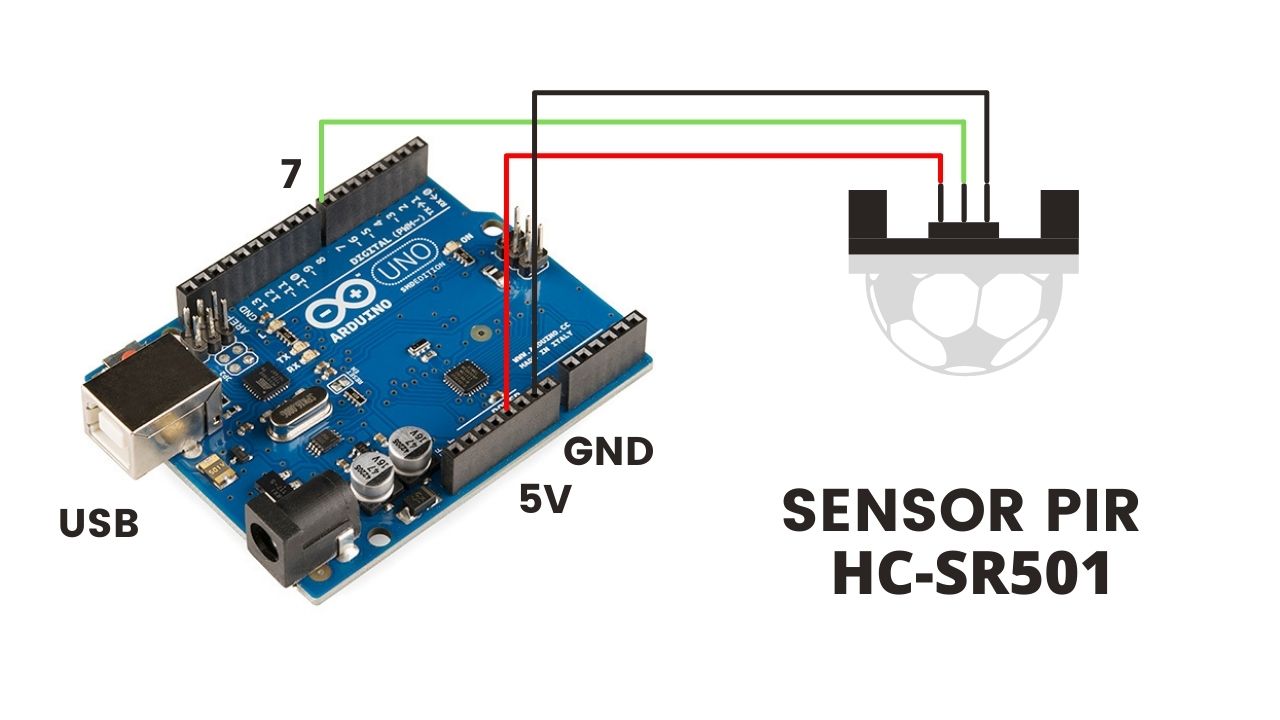
Here I show the three connection pins, one goes to ground, the other to the output and the third to a 5 to 12 volt source:
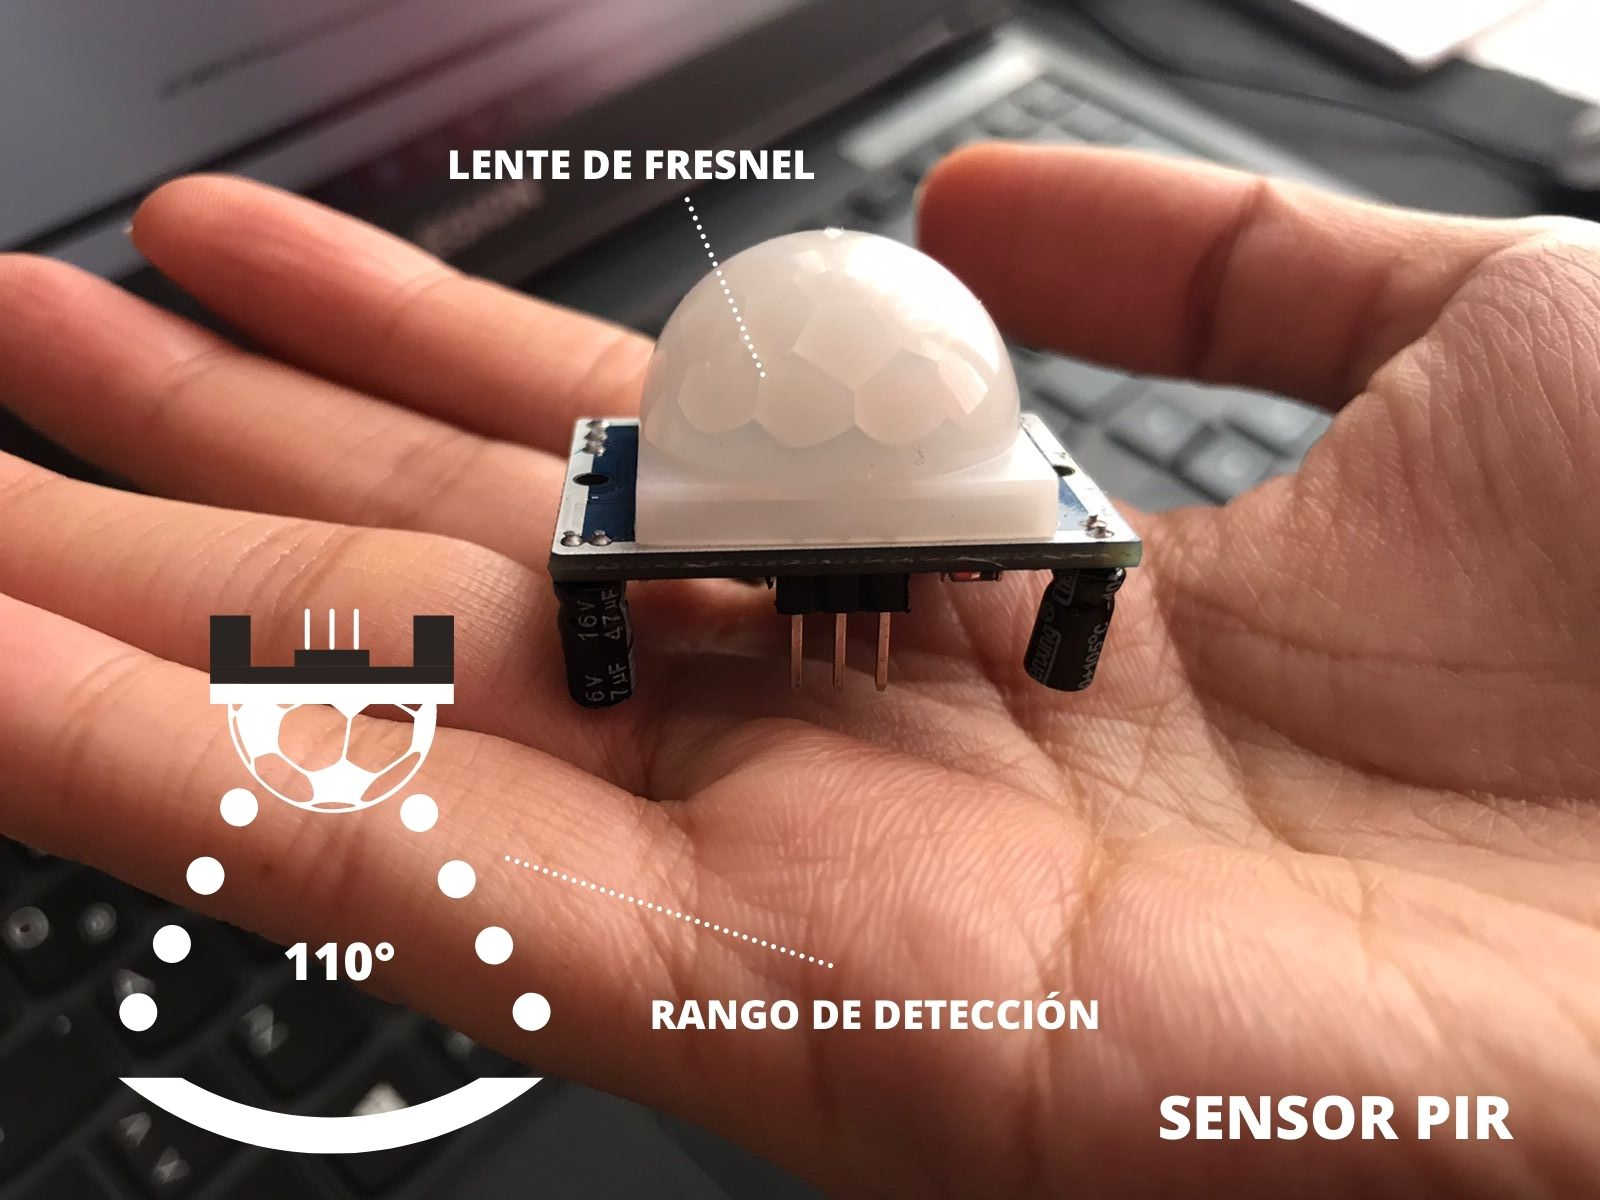
The PIR sensor has a working range with an angle of 110°, this from the fresnel lens that is located on the outside, a spherical shape that allows it to do this job:
It has a parameter adjustment by means of two potentiometers, one for sensitivity and the other for detection distance:
Specifications HC-SR501:
- Uses LHT778 PIR and BISS0001 controller
- Supply voltage: 5 to 12 VDC
- Average power consumption: menos 1 milliampere
- Adjustable distance range from 3 to 7 meters
- Angle of detection: 110° cone
- Dimensions: 3.2 x 2.4 x 1.8 cms
- Operating temperature: - 15° to + 70°C
Below I share in detail the wiring connection between the PIR sensor and the arduino UNO, first in tinkercad and then in my own arduino. In addition I also share the odec I used to perform the simulation that you will see in the video:
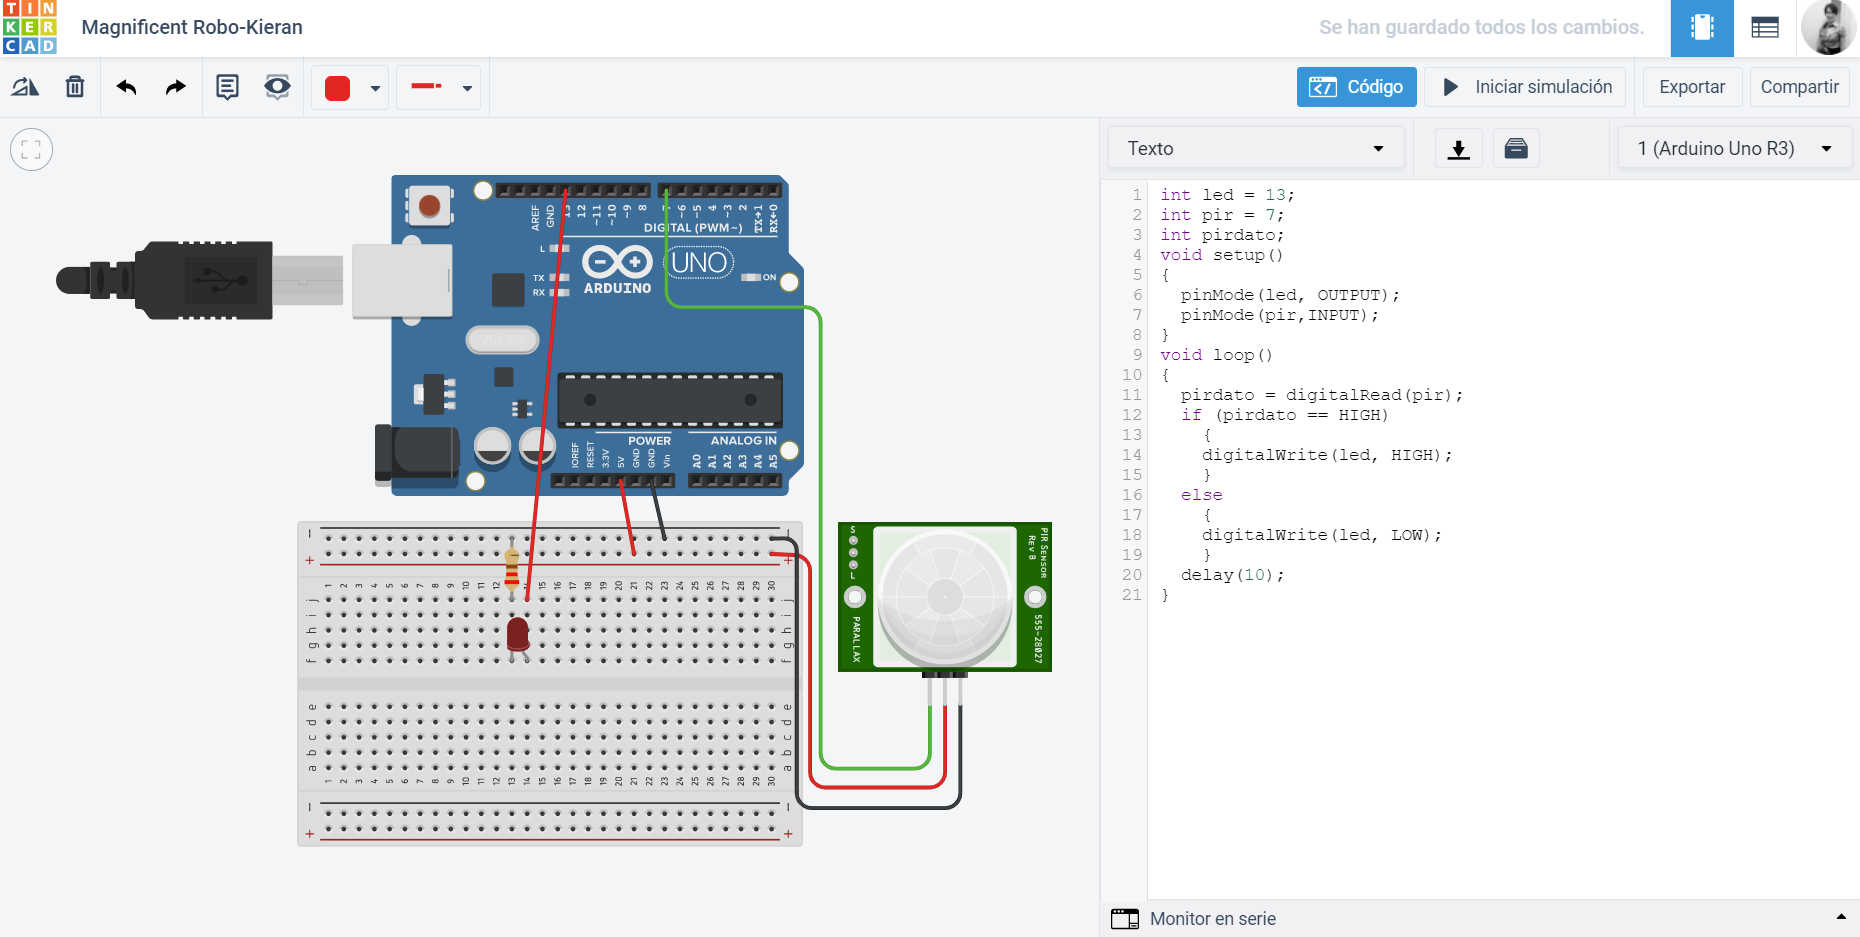
Tinkercad
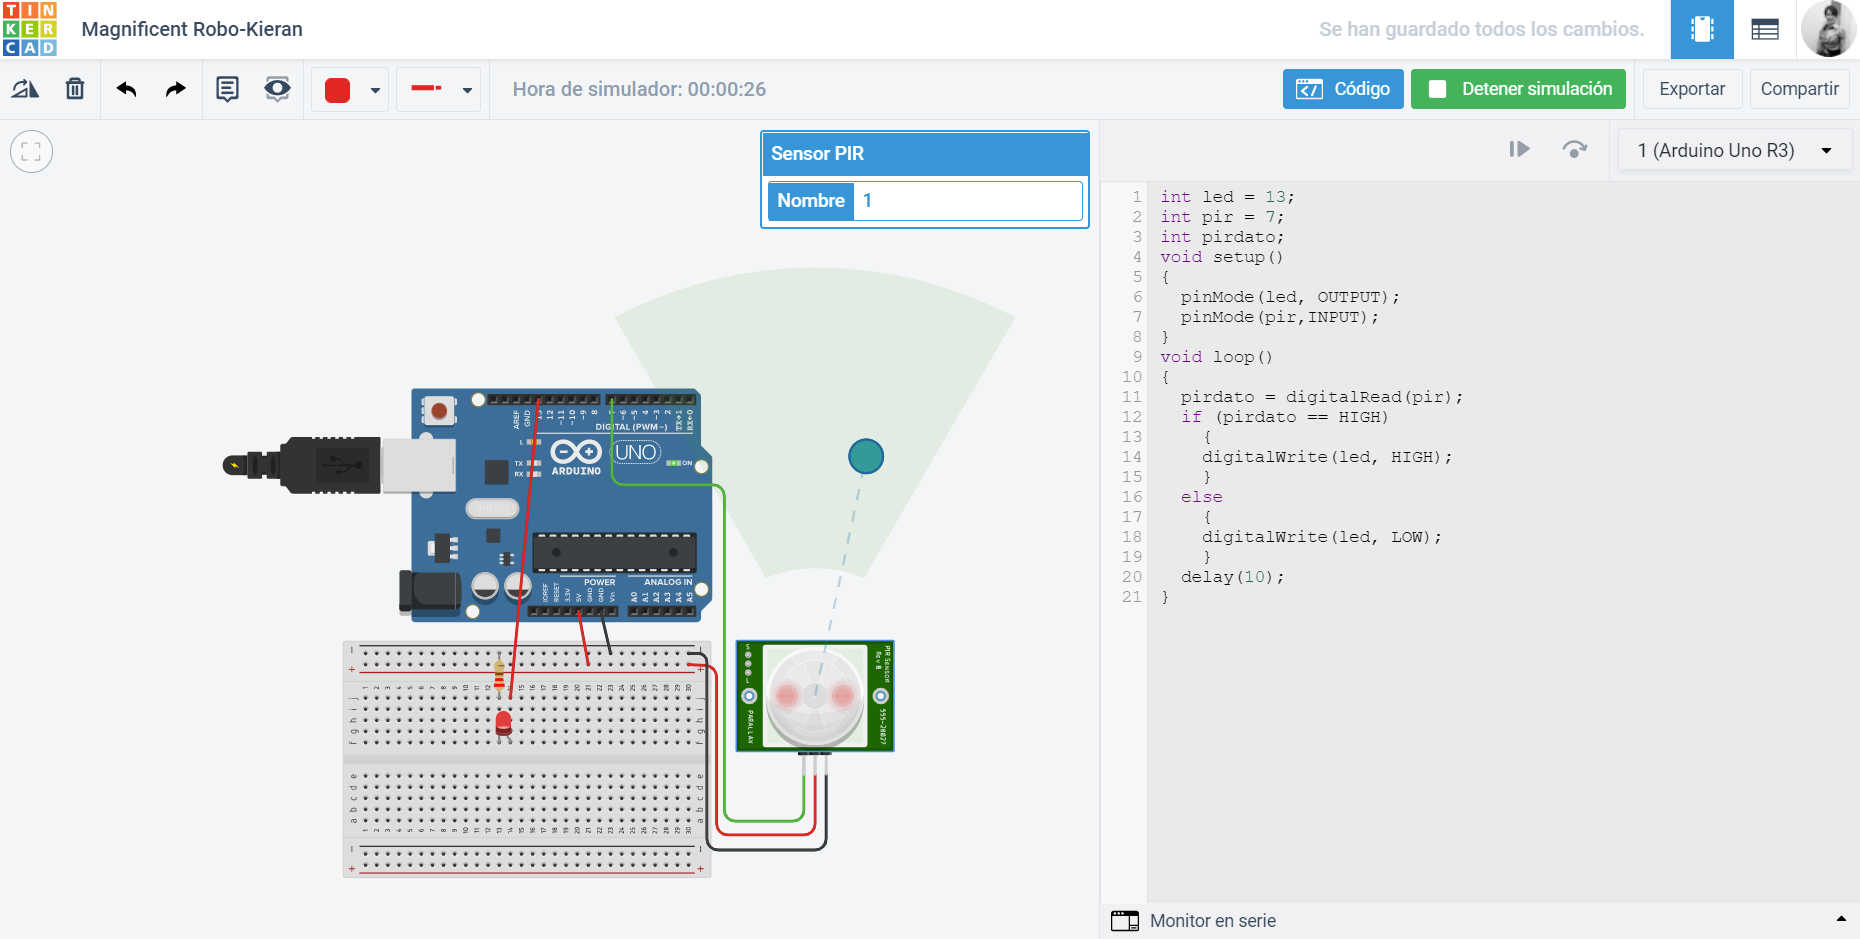
Tinkercad
Code:
	//Mayra Ascencio Calderón
	//Fab Academy 2021
	//Code

	byte sensorpir = 7;
	byte led = 13;

	void setup() {
		pinMode(sensorpir,INPUT);
		pinMode(led,OUTPUT);
		Serial.begin(9600);
	}

	void loop() {
		if(digitalRead(sensorpir) == HIGH)
		{
		Serial.println("Detectado movimiento por el sensor pir");
		digitalWrite(led,HIGH);
		delay(1000);
		digitalWrite(led,LOW);
		}
	}
Final vídeo:
Simulation
My final board
Now that I have had more practice with my designed board, I was encouraged to continue with the following weeks with more confidence. In this section I show the operation of a first test of an external button to make my led blink. This is because I wanted to go step by step, sometimes it is a little scary to have broken some part of it.
Buttom + LED
//Mayra Ascencio Calderón
//Fab Academy
//Code

const int sensor = 10;
const int led1 = 8;
int s1;

const int pinservo1=1;

void setup() {

  pinMode(sensor,INPUT);
  pinMode(led1,OUTPUT);

}

void loop() {

 s1= digitalRead(sensor);


 if (s1==1)
 {digitalWrite(led1,HIGH);

 }
 else
 {
  digitalWrite(led1,LOW);

 }


delay(20);
}
My final board
As a second step I did the same exercise by connecting the infrared sensor.
The 5V infrared line following sensor module, commonly known as KY-033, is a device designed to detect lines on surfaces, facilitating the construction of line following robots and other automation projects.
Main features:
- TCRT5000 sensor: uses an infrared emitter and receiver to detect the presence of lines by reflecting infrared light.
- Digital output: Provides a digital signal indicating the detection of a line: low level (LOW) when a line is detected (black surface) and high level (HIGH) when it is not detected (white surface).
- Sensitivity adjustment: Includes a potentiometer that allows to calibrate the sensitivity of the sensor according to the lighting conditions and the contrast of the surface.
- Compatibility: Operates with voltages from 3.3V to 5V, which makes it compatible with various platforms such as Arduino, ESP32, Raspberry Pi, among others.
Connections:
- The module has three pins:
VCC: Connect to 5V from the Arduino.
GND: Connect to GND of the Arduino.
OUT: Connect to a digital pin of the Arduino (for example, pin 7).
Infrared Line Track + LED
//Mayra Ascencio Calderón
//Fab Academy
//Code

const int sensor = 10;
const int led1 = 8;
int s1;

const int pinservo1=1;

void setup() {

  pinMode(sensor,INPUT);
  pinMode(led1,OUTPUT);

}

void loop() {

 s1= digitalRead(sensor);


 if (s1==1)
 {digitalWrite(led1,HIGH);

 }
 else
 {
  digitalWrite(led1,LOW);

 }


delay(20);
}