14. Networking and communications
For the final project I needed to make send signal from two devises so in this week I want to connate the tow of them by Bluetooth.
Group Assignment
Result
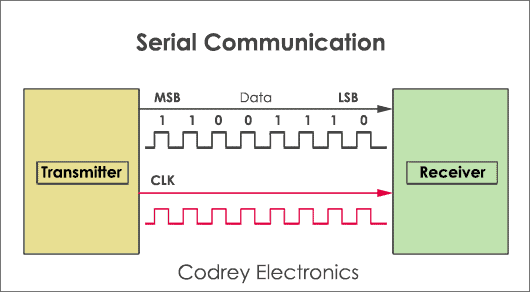
Serial communication
Serial communication it is the most widely used approach to transfer information between data processing equipment and peripherals. In general, communication means interchange of information between individuals through written documents, verbal words, audio and video lessons.
Every device might it be your Personal computer runs on serial protocol
 Serial Port Protocol
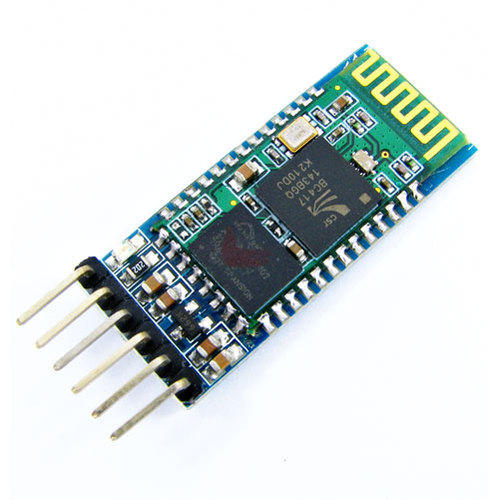
Bluetooth HC-05
I used Bluetooth module called HC-05 it is ease to use need 3.7v and this help me a lot in my final project
why ?
I used Bluetooth because my two devices far from each other and the wireless will be more flexible to move, one of the devices will be in motorcycle plat and the other will be in helmet.
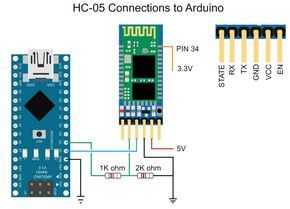
this is it pin out :
how to Pair Two HC-05 Bluetooth Module
I learned all these steps from this video here
to pair the to Bluetooth together you should make the Bluetooth module identify that it is master or slave by doing these steps
first contact the to the programmer and open the Arduino IDE mon:
then you enter the command mood in the Bluetooth by pressing on the button until it blink ever two second.
after you do that contact the RX and TX
RX in the Bluetooth to the TX in the programmer and the TX in the Bluetooth to RX in the programmer
open the serial mounter
and make sure that the
“both NL and CR” and “38400 baud”
all command start with
AT+
to check that everything working enter AT and the replay should be ok
AT+ROLE?
+ROLE+0
OK
That will show you if the bluetooth in the slave or master mood if you get 0 that mean that the bluetooth in the slave mood and if you get 1 that mean it is in the master mood
to change it to master you have to
AT+ROLE=1
+ROLE:1
OK
the other thing you need to know is the address of the Bluetooth and you can do that by
AT+ADDR?
+ADDR:98:D3:51:FD:ED:7C
OK
you have to copy this address and enter it the other Bluetooth by doing the same steps one of them must be slave and the other master they must have the same address.
AT+ADDR=98:D3:51:FD:ED:7C
OK
then when you open the two Bluetooth they will blink fast until it get contacted to each other and they will blink at the same time .
Software Serial
for coding I used Software Serial it is a library that enables serial communication with a digital pin other than the serial port. It is possible to have multiple software serial ports with speeds up to 115200bps. However, be careful when the baud rate is 115200bps because the reception latch timing is not so accurate. The receive buffer is fixed at 256 bytes.
To use it, specify #include
use two board
the receiver has ATtiny44a and master has ATtiny84a this is the pinout for two so it help us work in it :
for more information go to this page
why
I have to use this library because the Bluetooth has Serial communication and the AT tiny 84 does not have Serial communication so I have to use some translator between them, this translator is Software Serial.
Master :
you can find more information about the circuit
Slave:
you can find more information about the circuit in
Input devices
then
Code and library
I use Software Serial library
for master:
// the setup function runs once when you press reset or power the board
void setup() {
  // initialize digital pin LED_BUILTIN as an output.
  pinMode(LED_BUILTIN, OUTPUT);
}

// the loop function runs over and over again forever
void loop() {
  digitalWrite(LED_BUILTIN, HIGH);   // turn the LED on (HIGH is the voltage level)
  delay(1000);                       // wait for a second
  digitalWrite(LED_BUILTIN, LOW);    // turn the LED off by making the voltage LOW
  delay(1000);                       // wait for a second
}#include <Tiny4kOLED.h>
#include "SolomonSystech.h"
#include <SoftwareSerial.h>
SoftwareSerial mySerial(1,6); // RX1, TX6
// ============================================================================

void setup() {


  oled.begin();
  oled.clear();
  oled.bitmap(0,0, 128,4, logo);
  oled.on();
  delay(1000);
  oled.clear();

 mySerial.begin(9600);
}

void loop() {
  int x = 0 ;
 if(mySerial.available() > 0){
    x = mySerial.read();
 }

 if (x == '1')
 {
  oled.begin();
  oled.clear();
  oled.bitmap(0,0, 128,4, lift1);
  oled.on();
  delay(250);

  oled.begin();
  oled.clear();
  oled.bitmap(0,0, 128,4, lift2);
  oled.on();
  delay(250);

  oled.begin();
  oled.clear();
  oled.bitmap(0,0, 128,4, lift3);
  oled.on();
  delay(250);
 }

  if (x == '2')
  {
  oled.begin();
  oled.clear();
  oled.bitmap(0,0, 128,4, right1);
  oled.on();
  delay(250);


  oled.begin();
  oled.clear();
  oled.bitmap(0,0, 128,4, right2);
  oled.on();
  delay(250);

  oled.begin();
  oled.clear();
  oled.bitmap(0,0, 128,4, right3);
  oled.on();
  delay(250);
  }
  else {
  oled.begin();
  oled.clear();

  }
  }
for receiver:
#include <SoftwareSerial.h>
SoftwareSerial mySerial(10, 2); // RX, TX

// defines pins numbers
const int trigPinL = 5;
const int echoPinL = 6;
const int ledL = 3 ;
const int trigPinR = 7;
const int echoPinR = 8;
const int ledR = 9 ;

// defines variables
long durationL;
int distanceL;
long durationR;
int distanceR;
int x ;


void setup()
{
pinMode(trigPinL, OUTPUT); // Sets the trigPin as an Output
pinMode(echoPinL, INPUT); // Sets the echoPin as an Input
pinMode(ledL, OUTPUT);

pinMode(trigPinR, OUTPUT); // Sets the trigPin as an Output
pinMode(echoPinR, INPUT); // Sets the echoPin as an Input
pinMode(ledR, OUTPUT);
mySerial.begin(9600);


}

void loop() {
x=0;
// FOR THE LIFT SIDE
// Clears the trigPin
digitalWrite(trigPinL, LOW);
delayMicroseconds(2);

// Sets the trigPin on HIGH state for 10 micro seconds
digitalWrite(trigPinL, HIGH);
delayMicroseconds(10);
digitalWrite(trigPinL, LOW);

// Reads the echoPin, returns the sound wave travel time in microseconds
durationL = pulseIn(echoPinL, HIGH);

// Calculating the distance
distanceL= durationL*0.034/2;


//led signle lift

if (distanceL < 300)

{
  digitalWrite(ledL, HIGH);   // turn the LED on (HIGH is the voltage level)
  delay(300);                       // wait for a second
  digitalWrite(ledL, LOW);    // turn the LED off by making the voltage LOW
  delay(300);                       // wait for a second
  x=1;
}

else if (distanceL < 200)

{
  digitalWrite(ledL, HIGH);   // turn the LED on (HIGH is the voltage level)
  delay(200);                       // wait for a second
  digitalWrite(ledL, LOW);    // turn the LED off by making the voltage LOW
  delay(200);                       // wait for a second
  x=1;
}

else if (distanceL < 150)

{
  digitalWrite(ledL, HIGH);   // turn the LED on (HIGH is the voltage level)
  delay(100);                       // wait for a second
  digitalWrite(ledL, LOW);    // turn the LED off by making the voltage LOW
  delay(100);                       // wait for a second
  x=1;
}


else if (distanceL < 100)

{
  digitalWrite(ledL, HIGH);   // turn the LED on (HIGH is the voltage level)
  mySerial.write('1');
  delay(40);                       // wait for a second
  digitalWrite(ledL, LOW);    // turn the LED off by making the voltage LOW
  delay(40);                       // wait for a second
  x=1;
}

else if (distanceL < 75)

{
  digitalWrite(ledL, HIGH);   // turn the LED on (HIGH is the voltage level)
  mySerial.write('1');
  delay(30);                       // wait for a second
  digitalWrite(ledL, LOW);    // turn the LED off by making the voltage LOW
  delay(30);                       // wait for a second
  x=1;
}


else
{
digitalWrite(ledL, LOW);

}


//FOR THE RIGHT SIDE
// Clears the trigPin
digitalWrite(trigPinR, LOW);
delayMicroseconds(2);

// Sets the trigPin on HIGH state for 10 micro seconds
digitalWrite(trigPinR, HIGH);
delayMicroseconds(10);
digitalWrite(trigPinR, LOW);

// Reads the echoPin, returns the sound wave travel time in microseconds
durationR = pulseIn(echoPinR, HIGH);

// Calculating the distance
distanceR= durationR*0.034/2;

//led signle right

if (distanceR < 300)

{
  digitalWrite(ledR, HIGH);   // turn the LED on (HIGH is the voltage level)
  delay(300);                       // wait for a second
  digitalWrite(ledR, LOW);    // turn the LED off by making the voltage LOW
  delay(300);                       // wait for a second
  x=2;
}

else if (distanceR < 200)

{
  digitalWrite(ledR, HIGH);   // turn the LED on (HIGH is the voltage level)
  delay(200);                       // wait for a second
  digitalWrite(ledR, LOW);    // turn the LED off by making the voltage LOW
  delay(200);                       // wait for a second
  x=2;
}

else if (distanceR < 150)

{
  digitalWrite(ledR, HIGH);   // turn the LED on (HIGH is the voltage level)
  delay(100);                       // wait for a second
  digitalWrite(ledR, LOW);    // turn the LED off by making the voltage LOW
  delay(100);                       // wait for a second
  x=2;
}


else if (distanceR < 100)

{
  digitalWrite(ledR, HIGH);   // turn the LED on (HIGH is the voltage level)
  delay(40);                       // wait for a second
  digitalWrite(ledR, LOW);    // turn the LED off by making the voltage LOW
  delay(40);                       // wait for a second
  x=2;
}

else if (distanceR < 75)

{
  digitalWrite(ledR, HIGH);   // turn the LED on (HIGH is the voltage level)
  delay(30);                       // wait for a second
  digitalWrite(ledR, LOW);    // turn the LED off by making the voltage LOW
  delay(30);                       // wait for a second
  x=2;
}


else
{
digitalWrite(ledR, LOW);

}


  switch (x) {
    case 0:    // your hand is on the sensor
       mySerial.println('0');
      break;
    case 1:    // your hand is close to the sensor
       mySerial.println('1');
      break;
    case 2:    // your hand is a few inches from the sensor
      mySerial.println('2');
      break;

  }
  delay(10);

}
one on the thing that help me in the Bluetooth was application in the phone called “Bluetooth terminal hc-05”