10. Input devices
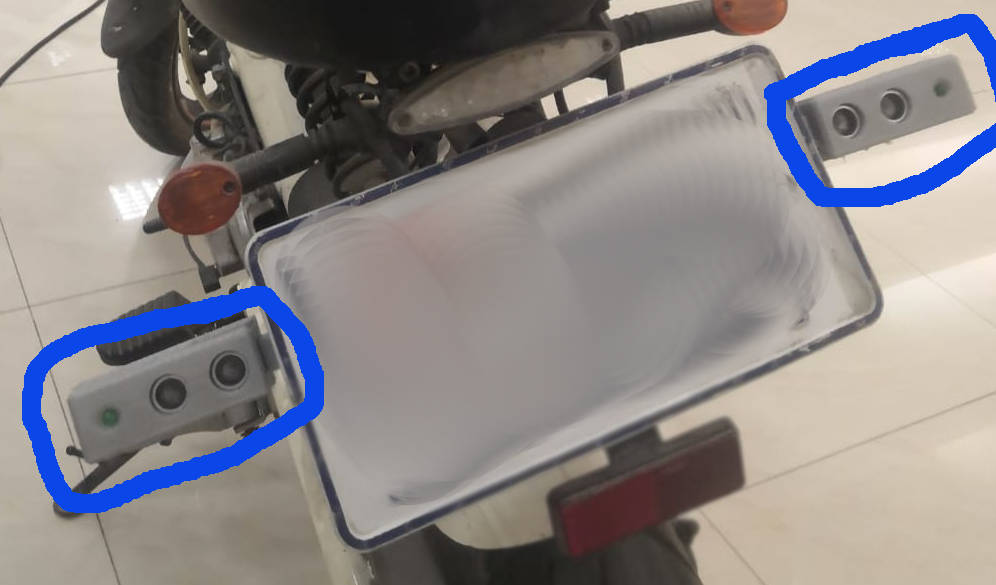
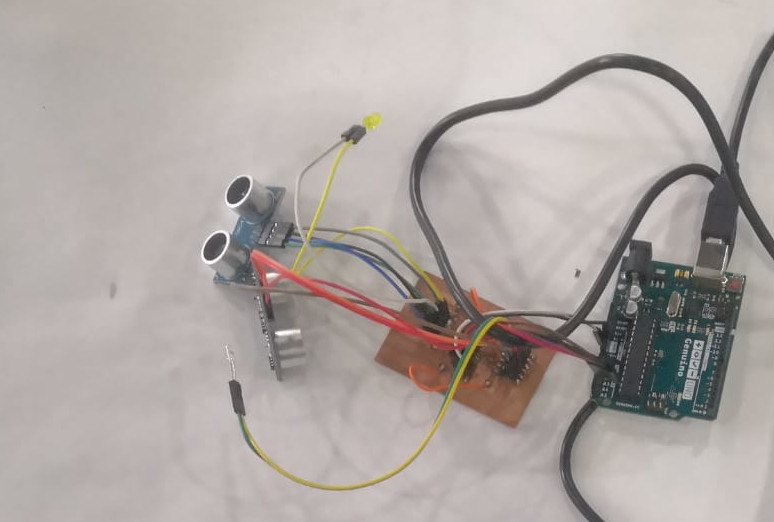
in the bleu circle is the ultrasonic that I used
as you see in the video I used the ultrasonic in my final project to detect the then send the information using the network connection and display it in the screen
for my final project I needed to detect the cars that behind the motorcycle rider
Group Assignment
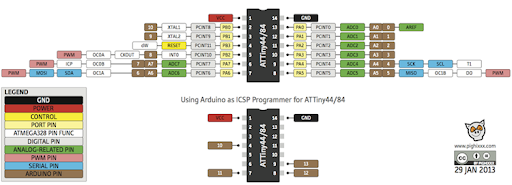
Microcontroller
I used the same microcontroller “ATtiny44” before so you can find programming steps in the Embedded programming week
Ultrasonic
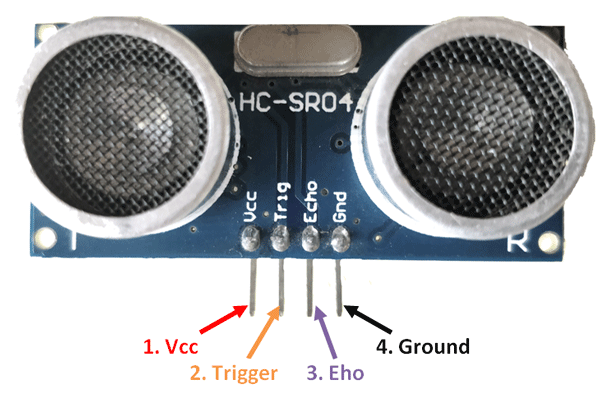
The ultrasonic sensor it have a lot of uses in our life as an example cars, robot and many other thing
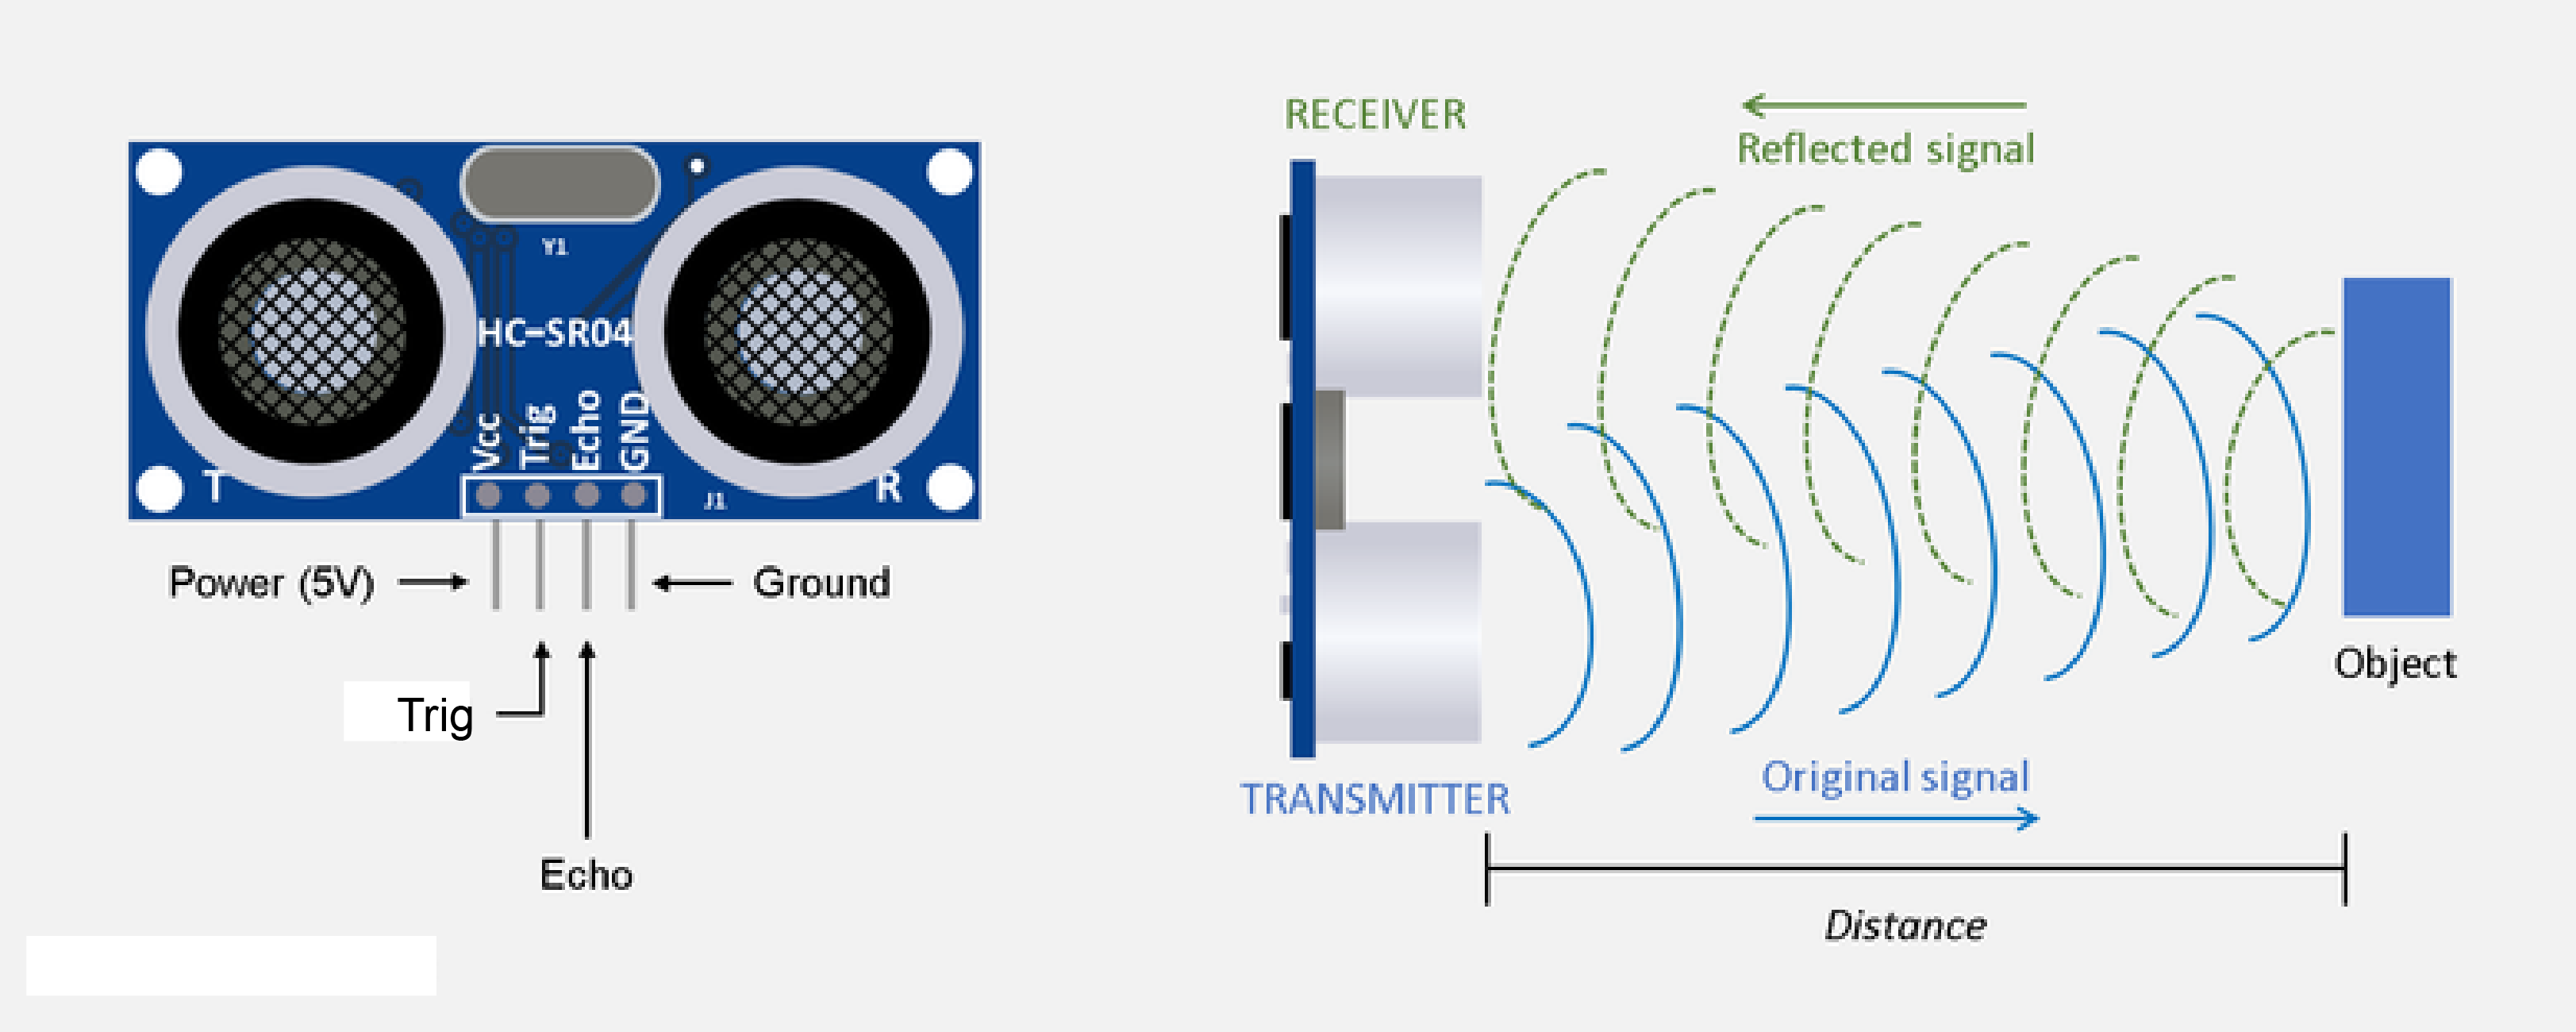
how it work this sensor send sound waves from the first eye it called “Transmitter” the waves go until hit the object then in reflect and go back to the other eye it called the “receiver”. Then is gave us the time that it take for the wave to hit the object and return, the we take the time and multiply by the wave speed this will give us the distance from the sensor to the object and going back, so we divide the distance by 2 to git the just the distant from the sensor to the object. you will learn more about it when you go to the code section.
why did I use it in the final project On the final project I need to know if something near the rider from back so I decided to use this sensor because it ease to use and ease to program. I used two sensor one for each side by this way the device will cover more of the blind spot
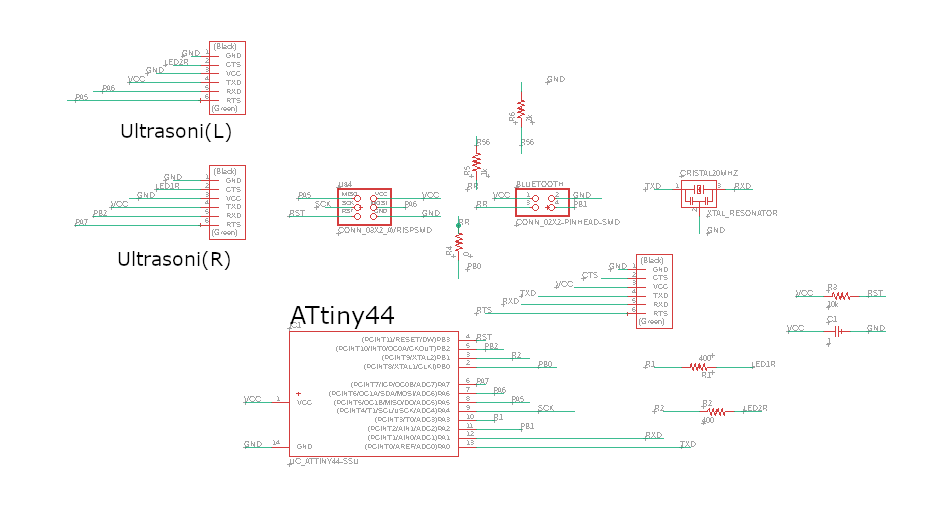
Electronic Circuit
design
I design this Circuit to use it for this week and the final project:
Components:
ATtiny44
Resistor:
0 ohm X3
10k rest
1k “for the Bluetooth”
2k “for the Bluetooth”
0.4k “for the led”x2
capacitor:
1uf
Cristal: 20mhz
Pin out
6x1—3
3x2—1
2x2—1
Wire jumper X3
Ultrasonic x 2
Bluetooth ht05
traces :
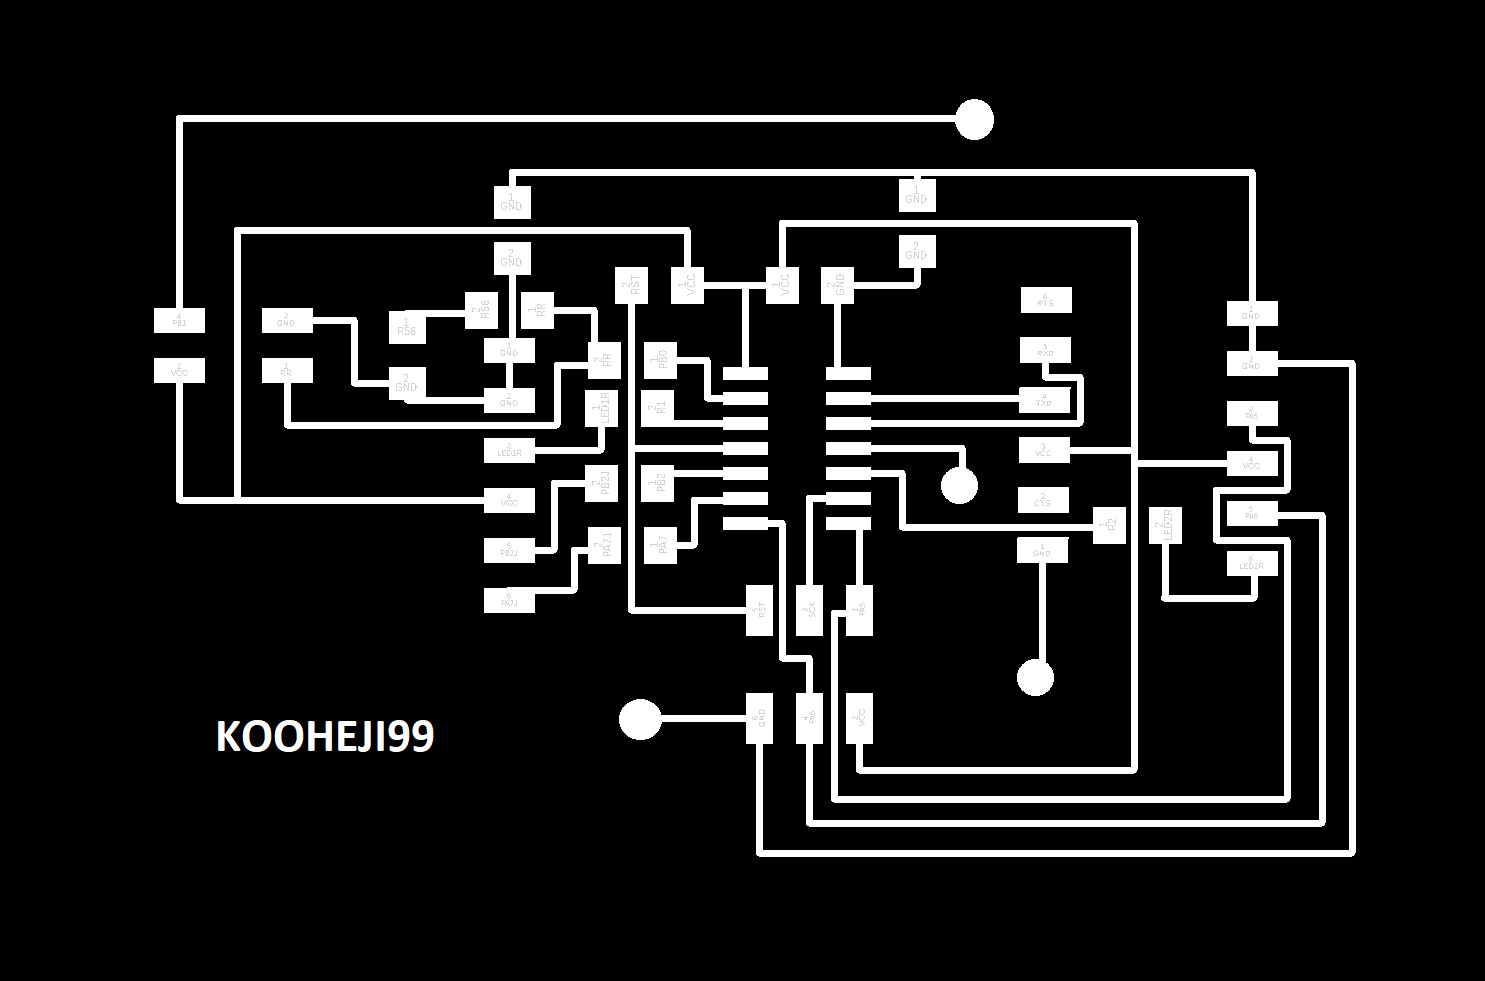
outline :

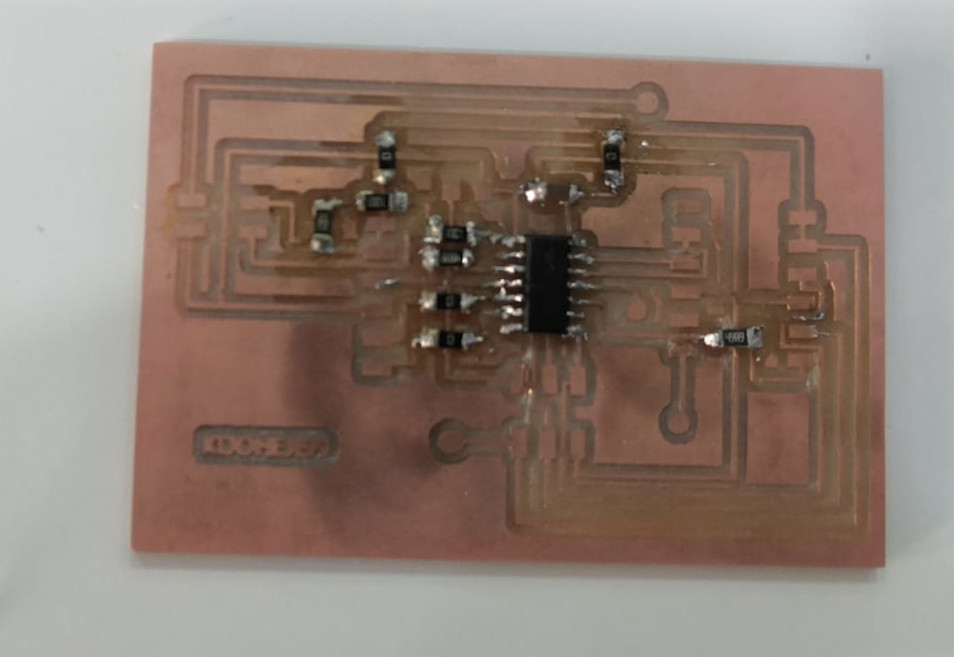
milling
in the milling I faced small problem when I start mill I didn’t take the size of Circuit so it mill on free space,
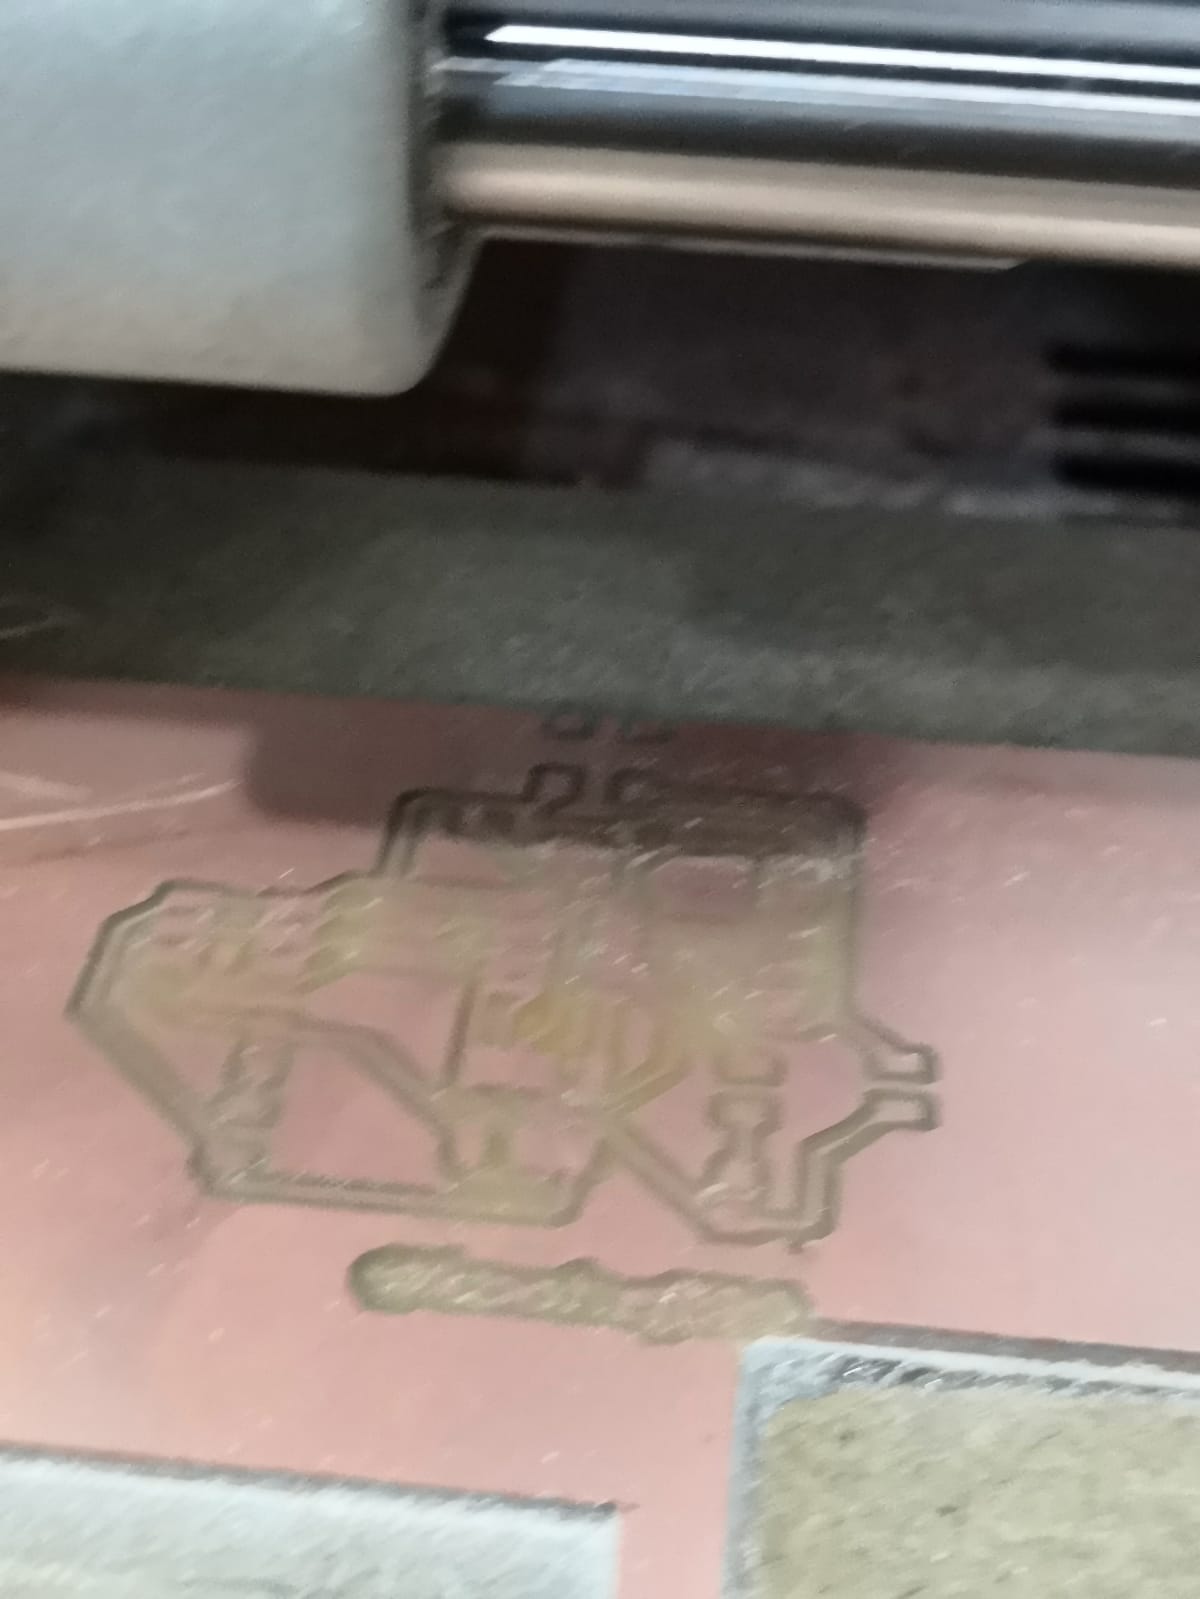 then I re-mill it but I make sure that there is enagh space for it
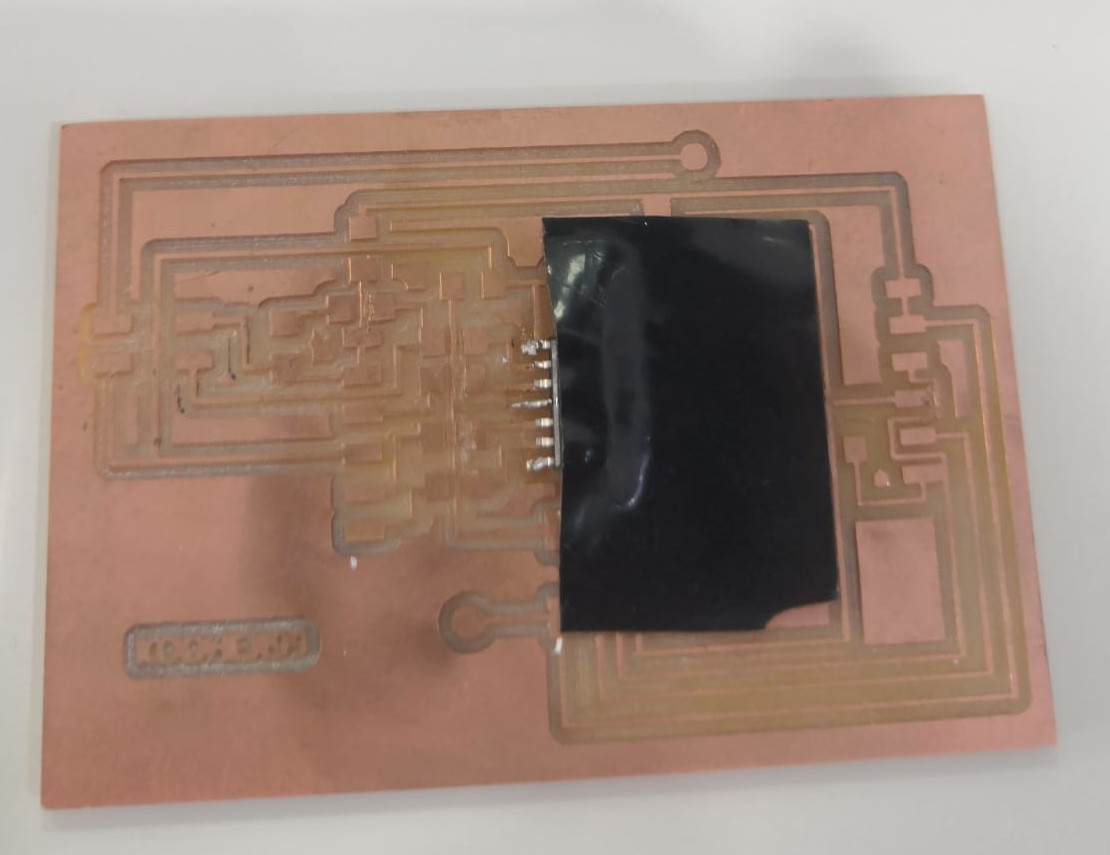
soldring
I start doing this Teknik to solder faster and easer, which is sticke the microcontroller or any part by tape so it dose not move while I solder
 as you see it didn’t road the
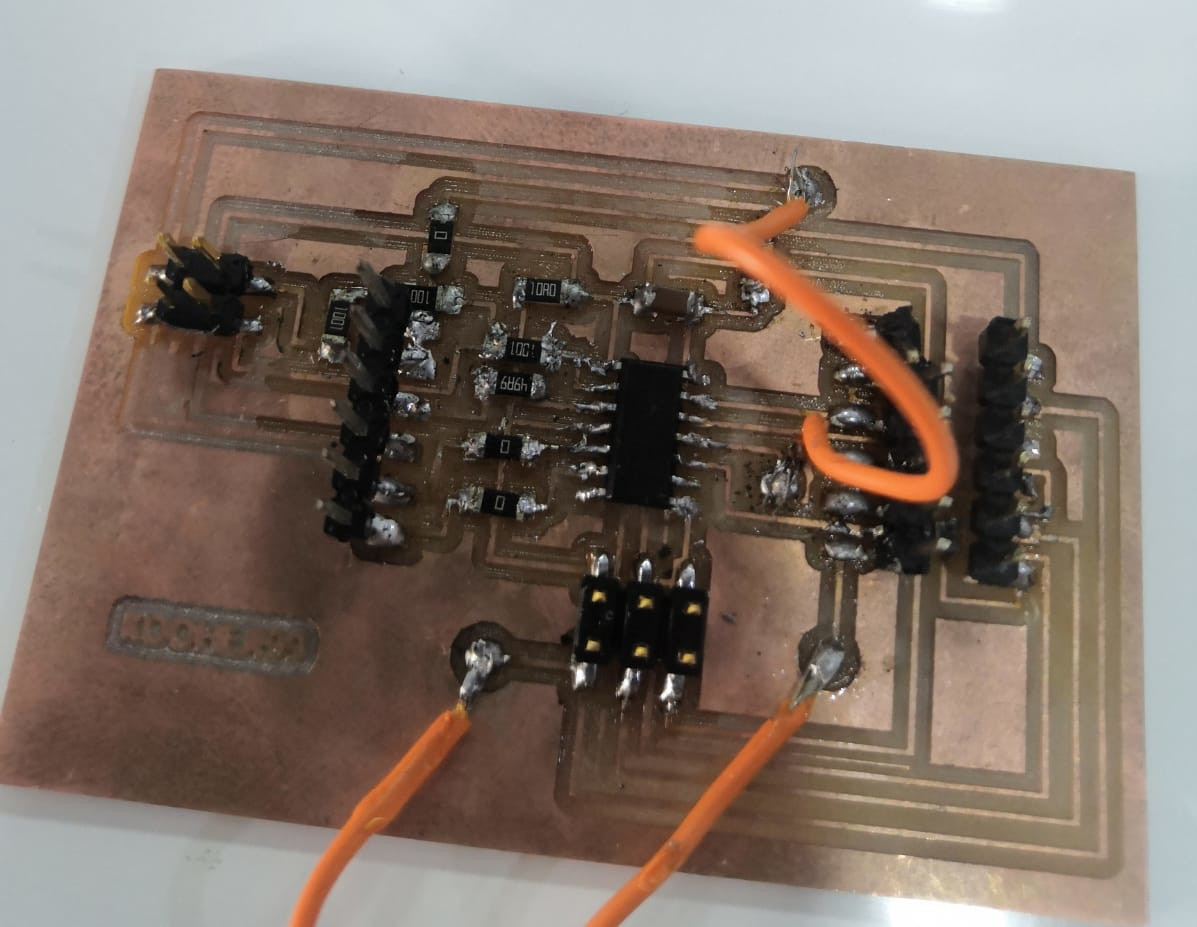 this is how it look after I finish soldering
 then I start to check if every thing right and it when well
Code
What it will do ?
the code will take data from the ultrasonic then it will see how far the object from it if the distant less then 3m it will make the light blink at the same side of the sensor, and ever time it get closer it will make the blinking go faster, at the same time it will send data to the other device that it detect something by the bluetooth.
How it will do it ?
first the ultrasonic will start counting time send sound waves from the Transmitter eye and when the receiver eye get the sound waves it will stop the counting time then multiple the time by the wave speed to get the distance that wave goes too and divided that by 2 because the distance that we get was from the sensor to the reflecting body and back to the sensor.
// Sets the trigPin on HIGH state for 10 micro seconds
digitalWrite(trigPinR, HIGH);
delayMicroseconds(10);
digitalWrite(trigPinR, LOW);

// Reads the echoPin, returns the sound wave travel time in microseconds
durationR = pulseIn(echoPinR, HIGH);


// Calculating the distance
distanceL= durationL*0.034/2;
after we get the distance if it less the 3 m it will start blinking and it will get faster when it reach 2m and faster when it reach 150 and as it get closer the blinking will get faster.
if (distanceR < 300)

{
  digitalWrite(ledR, HIGH);   // turn the LED on (HIGH is the voltage level)
  delay(300);                       // wait for a second
  digitalWrite(ledR, LOW);    // turn the LED off by making the voltage LOW
  delay(300);                       // wait for a second
  x=2;
}
At the same time it will send 0 if the sensors didn’t get any object close and if it get something at lift sensor if will send 1 and 2 if it was from the right sensor.
switch (x) {
    case 0:    // your hand is on the sensor
       mySerial.println('0');
      break;
    case 1:    // your hand is close to the sensor
       mySerial.println('1');
      break;
    case 2:    // your hand is a few inches from the sensor
      mySerial.println('2');
      break;
The code
#include <SoftwareSerial.h>
SoftwareSerial mySerial(10, 2); // RX, TX

// defines pins numbers
const int trigPinL = 5;
const int echoPinL = 6;
const int ledL = 3 ;
const int trigPinR = 7;
const int echoPinR = 8;
const int ledR = 9 ;

// defines variables
long durationL;
int distanceL;
long durationR;
int distanceR;
int x ;


void setup()
{
pinMode(trigPinL, OUTPUT); // Sets the trigPin as an Output
pinMode(echoPinL, INPUT); // Sets the echoPin as an Input
pinMode(ledL, OUTPUT);

pinMode(trigPinR, OUTPUT); // Sets the trigPin as an Output
pinMode(echoPinR, INPUT); // Sets the echoPin as an Input
pinMode(ledR, OUTPUT);
mySerial.begin(9600);


}

void loop() {
x=0;
// FOR THE LIFT SIDE
// Clears the trigPin
digitalWrite(trigPinL, LOW);
delayMicroseconds(2);

// Sets the trigPin on HIGH state for 10 micro seconds
digitalWrite(trigPinL, HIGH);
delayMicroseconds(10);
digitalWrite(trigPinL, LOW);

// Reads the echoPin, returns the sound wave travel time in microseconds
durationL = pulseIn(echoPinL, HIGH);

// Calculating the distance
distanceL= durationL*0.034/2;


//led signle lift

if (distanceL < 300)

{
  digitalWrite(ledL, HIGH);   // turn the LED on (HIGH is the voltage level)
  delay(300);                       // wait for a second
  digitalWrite(ledL, LOW);    // turn the LED off by making the voltage LOW
  delay(300);                       // wait for a second
  x=1;
}

else if (distanceL < 200)

{
  digitalWrite(ledL, HIGH);   // turn the LED on (HIGH is the voltage level)
  delay(200);                       // wait for a second
  digitalWrite(ledL, LOW);    // turn the LED off by making the voltage LOW
  delay(200);                       // wait for a second
  x=1;
}

else if (distanceL < 150)

{
  digitalWrite(ledL, HIGH);   // turn the LED on (HIGH is the voltage level)
  delay(100);                       // wait for a second
  digitalWrite(ledL, LOW);    // turn the LED off by making the voltage LOW
  delay(100);                       // wait for a second
  x=1;
}


else if (distanceL < 100)

{
  digitalWrite(ledL, HIGH);   // turn the LED on (HIGH is the voltage level)
  mySerial.write('1');
  delay(40);                       // wait for a second
  digitalWrite(ledL, LOW);    // turn the LED off by making the voltage LOW
  delay(40);                       // wait for a second
  x=1;
}

else if (distanceL < 75)

{
  digitalWrite(ledL, HIGH);   // turn the LED on (HIGH is the voltage level)
  mySerial.write('1');
  delay(30);                       // wait for a second
  digitalWrite(ledL, LOW);    // turn the LED off by making the voltage LOW
  delay(30);                       // wait for a second
  x=1;
}


else
{
digitalWrite(ledL, LOW);

}


//FOR THE RIGHT SIDE
// Clears the trigPin
digitalWrite(trigPinR, LOW);
delayMicroseconds(2);

// Sets the trigPin on HIGH state for 10 micro seconds
digitalWrite(trigPinR, HIGH);
delayMicroseconds(10);
digitalWrite(trigPinR, LOW);

// Reads the echoPin, returns the sound wave travel time in microseconds
durationR = pulseIn(echoPinR, HIGH);

// Calculating the distance
distanceR= durationR*0.034/2;

//led signle right

if (distanceR < 300)

{
  digitalWrite(ledR, HIGH);   // turn the LED on (HIGH is the voltage level)
  delay(300);                       // wait for a second
  digitalWrite(ledR, LOW);    // turn the LED off by making the voltage LOW
  delay(300);                       // wait for a second
  x=2;
}

else if (distanceR < 200)

{
  digitalWrite(ledR, HIGH);   // turn the LED on (HIGH is the voltage level)
  delay(200);                       // wait for a second
  digitalWrite(ledR, LOW);    // turn the LED off by making the voltage LOW
  delay(200);                       // wait for a second
  x=2;
}

else if (distanceR < 150)

{
  digitalWrite(ledR, HIGH);   // turn the LED on (HIGH is the voltage level)
  delay(100);                       // wait for a second
  digitalWrite(ledR, LOW);    // turn the LED off by making the voltage LOW
  delay(100);                       // wait for a second
  x=2;
}


else if (distanceR < 100)

{
  digitalWrite(ledR, HIGH);   // turn the LED on (HIGH is the voltage level)
  delay(40);                       // wait for a second
  digitalWrite(ledR, LOW);    // turn the LED off by making the voltage LOW
  delay(40);                       // wait for a second
  x=2;
}

else if (distanceR < 75)

{
  digitalWrite(ledR, HIGH);   // turn the LED on (HIGH is the voltage level)
  delay(30);                       // wait for a second
  digitalWrite(ledR, LOW);    // turn the LED off by making the voltage LOW
  delay(30);                       // wait for a second
  x=2;
}


else
{
digitalWrite(ledR, LOW);

}


  switch (x) {
    case 0:    // your hand is on the sensor
       mySerial.println('0');
      break;
    case 1:    // your hand is close to the sensor
       mySerial.println('1');
      break;
    case 2:    // your hand is a few inches from the sensor
      mySerial.println('2');
      break;

  }
  delay(10);

}
Files
circuit design
traces :
outline :