Output Devices
Assignment List
- individual assignment: ☑
- add an output device to a microcontroller board you've designed, and program it to do something ☑
- group assignment: ☑
- measure the power consumption of an output device ☑
- To Conclude & Reflect
individual assignment
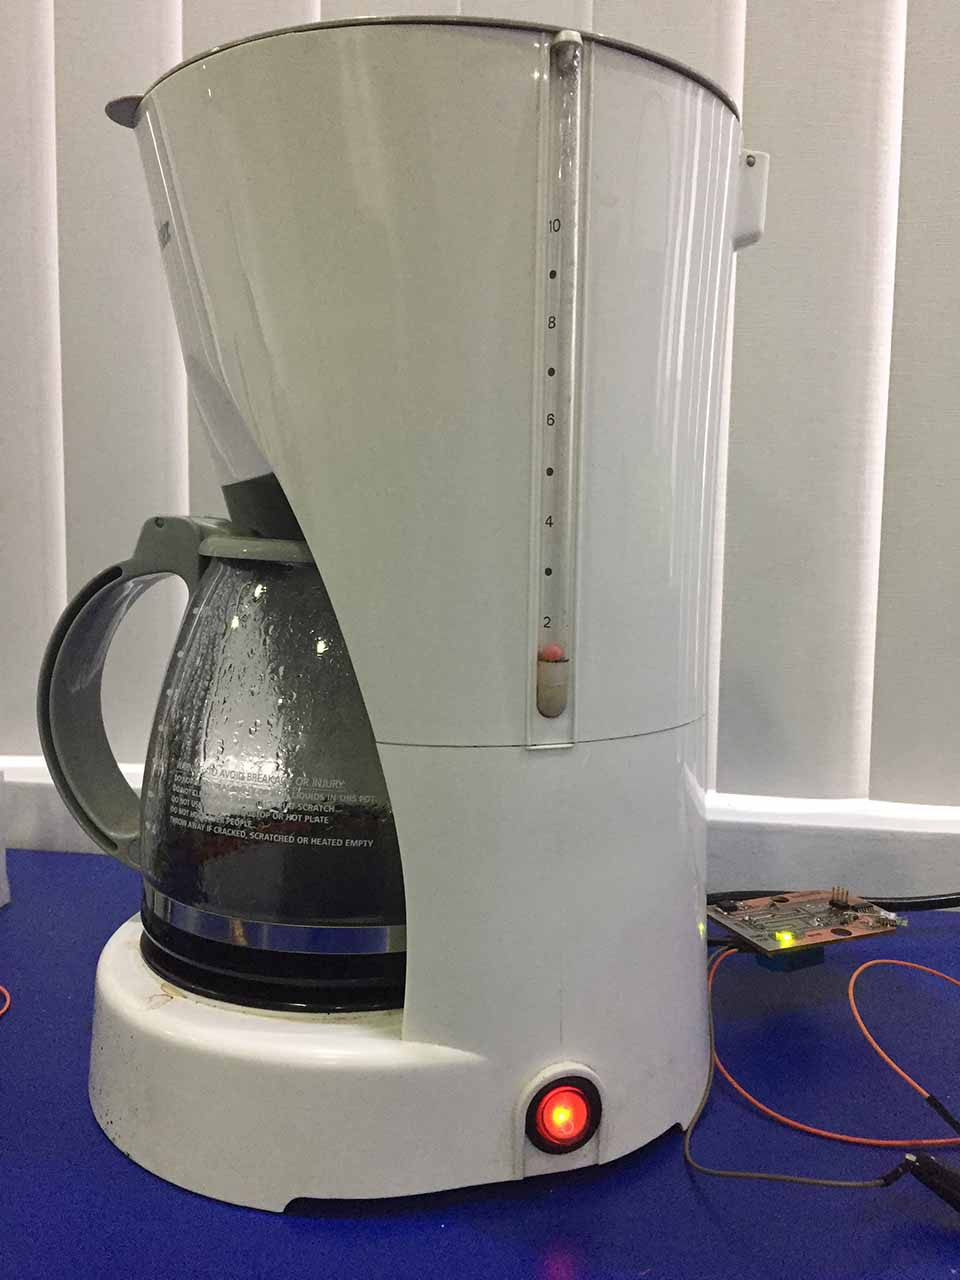
In this section I did a microcontroller to actuate a relay. The final goal being turn on a coffee maker. I measured the output device's in the group assignment, to determine the relay specifications. 7.3 ampers and 120v.
As you will see, above is the finished pcb already turning on the device.


In the beguining I actually created a pcb, without a bluetooth in order to activate the relay via input plugs. I had extra time and thought maybe Ill make an aditional leap and create a pcb with a bluetooth integrated and get ahead on the final project. I did get some know-how from suhail-p.
| Quantities | Description | |
|---|---|---|
| 1 | Relay 5v 110v | |
| 1 | Mosfit | |
| 1 | Screable 3 port cable holder | |
| 2 | 1k resistance | |
| 1 | 10 k resistance | |
| 1 | Attiny 45 | |
| 1 | AVR isp pin 3x2, male | |
| 1 | 1 uf capacitor | |
| 1 | LED smd | |
| 2 | 2 pins screwable ports |
The pcb with a bluetooth:

This was the second itteration. In this case the bluetooth module DN-4971 on the top left corner is integrated.


Inserting the png files into mods. In this case the parameters changed slightly, and documenting it will help me next week for sure.
At the same time I did this experiment I thought was neat and safer to work with when using 120v 7amp power. First in Eagle, I gave the 120v footprints a 100 mil wide path. I later edited this paths to have their own png file, and g code so as to add multiple offsets only arround them. Saving myself tons of time.
The way I look at it is if I do require to fix or make another pcb, by making the minimun amount of offsets, Ill have more time for all this debug that will surely exist. As for example: Out of line line.


I found this out of line lines (shown on the left), and had to go back a recreate the g code. I found them while placeing the machining operation in the nc - viewer online.
I also found this line that most lightly mods was picking up from the edge of the image (shown in the right). In the later case I just stoped the cnc machine before it started cutting that line, as it was at the end of the g-code.
On the right what you are seeing is a conglomerate of all the g-codes into a single file. I do this because I cannot add multiple files to the nc-viewer online. It is also helpfull to see that everything lines up Before actually machining them all.

Above is the pcb I ended machining. With the extra offsets only on the 120v paths, a couple of mounting holes on the sides. And names on everything as to instantly communicate what is going on. We have the technology.
The time it takes machining greatly outweight the possible little mistake that might burn the microcontroller.
debugging:

I was having trouble with the pcb, and didnt realize that I connected the mosfet wrong. I also did not provide power to the bluetooth. Corrected by alex, I did some hands on engine repair and with a bit of luck I managed to get everything conected and working. Still ogly thoug.

I also had to switch the relay, as the original one I solder just didnt work. And those 5 pis where hell to brake loose. As a result all the salder material all over. Bit more and could have sold it as a "chrome" pcb. Also, the relay broke while unsoldering one leg.
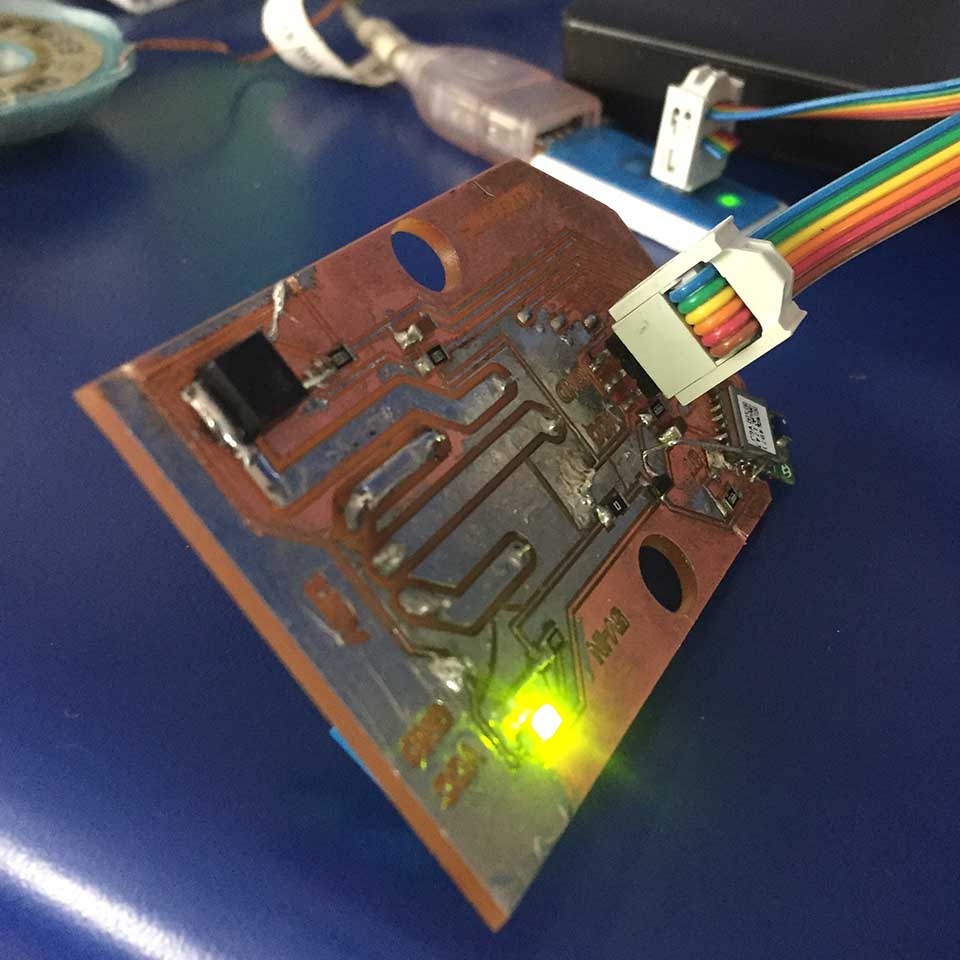
Here is the pcb for the Output Device Actually working! Yey!
Here is the way we hacked the coffee maker in order for the pcb to control it. It was all safe, and aproved by an Electrical Engeneer: Alex.
Here is a nice colose up on how the coffee machine works. With a power source on the side for the output device. As it is intended to stand alone, 5v vcc and ground where introduced in circuit to power the dc side of the system.
the protocol and system used to program
One procedure that enables the fabacademy to work so rapidly is the method of programing the microcontroller. In this case every programing done is in system. Through the ISP header.

I'll use the 6-pin AVR ISP header.
It is also good to note that the 6-pin head is not connected directly to the computer, but its communication works as follows:

The memntioned is the programming protocol I use to program in this case.
Inside the attiny 88, was a simple code telling it to turn on and off every 5 seconds. Just to test the realy out. I supriseingly was enough to make "warm" coffee.
#include 'avr/io.h'
#include 'util/delay.h'


int main()
{

  /* Configure the port A0 as Output */
    DDRB = 0Xff;

    while(1)
    {

      PORTB = (1 << PB0); /* Turn ON the Relay */
      _delay_ms(500);
      PORTB = (0 << PB0); /* Turn OFF the Relay */
      _delay_ms(500);

    }

    return (0);
}
The Bom:
- 1x Pins 2x3
- 1x modulo bluetooth RN4871
- 2x capacitors 1uf
- 2x LED
- 1x microcontrolador ATtiny44
- 1x mosfetto 252
- 1x terminal 1x3 para coneccion de relay
- 1x relay de 5v mecanico (srd-05vdc-sl-c)
- 1x regulador sot23
- 1x 10k ohm
- 2x 330 ohm
- 1x 4.7 ohm (o similar)
- 1x 1k
- 1x 0k
group assignment
I measured the current going through an outlet into the Coffee Maker. In order for it to give a proper value of the resistance, I added water and actually brewed coffee.. for learning purposes of course.
And so I started with a certain left turn. It was a turning point when I attemped to measure the Ohm's between each outlet plug.
Fortunately I did not blow any fuses, yet everyone heard my mischeif.

Current is closer to the rate at witch a river travels. Its not at all like volts and finding a potential diference.
Once I had this thoughroly expained, we proceded to hook up an extra plug for the wall. Running the current though the meter on one end.

Bazinga: 7.31 ohms

This all equates to realizing that my relay, to turn on and off the coffee maker must be just as strong as the coffee its brewing. As it the heating element is basically a gigantinc resistance that mostly emits heat when current runs through, it require a large energy.
To Conclude
From this assignment, I was able to create several connections to my final project as well as literal debugging conections. Actually drink my warm coffee semi-autonomously made, was bittersweet. An i would do it all the time.
It did require tons of debugging, so as a mental note I will make most of the bits and parts polished enough just to be jouint in a final week.