
Project developement
design, build, and connect wired or wireless node(s) with network or bus addresses
send a message between two projects
This week is for me like a resumption and the home stretch, then it was a little bit hard to go back again in movement. In my planning to reach my final project objectives this week I planned to learn how to communicate throught a wireless connection with the board that I have designed for the Output week.
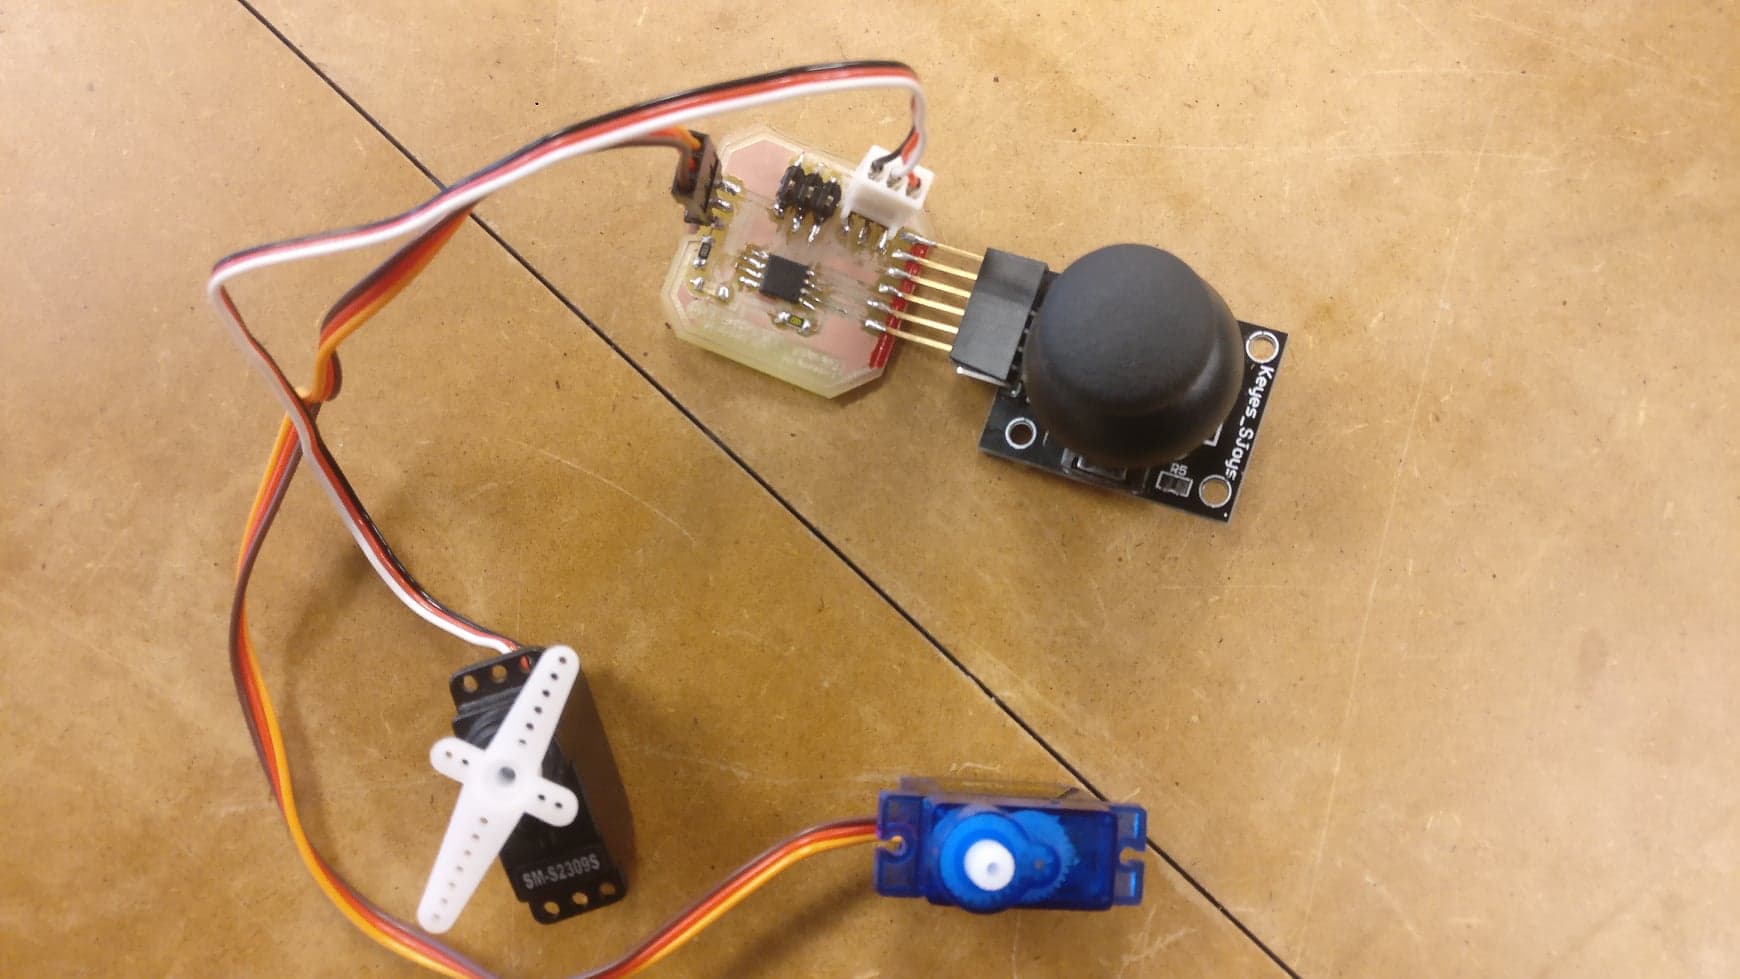
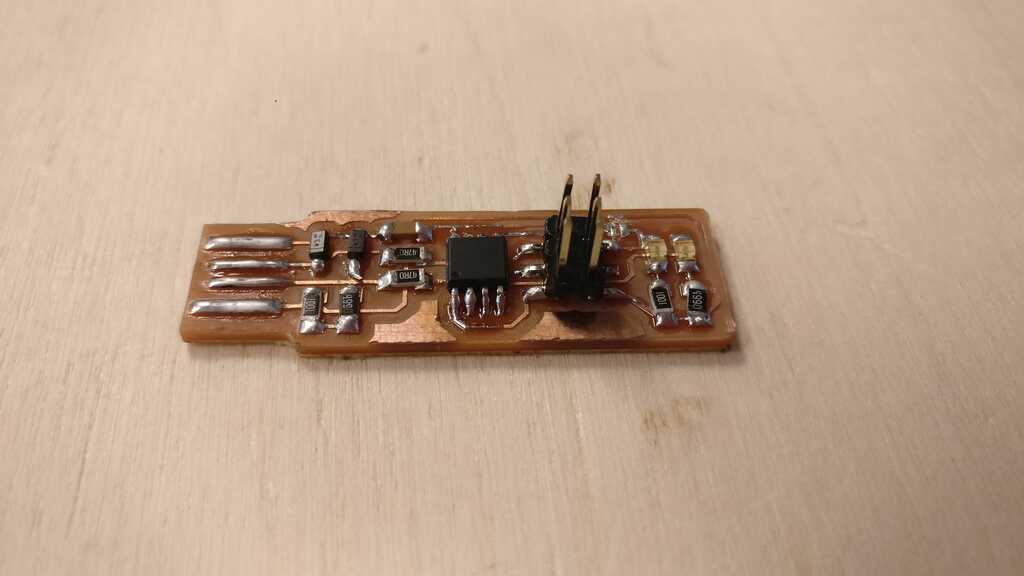
Then 2 weeks ago, I have made a board based on esp8266. The esp8266, have a built-in wifi module. I have also added on my board 2 connectors for 2 servo motors and a LED. The idea in a first time is to be able to light on and off a LED by clicking on little webpage hosted on the ESP8266.
Before starting any code, I need to know what is a Network and how it works...
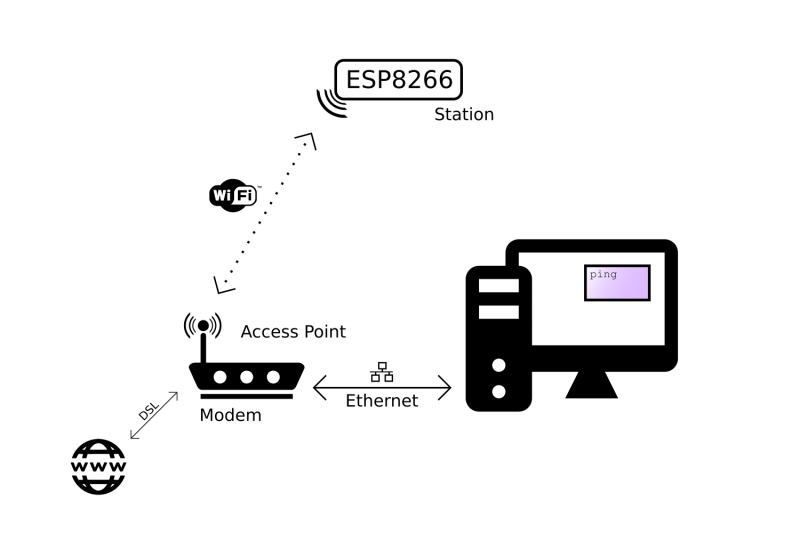
Basicaly, on this image you can see a modem. This modem will create the Network and some device will be connected to it. In our case the devices will be a computer (in order to access to the webpage) and the esp8266.
Now, we need to know how all of the device will communicate. A web server is a node of Network that will store and serv files. Then a client can request such a file or another piece of data. With our classic use of internet most of the website use the HTTP(S) protocole in order to make the request.
HTTP or the Hypertext Transfer Protocol is the text-based protocol used to communicate with (web) servers. There are multiple HTTP request methods, but I'll only cover the two most widely used ones: GET and POST.
I will not get into the details of the structure of an HTTP request but HERE a very good documentation about networking and esp8266.
Nice, now we know a protocol that allow us to send ang get request with a webserver. But how can we know to who we want to talk ?
That's where the Internet Protocol (IP) comes in. Every device on the network has a personal IP address. The DHCP server (Dynamic Host Configuration Protocol Server) makes sure that these addresses are unique. This means that you can now send a message to a specific address. This is what look like an IPv4 : 192.168.1.5 Now there is also a new kind of IP called IPv6 but I won't talk abot it here...
Ok know we need to have another layer of protocole that deal the transport of the request (HTTP). This the transport layer. There are mainly two protocols that make up this third layer: the Transmission Control Protocol (TCP) and the User Datagram Protocol (UDP).
Okay, know we have a little piece of theory in order to understand he differents terms that we found usually in this kind of code.
The first thing to do before starting the code is to install the requiered library. The first that we will use this week is ESP8266 WIFI library. Here a very good documentation about how to use it. In order to install it just clone the git repo and put copy past the folders and files into your arduino IDE library folder.
Ok, know we have all of the keys to start the first test.
////////////////////////////////////////////////////////////////
// Programme simple de webserver
////////////////////////////////////////////////////////////////
#include < ESP8266WiFi.h>
const char* ssid = "";
const char* password = "";
int ledPin = 14;
WiFiServer server(80);

void setup() {
  Serial.begin(115200);
  delay(10);
   pinMode(ledPin, OUTPUT);
  digitalWrite(ledPin, LOW);

  // Connect to WiFi network
  Serial.println();
  Serial.println();
  Serial.print("Connecting to ");
  Serial.println(ssid);
  WiFi.begin(ssid, password);
  while (WiFi.status() != WL_CONNECTED) {
    delay(500);
    Serial.print(".");
  }
  Serial.println("");
  Serial.println("WiFi connected");

  // Start the server
  server.begin();
  Serial.println("Server started");

  // Print the IP address
  Serial.print("Use this URL to connect: ");
  Serial.print("http://");
  Serial.println(WiFi.localIP());
}

void loop() {
  // Control de la connection client
  WiFiClient client = server.available();
  if (!client) {
    return;
  }

  // Attente de l'envoi de quelque chose du client
  Serial.println("new client");
  while(!client.available()){
    delay(1);
  }

  // Première ligne de la requête
  String request = client.readStringUntil('\r');
  Serial.println(request);
  client.flush();

  // Lecture-préparation réponse de la requête
  int value = LOW;
  if (request.indexOf("/LED=ON") != -1)  {
    digitalWrite(ledPin, HIGH);
    value = HIGH;
  }
  if (request.indexOf("/LED=OFF") != -1)  {
    digitalWrite(ledPin, LOW);
    value = LOW;
  }

  // Réponse à la requête
  client.println("HTTP/1.1 200 OK");
  client.println("Content-Type: text/html");
  client.println("");
  client.println("");
  client.println("< html>");
  client.println("< head>");
  client.println("< /head>");
  client.println("< body>");
  client.println("< div style=\"text-align:center\">");
  client.println("< h1>TEST WIFI SERVEUR< /h1> < br>< br>");
  client.print("Led pin is now: ");
  if(value == HIGH) {
    client.print("On");
  } else {
    client.print("Off");
  }
  client.println("< br> < br>");
  client.println("< a href=\"/LED=ON\"\">< button style=\"height: 50px; width: 100px\"> ON < /button>< /a>");
  client.println("< a href=\"/LED=OFF\"\">< button style=\"height: 50px; width: 100px\"> OFF < /button>< /a>< br />");
  client.println("< /body>");
  client.println("< /html>");

  delay(1);
  Serial.println("Client disonnected");
  Serial.println("");

}
Here this is a little part of code that I found. Let's see how we can lake it working
#include < ESP8266WiFi.h>
const char* ssid = "";
const char* password = "";
int ledPin = 14;
WiFiServer server(80);
// Connect to WiFi network
Serial.println();
Serial.println();
Serial.print("Connecting to ");
Serial.println(ssid);
WiFi.begin(ssid, password);
while (WiFi.status() != WL_CONNECTED) {
delay(500);
Serial.print(".");
}
  Serial.println("");
  Serial.println("WiFi connected");

  // Start the server
  server.begin();
  Serial.println("Server started");

  // Print the IP address
  Serial.print("Use this URL to connect: ");
  Serial.print("http://");
  Serial.println(WiFi.localIP());
There is now the main loop to understand.
  // Control de la connection client
  WiFiClient client = server.available();
  if (!client) {
    return;
  }

  // Attente de l'envoi de quelque chose du client
  Serial.println("new client");
  while(!client.available()){
    delay(1);
  }

  // Première ligne de la requête
  String request = client.readStringUntil('\r');
  Serial.println(request);
  client.flush();

  // Lecture-préparation réponse de la requête
  int value = LOW;
  if (request.indexOf("/LED=ON") != -1)  {
    digitalWrite(ledPin, HIGH);
    value = HIGH;
  }
  if (request.indexOf("/LED=OFF") != -1)  {
    digitalWrite(ledPin, LOW);
    value = LOW;
  }

  // Réponse à la requête
  client.println("HTTP/1.1 200 OK");
  client.println("Content-Type: text/html");
  client.println("");
  client.println("");
  client.println("< html>");
  client.println("< head>");
  client.println("< /head>");
  client.println("< body>");
  client.println("< div style=\"text-align:center\">");
  client.println("< h1>TEST WIFI SERVEUR< /h1> < br>< br>");
  client.print("Led pin is now: ");
  if(value == HIGH) {
    client.print("On");
  } else {
    client.print("Off");
  }
  client.println("< br> < br>");
  client.println("< a href=\"/LED=ON\"\">< button style=\"height: 50px; width: 100px\"> ON < /button>< /a>");
  client.println("< a href=\"/LED=OFF\"\">< button style=\"height: 50px; width: 100px\"> OFF < /button>< /a>< br />");
  client.println("< /body>");
  client.println("< /html>");

  delay(1);
  Serial.println("Client disonnected");
  Serial.println("");

}
Then in a second time, by using String request = client.readStringUntil('\r'); we created a variable that will store the entiere request.
Then we want to analyse the request, basically if the led as to be ON or OFF. This information depend on wich button the user will use (I will talk after this about how w send the info).
We will use this function (request.indexOf("/LED=ON") in order to analyse the request. And in function of the value ON or OFF, we set pin 14 to HIGH or LOW.
Finally, when the request is finished the server will send an answer in the form of webpage. In order to make this, we use the client.println and then type the message in form of html + CSS. The client will be on web navigator that will directly interpreted the html as a page.
Then as you can see the structure of the webpage is very simple. The only "tricks" made here is the way the information about the led will be send. In fact we put the information into a < a href=""> balise. href take in argument an URL, this mean that when you click on a link your navigator will send an HTTP request to the server indicate by the URL. Then instead of put an URL, we put an information LED=ON or LED=OFF, and this information will be send to the server hosted on the esp trhough an HTTP request.
Then I upload the code using the same method as I described on the Output Week.
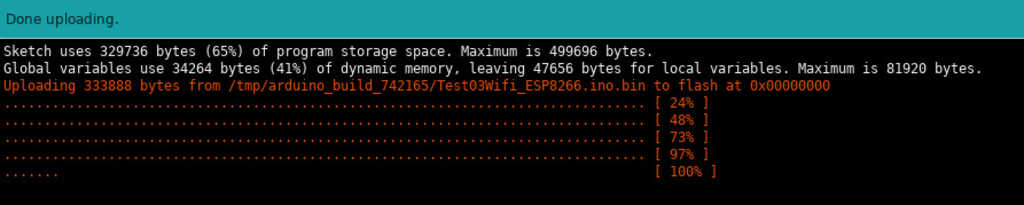
Here you can see the monitoring of the request that are made. We can see in first time the name of my network "azkardar" and the local IP that I need to use to connect access to the webserver hosted on the esp.
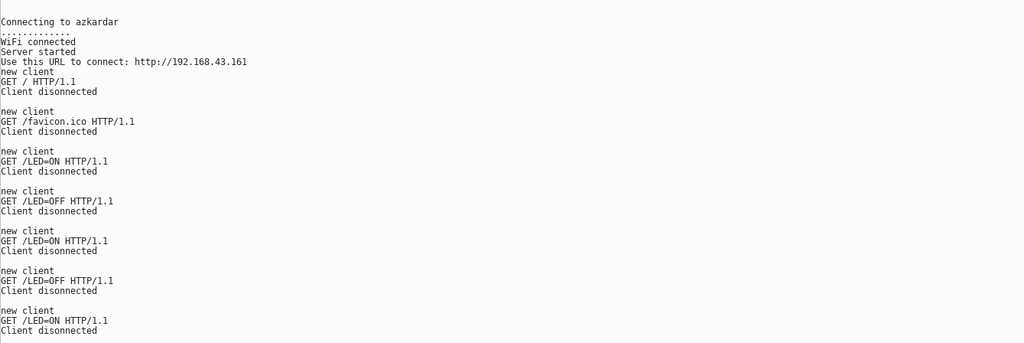
And finally, this the result :
As you can see the HTTP requests works well but they have a very big problem for our usage. Basicaly, when you want to communicate with a website this is not a big deal to create a new request and then open a new connection when you want to load a new page because this type of action are made one by one and separated by some seconds.
But it exist the websockets ! WebSocket is a technology that keeps the TCP connection open, so you can constantly send data back and forth between the ESP and the client, with low latency. And since it's TCP, you're sure that the packets will arrive intact.
Then the first thing to do is to download the WebSocket library on github and to copy past he files and folders into the library folder of your arduino IDE. Websocket github
Now let's see the code :
////////////////////////////////////////////////////////////////////////////////////////////////
// transmission Web-Socket
///////////////////////////////////////////////////////////////////////////////////////////////

#include < ESP8266WiFi.h>
#include < WiFiClient.h>
#include < ESP8266WebServer.h>
#include < ESP8266mDNS.h>
#include < WiFiUdp.h>
#include < ArduinoOTA.h>
#include < WebSocketsServer.h> //pour la communication "instanée"
#include < Hash.h>
#include < Servo.h>

//////////////////////////////////////////////////////
// Initialisation transmission wifi
const char* ssid     = "";      //wifi name
const char* password = "";  //wifi password
const int portWeb = 80;
const int portSocket = 81;
const char* http_site = "/";

MDNSResponder mdns;
ESP8266WebServer server(portWeb);
WiFiClient client;
WebSocketsServer webSocket = WebSocketsServer(portSocket);

String webPage;
String etatLed="test";
boolean LEDStatus=false;
int ledPin = 14;
int servo1Pin = 4;
Servo servo1;


///////////////////////////////////////////////////////
// PAGE WEB
///////////////////////////////////////////////////////
String page(){
  webPage = "";
  webPage += "< html>< head>< /head>";

  webPage += "< style>";
  webPage += "body {background-color: lightyellow}";
  webPage += "h1 {color:blue}";
  webPage += "a {text-decoration:none; display:block;width:100%;height:100%;}";
  webPage += "li, button {color: blue;background:lightgrey;border: 1px solid #000;border-radius: 8px;position: center;font-size: 500%;}";
  webPage += "li {display:inline-block;width: 30%;height:120px;padding: 15px 20px;color: #fff;font-size: 600%;font-weight: bold;}";
  webPage += "input[type=range] {-webkit-appearance: none; width: 100%;margin: 14.4px 0;}";
  webPage += "input[type=range]:focus {outline:none; }";
  webPage += "input[type=range]::-webkit-slider-runnable-track {  width: 100%;  height: 60px;  cursor: pointer;  box-shadow: 0px 0px 0px rgba(0, 0, 0, 0), 0px 0px 0px rgba(13, 13, 13, 0);  background: #055def;  border-radius: 10.9px;  border: 5.5px solid #055def;}";
  webPage += "input[type=range]::-webkit-slider-thumb {  box-shadow: 0px 0px 11.9px #93f27c, 0px 0px 0px #a6f493;  border: 7.1px solid #fff700;  height: 100px;  width: 28px;  border-radius: 21px;  background: rgba(125, 0, 114, 0.98);  cursor: pointer;  -webkit-appearance: none;  margin-top: -19.9px;}";
  webPage += "input[type=range]:focus::-webkit-slider-runnable-track {  background: #b3cffd;}";
  webPage += "input[type=range]::-moz-range-track {  width: 100%;  height: 60px;  cursor: pointer;  box-shadow: 0px 0px 0px rgba(0, 0, 0, 0), 0px 0px 0px rgba(13, 13, 13, 0);  background: #055def;  border-radius: 10.9px;  border: 5.5px; solid #055def;}";
  webPage += "input[type=range]::-moz-range-thumb {  box-shadow: 0px 0px 11.9px #93f27c, 0px 0px 0px #a6f493;  border: 7.1px solid #fff700;  height: 100px;  width: 28px;  border-radius: 21px;  background: rgba(125, 0, 114, 0.98);  cursor: pointer;}";
  webPage += "input[type=range]::-ms-track {  width: 100%;  height: 30px;  cursor: pointer;  background: transparent;  border-color: transparent;  color: transparent;}";
  webPage += "input[type=range]::-ms-fill-lower {  background: #011536;  border: 5.5px solid #055def;  border-radius: 21.8px;  box-shadow: 0px 0px 0px rgba(0, 0, 0, 0), 0px 0px 0px rgba(13, 13, 13, 0);}";
  webPage += "input[type=range]::-ms-fill-upper {  background: #055def;  border: 5.5px solid #055def;  border-radius: 21.8px;  box-shadow: 0px 0px 0px rgba(0, 0, 0, 0), 0px 0px 0px rgba(13, 13, 13, 0);}";
  webPage += "input[type=range]::-ms-thumb {  box-shadow: 0px 0px 11.9px #93f27c, 0px 0px 0px #a6f493;  border: 7.1px solid #fff700;  height: 100px;  width: 28px;  border-radius: 21px;  background: rgba(125, 0, 114, 0.98);  cursor: pointer;  height: 60px;}";
  webPage += "input[type=range]:focus::-ms-fill-lower {  background: #055def;}";
  webPage += "input[type=range]:focus::-ms-fill-upper {  background: #b3cffd;}";
  webPage += "< /style>";

  webPage += "< script>"; //partie pour les WebSockets
  webPage += "var Wsock;";
  webPage += "function start(){";
  webPage += "Wsock = new WebSocket('ws://' + window.location.hostname + ':81/');";
  webPage += "Wsock.onopen = function(event) {console.log(\"open socket\");};";
  webPage += "Wsock.onclose = function(event) {console.log(\"close socket\");};";
  webPage += "Wsock.onerror = function(event) {console.log(event);};";
  webPage += "Wsock.onmessage = function(event) {console.log(event);";
  webPage += "var e = document.getElementById(\"ledstatus\");";
  webPage += "if (event.data == \"ledon\") {e.style.color = \"red\";} else if (event.data == \"ledoff\") { e.style.color = \"black\";}";
  webPage += "else {console.log(\"unknown event\");}};}";
  webPage += "function buttonclick(e) {Wsock.send(e.id);}";
  webPage += "function buttonover() {Wsock.send(\"survol1\");}";
  webPage += "function buttonout() {Wsock.send(\"survol0\");}";
  webPage += "< /script>";

  webPage += "< body onload=\"javascript:start();\">";
  webPage += "< div style=\"text-align:center\">";
  webPage += "< h1>TEST WIFI SOCKET< /h1>< br>";
  webPage += "< div id=\"ledstatus\">< b>LED< /b>< /div>";
  webPage += "< button id=\"ledon\"  type=\"button\" onclick=\"buttonclick(this);\">On< /button>";
  webPage += "< button id=\"ledoff\" type=\"button\" onclick=\"buttonclick(this);\">Off< /button>";
  webPage += "< button id=\"survol\" type=\"button\" onmouseover=\"buttonover();\"onmouseout=\"buttonout();\">SURVOL< /button>";
  webPage += "< /body>< /html>";
  return webPage;
}
///////////////////////////////////////////////////////

///////////////////////////////////////////////////////
// TRAITEMENT SOCKET
///////////////////////////////////////////////////////
/*
typedef enum {
    WStype_ERROR,
    WStype_DISCONNECTED,
    WStype_CONNECTED,
    WStype_TEXT,
    WStype_BIN,
        WStype_FRAGMENT_TEXT_START,
        WStype_FRAGMENT_BIN_START,
        WStype_FRAGMENT,
        WStype_FRAGMENT_FIN,
} WStype_t;
 */
void webSocketEvent(uint8_t num, WStype_t type, uint8_t * payload, size_t length){
    Serial.printf("webSocketEvent(%d, %d, ...)\r\n", num, type);
    switch(type) {
        case WStype_DISCONNECTED:
            Serial.printf("[%u] Disconnected!\r\n", num);
            break;
        case WStype_CONNECTED:
        {
            IPAddress ip = webSocket.remoteIP(num);
            Serial.printf("[%u] Connected from %d.%d.%d.%d url: %s\r\n", num, ip[0], ip[1], ip[2], ip[3], payload);
            if (LEDStatus) {
              webSocket.sendTXT(num, "ledon", strlen("ledon"));
            }
            else {
              webSocket.sendTXT(num, "ledoff", strlen("ledoff"));
            }
        }
            break;
        case WStype_TEXT:
          Serial.printf("[%u] get Text: %s\r\n", num, payload);

          if (strcmp("ledon", (const char *)payload) == 0) {
            digitalWrite(ledPin, HIGH);
            LEDStatus=true;
          }
          else if (strcmp("ledoff", (const char *)payload) == 0) {
            digitalWrite(ledPin, LOW);
            LEDStatus=false;
          }
         else if (strcmp("survol1", (const char *)payload) == 0) {
            digitalWrite(ledPin, HIGH);
            LEDStatus=true;
          }
         else if (strcmp("survol0", (const char *)payload) == 0) {
            digitalWrite(ledPin, LOW);
            LEDStatus=false;
          }
          else {
            Serial.print("Unknown command : ");
            Serial.printf("%s\r\n",payload);
            Serial.println();
          }
          // send data to all connected clients
          webSocket.broadcastTXT(payload, length);
          break;
        case WStype_BIN:
          Serial.printf("[%u] get binary length: %u\r\n", num, length);
          hexdump(payload, length);

          // echo data back to browser
          webSocket.sendBIN(num, payload, length);
          break;
        default:
          Serial.printf("Invalid WStype [%d]\r\n", type);
          break;
    }
}

///////////////////////////////////////////////////////


///////////////////////////////////////////////////////
// SETUP
///////////////////////////////////////////////////////
void setup() {
    ArduinoOTA.setHostname("laserboxV1"); // on donne une petit nom a notre module
    ArduinoOTA.begin(); // initialisation de l'OTA
    Serial.begin(115200);
    delay(10);
    pinMode(ledPin, OUTPUT);
    digitalWrite(ledPin, LOW);
    LEDStatus=false;
    // Connect to WiFi network
    Serial.println();
    Serial.println();
    Serial.print("Connecting to ");
    Serial.println(ssid);
    WiFi.begin(ssid, password);
    while (WiFi.status() != WL_CONNECTED) {
      delay(500);
      Serial.print(".");
    }
    Serial.println("");
    Serial.println("WiFi connected");

    // Start the server
    server.begin();
    Serial.println("Server started");

    // Print the IP address
    Serial.print("Use this URL to connect: ");
    Serial.print("http://");
    Serial.println(WiFi.localIP());

    if (mdns.begin("esp8266", WiFi.localIP())){Serial.println("MDNS responder started");};

    //reponse du serveur page html
    server.on("/", [](){
      server.send(200, "text/html", page());
    });
    server.on("/up", [](){
      // Turn off LED
      digitalWrite(ledPin, HIGH);
      LEDStatus=true;
      server.send(200, "text/html", page());
      delay(30);
    });
    server.on("/down", [](){
      //Turn on LED
      digitalWrite(ledPin, LOW);
      LEDStatus=false;
      server.send(200, "text/html", page());
      delay(30);
    });
    server.begin();
    Serial.println("HTTP server started");

    //SERVEUR socket
    webSocket.begin();
    webSocket.onEvent(webSocketEvent);
    Serial.println("Socket event started");

}


///////////////////////////////////////////////////////
// LOOP
///////////////////////////////////////////////////////
void loop() {
  server.handleClient();
  ArduinoOTA.handle();
  webSocket.loop();


}
Then I will try to explain the big parts of the code, but I'm very new using websockets and some parts of the code that are used are still a little bit obscure to me.
#include < ESP8266WiFi.h>
#include < WiFiClient.h>
#include < ESP8266WebServer.h>
#include < ESP8266mDNS.h>
#include < WiFiUdp.h>
#include < ArduinoOTA.h>
#include < WebSocketsServer.h> //pour la communication "instanée"
#include < Hash.h>
#include < Servo.h>

//////////////////////////////////////////////////////
// Initialisation transmission wifi
const char* ssid     = "";      //wifi name
const char* password = "";  //wifi password
const int portWeb = 80;
const int portSocket = 81;
const char* http_site = "/";

MDNSResponder mdns;
ESP8266WebServer server(portWeb);
WiFiClient client;
WebSocketsServer webSocket = WebSocketsServer(portSocket);

String webPage;
String etatLed="test";
boolean LEDStatus=false;
int ledPin = 14;
WebSocketsServer webSocket = WebSocketsServer(portSocket);
As the same way, in the HTTP code we create the client and a string that will contains the webpage.
The second part is the webpage that will be displayed constently.
///////////////////////////////////////////////////////
// PAGE WEB
///////////////////////////////////////////////////////
String page(){
  webPage = "";
  webPage += "< html>< head>< /head>";

  webPage += "< style>";
  webPage += "body {background-color: lightyellow}";
  webPage += "h1 {color:blue}";
  webPage += "a {text-decoration:none; display:block;width:100%;height:100%;}";
  webPage += "li, button {color: blue;background:lightgrey;border: 1px solid #000;border-radius: 8px;position: center;font-size: 500%;}";
  webPage += "li {display:inline-block;width: 30%;height:120px;padding: 15px 20px;color: #fff;font-size: 600%;font-weight: bold;}";
  webPage += "input[type=range] {-webkit-appearance: none; width: 100%;margin: 14.4px 0;}";
  webPage += "input[type=range]:focus {outline:none; }";
  webPage += "input[type=range]::-webkit-slider-runnable-track {  width: 100%;  height: 60px;  cursor: pointer;  box-shadow: 0px 0px 0px rgba(0, 0, 0, 0),
  0px 0px 0px rgba(13, 13, 13, 0);  background: #055def;  border-radius: 10.9px;  border: 5.5px solid #055def;}";
  webPage += "input[type=range]::-webkit-slider-thumb {  box-shadow: 0px 0px 11.9px #93f27c, 0px 0px 0px #a6f493;  border: 7.1px solid #fff700;  height: 100px;  width: 28px;  border-radius: 21px;  background: rgba(125, 0, 114, 0.98);  cursor: pointer;  -webkit-appearance: none;  margin-top: -19.9px;}";
  webPage += "input[type=range]:focus::-webkit-slider-runnable-track {  background: #b3cffd;}";
  webPage += "input[type=range]::-moz-range-track {  width: 100%;  height: 60px;  cursor: pointer;  box-shadow: 0px 0px 0px rgba(0, 0, 0, 0), 0px 0px 0px rgba(13, 13, 13, 0);  background: #055def;  border-radius: 10.9px;  border: 5.5px; solid #055def;}";
  webPage += "input[type=range]::-moz-range-thumb {  box-shadow: 0px 0px 11.9px #93f27c, 0px 0px 0px #a6f493;  border: 7.1px solid #fff700;  height: 100px;  width: 28px;  border-radius: 21px;  background: rgba(125, 0, 114, 0.98);  cursor: pointer;}";
  webPage += "input[type=range]::-ms-track {  width: 100%;  height: 30px;  cursor: pointer;  background: transparent;  border-color: transparent;  color: transparent;}";
  webPage += "input[type=range]::-ms-fill-lower {  background: #011536;  border: 5.5px solid #055def;  border-radius: 21.8px;  box-shadow: 0px 0px 0px rgba(0, 0, 0, 0), 0px 0px 0px rgba(13, 13, 13, 0);}";
  webPage += "input[type=range]::-ms-fill-upper {  background: #055def;  border: 5.5px solid #055def;  border-radius: 21.8px;  box-shadow: 0px 0px 0px rgba(0, 0, 0, 0), 0px 0px 0px rgba(13, 13, 13, 0);}";
  webPage += "input[type=range]::-ms-thumb {  box-shadow: 0px 0px 11.9px #93f27c, 0px 0px 0px #a6f493;  border: 7.1px solid #fff700;  height: 100px;  width: 28px;  border-radius: 21px;  background: rgba(125, 0, 114, 0.98);  cursor: pointer;  height: 60px;}";
  webPage += "input[type=range]:focus::-ms-fill-lower {  background: #055def;}";
  webPage += "input[type=range]:focus::-ms-fill-upper {  background: #b3cffd;}";
  webPage += "< /style>";

  webPage += "< script>"; //partie pour les WebSockets
  webPage += "var Wsock;";
  webPage += "function start(){";
  webPage += "Wsock = new WebSocket('ws://' + window.location.hostname + ':81/');";
  webPage += "Wsock.onopen = function(event) {console.log(\"open socket\");};";
  webPage += "Wsock.onclose = function(event) {console.log(\"close socket\");};";
  webPage += "Wsock.onerror = function(event) {console.log(event);};";
  webPage += "Wsock.onmessage = function(event) {console.log(event);";
  webPage += "var e = document.getElementById(\"ledstatus\");";
  webPage += "if (event.data == \"ledon\") {e.style.color = \"red\";} else if (event.data == \"ledoff\") { e.style.color = \"black\";}";
  webPage += "else {console.log(\"unknown event\");}};}";
  webPage += "function buttonclick(e) {Wsock.send(e.id);}";
  webPage += "function buttonover() {Wsock.send(\"survol1\");}";
  webPage += "function buttonout() {Wsock.send(\"survol0\");}";
  webPage += "< /script>";

  webPage += "< body onload=\"javascript:start();\">";
  webPage += "< div style=\"text-align:center\">";
  webPage += "< h1>TEST WIFI SOCKET< /h1>< br>";
  webPage += "< div id=\"ledstatus\">< b>LED< /b>< /div>";
  webPage += "< button id=\"ledon\"  type=\"button\" onclick=\"buttonclick(this);\">On< /button>";
  webPage += "< button id=\"ledoff\" type=\"button\" onclick=\"buttonclick(this);\">Off< /button>";
  webPage += "< button id=\"survol\" type=\"button\" onmouseover=\"buttonover();\"onmouseout=\"buttonout();\">SURVOL< /button>";
  webPage += "< /body>< /html>";
  return webPage;
}
String varibale that contains all of the webpage.
Also there is another big difference beetwen the old code and this one. Here we are using websocket, the we want to be able to send data constently, in order to make this we are using javascript.
You can see it in the middle of the page, beetwen the CSS part and the HTML part. Basicaly, I create a function that in function of the action of the webpage will send some specific data (depending of the action) to the server.
We chose to who we want to send the data with this function : Wsock = new WebSocket('ws://' + window.location.hostname + ':81/');"
window.location.hostname represent the IP adress of the esp on the network.
void webSocketEvent(uint8_t num, WStype_t type, uint8_t * payload, size_t length){
    Serial.printf("webSocketEvent(%d, %d, ...)\r\n", num, type);
    switch(type) {
        case WStype_DISCONNECTED:
            Serial.printf("[%u] Disconnected!\r\n", num);
            break;
        case WStype_CONNECTED:
        {
            IPAddress ip = webSocket.remoteIP(num);
            Serial.printf("[%u] Connected from %d.%d.%d.%d url: %s\r\n", num, ip[0], ip[1], ip[2], ip[3], payload);
            if (LEDStatus) {
              webSocket.sendTXT(num, "ledon", strlen("ledon"));
            }
            else {
              webSocket.sendTXT(num, "ledoff", strlen("ledoff"));
            }
        }
            break;
        case WStype_TEXT:
          Serial.printf("[%u] get Text: %s\r\n", num, payload);

          if (strcmp("ledon", (const char *)payload) == 0) {
            digitalWrite(ledPin, HIGH);
            LEDStatus=true;
          }
          else if (strcmp("ledoff", (const char *)payload) == 0) {
            digitalWrite(ledPin, LOW);
            LEDStatus=false;
          }
         else if (strcmp("survol1", (const char *)payload) == 0) {
            digitalWrite(ledPin, HIGH);
            LEDStatus=true;
          }
         else if (strcmp("survol0", (const char *)payload) == 0) {
            digitalWrite(ledPin, LOW);
            LEDStatus=false;
          }
          else {
            Serial.print("Unknown command : ");
            Serial.printf("%s\r\n",payload);
            Serial.println();
          }
          // send data to all connected clients
          webSocket.broadcastTXT(payload, length);
          break;
        case WStype_BIN:
          Serial.printf("[%u] get binary length: %u\r\n", num, length);
          hexdump(payload, length);

          // echo data back to browser
          webSocket.sendBIN(num, payload, length);
          break;
        default:
          Serial.printf("Invalid WStype [%d]\r\n", type);
          break;
    }
}
void webSocketEvent(uint8_t num, WStype_t type, uint8_t * payload, size_t length)
The function is build with switch, depending of what type of data is send the traitement is different.
The first case is about show who is talking to the server, and check if it is right connected.
After the second part that interest us is the case if the data is a TEXT (case WStype_TEXT:). If it is, then it will read the text and made an action in function.
For exemple, if (strcmp("ledoff", (const char *)payload) == 0) check if the text contains "ledoff". If it is then we the esp will power off the pin corresponding to the led with this call : digitalWrite(ledPin, LOW);
The method is the same for the other type of case possible
Finally, the last part of the code is the setup. In it we can found the IP of the esp :
// Print the IP address
Serial.print("Use this URL to connect: ");
Serial.print("http://");
Serial.println(WiFi.localIP());
// Start the server
server.begin();
Serial.println("Server started");
//SERVEUR socket
webSocket.begin();
webSocket.onEvent(webSocketEvent);
Serial.println("Socket event started");
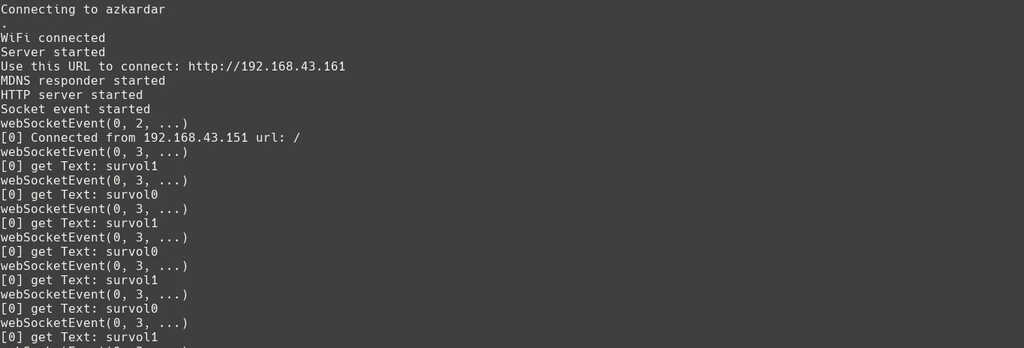
It works pretty well !!!
And also the monitoring :
I'm very happy of this week, because I have discovered a lot of new stuff. I'm stating to understand all of the differents parts but Networking is a really huge field and I will need more partice to master it well ^^
Also, there is a problem that I need to resolve in the interface week. For now the esp host the webpage, and it works well. But if I want to intercate with differents esp, I will need to open differents webpage corresponding to each esp on the network. This mean that I need to find a way to gather all of the control of every esp on single webpage.
Project developement
Intelectual property
Wildcard Week

Machine design
Interface
Mechanical Design
Networking and communications
Application and Implication
Output device

Input device
Molding and casting
Embedded programming
Computer-Controlled Machining
Electronics design

3D scanning and printing
Electronic production
Computer controlled cutting

Computer-aided design

Versioning and Website
Idea of my final project

How to modelise a longboard
For any suggestion, help or featured project