
Project developement
Hi, here I will explain my approach of how I create my website and how I make it accessible on internet using GitLab. At first I have to choose a template because I don't have the skills for create a responsive and pretty Website in 1 week. I decide then to found one on html5up.
In order to find the best template for my website I had to know what use I will have and then what are the criterion for choosing the best template. I will use this website for documenting my weekly work for the FabAcademy and people will use my website in order to find documentations.
On the whole :
Then I choose the template called "editorial" because he respect all of my criterion and is very nice and easy to navigate in. At this time my objectif was to modify it for my requirements.
Using Visual Studio Code I have opened up my html files called generic and index in order to build my homepage and a generic page that I will use for creating new pages. I deleted some parts of the homepage that was useless for me. To do this, I use the "examine element" tools of firefox. He able you to examine your Website and to identify parts of your Website in html code. Then I have deleted the code who correspond to the useless parts. Afterwards, I have added all of the week on my menu and generated all of my week pages. And I fill my pages with documentations and text about me.
A website is basically composed by 2 differents things that work together.
The firts part is the content of your website and it is coded using HTML balise. This is the differents type of data, for exemple all of the text, list, table or images will be added to the body of your website through HTML.
The second part is the page layout. It is coded with a language called CSS. With you will be able to modify precisly the placement, color, size and many other visual parameters. In most of the case, the CSS will be write into a different file than the HTML and the HTML will in a way "import" the css and apply it to the differents contents of the HTML page.
Then, your navigator will interpret the html and css code together in order to display what you are seeing when you surf on the web.
You must ask, how the css will now to wich content it must applied and I will explain it but before I want you to see the exatly same webpage (this webpage) without the CSS. I think that something that you already see ! This page without CSS . As you can see all of the content of the webpage is put under previous element and there is no color, or page layout. The sizes of the images are them native size, etc..
Now I will explain how a webpage is build. Basically you can see a webpage as a big rectangle, and all of the content of you webpage will be put into other rectangles, etc... The HTML will allow you to create the rectangles and the CSS will allow you to place and change the layout of those rectangles.
I invite you to right click on this page and select view code source. Now you will be able to see the HTML code of the current page that you are visiting. Now you should reconize some of the contents that you see on the webpage. But you should see this content (for exemple this text) beetwen some balises composed by a name and two < >.
A balise or a tag in html is what will defined the type of content that you will put in. It correspond to the rectangles that I talked earlier. There is two type of balise, an opening balise < >. And a closing balise < / >. Basically, the first type of tag, the most basic is the < html > tag this is the first big ractangle that will contain all of the other tags and contents. In every web page this tag will contains at least 2 other tags : the < head > and the < body >. The head contains the link to the CSS file and some other informations for your navigator as the caractere table. The body will be contain all of your contents. Now let's see the other kind of tag that are often used :
In the tags, you can add other elements, the thing the most used in order to give a "name" to a certain tag that will contain a certain part of your page you can add a class. This is the syntaxe : < div class="text1">. Now your navigator know that this tag belong to the text1 class.
Now let's see in CSS how you will apply a certain layout for all of the content in the text1 class.
text1{
	background: rgba(230, 235, 237, 0.25);
	border-radius: 0.375em;
	border: solid 1px rgba(210, 215, 217, 0.75);
	font-family: "Courier New", monospace;
	font-size: 0.9em;
	margin: 0 0.25em;
	padding: 0.25em 0.65em;
}
something like this.
If you want to know more about css, here a very good css tutorial.
Finally for my website I have followed those little rules about css and html, with them I have idenify the differents part of the website that interested me and I have modify them using a code editor (Visual Studio code)
After this my website was ready to be upload. One of the requirement of the week was to use GitLab for hosting the Website. The first time was to create my GitLab account and associate it to the FabAcademy GitLab called FabCloud. I went to the Fabcloud page and I logged in with the same email I used for registration at the Fabacademy 2019. My FabCloud account was created.
Now, I needed to make communicate my local repo and my fabCloud repo. To do this Git use "SSH key". The first step is to generate an SSH key on my computer.
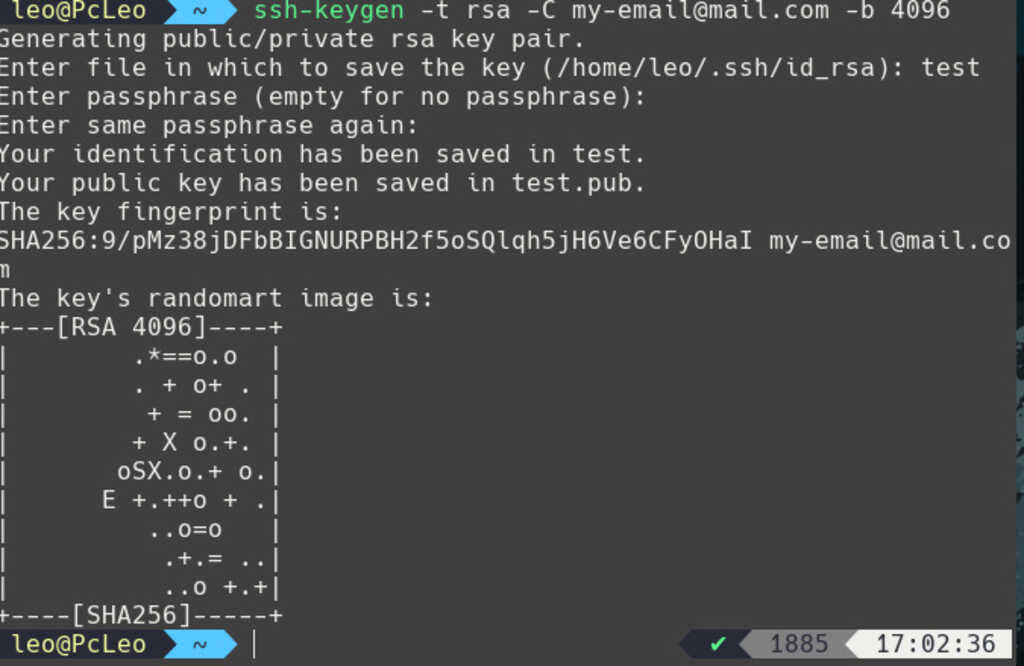
On my Linux terminal I used this command ssh-keygen -t rsa -C my-email@mail.com -b 4096 and saved the SSH key in a file.
I copy the public part of the SSH key using xclip -sel clip id_rsa.pub in my .ssh repo. and I past it in GitLab. Use ls -a in order to see your hiding repo (like .ssh).
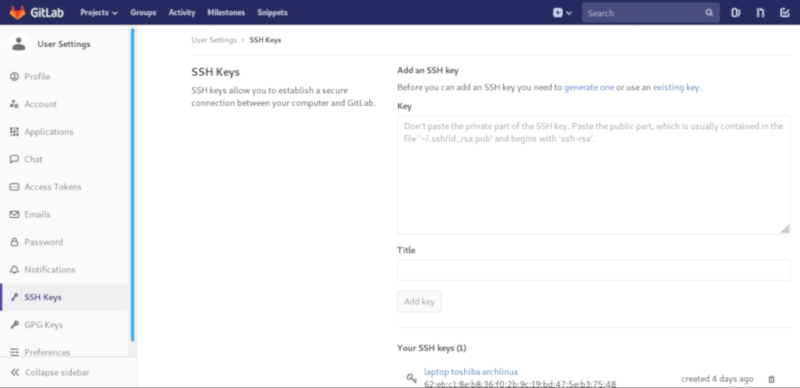
And I clicked on "Add key".
Now I have to configure my repo to transform my html and css files in a website. To do this my repo needed to be used as a server.
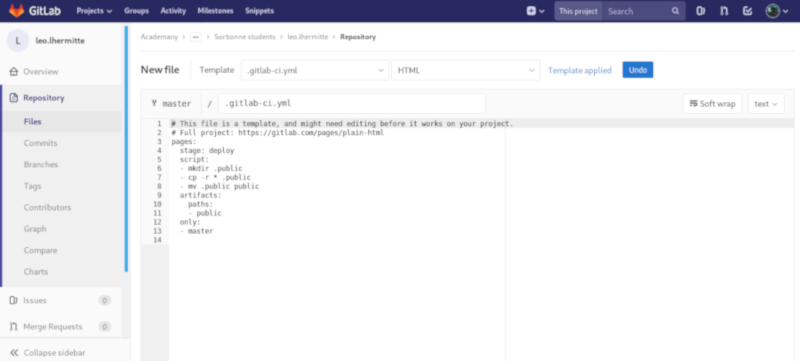
As you can see on the picture, I create in the root of my repo a new file using an existing template of .yml file. This little script make running a little server to generate my Website.
Afterwards, I cloned my repo on my computer using "git clone git@gitlab.fabcloud.org:academany/fabacademy/2019/labs/sorbonne/students/leo-lhermitte.git" And I added all of my Website files in my local repo.
Finally, I just had to upload my new files to my gitlab repo.
To do this, I used git status to check that all of my changes are concidered by git and to check the size of my upload.
Afterwards, I used git add * to add all of my changes to futur new commit. Then git commit -m "First version of my website"
And then git push for upload all of my changes.

I think the most important thing that I have dicovered this week is the git logic ! Git seems to be a really powerful tool ! This open source concept is used by GitHub or GitLab and many other. It allow you to manage you files and version with a distant server. And the true power of this tool I guess is the possibility to have more than on user working on the same project while managing different versions and development branches.
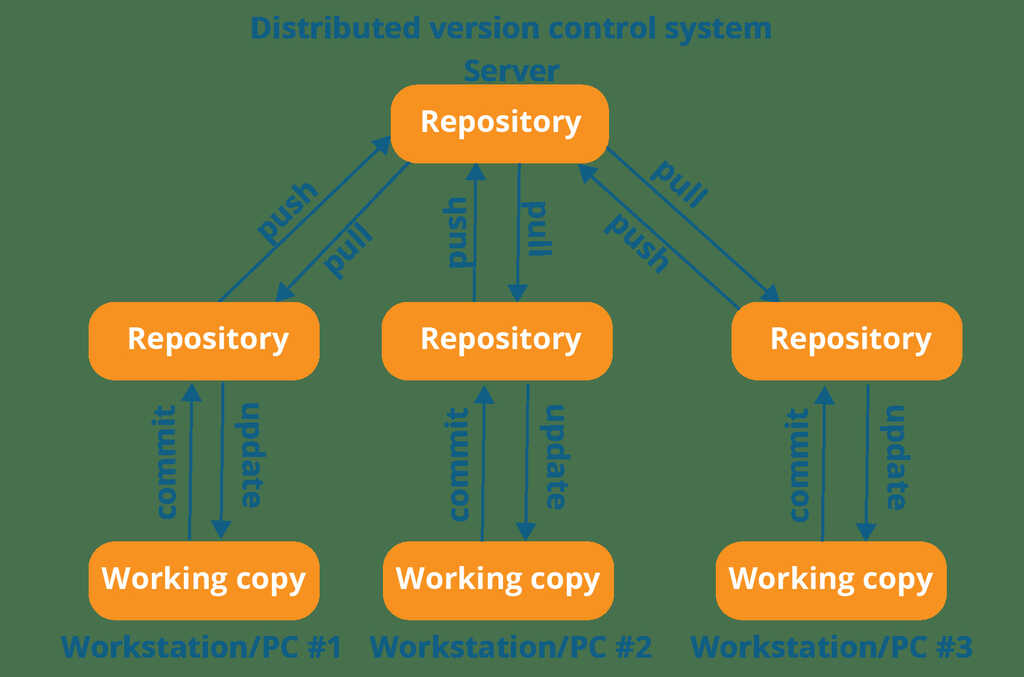
At least my basics knowledge about html/css and website has allowed me to understand and make what I want with the html5up template. Fortunately, the code construction of this template is really clear ! But in this field I don't have learned a lot of new things, this in the versioning and git field that I have learned impressive new things for me. I plan to try to use Gitlab to manage differents version of the 3D models of my final project. I have heard that gitlab allow you to manage and see the difference beetwen two .STL files. Finally, this week was for me the opportunity to dive into the web world and that was very interesting.
See you later space cowboy