Nilton Anchayhua Fab Academy 2015

        # GESTALT FIRMWARE MAKEFILE
# REVISED: 3/1/2013
# REVISED: 10/18/2013: added -networkedGestalt lib, now compiles bootloader correctly
# Ilan Moyer and Nadya Peek
# www.pygestalt.org

#Change filename as appropriate. Note: assumes .cpp

GESTALT_DIR = ../pygestalt-master/gsArduino

MCU = atmega328p
FREQ = 18432000


#application program, uncomment if you want to use this instead.
PROJECT = 086-005a
ADDRESS = 0x0000
GESTALT_DEFS = -DstandardGestalt -DnetworkedGestalt -DsingleStepper -Dgestalt328

#----INNER WORKINGS BEGIN HERE----
GESTALT_FILE = $(GESTALT_DIR)/gestalt.cpp
LDSECTION = --section-start=.text=$(ADDRESS)
SOURCES = $(PROJECT).cpp $(GESTALT_FILE)

CFLAGS = -g -Wall -Os -mmcu=$(MCU) -DF_CPU=$(FREQ) -I$(GESTALT_DIR) $(GESTALT_DEFS)
LDFLAGS = -Wl,$(LDSECTION)

all: $(PROJECT).hex clean

$(PROJECT).o: $(SOURCES)
    avr-g++ $(CFLAGS) -c -Wall $(SOURCES)

$(PROJECT).elf: $(PROJECT).o
    avr-g++ $(CFLAGS) $(LDFLAGS) gestalt.o -o $@ $^

$(PROJECT).hex: $(PROJECT).elf
    avr-objcopy -j .text -j .data -O ihex $< $@

clean:
    rm -rf *.o *.elf

####
# load program code
####
# note: if you only have the 328 instead of the 328p, just compile for 328
# and load with the -p m328 flag. You'll need to add 328 to your avrdude.

program-avrisp2-fuses:
    avrdude -c avrisp2 -P usb -p m328p -U efuse:w:0x5:m -F
    #note that only first 3 bits can be set
    avrdude -c avrisp2 -P usb -p m328p -U hfuse:w:0xD8:m -F
    avrdude -c avrisp2 -P usb -p m328p -U lfuse:w:0xEF:m -F

program-avrisp2:

    avrdude -e -c avrisp2 -P usb -p m328p -U flash:w:086-005a.hex
def restart():
global xdist
global ydist
global supercoords
xdist=0
ydist=0
supercoords=[[xdist,ydist]]
print supercoords
moverse()
def x_mas():
global xdist
global supercoords
xdist=xdist+5
supercoords=[[xdist,ydist]]
print supercoords
moverse()
def x_menos():
global xdist
global supercoords
xdist=xdist-5
supercoords=[[xdist,ydist]]
print supercoords
moverse()
def y_mas():
global ydist
global supercoords
ydist=ydist+5
supercoords=[[xdist,ydist]]
print supercoords
moverse()
def y_menos():
global ydist
global supercoords
ydist=ydist-5
supercoords=[[xdist,ydist]]
print supercoords
moverse()
def moverse():
global supercoords
for coords in supercoords:
stage.move(coords,0)
status = stage.xAxisNode.spinStatusRequest()
while status['stepsRemaining'] > 0:
time.sleep(0.0095)
status = stage.xAxisNode.spinStatusRequest()
print "nilton"
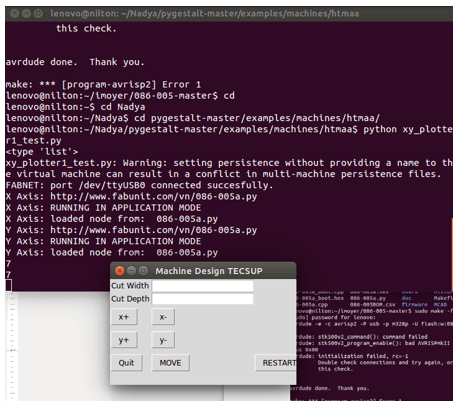
stage = virtualMachine(persistenceFile = "xy_plotter1_test.vmp")
stage.xyNode.setVelocityRequest(2)
master = Tk()
master.title("Machine Design TECSUP")
master.bind('q','exit')
master.geometry("300x170")
Label(master, text="Cut Width").grid(row=0)
Label(master, text="Cut Depth").grid(row=1)
e1 = Entry(master)
e2 = Entry(master)
e1.grid(row=0, column=1)
e2.grid(row=1, column=1)
Button(master, text='x+', command=x_mas).grid(row=3, column=0, sticky=W, pady=4)
Button(master, text='x-', command=x_menos).grid(row=3, column=1, sticky=W, pady=4)
Button(master, text='y+', command=y_mas).grid(row=4, column=0, sticky=W, pady=4)
Button(master, text='y-', command=y_menos).grid(row=4, column=1, sticky=W, pady=4)
Button(master, text='Quit', command=master.quit).grid(row=5, column=0, sticky=W, pady=4)
Button(master, text='MOVE', command=move_axes).grid(row=5, column=1, sticky=W, pady=4)
Button(master, text='RESTART', command=restart).grid(row=5, column=2, sticky=W, pady=4)
mainloop( )