
Principles and practices, project management
interface and application programming
mechanical design, machine design
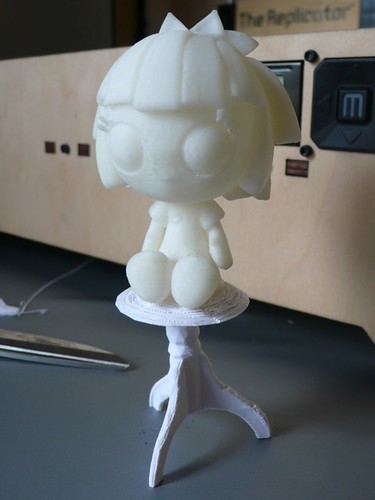
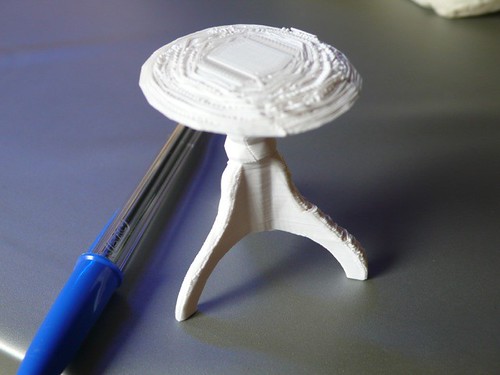
The Piano Chair

This week assignment about 3D scanning was particularly important to my final Project and I took the opportunity to try different possibilities (Kinect and 123D Catch) to understand better this process. In my final project, I propose to create a mechanism that would allow me to scan moving objects. My goal is to capture a fragment of time that would display the movement of an object and translate it to a tridimensional format.
For this assignment I decided to try scanning with Kinect. I downloaded several softwares in an attempt to find the one that would best meet my needs. Among those softwares I choose the one that worked best with my computer configuration.
For the experiments with Kinect I had three different objects: one piano chair, one moving table clock and an office chair. The reason why I choose those objects goes as follows:
Piano chair: The piano chair was first selected so to mimic the rotating moving of a disc that I intend to use in the final project structure. I found that it would work as a support to place an object and rotate it in its center. In the end the chair became the main object that I chose to print.
Moving table clock: This table clock has an interesting feature that has a spring to sustain the clock. The idea was to move the clock and capture this circular move around its center. In this first week of test I had problems to capture the clock because of the reduced size.
Office chair: This was a solution I found to replace my small moving object to one bigger in scale. The Kinect did recognize it although the task to scan something in motion did confused the software a bit.
About the software used for the experiment:
At first I tried using the software SCENECT but I experienced some unusual problems trying to let the program stable. Sometimes it didn´t recognized the Kinect and I couldn´t go on with the tests.
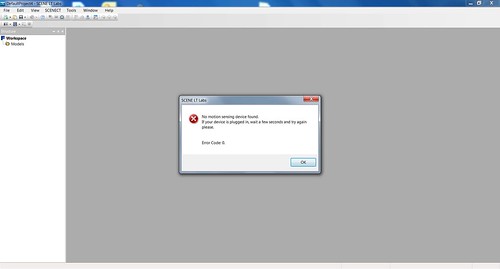
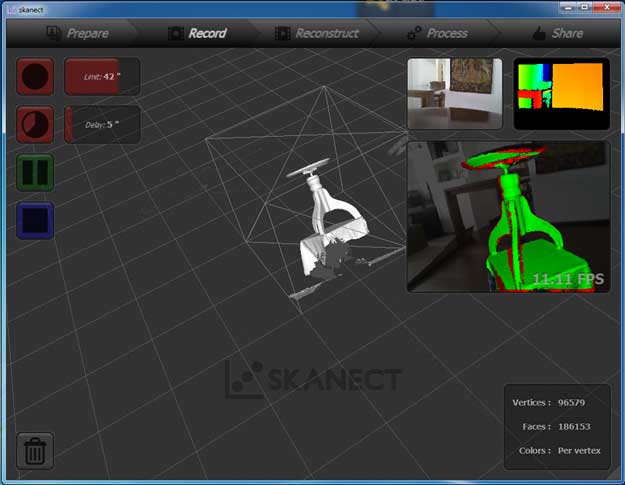
After a long research on other softwares that worked with Kinect, I found SKANECT. This software was really simple to use, with a very concise interface. It recognized the Kinect at first and was stable during the scanning process. It took me several tests to experiment the settings and adjust my scanning. At the beginning my scan was looking amorphous comparing to the scanned object but after the tests I managed to scan the object with a better precision although without perfection. Below I´ll describe the experiments held with SKANECT and the remarks I would point out for who else that want to try it:
Experiment #1 – Moving Clock
My first idea when scanning an object was to link the assignment with my final project proposal of scanning a moving object. That´s why I chose an object that could rotate and the idea was trying to capture it´s effect translated in a 3D file. I placed the table clock on a piano chair for two reasons: first was to lift the object higher so to facilitate the task of scanning and second because the chair had a feature of rotating in its center, like the disk I imagined to support the objects in my final project proposal. The idea of mixing two different directions of motion called my attention and I thought it would be an interesting starting point to research.
Steps:
- Positioned the table clock on the table;
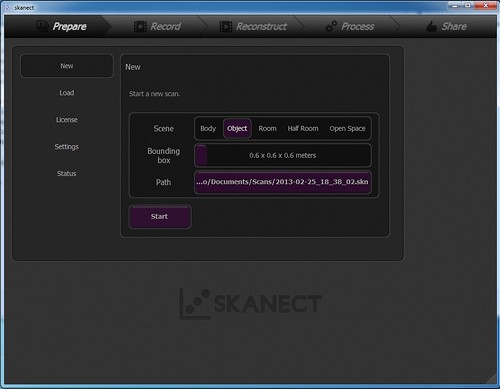
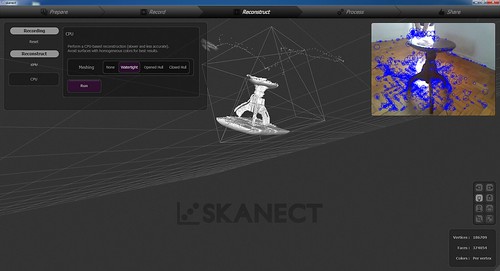
- With the Kinect connected to the computer I opened the software and changed the following parameters in the “Prepare” settings:
NEW >> Scene (object) / Bounding box (adjusted to fit the object) / Path (defined the path in with the file would be saved)
SETTINGS >> Recording Feedback (CPU)* / Feedback quality (High) / Offline Recording (All frames)
* Here is a problem that I faced during adjusting the scanning parameters. I could not change the recording feedback to GPU (Graphic Processing Unit) because my video card was not compatible I should made an update to a NVidia driver to make it work properly. The CPU (computer processing unit) mode in which I worked is not made to work with graphics but with calculations and numbers. So probably if I would upgrade my video card I would achieve even better results during scanning.
- In “Record” settings I set the time needed for scan and a timer to position myself in front of the object after clicking start.
- During the scanning process I circled around the object keeping the Kinect still and tried to do a 360 degree turn around the object. The software tracked all the Kinect position during scanning and showed it in real time.
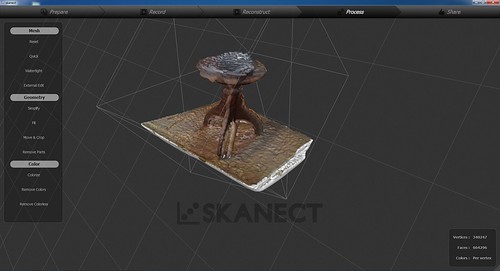
- After the time was gone I followed to the next step that was “Reconstruct”. There I was able to check the appearance of the scanned object.
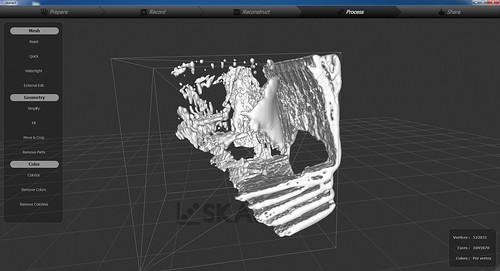
The final result wasn´t good and did not resemble the original clock. It was so amorphous that I suspected the Kinected could not work well with reduced scale objects.
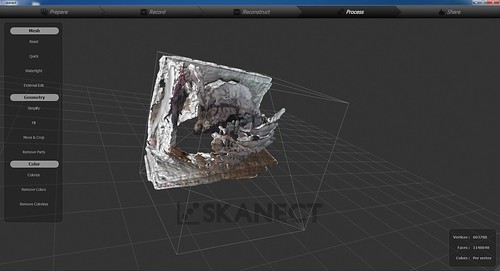
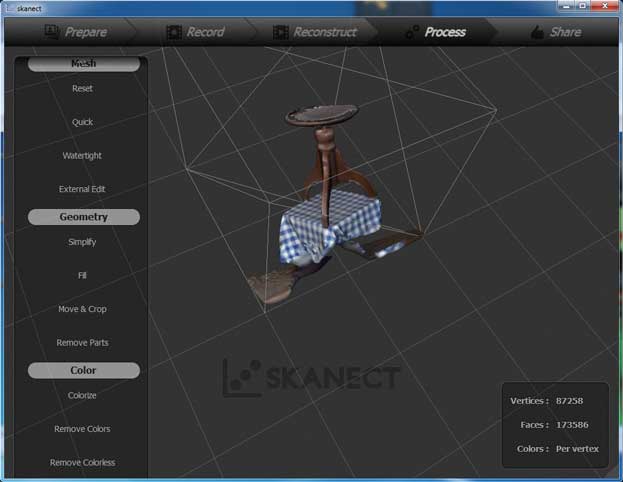
Experiment #2 – Piano Chair
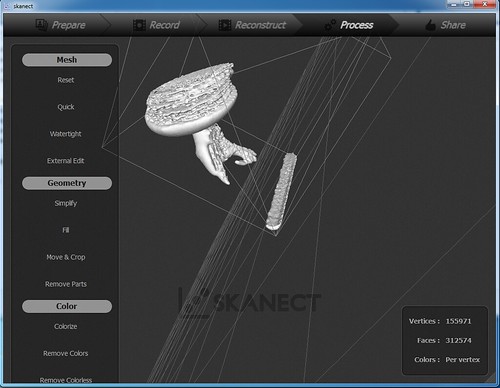
After the frustrated result at the first experiment I decided to make a test with a bigger object and as the chair was already in the room I tried to capture it with the Kinect following the same steps. In the beginning I got different results that were not similar to the original object. The chair looked amorphous and after adjusting the bounding box setting I managed to get better results! The last three scan (out of 20 or more) were definitely the best, but as they were looking quite similar I decided to stop.
- After creating the mesh I exported the files to a PLY format that could be read in Rhino 3D.

Experiment #3 – Office Chair
After the positive results with the piano chair, I decided to change object once more. Now I choose an office chair which movement could be perceived when it was rotating along its center axis. I asked my brother to push the chair around its axis while I recorded the action with the Kinect. For this experiment I stayed in one position and did not turn around the object. I followed the same steps listed above and the result was really interesting. I just did not export because the mesh resulted in a very complex object with loose parts that probably would not be printed without further manipulation. The results can be seen bellow:
Remarks on working with Kinect:
It was a really interesting experience to capture digital tridimensional data from an object using Kinect. I noticed that it will be necessary to define several parameters in order to capture a good image. Based on this first experiments I´m not able to define those parameters exactly yet but I intend to do it throughout the course, to help with my final assignment. I´ll list all those remarks in this week’s assignment complementing the information here documented.
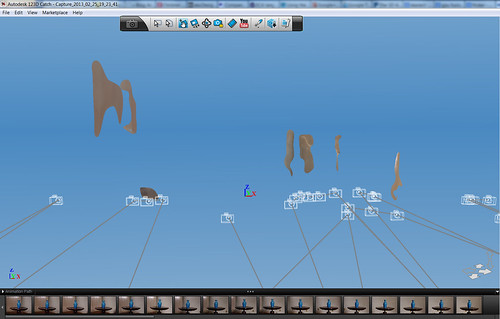
Tests with 123D Cath
As I spend most of the week trying to figure it out how to work with Kinect I didn’t have time to experiment with 123D Catch. For this test I choose a Chinese vase, because I thought it would be less problematic to scan due to its symmetric shape. My intention was to change the object after the experiment with the vase be successful. I did three tests and could not go further with it because the tests didn´t seem to work properly. I´ll describe them bellow:
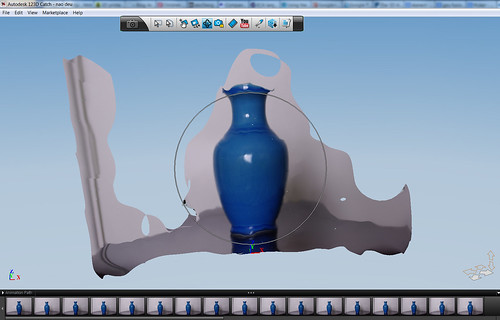
Experiment #1
In this experiment I placed the vase in the top of the piano table and fixed the camera in a tripod. The light was perfect giving the object a good illumination without any shadow. I placed the object against a white background and rotated the piano chair in order to capture the several frames the software needed. I thought that by doing so, I would have a perfect tridimensional object with no interference with the background and most important, I was testing my proposal of fixing the camera and rotating a disc like I did in the final project. I was surprised with the result when I send it to 123DCatch. The experiment went wrong and the software only created one face of the object. The reason I found out later was because 123DCatch does not work with you don´t place reference points in the background, that changes while the object is being turn. For the future, I may do further investigations in order to fix this problem.
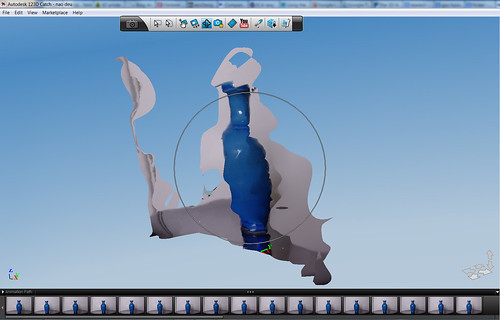
Experiment #2
For this experiment I put the vase and the piano chair at the center of a room filled of things. I circled around the object holding the camera in my hands trying keep it in the same position. At the room the light was not the best because of the time of the day, so I need to add artificial light. At first I thought that the surrounding would disturb the results but it was not that bad. The object was a little distorted but I managed to see it in a tridimensional format. Other problem was that the software did not isolated the vase from the piano chair and from some details in the surrounding. Looking at the software website I noticed that the successful s3D objects were taken directly on the floor. So I tried to do the next experiment on a clean and empty space.
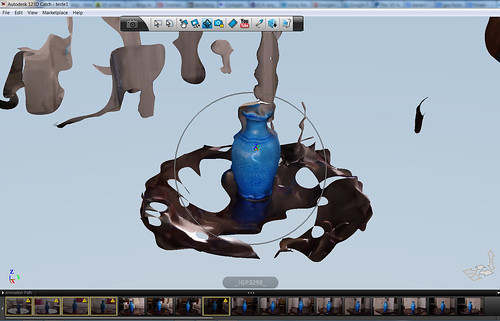
Experiment #3
This time I went to an empty space and place the piano table with the vase on it top at the center of the room. I fixed the camera in the tripod and in order to circle around the object keeping always the same distance I placed a thread between the piano and the tripod. I took several pictures dislocating the tripod a short distance around the object. The light was not the best so I need to add artificial light to illuminate the object. After sending the pictures to the software I got the worse result. The image did not appear and it was the worst result I had among all the experiments. I think that this problem may be due to the clean room with few references. I just placed some few reference points around the object and maybe this was not the best thing to do.
Remarks on working with Kinect:
I think that 123DCatch may be a good tool for scanning when I investigate further how to post process the image and manipulate it inside of the software. My hope is that I could reach to a point that I could isolate the object and get a perfect three dimensional digital object. I like the fact that 123DCatch keep the colour information of the object, this is something that I was not yet able to do using Kinect.
Final project considerations:
After all the experiments displayed here I think that using 123DCatch for my final project is not an option anymore. I really liked to work with Kinect and could see in it a great potential to be explored. I may continue doing experiments throughout the course using Kinect and I intend to investigate it deeper trying to mix 3D scanning with programming. I already have some articles about this subject so I may try to continue in this line.
3D Printing:
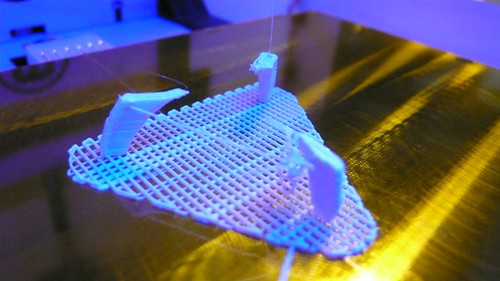
The first attempt to print the file of the piano chair failed because the resulting mesh had too many holes and problems. We tryed fixing the file in netfabb studio, but we were not able to fix the mesh. The solution was trying to scan the object one more time, but now with a computer that would have a better Graphic Processing Unit (NVidia).
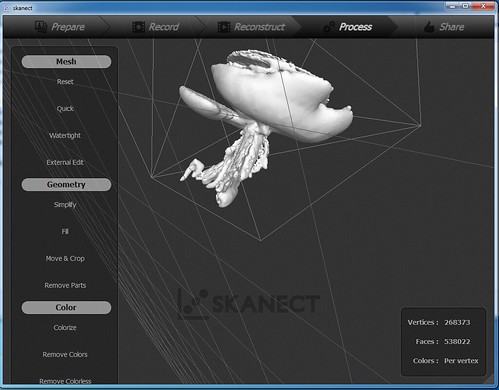
When I found the right computer that allowed me to work with a better video card I tryed scanning the object again. The quality was great and I could see the diference between this and the old scanning result.
One thing I noticed, in Skanect is that this software works really well when the scanning target is a person. It covers all the spaces and show lots of details of the face and body. When I tryed to scan the piano chair, I had to do it in two separate steps because the scanning would not cover all the object surface at once. At first I scanned the base and secondly I scanned the seat of the piano chair. Later I edited the two mesh files in Rhino 3D where I fixed the few holes and joined the two separate parts (base and seat).
Printing with a 3D printer:
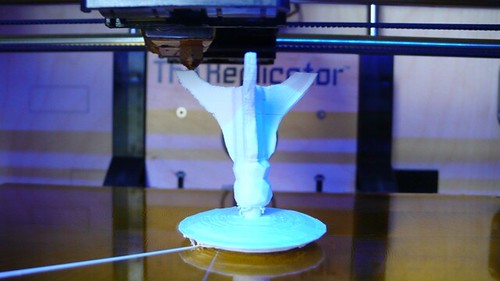
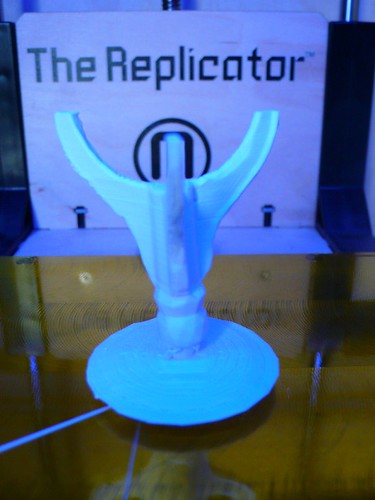
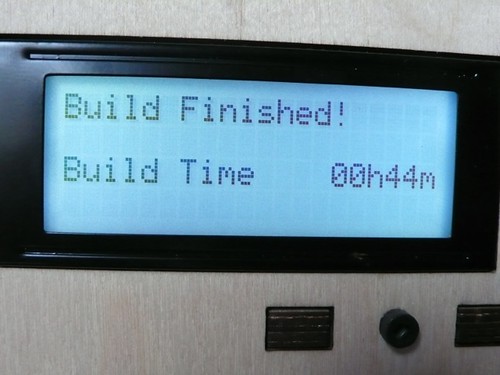
When the piano chair file was ready I ask the help of Eduardo Lopes (Garagem Lab) to assist me in the 3D printing phase. The 3D printer we used was a Replicator from Makerbot and the material was ABS. At first we tried printing the chair upright but because of the chair geometry it was difficult for the printer to complete the chair legs without dropping material.
A second test was made using support material but it didn´t work either.

So, it was recommended by Eduardo to turn the chair upside down and the printing process went fine! The printing time was 44 minutes and there was no problem during it.
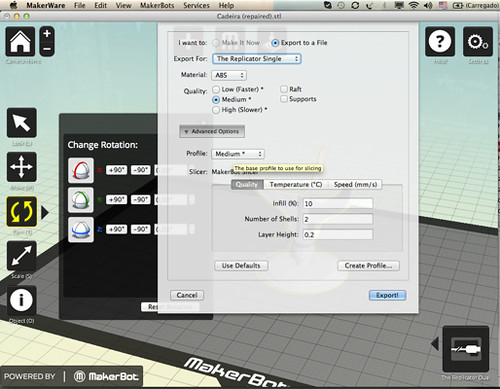
The steps were the following before sending the chair to print in the MakerWare software:
- Position the chair upside down and perpendicular to the table
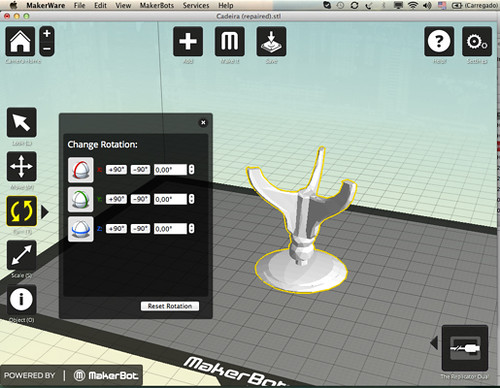
- Export the file for “The Replicator Single”
- Chose the material (ABS)
- Select quality (Medium)
- In Advanced Options I determined quality, temperature and Speed parameters
- Quality Parameter: Infill (%): 10 / Number of Shells: 2 / Layer Heigh: 0,2
- Temperature Parameter: Extruders: 230° / Platform: 110°
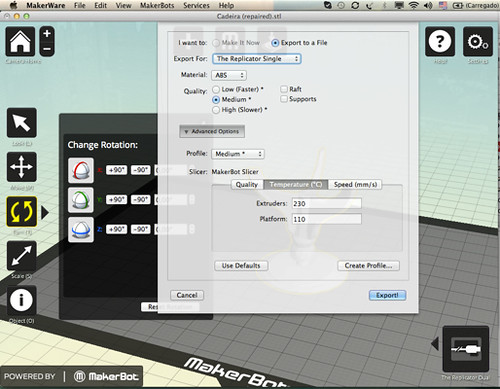
- Speed Parameter: While Extruding: 80 mm/s / While Traveling: 100mm/s

---
Software: Skanect / Rhino 3D / NetFabb Studio
Hardware: Kinect
File: 3Dm file