Principles and practices, project management
interface and application programming
mechanical design, machine design
Interface and Application Programming
In order to accomplish this week´s assignment I had to head back to the Input Device week and fix the problems I had there. I´m still working to fix those errors I found during programing my board so I could advance to the Interface step.
I hope I can keep track of this assignment later this week.
(16/04/2013)
---
This assignment was meant to create an interface to the board I programmed in the input assignment. The interface I used to visualize the sensor results was a Python file developed by professor Neil Gershenfeld (MIT). So to work with application programming I had to understand the Python code and consider changes to make it look different and maybe even new.
For this assignment we had the help of Radamés Ajna that explained the Python code of the reflect board and helped us to create a similar code using Processing. The result looks like this:
import processing.serial.*;
Serial myPort; // Create object from Serial class
PFont font;
final static int nloop = 100;
boolean toRead = false;
int c = 0;
float on, off;
float filtr = 0; //filter
float amp = 25; // amplitude
float eps = 0.9; //filter time constant
int on_H=0, on_L=0;
int off_H=0, off_L=0;
void setup()
{
size(600, 500);
String portName = Serial.list()[0];
println(portName);
myPort = new Serial(this, "COM11", 9600);
font = createFont("helvetica", 20);
noStroke();
}
void draw()
{
background(255);
fill(255, 0, 0);
float w_on =map(on, 0, 1024, 0, width);
rect(0, 0,w_on, 100);
textFont(font);
text(on, w_on, 100);
fill(0, 0, 255);
float w_off =map(off, 0, 1024, 0, width);
textFont(font);
text(off, w_off, 300);
rect(0, 200, w_off, 100);
filtr = (1-eps)*filtr + eps*amp*(on-off);
fill(0, 225,0);
float w_filtr =map(filtr, 0, 4024, 0, width);
textFont(font);
text(filtr,w_filtr, 500);
rect(0, 400, w_filtr, 100);
}
void serialEvent(Serial p) {
int inB = p.read();
switch(c) {
case 0:
if (inB == 1) {
c++;
}
break;
case 1:
if (inB == 2) {
c++;
}
break;
case 2:
if (inB == 3) {
c++;
}
break;
case 3:
if (inB == 4) {
c++;
}
break;
case 4:
on_L = inB;
c++;
break;
case 5:
on_H = inB;
c++;
break;
case 6:
off_L = inB;
c++;
break;
case 7:
off_H = inB;
c = 0;
toRead = false;
on = (float) (on_L + on_H*256)/nloop;
off = (float) (off_L + off_H*256)/nloop;
//println(" " + on + " " + off);
break;
default:
c = 0;
myPort.clear();
break;
}
}
I intend to create my interface inspired in some code provided in the Open Processing website. I´m in the process of chosing an interface that met most with my intentions and later adapt it´s code to merge with the previous code for reflect light I have already.
(19/04/13)
---
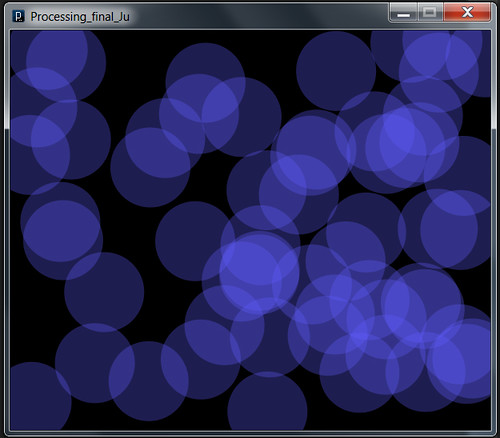
Because I have never used Processing I decided to create my interface based in some finalized graphic. After a research on the OpenProcessing website (http://www.openprocessing.org) I found some interesting interfaces, I select a lot of them and chose one to adapt to the processing code to display the reflect light.
The interface I chose is the “Problem Set #3 - Question 05”, that is a cluster of circles that vary according to the click of the mouse. I analyzed the content of the code in order to adapt it to my code. The first thing I did was to discard the command that change the graphic with the mouse. I also changed the background from white to black. I found it easier to copy the parameters of the code to my reflect code bar. The result looks like this:
import processing.serial.*;
Serial myPort; // Create object from Serial class
PFont font;
final static int nloop = 100;
boolean toRead = false;
int c = 0;
float on, off;
float filtr = 0; //filter
float amp = 25; // amplitude
float eps = 0.9; //filter time constant
int on_H=0, on_L=0;
int off_H=0, off_L=0;
float[] x = new float[300];
float[] y = new float[300];
void setup()
{
size(600, 500);
smooth();
String portName = Serial.list()[0];
println(portName);
myPort = new Serial(this, "COM11", 9600);
font = createFont("helvetica", 20);
noStroke();
rectMode(CENTER);
for (int i=0; i < x.length; i++) {
x[i] = random(width);
y[i] = random(height);
}
}
void draw() {
background(0);
fill(on, off, 255, 80);
int numRect = int(map(off, 0, height, 1, x.length));
for (int i=0; i < numRect; i++) {
pushMatrix();
translate(x[i], y[i]);
ellipse(0, 0, 100, 100);
popMatrix();
}
}
void serialEvent(Serial p) {
int inB = p.read();
switch(c) {
case 0:
if (inB == 1) {
c++;
}
break;
case 1:
if (inB == 2) {
c++;
}
break;
case 2:
if (inB == 3) {
c++;
}
break;
case 3:
if (inB == 4) {
c++;
}
break;
case 4:
on_L = inB;
c++;
break;
case 5:
on_H = inB;
c++;
break;
case 6:
off_L = inB;
c++;
break;
case 7:
off_H = inB;
c = 0;
toRead = false;
on = (float) (on_L + on_H*256)/nloop;
off = (float) (off_L + off_H*256)/nloop;
//println(" " + on + " " + off);
break;
default:
c = 0;
myPort.clear();
break;
}
}
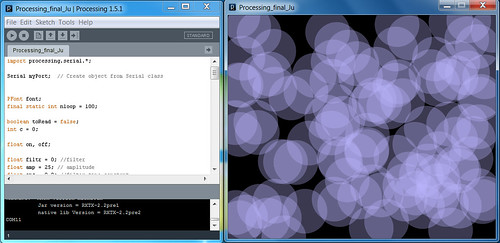
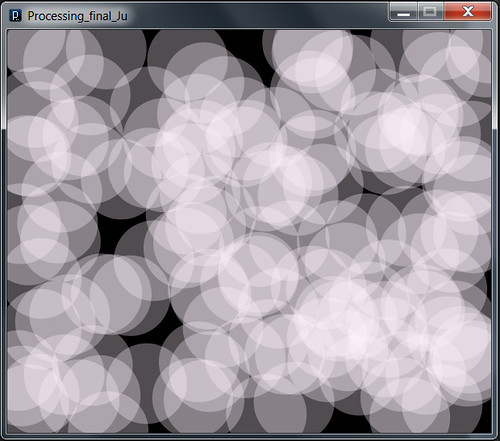
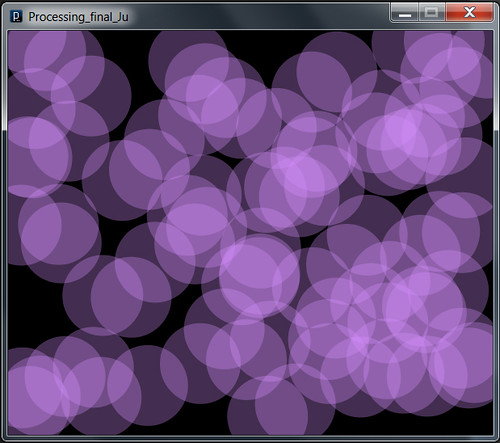
It worked really well and the resulting interface displayed the variation of reflection through the cluster of circles that changed in quantity and opacity depending of the light reflection.