
2021 project - Vinyl Record Cutting Lathe
Project description
My final project is to build a Vinyl record cutting lathe to be able to engrave music on blank vinyl records.The initial project description can be found on my project dedicated page.
Tasks done so far
I'm supposed to do my final presentation on June 11th and that's going to be a challenge regarding what I've done so far and what I still have to do!I realize that I decided myself for this project too late during my Fabacademy...
The idea only emerged during week 14 giving me only 1 month to build a working prototype.
I wish I could have find such a motivating project idea much earlier. And that I could have one more week to present it on June 16th.
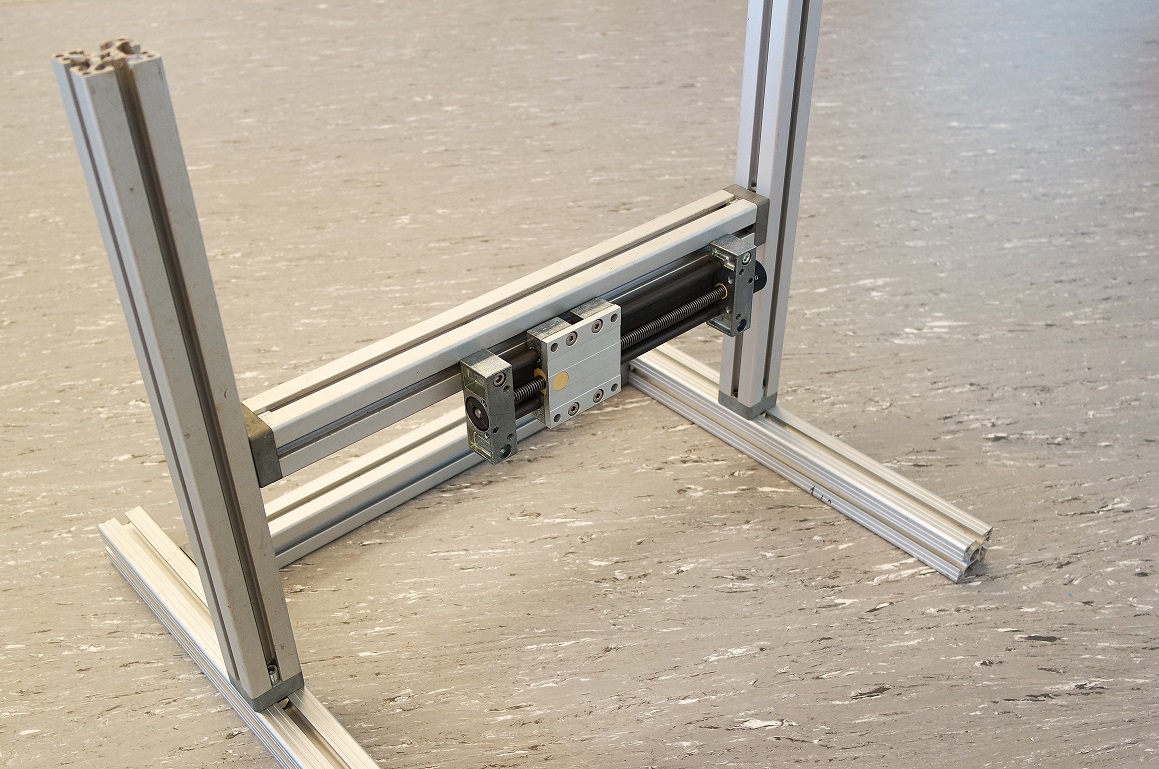
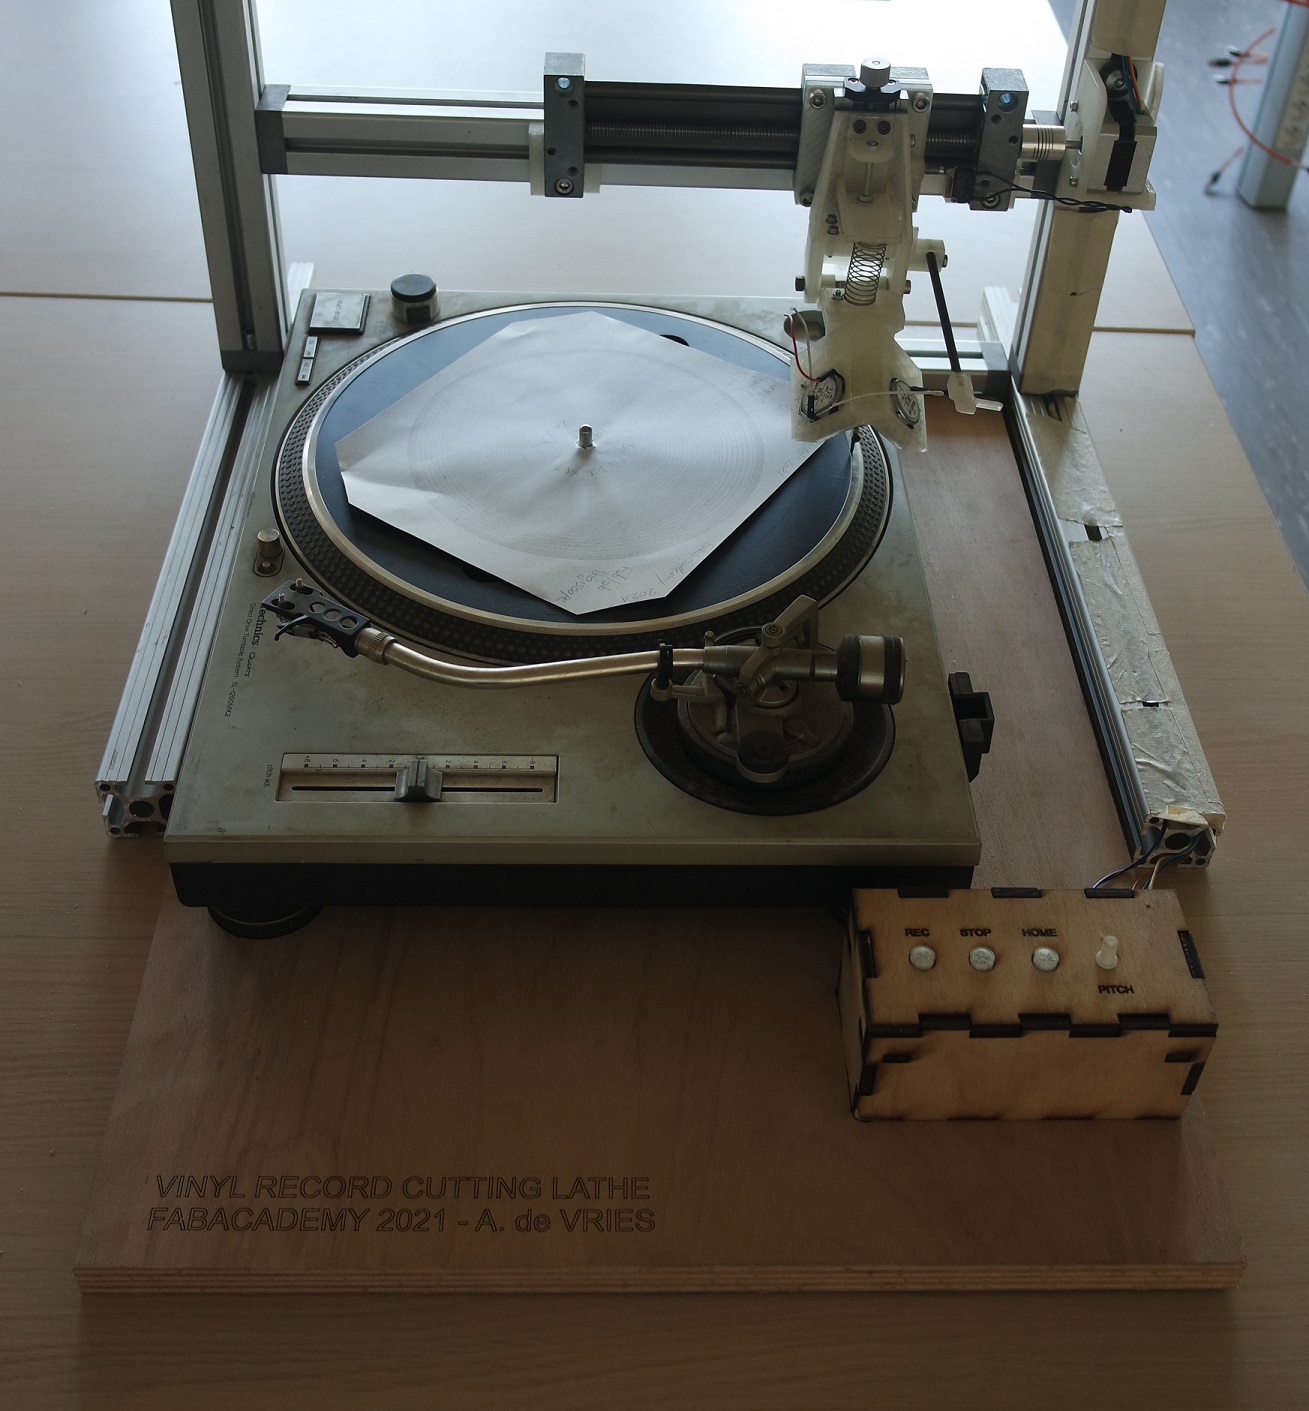
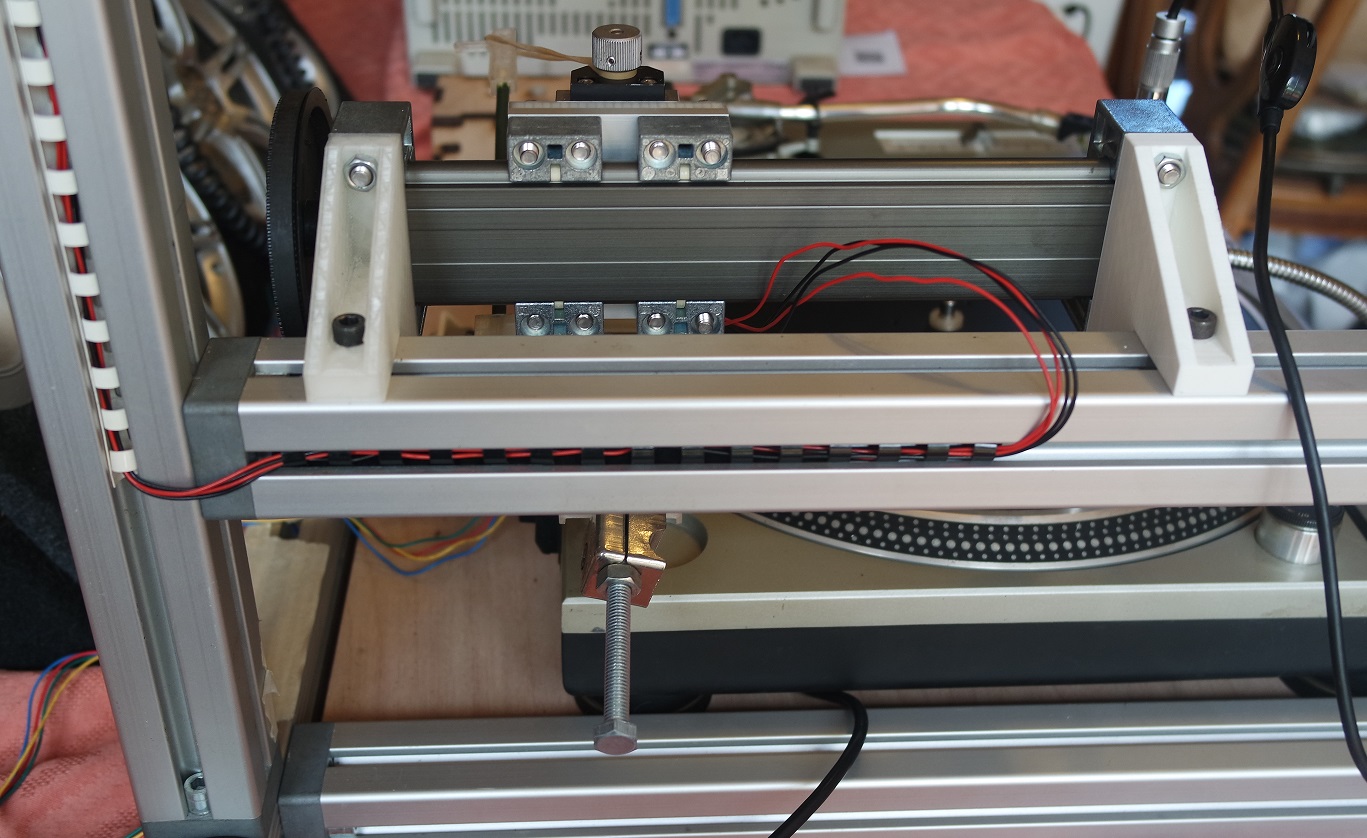
The main structure of the machine is finished.
The frame was built from 40x40mm aluminium extrusions and is very strong and stable which is what I was looking for:
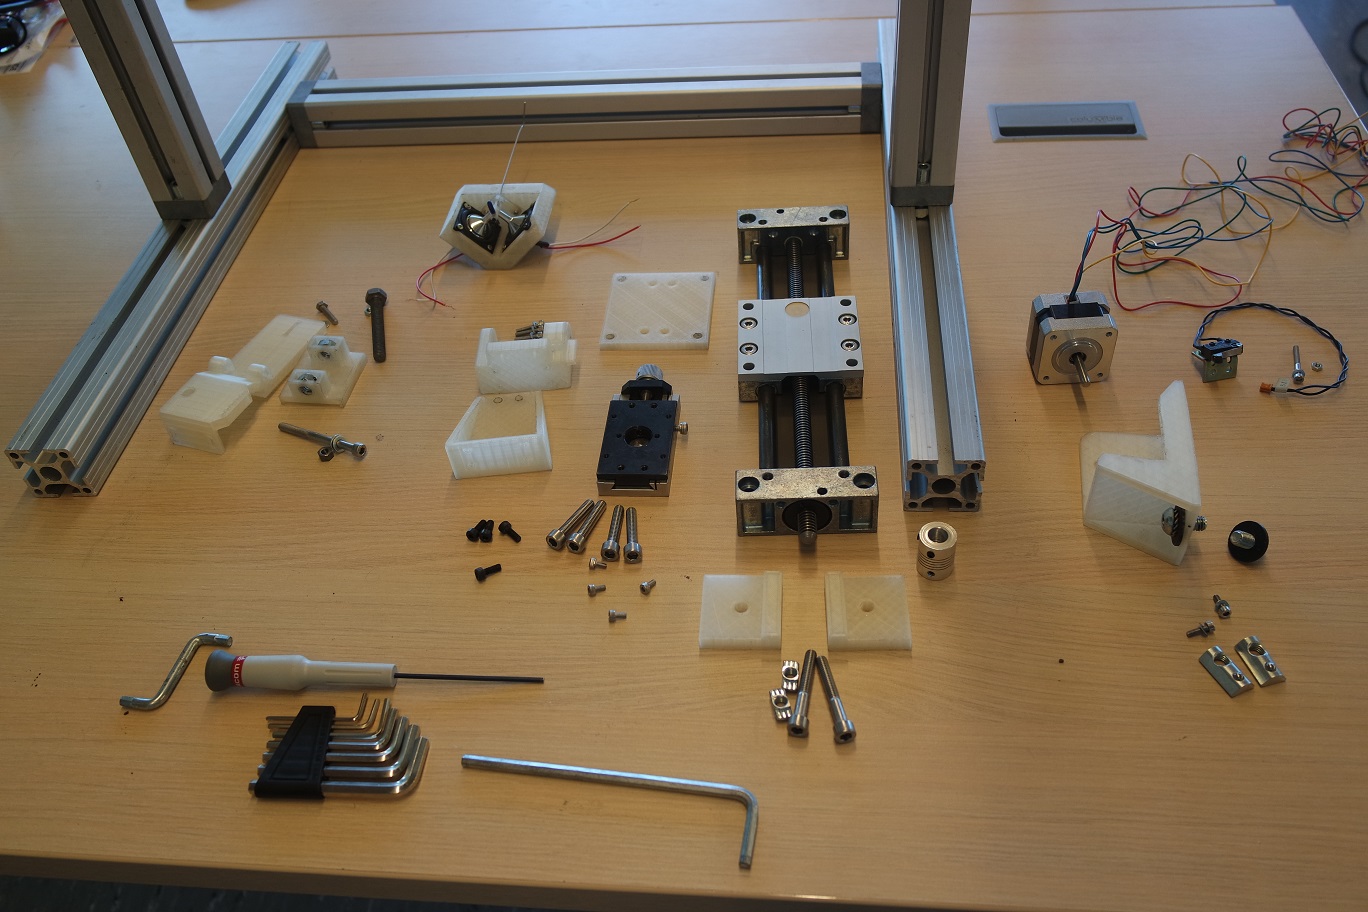
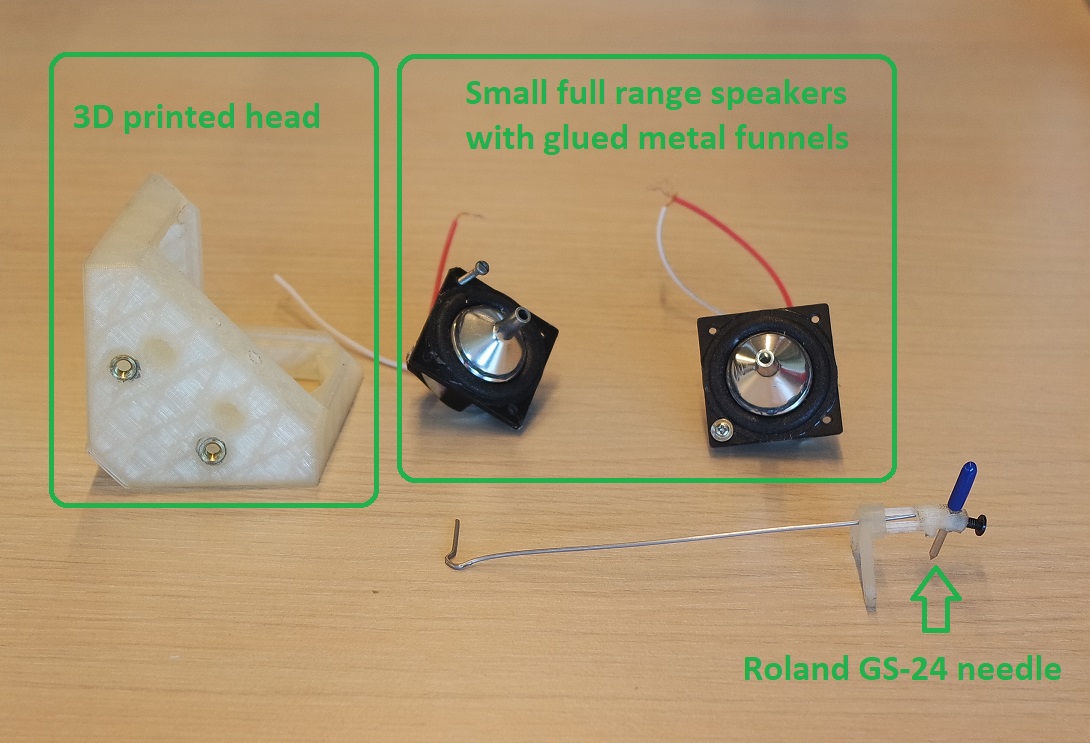
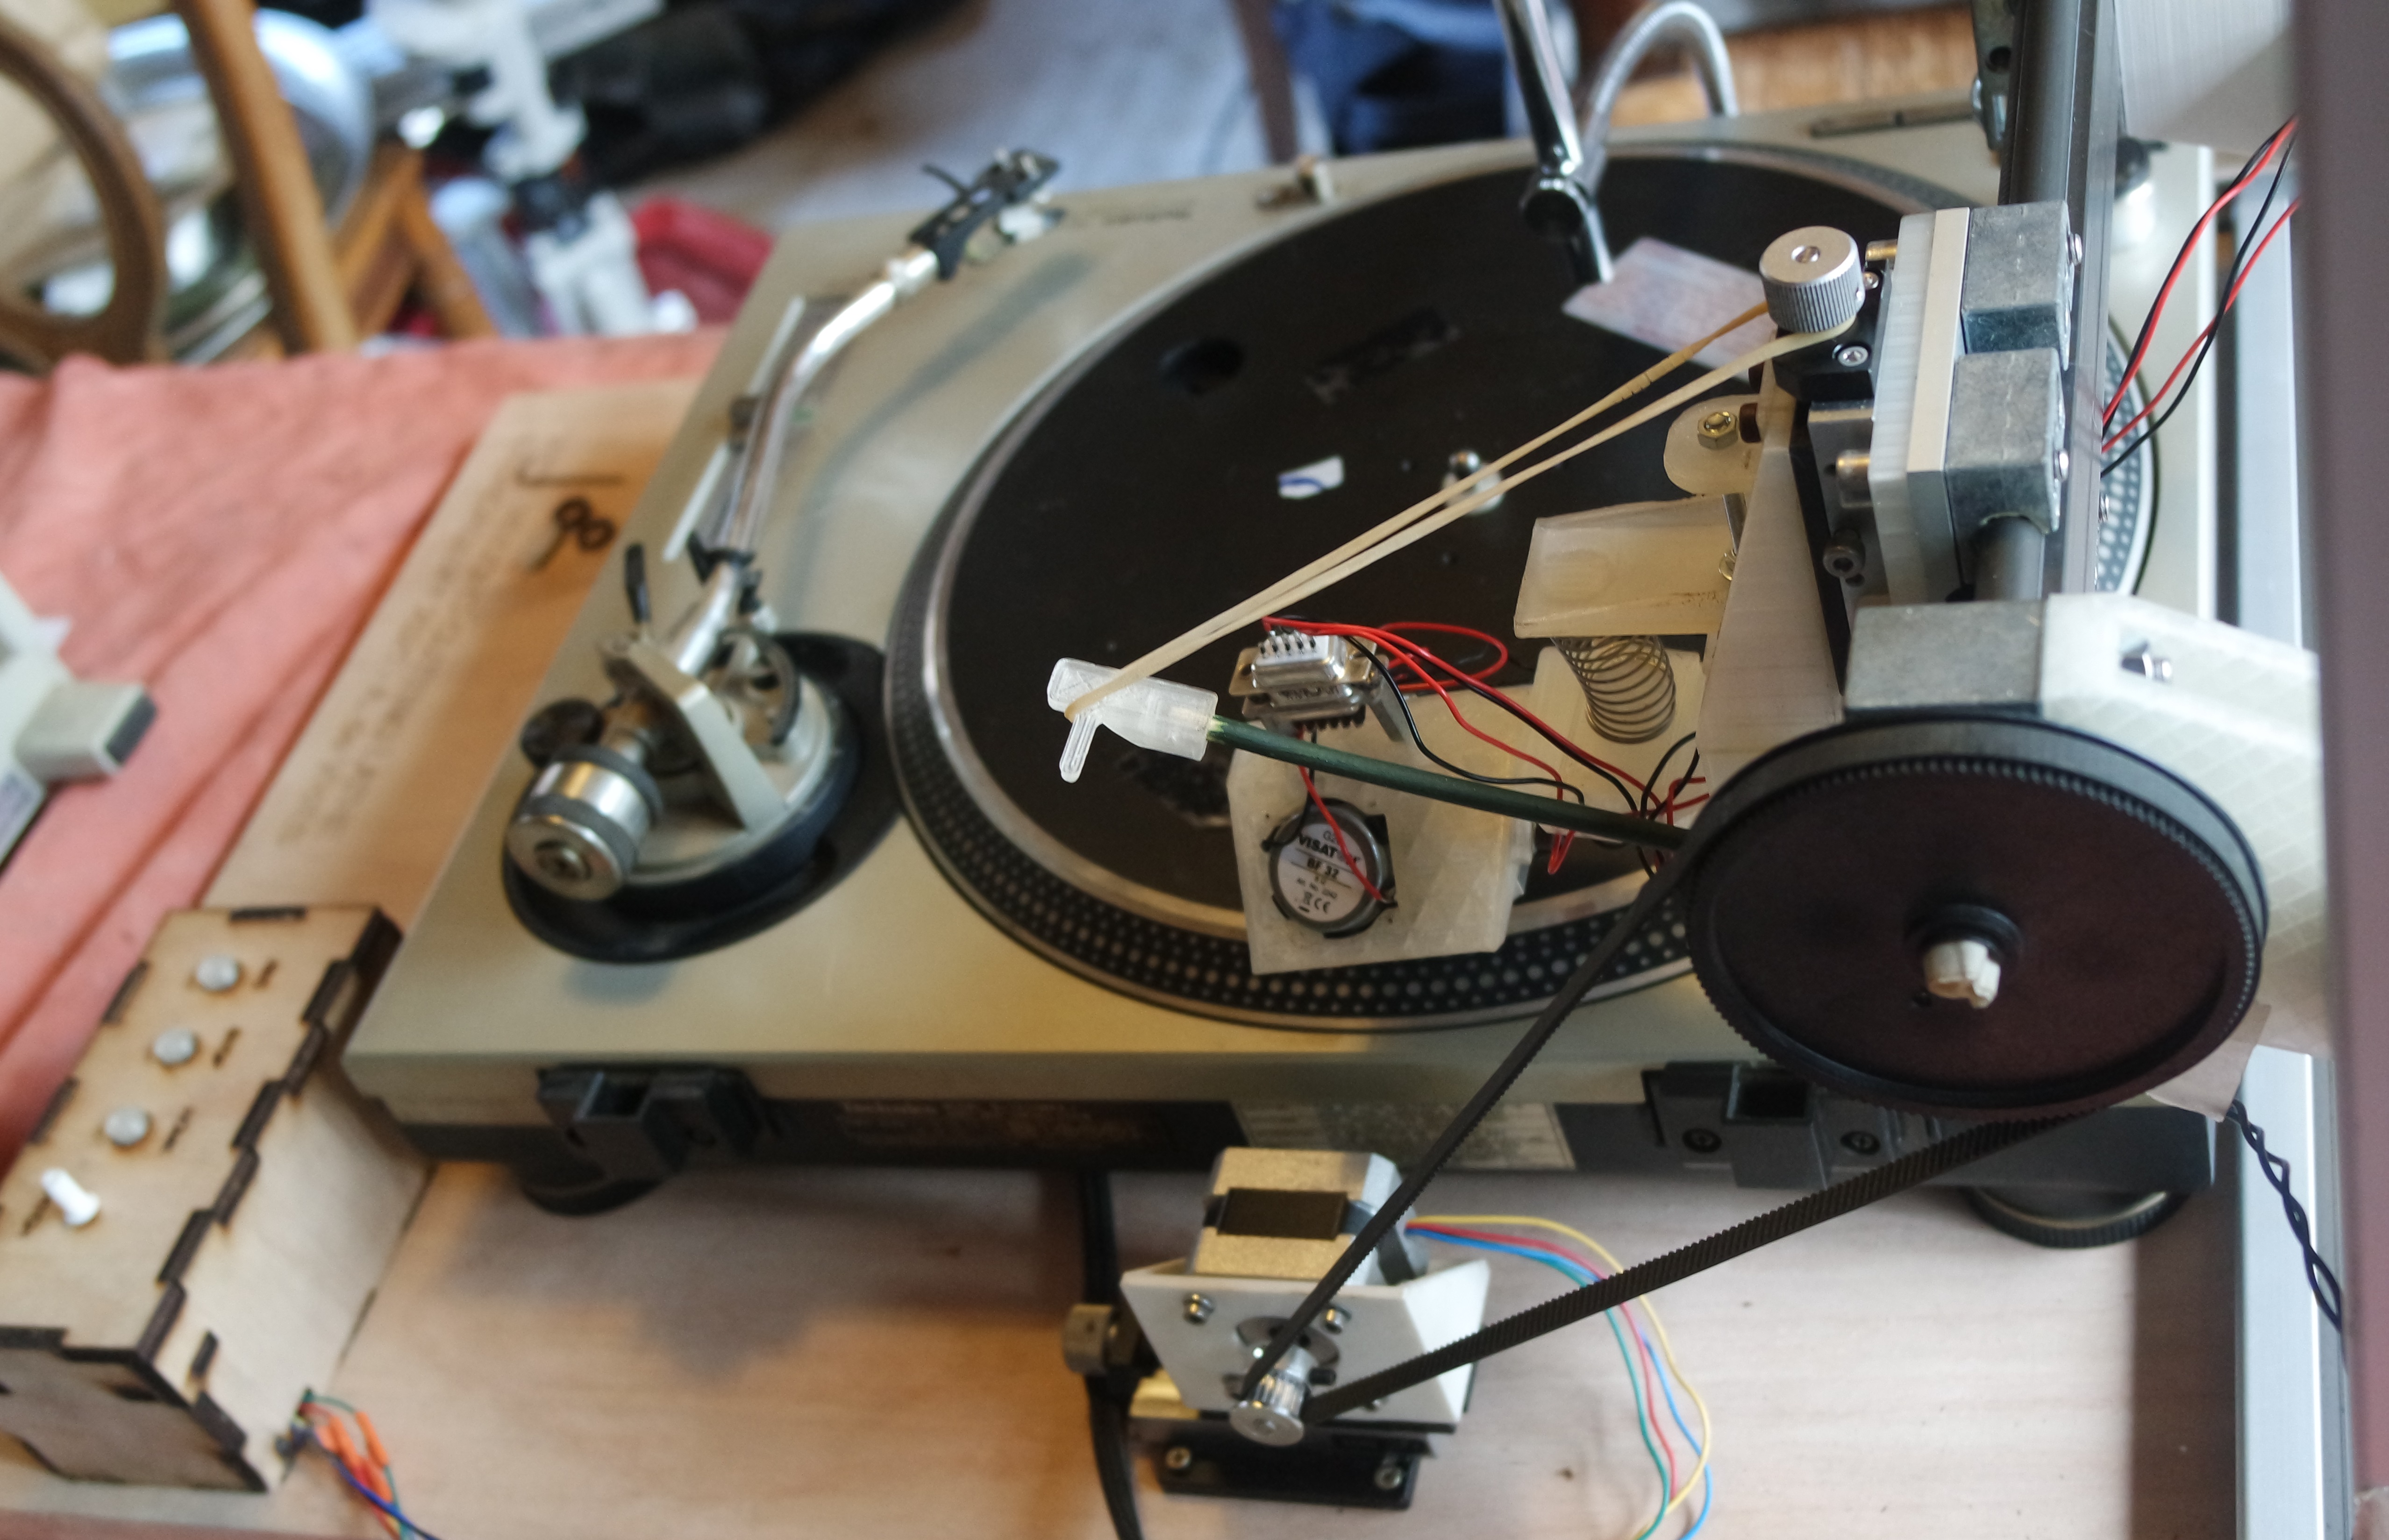
At this point, all the CAD parts needed to build the arm and the engraving head have been 3D printed and assembled:
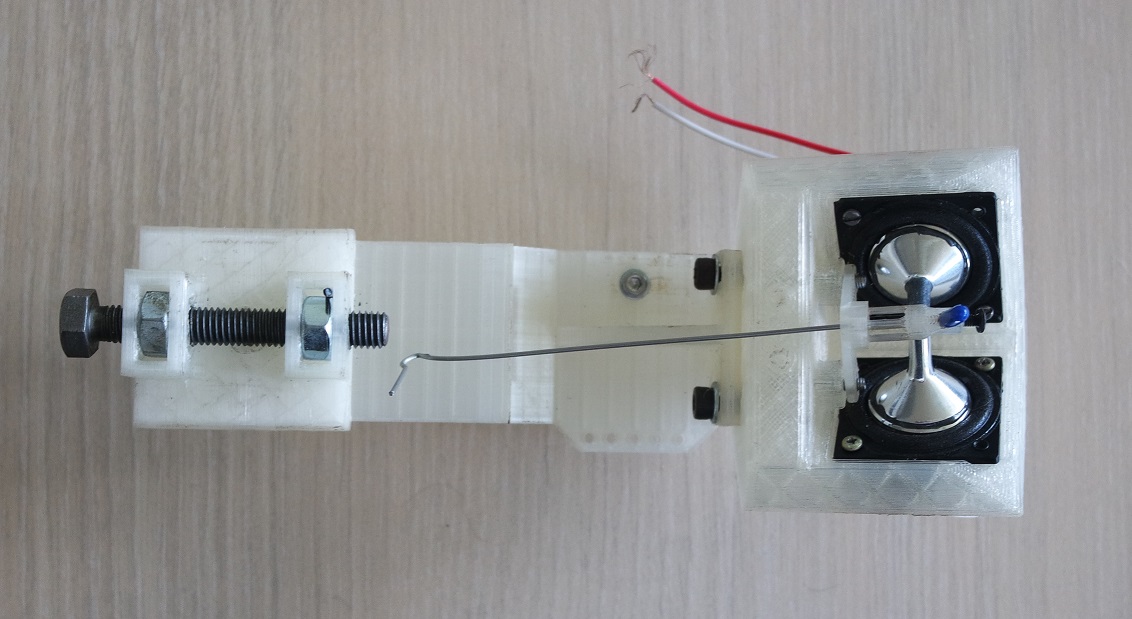
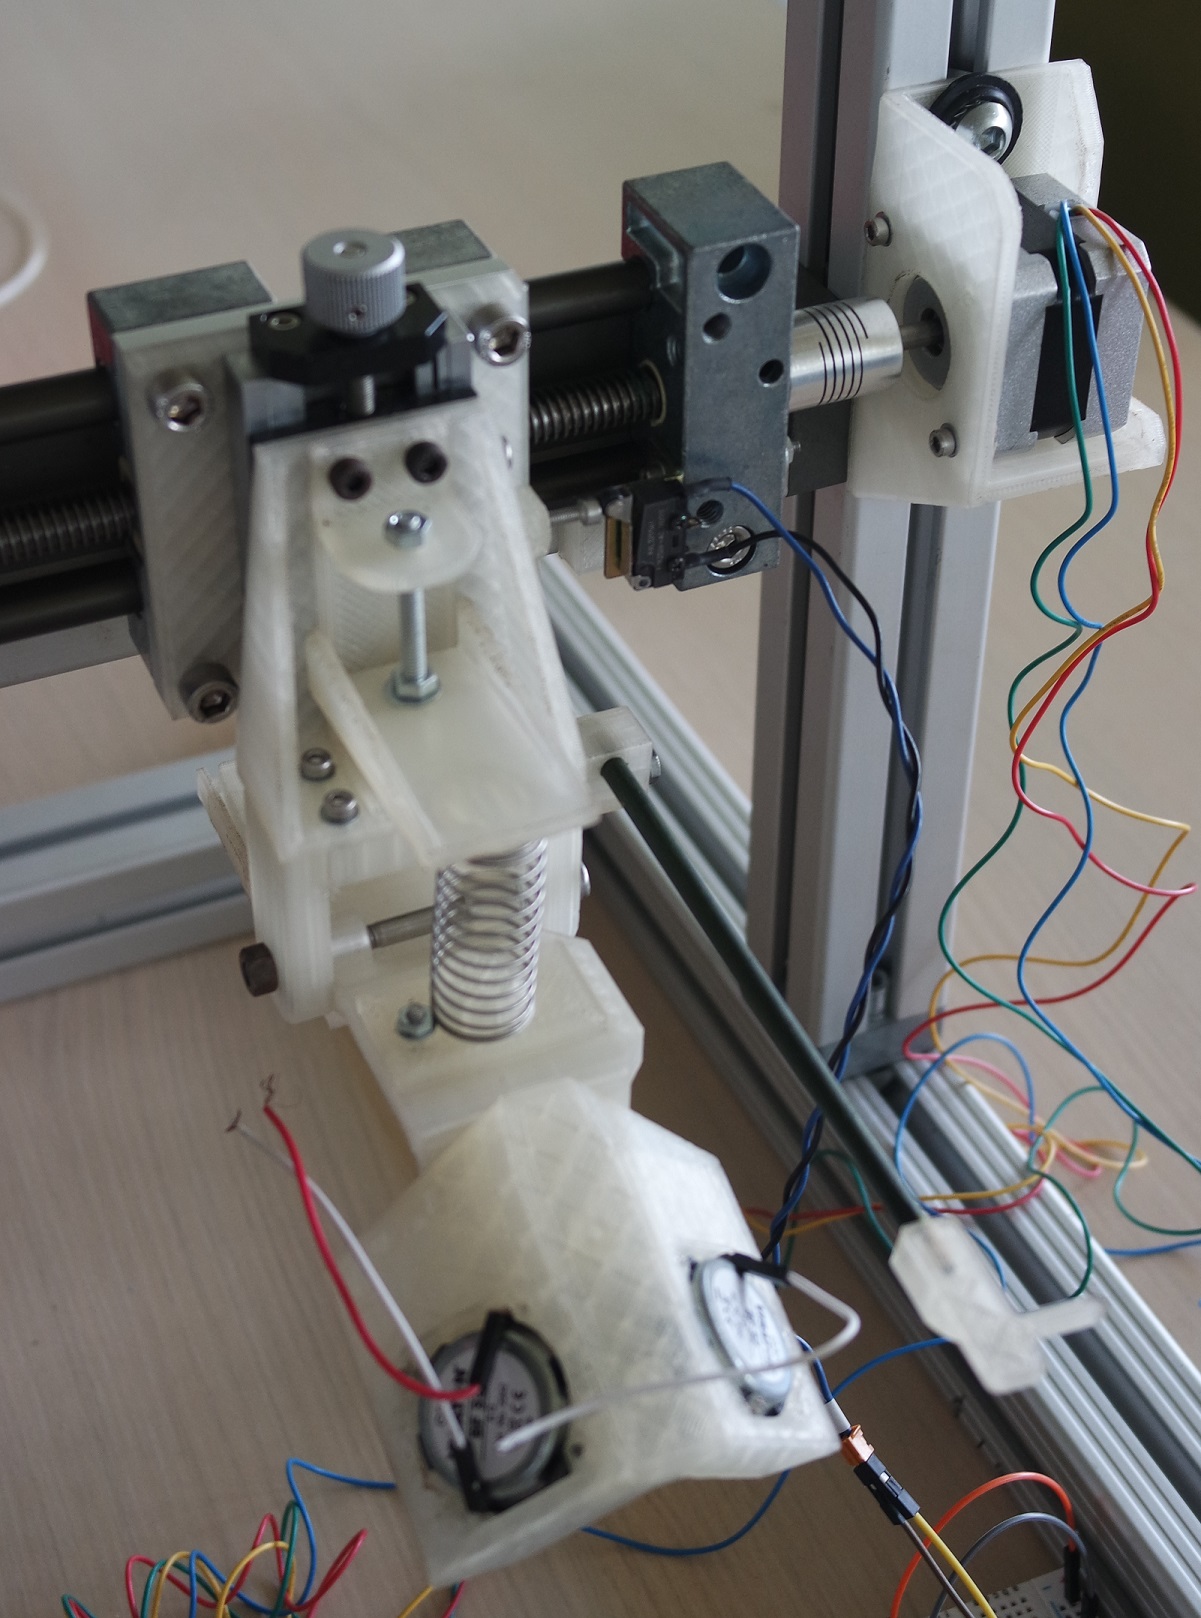
The engraving head has also been assembled with its two tiny BF-32 full range speakers connected to the engraving needle by small epoxy glued metal funnels:

I just finished the first version of the code for my X gantry movement and tested it.
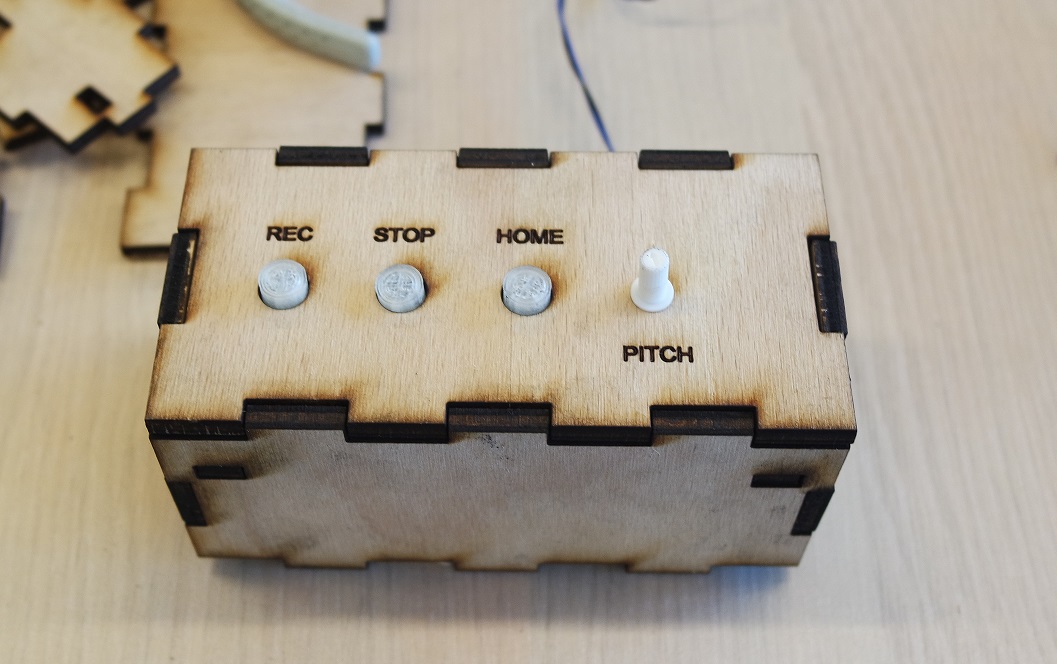
At the moment it's using 3 buttons and a potentiometer for
- starting the recording (REC button)
- abort the recording if needed (STOP button)
- perform homing (HOME button)
- speed fine tuning (SPEED potentiometer)
Remaining tasks
Time is running short and I still have a lot to do!Last week (week 17) I broke my L293D stepper driver by probably making a short circuit and had to use a A4988 stepper driver instead.
And I did all my programming based on it.
So I think I'd better stuck with it now if I want to have a chance to finish on time for the end of the week.
That means I will have to design and make a new electronic board for it because at the moment I'm using breadboards which is far from ideal.
I planned to make a mold and to cast Cerrotru to make a counterweight for the engraving head, but I really don't know if I will have enough time (only 5 remaining days at the time of writing).
I also need to design and make a laser cutted box for the electronic integration.
Do some CNC milling to make a "registering" base for the record player and control box.
Add a servo motor for the engraving head up and down motion.
And of course I also need to provide some sound to the engraving head and perform my first engraving tests.
Questions that need to be resolved
The first one is "will it work?" and can only be answered by testing engraving some sound.The second one is "will noise from the motor will be noticeable on the recording?".
Once again only testing will give me an answer.
If this is the case, I will probably need to remove the motor from the aluminium frame, and use a belt and belt pulleys instead of a direct connection between the motor axis and the X gantry screw.
The third question I have in mind is "will a Roland GS-24 vinyl cutting needle be able to do the job?".
If not, I will probably need to buy and use a dedicated record vinyl embossing needle instead.
And at last but not least "will I be able to finish in time?".
We'll see... I will document my progress for the 5 remaining days at the bottom of this page.
What did I learn?
I learned a lot of things during my Fabacademy!- Electronic design and production
- Soldering
- Networking
- Interface programming
- Molding and casting
One of my 1st advice for future Fabacademy candidates would be to not start it until you have a good idea for a final project.
And if you do, to quickly find ideas and decide on one as fast as possible to be able to use each week for your final project.
I'm quiet sure that if I had decided right at the beginning, my project would be much more advanced, and I would be much more confident to be able to finish it on time.
I also realized that the Fabacademy is a very intensive program and that it's very hard to go back to studies when you are not so young.
Final countdown
June 7th 2021 (D minus 4)
During the morning I made my first audio test at home to check that the speakers on the engraving head are working fine.But one of the wires that I had solder broke and I will have to solder it back when at the lab.
I also started to search and read about Frequency Response because it's something I will need to measure.
Here are a few interseting links on that subject (and more) that I still need to read and digest:
- pearl-hifi.com
- electroacoustique.univ-lemans.fr
- lesnumeriques.com
- gearspace.com
- freedsp
- electronics-tutorials.ws
- artalabs
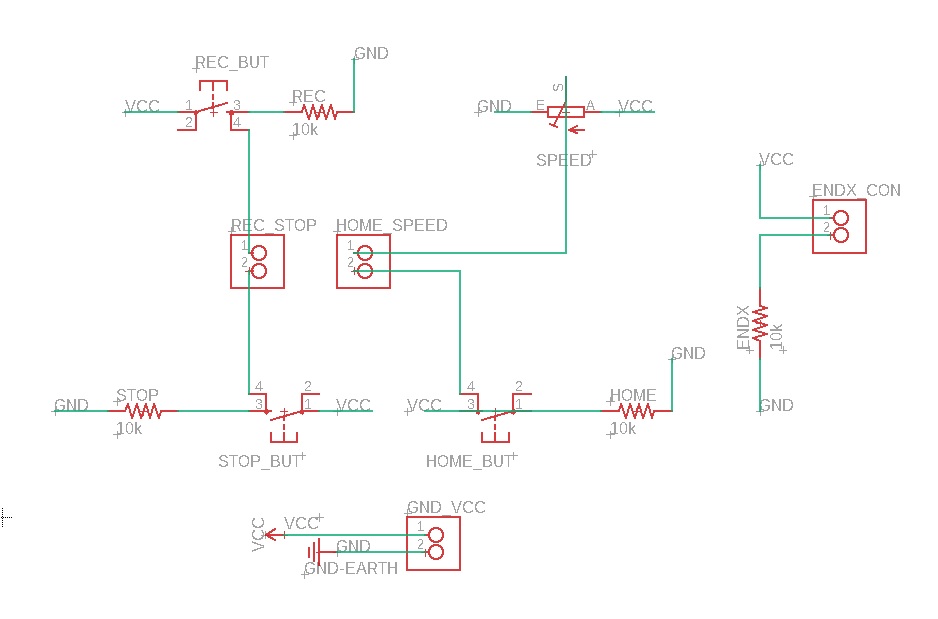
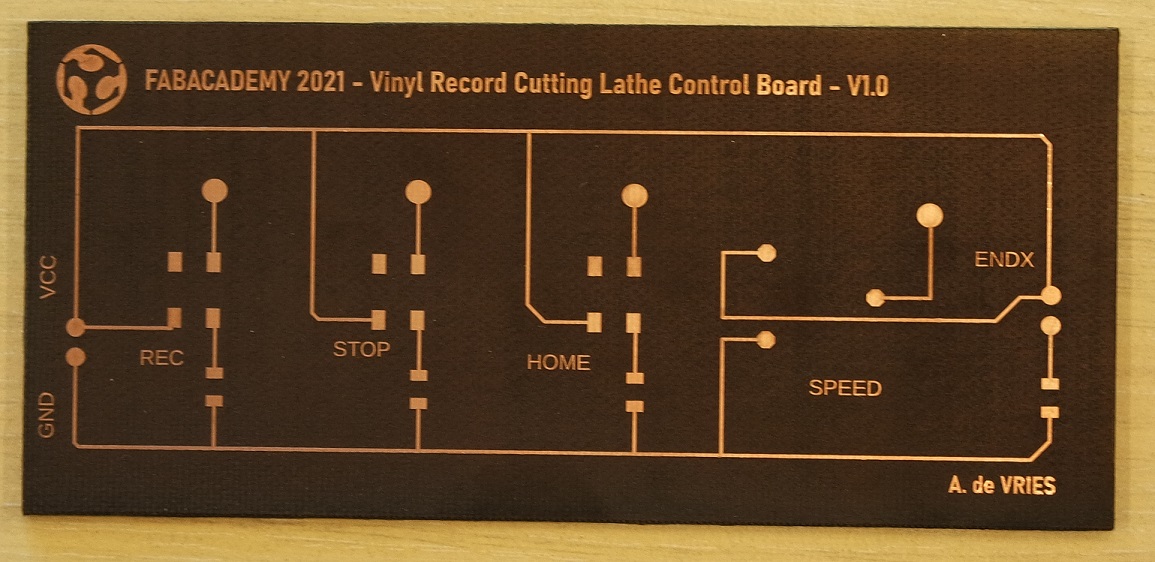
Then once at the lab I designed the board for my buttons and potentiometer:
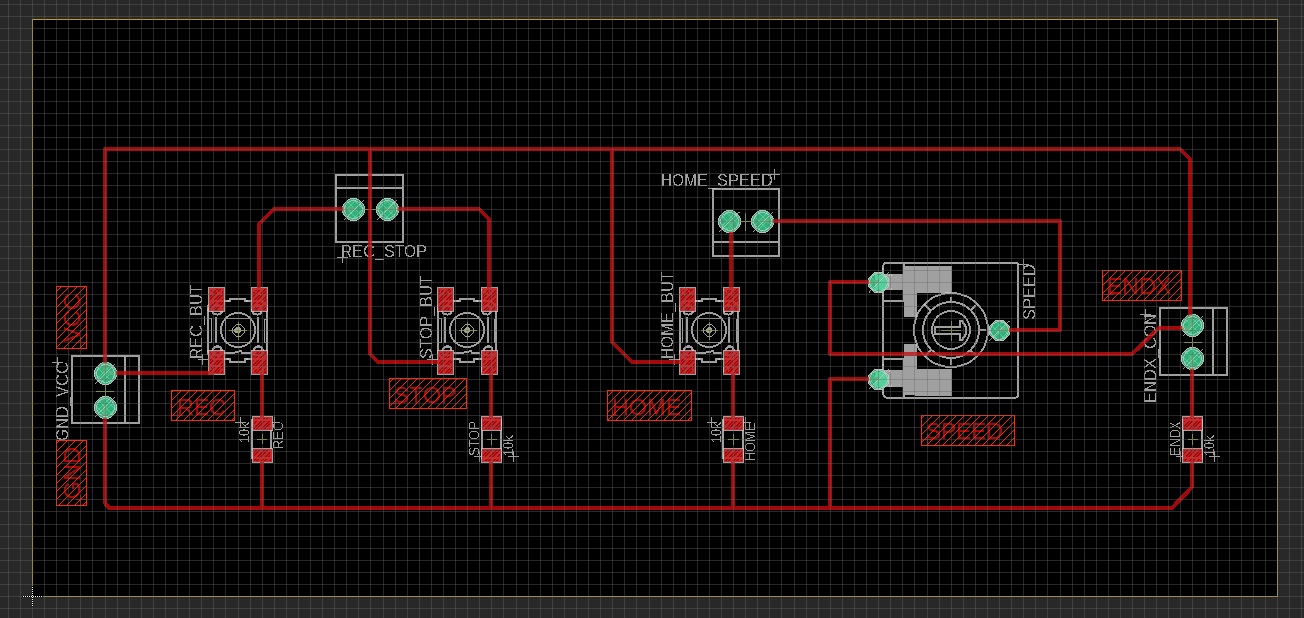
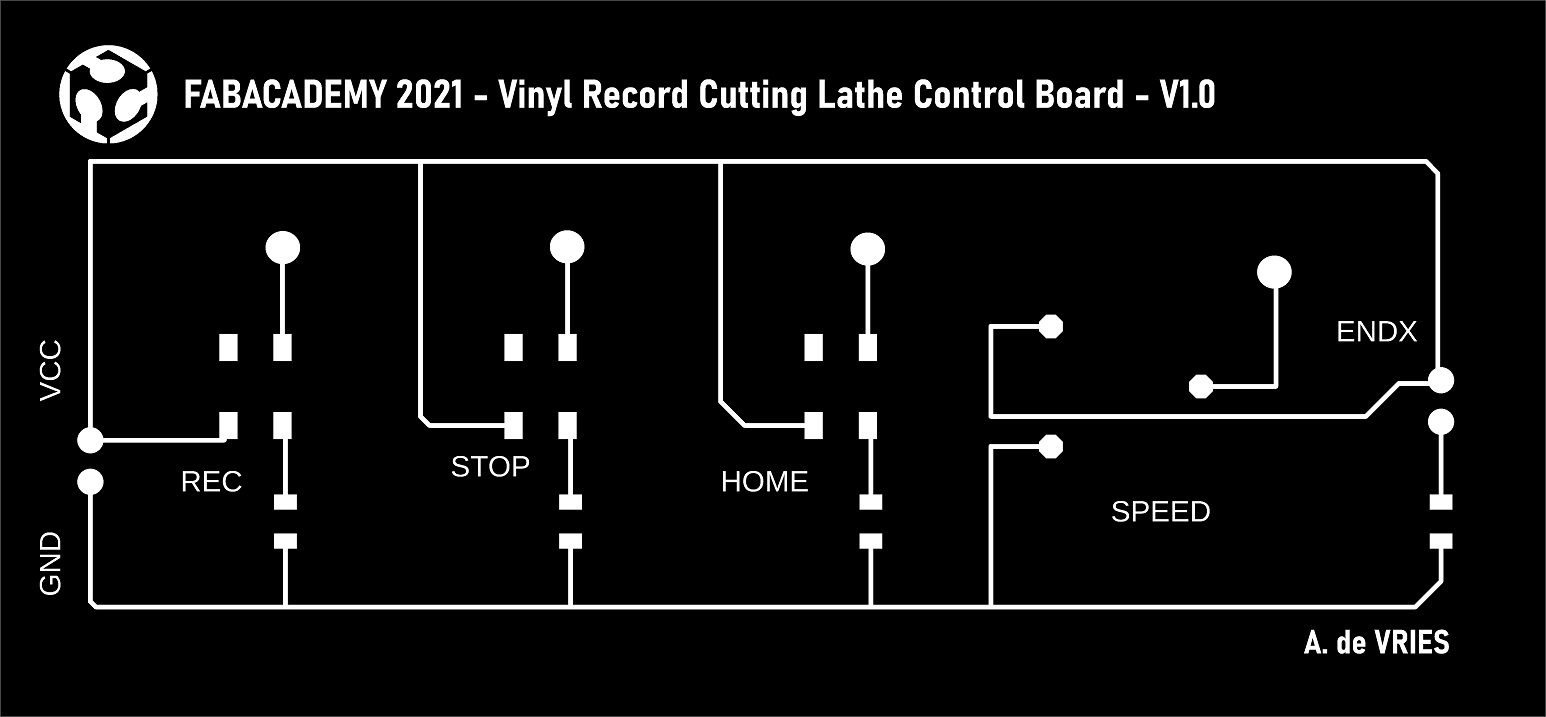
And then I engraved it and will solder it tomorow:
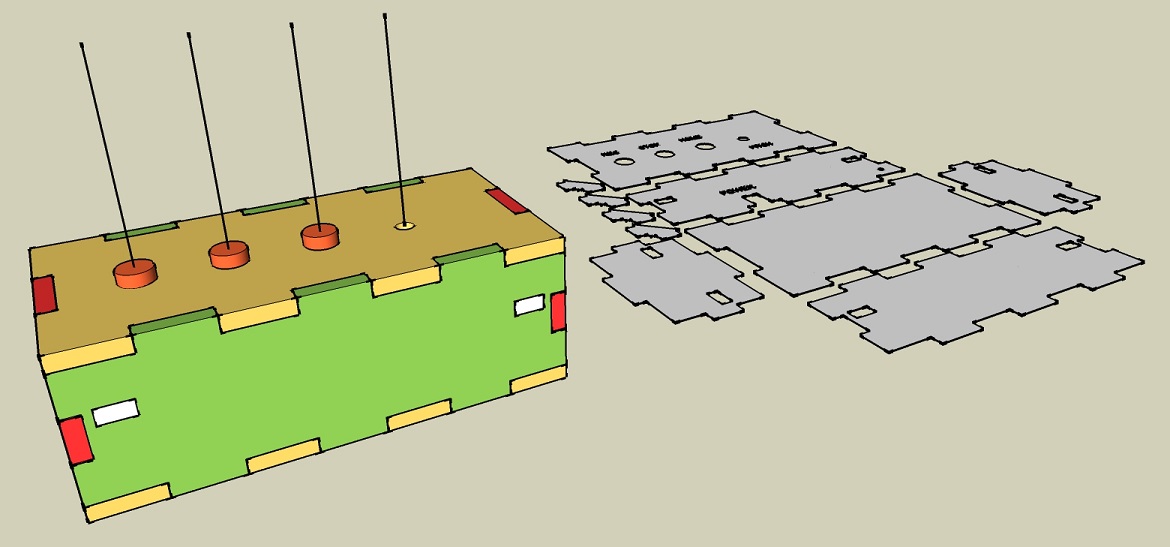
While it was engraving I also started to design a box for the electronic integration (unfinished):
June 8th 2021 (D minus 3)
The first thing I did was to solder my board.Only the potentiometer is still missing because it's higher than the buttons so I want to cut and finish the box to see how I will integrate it:

Then I finished the design of my integration box and cutted it with the laser cutter:
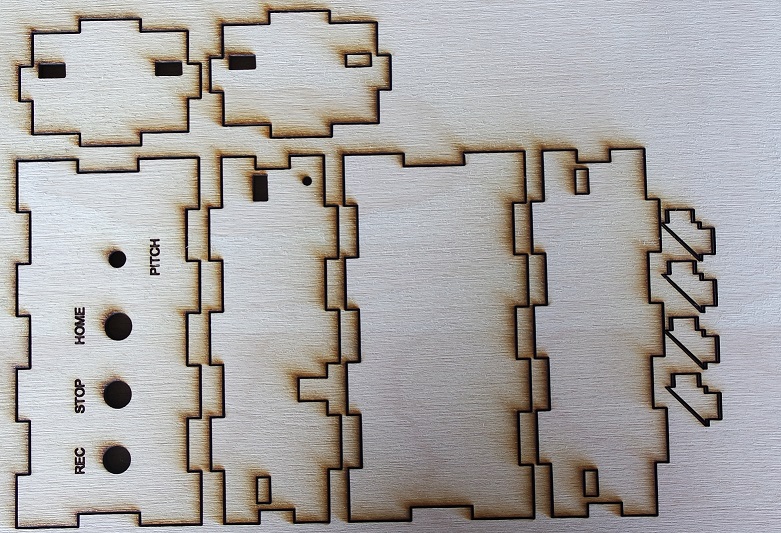
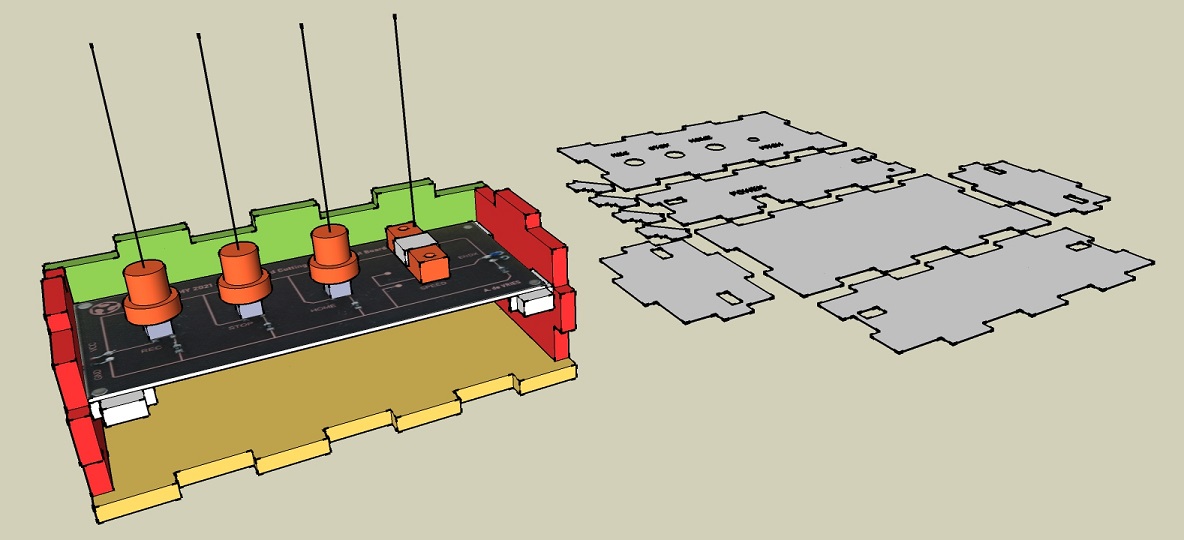
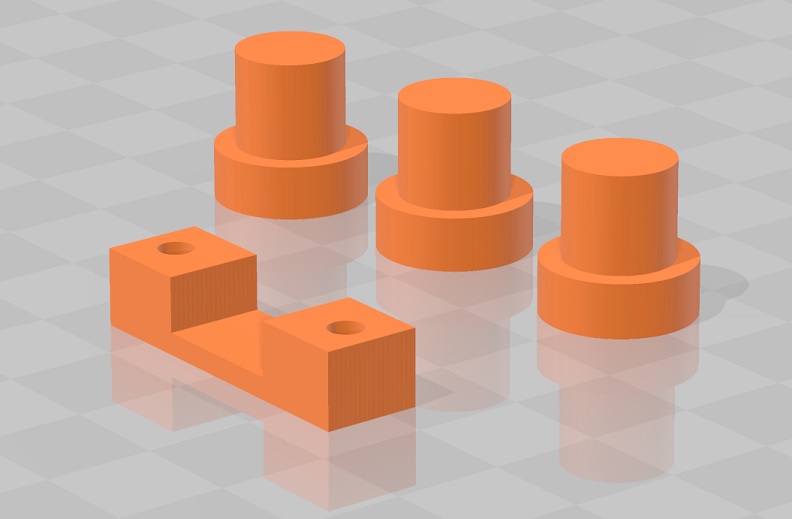
I also designed and 3D printed 3 buttons and a "U" shaped part that will hold my potentiometer underneath the top of the box:
And finally I assembled the integration box with my board and the 3D printed parts to check that everything fits well:
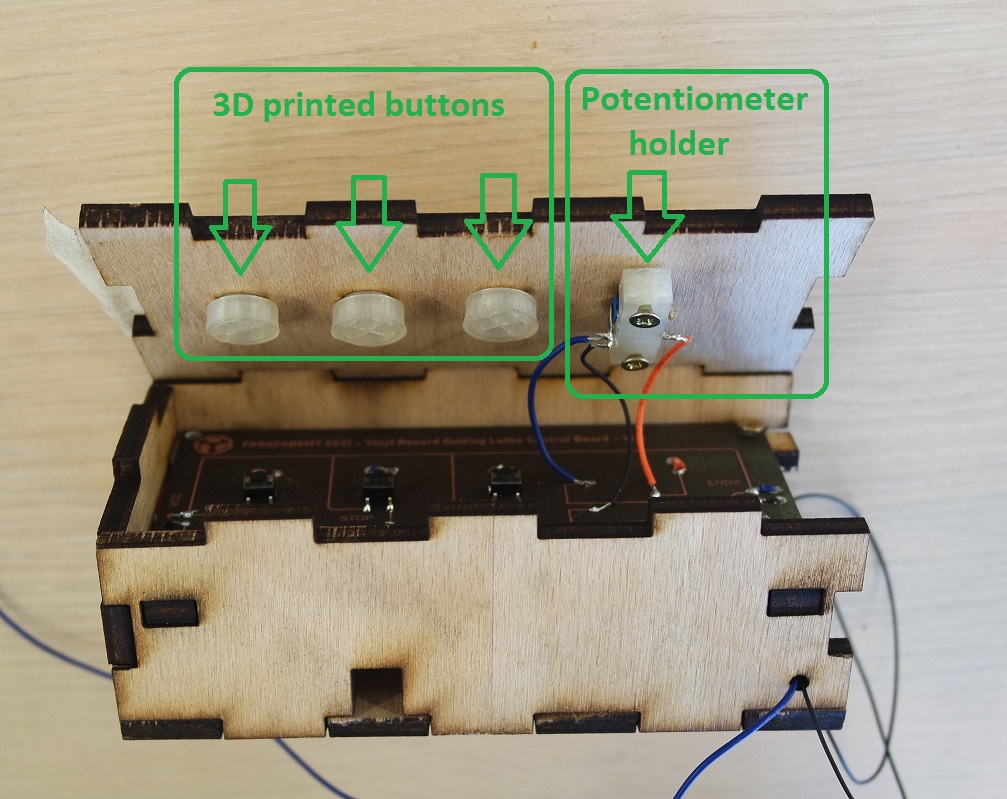
The 3D printed buttons are doing their job and I can here the "click" sound when I push on them.
The box might be a bit too small for everything to fit in it but it should be possible.
If that's not the case I might have to laser cut a second bigger version.
June 9th 2021 (D minus 2)
After checking more than twice that everything was connected properly, I tested my board and everything worked as expected.But this test was done on a Arduino Mega board instead of my Satshakit board.
So the next thing I did was to test again with my Satshakit board that I made on week 12 and it also worked.
My Satshakit board is much smaller than the Arduino Mega and everything could probably take place inside my box.
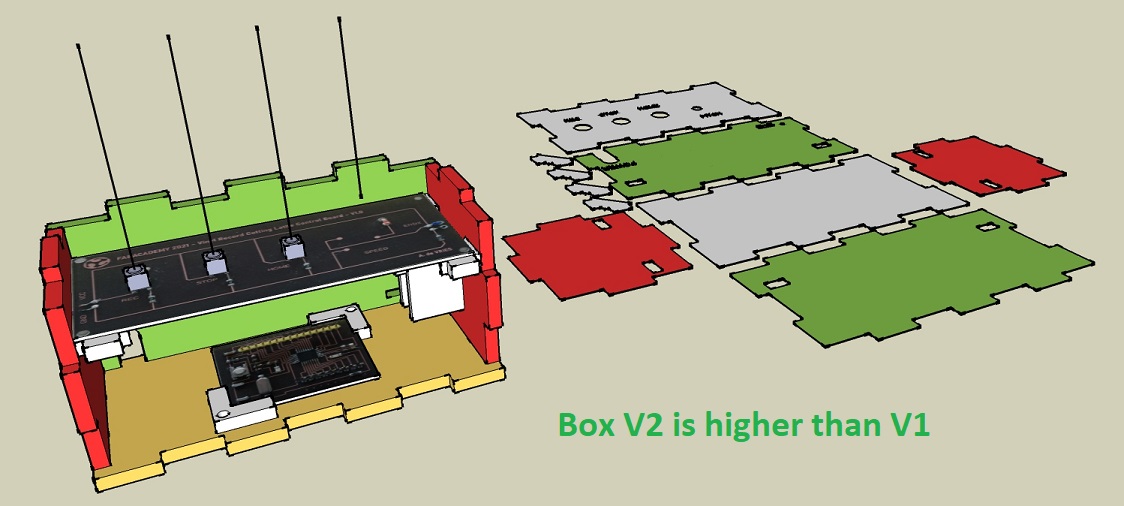
But to make things easier to connect I decided to make a second version of the box which is 2cm higher than V1:
As the Satshakit doesn't have outpout pins for VCC and GND I also had to do a little bit of additional wires soldering.
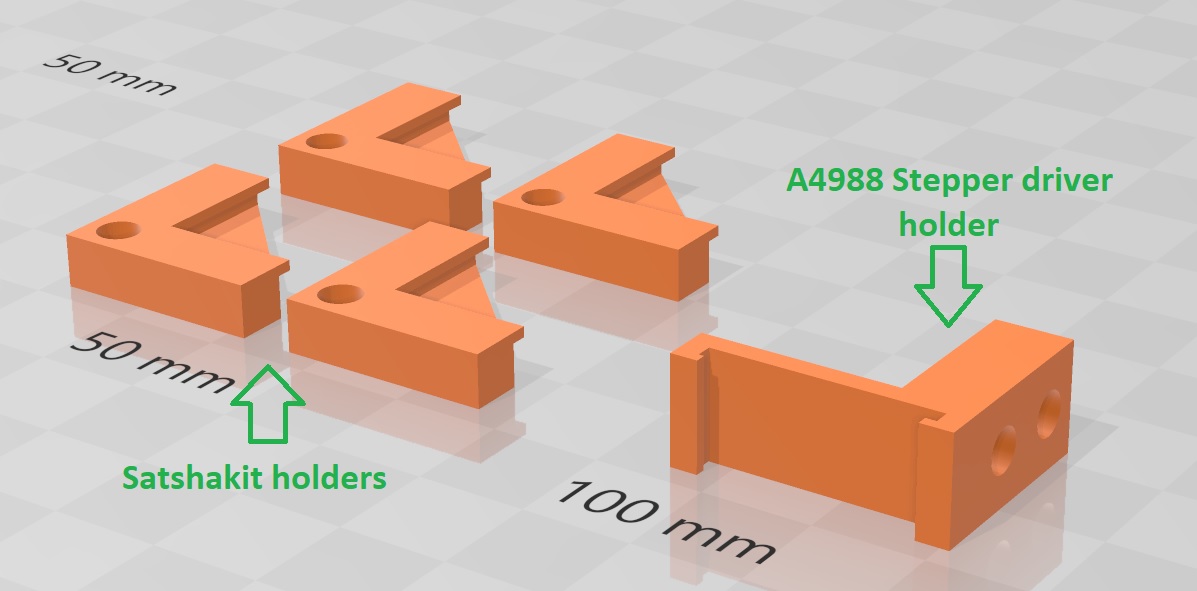
And I also 3D designed and printed extra parts for holding my Satshakit and the A4988 stepper driver in place:
June 10th 2021 (D minus 1)
Today I assembled back all my electronics into my new box V2 and tested again to make sure it was still working before to close my box: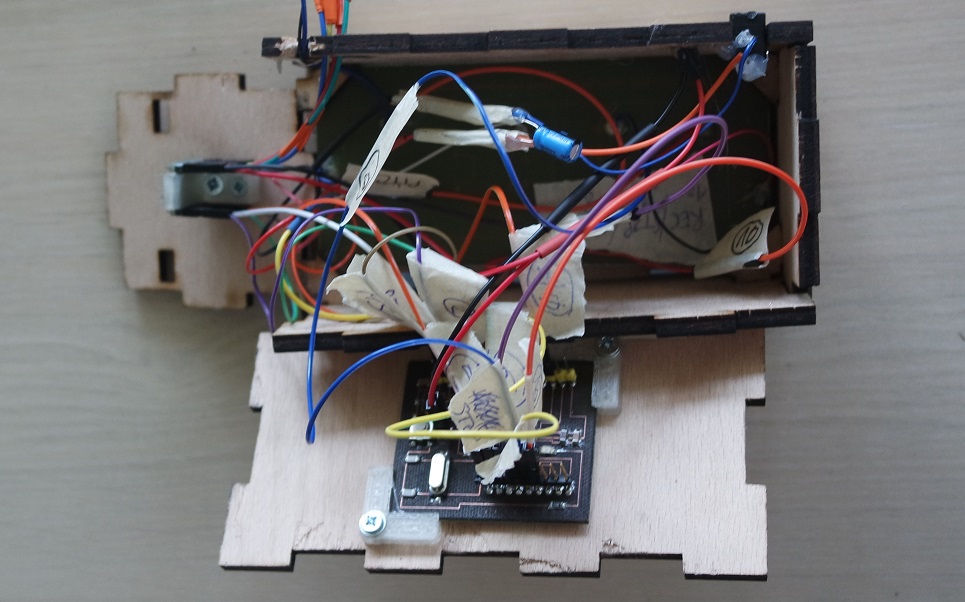
And then I tested again once closed:
As I had bring my Technics 1200 Mk2 turntable with me, I installed it underneath the X gantry of my machine and ajusted all the aluminium extrusion so that the needle is very close to the top of the turntable:
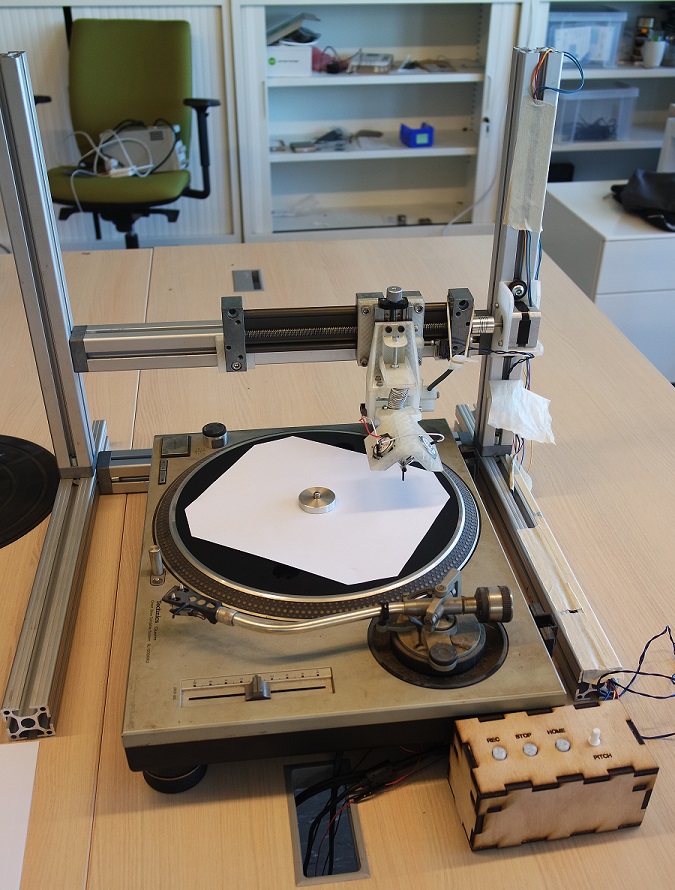
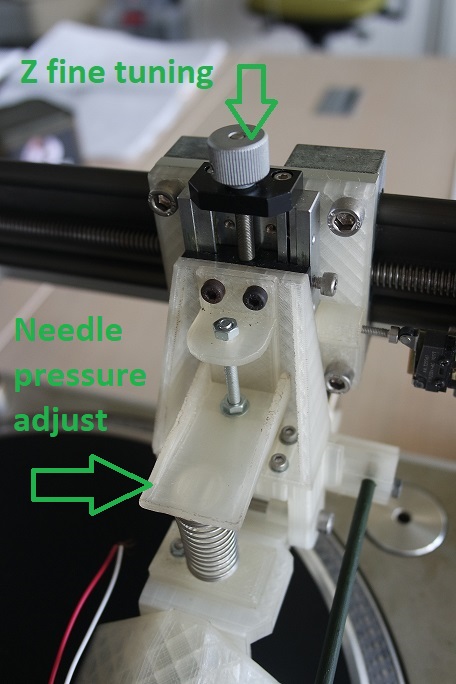
Then I could adjust it even better with the Z fine tuning.
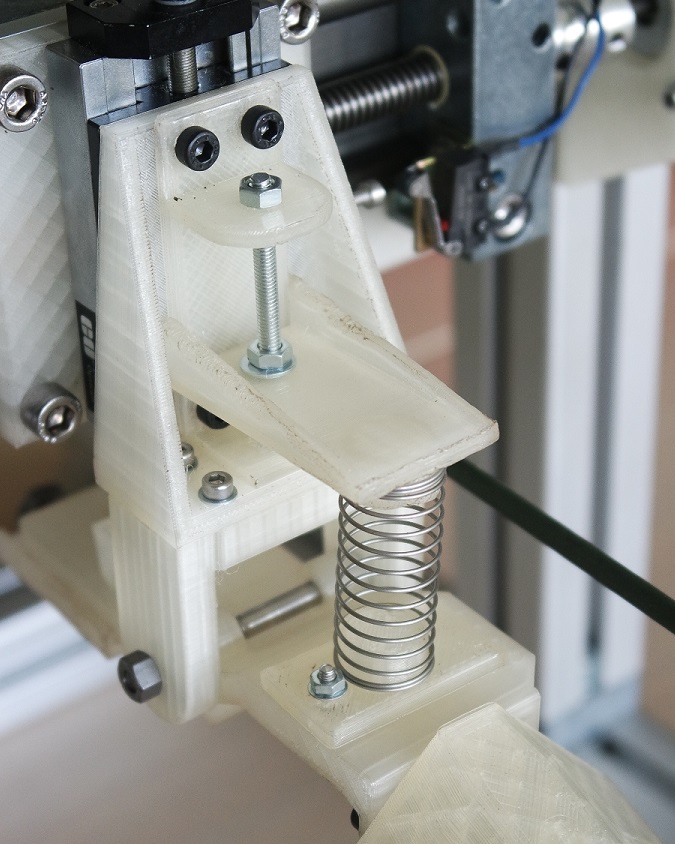
I also adjusted the pression on the needle both by playing with the counterweight at the back of the arm and the pressure on the engraving head spring:
Then I was ready to perform a very 1st test.
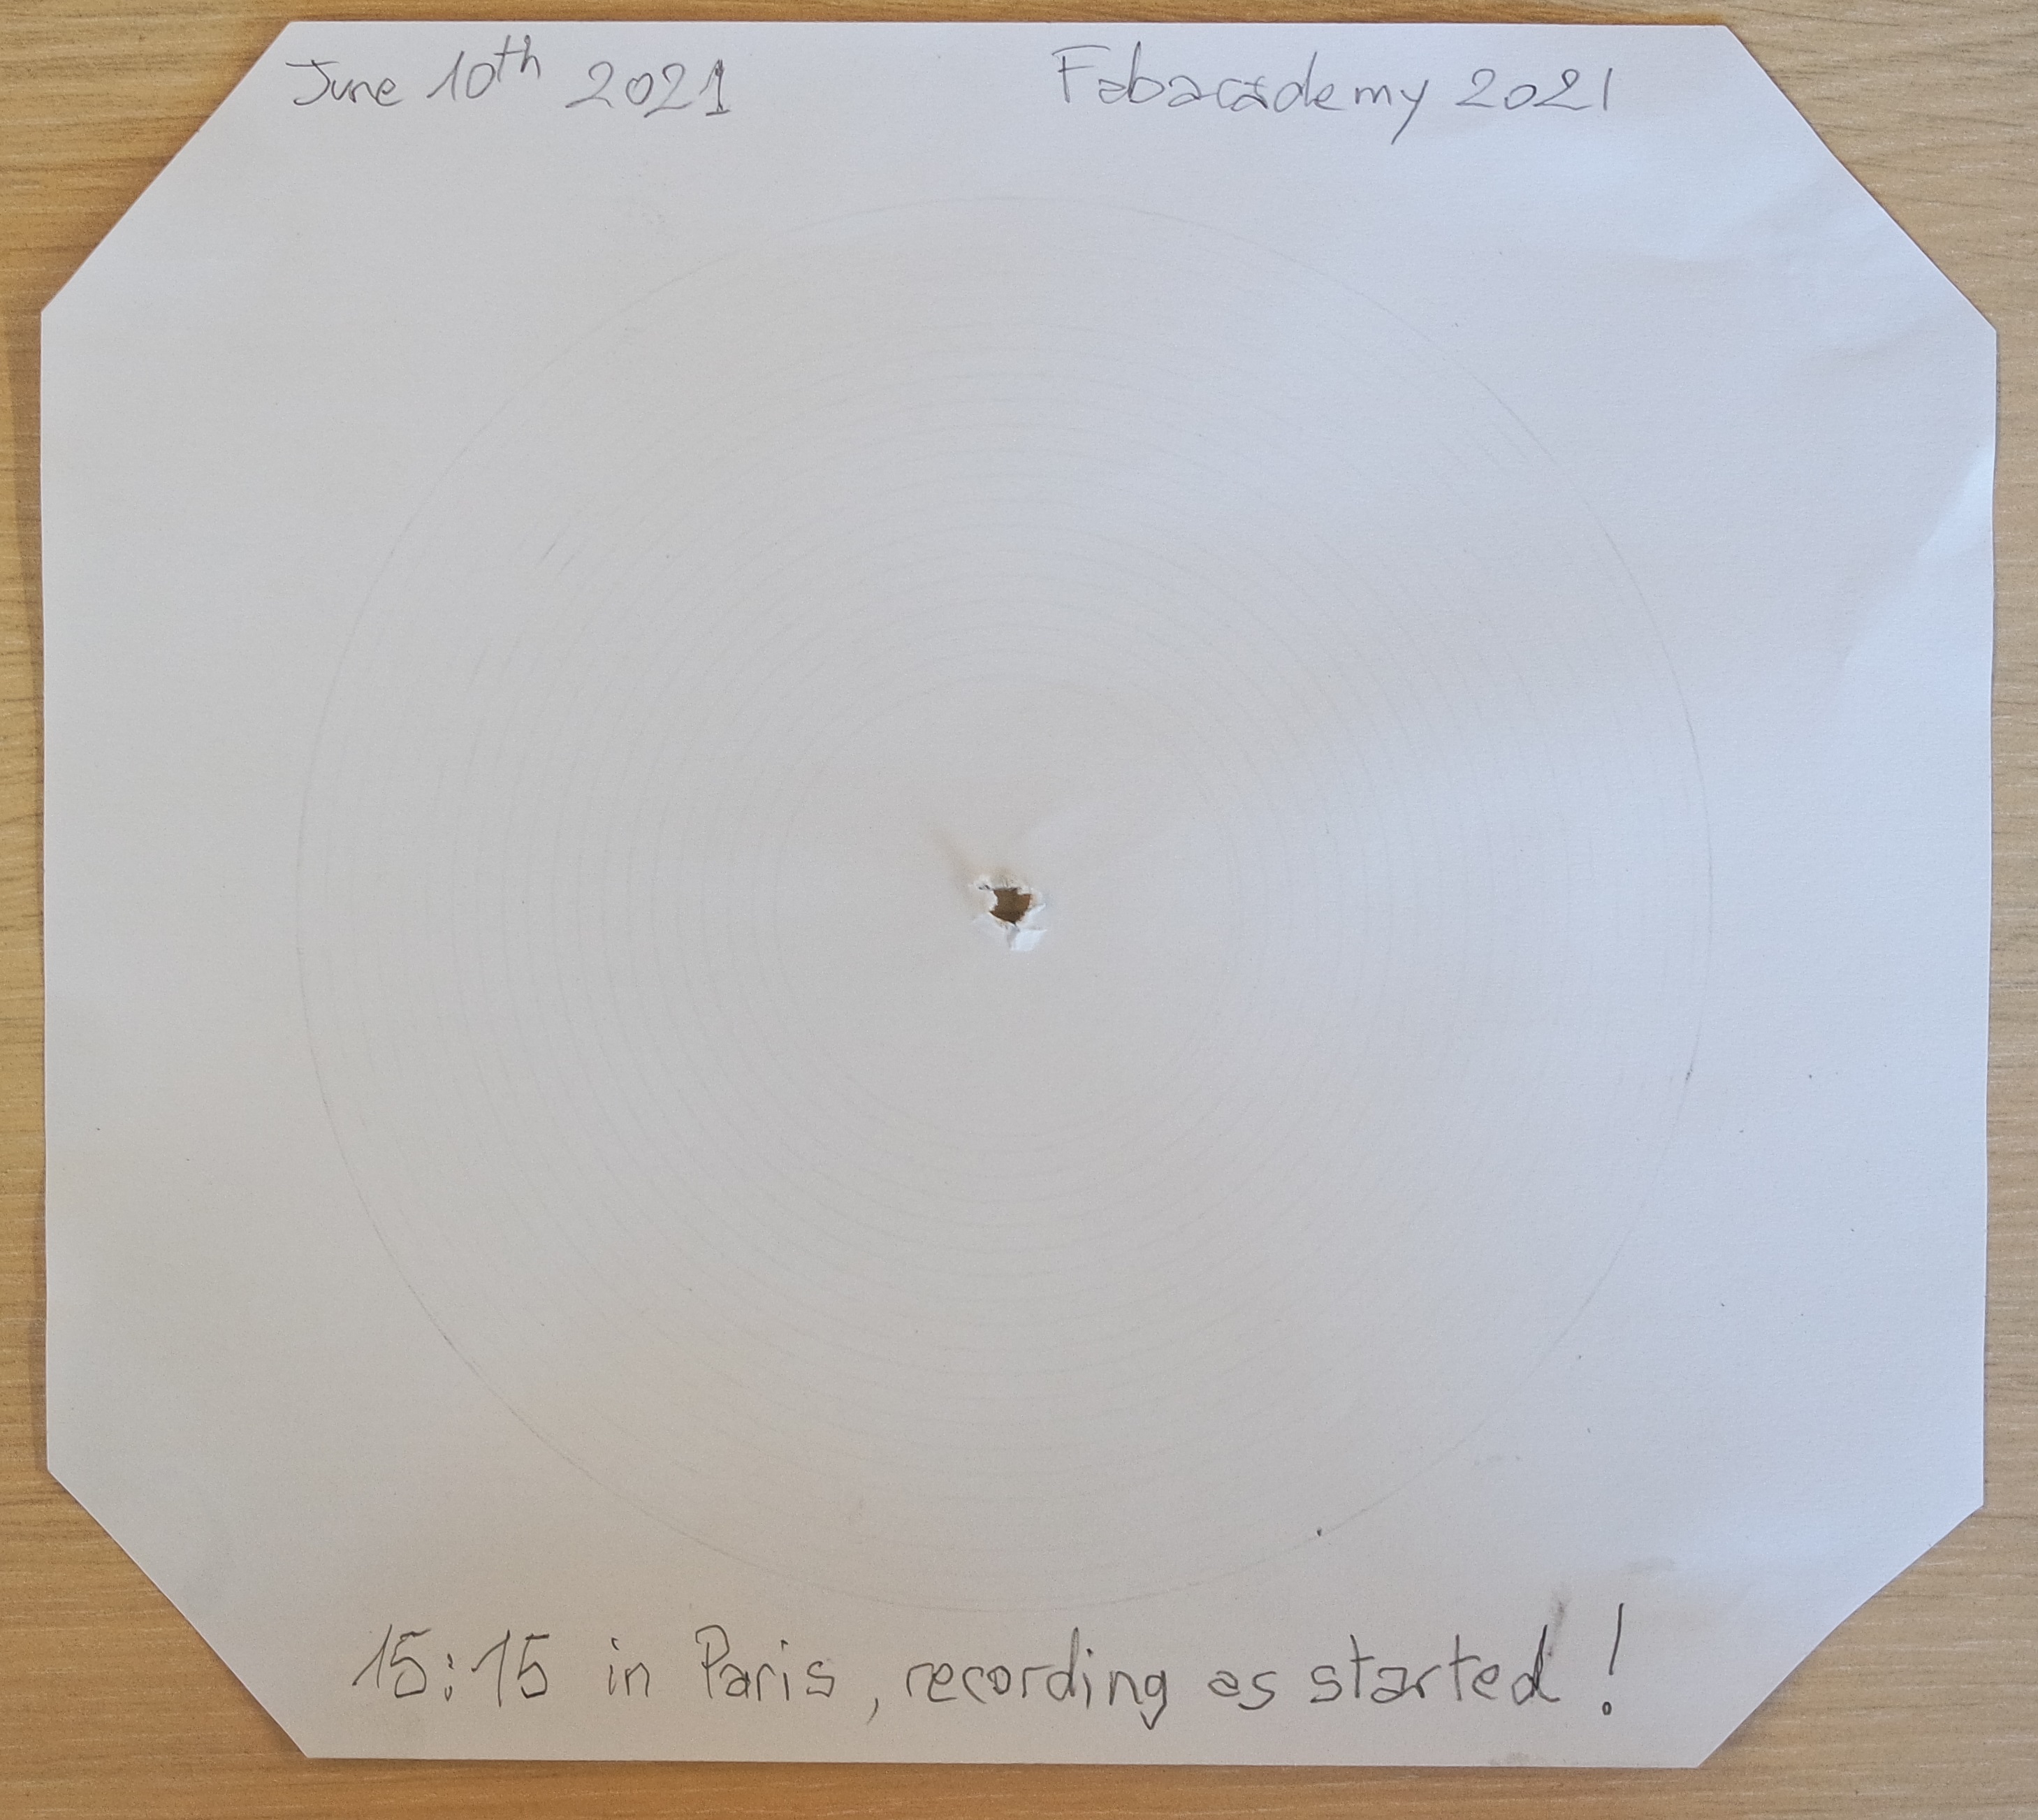
I performed my very first tests on paper by replacing the Roland GS-24 needle by a pencil tip.
And here is the very 1st result I got at high speed and 33 RPM rotation:
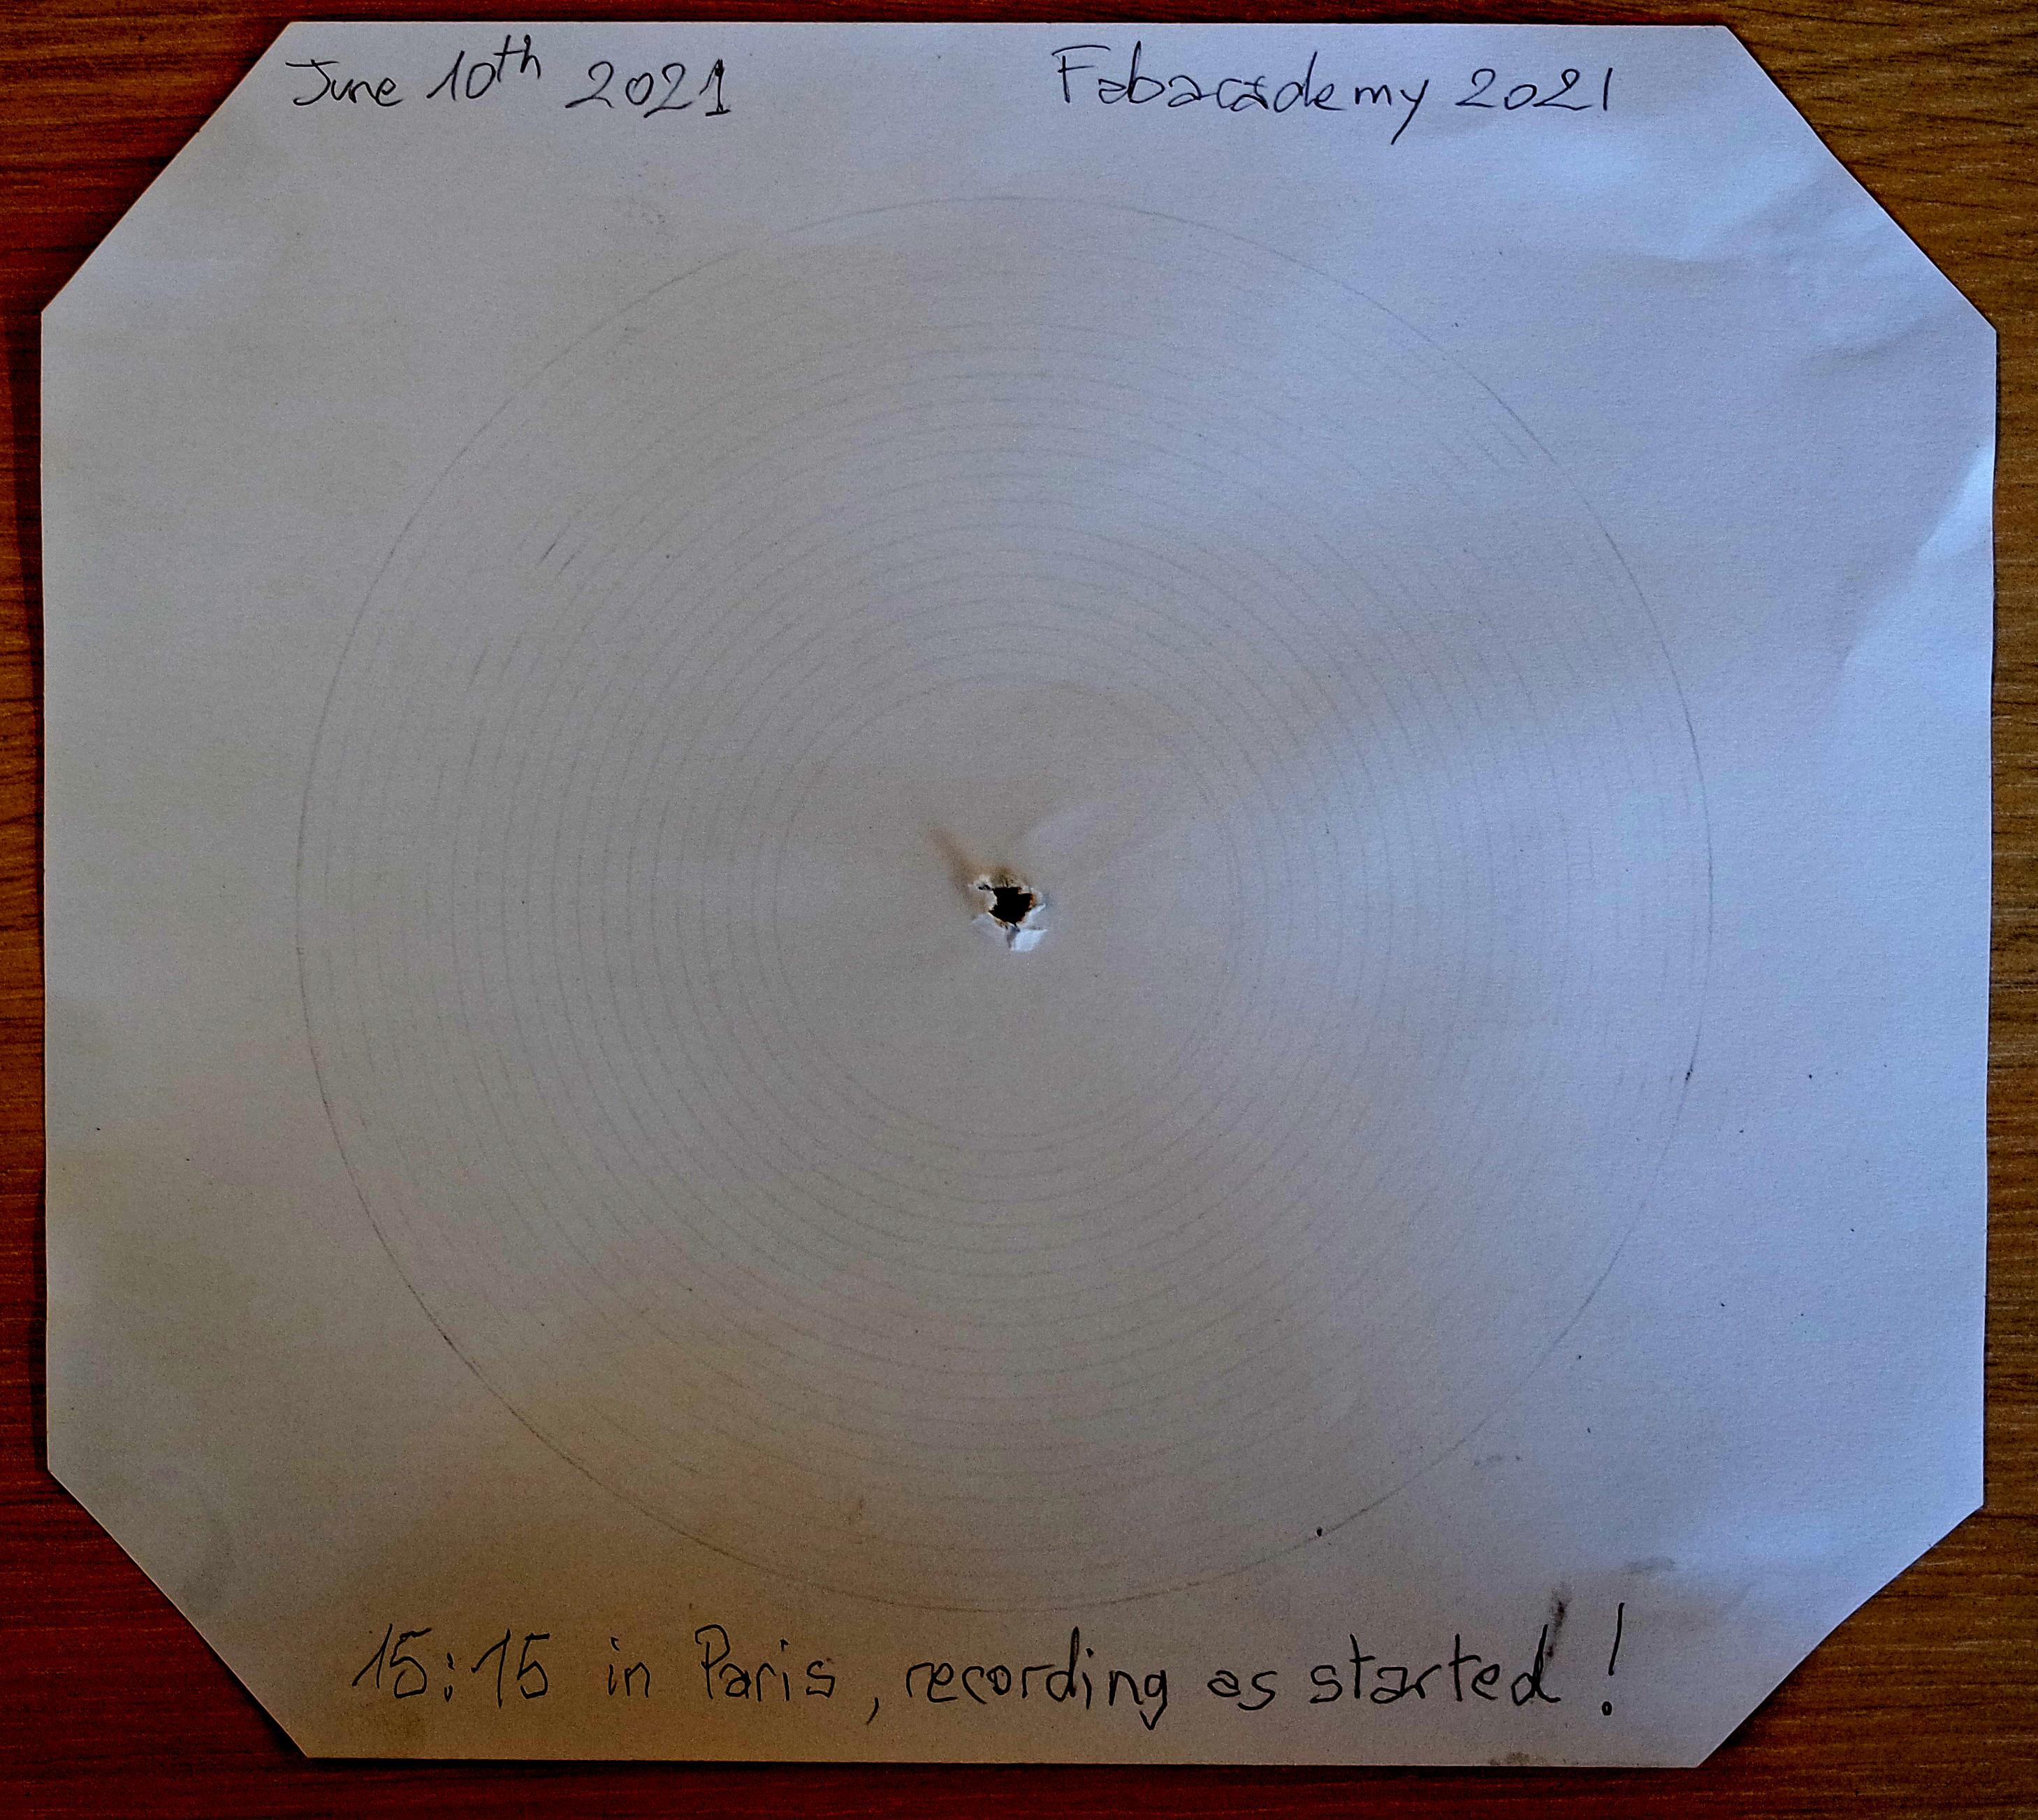
This is exactly the same image on which I enhanced the contrast to better see the groove:
After this 1st test I adjusted the needle pressure again to be able to better see the groove on the next tests.
Then I performed more tests by varying:
- X engraving speed
- rotating speed (33 / 45 RPM)
- counterweight
- needle pressure
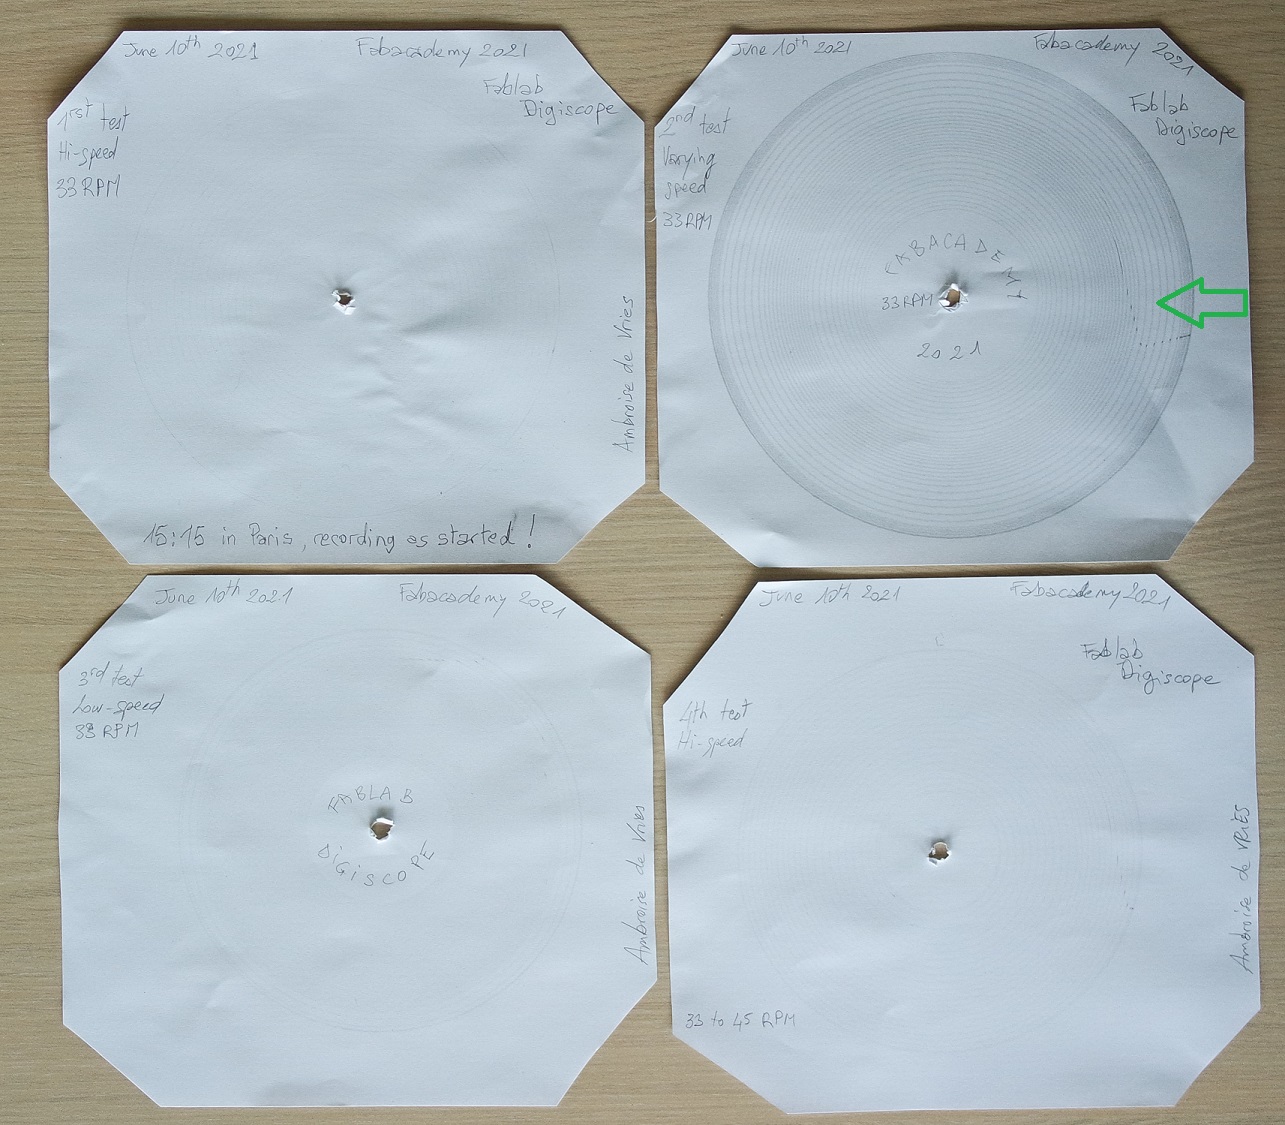
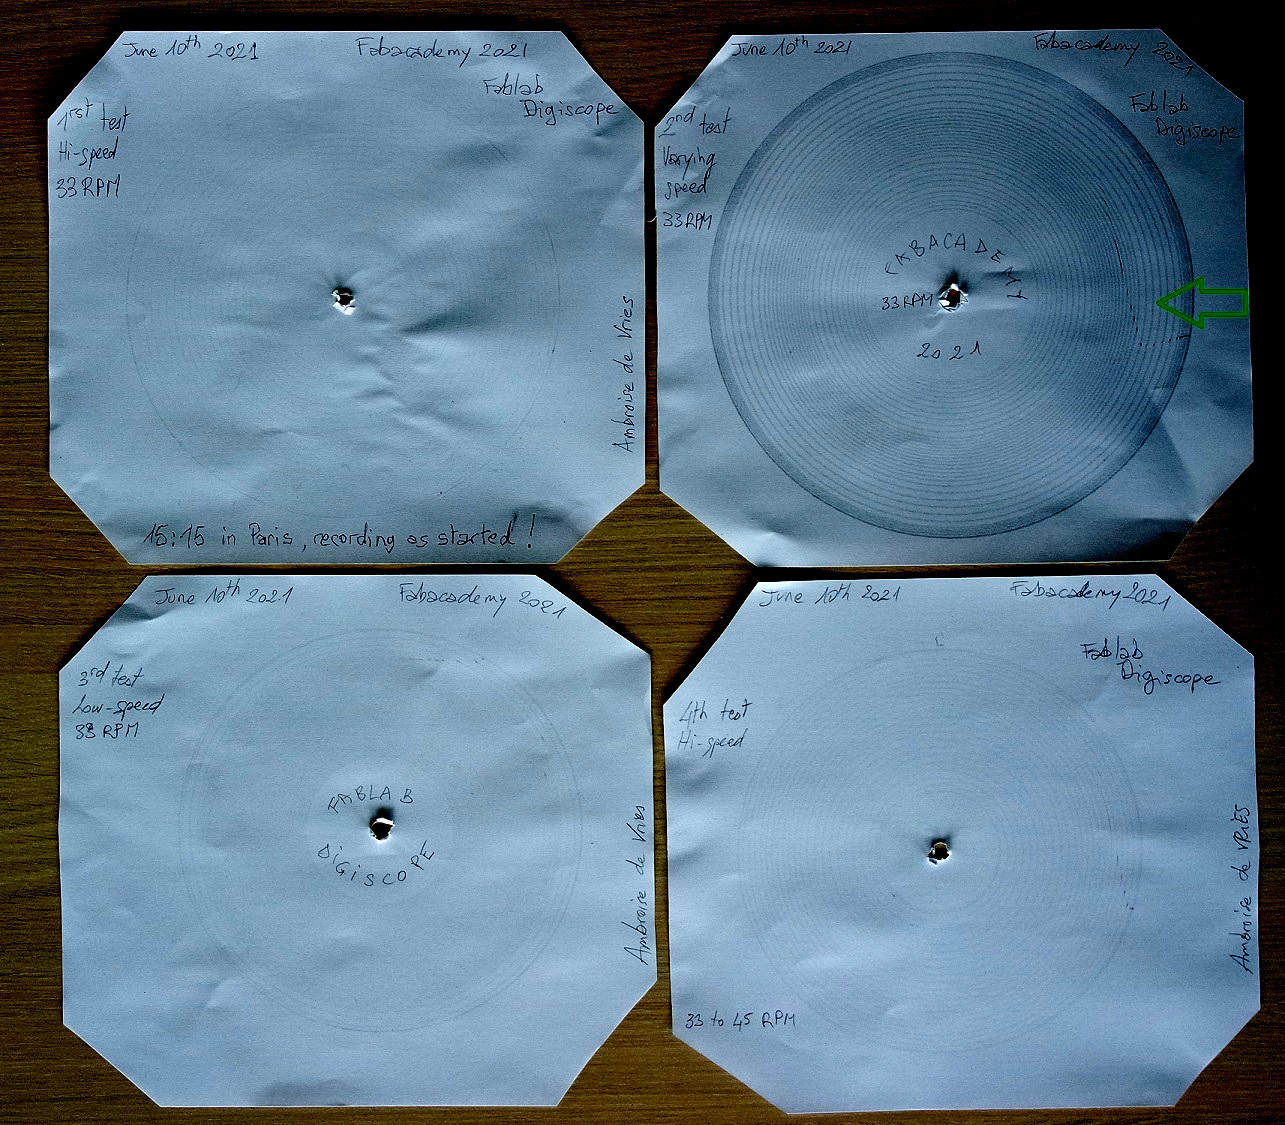
The marks than can be seen on the 2nd test (showed by a green arrow) is the result of this sticker on my turntable:

But I won't remove it...
And here is a video showing one of these tests:
Then I spent the rest of my day time to work on my final video presentation.
I'm using Openshot video Editor to produce it.
June 11th 2021 (H minus 7)
This morning I worked again on my final video presentation.It's 1mn and 26s long and I used FFMPEG to compress it down to 9.28Mb.
Here is the link to my final presentation video.
June 14th 2021
Today I performed some audio tests at home because it's difficult for me to bring all my home studio equipment at the lab (pre-amplifier, amplifier, equalizer, and speakers).It's already difficult each time I must bring my turntable because this beast weight 18kg with its flycase!
The sound coming out of the tiny BF-32 speakers seems to be loud enough but I can't see the needle moving just by eyes.
It would probably need to be seen under a microscope.
I will try real engraving tests with audio during the next week-end when I will bring the lathe back at home.
I also started to read and learn about the audio mastering process for vinyl cutting.
Here is a list of the most interesting websites I could find on that subject:
- Music File Preparation
- Vinyl record audio preparation
- How to prepare audio master
- Pro-tools
- Vinyl mastering
- Preparing audio for vinyl
- Mastering for vinyl tips
- Vinyl mastering
- How to master for vinyl
- How to mastering and vinyl cutting
June 15th 2021
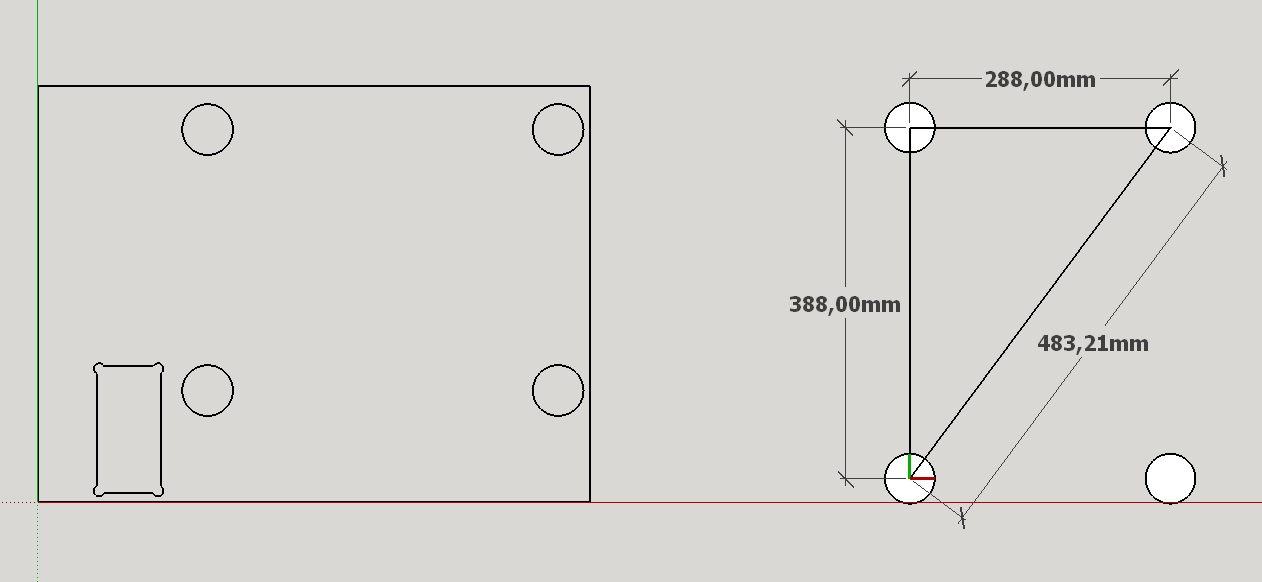
I had plan to mill a thick piece of wood on which my turntable could take place in pockets so it can always be at the same place regarding the frame.It will also have another pocket for my electronic box to avoid it moving.
As I couldn't find accurate dimensions for the Technics 1200 MK2 turntable, I first made a template on a big sheet of paper to deduce all the dimensions I needed:

Then I could reproduce it in CAD for my milling process with the Shopbot:
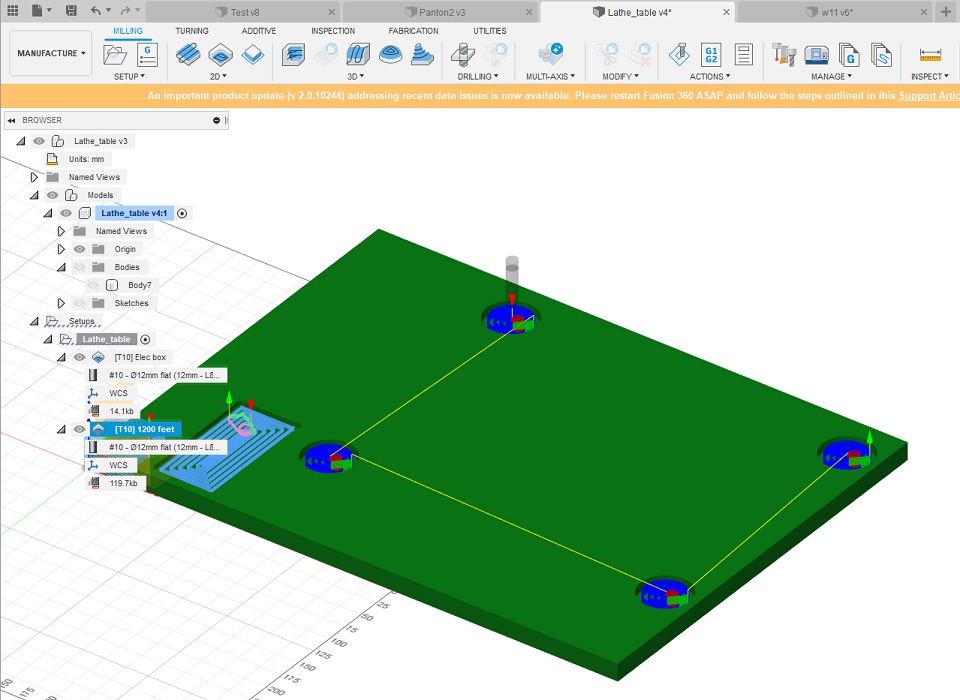
And here is the milling result (with laser engraved text added):
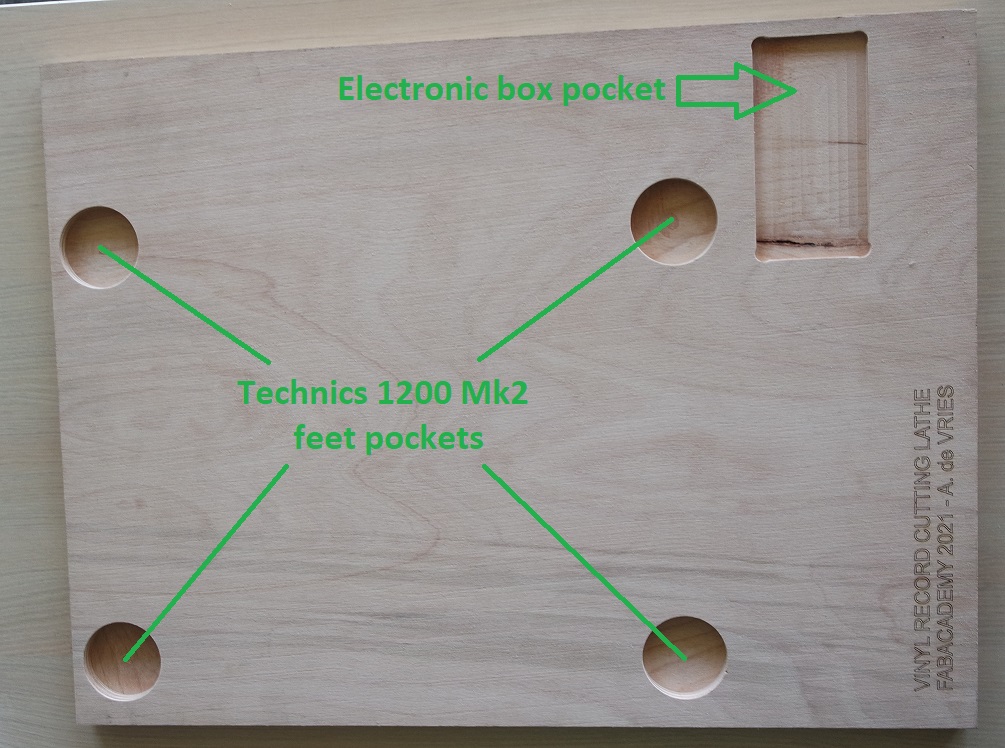
And here placed between the legs of the lathe with my turntable in place:
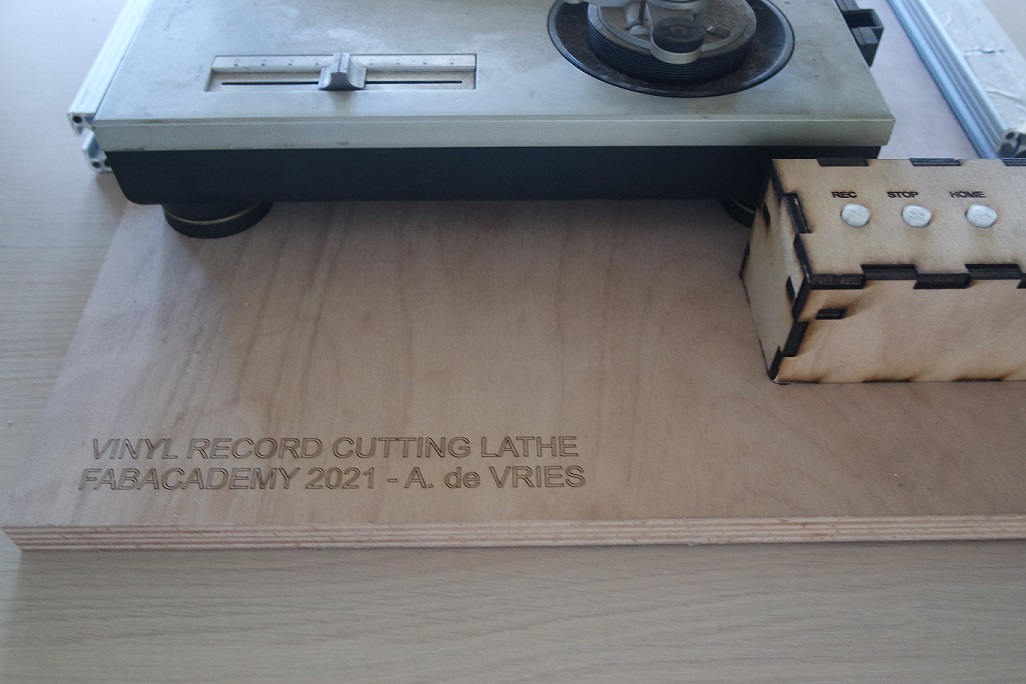
This way I can easily replace the turntable exactly where it needs to be very quickly and the control box doesn't move around.
June 19th 2021
This saturday I prepared everything to be able to engrave some sound before the end of the week-end.So I have read more and more advices on how to prepare audio files to be cut on vinyl (sound mastering), and made myself an audio setup.
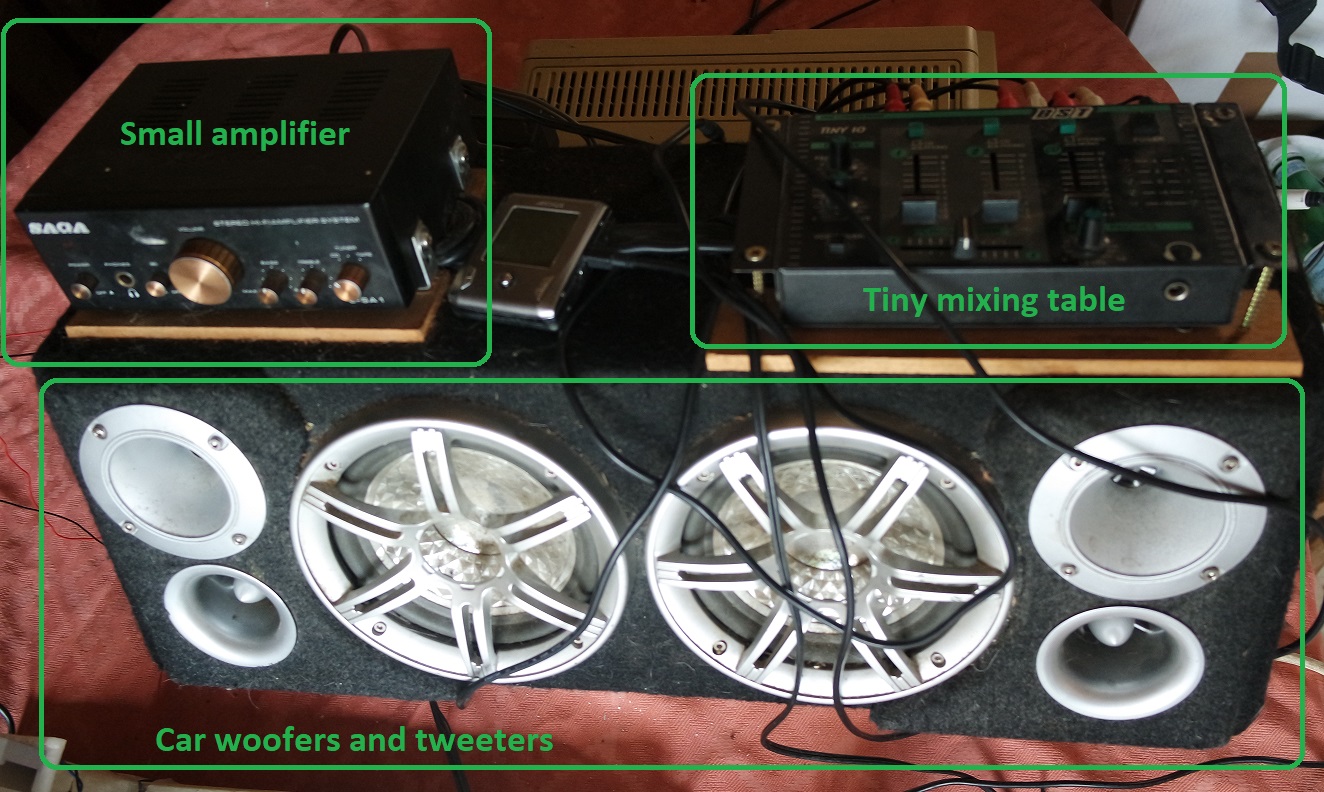
I could have use a big pre-amp, a big amplifier and an equalizer but I wanted to try to have something more "portable" in case I want to be able to go recording outside for some live recording sessions.
So instead I used a small amplifier that I had (probably the worse one I have but its size is interesting), a tiny mixing table, and some speakers that you usually find in cars (mine has been salvaged years ago from the trash).
I quickly put everything all together with screws so I can just carry it by the handle (still a bit heavy) and here is a photo of this setup:
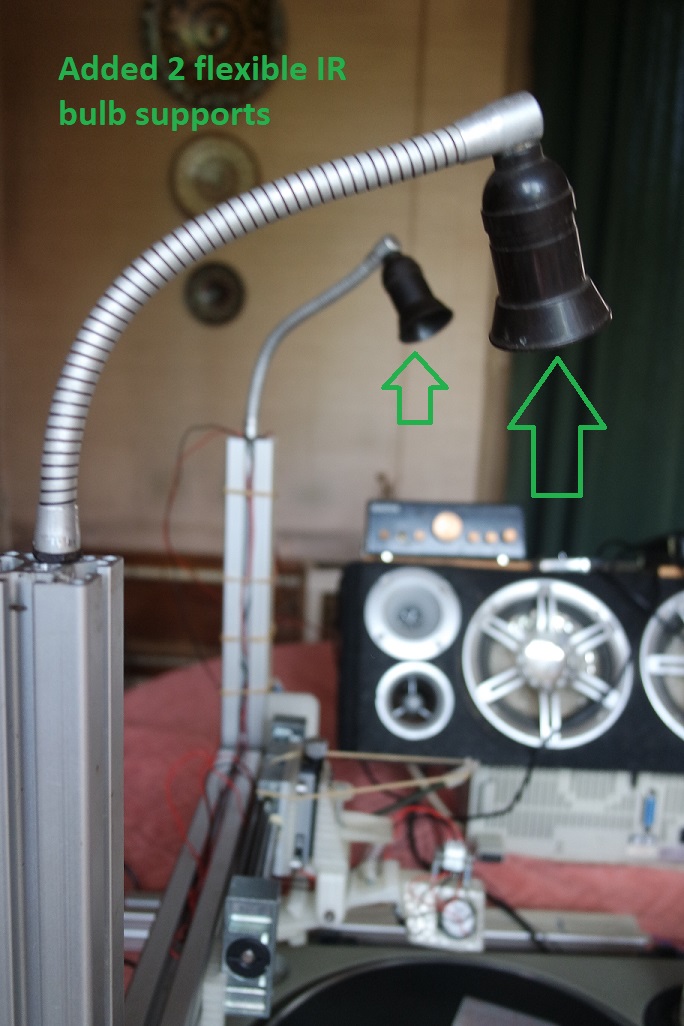
I also added 2 flexible gooseneck that will serve to warm up the media with 2 Infra-Red light bulbs when I will try real cutting instead of embossing:
June 20th 2021
Since June 16th I cannot work on my project anymore except during my week-ends.So this week-end I felt ready for engraving my very first cut on a CD-R.
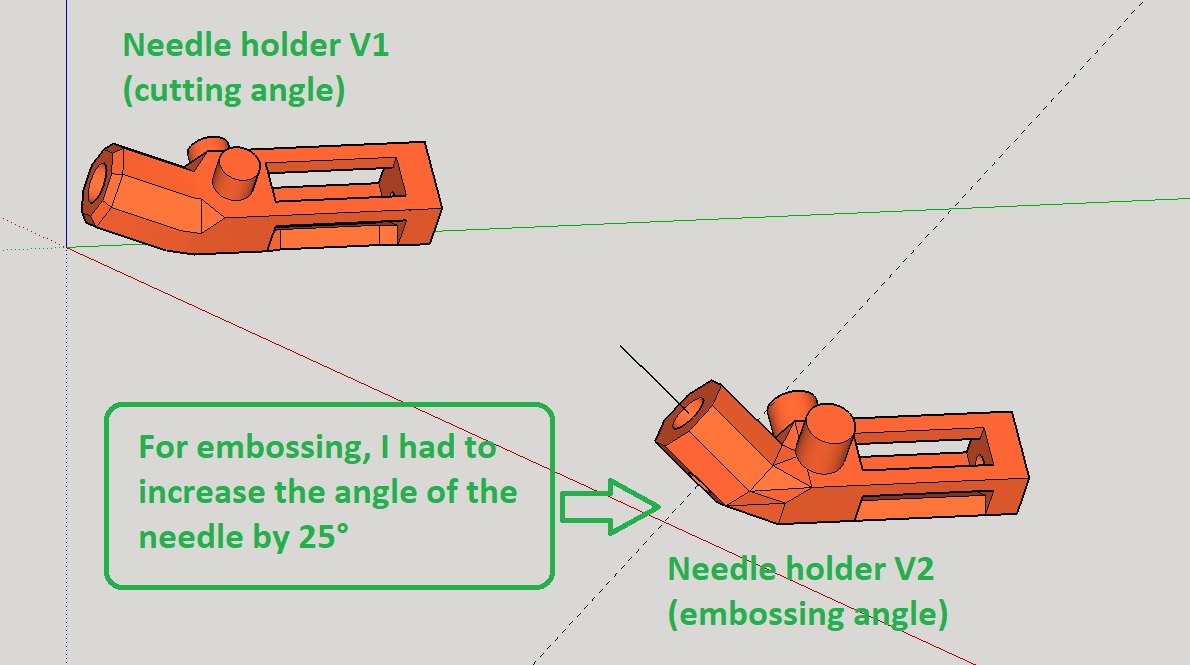
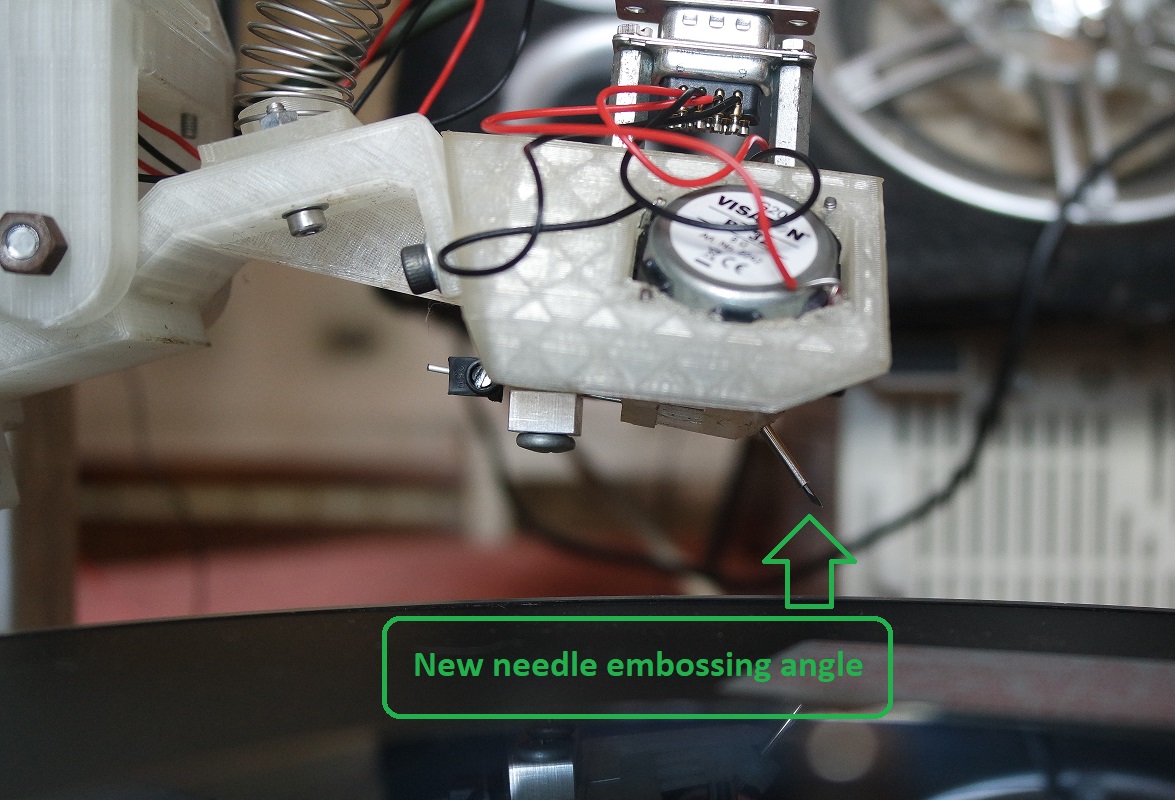
But before proceeding, I figured out that my needle will need more angle relative to the media surface to be able to emboss, so I redesigned the needle holder with a 25° accentued angle compared to the previous one and printed it:
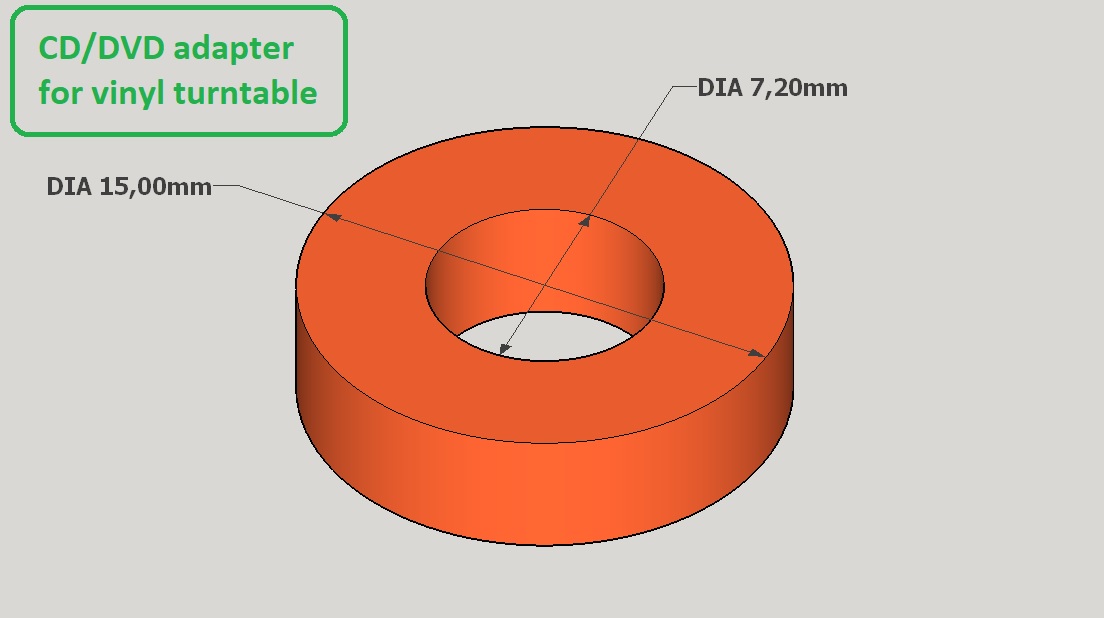
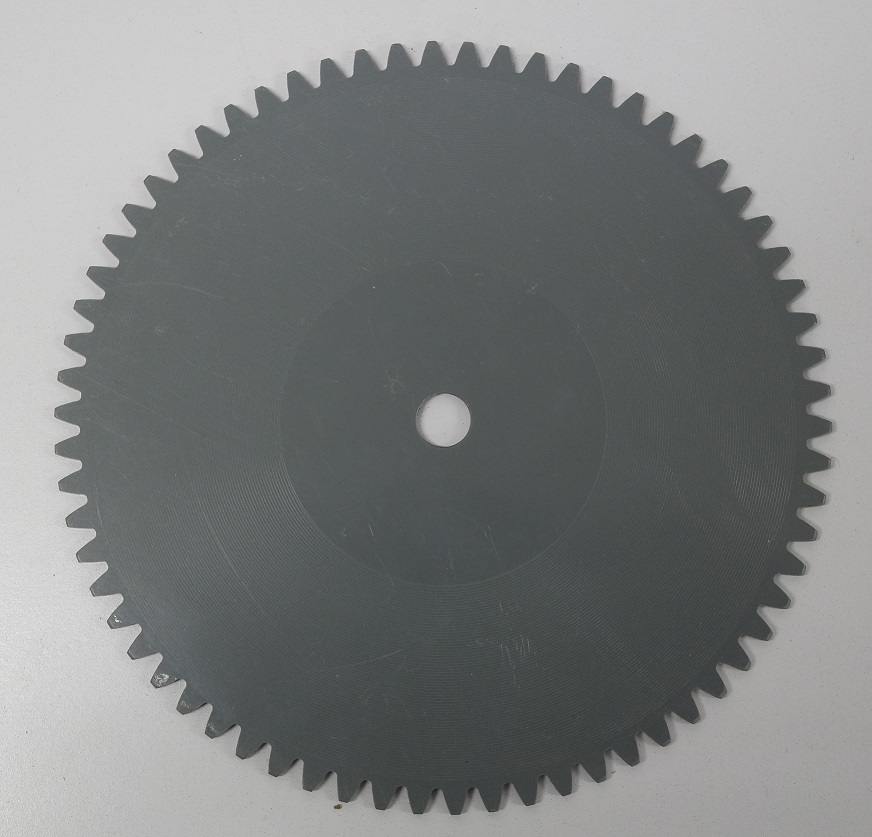
I also needed a diameter adapter to be able to spin a CD-R on my turntable so I designed this very simple one and printed it:
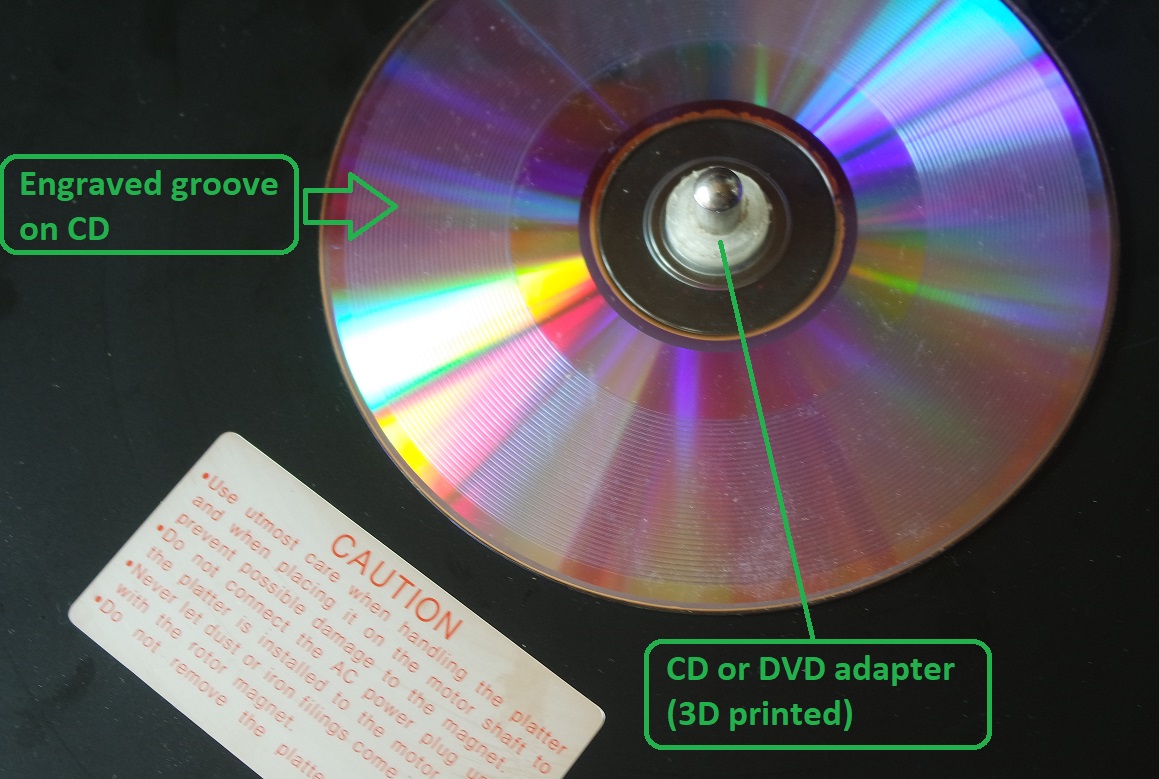
The very first test cut I did was engraving a "white noise" at 45RPM (no sound provided to the engraving head).
I didn't record a video of that very 1st engraving test but it worked suprinsigly well.
But I made a video of the playback of that "white noise" engraving where we can clearly hear the rumble sound made by the motor.
While I know this is something I will have to improve, it's very encouraging because I know that the turntable is able to follow the groove and that the needle does engrave any small sound variation.
Here is the "white noise" playback:
Video TODO
For my first test with sound I decided to choose a calm tune without too much drum or bass.
So I have choosen a tune by the Romanian artist Dona Dumitru Siminica. The tune is called "Afara e intuneric".
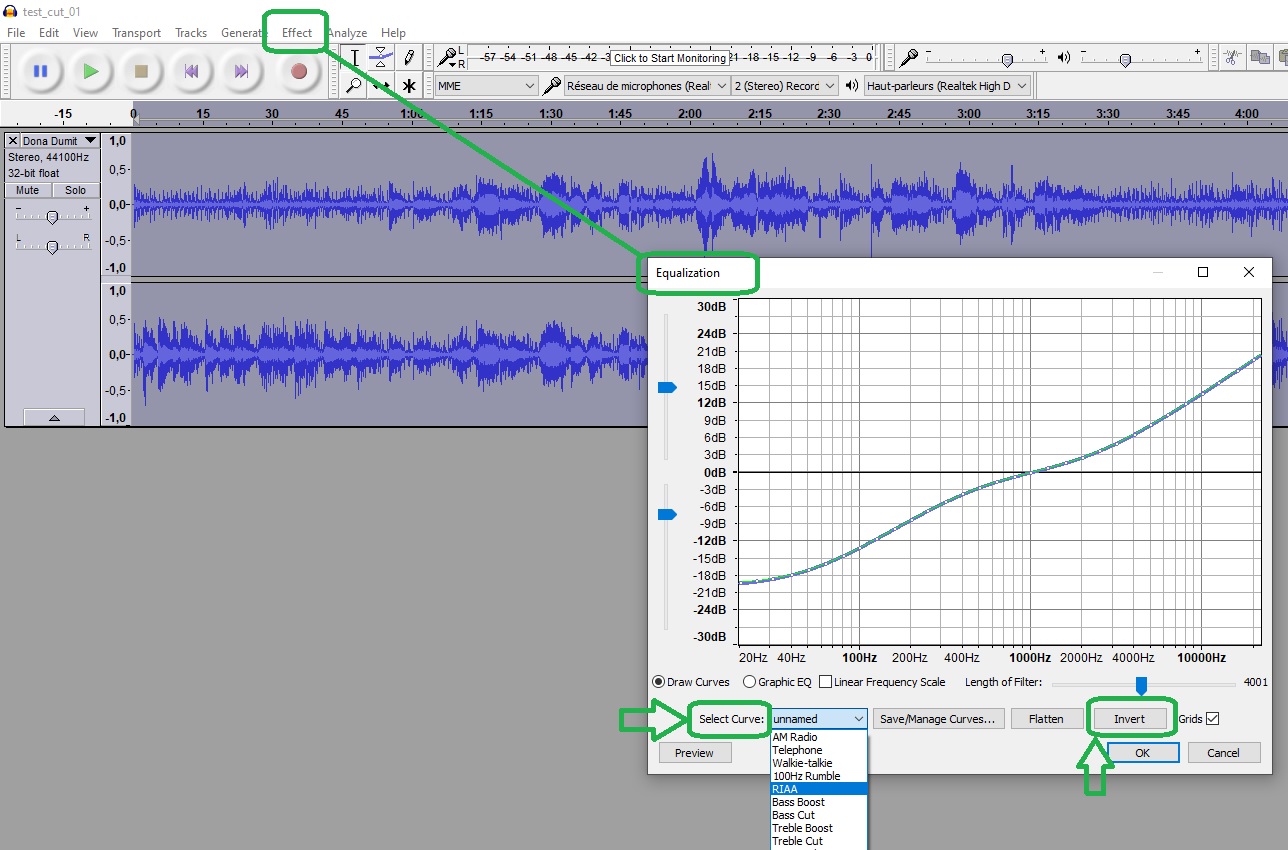
But before to proceed I had to make some mastering work and I used Audacity wich is a free to use and open-source DAW.
What I mainly did is to
- use a highpass filter at 150 Hz
- use a lowpass filter at 15 kHz
- use an inverted RIAA curve
Here is a video of the engraving step at 45 RPM / Mono:
And a video closeup of the same testcut seen from another angle:
And here is a video of the playback step showing that the result is very encouraging if I can minimize or eliminate the motor rumble in the future:
Then I made a second test with sound but this time I wanted a tune that has more drum and bass in it.
I have choosen a tune called "Surfin'" by Ernest Ranglin.
It worked very well but I think I recorded it with too low volume.
Here are the videos showing the engraving and playback steps (45 RPM / Mono):
In conclusion I am very happy to see that it works, and I will now spend time at trying to improve my machine (motor noise, servo motor arm lifting, making a precision turntable with high torque), settings (arm weight, engraving speed, RPM speed, code, etc), and sound mastering knowledge.
I think the quality of the audio could be improved a lot by just engraving less deep by fine tuning the needle pressure and counterweight.
Doing so it will probably minimize the motor noise.
But I will have to do it on my sparetime so I will only be able to work on it again on my next week-end...
June 27th 2021
This week-end I made more tests by fine tuning the pressure and weight of the engraving head and got much better results with less noise.I performed these tests at 33RPM to see how much recording time I could achieve on a blank CD.
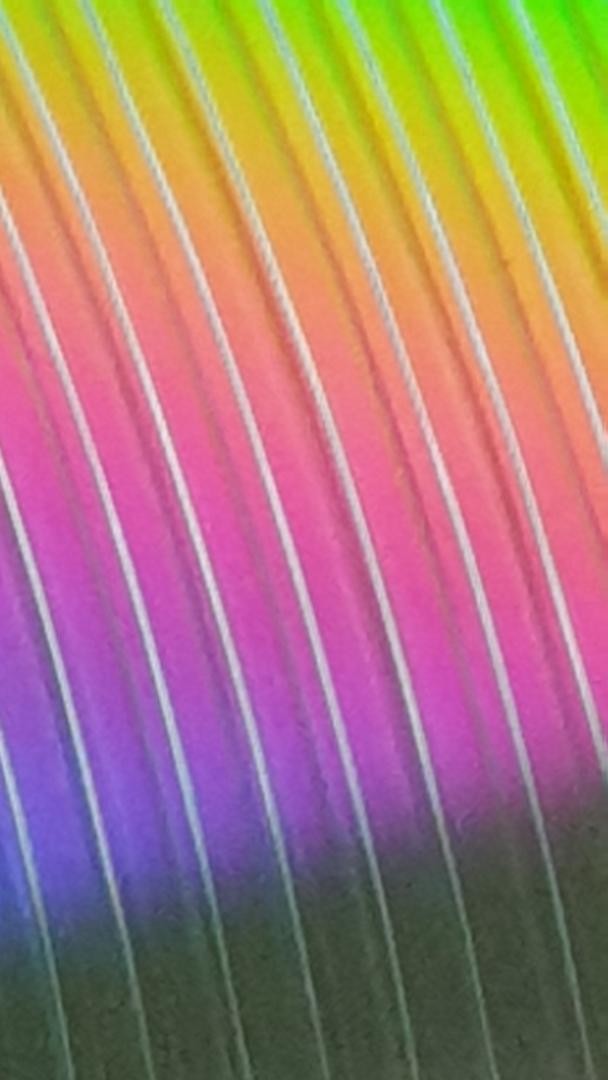
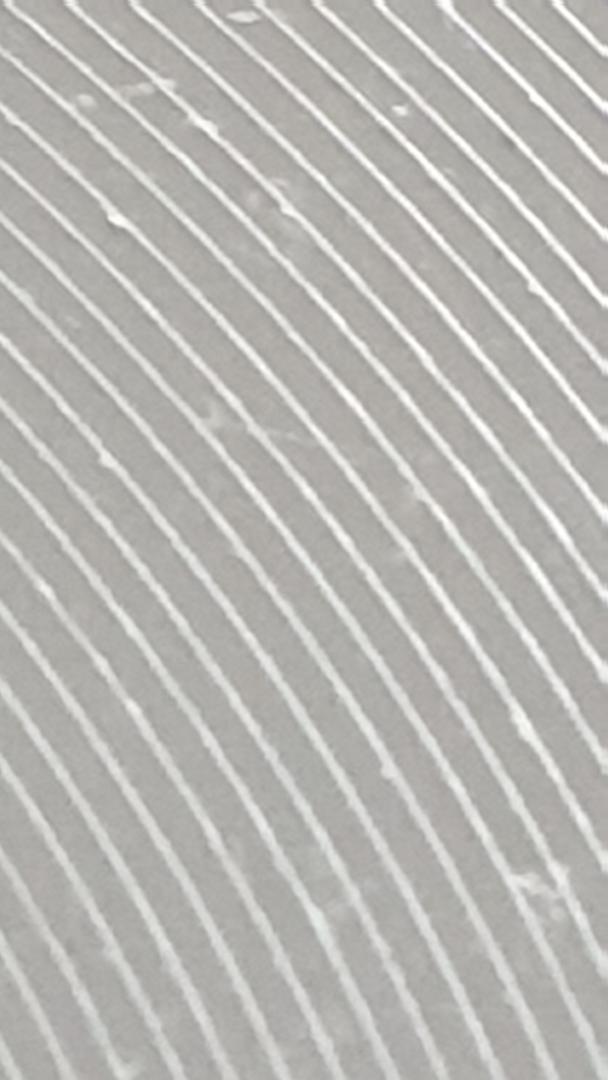
Here is a close-up photo of one of these recordings where we can see I could go even slower and probably could double the recording time:
I also performed a test on some plastic sheet that I had at home without knowing what kind of plastic it was, but the sound quality was of lesser quality.
This is probably due to this plastic being harder than a CD surface:
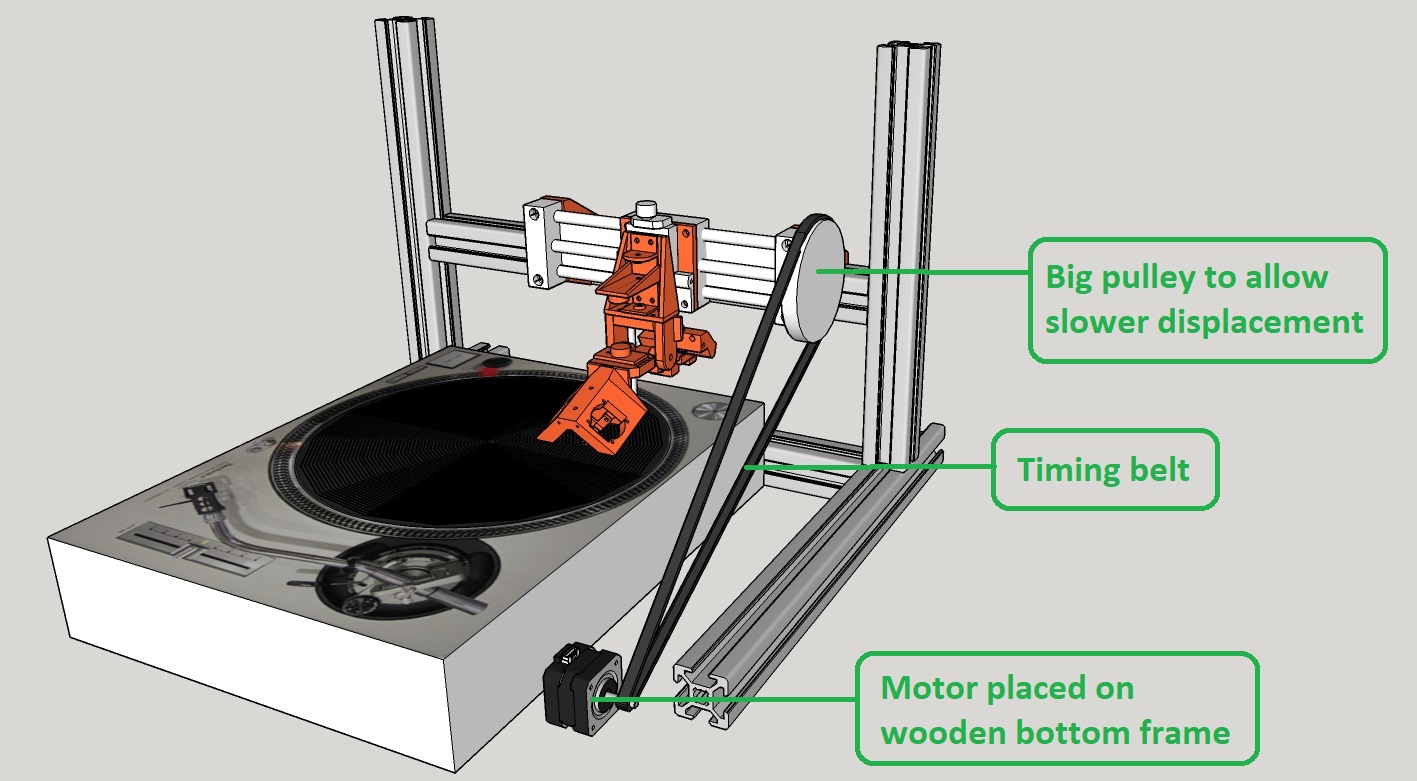
But to be able to go even slower, and also to reduce even more the motor vibrations and rumble, I realize that I will have to put my motor away from the aluminium frame and to use a big pulley to achieve slower displacement without reaching the NEMA lower speed limit.
So I started to think about its new location and adapted my CAD design.
I have to 3D print this new part twice plus a new motor holder:
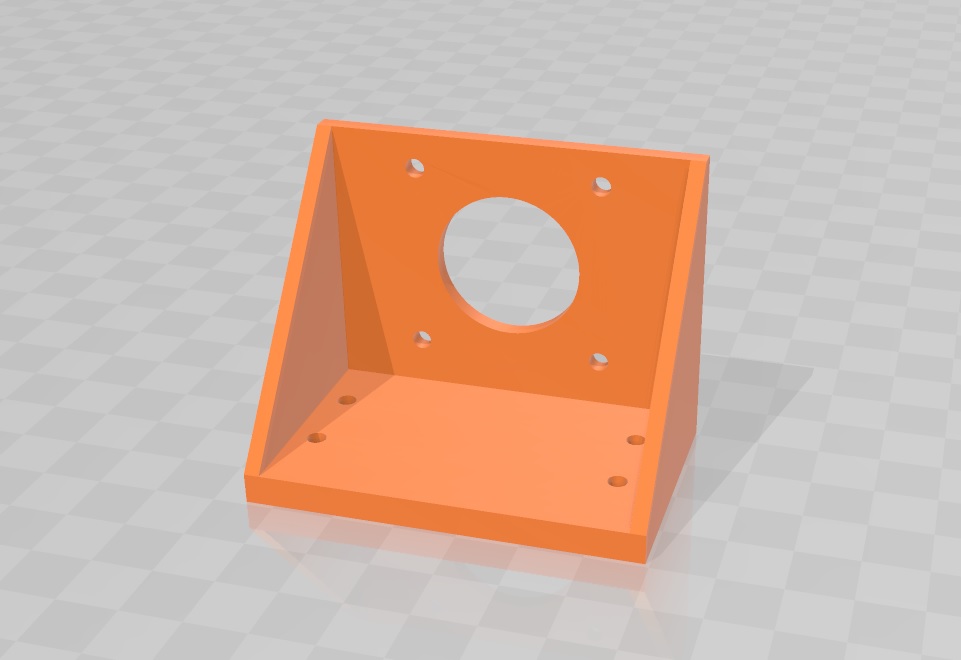
This new design will also give me more room to fit a servo motor to automatically lift the arm at the end of a recording:
I will upload some sound results from these tests as soon as possible.
To be continued...

Project files
Here is my SketchUp file which includes all the parts that I have designed for my project (3D prints, CNC milling, Laser cutting, etc.):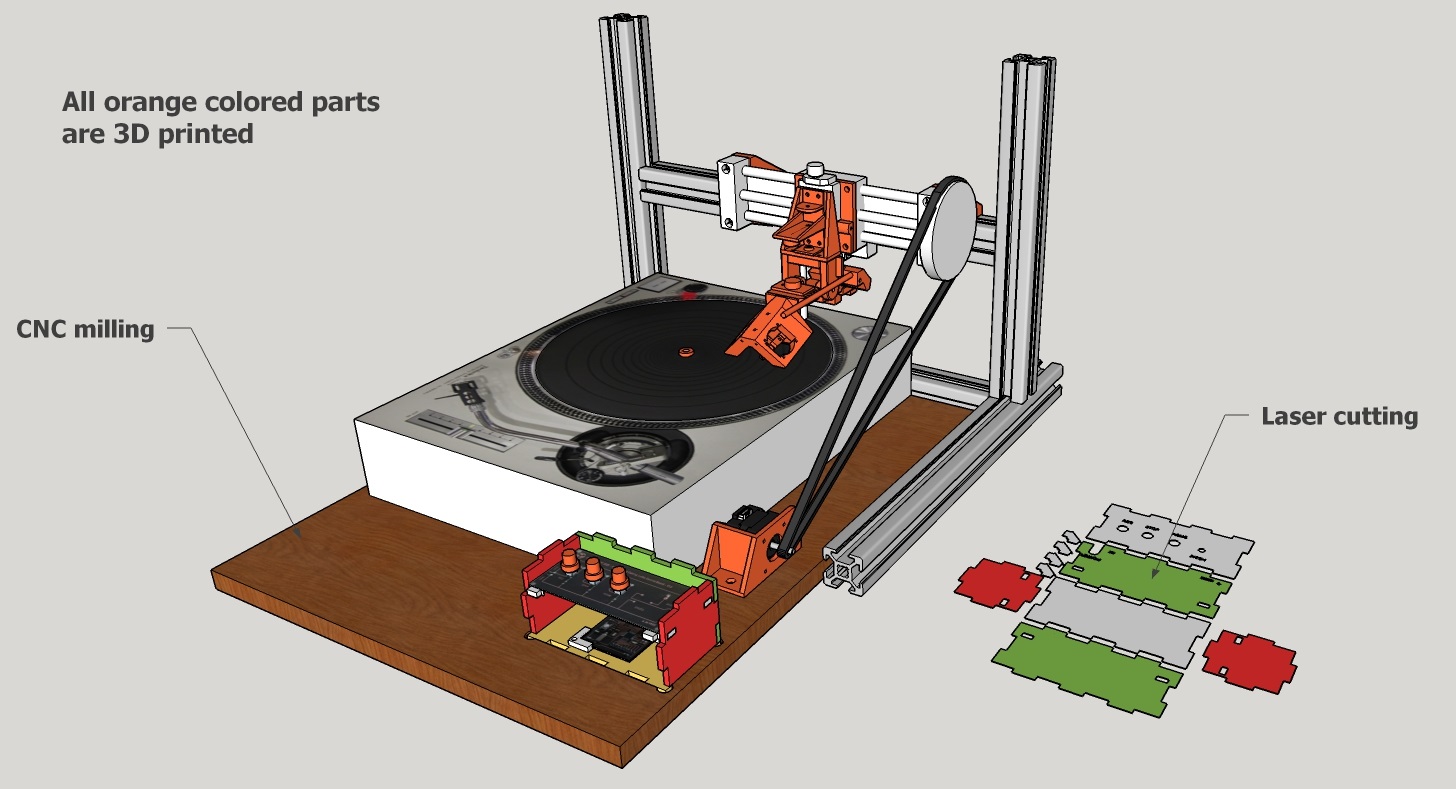 proto11.skp
And this is my SketchUp file for the needle holder with two different angles (cutting angle and embossing angle): Needle_holder.skp