Week 13
Output Devices
We were introduced with several output devices like the RGB LED, LED Array, LCD, Speakers, Soleniod, DC Motor, Servo Motor, Brushless DC motor, Stepper Motor and the drivers used to make them work. We were also introduced into electrical safety and power consumption of devices. This week's assignment was to add an output device to a microcontroller board and to measure the power consumption of an output device.
My final project ought to have a display and it was decided to familiarise with the working of an LCD.
Liquid Crystal Display (LCD)
We have a 16x2 LCD display at our lab, which can display 16 characters in two rows.

The Data sheet of 16x2 LCD module is given below.
The LCD module has 16 pins numbered from 1 to 16. Pin 1, 2 & 3 are for power supply and adjusting the constrast with Pin 1 acting as GND and Pin 2 as VCC. Voltage at Pin 3 defines the contrast of the LCD. By connecting a potentiometer to Pin 3, we can control the contrast according to the final environment into which the LCD is put in use.
Pin 4 is the "Register select" pin which defines if the incoming data(on Pin 7 to 14) is an instruction or characters to be displayed. Making this pin high makes the LCD to read the incoming data's as characters to be displayed and does accordingly. Making this pin low makes the LCD to read the incoming data(on Pin 7 to 14) as instructions. The instruction can be to set the cursor to a specific location, clear the display, turn off the display etc. This pin has to be connected to the MCU.
Pin 5 is the "Read/Write" pin which selects the mode whether we will write to the LCD or read from the LCD. A high state sets the LCD to "Read" mode and a low to "Write" mode. If nothing is to be read from an LCD screen, this pin can be permanently set to low and can be connected to GND.
PIN 6 is the "Enable" pin which triggers the clock inside the LCD module so as to execute the instructions given to the LCD. The instructions/displaying of characters will be executed when this pin turns from low to high. This pin has to be connected to the microcontroller which will take control of generating clock signals.
PIN 7 to 14 are the 8 data pins. The LCD module can work in 4/8 bits operation. All the 8 pins have to be connected to the microcontroller for transferring 8 bits of data at a time. For carrying out a four bit operation, data pins D4, D5, D6 & D7 (PIN 11, 12 ,13 & 14 respectively) are to be used.
Pin 15 & 16 are not to be connected and are relevant only for LCD's with backlight with the pins acting as the anode and cathode for the LED backlight.
The Data sheet of the driver for working with the LCD module is given below.
For making the LCD to work in 4 bit operation, a total of six pins of the MCU has to be connected to the LCD module. It is advisable to connect the data pins of the LCD to a single port of the MCU (preferably continous pins) so that data transfer will be effective. It is also advised to connect the data pins to the first or last four pins of a PORT.
PCB Design & Production
This website is a tutorial for working the LCD with an Arduino and was referred upon.
Taking into account of my final project and with an aim to make a general purpose board which connects an LCD display and also with provision to connect several other input and output devices, i started to design the board using an ATmega 328P processor. Below image shows the schematic which was designed and checked for electrical rules.
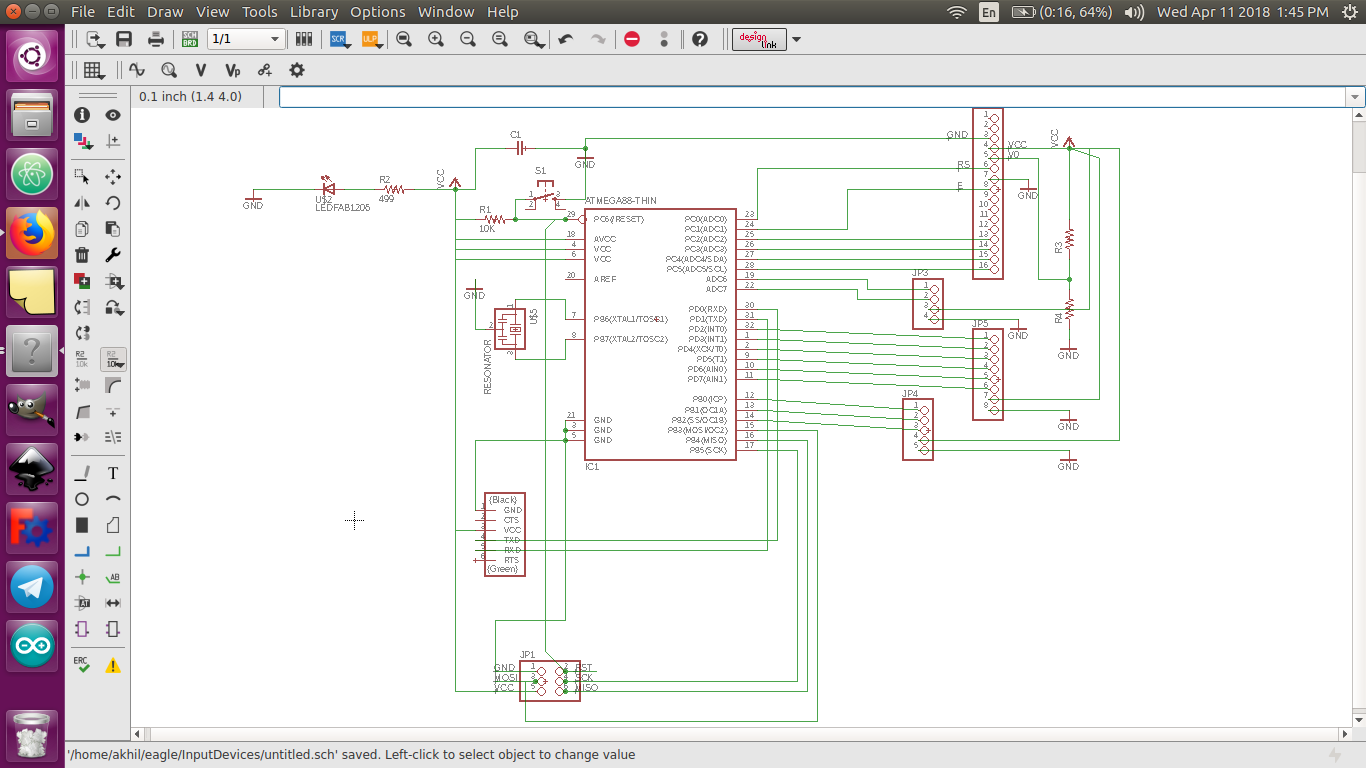
However, when the schematic was switched into board view for making the traces, i found it really difficult to route the traces without any jumper wires. After trying several options, i could only manage to route the traces with 4 jumper wires. To avoid the jumper wires, i tried using zero ohm resistors. However, things got messy and the experiments consumed lot of time. For the limited time available for the weekly assignments, and to keep things simple, i was forced to postpone the designing of the general purpose board to a later time. Even though the attempt was not fruitful, it was indeed a worthy learning curve which gave a brief idea about the ATmega 328P.
To experiment with an LCD display, it was decided to depend upon Neil's design to add an LCD to a microcontroller board. (More about electronic design during Electronics Design Week.)
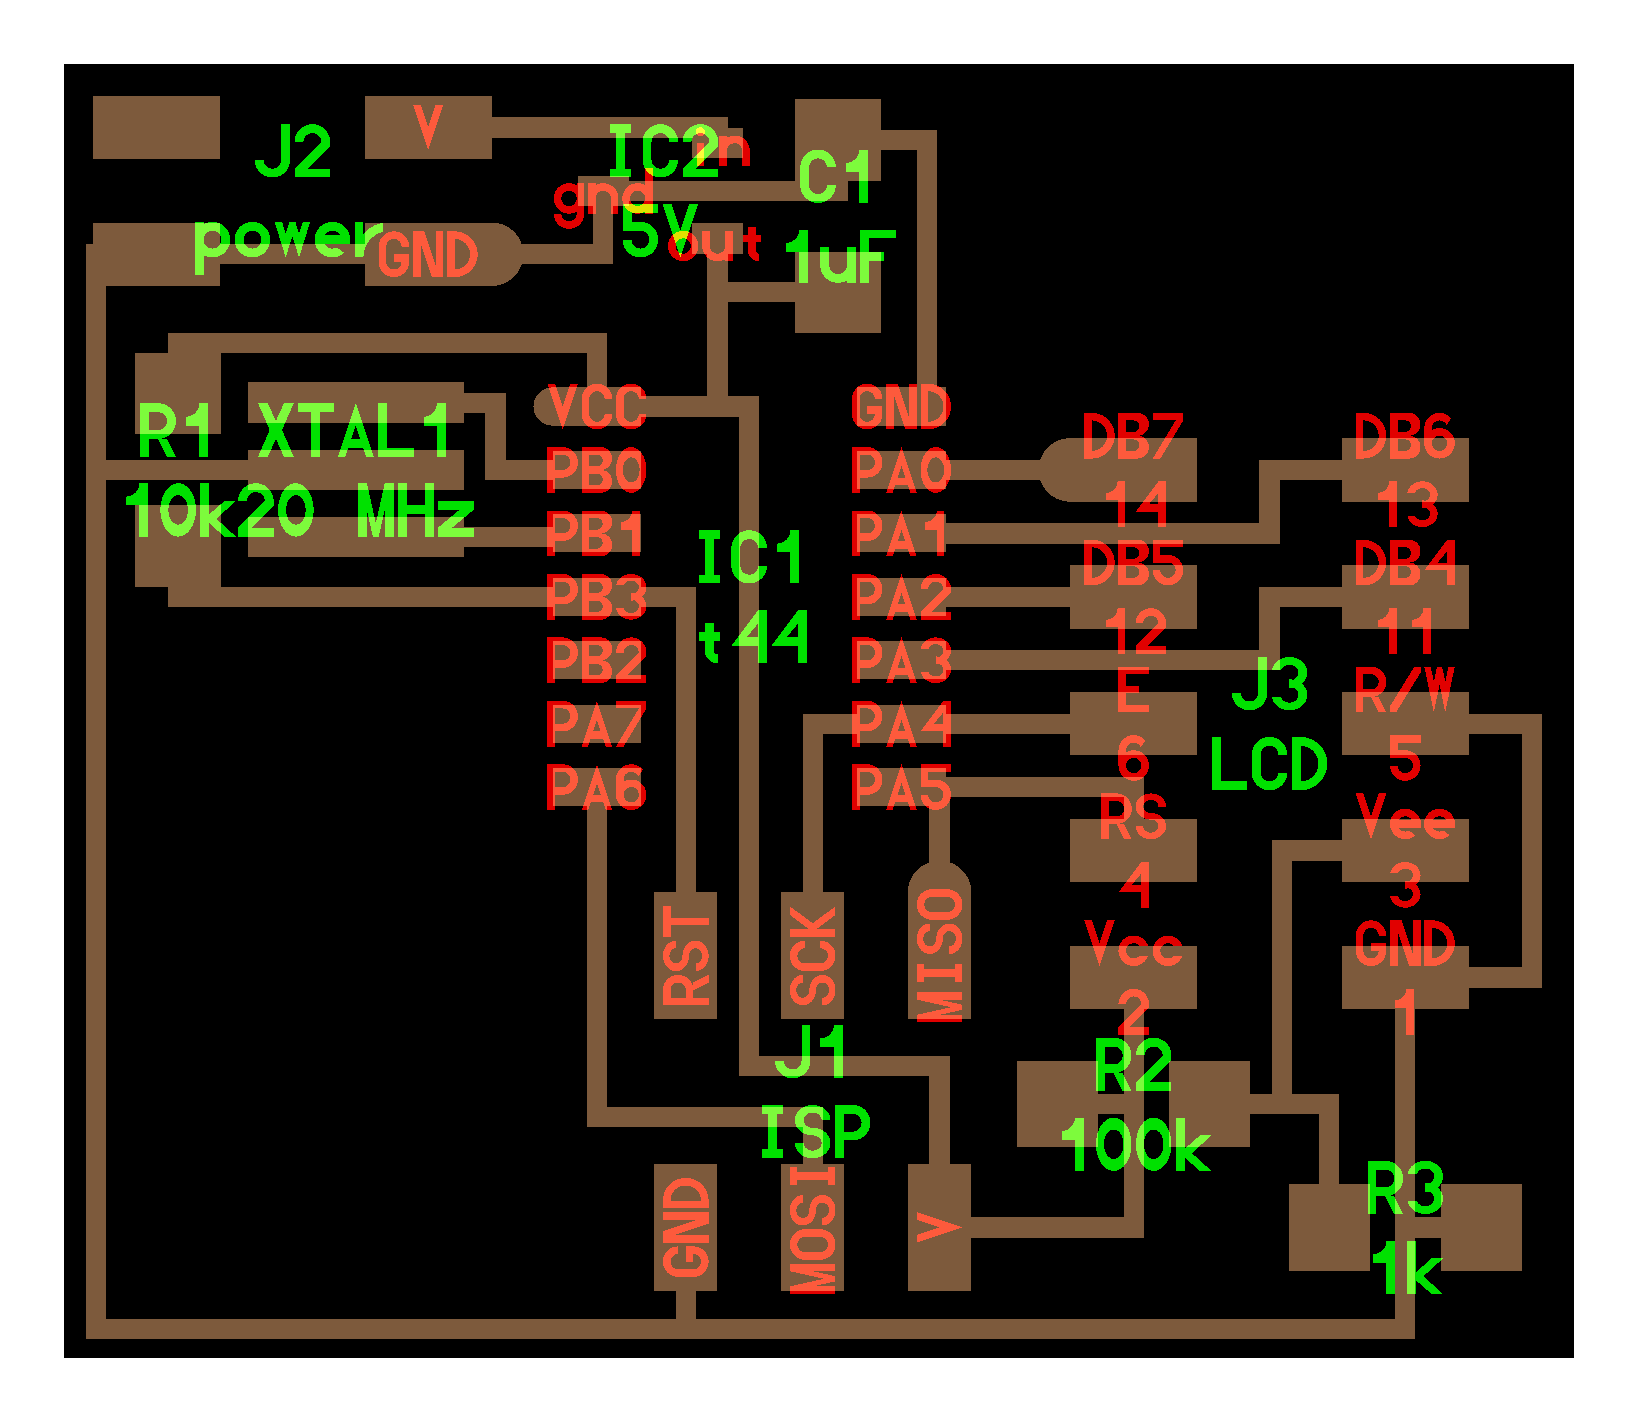
The pins PA0,PA1,PA2,PA3 of the MCU are connected to a header so that it can be connected to the data pins of the LCD using wires. Pins PA4 and PA5 are also connected to a header so as to connect to the enable and register select pin of the LCD module.
In addition to the providing header pins for LCD module, two resistors R2 (100k) & R3 (1k) are connected to the Vee Pin of LCD Module to act as a potentiometer.
The reset pin PB2 of the microcontroller is pulled up using a resistor R1 of 10k and a resonator of 20 MHz is connected to pin PB0 and PB1 of the microcontroller.
A header pin is also provided to power up the board externally. A 5V regulator is also used to regulate the external power to 5V.
To use the unused pin's PA7 and PB2, the two pins were connected to a pin head.
The respective components were added into the schematic of EAGLE. The components added and the respective packeges are as follows.
1. ATTINY44-SSU (ATTINY44) (Package:SOIC14, Library: fab)
2. Resonator (Package:EFOBM, Library: fab)
3. 3 Resistors - RES-US1206FAB (RES-US) (Package:R1206FAB, Library: fab).
4. PINHD-2X3-SMD (Package:2X03SMD, Library: fab)
5. PINHD-2X5-SMD (Package:2X05SMD, Library: fab)
6. PINHD-2X2-SMD (Package:2X02SMD, Library: fab)
7. PINHD-1X2 (Version 3) (Package:1X02 (Version 1), Library:pinhead (Version 3)
8. CAP-UNPOLARIZEDFAB (CAPACITOR) (Package:C1206FAB, Library: fab)
9. REGULATOR SOT23 (REGULATOR) (Package:SOT23, Library: fab)
Below is the schematic after adding all the components and making the electrical connections.

The schematic was then checked for electrical rules and the board layout was made. Below is the image of the baord.

Click here to download the Design Files
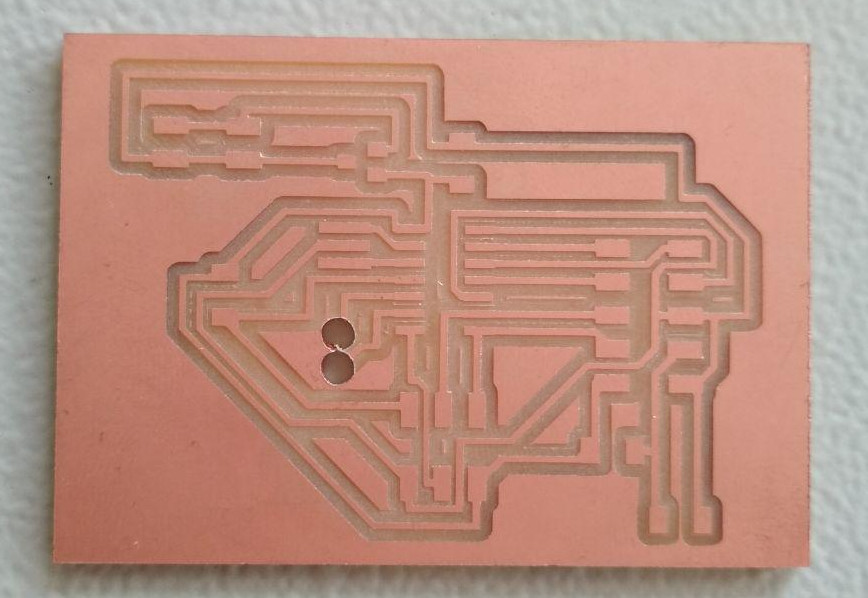
Below image shows the milled board. The two holes visible are the result of a grave mistake which was committed while editing the PNG image(exported from EAGLE) for pads in GIMP.
 Below is the image exported from EAGLE with only the "pads" selected in Layer view of EAGLE.

As the Modella MDX-20 will cut out the black areas adjacent to the white, the image exported had to be edited. Instead of making only the inside of the required holes as black, the entire area of the pads were filled with black in GIMP, with the entire remaining area as white. The edited image was imported into Fab Modules for drilling holes and the Modella drilled out the entire black area leaving two big holes. (More on Electronics Production Week.)
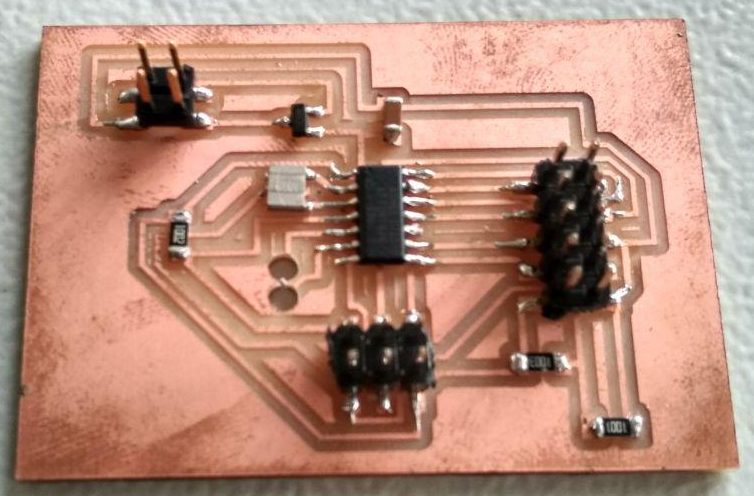
Below image shows the board after stuffing the components.
Programming & Testing the PCB
After selecting the external clock as 20MHz, bootloader was burned in Arduino. The example programme in Arduino IDE was edited and uploaded to the board. (Using Arduino IDE during the Embedded Programming Week.)
Implementing I2C with LCD
A minimum of six pins of the MCU has to be connected for displaying text onto an LCD. 4 valuable pins of the MCU can be set free by implementing the I2C communication to the LCD. Only the SDA & SCL pins of the MCU are required to be connected to the LCD in case of an I2C communication between the MCU & LCD. (More on Networking & Communication Week.)
A 16x2 LCD with backlight and an I2C module for LCD was bought from a local shop. The two parts were soldered together with the corresponding pins. The I2C module had a marking for the backlight LED pin with which the oreintation of the components for soldering were fixed. The below image shows the LCD and I2C module. The board designed for the Final Project was used to communicate to the LCD.
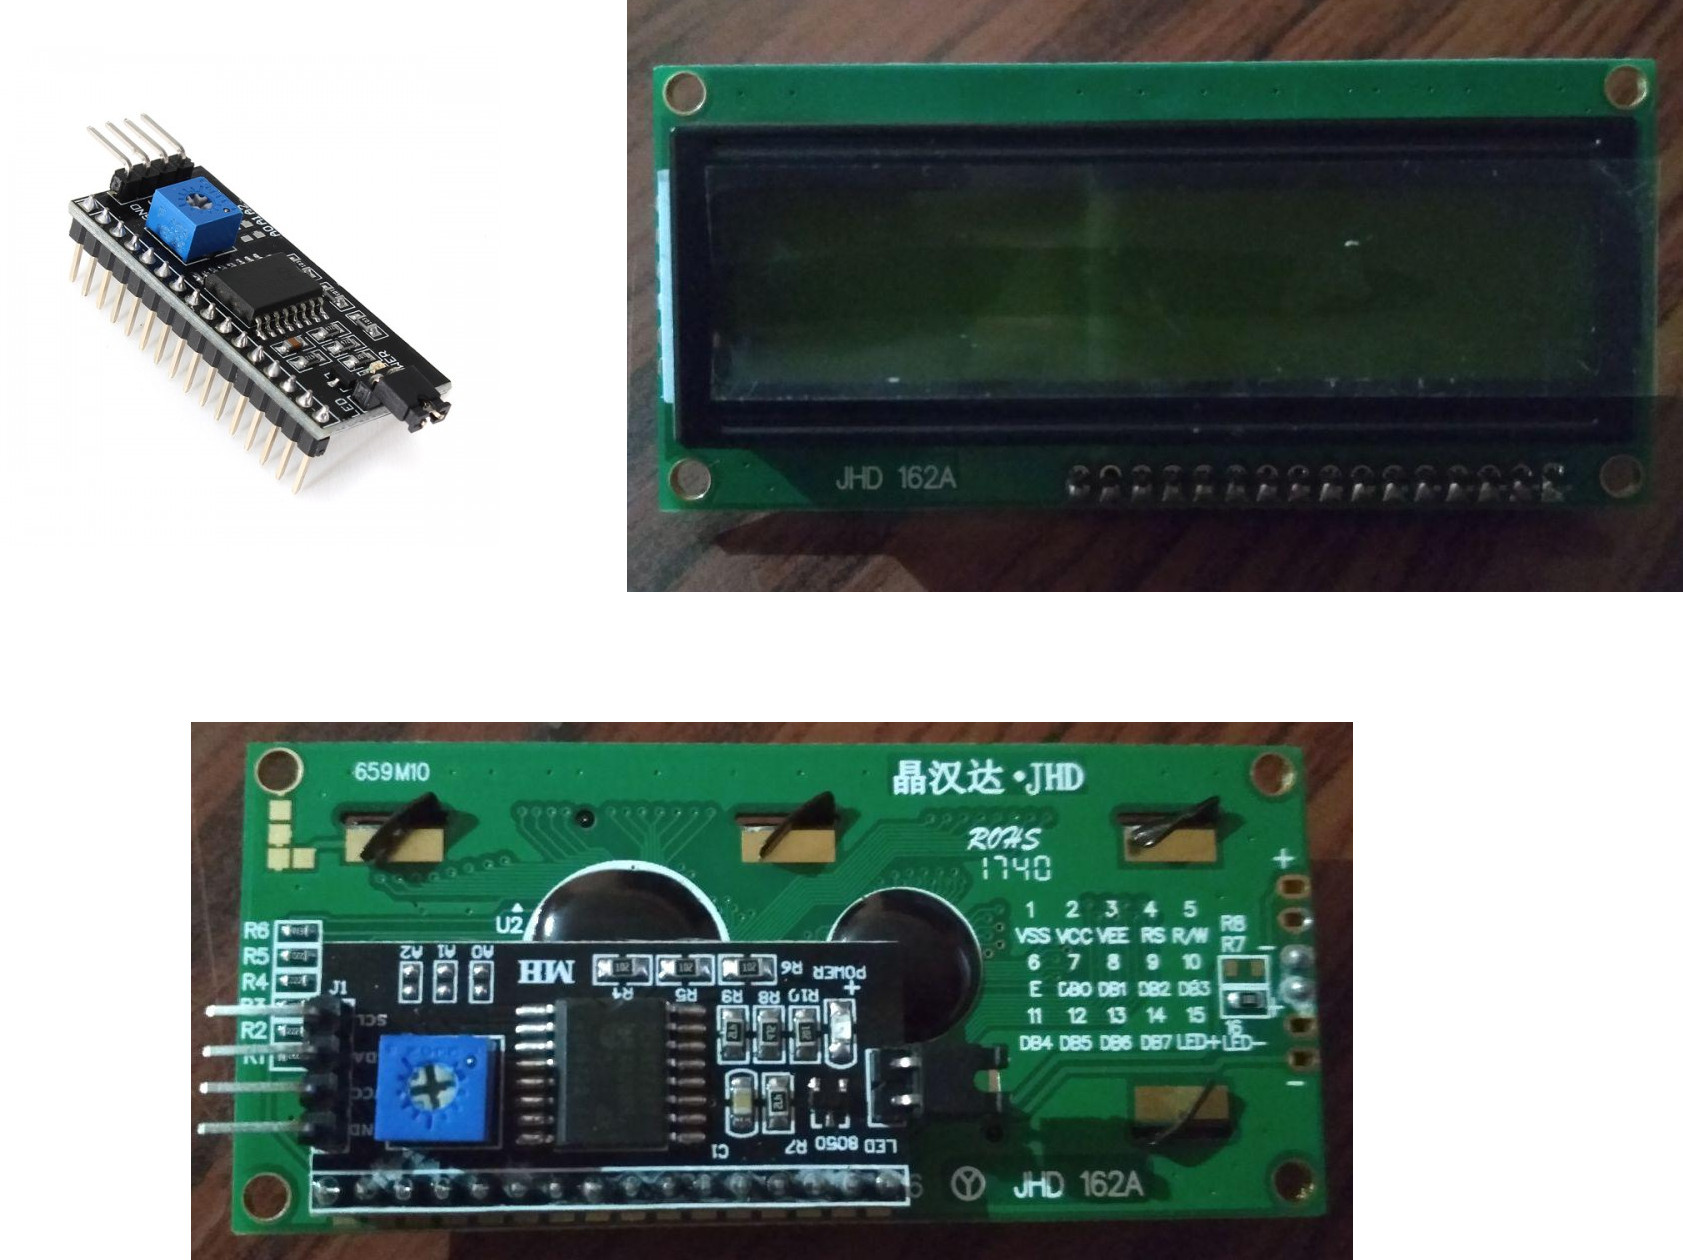
The MCU will send data/instructions to the I2C module which will then display or read the text on LCD by using its own controllers. To implement the I2C communication, the address of the I2C device has to be first found out. This Tutorial was relied upon in finding the address of the I2C module. After uploading the skech to the MCU, the LCD with the I2C module was connected to the SDA and SCL pinouts and the board was powered up for serial communication using an FTDI cable. The serial window od the Arduino showed the the address as 0x3F.

To display text onto the LCD using I2C communication, this Tutorial was relied upon. The Serial LCD Library was added to the arduino and the following skecth was uploaded to the board.
  // This program is written to print data onto a 16x2 LCD using I2C protocol.
  // Akhil Hari 24-06-2018
  // Fab Academy 2018, Fab Lab Trivandrum, India
  // Output Devices Week

  // MCU - ATmega 328P (32-pin TQFP)
  // The MCU is connected to the I2C module which will drive the LCD
  // The SDA & SCL Pins of the MCU and the I2C module are to be connected.
  // The SDA & SCL Pins of the MCU are pulled up externally for I2C communication.
  // The MCU and the I2C module should have a common ground.

  #include <Wire.h>               // Includes the wire library for serial communication.
  #include <LiquidCrystal_I2C.h>  // includes the LCD library for implementing I2C.
  //Set the pins on the I2C chip used for LCD connections:address, enable, R/W, RS, D4, D5, D6, D7, backlight, backlightpol
  LiquidCrystal_I2C lcd(0x3F, 2, 1, 0, 4, 5, 6, 7, 3, POSITIVE);

  void setup()
  {
    lcd.begin(16, 2);           //Set LCD to 16 columns and 2 rows
    lcd.backlight();            //Power on the back light
    delay(100);
    lcd.backlight();            //Power off the back light
    lcd.setCursor(0, 0);        //Set the cursor to first row first column
    lcd.print("Fab Speedo");    //16 characters per line
    delay(2000);
    lcd.clear();                //Clear the screen
  }

  void loop()
  {
    lcd.setCursor(0, 0);        //Set the cursor to first row first column
    lcd.print("Speed:");        //16 characters per line
    lcd.setCursor(0, 1);        //Set the cursor to first row first column
    lcd.print("Distance:");
    delay(100);
    lcd.clear();                //Clear the screen
  }
Measuring Power Consumption
For measuring the power consumption of the board with the LCD, the board was powered up with the signal generator at 5V and 1 Ampere. The board with the LCD showed a consumption of 0.04 Ampere.