Attending the Fab Academy in Barcelona, I document each week of intense learning as I come across new digital fabrication techniques.
This documentation is as much a report of what I do as a reflection on why I do so, and will hopefully guide me back to Oceania to spread and make good use of the knowledge gathered along the path.
--- summary of the assignment ---
objective :
Design and produce something with a digital fabrication process (incorporating computer-aided design and manufacturing) not covered in another assignment. Document the requirements that your assignment meets, and include everything necessary to reproduce it. Possibilities include (but are not limited to) composites, textiles, biotechnology, robotics, and cooking.
what I did :
For the wildcard week, I attended the fabricademy bootcamp. It was a week of fast-paced experiments which included :
download :
Learning outcomes :
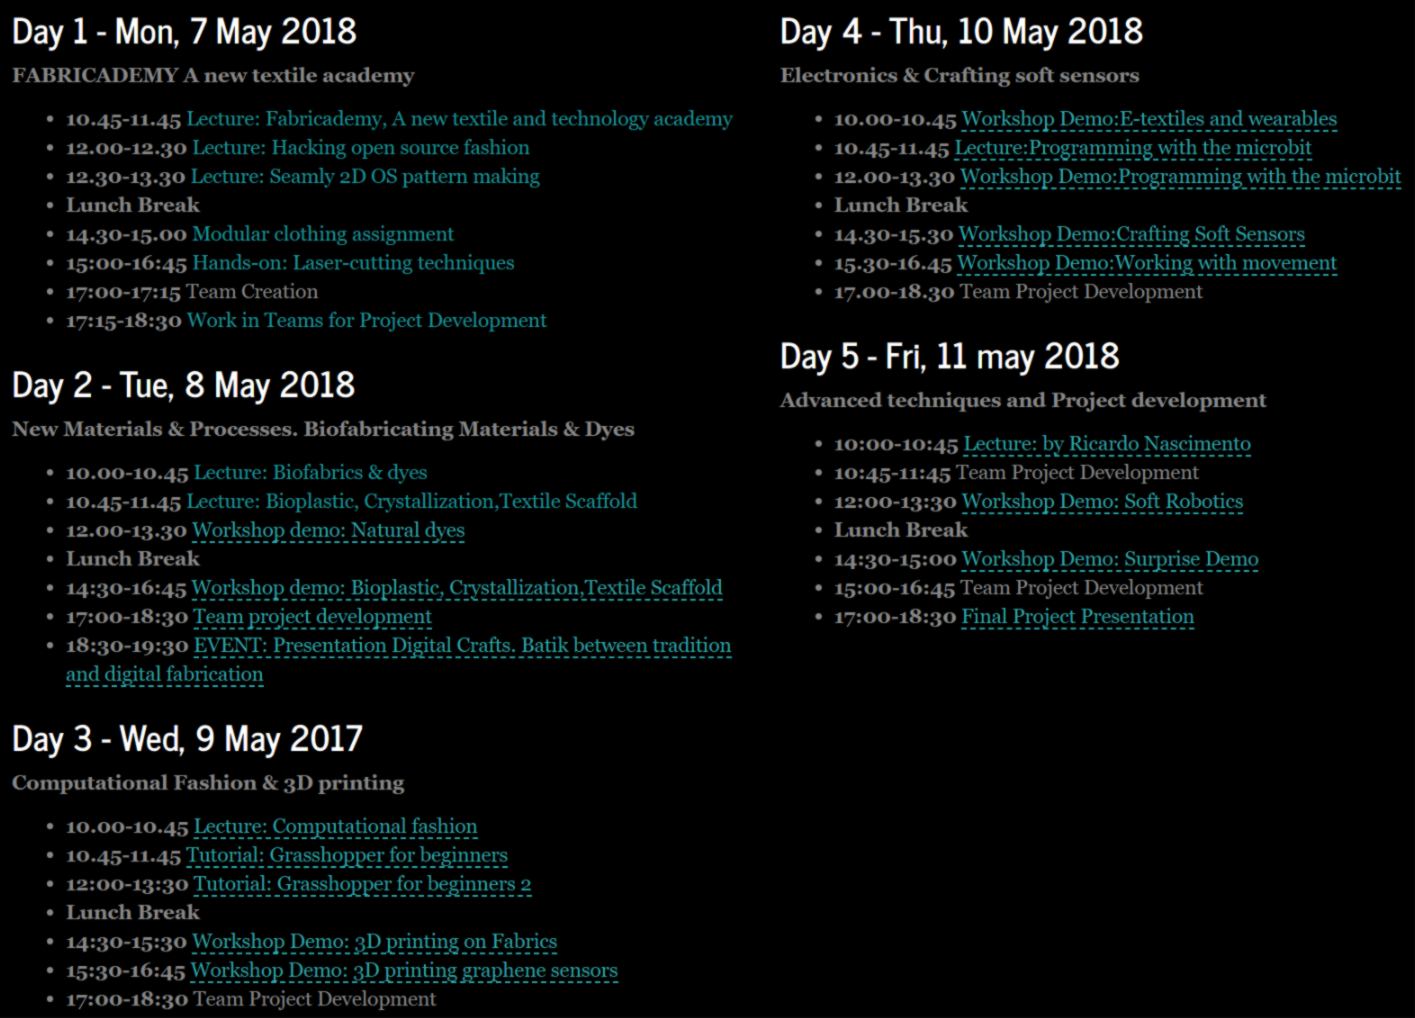
07.05.18 / First day of the fabricademy. We will focus on 2d patterns and laser cutting. We will have a tutorial on Valentina for pattern design.
The group of "students" comes from all over the place: South America, the United States, Eastern Europe...and mostly female and in the fashion industry. Most of them are well-versed in digital design.
I learn that by attending the bootcamp, I will later be "entitled" to run the fabricademy elswhere as an instructor. A bonus I guess.
Background story : the fabricademy is looking at tackling specific issues related to the textile/fashion industry, the second most polluting industry worldwide, with labor exploitation, very closed technology and mindset, and very little cross-pollination with other industries. The fabricademy wishes to acknoledge the fact that education in this sector must evolve and grow with an open-source mindset, providing access to a large amount of information incaccessible in the last generation.
As for the Fab Academy, all researches are online. It means that it is possible to study at the Fabricademy for free.
Sadly we won't cover "digital bodies", or tailoring using digital fabrication tool. I guess I can figure it out by myself later on, since they usually use a Kinect as 3d scanner. Today we will look at "Circular Open source Fashion". Clothing tends to be designed as a puzzle of pattern which pieces are usually laser cut. There is also an open-source catalogue.
We will then look at biofabricating dyes and materials and see where we can cut down on use and release of polluting chemicals used for dyes. The question of up-scaling the production brings up another topic : local manufacturing vs global manufacturing. It is related to the DIDO concept, dear to the Fab-City movement.
We will then cover Textile and wearables, how to embeed sensors and electronics in your garment. A designer from Kobakant will join us to provide a tailored workshop for us.
In the computational couture workshop, using Grasshopper, we will be looking at designing not only a garnment but the production system behind it.
In "textile as scaffold", we will look at crystallisation, fabricating biocomposites. We will also looks at traditional manufacturing process, and combine them with digital design. In "open source hardware", we will see how to hack and/or design fabrication machines. We will also have a soft robotics workshop, which I am very interested in - especially for inflatable structure, which I think is underused.
Finally to get ready for the Nowhere festival right after the Fab Academy, we will have a skin electronics class. That would be a fantastic gift to offer during the festival.
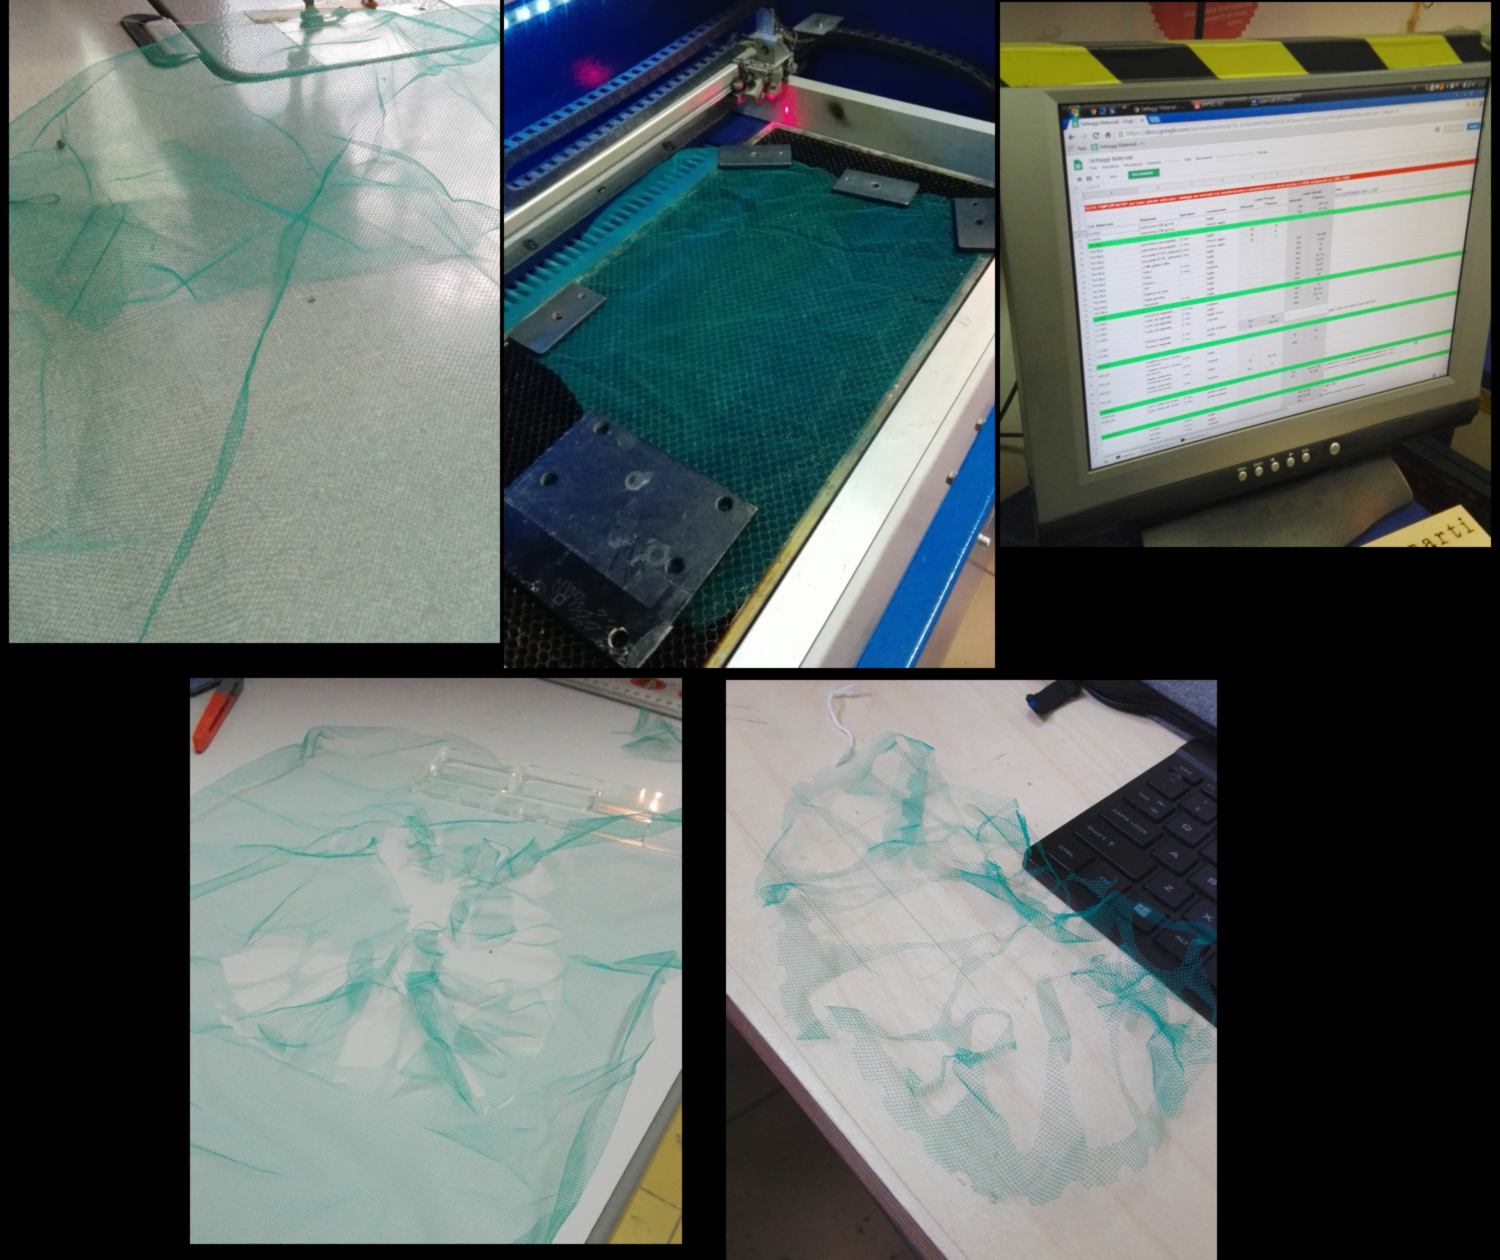
In the afternoon we begin to approach interlockable patterns. I pot around with the idea of a very breathable material based on the concept of medieval mesh :
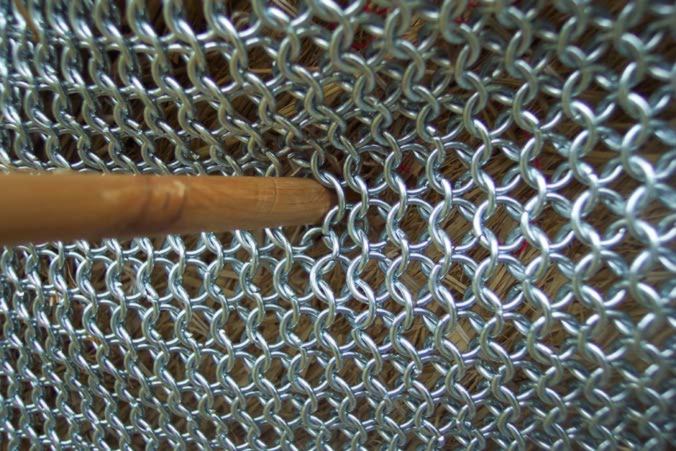
I begin from a very simple shape, test how well the material fits, then ask Zoe for some help with the laser cutter - the software is entirely in Italian - then assemble it. I add an extra element - slices made out of paper on the picture below - to minimise the surface of fabric in contact with the skin :
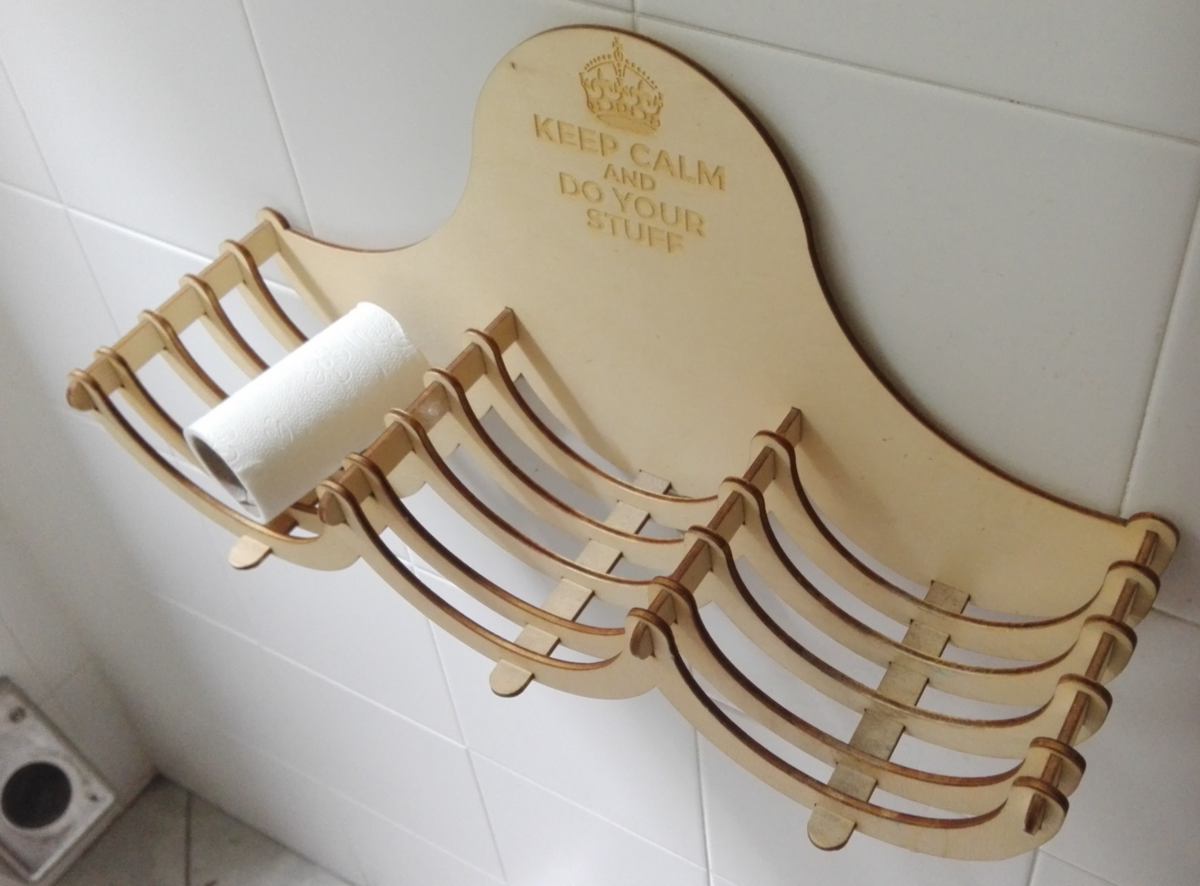
the afternoon goes by very quickly and I have no time to make a second prototype, triangular rather than hexagonal. Another design statement I cannot help but share with you, hidden in the bathroom, which to me is an obvious makerspace statement:
One point that Zoe mentions during the workshop is the DIT (do -it-together) approach, that from her perspective is an evolution of DIY, a smarter option to match what the giants of the industries do : benefitting from larger production/design scale :
Below I will add a somehow long but useful list of links that we discussed today :
If I had to post only one picture from today, it would be this one :
08.05.18 / "More of a playful day today" We cover more tricks to laser cut fabric, then experiment with natural textile dying and bioplastics.
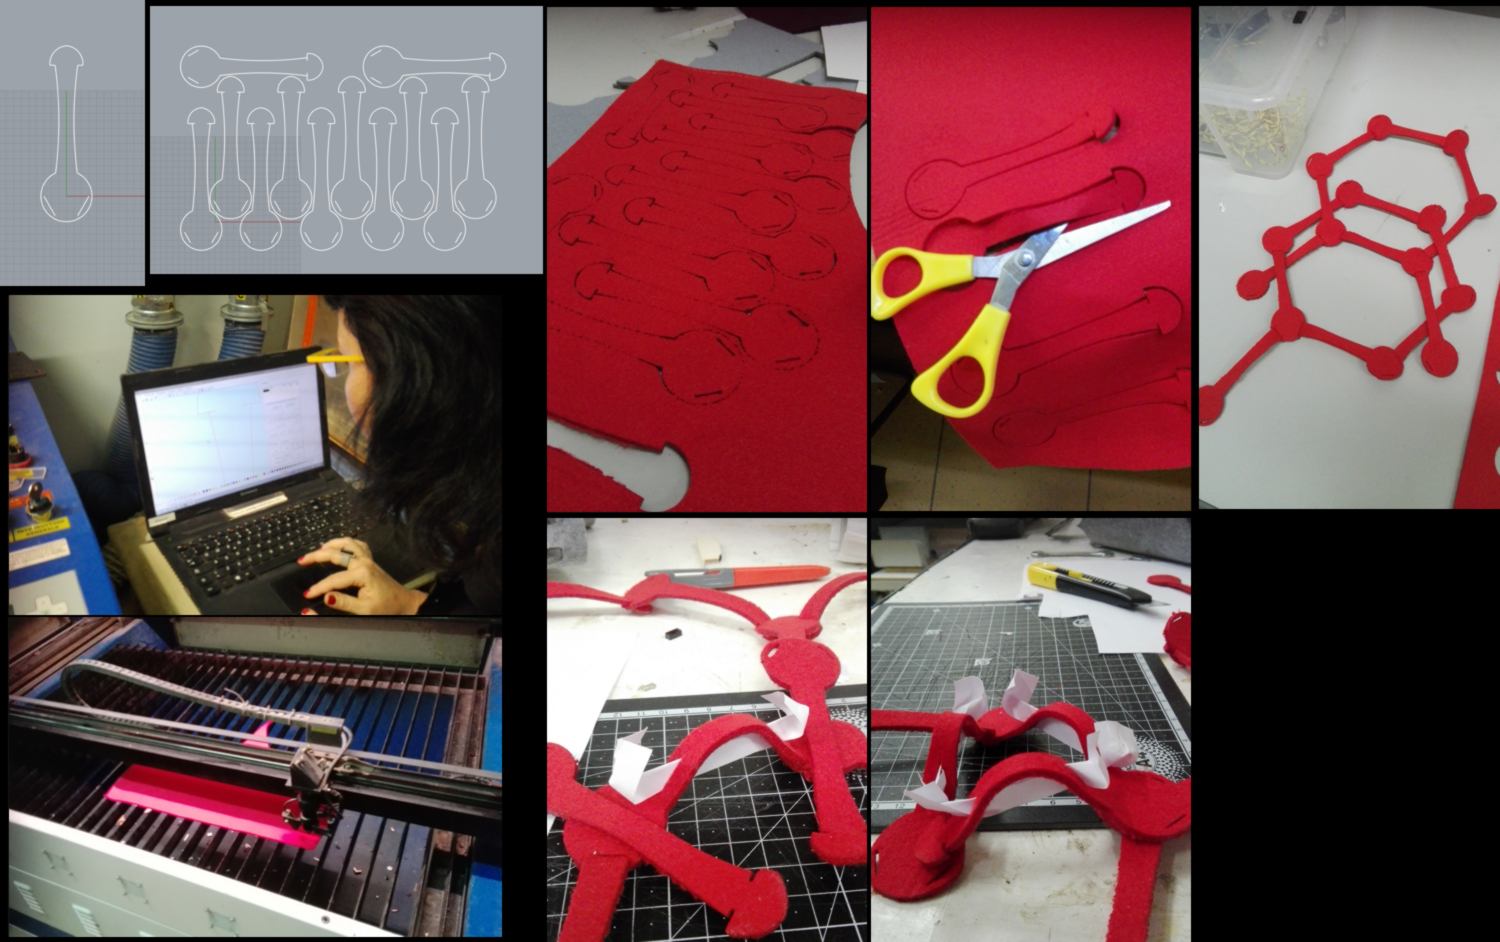
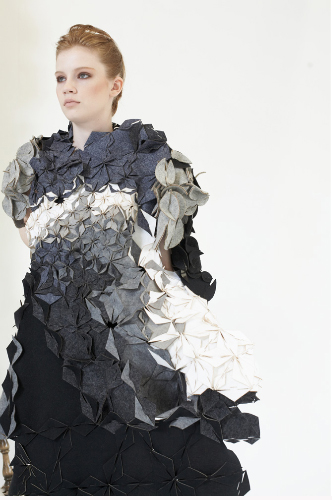
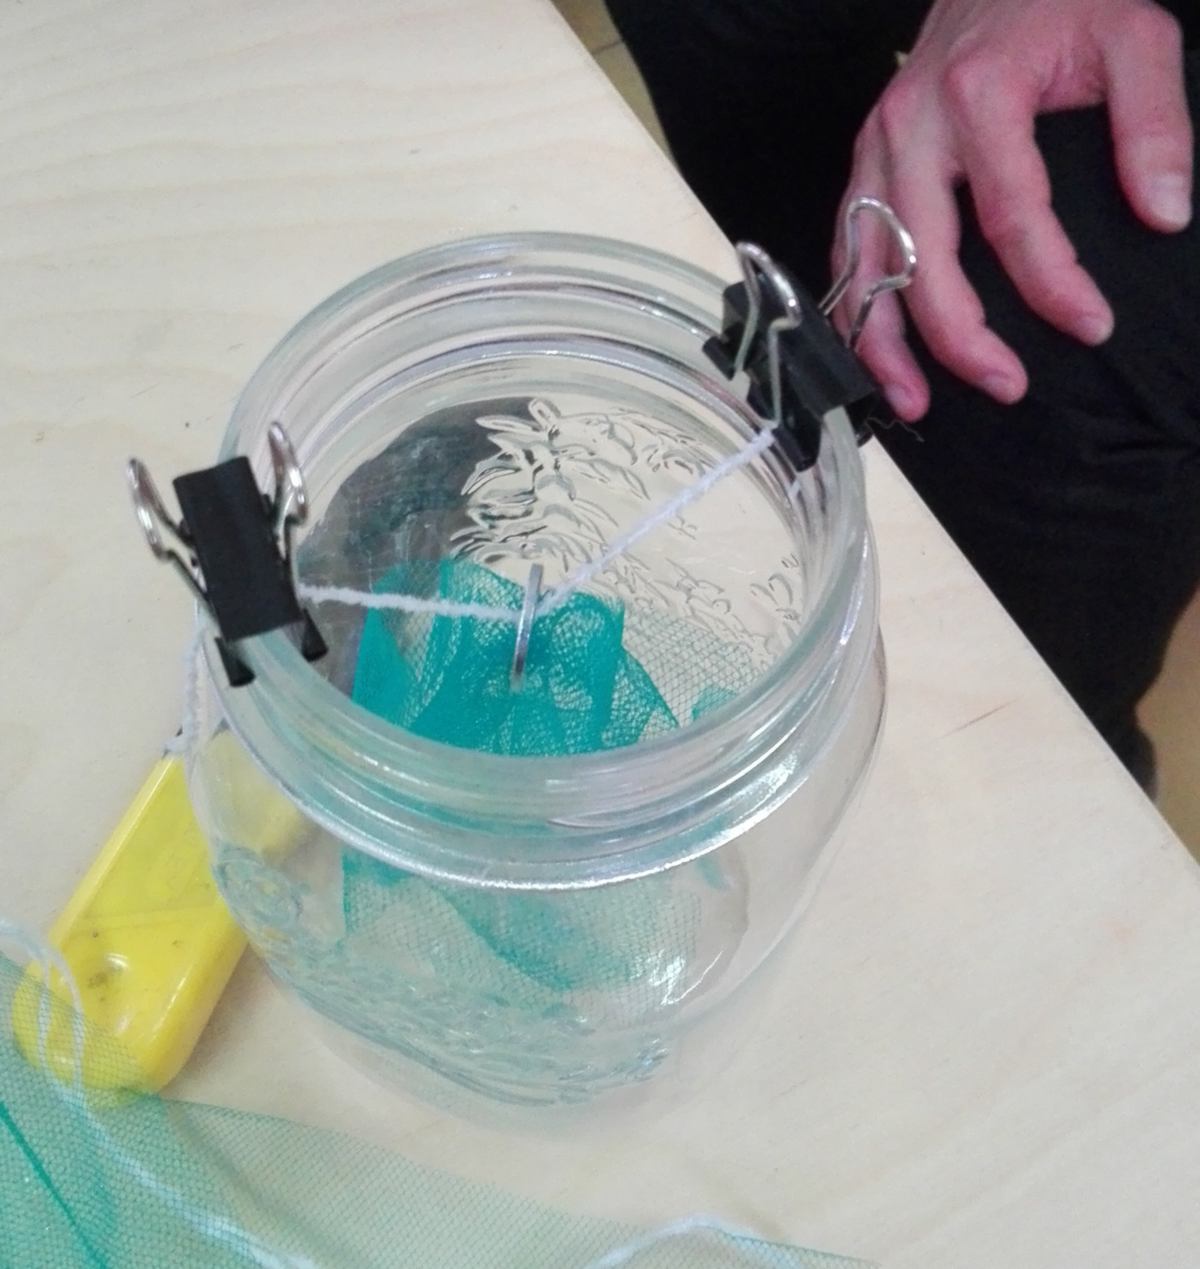
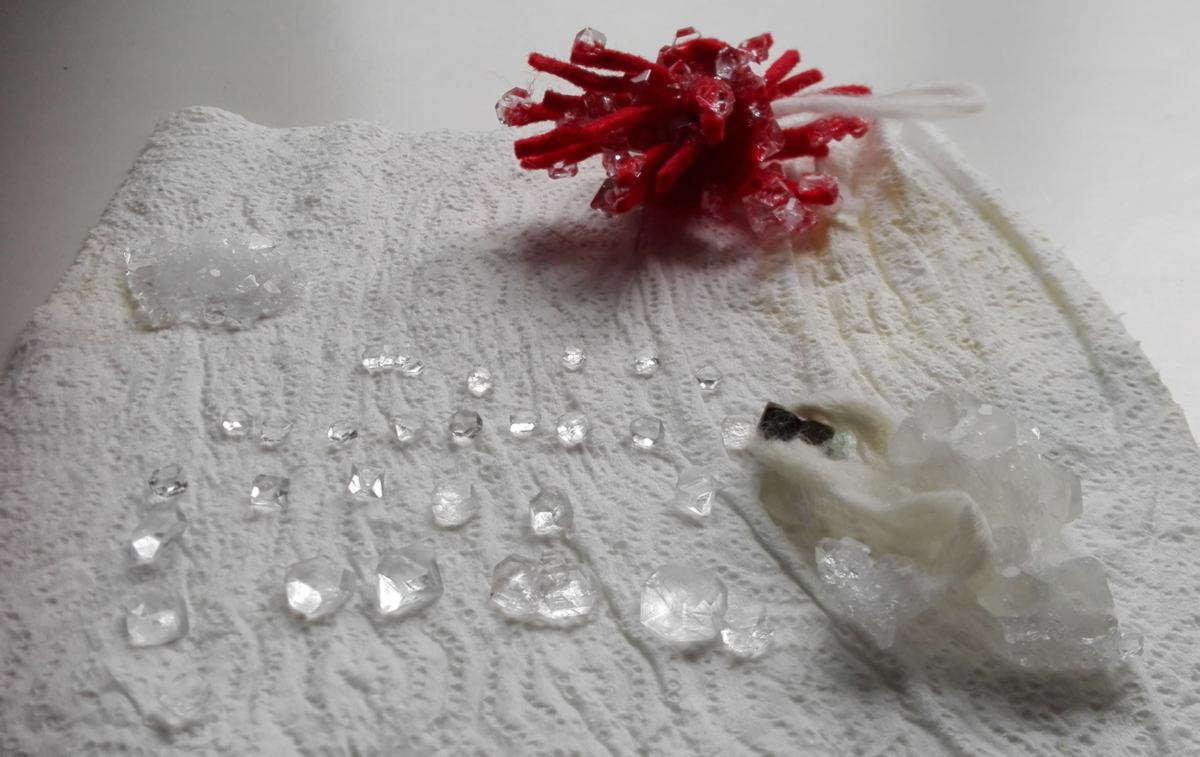
We will first begin by designing something to cristallise. I begin to craft a shape with some threads, but it quickly become really counter-productive, knotting tiny pieces together. So I move on to design the shape I want digitally and will laser cut a piece of felt. I make the shape so that folded, it will turn into an intricate 3d shape which once crystalised would not be possible to make in other way but via 3d printing :
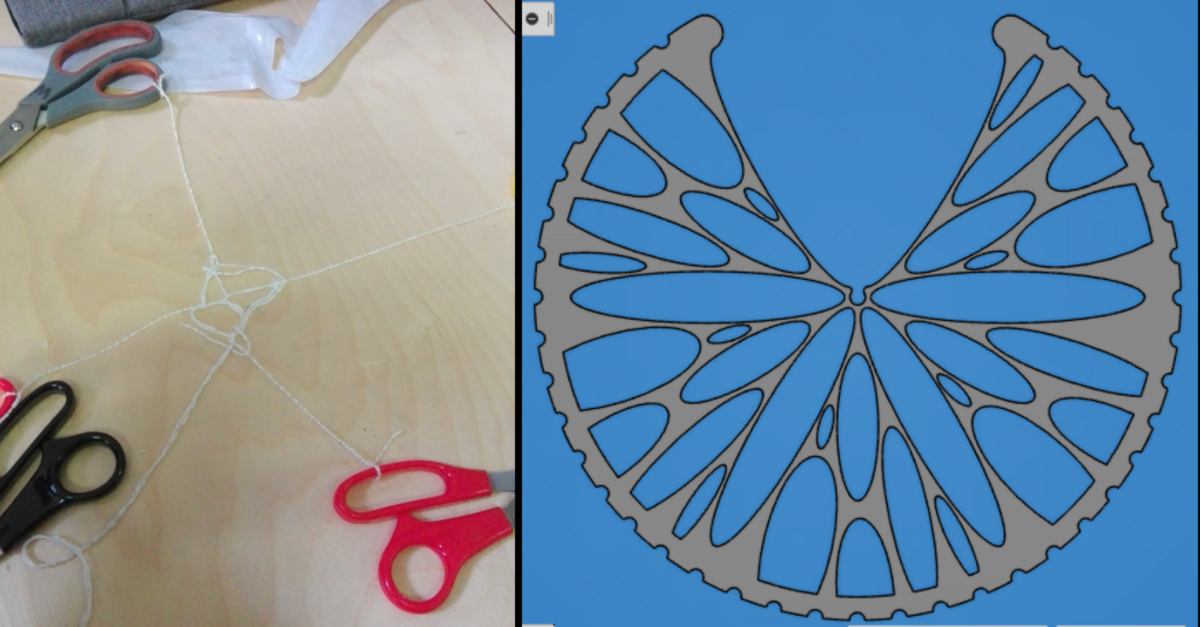
On the way to the laser cutter I find this fantastic textile - fantastic because it enables me to test to what extent the crystallisation process will bridge points far apart from each other. I will use this textile. We set up the settings according to what the Google sheet designed by the makers at WeMake says - and modify it to match our needs - , then add weights in the corners to hold the material down. We then start cutting the inner shape, the the final outer shape. The results is a bit of a disaster : the fabric does not hold its shape properly :
This is not much of a failure since, because the fabric is now on the table, other people have incorporated it in their designs, so we will be able to see the result anyway :
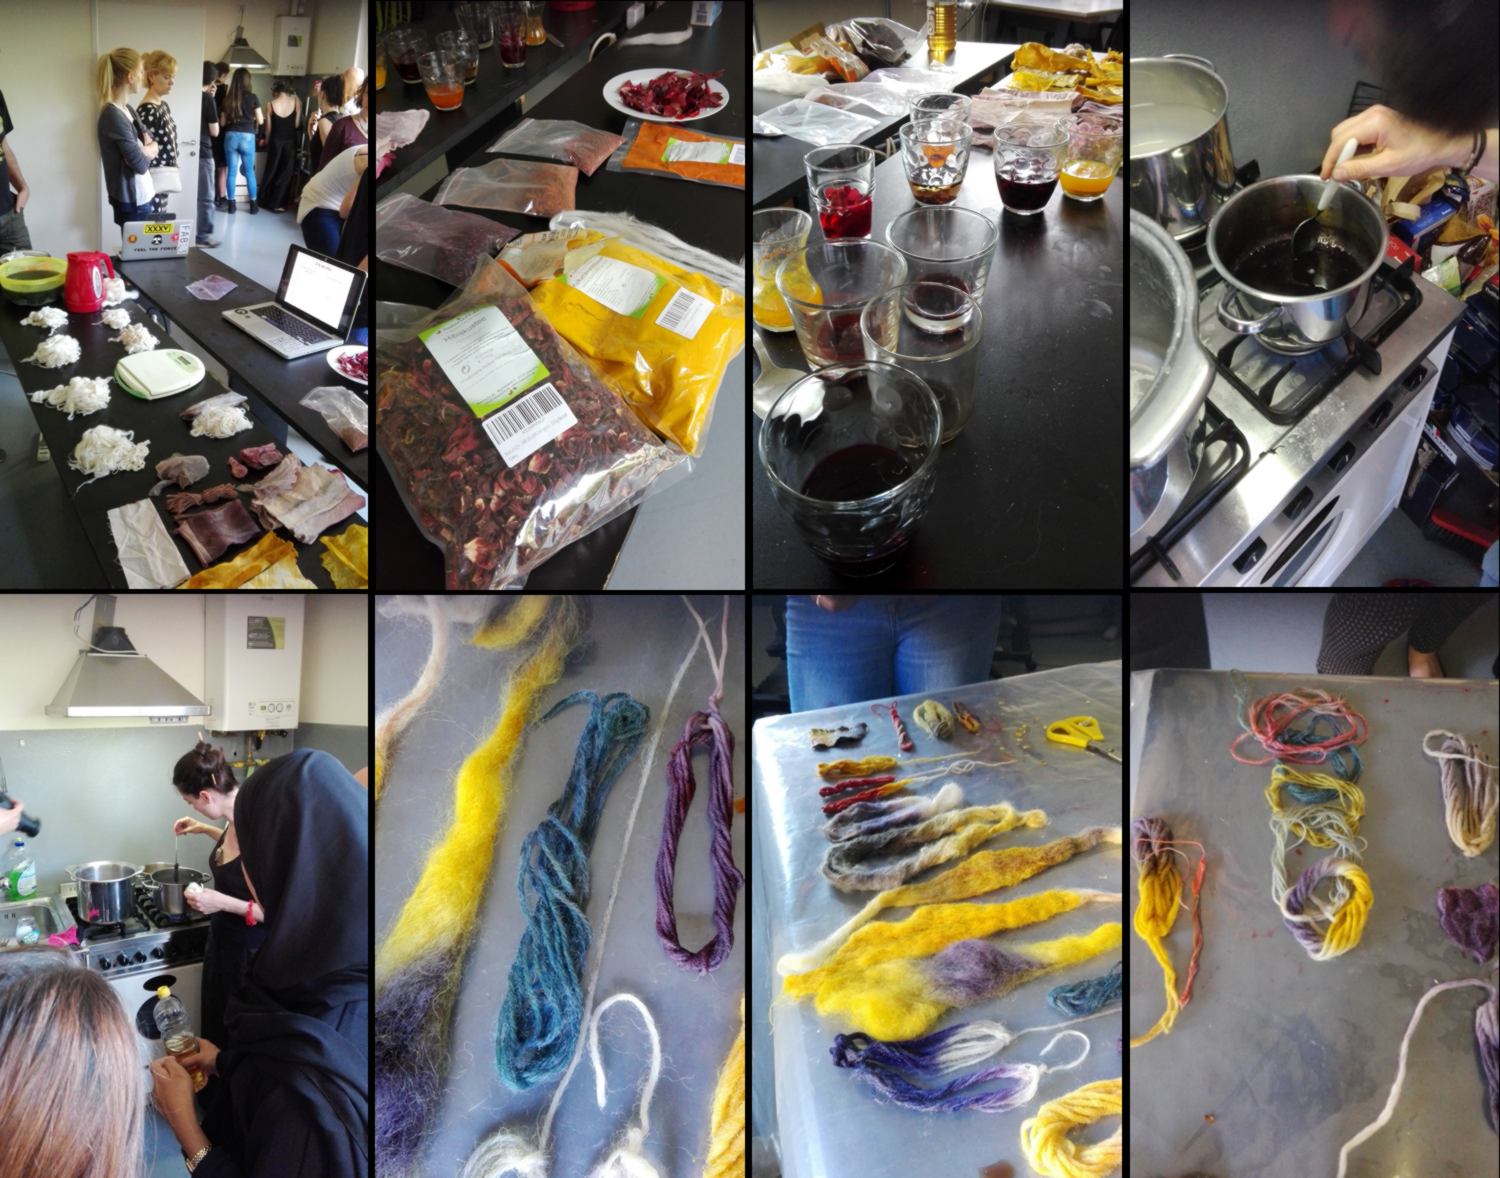
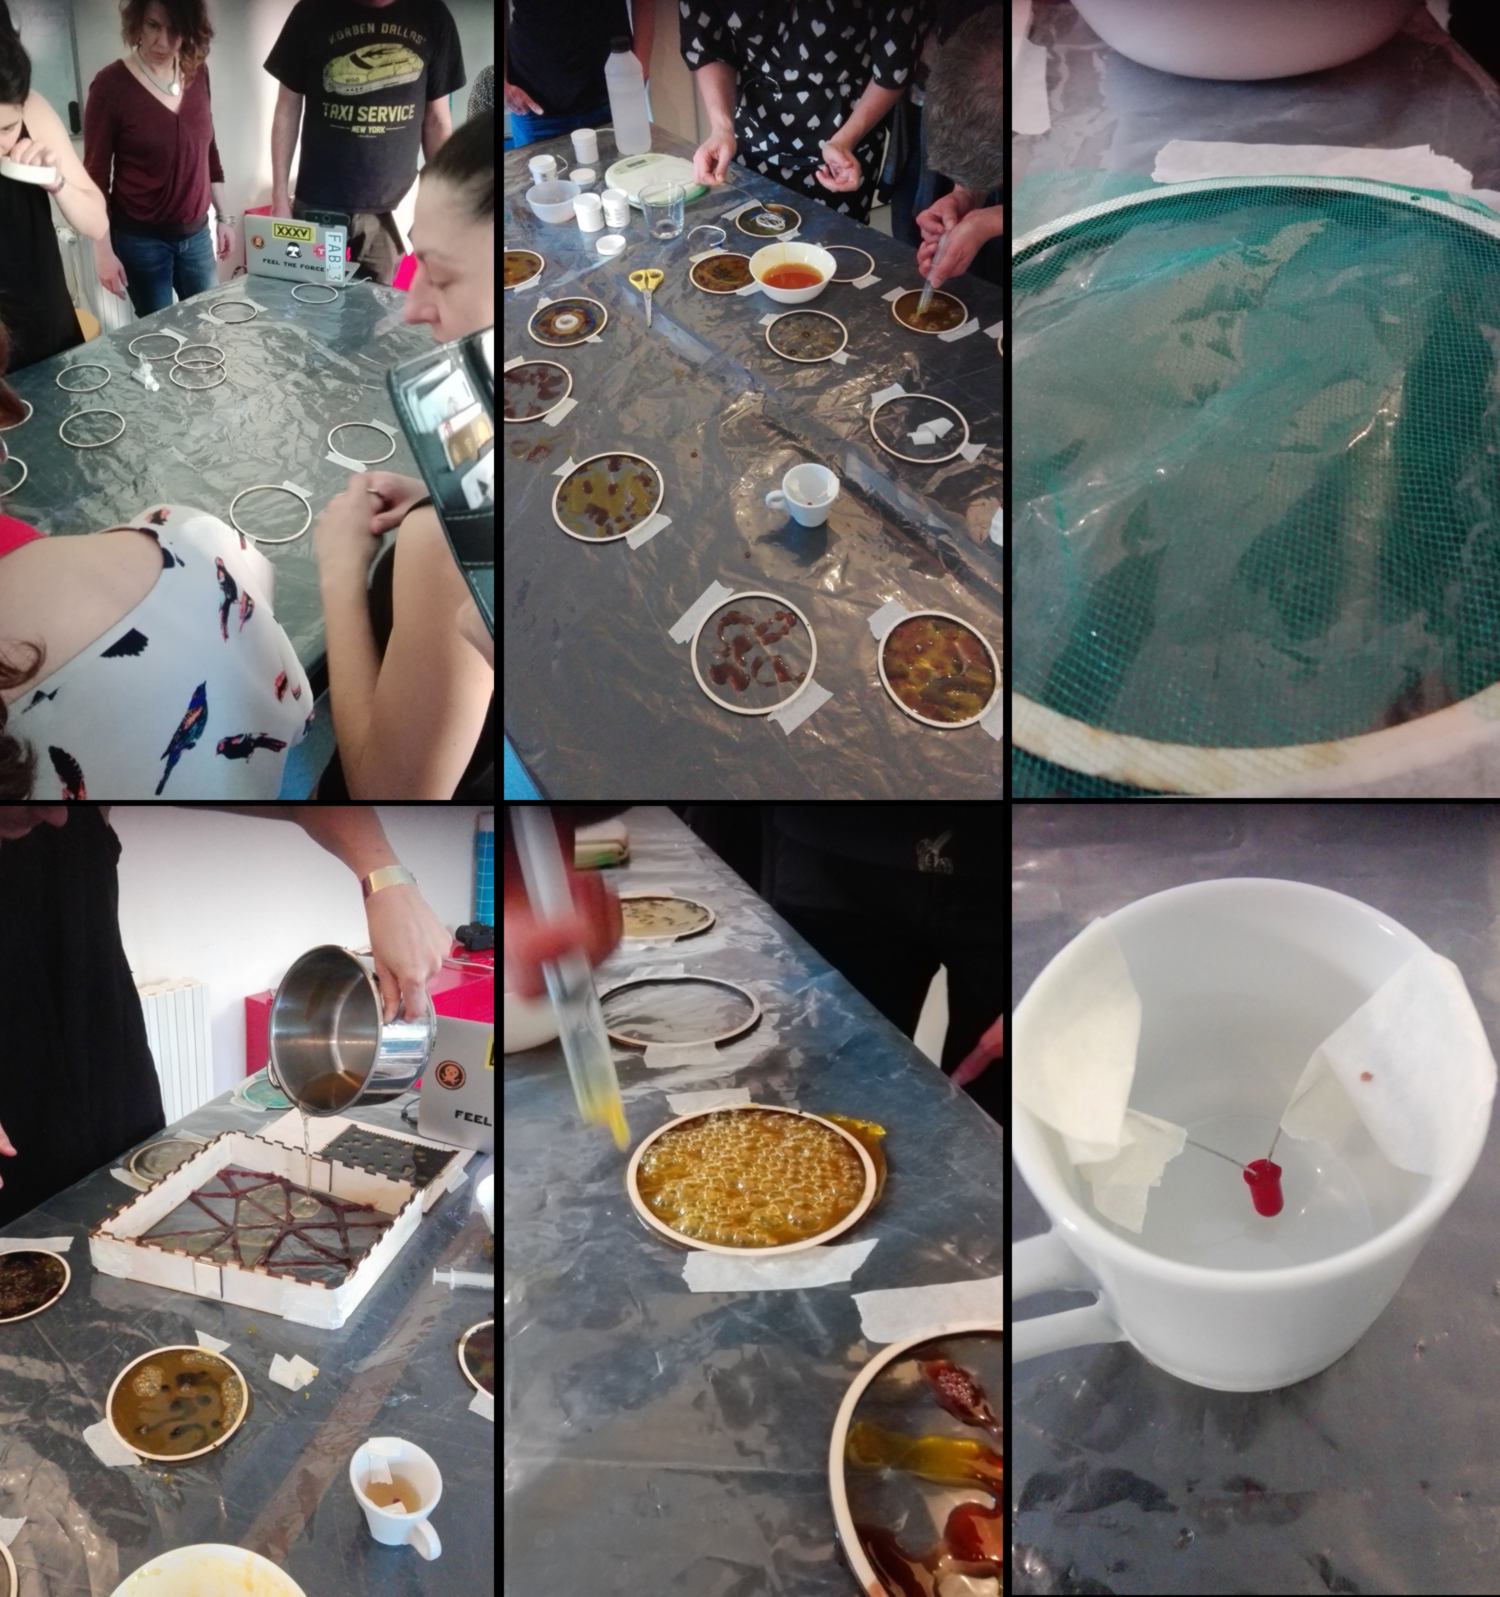
We are going upstairs to the kitchen which has turned into a bio-lab for the afternoon. Are laid out all products and equipment we will use for natural dying : ibiscus, onion peel, curcumin, black beans and more. All recipes can be found on the fabricademy wiki or here. We make hot and cold dye, and drop different material - wool, cotton, half synthetic fibers - in the mixes, combining different dyes at time :
With the mixture left from the cleaning up of the fabric and some -natural- additive, we fill up our containers full of shapes ready to be crystalised. the process will take some time (counting in days):

Then we move on to bio-plastic. We first mix up the dyes we prepared earlier with gelatine or its vegan equivalent and draw onto the circular shapes laid on a table. Some textiles is sometimes added, other test-pieces are covered with bubbles, and I add an LED in one of them so once solidified, it will be embeeded within the plastic .
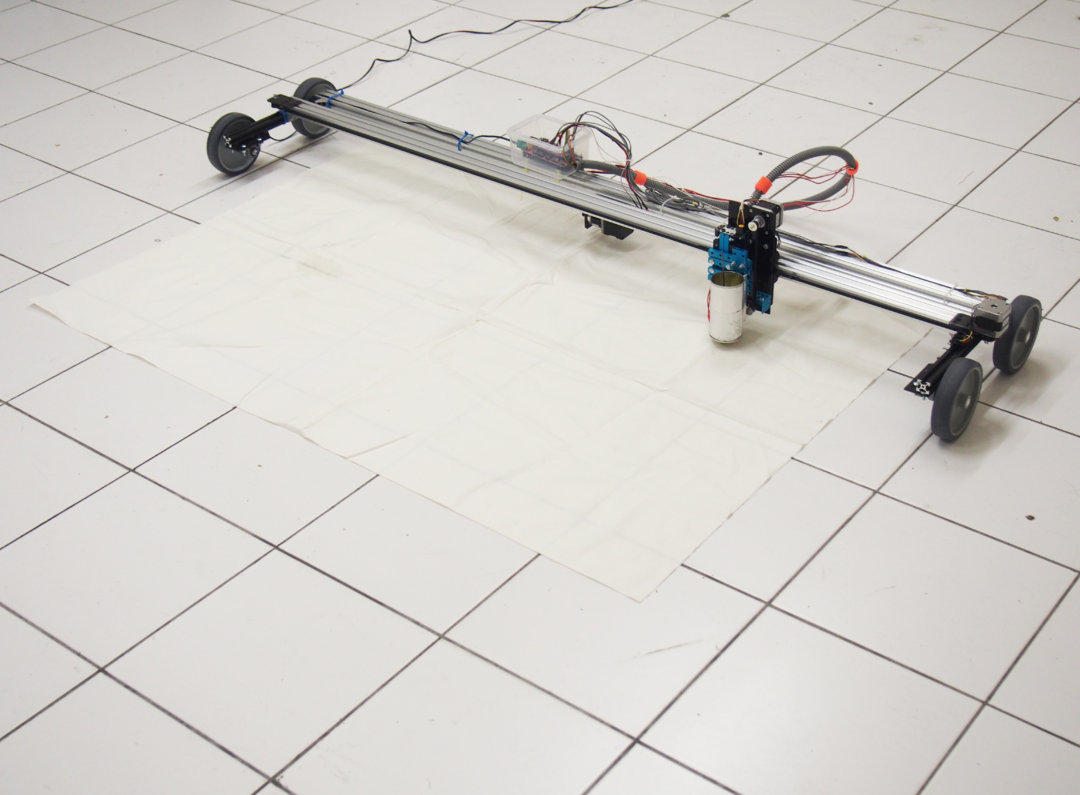
To close today's shenanigans, we have Eugenia Morpurgo and other makers coming to present their work. Guess what : Eugenia Morpurgo is actually the makers behind the machine I was talking about yesterday! all her work is open-source and ready for duplication.
I also finally get to discuss with Enrico Bassi (working on the fabkit project for refugee camps) as well as another fabricademy bootcamp student who worked in refugee camps for year. We discuss about the legal barriers which often restricts refugees to work in the country they are hosted. In Austria, refugees get 40 euros per months in pocket money on top of accomodation and food. It is little money.
People look for solutions to that. I am no specialist on the subject (so I recommend anyone reading this to find solid sources of information rather than take my word for granted), but I hear that self-employement is sometimes allowed, which is very difficult when one has any tools to exercise their craft. This leads to refugees doing all the physically demanding jobs at rates under the legal minimum, forced prostitution and so on.
For the others staying at the camp, boredom and depression is commun. In this context, the introduction of a lab in these places does not seem irrelevant.
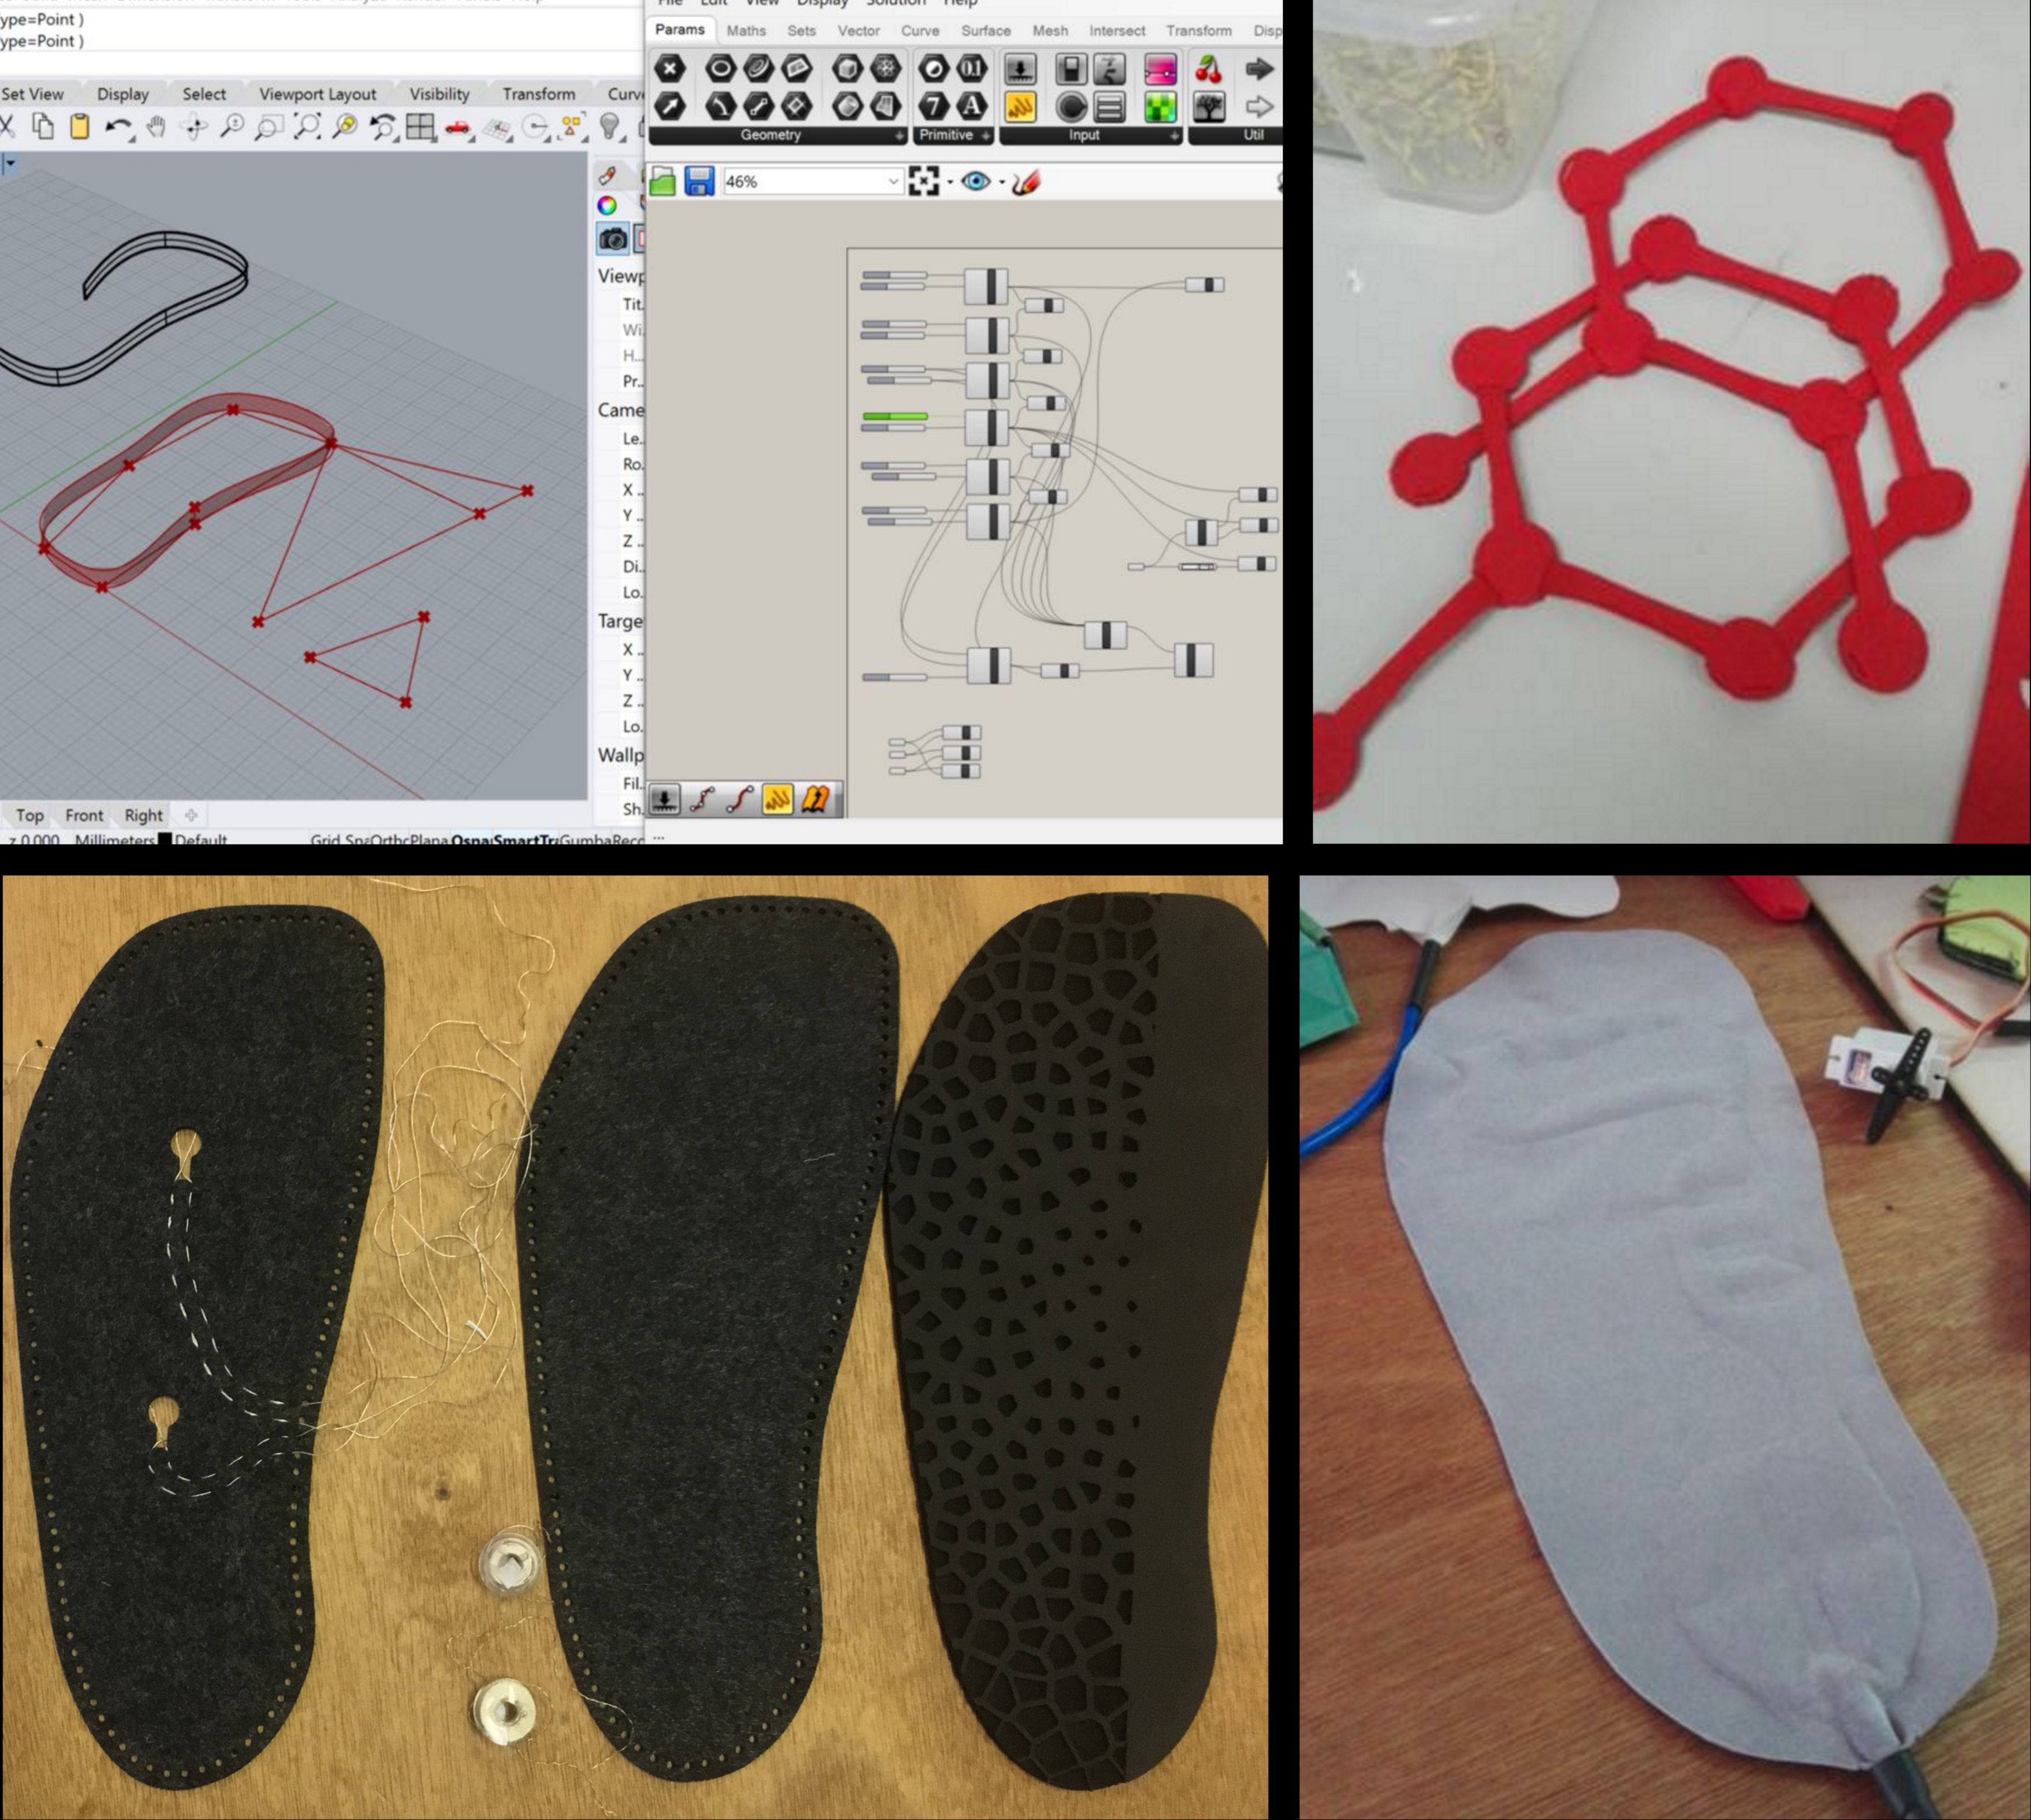
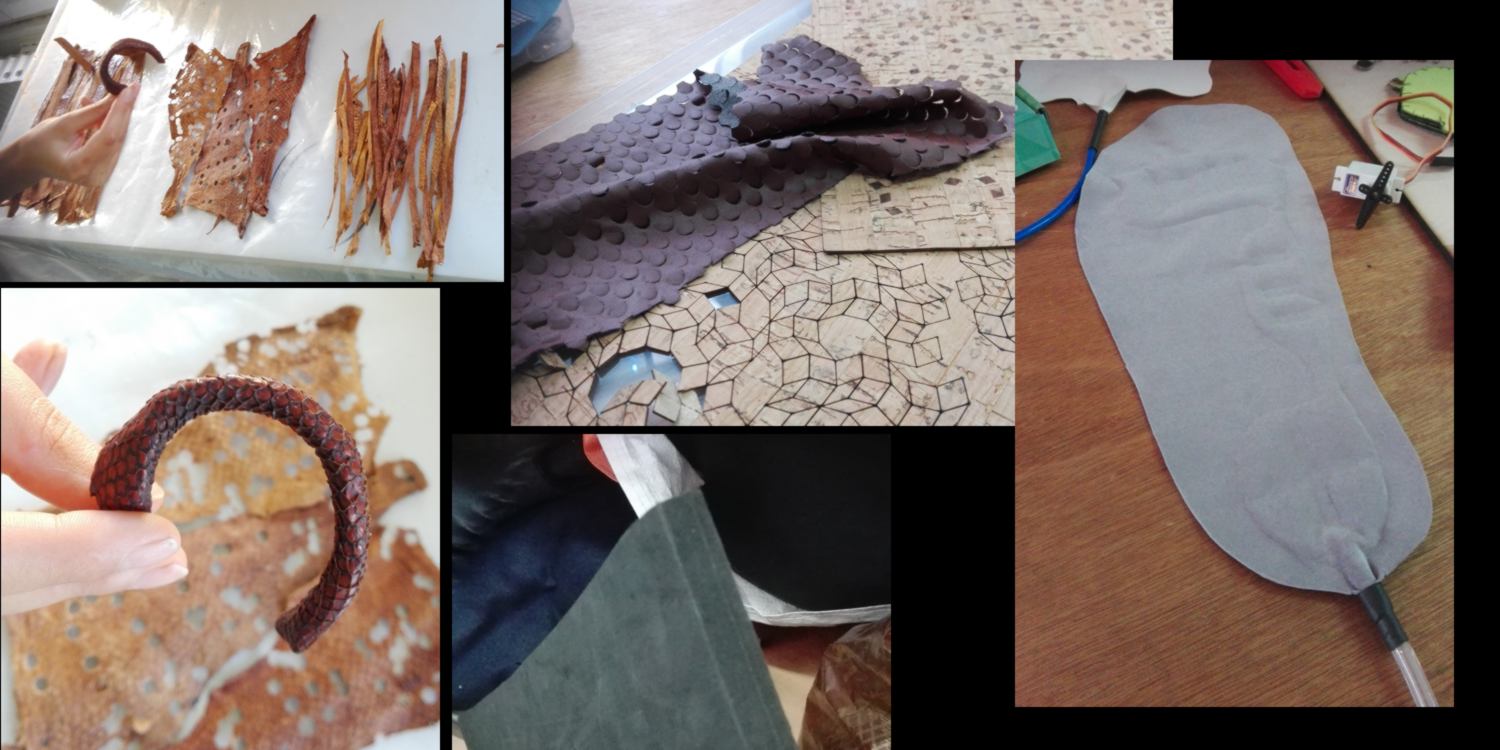
09.05.18 / We get into computational design attending a lecture followed by a Grasshopper demo/tutorial. I begin to think about how to create a parametric design for the sandal :

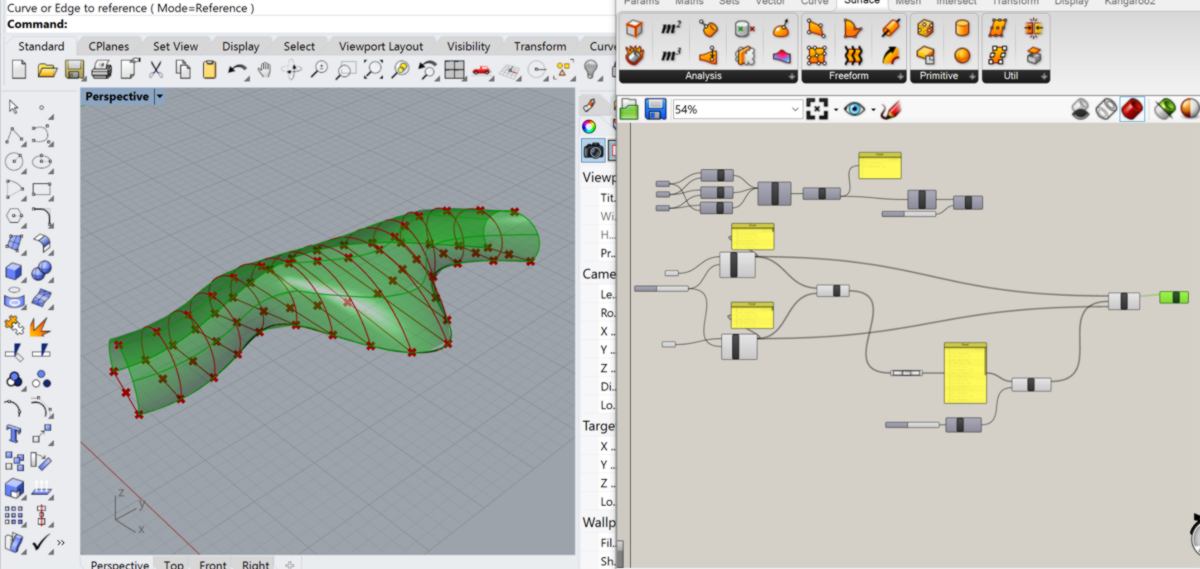
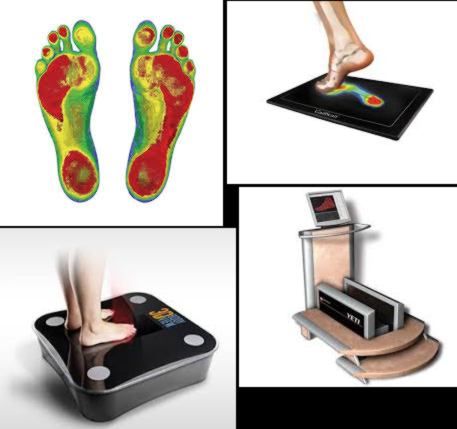
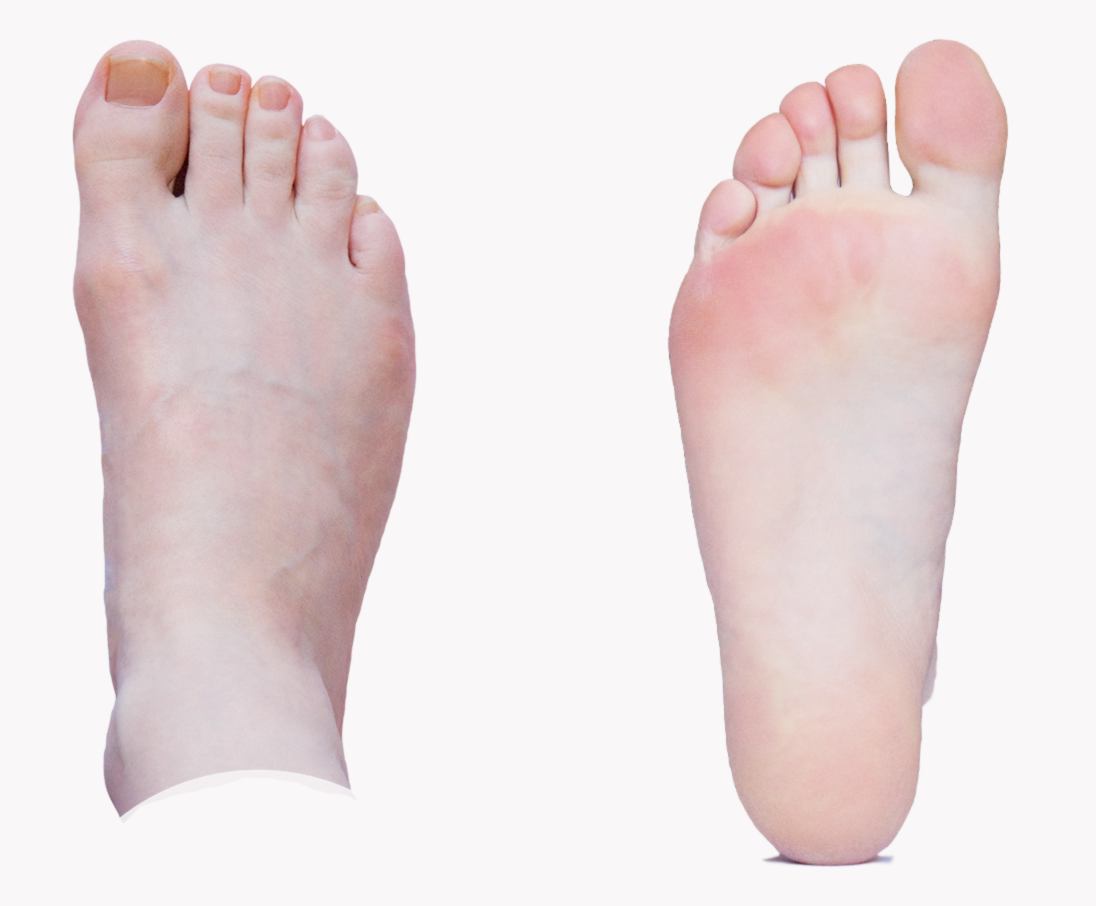
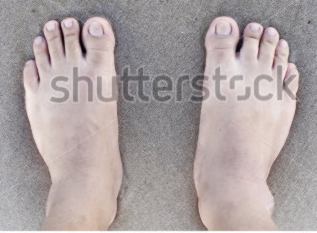
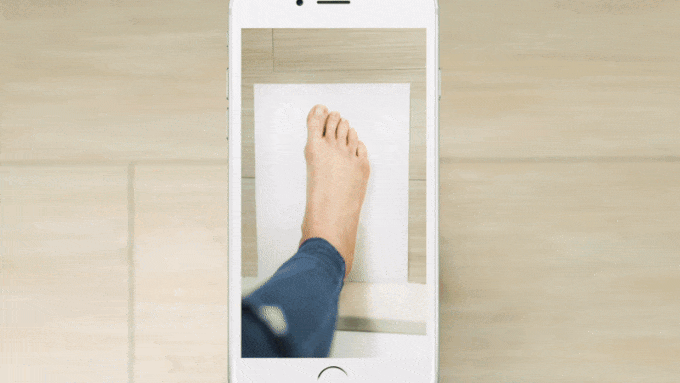
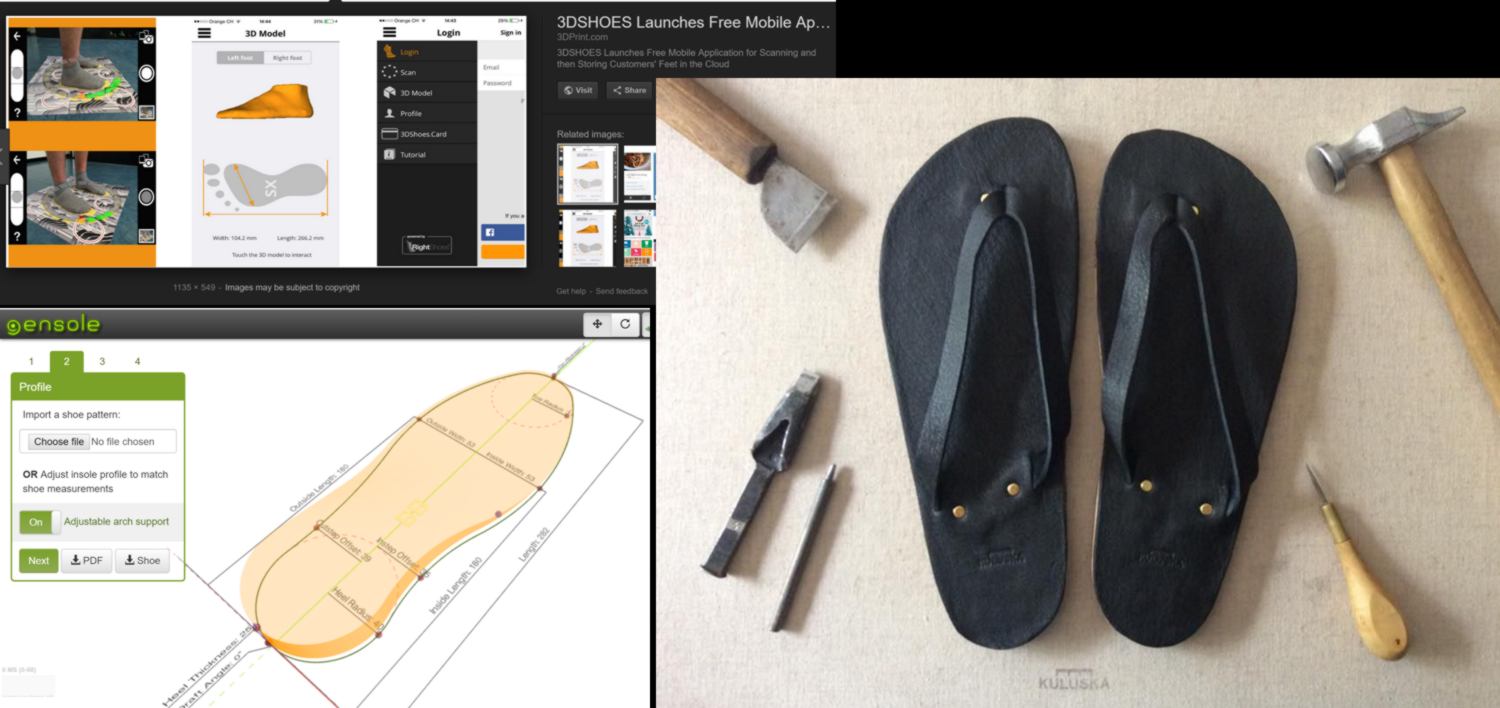
As we do this I look for documentation to design the sole. A cloud of 8 points (3 on each side and one at each end) seems to work. Now I wonder how measurement on feet are usually taken. Or : how could we cut a sole that is perfectly the size of a foot resting on the floor? Foot scanner exists on the market :
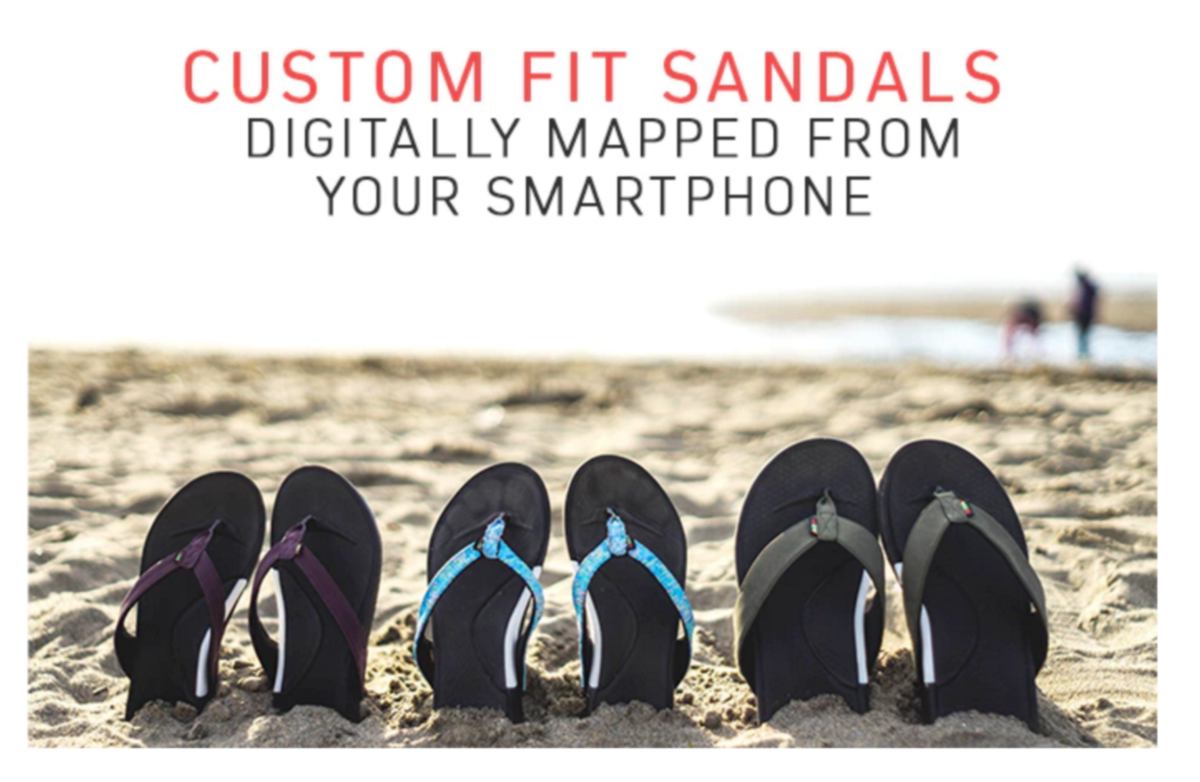
I find a kickstarter campaign covering the fabrication of personalised sandals which uses prosumers' phone as scanner. Perhaps there is a legitimate, cheap alternative available.
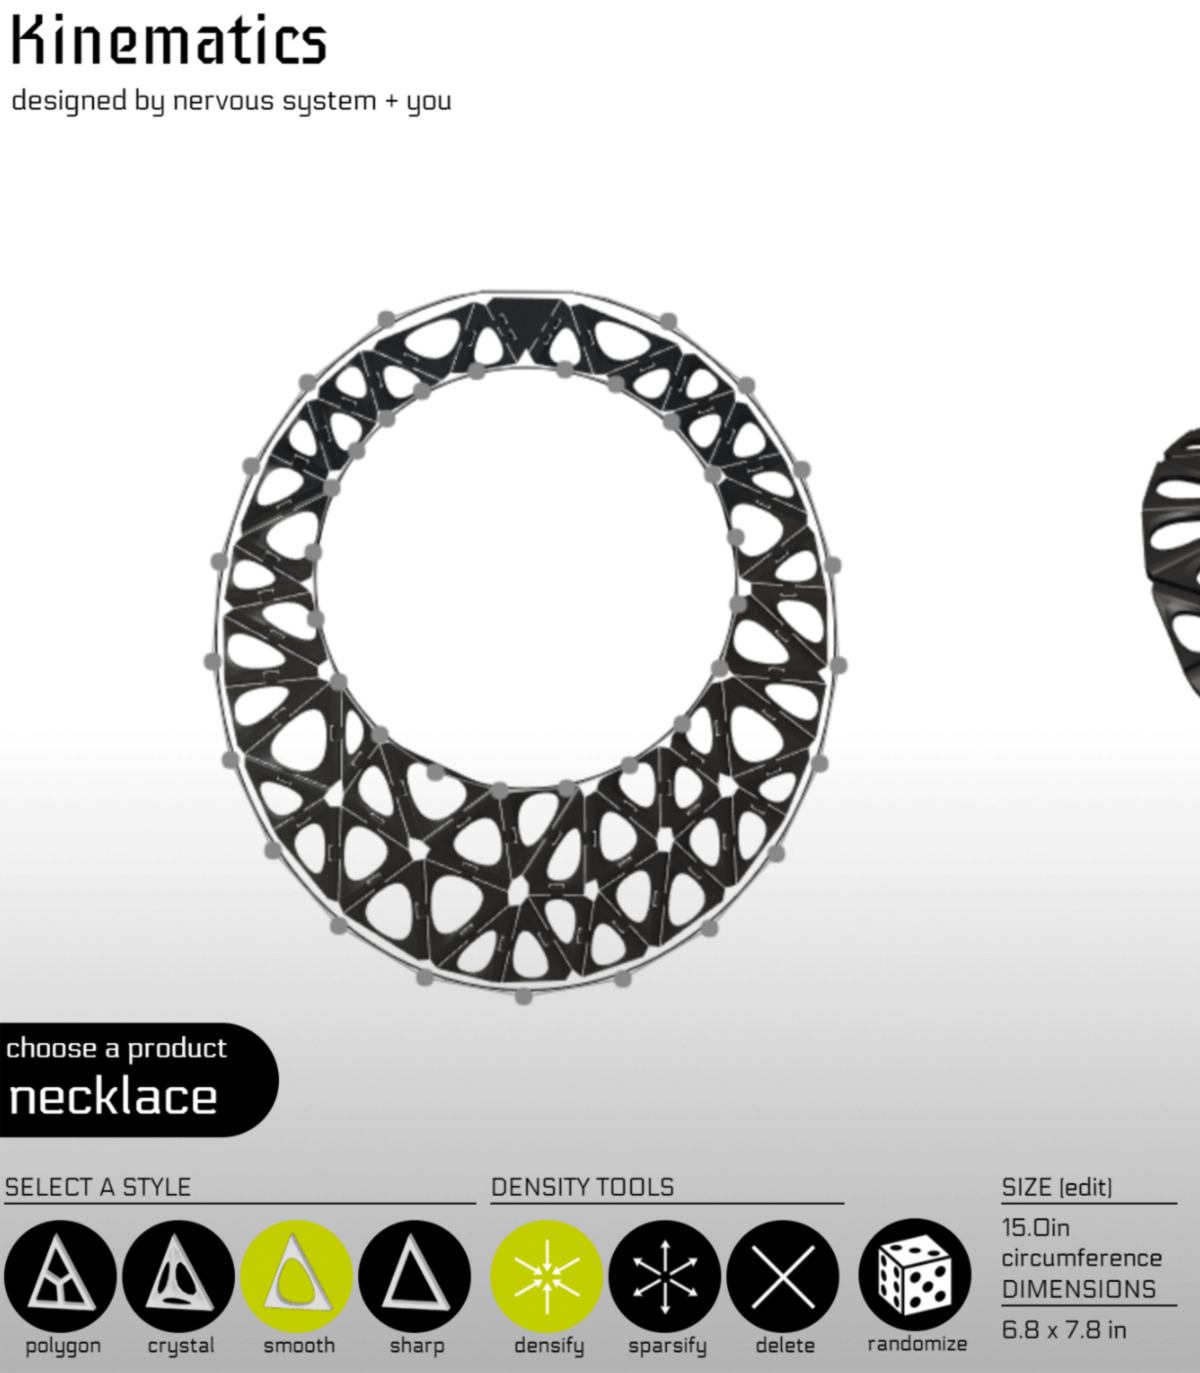
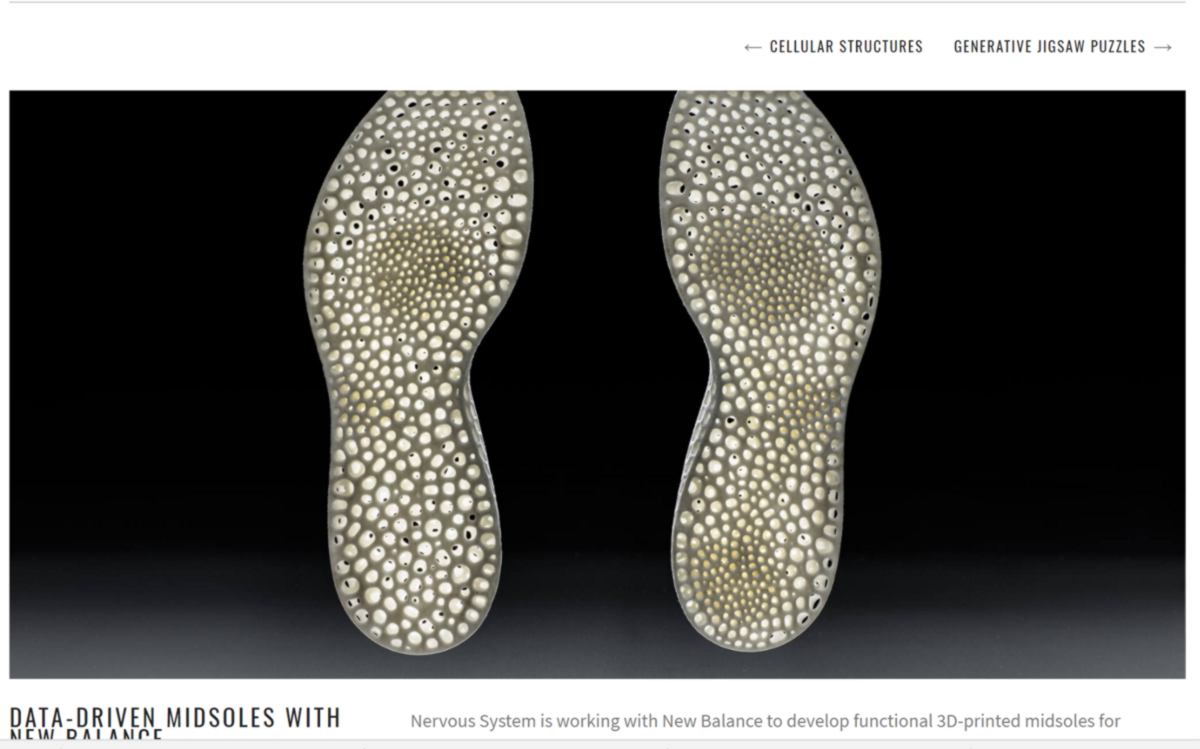
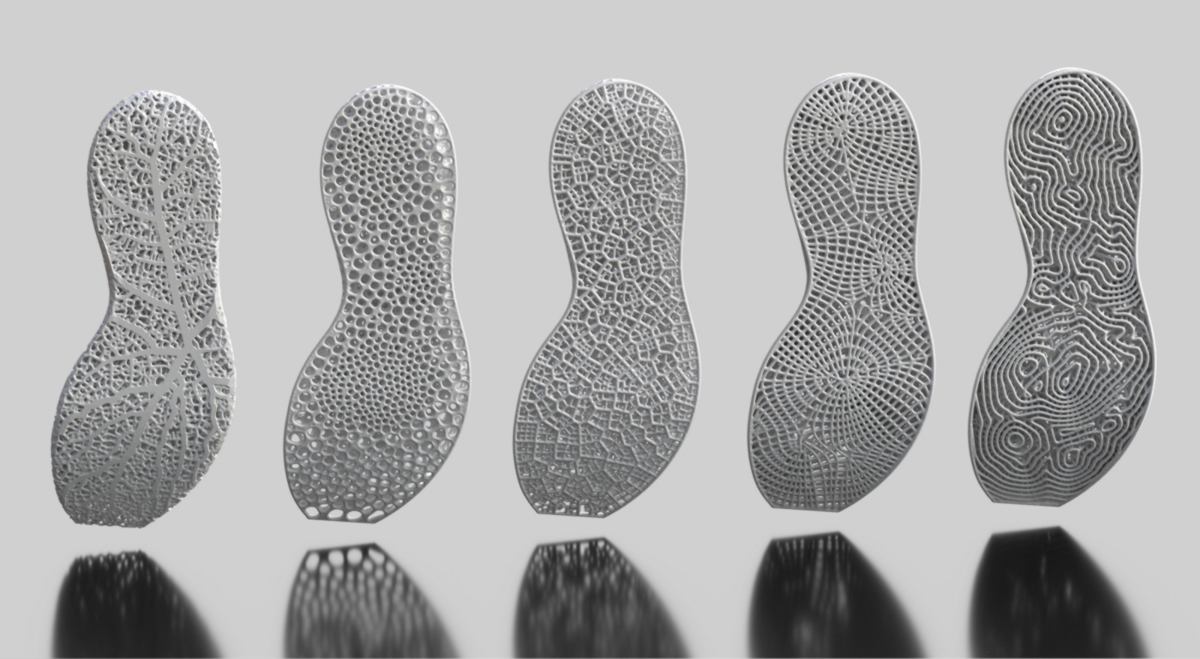
After lunch we discuss about the application of parametric design such as kinematics by Nervous System as well as other online applications.

Nervous system also worked on sole : "Nervous System is working with New Balance to develop functional 3D-printed midsoles for performance running shoes. We have created proprietary systems to generate midsole designs from pressure data from runners, making it possible to create variable density cushioning that is customized to how a person runs. This ongoing project has given us a unique opportunity to apply our generative design techniques to a new domain."
I remmeber the last time I bought some sandals. It was at a festival, and Havaianas had a stand where you could design your own sandals, selecting the color of the sole, the color of the treads and an extra decoration attached to the thread. What if the same experience would be provided, but this time the sole are made at the customers size, and once the item is purchased?
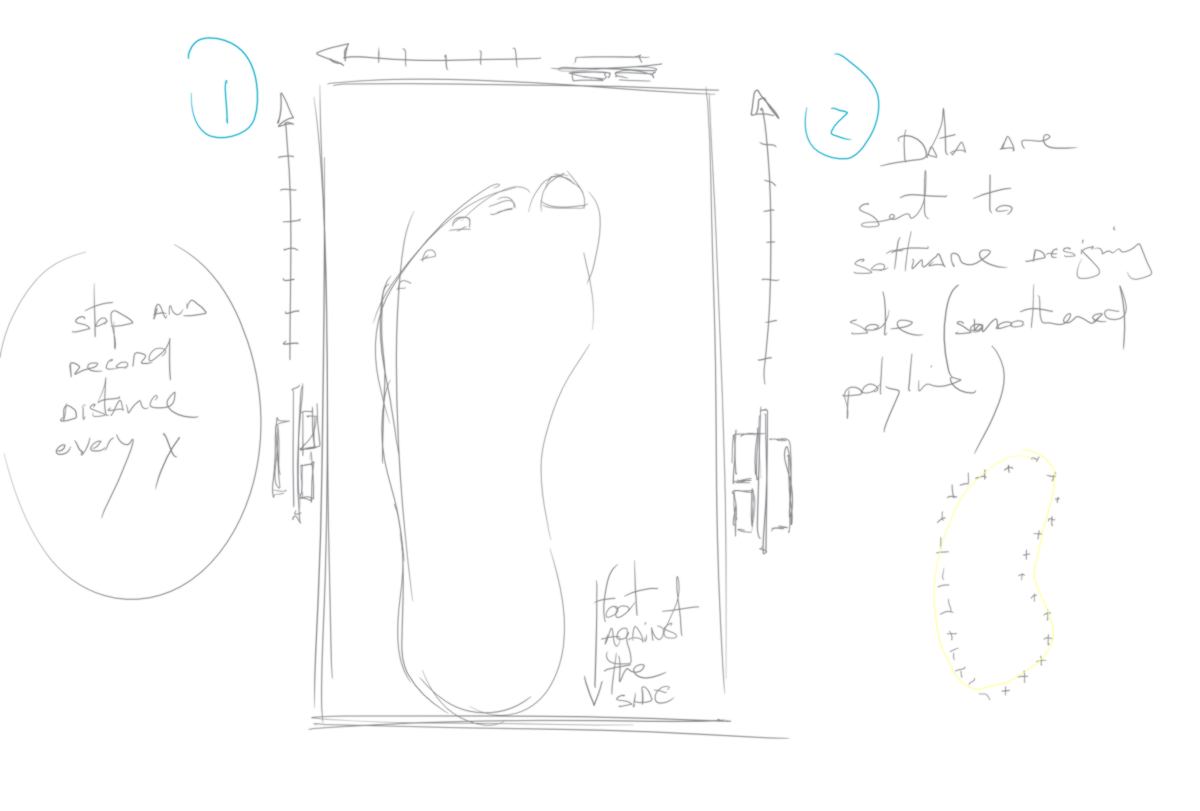
The first step is to take the dimensions of the customers' feet. The device has to be portable, and take the measurement where it is required, so that the cutting machine will cut into a flat surface the exact imprint of the foot while resting on the floor. So which points are critical to the design? All feet are very different :
I start thinking of a very cheap, simple way to scan a foot using three distance sensors :
Another demo degins. We talk about 3d printing with Graphene to make a sensor hidden in the sole of a shoe. The graphene layer acts as a resistor which resistance changes when pressed. The graphene is designed as one object. During the 3d print, the print will stop at different height to let the user add some electronics :
We also discuss the possibility of printing on fabric, or embeeding fabric within a print :
I look at different DIY way to make sandals, starting with people using tyres. Also, below is a snippet of a conversation I have with a friend from new zealand :

Well, photogrammetry is a thing. And
a few links from today :
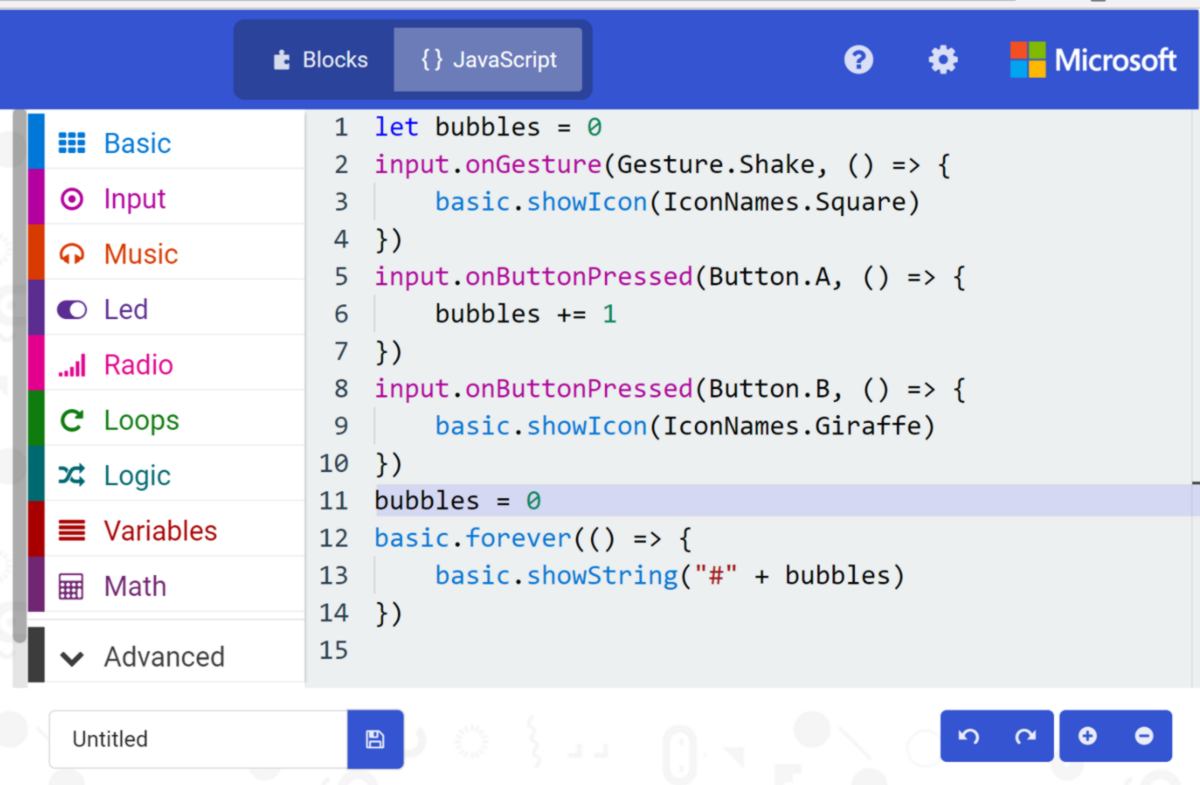
10.05.18 / Wearable electronic days. We get introduced to different conductive and resistant textiles and discuss about Microbit, a recent, open-source board for educational purpose. The "scratch-style" IDE is available here.
There are way more pins available that initially displayed, and can be accessed via a breakout board :
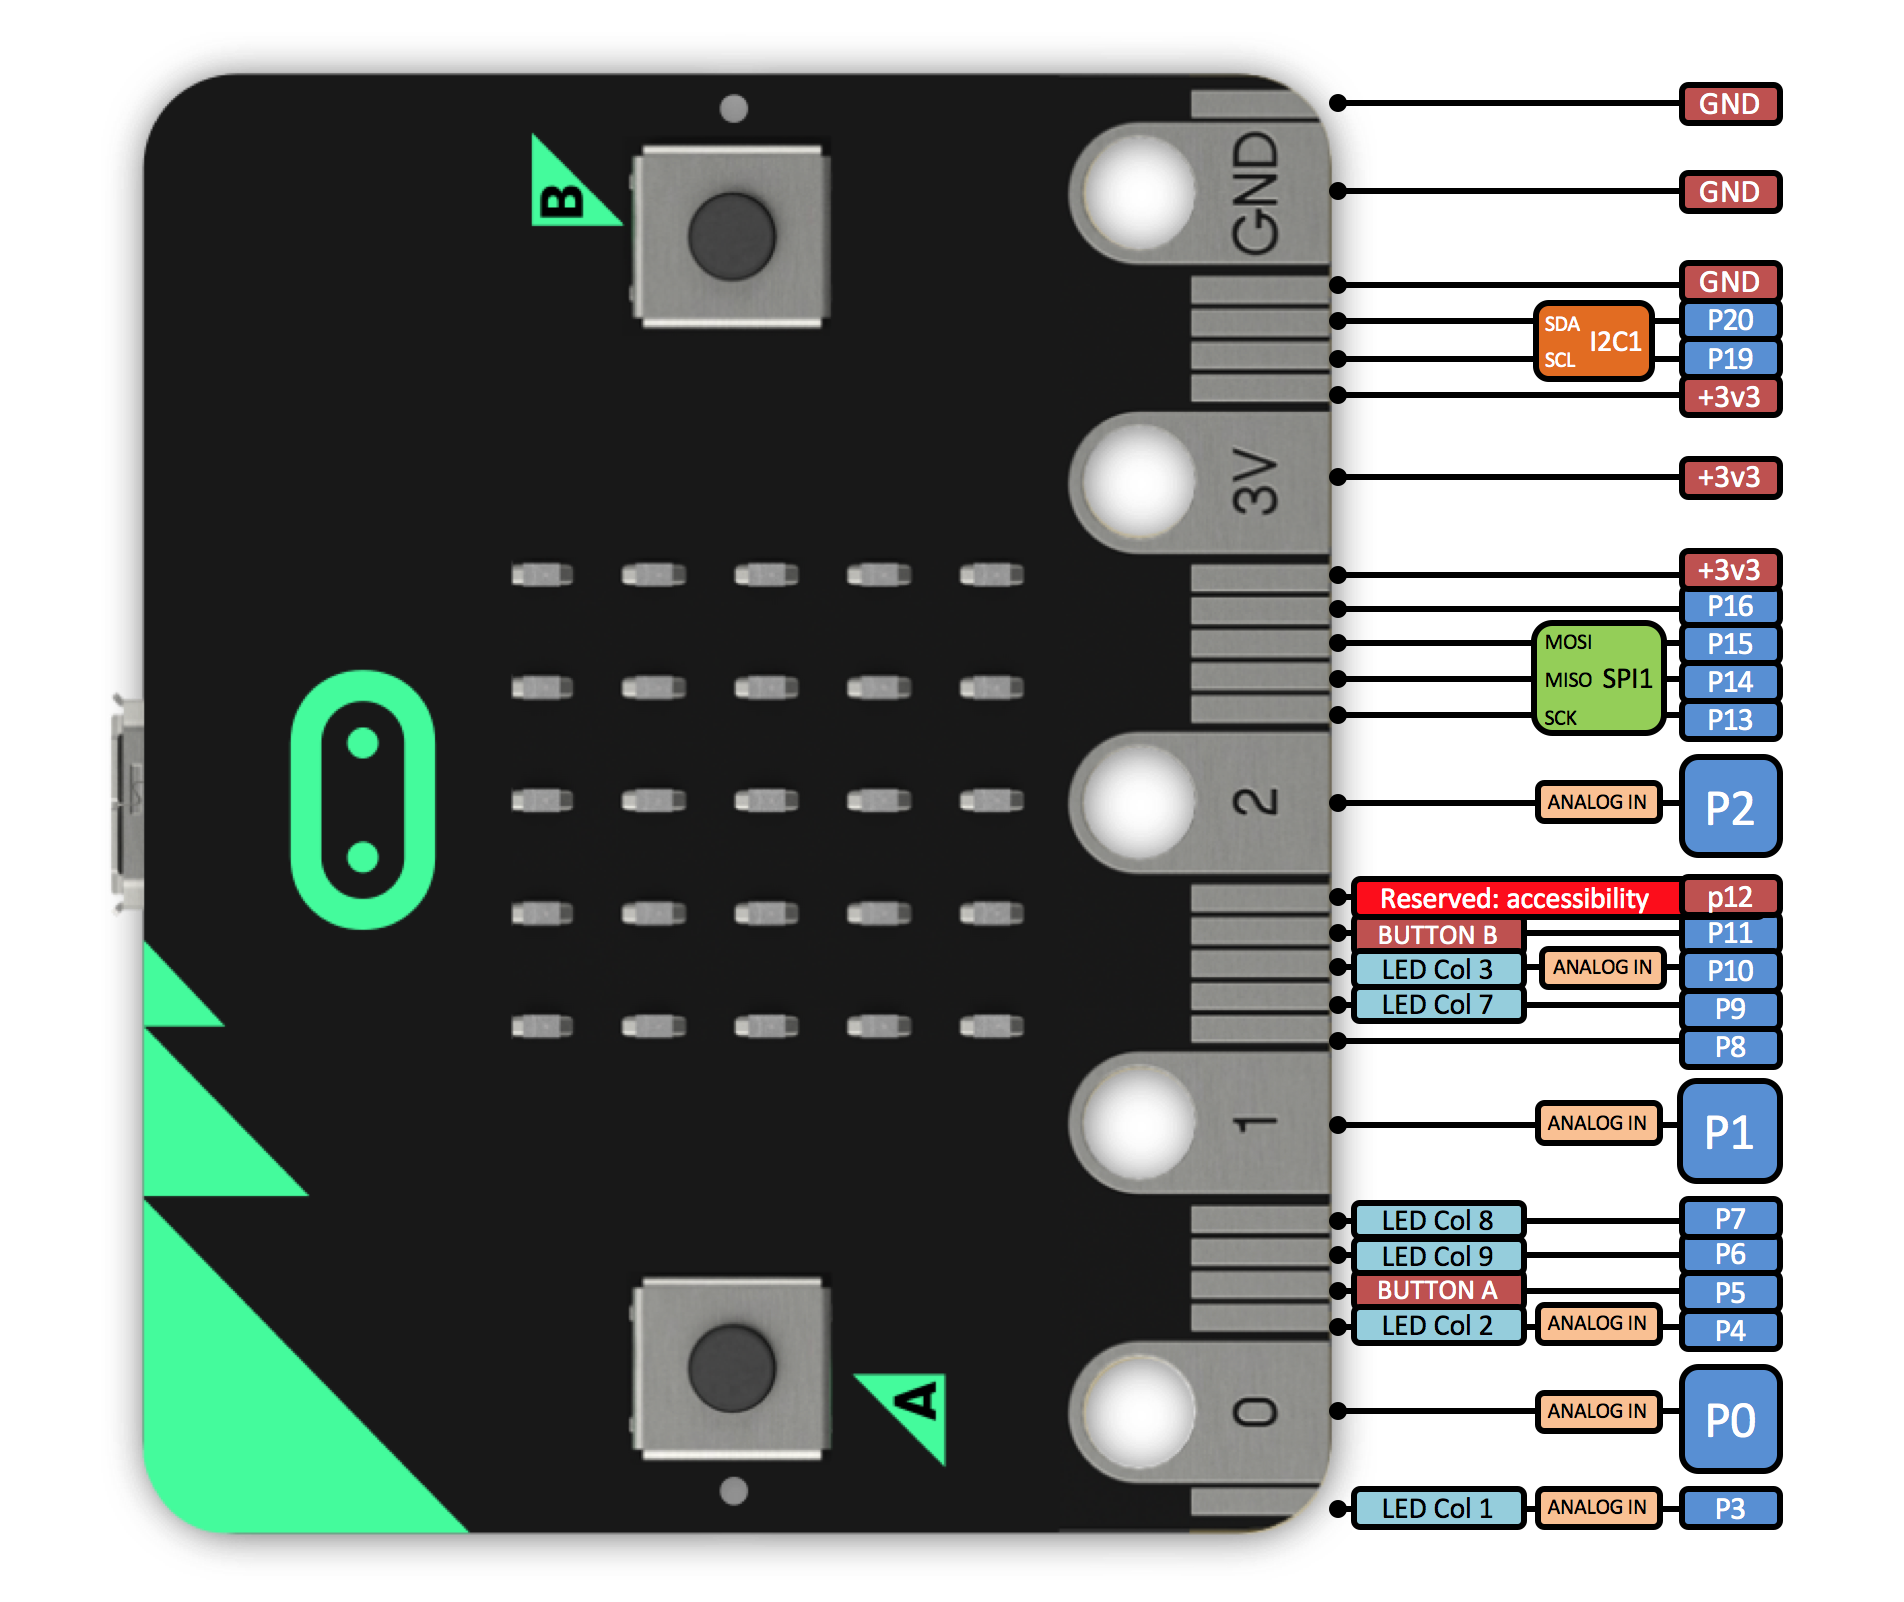
And the schematic is available online :
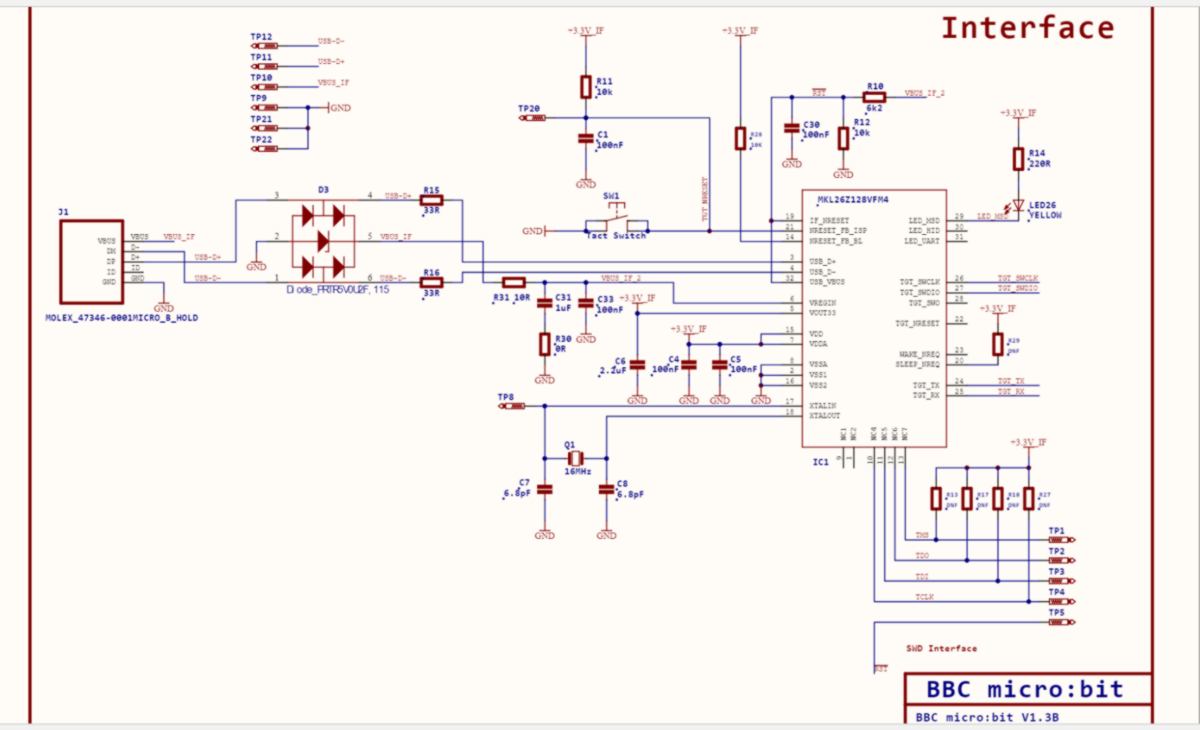
And the block of code can be translated in Javascript, and for professional coding, python can be used.
We get introduced to a wide range of product and material that are conductors, textiles, threads, ATTiny programmers, Lilipads:

After a short tutorial, we make our first pressure sensor using some noeprene and a textile which offers a variable resistance according to how much it is pressed. The general idea is that the closer the thread, the most conductive. We sandwich this material between two layers of laser-cut neoprene on which we have stiched some conductive thread, and apply some voltage :

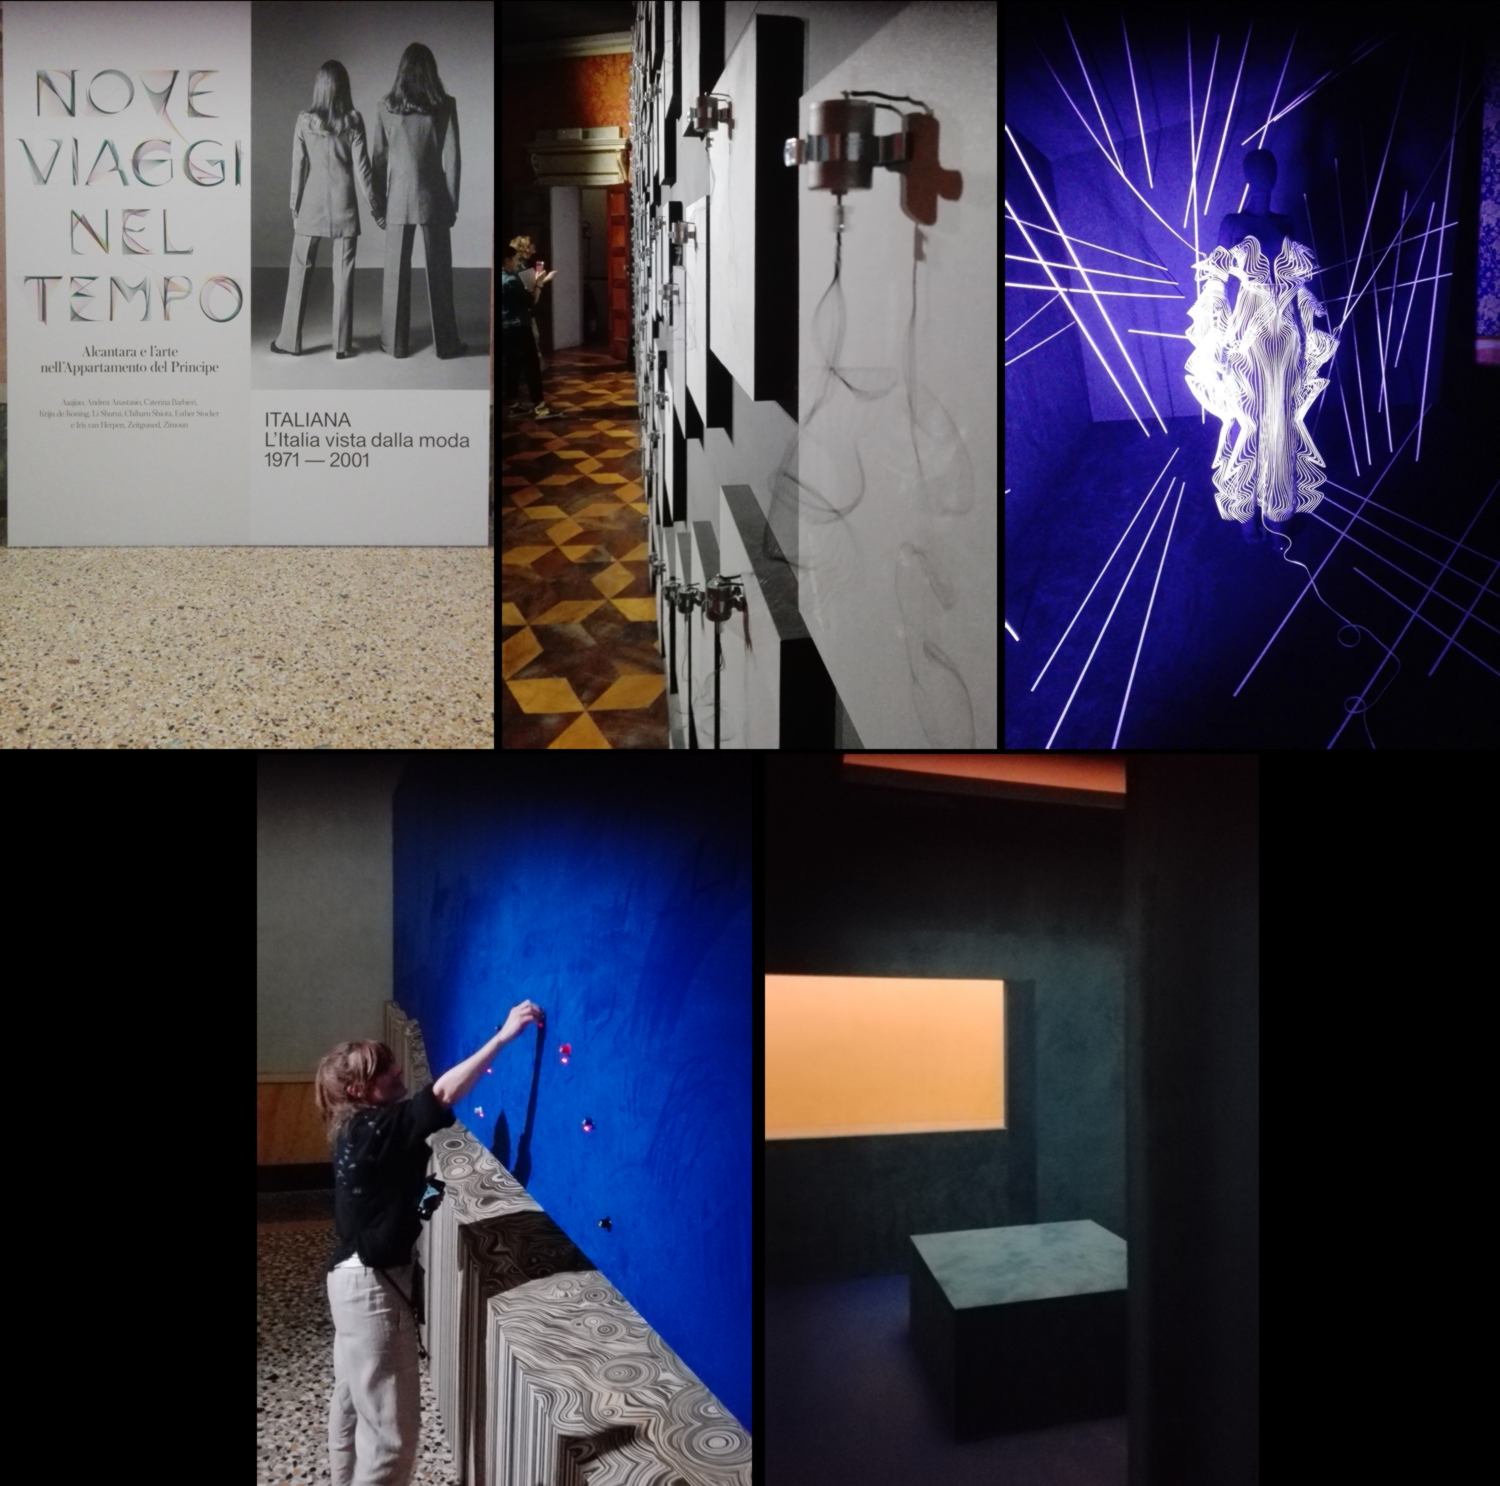
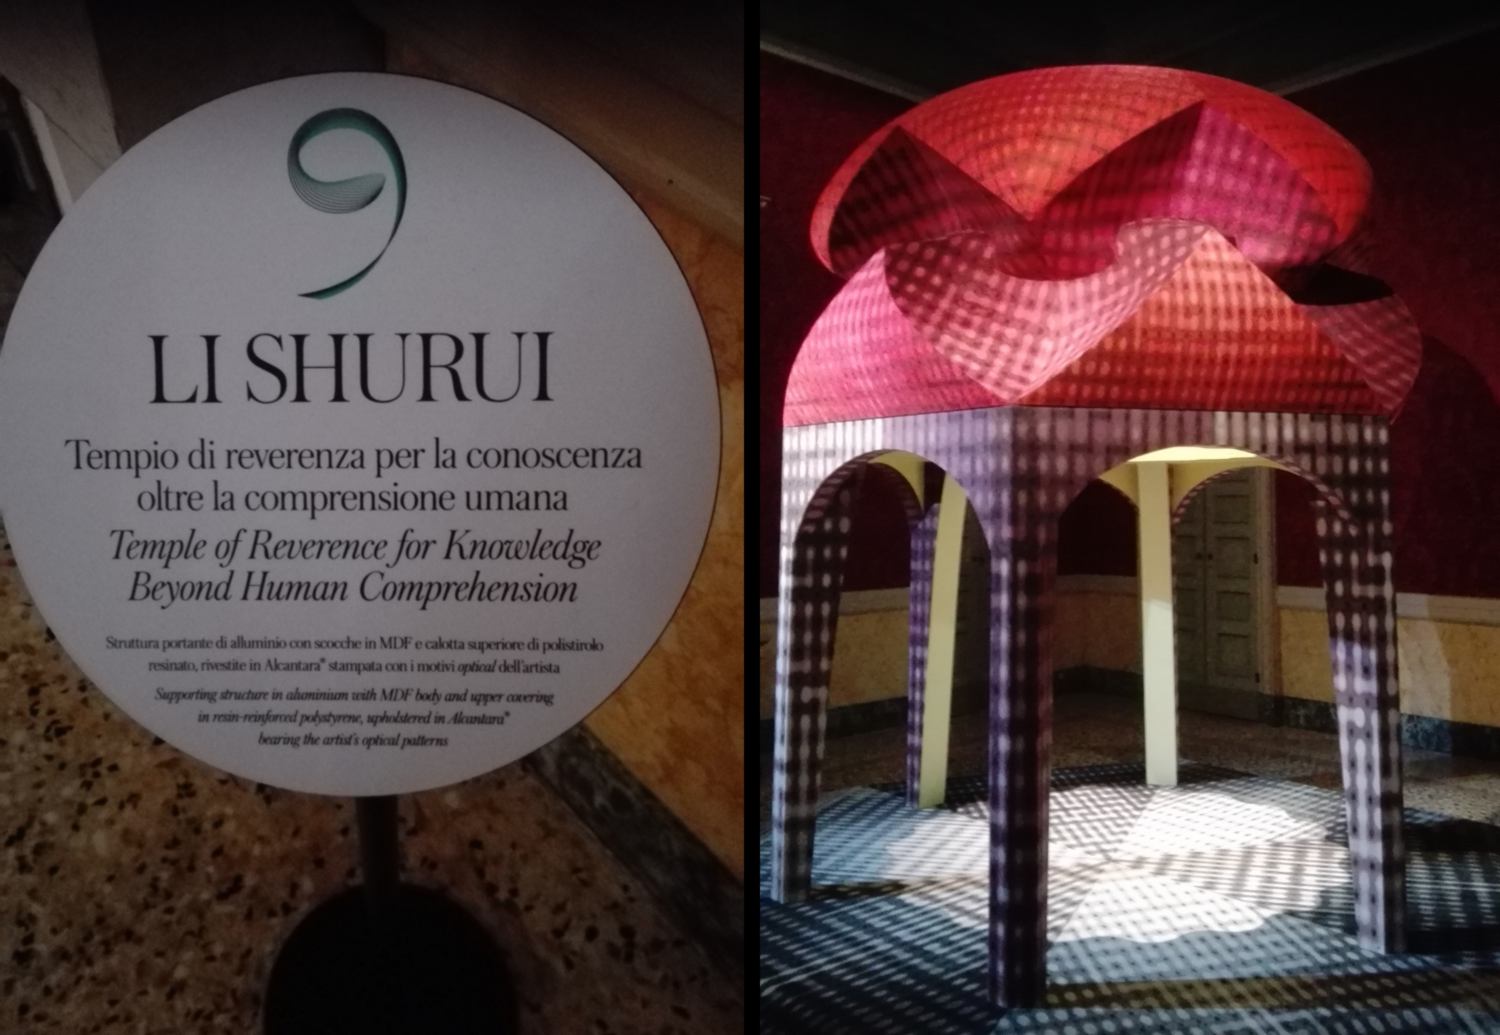
after a long afternoon covering the application of e-textile in the world of fashion with Ricardo, we head to a museum where different Italian artists have been experimenting with the same textile (representative of a part of Italy) and came up with completely different pieces :
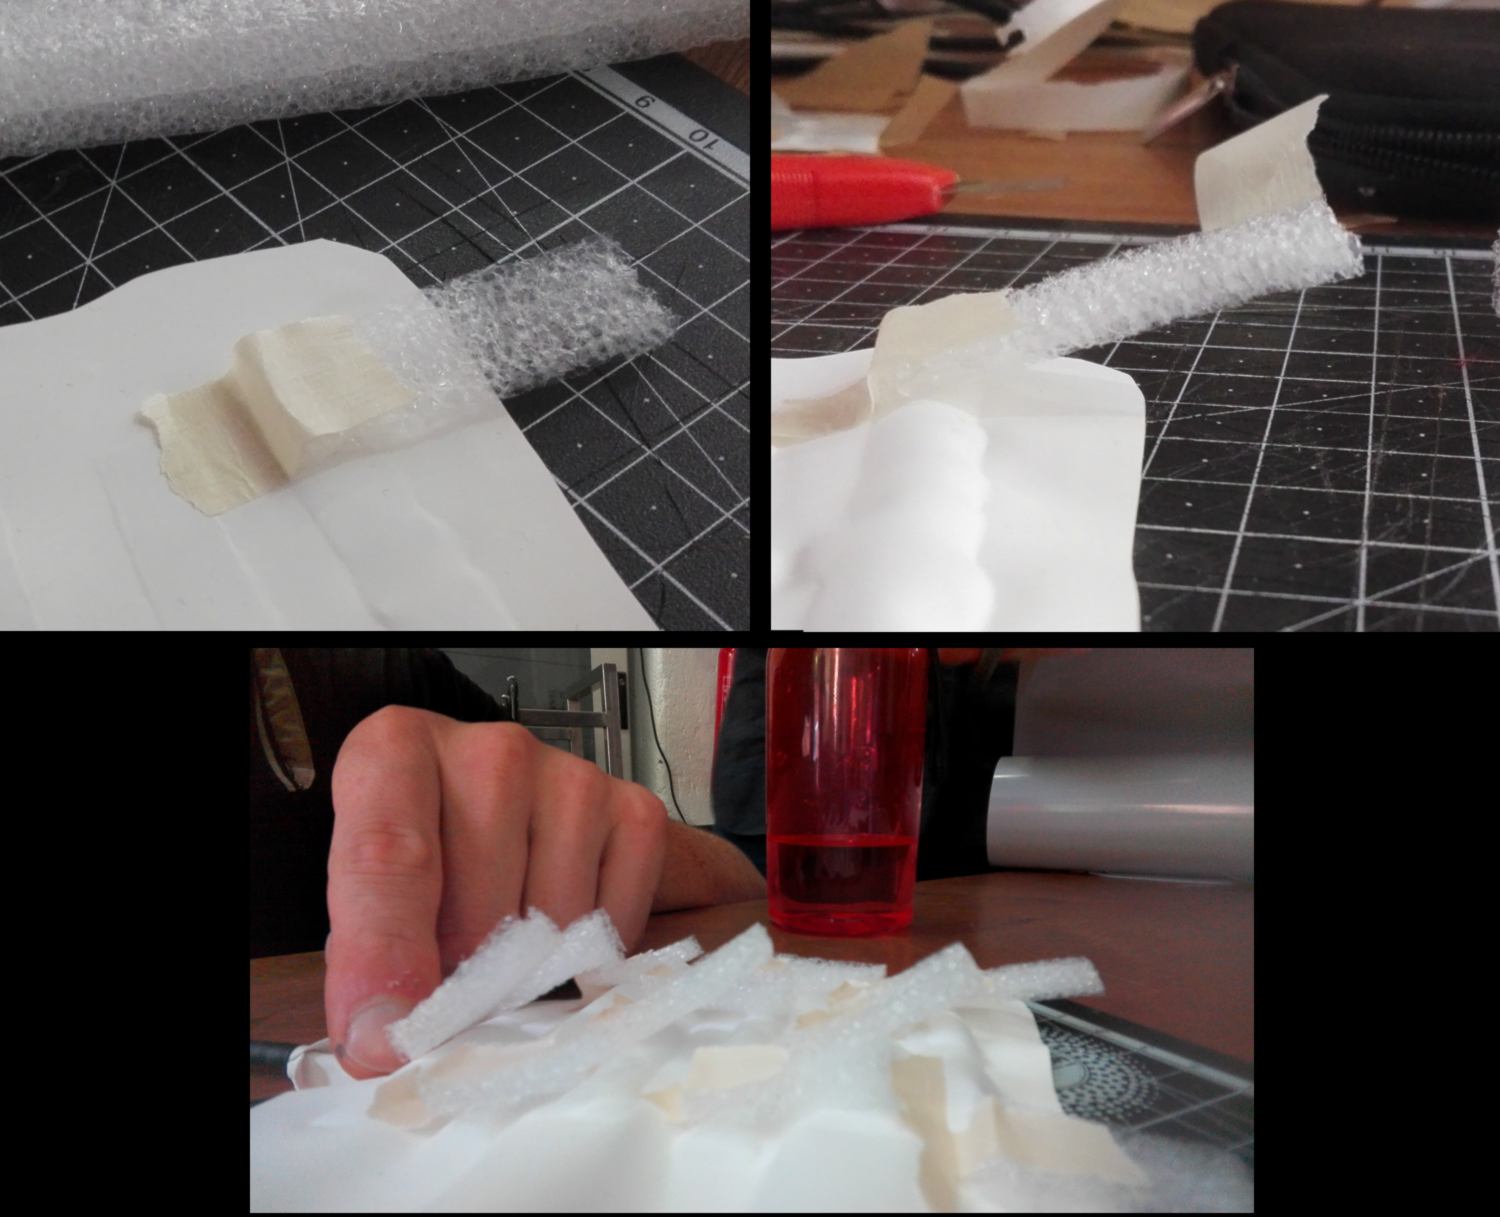
11.05.18 / Last day of the bootcamp. A researcher and former Fab Academy student from a Fab Lab in Germany presents her work in soft robotics and runs a workshop with us. By designing and vinyl cutting shapes of channels in baking paper, putting it between two sheet of vinyl for transfert and ironing it, we rapidly come up with prototypes :
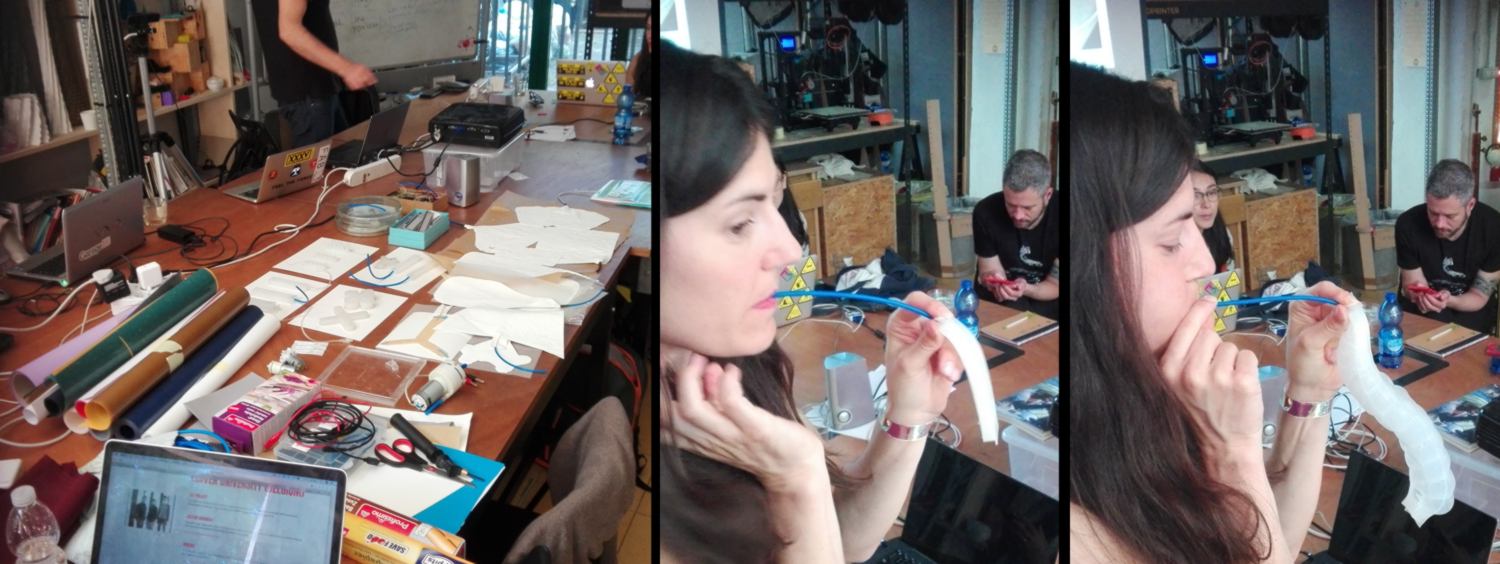

With the pressure applied, the material can take different shapes. Rather than focusing on giving the material itself a specific shape, I use it as an actuator to lift another material. I can think of two applications for such system :
At lunch time I have a look at the test-pieces of bioplastics which are finally dry. We end up with completely different visual results, resistance and texture according to what was added to the initial solution. The most successful is the test-piece which holds a fair amount of bubbles. I am surprised at how resistant the material is.
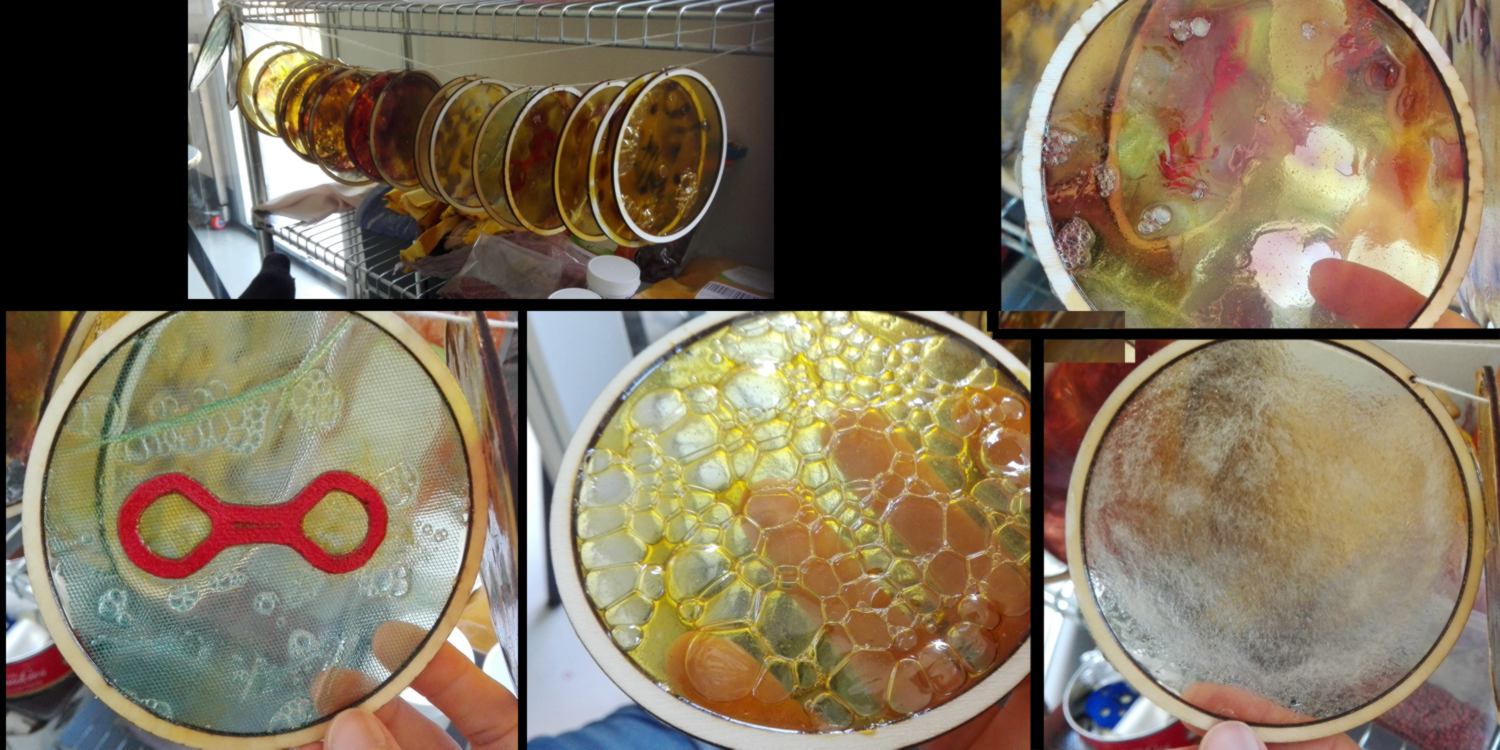
As a test I submerge a small piece of it in water. One hour later, the plastic has warped and thickened, and has become slimy. It has very little waterproofing capability. I guess used this way with no extra binder, It could become useful to design temporary objects (packaging?) which are kept inside. I am also curious to research how other biogredeable plastic based on corn and widely used in supermarket in Italy and France are crafted.
In the afternoon we begin a hackathon in group to come up with prototype for our project. In order to add some electronics, we come up with the concept of "shock" : a Shoe which provides a gentle foot massage when the user put her/his/their heel on the table. We are using the pressure sensor located on the back of the heel, triggering the mini-vibrating actuators.
While the rest of the group works on the textile design, I focus on the electronics, writing a bit of code and prototyping the PCB on a breadboard. I end up using a transistor to send power to the actuators (the voltage delivered by the pins is to low) and a pull down resistor to receive a clean signal from the sensor. I also use for the first time some old school capacitor, gathering what I can find around the lab. A bit of soldering to fit some male headers to the Microbit and we get the first draft:
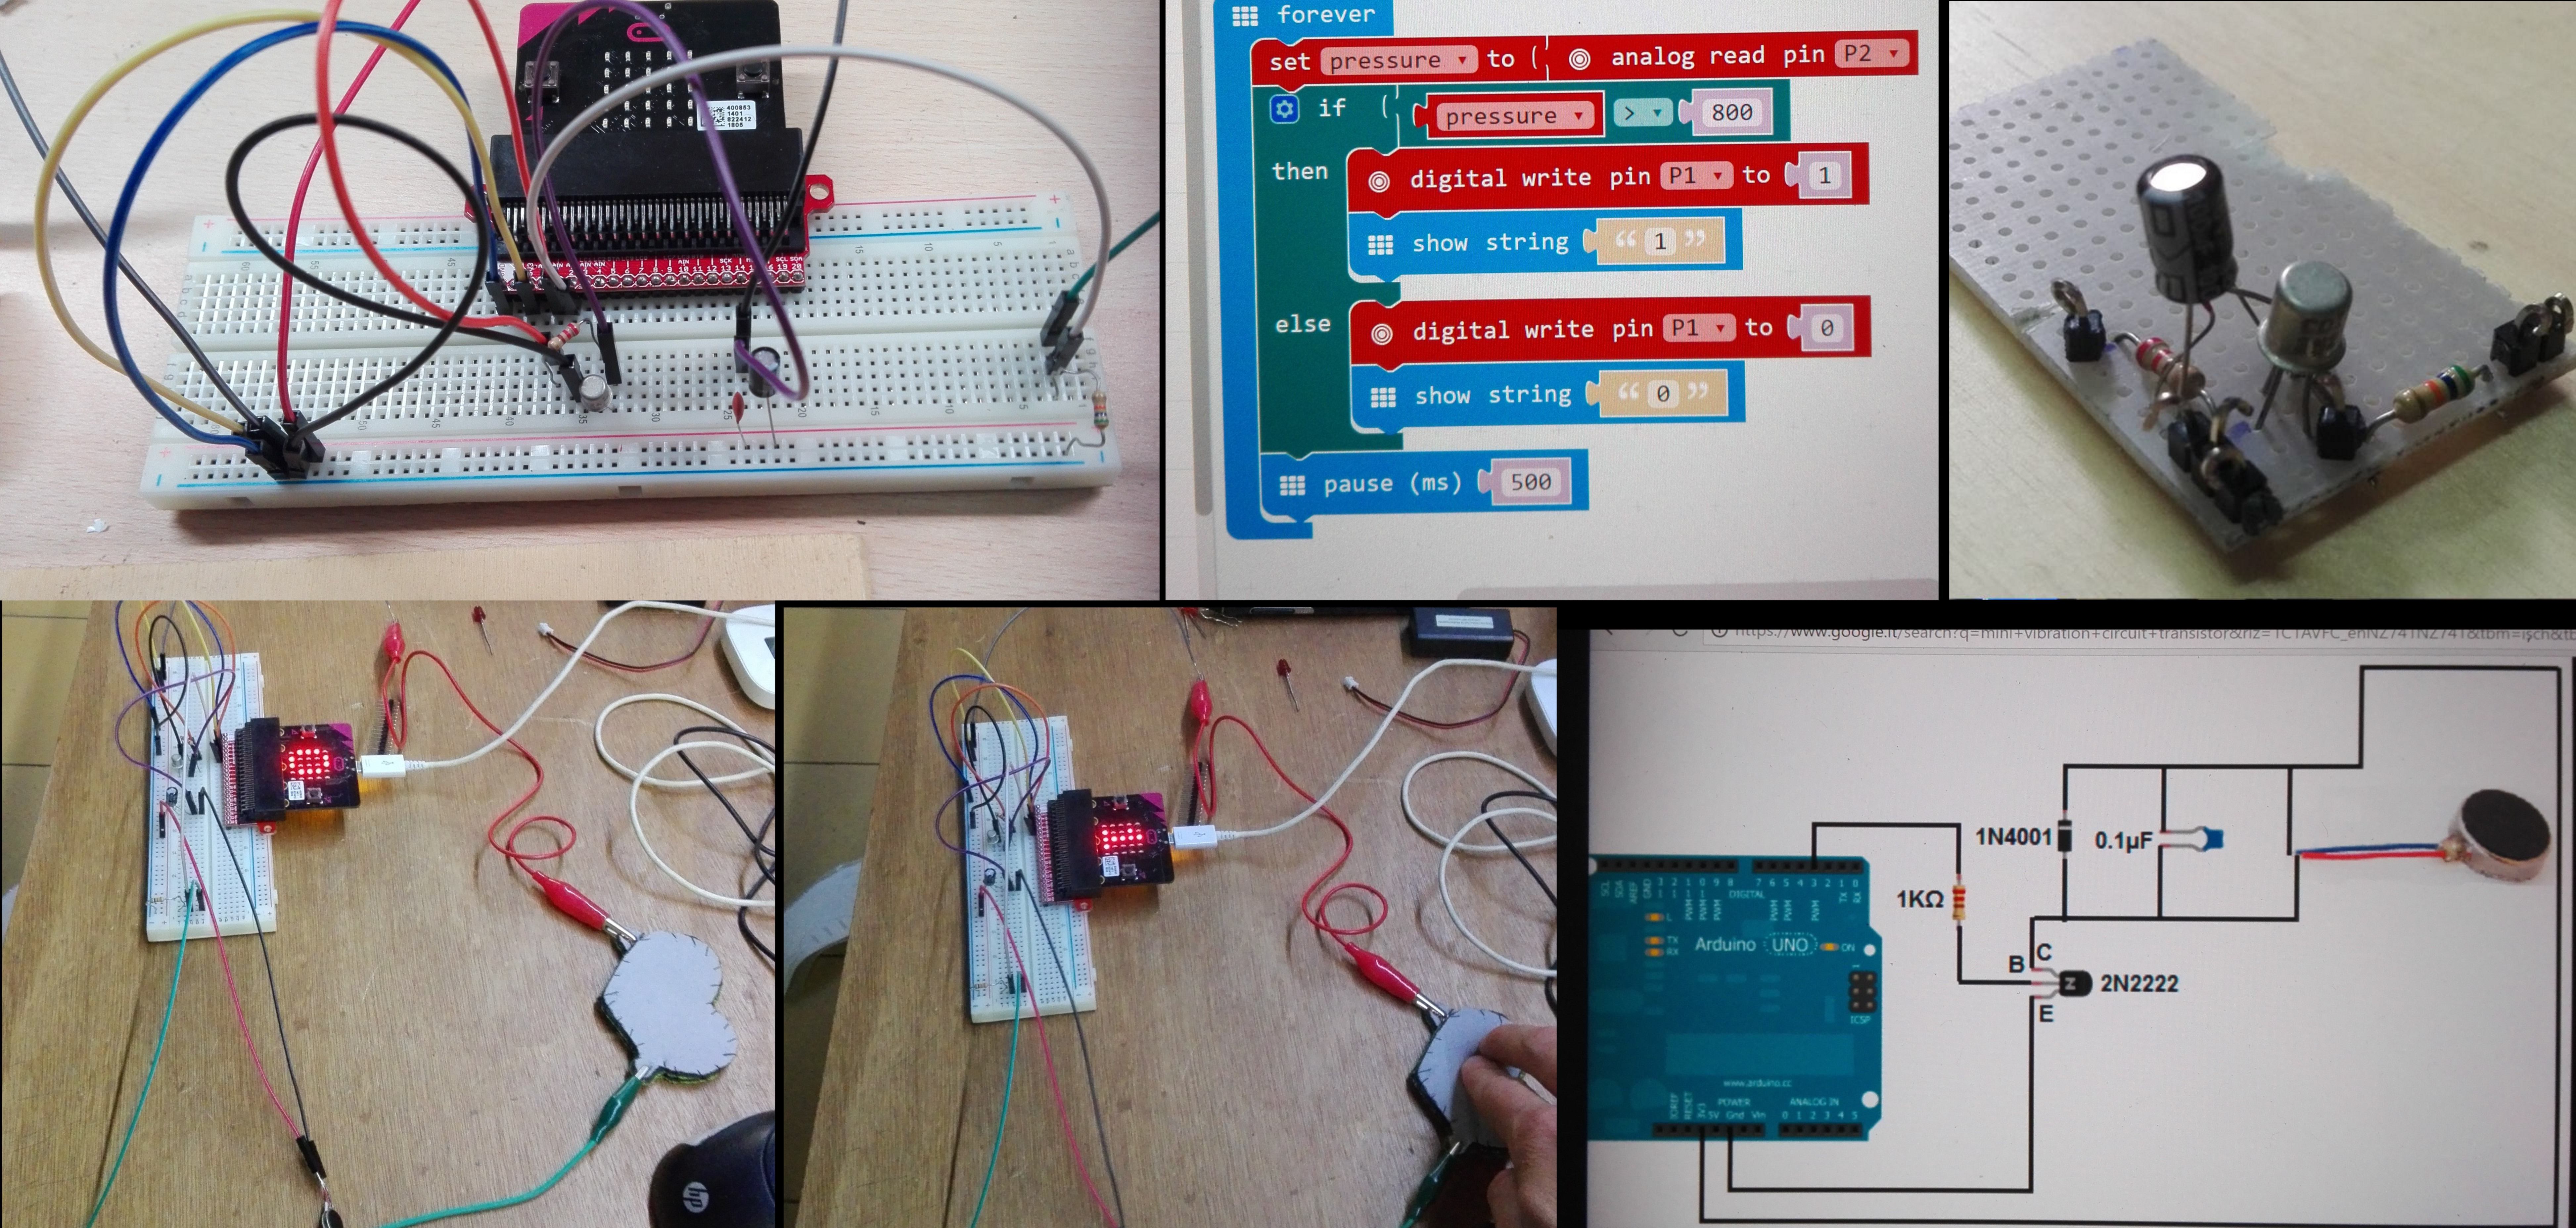
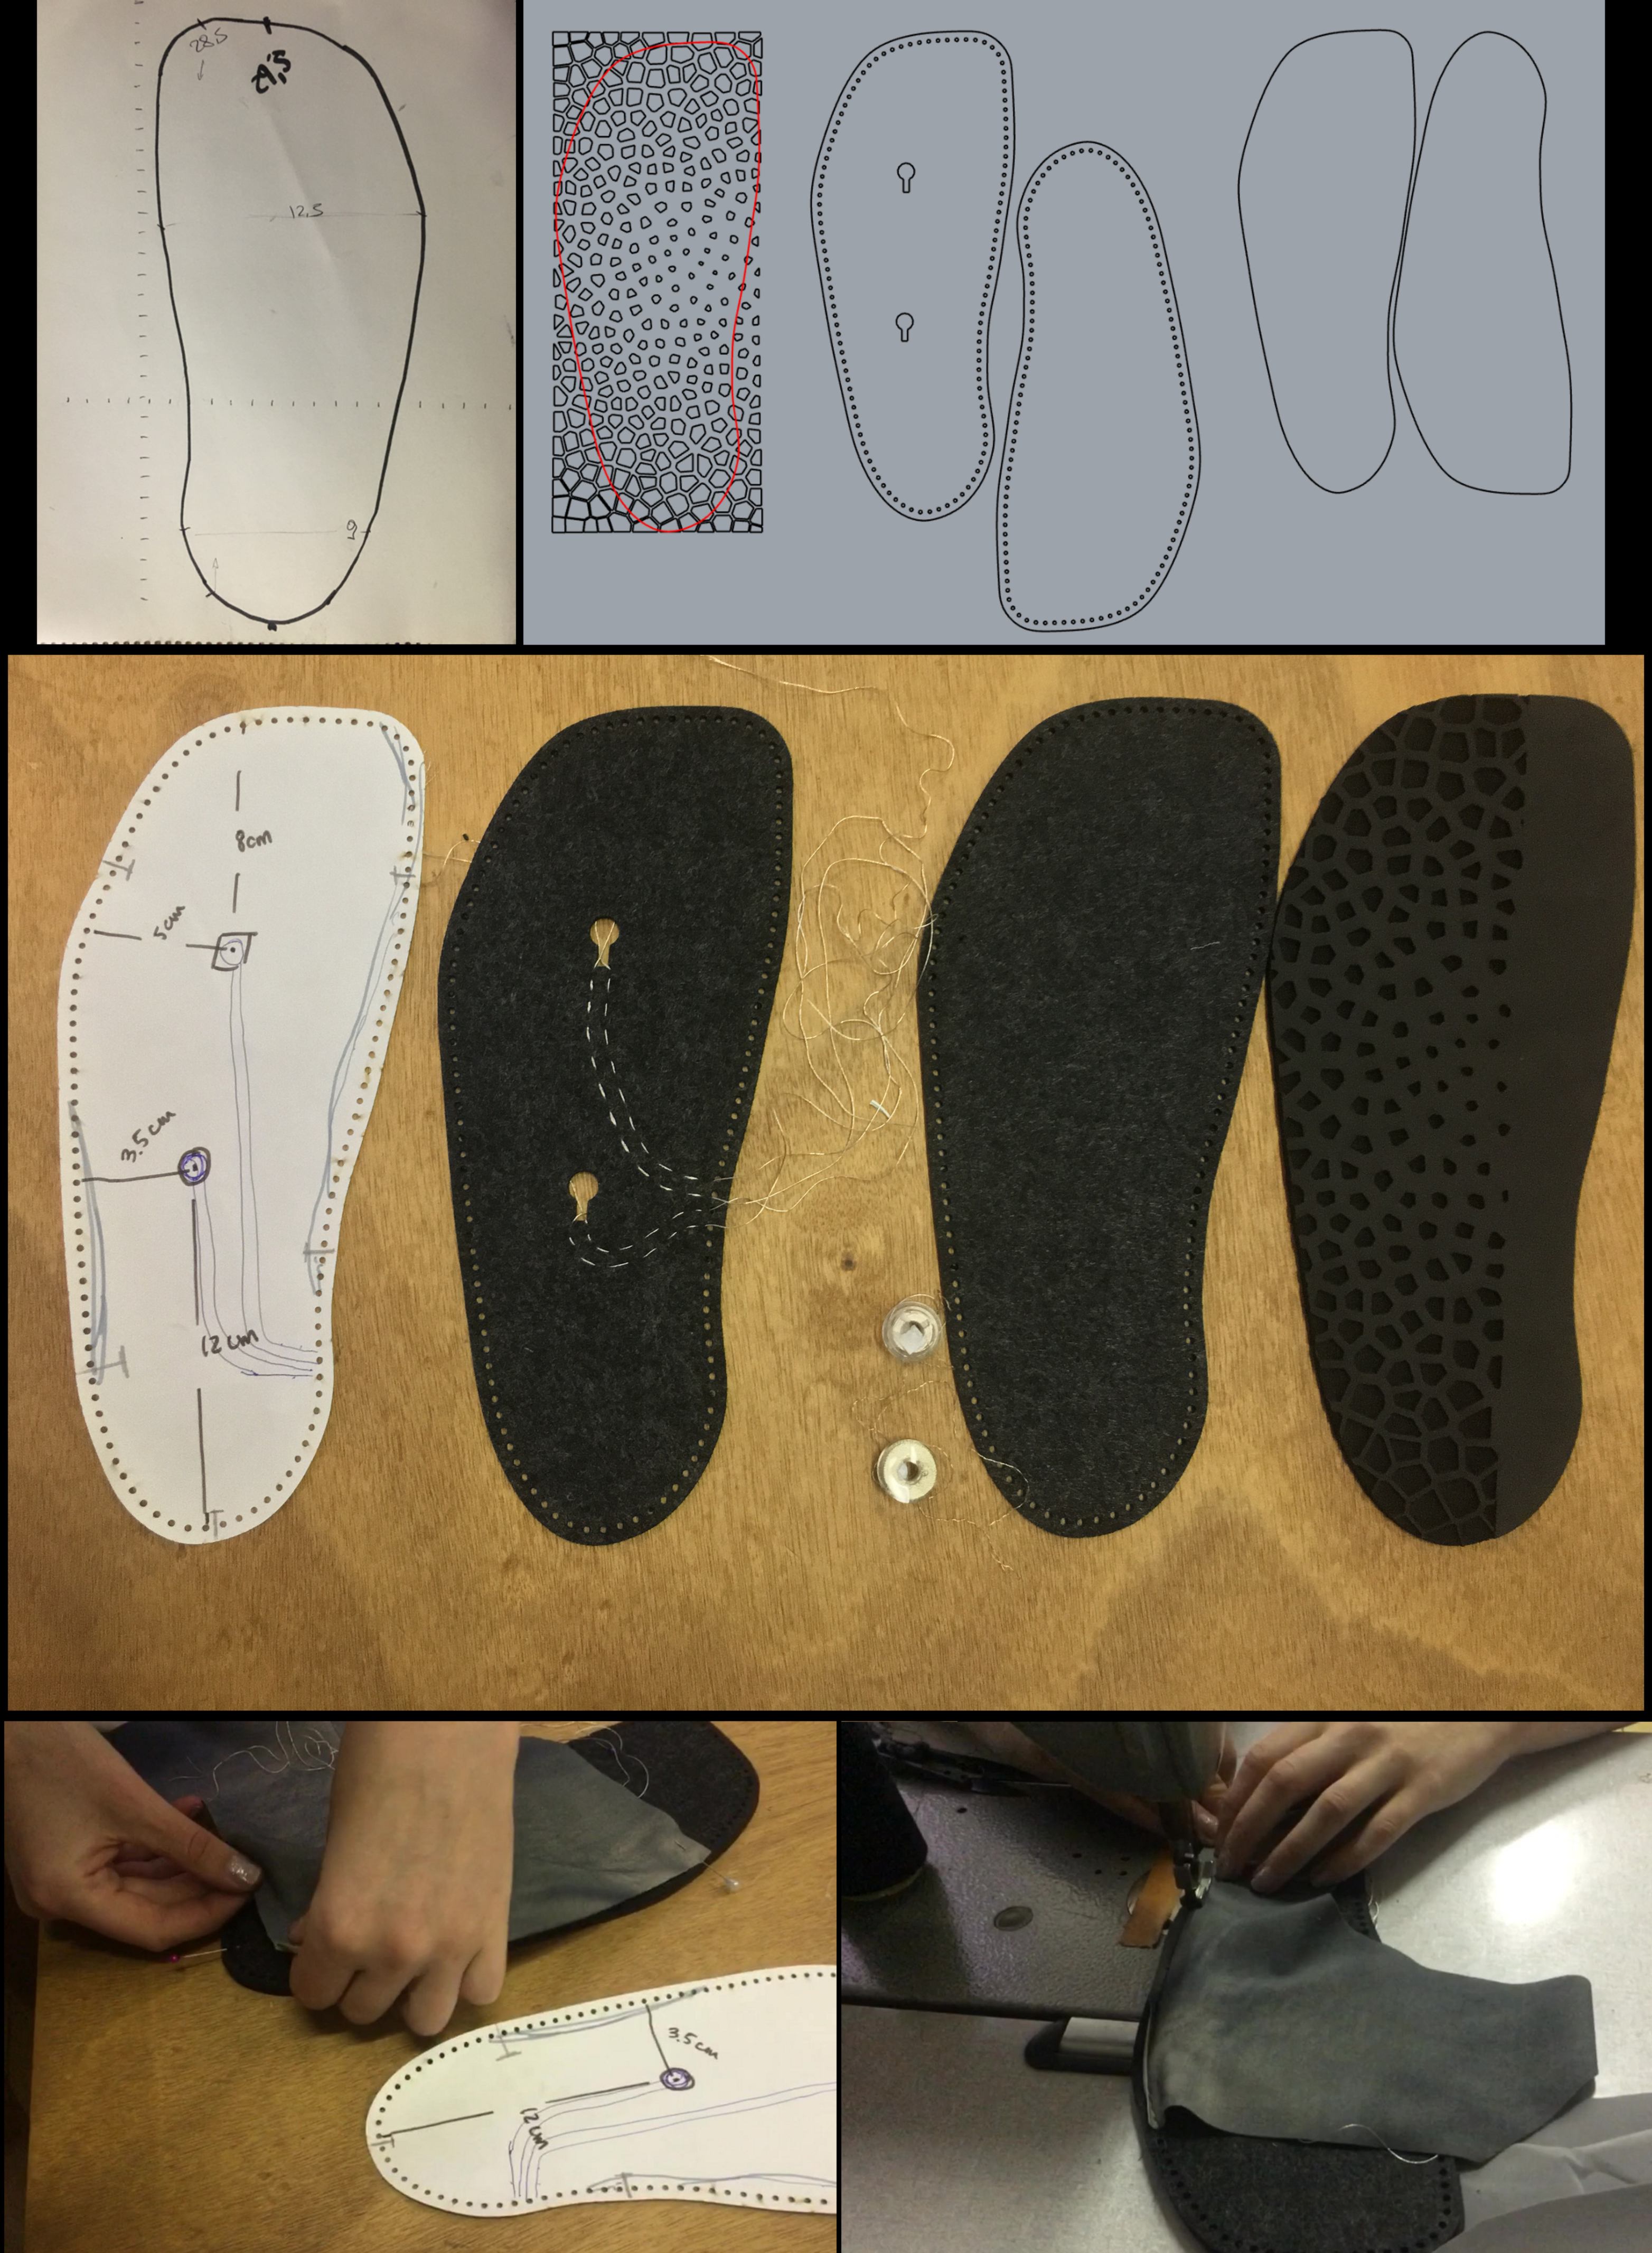
Now the challenge is to fit it all into the sole. To accelerate the process I decide to directly solder my components on a perforated board. Initially the idea is seducing since I do not have to look for SMD parts around the lab, but eventually this choice seems less and less like a good idea.
I must admit that I am drained. It was a great but long week. My brain is in sleep mode, and translating the PCB design from the bread board to the perforated board is painfully difficult - much more than drawing a sketch on Eagle would have been (lesson learned). I finally get to put everything together, and with no time to sew it to the shoe, we gather all the components on the table for the final presentation :
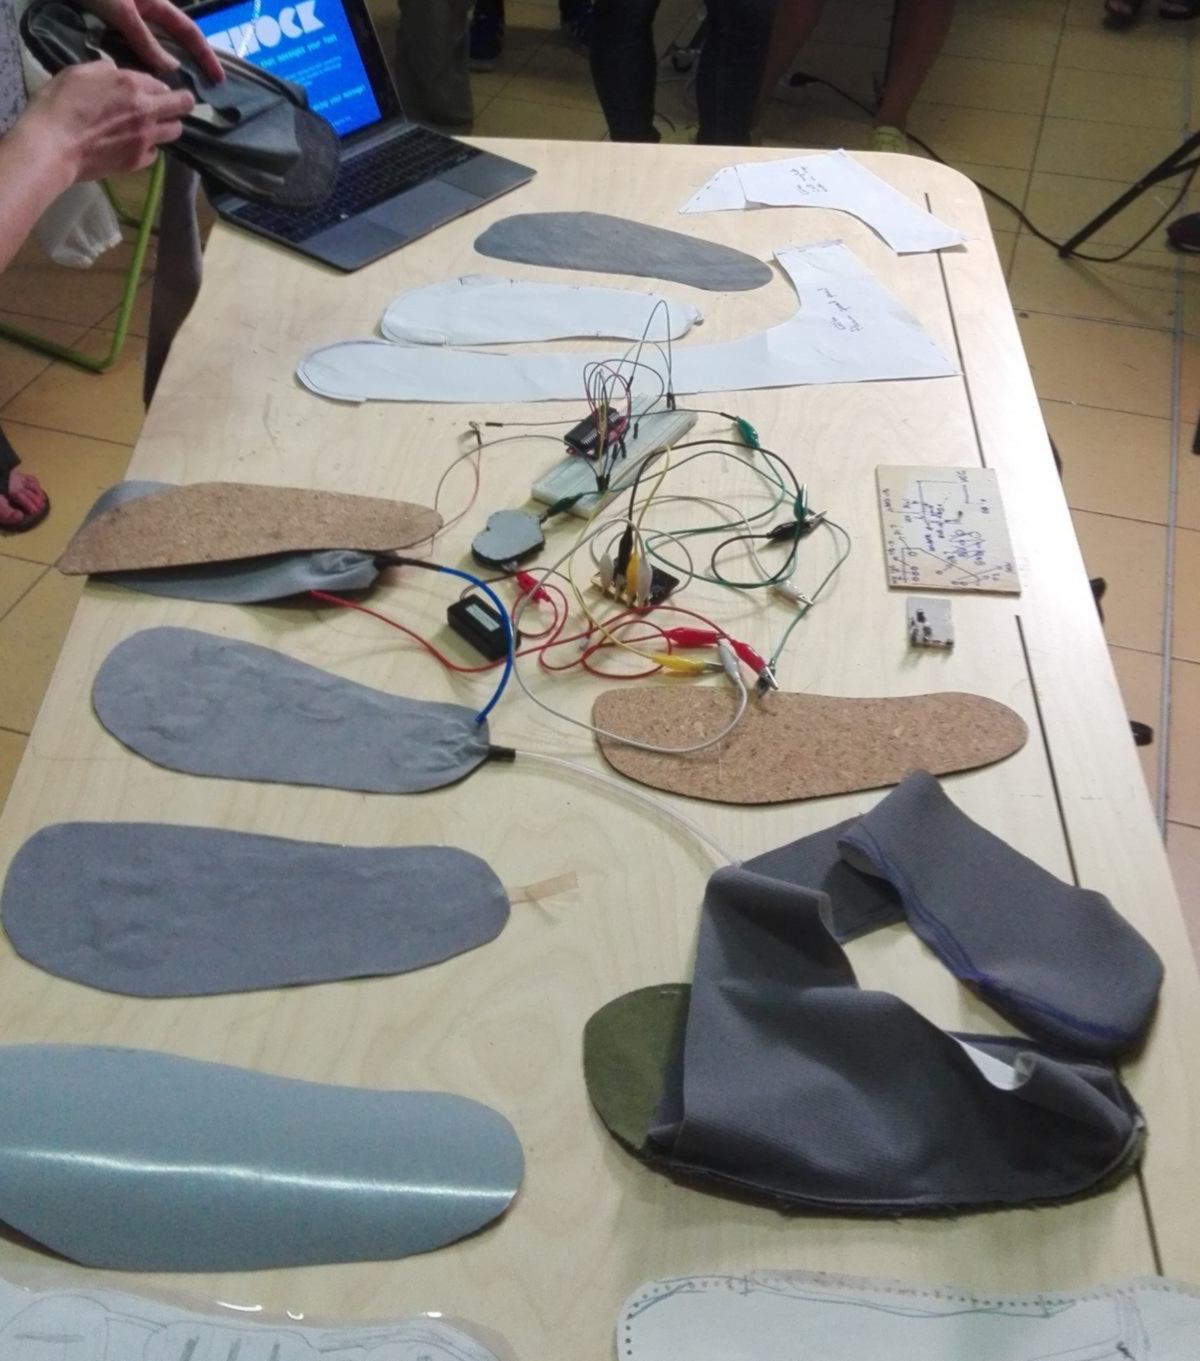
This hackathon did not enable us to fully finish this project, which I consider my main project for this week. You can find the design files (rhino) and other references here. I was unable to track down the exact type of material used by the rest of the team, however if you are interested in replicating this model I will happily get these pieces of information for you.
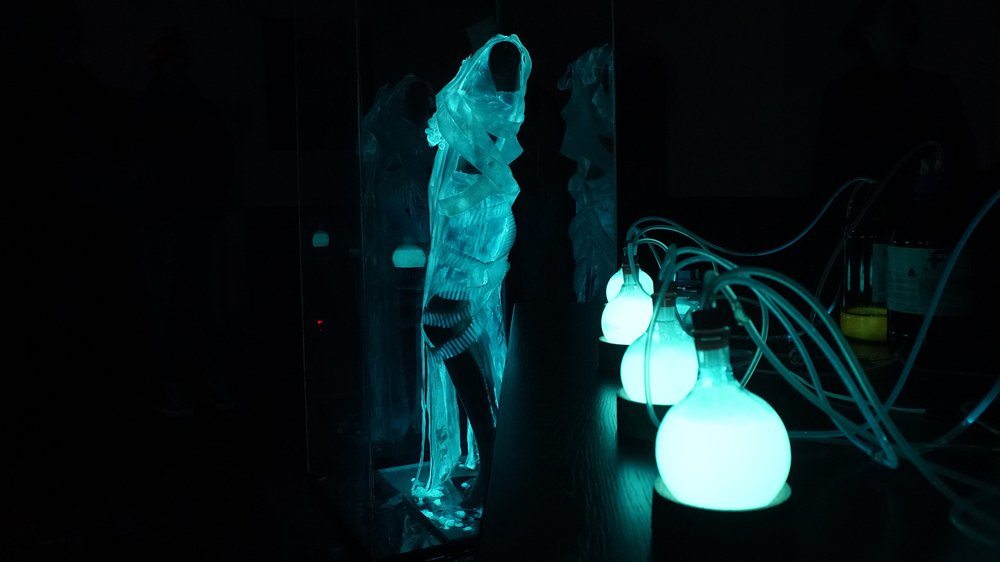
This conludes our bootcamp, and the wildcard week. I leave you with the last picture that I took on that afternoon. Remember the cristallisation process?
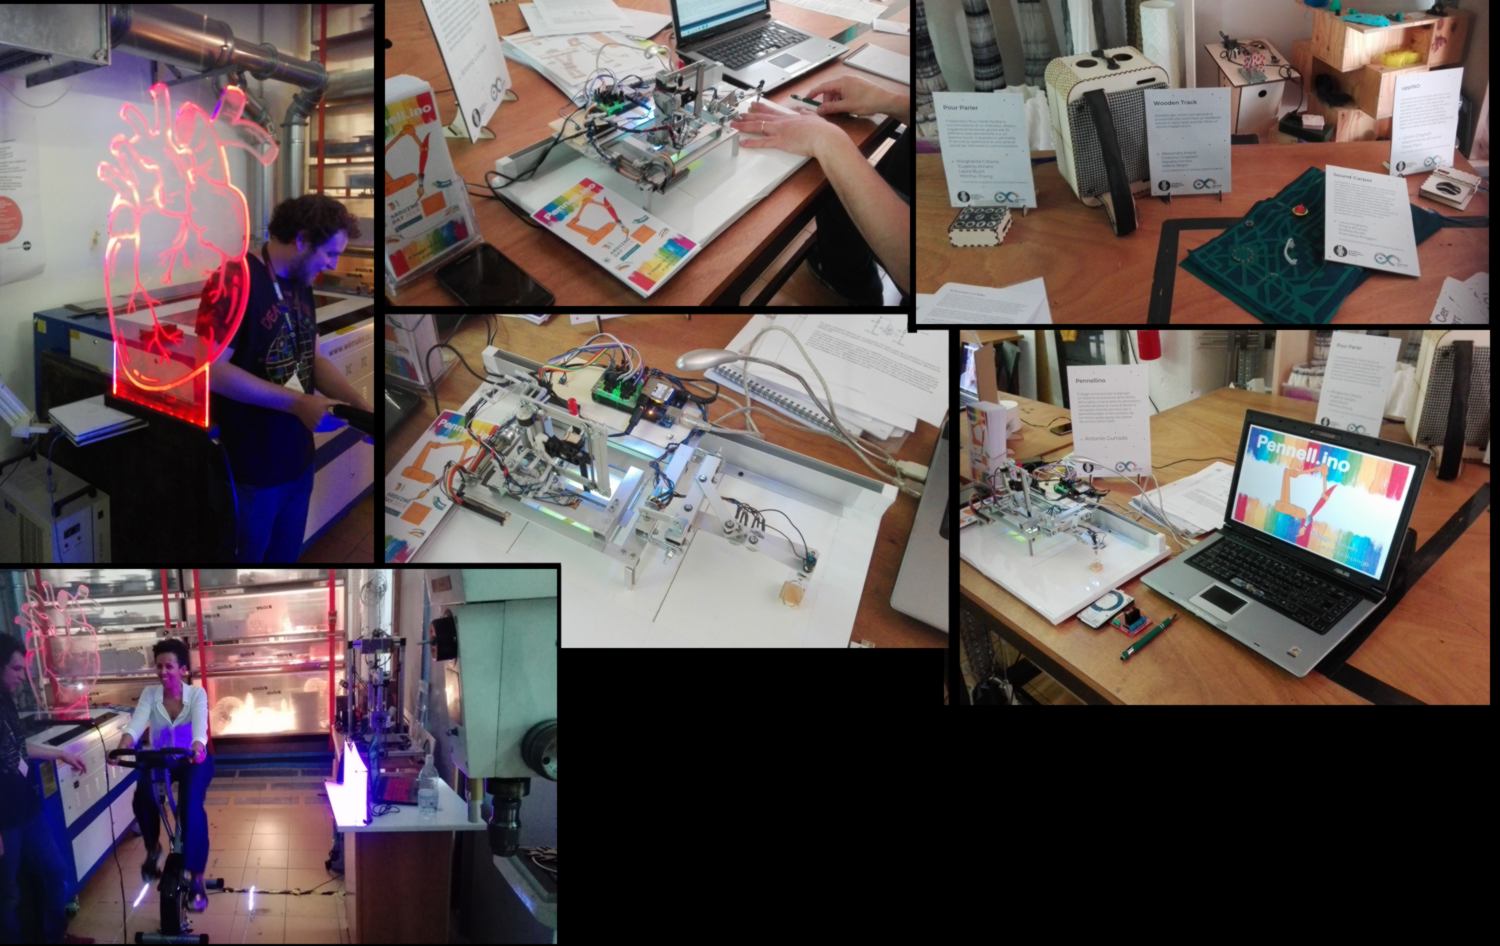
12.05.18 / International Arduino Day! The lab is packed with tables where all sorts of projects are showcased. One machine is a drawing machine, but specifically designed for people with disabilities : the machine supposedly expands the motion of the finger of the user. I won't get a demonstration sadly.
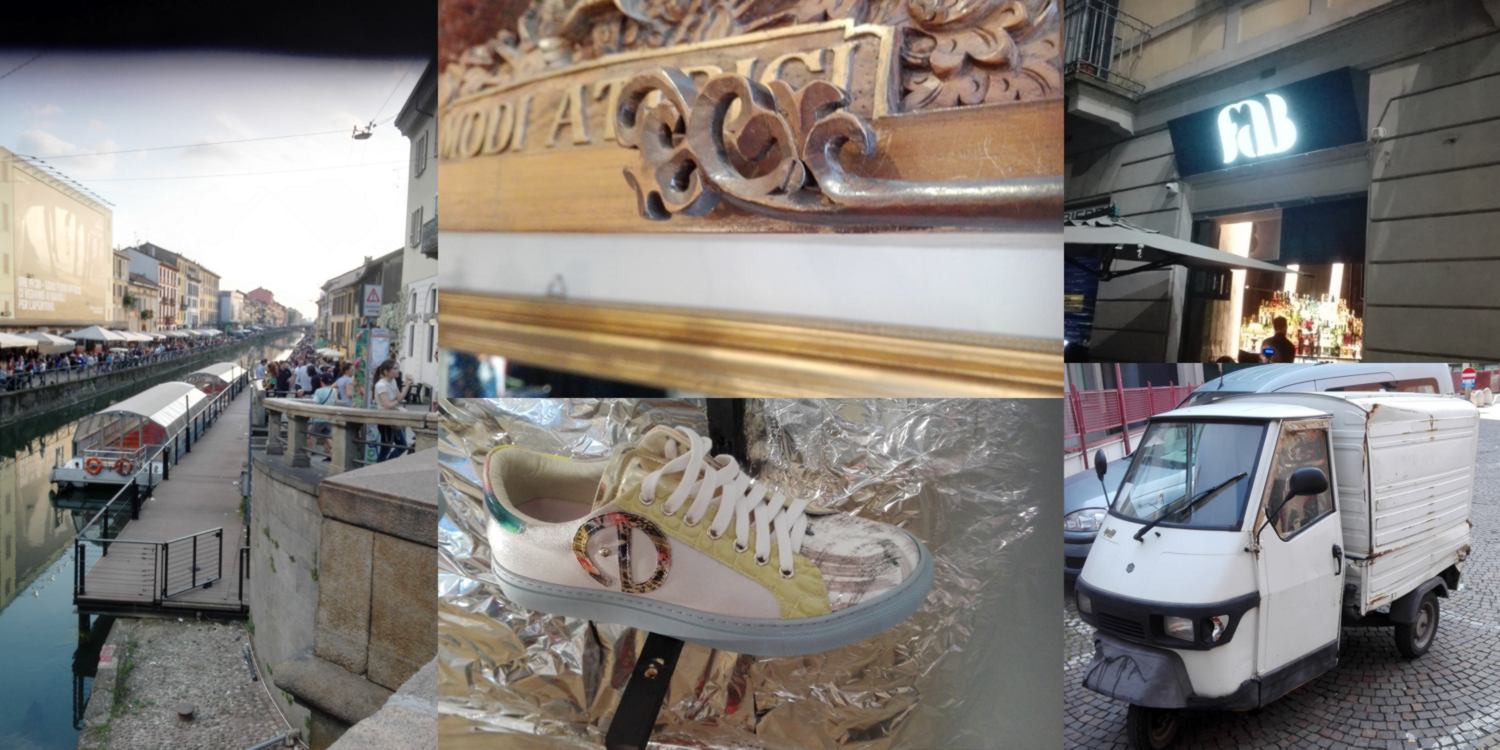
The rest of the day is a stroll through the city, appreciating the cultural appeal of Milan :
I am also looking at assembling several files in Fusion 360 as well as using selection sets for my final project.