Final Project
Oops I Did It Again
A curtain that insists you leave
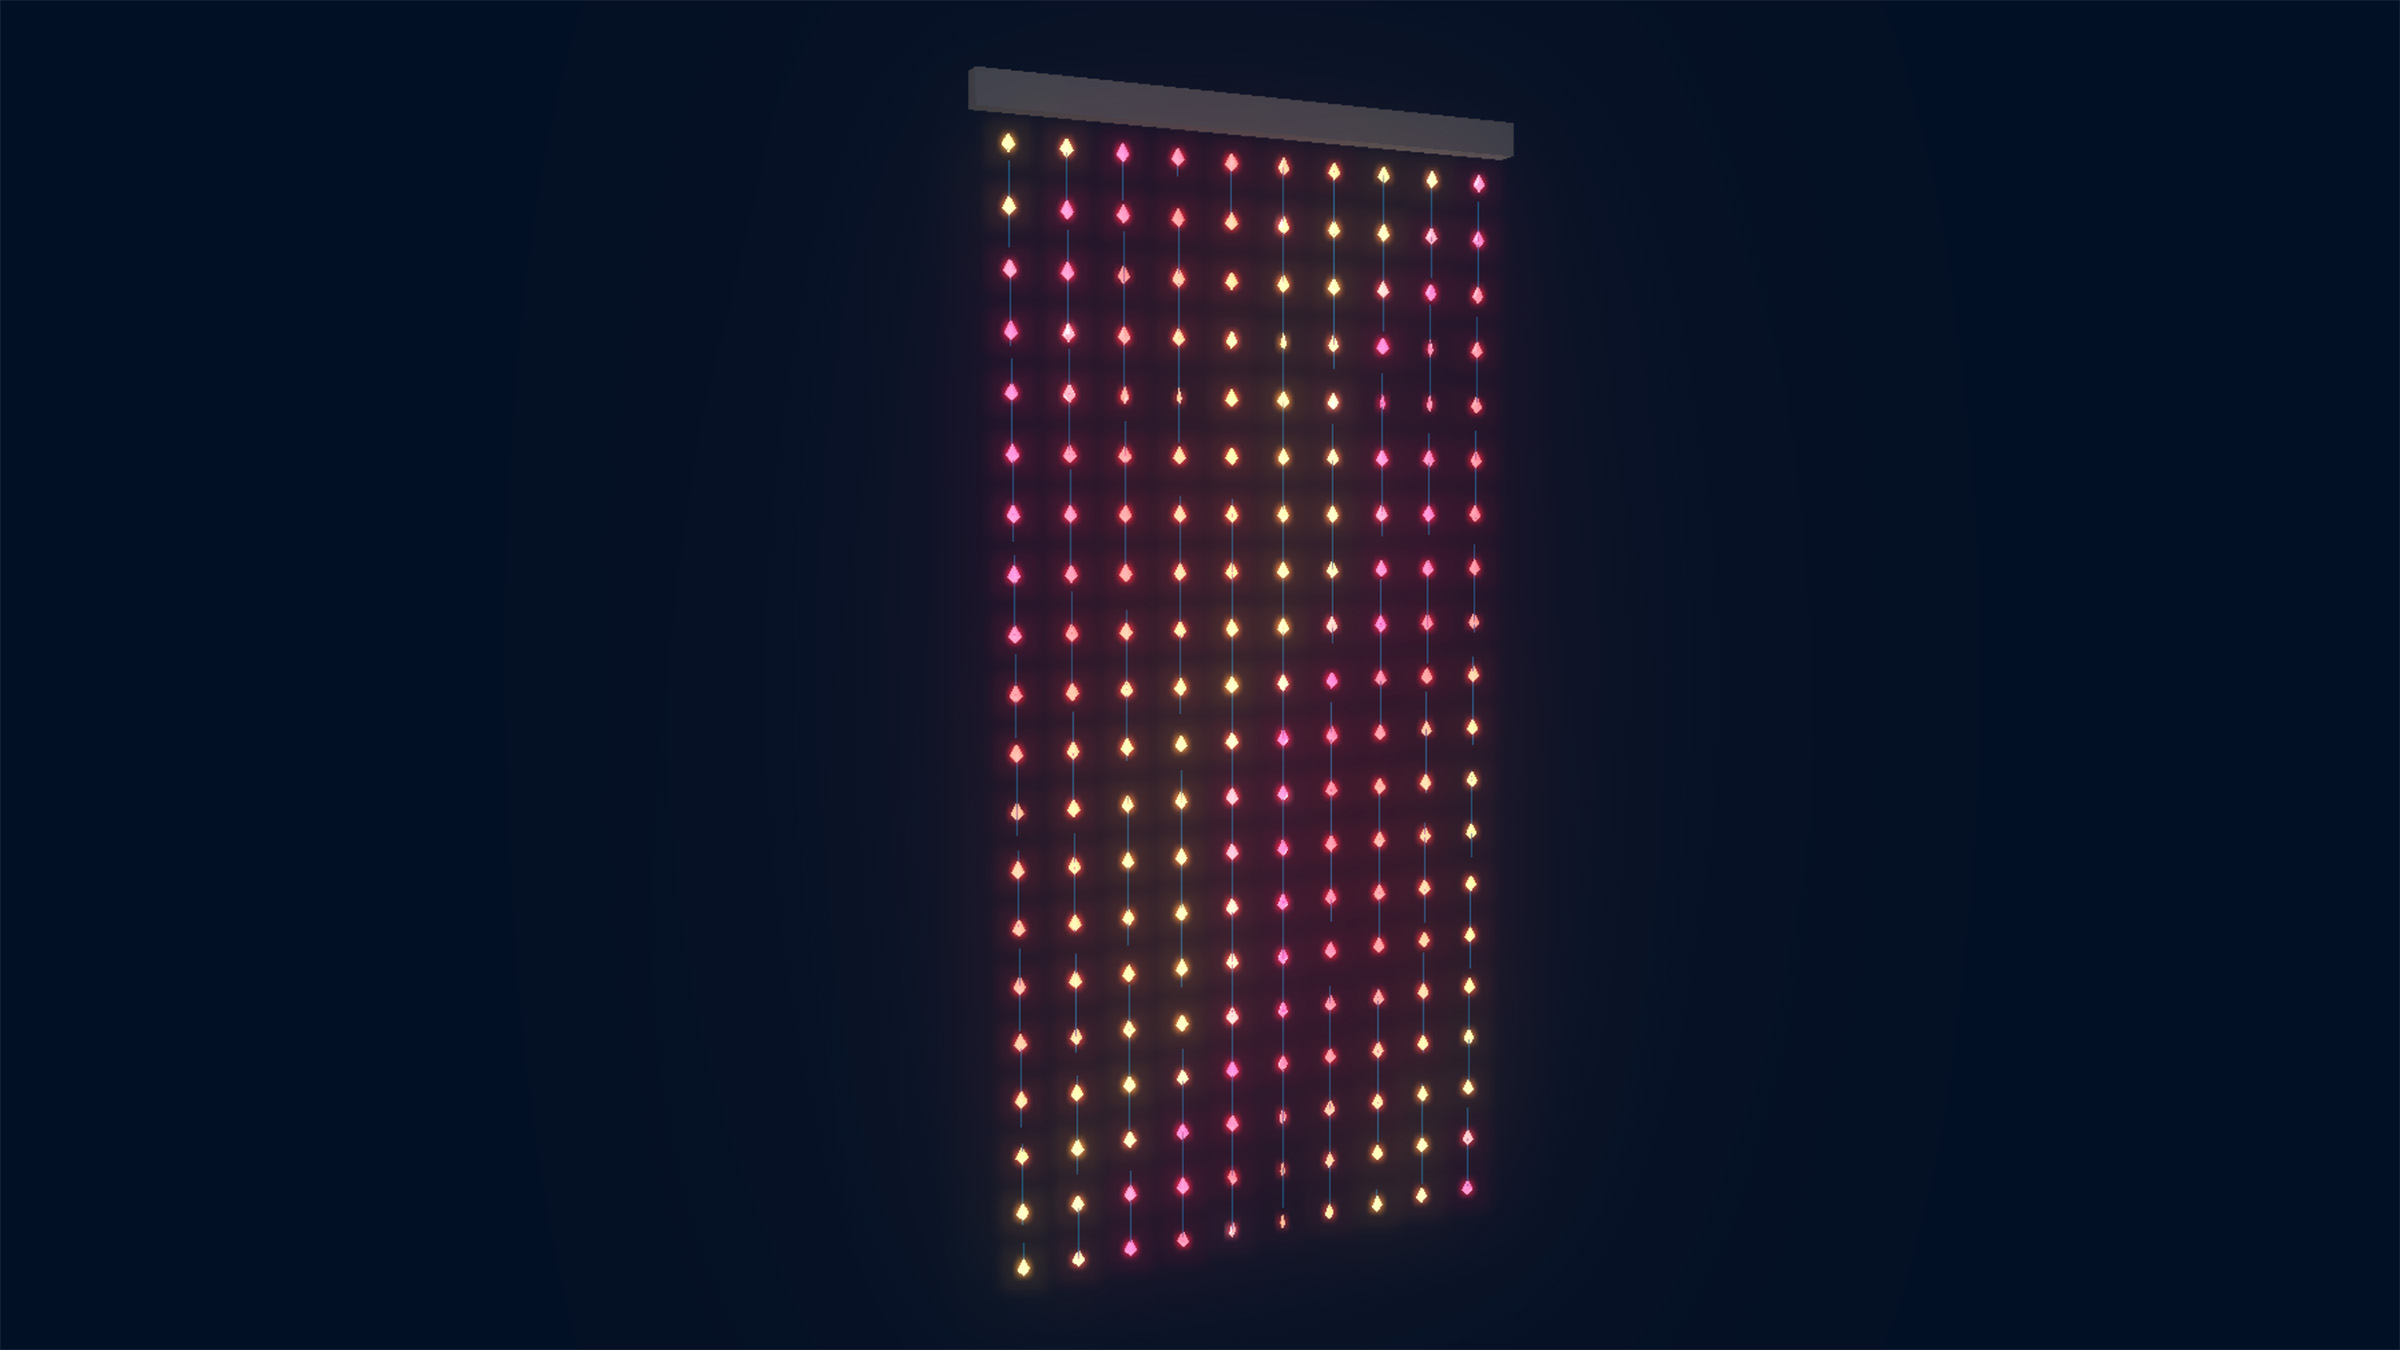
Oops I Did It Again is a curtain that nudges you to step away when you’ve been in the same space for too long. It’s built around the experience of getting so absorbed in a project that taking a break gets pushed aside and self-care is neglected. When timers or notifications are often simply too easy to ignore. The curtain first is calm and easy to dismiss, but over time it becomes more insistent, shifting from subtle color changes to increasingly intense light patterns until it’s hard to stay put.
It takes the form of a 90s doorway bead curtain, pulling from personal childhood memories of early prized possessions, bought with scarce money, when objects felt important and worth protecting. That familiarity gets turned against you. The curtain can become “distressed” over time, tapping into the tendency to care for others more easily than for yourself. A kind of Tamagotchi—like experience, but one that tricks you into self-care by making you take care of it.
 Britney Spears, Robert Sebree 2000
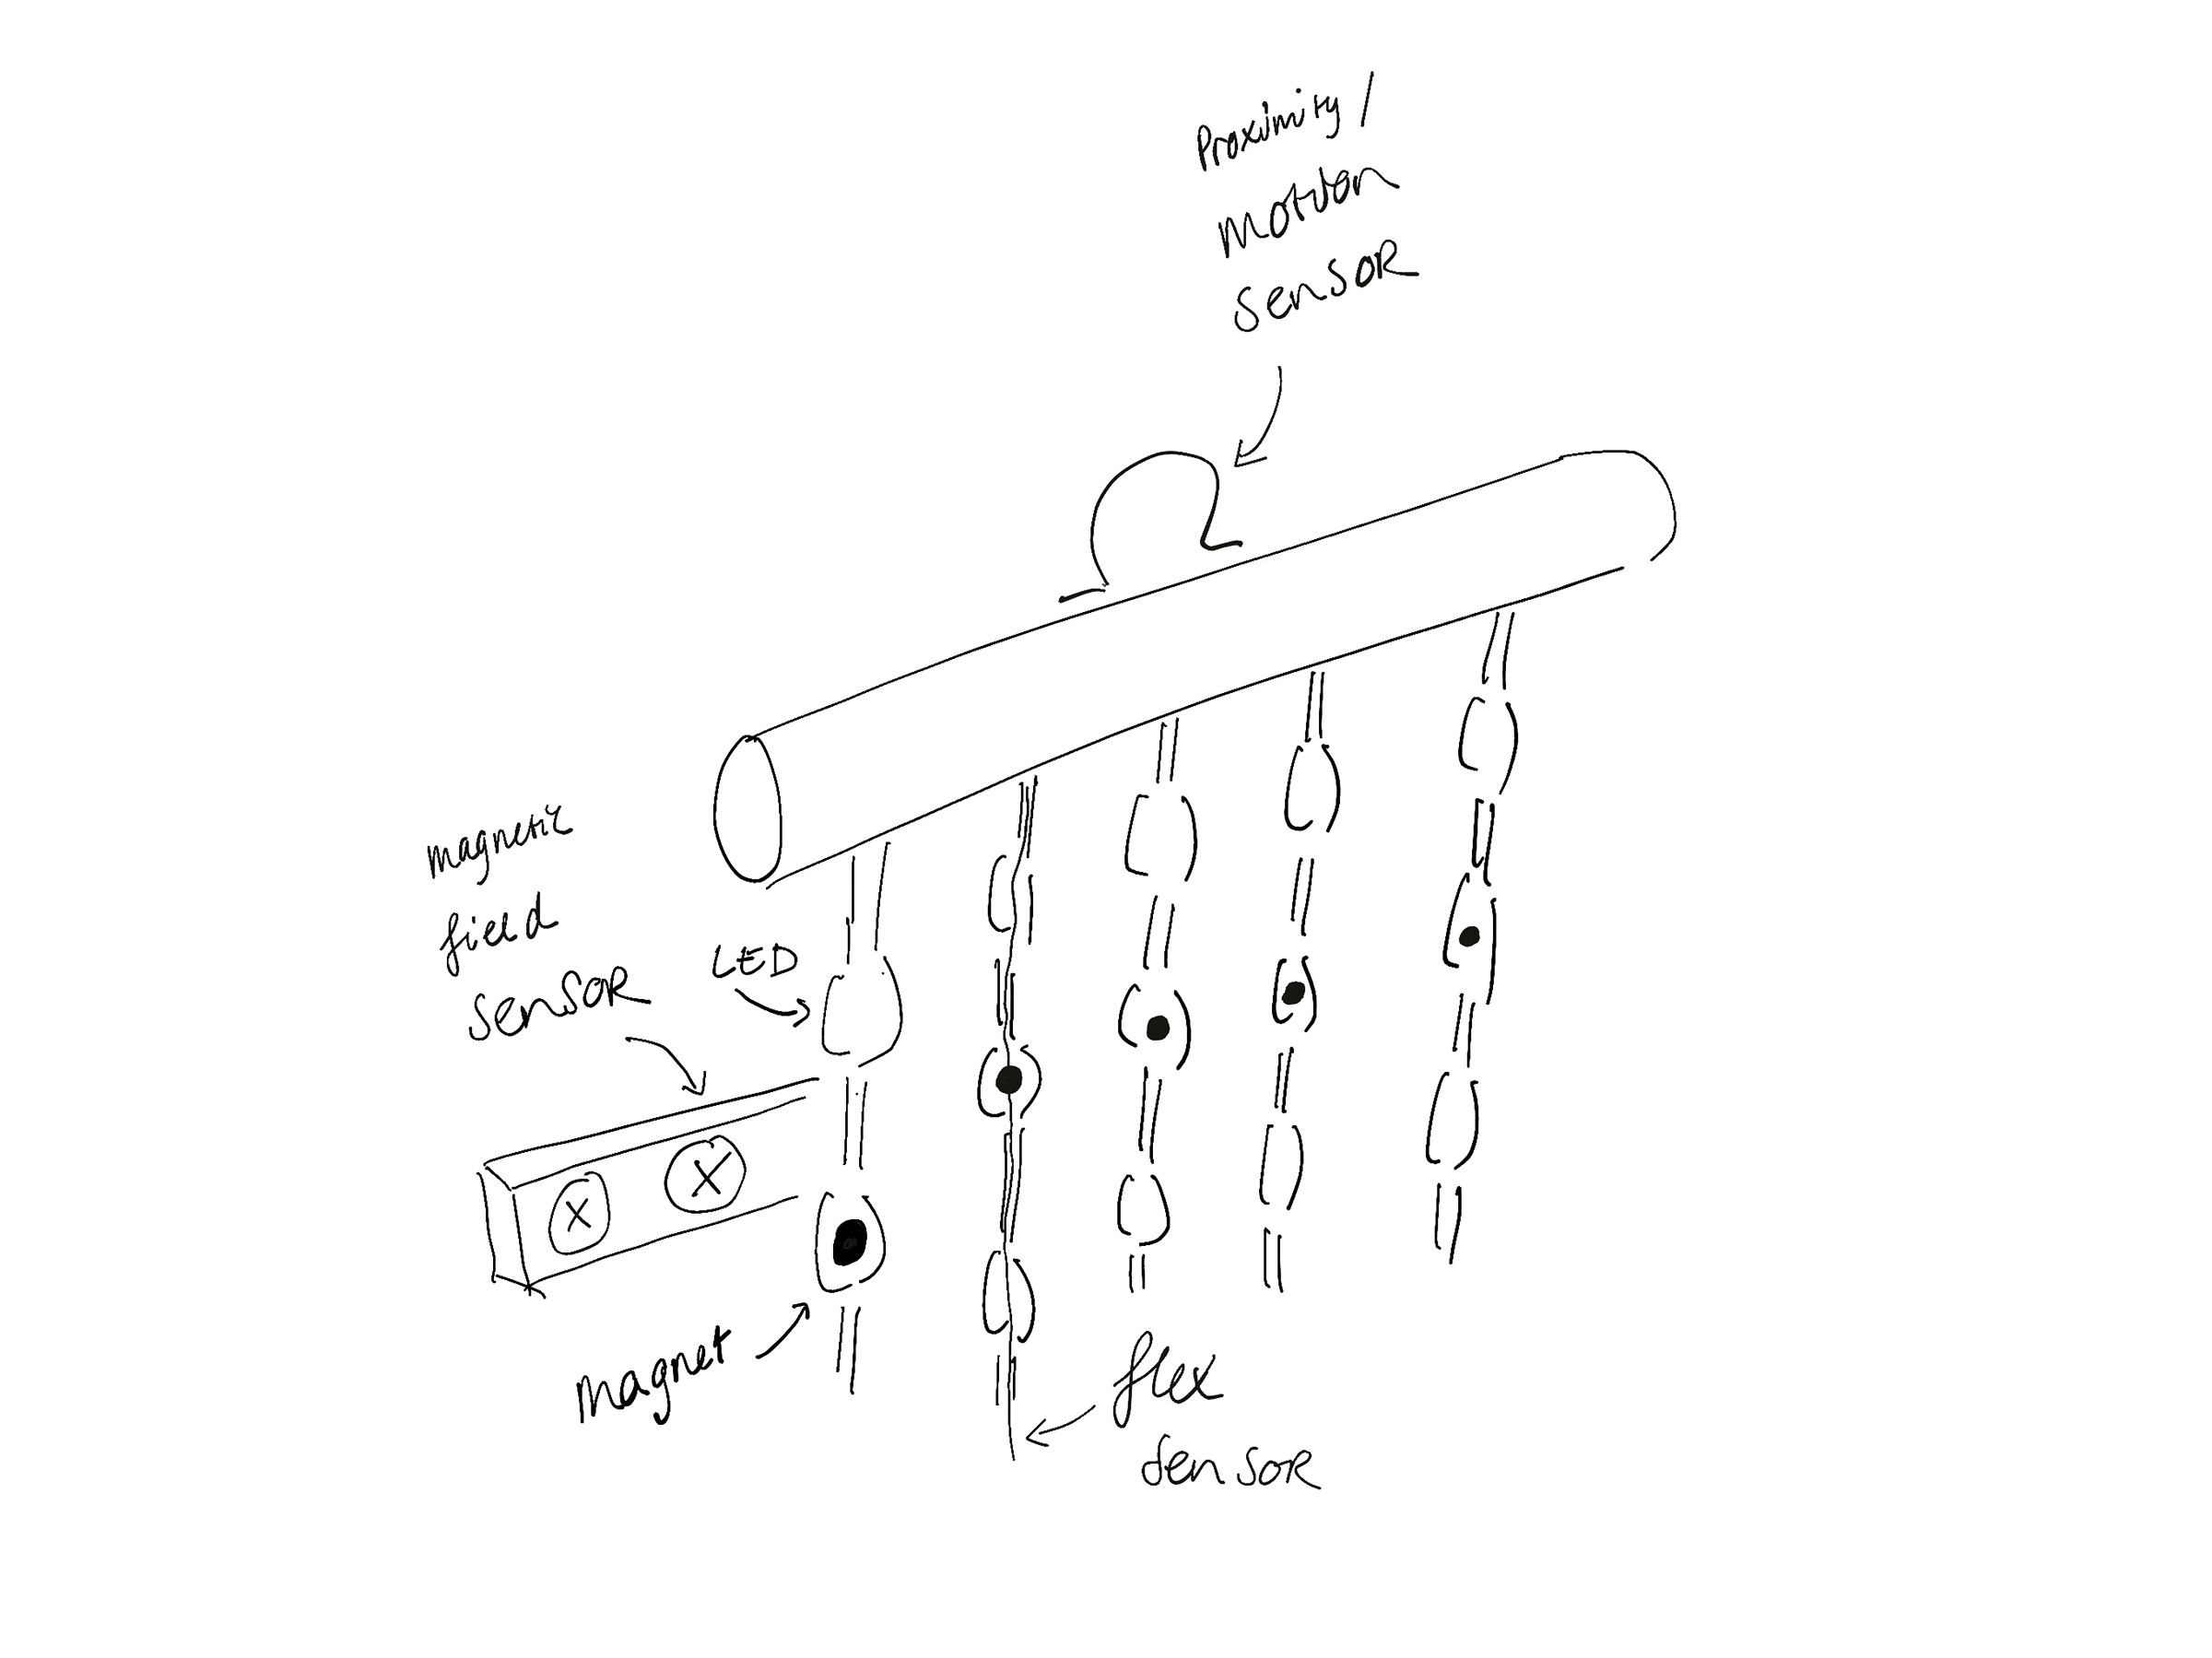
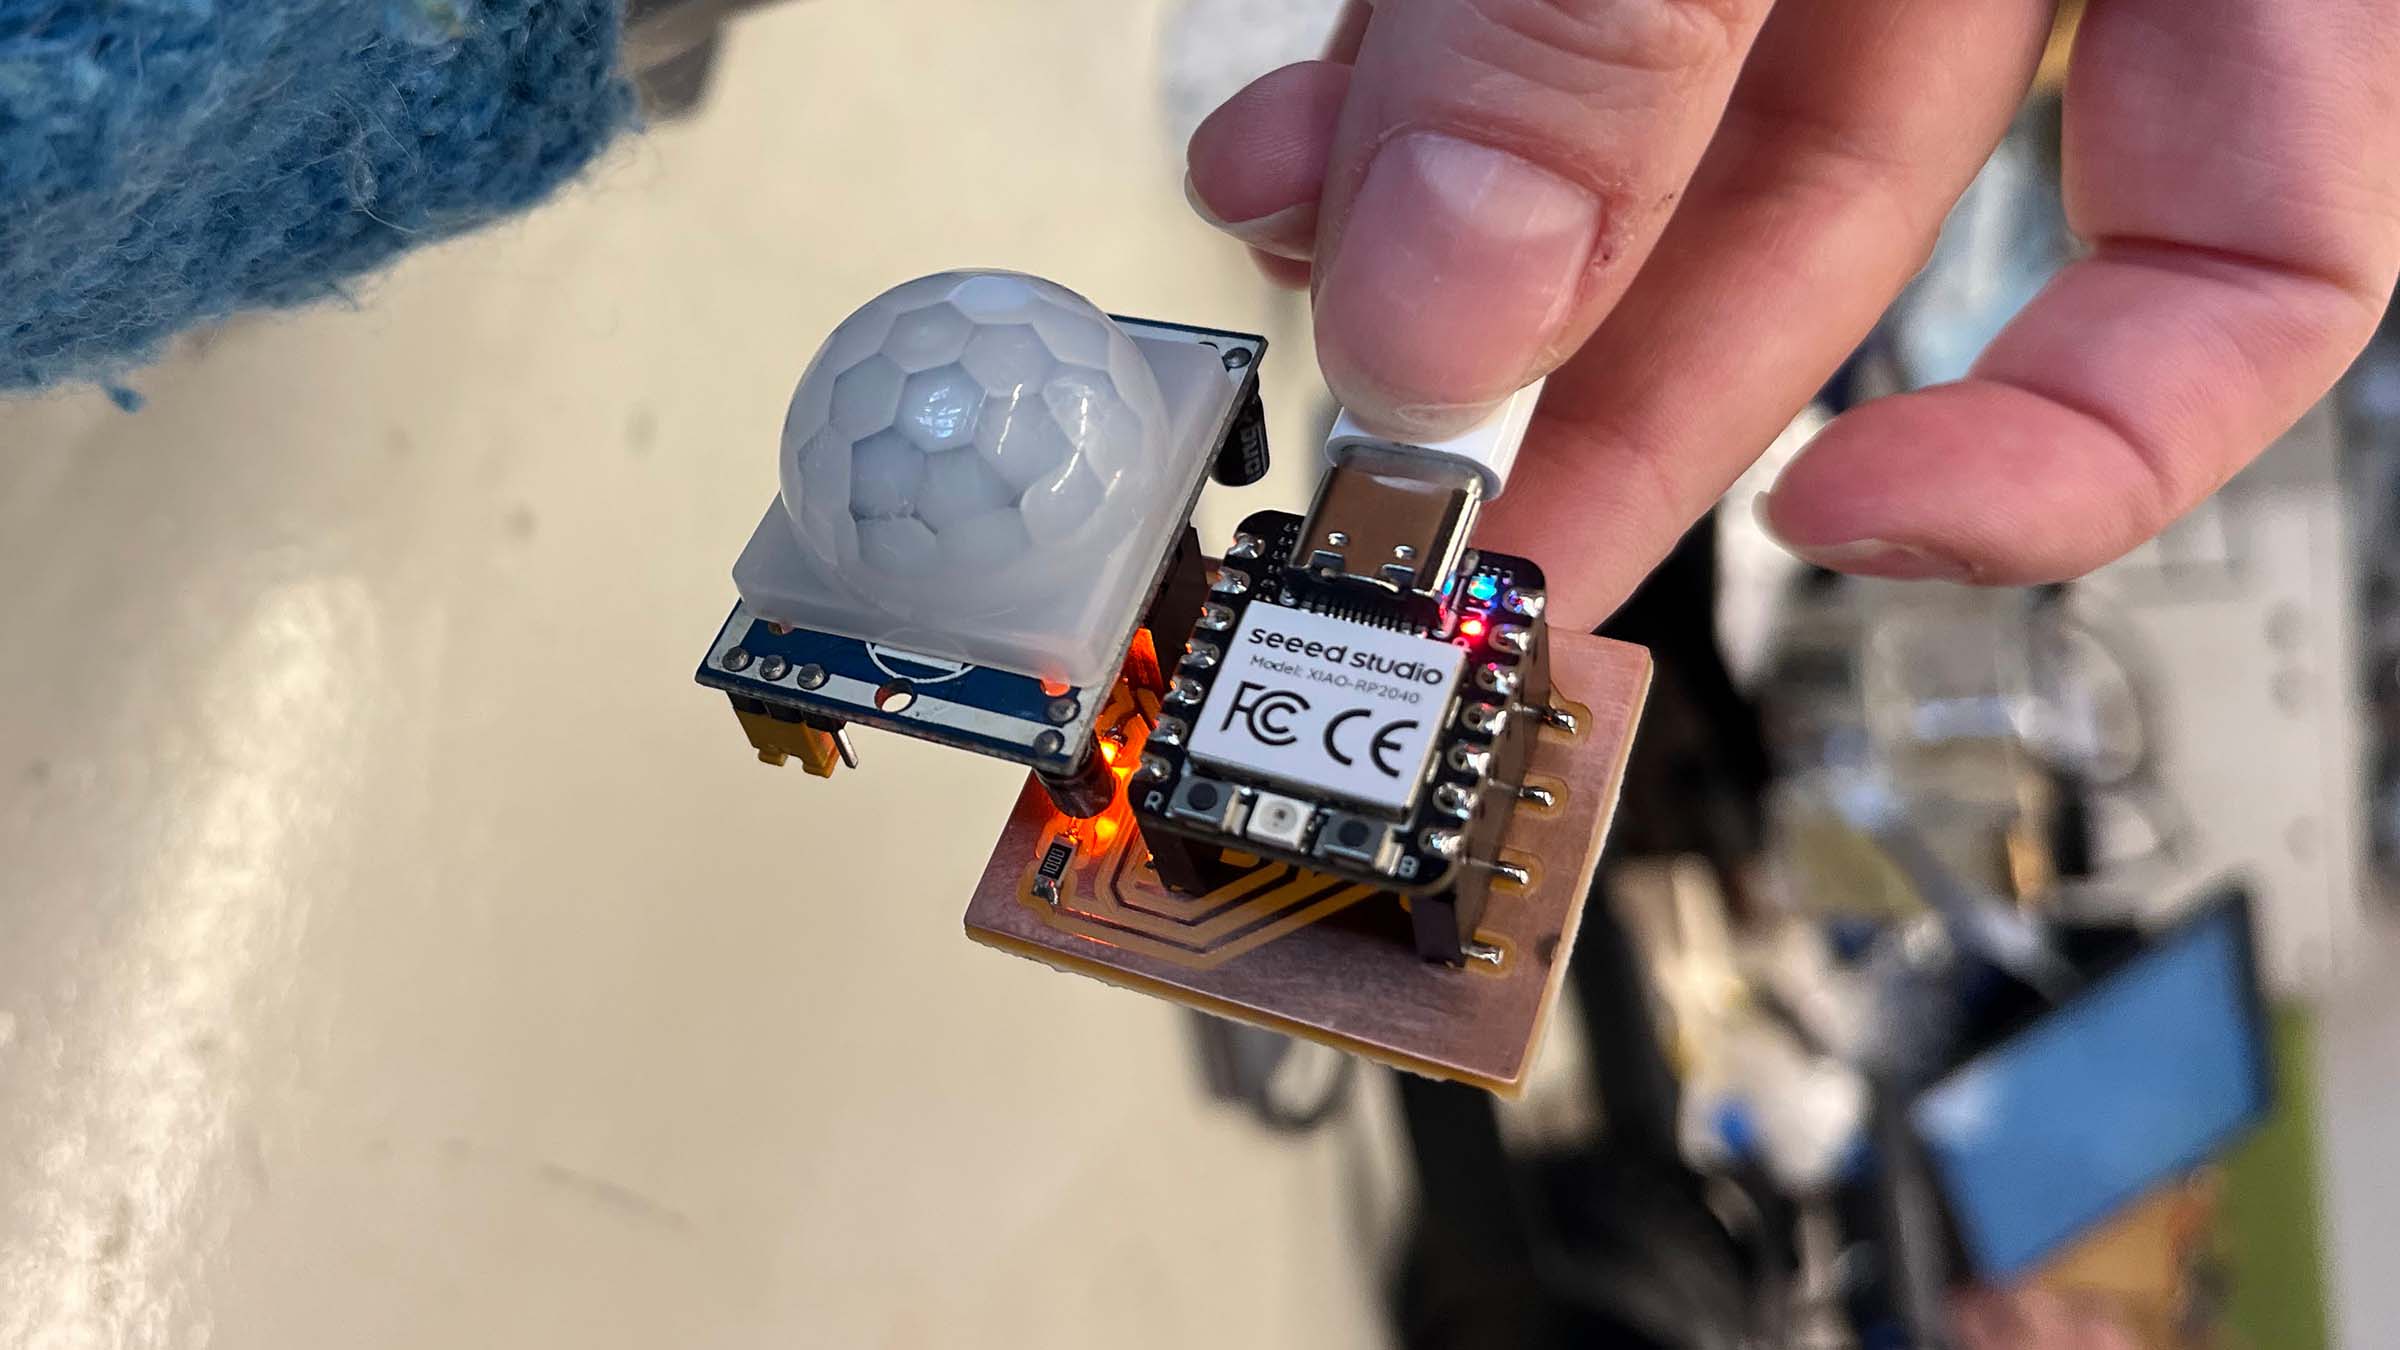
The system detects when someone actually passes through and leaves the room, using motion sensing and a magnetic field sensor to distinguish a person from something smaller like a cat. If no exit is registered, it escalates; if no movement is detected at all, it settles into a resting state. Passing through is rewarded, returning is acknowledged, and over time the system logs this data locally, allowing it to be combined with mood or medication tracking to build insight into longer-term patterns.
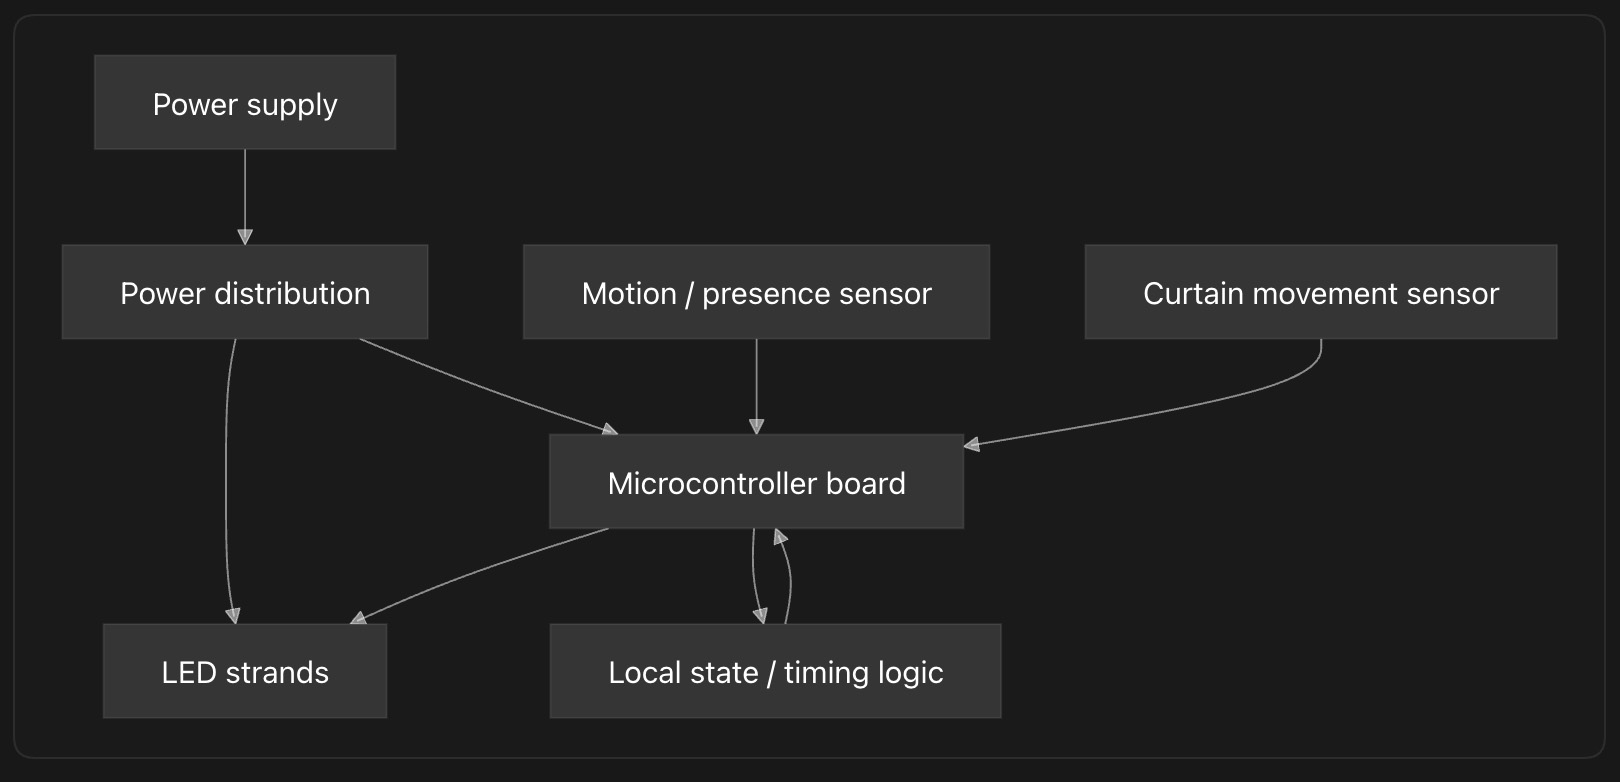
System overview
The curtain consists of multiple flexible strands, each containing a series of small light nodes (LEDs). These are controlled by a microcontroller and respond to sensor input.
- Input: magnetic field for movement of the curtain, motion sensors to detect entering and exiting
- Processing: a microcontroller translates this input into light patterns
- Output: LEDs embedded in the strands create a dynamic, semi-transparent display
Design
For the design of my curtain I wanted to challenge myself to stay close to the original, as to evoke those fond childhood memories of having a bead curtain as prized possession I wanted to care for. I also felt the reference may get lost by making a more modern design.
3D design
All the 3D designs for this project are made by me in either Freecad or Blender. For visualization purposes I've sometimes used AI, but never for the actual CAD files send to machines.
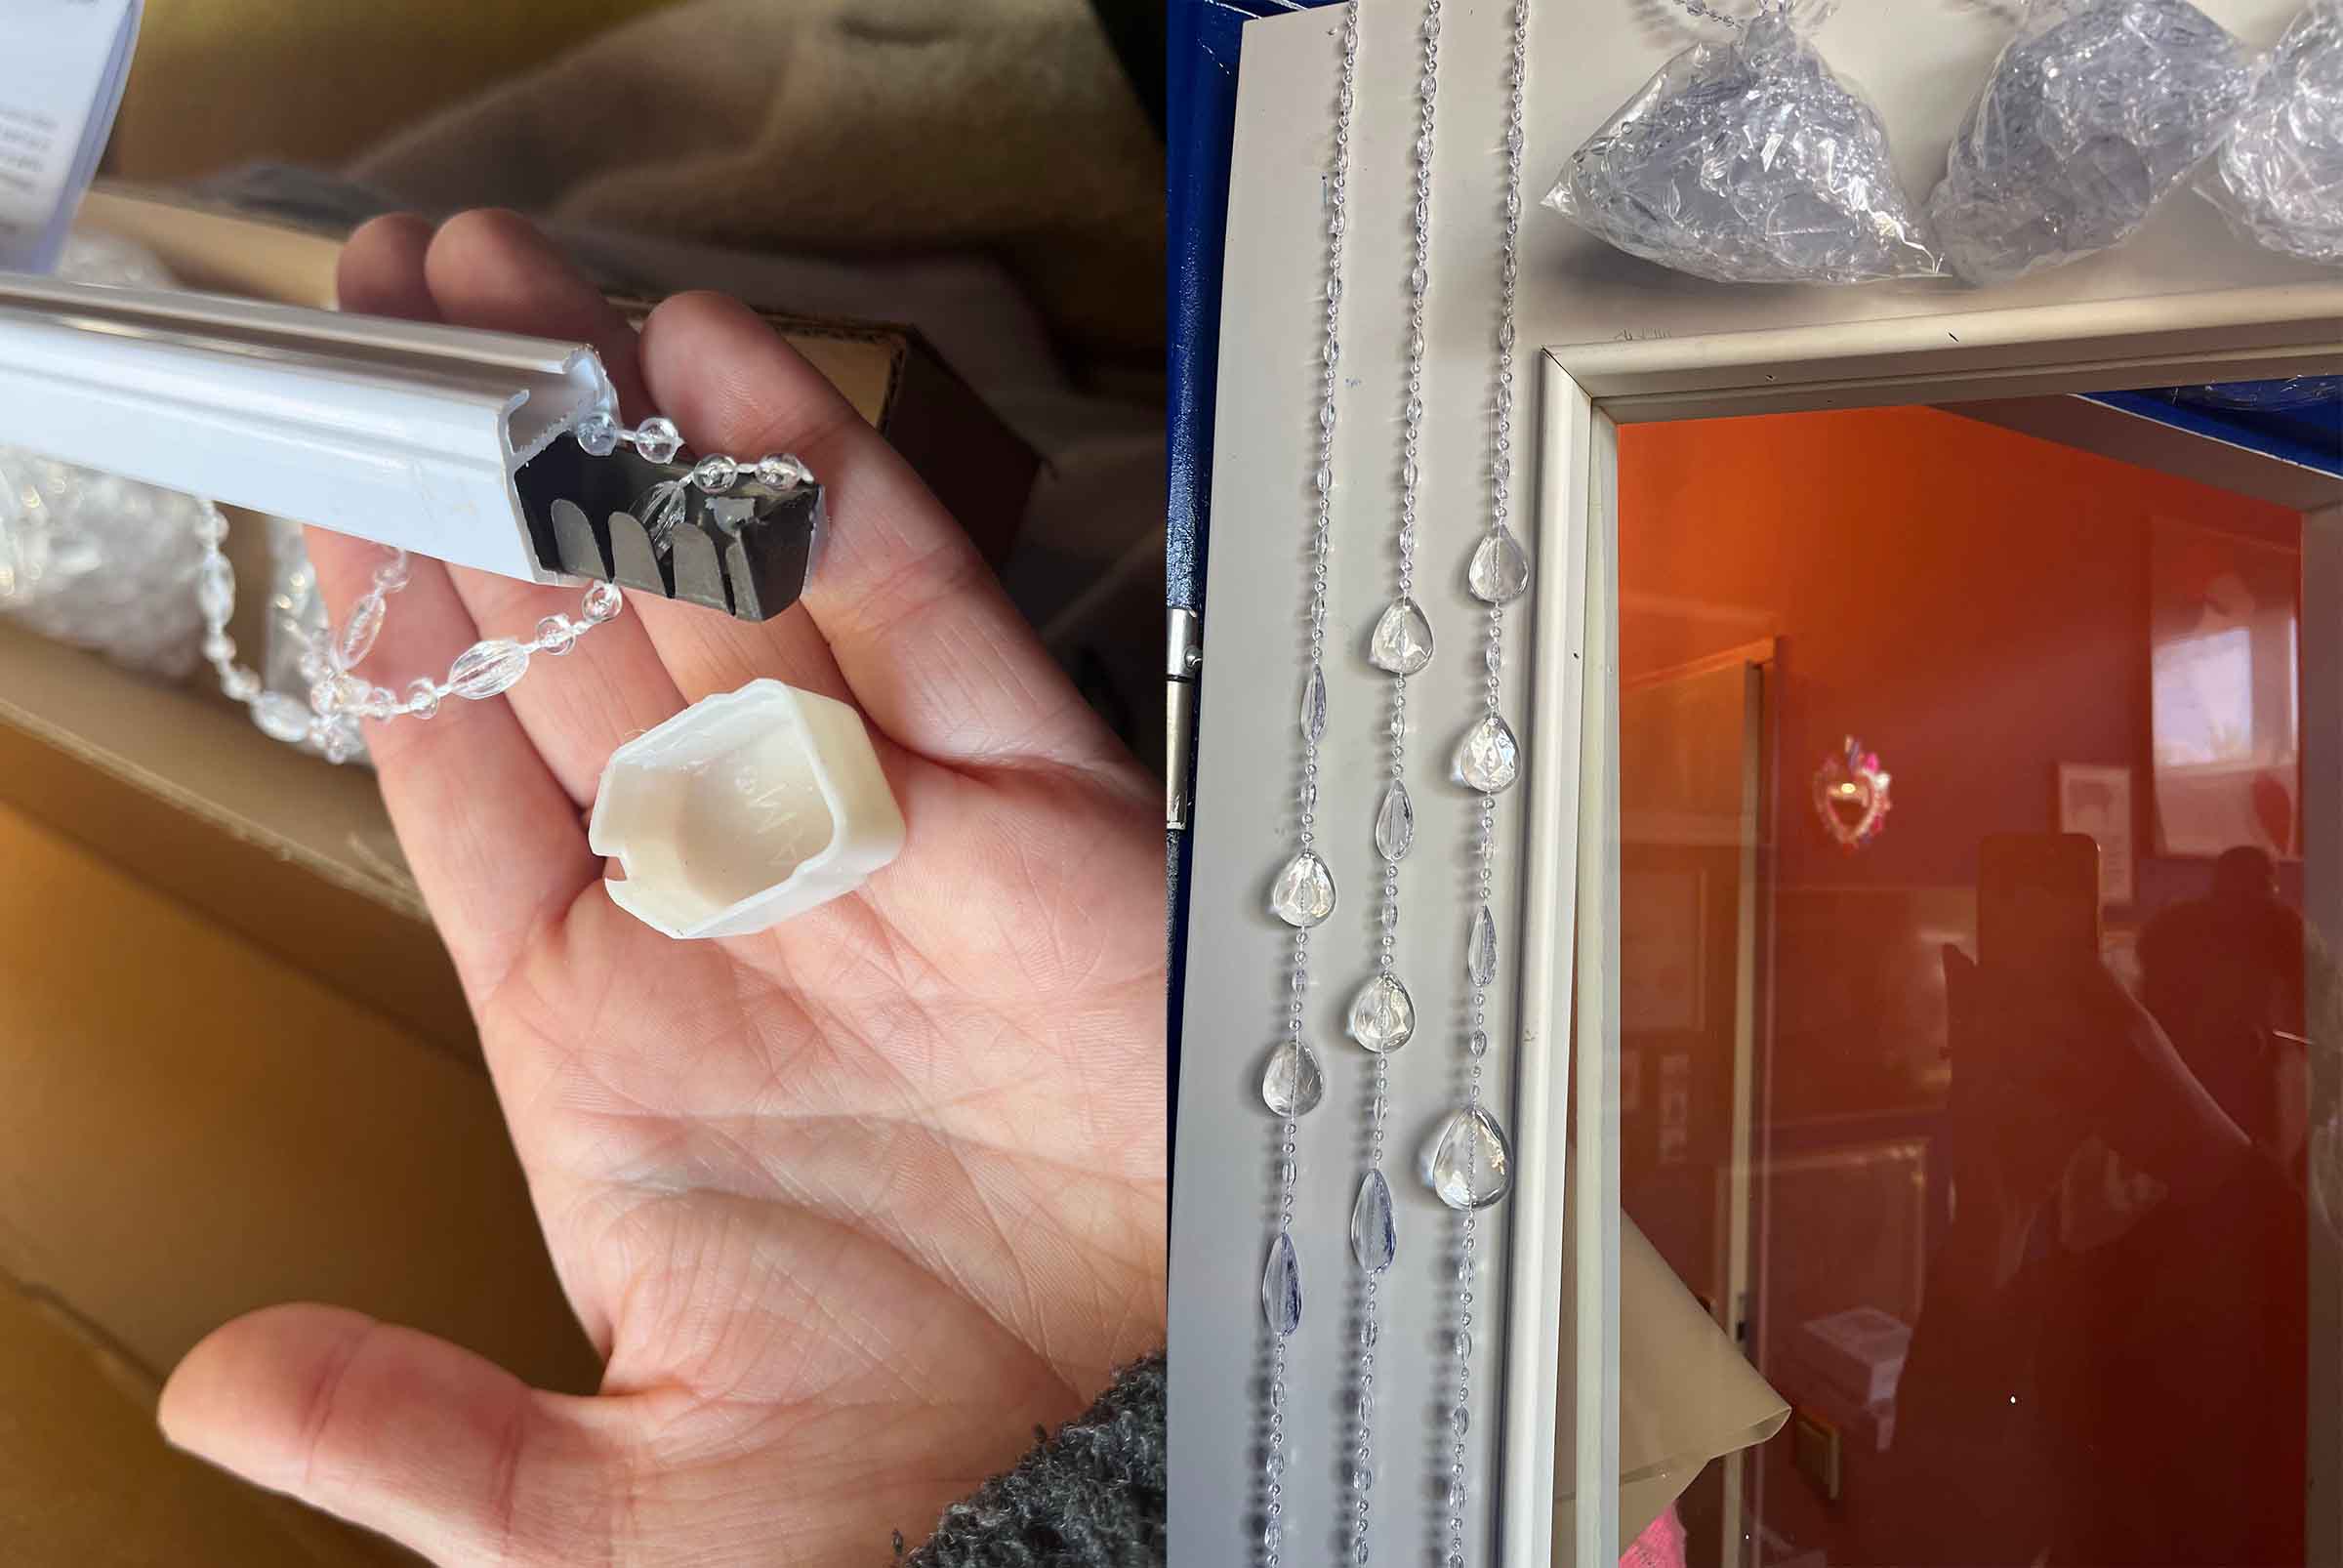
Beads
For the beads I've the same design throughout Fab Academy, first appearing in 3D-printing week, later being used in molding and casting week and application programming. For the final beads I've changed it's shaped and size slightly, but kept the overall design the same.
Top bar
Lights
The light patterns get slowly more distressed over time as there is no interaction with the curtain. I've designed this behavior for week 15 with some help from ChatGPT. I then translated them into MicroPython code using Codex, you can find the code in the files section below. In the future I want to custom design my own light patterns.
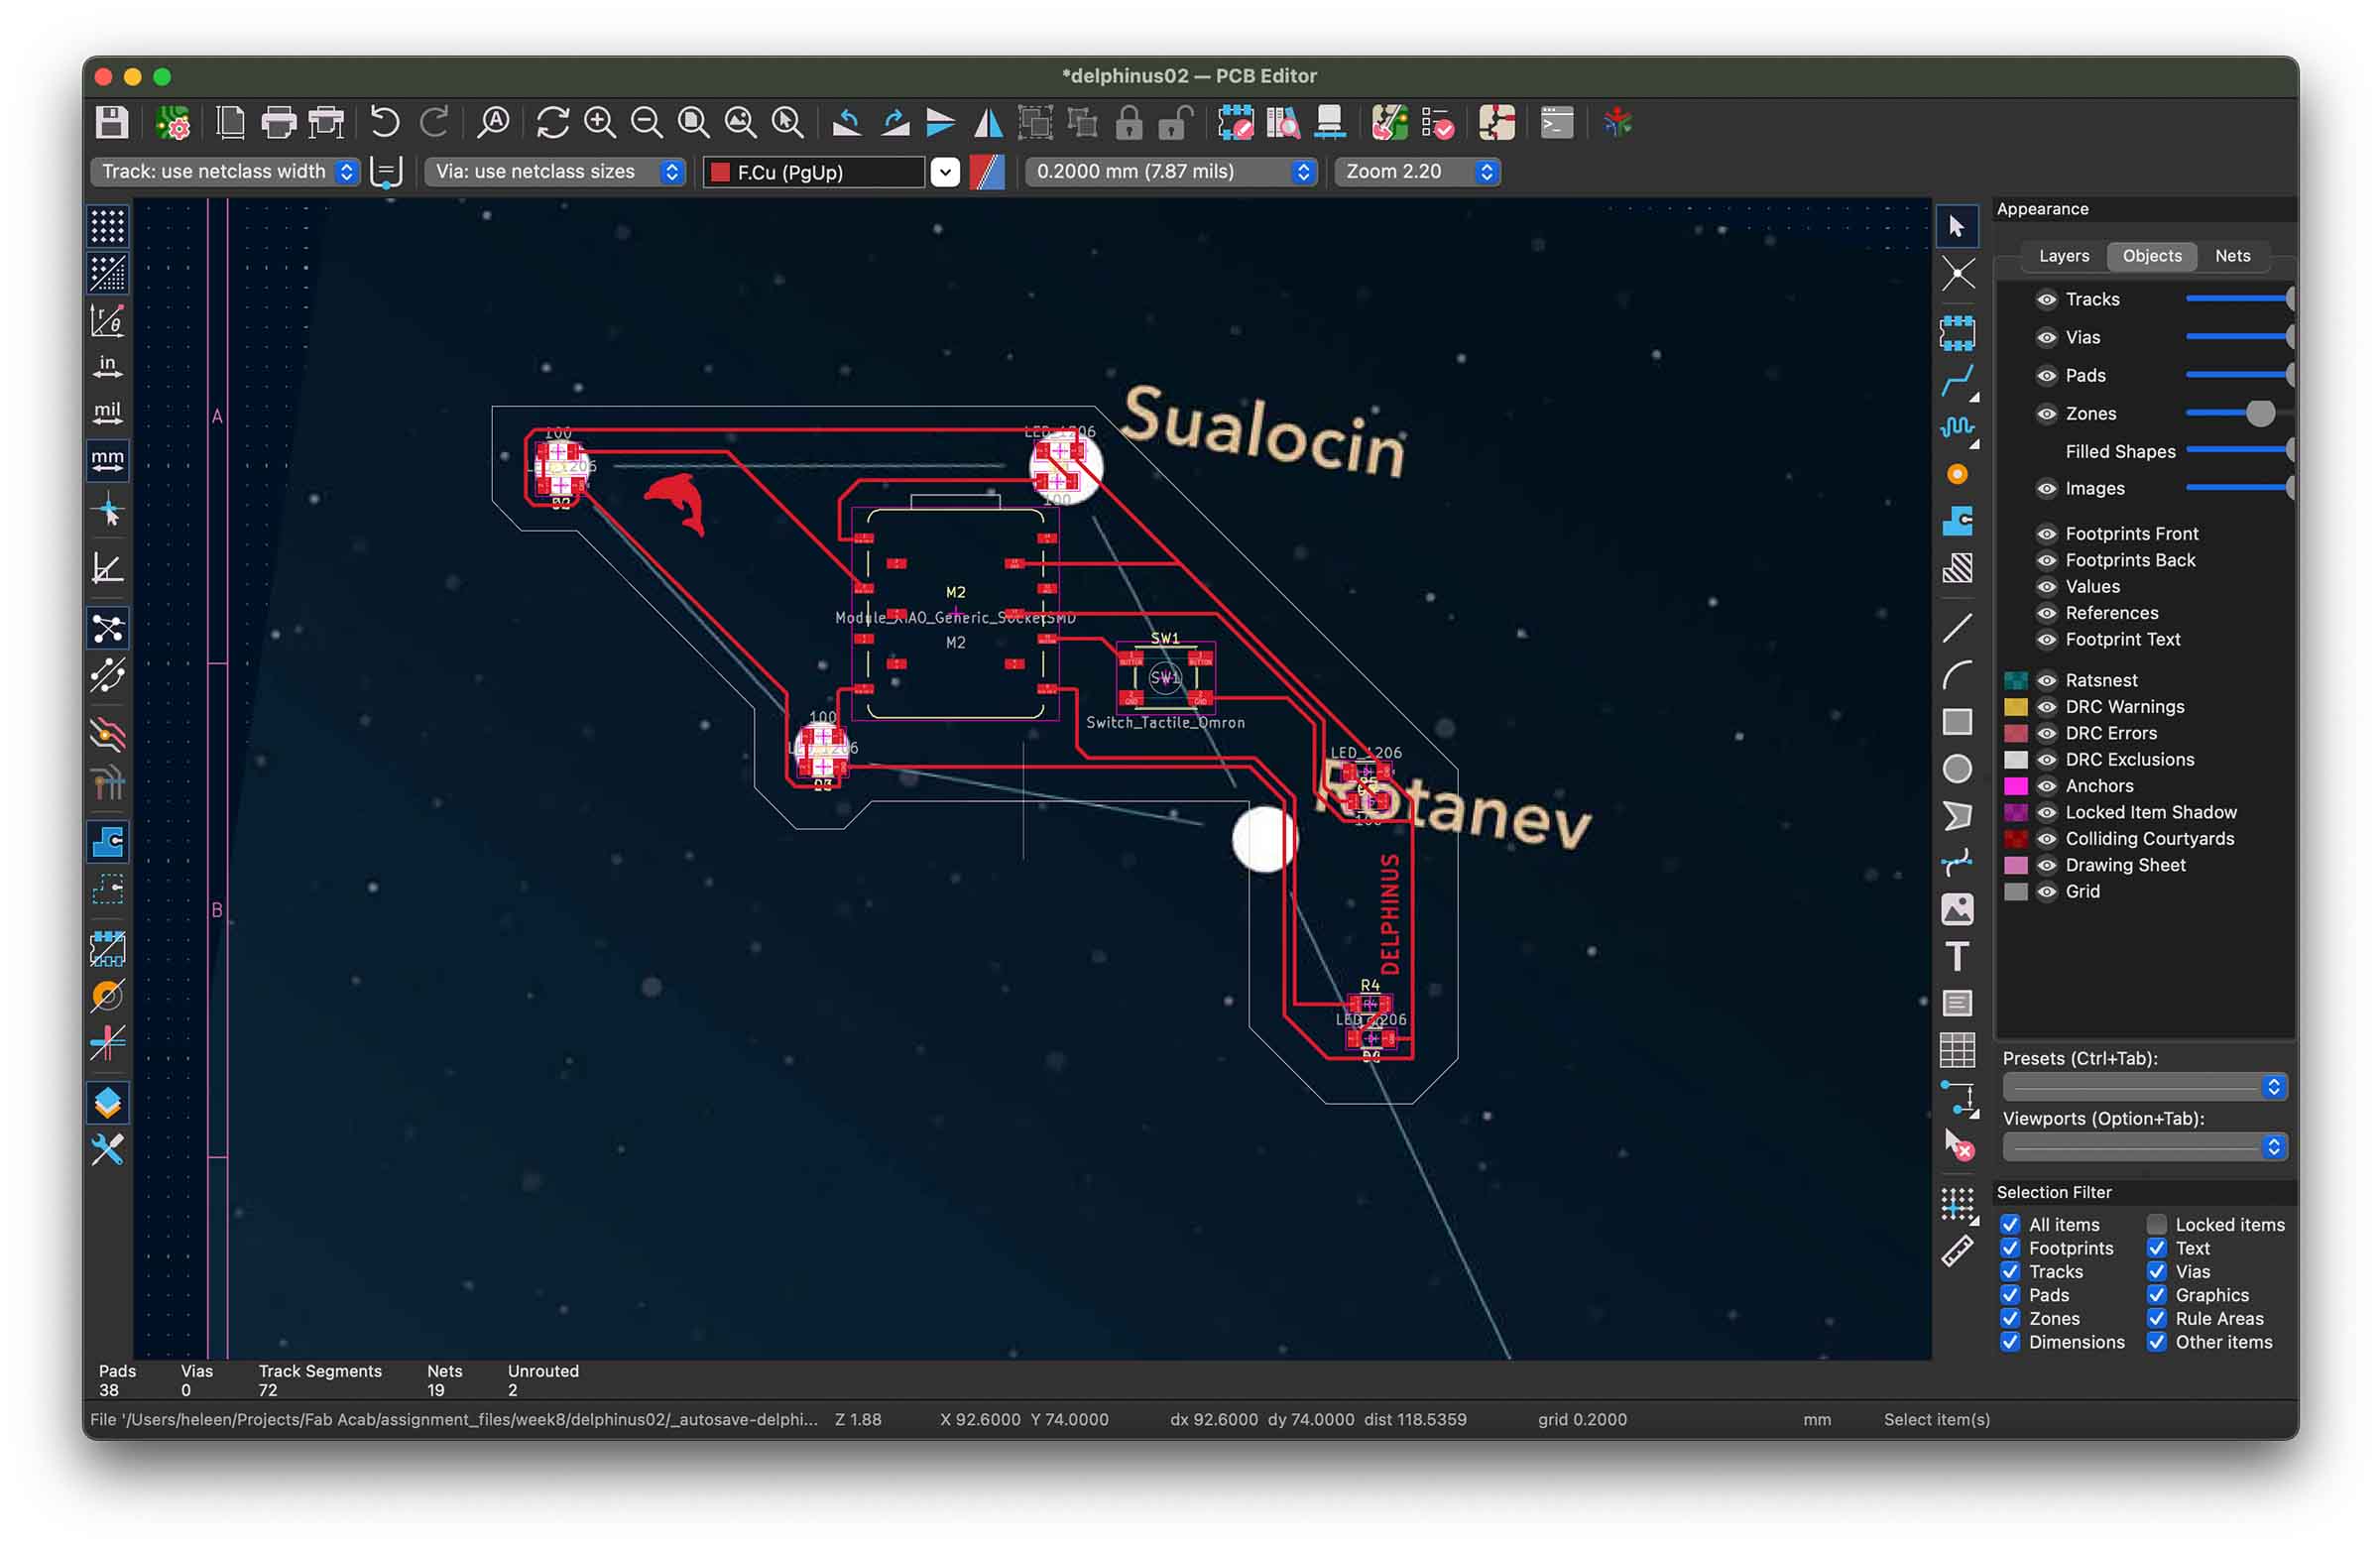
Electronics
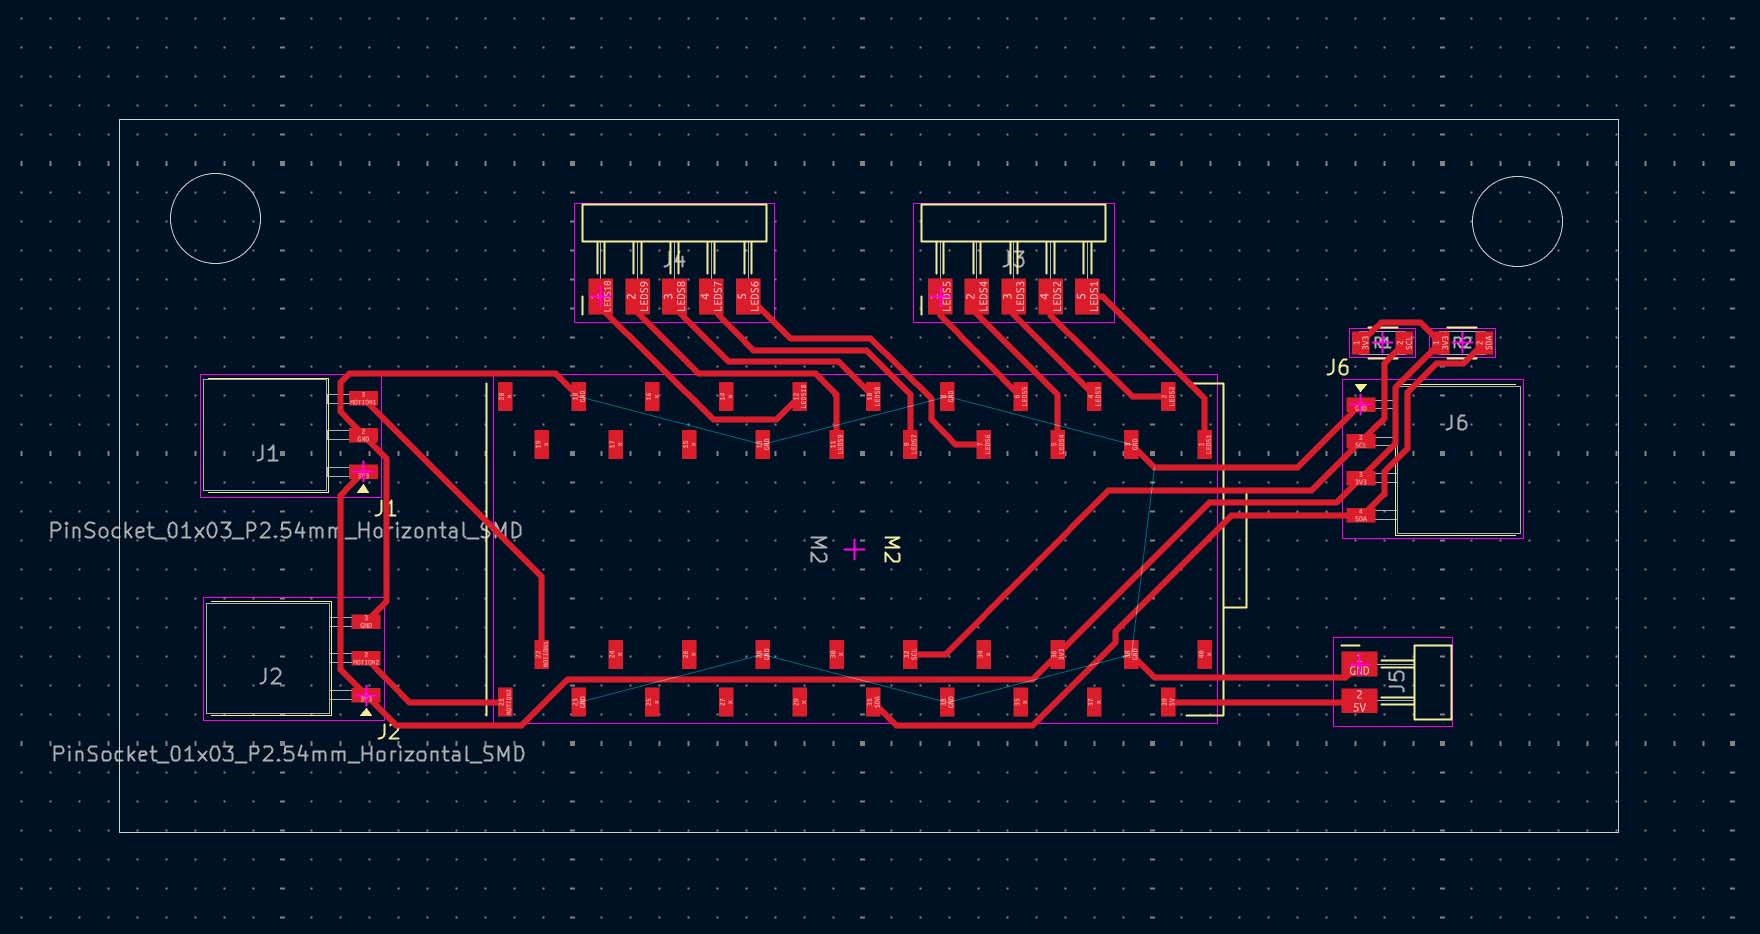
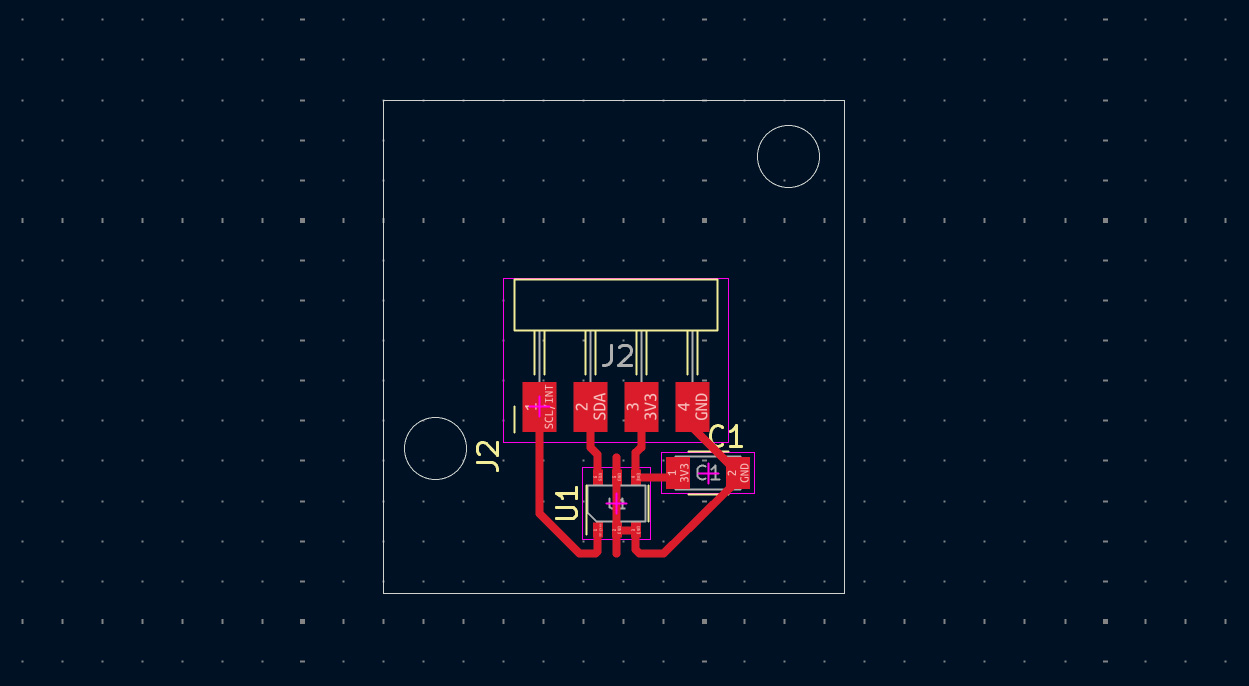
For the electronics I designed two boars, one main PCB housing the microcontroller and exposing all the pins needed for the sensors and lights. The hall sensor has it's own little board and communicates over I2C with the microcontroller. All designs are made in KiCad and processed for the mill using Mods.
Main PCB
Hall sensor PCB
Production
All the parts for this project have been made by me at the Fab Lab at Waag or at home; sometimes with a little help from Henk & Irja and my classmates Chris & Remco, thanks y'll.
Beads
The 200 beads I've printed at home on my Prusa Mini+ using Fiberlogy easy pet-g.
Top bar
The top bar consists of a rail, which is made up of 6 parts holding the electronics and strands in place. These parts have been 3D printed at home using silver PLA by eSun.
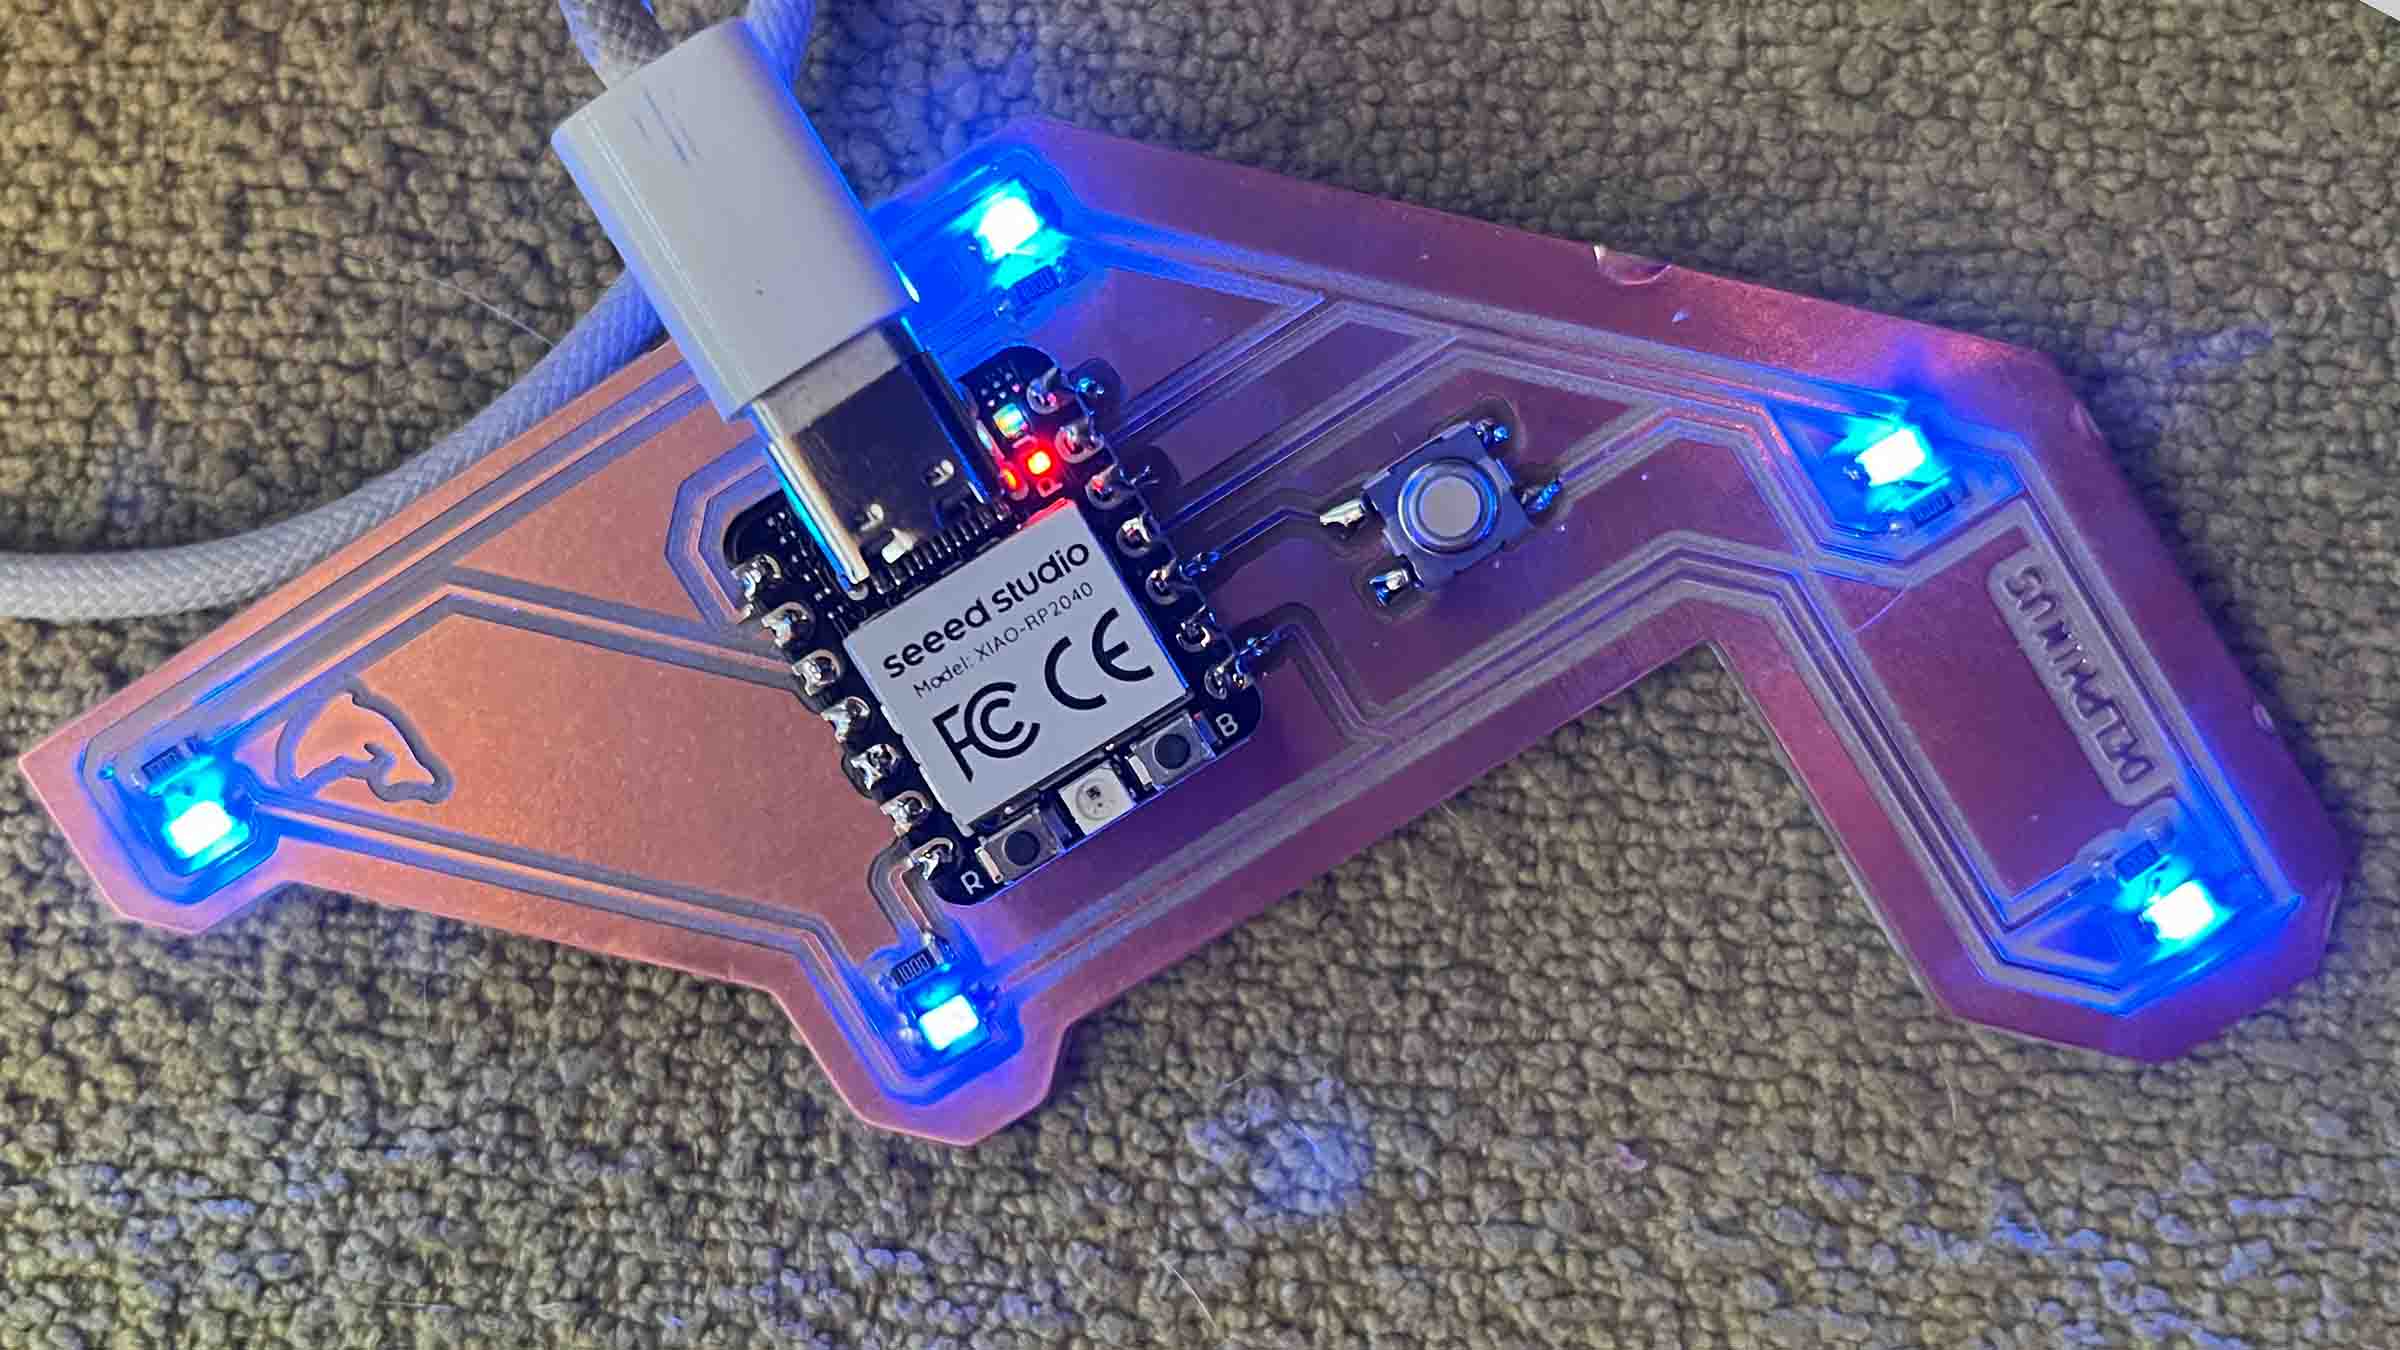
Electronics
All electronics have been milled just like documented in week 8. The cables I've made using ribbon cable and a crimp set with Dupont connectors Henk supplied me with. For the mircocontroller I used a Raspberry Pi Pico.
BOM
Main Board
| Qty | Component | Notes | Price | Source |
|---|---|---|---|---|
| 1 | Raspberry Pi Pico | Main MCU | $6 | Waag inventory |
| 2 | 4.99kΩ resistor | I²C pull-ups for SDA/SCL | $0.20 | Waag inventory |
| 2 | 5-pin header | LED strip outputs (DATA) |
$1.46 | Waag inventory |
| 2 | 3-pin socket | HC-SR501 connections (3V3, GND, DATA) |
$3.22 | Waag inventory |
| 1 | 4-pin socket | TLE493D breakout (3V3, GND, SDA, SCL) |
$2.13 | Waag inventory |
| 1 | 2-pin header | Power split toward MCU power | $0.47 | Waag inventory |
| 1 | Custom PCB (main board) | FR1 | Waag inventory |
Hall Sensor Board
| Qty | Component | Notes | Price | Source |
|---|---|---|---|---|
| 1 | Infineon TLE493D-A2B6 | I²C hall/magnetic sensor | $2 | Waag inventory |
| 1 | 100nF ceramic capacitor | Decoupling cap for TLE493D | $0.07 | Waag inventory |
| 1 | 4-pin header | TLE493D breakout (3V3, GND, SDA, SCL) |
$0.82 | Waag inventory |
| 1 | Custom PCB (TLE493D breakout) | FR1 | Waag inventory |
Misc
| Qty | Component | Notes | Price | Source |
|---|---|---|---|---|
| 2 | HC-SR501 | External PIR modules | $2.00 | Octronic |
| 0.43kg | Fiberlogy Easy PET-G pure transparent | Beads filament | $8.55 | |
| 0.05kg | eSun silver silk PLA | Bar filament | $1.14 | |
| 98x12cm | Acrylic sheet | Back plate | Waag inventory | |
| 90cm | Ribbon cable | Waag inventory | ||
| 1 | Lidl Parkside crimp set | $25 | Waag inventory | |
| 1 | Old USB Cable | My house | ||
| 1 | Power supply | $10 | bol.com |
Power Requirements
The LED packaging specifies:
- Output power:
0.1 W per LED - RGB output current:
5 V 5 mA
The current specification is most likely given per RGB color channel.
Since each LED contains red, green, and blue channels:
- Red ≈ 5 mA
- Green ≈ 5 mA
- Blue ≈ 5 mA
Estimate using the packaging specification:
- 200 × 0.1 W = 20 W
Required current at 5 V:
- 20 W ÷ 5 V = 4 A
Measured power consumption
To verify the LED power consumption, a current measurement was performed using 20 LEDs set to full white brightness.
- Number of LEDs tested:
20 - Supply voltage:
5 V - Measured current:
0.329 A
Current per LED:
- 0.329 A ÷ 20 = 0.01645 A
- ≈
16.5 mA per LED
Power per LED:
- 5 V × 0.01645 A = 0.08225 W
- ≈
0.082 W per LED
Estimated Total System Consumption
The final installation contains approximately 200 LEDs.
Estimated total current:
- 200 × 16.5 mA = 3300 mA
- ≈
3.3 A
Estimated total power consumption:
- 5 V × 3.3 A = 16.5 W
I ended up buying a 5V 18W charger online.
Fabrication and design research
The design draws inspiration from the 90s classic bead curtain, the aim is not to get the design as close to the original, but it would be nice if the reference is obvious for those whom remember the original all too well. Below I describe what I've learned from during Fab Academy while researching how I would go about making an interactive version of this object.
 The OG bead curtain for design reference
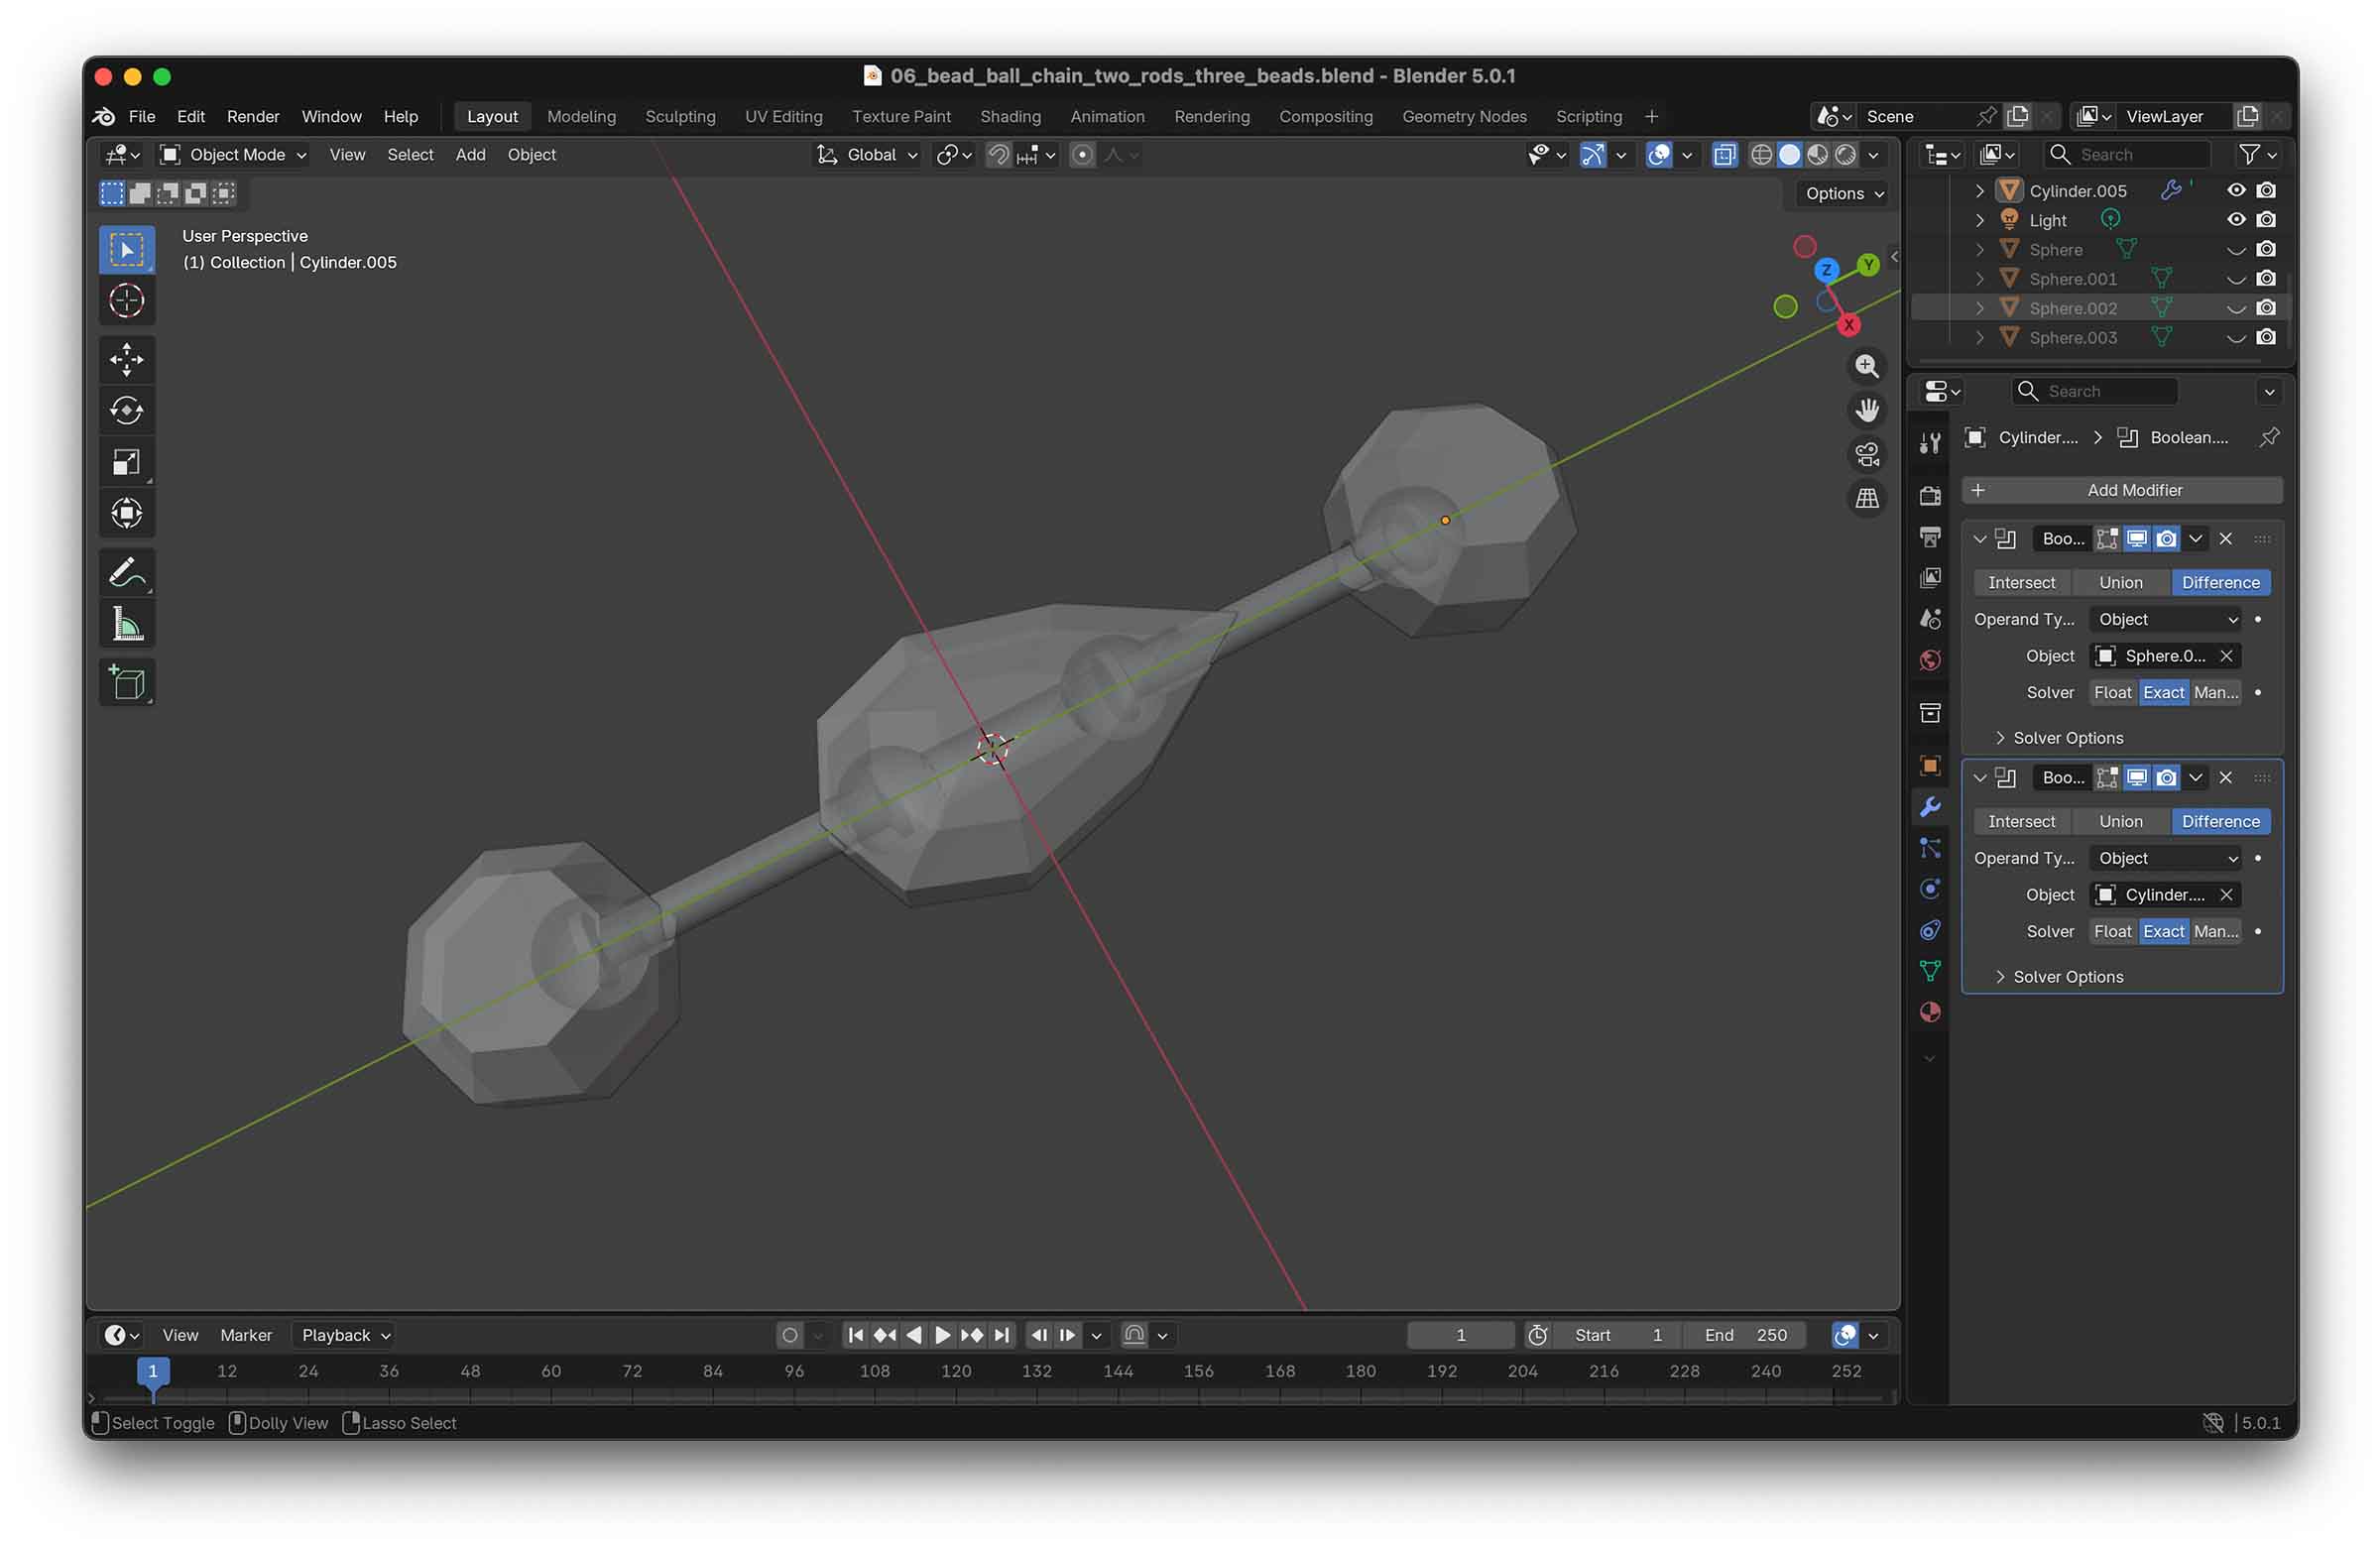
Week 5
In week 5 I explored this design direction by making a small 3D-printed bead curtain test. I was interested in the logic of solid beads becoming flexible once connected, and used the assignment to experiment with a faceted bead shape, a rod running through it, and later a simple linked mechanism that could wiggle a bit more like a curtain.
Week 8
In week 8 I learned how to design and produce custom PCBs, which is directly relevant for embedding light into the curtain. I worked on boards that could drive multiple LEDs and got familiar with the full process from schematic to milling and testing. This gave me a better understanding of how to control several light points at once, and how to think about distributing electronics across a system rather than treating it as a single unit.
Week 9
During week 9 I focused on input devices that could be useful for my final project. Unfortunately the magnetic field sensors got delayed in the mail, so for this week I played with a motion and flex sensor instead. For the motion sensor I build a little PCB with a microcontroller socket and a LED that lights up when motion is detected.
Week 10
In week 10 I focused on output devices and explored different types of addressable RGB LEDs for the curtain. Since light is currently the main output for the project, this week was important for understanding both the technical setup and the visual qualities of different LED systems.
I designed and milled a custom PCB that can control multiple LED strands independently, since the final curtain will consist of separate hanging strands rather than one continuous strip. I also experimented with different LED formats and became particularly interested in small “pebble” LEDs, which diffuse light more softly and feel closer to beads hanging in space than flat LED strips do.

Week 15
In week 15 I built a browser-based simulation of the curtain using ThreeJS and the Rapier physics engine. The goal was to prototype the movement and interaction of the final project before building the full physical version.
The simulation models strands of beads with physics-based movement and lets me experiment with different interaction and lighting behaviours. I also used it to prototype the “distress” logic of the curtain, where the light patterns gradually escalate over time until someone passes through.
Click here to open simulation in fullscreen
This week also became an experiment in working with AI-assisted coding. Rather than focusing on polished code structure, I used ChatGPT as a collaborative tool to quickly prototype physics systems, materials, lighting behavior and serial communication with a physical PCB prototype.
Week 16
In week 16 I focused on system integration for the final project.
Inspiration & References
This project is inspired by projects like Random International’s Rain Room, Studio Drift and United Visual Artists and many more. What I find interesting in these works is how they use light and repetition to create a spatial experience you can move through.
Within Fab Academy there are a lot of projects that deal with LEDs, sensors and interaction, usually in the form of panels or wearables. While not directly similar, they were helpful for thinking about how to build a system with multiple light points. Examples include work like Juliana Lozano — Kinetic Curtain, Adriana Mexicano — wearable vest with proximity sensor + LEDs + optical fiber, Nicole Bakker — The Airable, wearable with LED feedback based on sensed data and Diane Walsh — felt artwork + large LED array.
Looking back
This has been a crazy ride that I would not have missed for the world. This program is so.. different; nothing can prepare you for it. You'll have to figure out how to get through it while you're doing it—and then there's another lecture from Neil. Keep up!
While I'm proud of my new skills in CAD, CAM and electronics, I didn't expect to learn this much about myself as well. I learned I have a lot of trouble keeping things simple, that I'm uncomfortable publishing work online that I consider mediocre or even bad, and that I'm my own worst critic. The intense pace of this program forced me to let go of the detailed focus I usually see as an asset. It made me realize I was here to learn new skills, practice new techniques and get to know a network of makers, not to publish cool stuff online. My ego had to take a back seat.
Another thing I didn't expect but that has been a real challenge is how anxious I've been throughout this program. I've been scared to touch other people's equipment, to waste materials, to break machines that aren't mine, and to experiment when people are watching. Working in the lab has been a real challenge, and I was confronted with how terrified I am of making mistakes in the physical world instead of the digital one, where I can pretend to be in control. I'm intensely proud of just plowing through and tackling every machine. This is a challenge I'm taking with me after Fab Academy, and I bought myself a scary little machine to keep practicing.
Even though it wasn't always a smooth ride, this was sooooo much fun! As for the skills I've learned and the friends I've made, I hope this is only the beginning.
During Fab Academy I faced some extra challenges in my personal life, and I can't thank Henk, my classmates Chris and Remco <3, all our instructors, and everyone at Waag enough for their support.
Files
- Bead Blender
- Main PCB
- Hall PCB
- Teeth default Freecad
- Teeth mount Freecad
- Teeth PIR Freecad
- Back Freecad
- Bar spacer double
- Bar spacer left end
- Bar spacer right end
- Code oops.py
Other ideas
Just cause it's fun, here's some ideas that didn't quite make it:
- pimp my cargo bike
- hand/body size fidget spinner for my neurodivergent babes, other stimming/pressure devices (or like a wapperman machine?!)
- cat doorbell (send to Ricardo Marques)
- e-ink keyboard
- thermal fax for smartphones
- wearable displaying satellite data