Assigments

Week 20 cover

Week 20: Final Project Requirements

Final Project:

  • SpiruSense: intelligent photobioreactor for spirulina cultivation.

Final project requirements:

  • What does it do?
  • Who has done what beforehand?
  • What did you design?
  • What sources did you use?
  • What materials and components were used?
  • Where did they come from?
  • How much did they cost?
  • What parts and systems were made?
  • What processes were used?
  • What questions were answered?
  • What worked? What did not work?
  • How was it evaluated?
  • What are the implications?

Final Project: SpiruSense

What does it do?

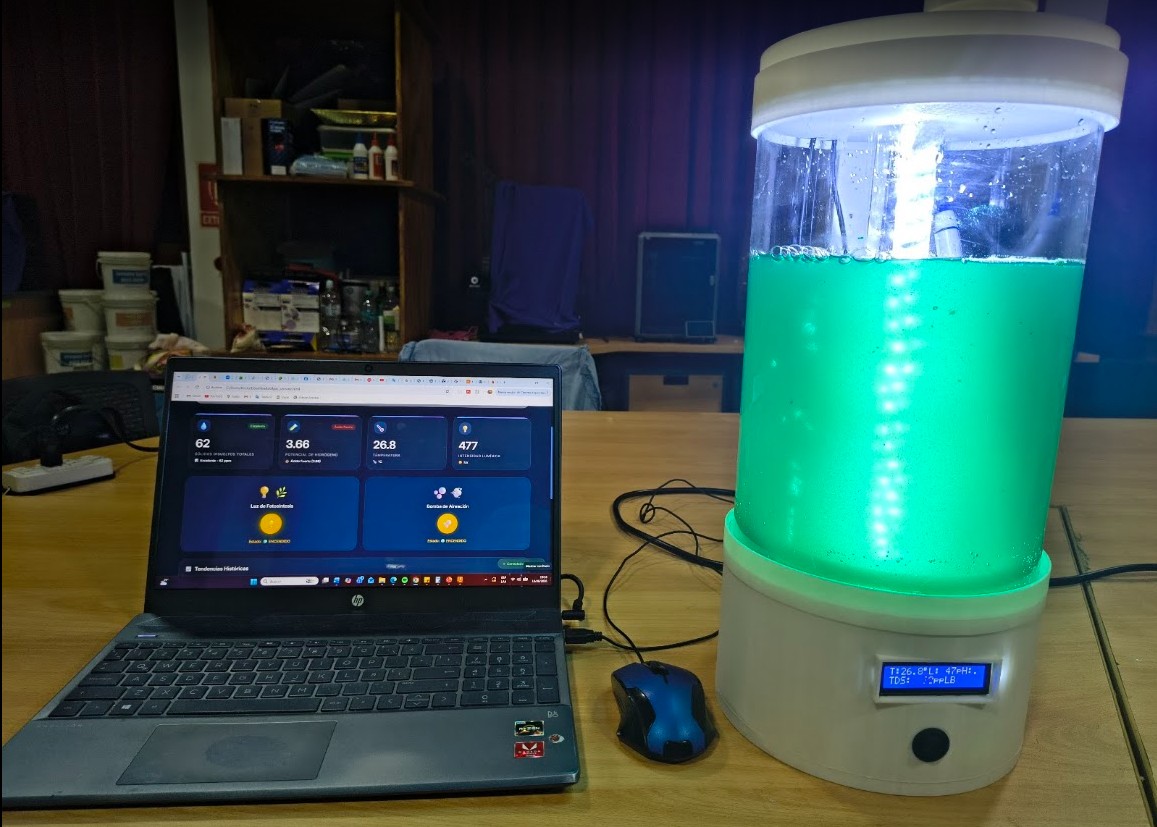
SpiruSense is an intelligent photobioreactor designed for the cultivation and monitoring of Limnospira platensis (spirulina). The system allows real-time measurement of temperature, pH, total dissolved solids (TDS), and light intensity. The data is displayed locally through an LCD screen and remotely through Firebase using a WiFi connection.

In addition, the system allows remote control of the lighting and aeration of the culture, facilitating continuous monitoring and improving the growth conditions of spirulina.

Img 1.1

Img. 1.1: Intelligent photobioreactor for spirulina cultivation.

Who has done something similar before?

During the research phase, projects related to automated microalgae cultivation and intelligent photobioreactors were analyzed.

Among the main references are:

  • Microalgae Bio-Photoreactor (Fab Academy 2017)
  • Ecotrons
  • AlgaGrower
  • Commercial photobioreactor systems for microalgae research and production.

These projects served as inspiration for the integration of sensors, remote monitoring, and automation of environmental variables.

However, SpiruSense differs because it includes:

  • Local fabrication through digital fabrication technologies.
  • Custom PCB designed and fabricated during Fab Academy.
  • Integration of low-cost sensors.
  • IoT platform based on Firebase.
  • Design oriented toward education, research, and small producers.
  • Low cost compared to commercial systems.
Img 2

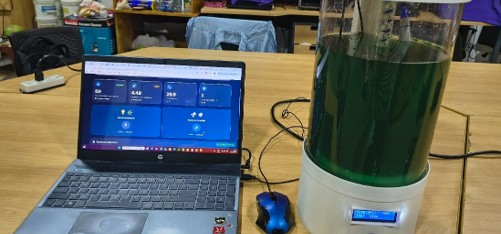
Img. 2: Spirulina cultivation test using my intelligent photobioreactor.

What did I design?

Mechanical Design

  • Photobioreactor base.
  • Upper lid.
  • Central lighting column.
  • Aeration system.
  • Sensor supports.
  • Electronic compartment.

Electronic Design

  • Custom PCB designed in KiCad.
  • Power supply system.
  • Sensor integration.
  • Actuator integration.

Digital Design

  • Firebase dashboard.
  • IoT architecture.
  • Firmware for XIAO ESP32-C3.

Video 1: Intelligent photobioreactor operation test showing real-time monitoring of water quality parameters.

What sources did I use?

Technical Documentation

  • XIAO ESP32-C3
  • Firebase
  • DS18B20
  • BH1750
  • TDS Meter
  • pH Sensor E201-C BNC

References

  • Fab Academy 2017 Microalgae Bio-Photoreactor
  • Ecotrons
  • AlgaGrower

Scientific Literature

  • Cultivation of Limnospira platensis
  • Photobioreactors for microalgae
  • Monitoring of physicochemical parameters
  • IoT systems for smart agriculture

Final Code Used

The following code was used to integrate TDS, pH, temperature, light intensity, LCD visualization, Firebase communication, and relay control for lighting and aeration.


/*******
 TDS Meter + pH Meter + DS18B20 + LCD I2C + Firebase Realtime DB + BH1750 + 2x Relay
 For XIAO ESP32-C3

 FEATURES:
 - TDS reading (total dissolved solids in water)
 - pH reading (acidity/alkalinity of water)
 - Temperature reading with DS18B20 sensor
 - Light intensity reading with BH1750 sensor
 - 2x relay control (light for photosynthesis and air pump)
 - Relay control from Firebase Realtime Database
 - Relay control with physical button (D8)
 - 2-row I2C LCD screen (16x2 or 20x2)
 - TDS calibration with 707 ppm buffer
 - pH calibration with buffers 4.0 and 7.0 at 25°C
 - Calibration storage in permanent memory
 - Data sending to Firebase Realtime Database
 - Interactive serial menu for WiFi and Firebase configuration

 USED PINS:
 - DS18B20: A1 (GPIO1)
 - TDS: A0 (GPIO0)
 - pH: A2 (GPIO4)
 - BH1750: SDA=D4(GPIO6), SCL=D5(GPIO7)
 - Button: D8 (GPIO21)
 - Light relay: D2 (GPIO2)
 - Air pump relay: D3 (GPIO3)
 - LCD I2C: SDA=D4(GPIO6), SCL=D5(GPIO7)

 SERIAL COMMANDS:
 - menu : Show interactive configuration menu
 - cal:707 : Calibrate TDS with 707 ppm buffer
 - reset : Restore TDS calibration to default value
 - calph7 : Calibrate pH with buffer 7.0
 - calph4 : Calibrate pH with buffer 4.0
 - luz on/off : Control light relay (D2)
 - bomba on/off : Control air pump relay (D3)
 - show : Show current configuration
 - temp : Read temperature manually
******/

#include <OneWire.h>
#include <DallasTemperature.h>
#include <Preferences.h>
#include <Wire.h>
#include <LiquidCrystal_I2C.h>
#include <WiFi.h>
#include <Firebase_ESP_Client.h>
#include <BH1750.h>
#include <EEPROM.h>

// ============ DEFAULT CONFIGURATION ============
const char* DEFAULT_WIFI_SSID = "Rocio";
const char* DEFAULT_WIFI_PASSWORD = "1234567890";
const char* DEFAULT_FIREBASE_HOST = "iot-algas-instituto-default-rtdb.firebaseio.com";
const char* DEFAULT_FIREBASE_SECRET = "iot-algas-instituto";

// ============ GLOBAL CONFIGURATION VARIABLES ============
String wifiSSID = "";
String wifiPassword = "";
String firebaseHost = "";
String firebaseSecret = "";

// ============ CORRECTED PINS ============
#define DS18B20_PIN A1
#define TDS_PIN A0
#define PH_PIN A2

const int BOTON_PIN = 9;
const int RELE_LUZ_PIN = 8;
const int RELE_BOMBA_PIN = 10;

// ============ LCD ============
#define LCD_ADDRESS 0x27
#define LCD_COLUMNS 16
#define LCD_ROWS 2

LiquidCrystal_I2C lcd(LCD_ADDRESS, 2, 1, 0, 4, 5, 6, 7, 3, POSITIVE);
#define GRADOS 223

// ============ OBJECTS ============
BH1750 lightMeter;
OneWire oneWire(DS18B20_PIN);
DallasTemperature ds18b20(&oneWire);
Preferences preferences;

FirebaseData fbdo;
FirebaseAuth auth;
FirebaseConfig config;

// ============ TDS VARIABLES ============
float kValue = 1.0;
float temperature = 25;
float tdsValue = 0;
float voltage = 0;
int adcValue = 0;

// ============ pH VARIABLES ============
float phValue = 7.0;
float phVoltage = 0;
float phCalibration7 = 2048;
float phCalibration4 = 1500;

// ============ BH1750 VARIABLES ============
float luxValue = 0;

// ============ RELAY VARIABLES ============
bool releLuzEstado = false;
bool releBombaEstado = false;
bool releLuzFirebase = false;
bool releBombaFirebase = false;

// ============ BUTTON VARIABLES ============
bool lastButtonState = HIGH;
unsigned long lastButtonPressTime = 0;
const unsigned long debounceDelay = 50;
int buttonPressCount = 0;
unsigned long lastButtonActionTime = 0;
const unsigned long doublePressDelay = 500;

// ============ TIME VARIABLES ============
unsigned long lastReadTime = 0;
const unsigned long readInterval = 2000;
unsigned long lastLcdUpdate = 0;
const unsigned long lcdInterval = 1000;

unsigned long lastFirebaseSend = 0;
const unsigned long firebaseInterval = 10000;
bool firebaseConnected = false;
unsigned long lastFirebaseCheck = 0;
const unsigned long firebaseCheckInterval = 2000;

// ============ SERIAL MENU ============
bool waitingForInput = false;
String inputBuffer = "";
int menuState = 0;
bool menuActivo = false;

unsigned long lastFirebaseIndicator = 0;
bool showFirebaseIndicator = false;

void cargarConfiguracion() {
    preferences.begin("config", false);
    wifiSSID = preferences.getString("wifi_ssid", DEFAULT_WIFI_SSID);
    wifiPassword = preferences.getString("wifi_pass", DEFAULT_WIFI_PASSWORD);
    firebaseHost = preferences.getString("fb_host", DEFAULT_FIREBASE_HOST);
    firebaseSecret = preferences.getString("fb_secret", DEFAULT_FIREBASE_SECRET);
    preferences.end();

    Serial.println("\nConfiguration loaded from memory:");
    Serial.print("WiFi SSID: ");
    Serial.println(wifiSSID);
    Serial.print("Firebase Host: ");
    Serial.println(firebaseHost.substring(0, 50) + "...");
}

void guardarConfiguracionWiFi(String ssid, String password) {
    preferences.begin("config", false);
    preferences.putString("wifi_ssid", ssid);
    preferences.putString("wifi_pass", password);
    preferences.end();
    wifiSSID = ssid;
    wifiPassword = password;
    Serial.println("\nWiFi configuration saved!");
}

void guardarConfiguracionFirebase(String host, String secret) {
    preferences.begin("config", false);
    preferences.putString("fb_host", host);
    preferences.putString("fb_secret", secret);
    preferences.end();
    firebaseHost = host;
    firebaseSecret = secret;
    Serial.println("\nFirebase configuration saved!");
}

void borrarConfiguracion() {
    preferences.begin("config", false);
    preferences.clear();
    preferences.end();
    wifiSSID = DEFAULT_WIFI_SSID;
    wifiPassword = DEFAULT_WIFI_PASSWORD;
    firebaseHost = DEFAULT_FIREBASE_HOST;
    firebaseSecret = DEFAULT_FIREBASE_SECRET;
    Serial.println("\nFactory configuration restored!");
}

void inicializarBoton() {
    pinMode(BOTON_PIN, INPUT_PULLUP);
    Serial.println("Button initialized in D8.");
}

void inicializarReles() {
    pinMode(RELE_LUZ_PIN, OUTPUT);
    pinMode(RELE_BOMBA_PIN, OUTPUT);
    digitalWrite(RELE_LUZ_PIN, LOW);
    digitalWrite(RELE_BOMBA_PIN, LOW);
    Serial.println("Relays initialized.");
}

void inicializarLCD() {
    Serial.println("Initializing LCD...");
    Wire.begin(6, 7);
    lcd.begin(LCD_COLUMNS, LCD_ROWS);
    lcd.backlight();
    lcd.clear();
    lcd.setCursor(0, 0);
    lcd.print(" TDS METER ");
    lcd.setCursor(0, 1);
    lcd.print(" Starting...");
    delay(2000);
    lcd.clear();
}

void inicializarTDS() {
    preferences.begin("tds", false);
    kValue = preferences.getFloat("kvalue", 1.0);
    preferences.end();
    if (kValue < 0.1 || kValue > 10) {
        kValue = 1.0;
    }
}

void inicializarDS18B20() {
    ds18b20.begin();
}

void inicializarADC() {
    analogReadResolution(12);
}

void inicializarBH1750() {
    Wire.begin(6, 7);
    lightMeter.begin(BH1750::CONTINUOUS_HIGH_RES_MODE);
}

void inicializarPHSensor() {
    EEPROM.begin(32);
    EEPROM.get(0, phCalibration7);
    EEPROM.get(sizeof(float), phCalibration4);
    if (phCalibration7 < 100 || phCalibration7 > 4000) {
        phCalibration7 = 2048;
        phCalibration4 = 1500;
    }
}
void conectarWiFi() {
    Serial.print("\nConnecting to WiFi: ");
    Serial.println(wifiSSID);

    lcd.clear();
    lcd.setCursor(0, 0);
    lcd.print("Connecting WiFi");
    lcd.setCursor(0, 1);
    lcd.print(wifiSSID.substring(0, 14));

    WiFi.begin(wifiSSID.c_str(), wifiPassword.c_str());

    int attempts = 0;
    while (WiFi.status() != WL_CONNECTED && attempts < 20) {
        delay(500);
        Serial.print(".");
        attempts++;
    }

    if (WiFi.status() == WL_CONNECTED) {
        Serial.println("\nWiFi connected!");
        Serial.print("IP: ");
        Serial.println(WiFi.localIP());

        delay(3000);

        lcd.clear();
        lcd.setCursor(0, 0);
        lcd.print("WiFi OK!");
        lcd.setCursor(0, 1);
        lcd.print(WiFi.localIP());
        delay(2000);
    } else {
        Serial.println("\nWiFi failed!");
        lcd.clear();
        lcd.setCursor(0, 0);
        lcd.print("WiFi ERROR!");
        lcd.setCursor(0, 1);
        lcd.print("Check credentials");
        delay(2000);
    }

    lcd.clear();
}

void conectarFirebase() {
    Serial.println("Configuring Firebase...");

    config.host = firebaseHost.c_str();
    config.signer.tokens.legacy_token = firebaseSecret.c_str();

    Firebase.begin(&config, &auth);
    Firebase.reconnectWiFi(true);

    delay(2000);

    if (Firebase.ready()) {
        firebaseConnected = true;
        Serial.println("Firebase connected!");

        lcd.clear();
        lcd.setCursor(0, 0);
        lcd.print("Firebase OK!");
        lcd.setCursor(0, 1);
        lcd.print("Ready to send");
        delay(2000);
    } else {
        firebaseConnected = false;
        Serial.println("Firebase failed!");

        lcd.clear();
        lcd.setCursor(0, 0);
        lcd.print("Firebase ERROR!");
        lcd.setCursor(0, 1);
        lcd.print("Check config");
        delay(3000);
    }

    lcd.clear();
}

void controlarReleLuz(bool encender) {
    digitalWrite(RELE_LUZ_PIN, encender ? HIGH : LOW);
    releLuzEstado = encender;
}

void controlarReleBomba(bool encender) {
    digitalWrite(RELE_BOMBA_PIN, encender ? HIGH : LOW);
    releBombaEstado = encender;
}

void controlarRelesConBoton() {
    int estadoBoton = digitalRead(BOTON_PIN);
    unsigned long now = millis();

    if (estadoBoton == LOW && lastButtonState == HIGH) {
        if ((now - lastButtonPressTime) > debounceDelay) {
            lastButtonPressTime = now;

            if ((now - lastButtonActionTime) < doublePressDelay) {
                buttonPressCount++;

                if (buttonPressCount == 2) {
                    controlarReleBomba(!releBombaEstado);

                    if (Firebase.ready()) {
                        Firebase.RTDB.setBool(&fbdo, "/control/rele_bomba", releBombaEstado);
                    }

                    buttonPressCount = 0;
                    lastButtonActionTime = 0;
                }
            } else {
                buttonPressCount = 1;
                lastButtonActionTime = now;

                delay(doublePressDelay);

                if (buttonPressCount == 1) {
                    controlarReleLuz(!releLuzEstado);

                    if (Firebase.ready()) {
                        Firebase.RTDB.setBool(&fbdo, "/control/rele_luz", releLuzEstado);
                    }

                    buttonPressCount = 0;
                }
            }
        }
    }

    lastButtonState = estadoBoton;
}

void leerTemperatura() {
    ds18b20.requestTemperatures();
    float temp = ds18b20.getTempCByIndex(0);

    unsigned long start = millis();
    while (temp == DEVICE_DISCONNECTED_C && (millis() - start) < 1000) {
        delay(10);
        temp = ds18b20.getTempCByIndex(0);
    }

    if (temp != DEVICE_DISCONNECTED_C && !isnan(temp) && temp > -50 && temp < 125) {
        temperature = temp;
    }
}

void leerLuz() {
    luxValue = lightMeter.readLightLevel();
    if (isnan(luxValue) || luxValue < 0) luxValue = 0;
}

void leerPH() {
    int rawValue = analogRead(PH_PIN);
    phVoltage = (rawValue / 4095.0) * 3300;

    if (phCalibration7 != phCalibration4) {
        phValue = 4.0 + (rawValue - phCalibration4) * 3.0 / (phCalibration7 - phCalibration4);
    } else {
        phValue = 7.0;
    }

    if (phValue < 0) phValue = 0;
    if (phValue > 14) phValue = 14;
}

void leerTDS() {
    long sumADC = 0;

    for (int i = 0; i < 10; i++) {
        sumADC += analogRead(TDS_PIN);
        delay(5);
    }

    adcValue = sumADC / 10;
    voltage = adcValue * (2.5 / 4095.0);
    calcularTDS();
}

void calcularTDS() {
    if (voltage >= 0.01 && voltage <= 2.4) {
        float v = voltage;
        float v3 = v * v * v;
        float v2 = v * v;
        float tdsRaw = (133.42 * v3 - 255.86 * v2 + 857.39 * v) * kValue;
        float tempComp = 1.0 + 0.02 * (temperature - 25.0);
        tdsValue = tdsRaw / tempComp;

        if (tdsValue < 0) tdsValue = 0;
    } else if (voltage < 0.01) {
        tdsValue = 0;
    } else {
        tdsValue = 9999;
    }
}

void actualizarSensores() {
    unsigned long now = millis();

    if (now - lastReadTime >= readInterval) {
        lastReadTime = now;
        leerTemperatura();
        leerTDS();
        leerPH();
        leerLuz();
        mostrarDatosSerie();
    }
}

void actualizarLCD() {
    unsigned long now = millis();

    if (now - lastLcdUpdate >= lcdInterval) {
        lastLcdUpdate = now;

        lcd.setCursor(0, 0);
        lcd.print("T:");
        lcd.print(temperature, 1);
        lcd.write(GRADOS);
        lcd.print("C");

        lcd.setCursor(7, 0);
        lcd.print("L:");
        lcd.print((int)luxValue);

        lcd.setCursor(12, 0);
        lcd.print("pH:");
        lcd.print(phValue, 1);

        lcd.setCursor(0, 1);
        lcd.print("TDS:");
        lcd.print(tdsValue, 0);
        lcd.print("ppm");

        lcd.setCursor(10, 1);
        if (releLuzEstado && releBombaEstado) {
            lcd.print("LB");
        } else if (releLuzEstado) {
            lcd.print("L ");
        } else if (releBombaEstado) {
            lcd.print(" B");
        } else {
            lcd.print("  ");
        }

        lcd.setCursor(15, 0);
        if (firebaseConnected && WiFi.status() == WL_CONNECTED) {
            lcd.print(".");
        } else {
            lcd.print(" ");
        }
    }
}

void enviarDatosFirebase() {
    if (!Firebase.ready()) {
        if (WiFi.status() == WL_CONNECTED) {
            conectarFirebase();
        } else {
            return;
        }
    }

    if (!Firebase.ready()) return;

    if (isnan(tdsValue) || isinf(tdsValue)) tdsValue = 0;
    if (isnan(phValue) || isinf(phValue)) phValue = 7.0;
    if (isnan(temperature) || isinf(temperature)) temperature = 25;

    bool exito = true;

    if (!Firebase.RTDB.setFloat(&fbdo, "/sensores/tds", tdsValue)) exito = false;
    if (!Firebase.RTDB.setFloat(&fbdo, "/sensores/ph", phValue)) exito = false;
    if (!Firebase.RTDB.setFloat(&fbdo, "/sensores/temperatura", temperature)) exito = false;
    if (!Firebase.RTDB.setFloat(&fbdo, "/sensores/luz_lux", luxValue)) exito = false;
    if (!Firebase.RTDB.setBool(&fbdo, "/sensores/rele_luz", releLuzEstado)) exito = false;
    if (!Firebase.RTDB.setBool(&fbdo, "/sensores/rele_bomba", releBombaEstado)) exito = false;
    if (!Firebase.RTDB.setInt(&fbdo, "/sensores/timestamp", (int)(millis() / 1000))) exito = false;

    firebaseConnected = exito;
}

void revisarComandosFirebase() {
    if (!Firebase.ready()) return;

    if (Firebase.RTDB.getBool(&fbdo, "/control/rele_luz")) {
        bool comandoLuz = fbdo.boolData();

        if (comandoLuz != releLuzFirebase) {
            releLuzFirebase = comandoLuz;
            controlarReleLuz(comandoLuz);
            Firebase.RTDB.setBool(&fbdo, "/control/rele_luz", releLuzEstado);
        }
    }

    if (Firebase.RTDB.getBool(&fbdo, "/control/rele_bomba")) {
        bool comandoBomba = fbdo.boolData();

        if (comandoBomba != releBombaFirebase) {
            releBombaFirebase = comandoBomba;
            controlarReleBomba(comandoBomba);
            Firebase.RTDB.setBool(&fbdo, "/control/rele_bomba", releBombaEstado);
        }
    }
}

void mostrarDatosSerie() {
    Serial.print("Temperature: ");
    Serial.print(temperature, 1);
    Serial.print(" C | TDS: ");
    Serial.print(tdsValue, 0);
    Serial.print(" ppm | pH: ");
    Serial.print(phValue, 2);
    Serial.print(" | Light: ");
    Serial.print(luxValue, 0);
    Serial.println(" lux");
}

void setup() {
    Serial.begin(115200);
    delay(1000);

    cargarConfiguracion();
    inicializarBoton();
    inicializarReles();
    inicializarLCD();
    inicializarTDS();
    inicializarDS18B20();
    inicializarADC();
    inicializarBH1750();
    inicializarPHSensor();
    conectarWiFi();
    conectarFirebase();
}

void loop() {
    unsigned long now = millis();

    if (!menuActivo) {
        actualizarSensores();
        actualizarLCD();
        controlarRelesConBoton();

        if (WiFi.status() != WL_CONNECTED) {
            conectarWiFi();
        }

        if (now - lastFirebaseSend >= firebaseInterval) {
            lastFirebaseSend = now;

            if (WiFi.status() == WL_CONNECTED) {
                enviarDatosFirebase();
            }
        }

        if (now - lastFirebaseCheck >= firebaseCheckInterval) {
            lastFirebaseCheck = now;

            if (WiFi.status() == WL_CONNECTED && firebaseConnected) {
                revisarComandosFirebase();
            }
        }
    }
}

What materials and components were used?

Component / Material Quantity Use in the project
XIAO ESP32-C31Main microcontroller of the system.
DS18B20 sensor1Measurement of culture temperature.
Gravity TDS sensor1Measurement of total dissolved solids.
pH E201-C BNC electrode1Measurement of culture pH.
BH1750 sensor1Measurement of light intensity.
16x2 I2C LCD screen1Local data visualization.
Air pump2Aeration and mixing of the culture.
2-channel relay module1Remote control of lighting and aeration.
White LED strip1Light source for the culture.
12V power supply1Main power supply of the system.
LM2596 Step-Down regulator1Voltage conversion for electronic components.
5V–3.3V logic converter1Logic level adaptation for sensors.
ON/OFF switch1General power on/off.
Custom PCB1Electronic integration of the system.
SMD componentsSeveralPCB fabrication.
ResistorsSeveralSignal conditioning and circuitry.
Connectors and headersSeveralComponent interconnection.
Transparent acrylic1 sheetThermoformed cylinder fabrication.
PLA filament1 kg3D printing of the structure.
Silicone hoses2 mAeration system.
3D printed air diffuser1Uniform bubble distribution.
Screws and nutsSeveralMechanical assembly.
Electrical wiringSeveralElectrical connections.
Silicone sealant1Sealing the system to prevent leaks.
Distilled waterAs neededTesting and calibration.
Spirulina (Limnospira platensis)According to cultureCultivated and monitored organism.

Where did they come from?

The materials and components used in the project came from different sources:

  • Inventory available in the Fab Lab.
  • Materials available in the laboratory.
  • Purchases from specialized suppliers in Lima.
  • Electronics stores located in Lima.
  • Online suppliers and sales platforms.

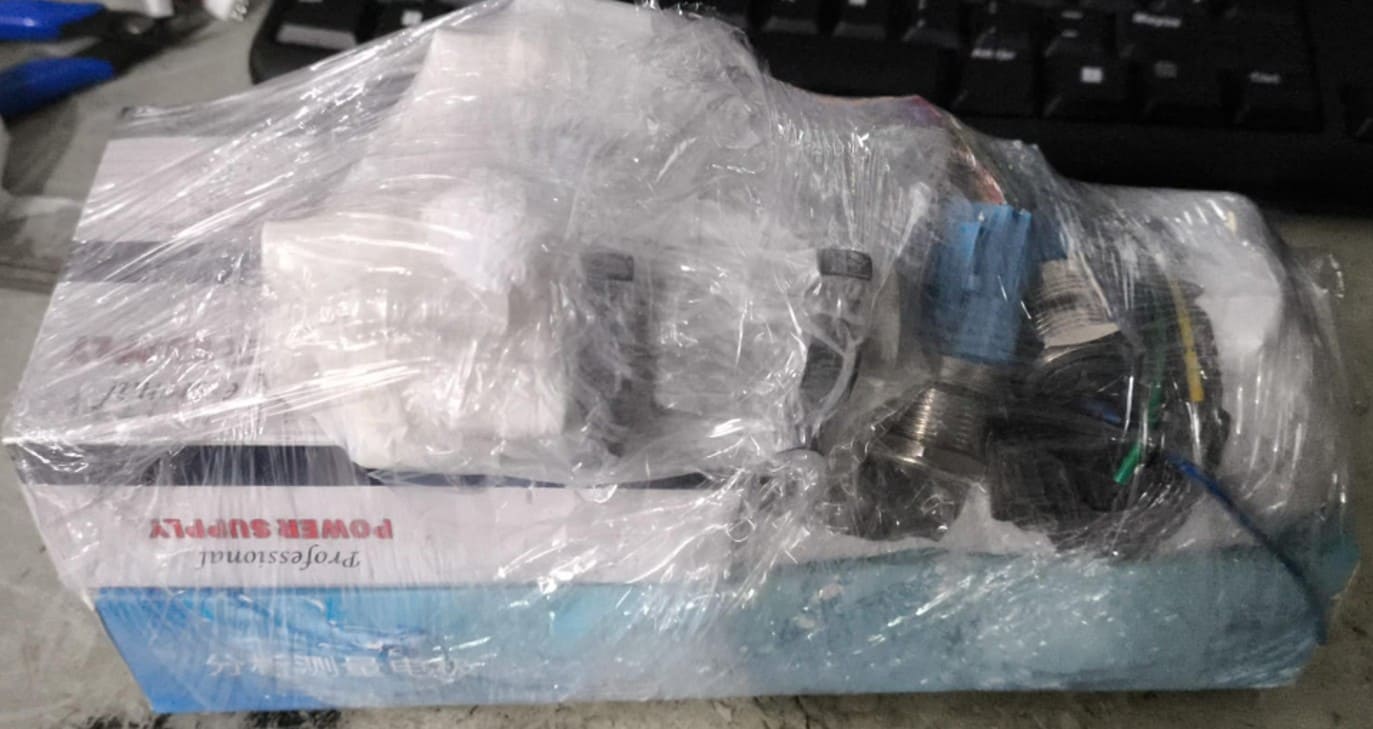
The project was developed in Madre de Dios, where the availability of electronic components is very limited. Because of this, most electronic components had to be purchased in Lima and shipped by parcel service.

Delivery time usually varies between 3 and 7 days. This represented a challenge during development because any missing component or selection error generated delays.

For example, I initially planned to use an OLED screen because of its better resolution and visual appearance. However, the module took longer than expected to arrive in Madre de Dios, so to meet the project schedule, I decided to use an I2C LCD screen that was already available in the laboratory. This solution allowed me to continue with the tests, electronic integration, and system validation without delaying the general development of the project.

Img 3

Img. 3: Receiving electronic components through SHALOM shipping company.

How much did they cost?

Component Quantity Total Cost (S/.) Total Cost (USD) Use in the project
XIAO ESP32-C3140.0011.11Main microcontroller.
DS18B20 sensor15.501.53Temperature measurement.
TDS sensor175.0020.83Dissolved solids measurement.
pH E201-C BNC sensor165.0018.06pH measurement.
BH1750 sensor110.002.78Light intensity measurement.
I2C LCD screen125.006.94Local visualization.
Air pump236.0010.00Culture aeration.
Relay module220.005.56Lighting and aeration control.
LED strip15.001.39Culture lighting.
12V power supply160.0016.67Main power supply.
LM2596 Step-Down regulator15.001.39Voltage conversion.
5V–3.3V logic converter16.001.67Signal adaptation for pH sensor.
ON/OFF switch15.001.39General power on/off.
Transparent acrylic160.0016.67Thermoformed cylinder.
PLA filament175.0020.833D printed structure.
PCB and electronic components150.0013.89Custom electronic board.
Resistors and connectorsSeveral10.002.78Circuitry and connections.
Miscellaneous materialsSeveral30.008.33Cables, hoses, screws, and sealing.
Estimated totalS/ 582.50USD 161.81

What parts and systems were fabricated?

Fabricated parts

  • 3D printed base.
  • 3D printed lid.
  • Aeration system.
  • Central lighting column.
  • Custom PCB.
  • Sensor supports.
  • Thermoformed acrylic cylinder.

Integrated systems

  • Monitoring system.
  • Lighting system.
  • Aeration system.
  • Electronic system.
  • IoT system.
  • Local visualization system.

What processes were used?

Area Process
2D DesignKiCad
2D DesignDesign for laser cutting
3D DesignFusion 360
Additive fabrication3D printing
Subtractive fabricationLaser cutting
Subtractive fabricationCNC fabrication
Electronic productionPCB milling
ElectronicsDesign and soldering
ProgrammingArduino IDE
IoTFirebase
IntegrationMechanical and electronic assembly

What questions were answered?

  • ✅ Does the structure support the culture volume?
  • ✅ Can the sensors monitor critical variables in real time?
  • ✅ Does Firebase allow stable remote monitoring?
  • ✅ Does the integrated lighting work properly?
  • ✅ Does aeration distribute the culture correctly?
  • ✅ Can the different subsystems work simultaneously?
  • ✅ Is it possible to develop a functional photobioreactor using digital fabrication?

What worked? What did not work?

Worked correctly

System Result
DS18B20 sensorCorrect real-time temperature reading.
pH E201-C BNC sensorpH measurement integrated into the system.
TDS sensorMonitoring of total dissolved solids.
BH1750 sensorLight intensity measurement.
I2C LCD screenLocal visualization of culture parameters.
WiFi communicationData sending to the cloud through Firebase.
FirebaseReal-time remote monitoring.
Lighting controlRemote on/off control from the web platform.
Aeration controlRemote activation of the aeration system.
General integrationJoint operation of sensors, actuators, and remote monitoring.

Problems found and implemented solutions

Problem Identified cause Implemented solution
First lighting system failed. Stored LEDs with deteriorated silicone coating were used. The LED strip was completely replaced with a new one.
The photoresistor burned twice. It was initially powered with 5V when it should have worked at 3.3V. The power supply was redesigned using the correct voltage.
Difficulties calibrating the pH sensor. Calibration solutions were not initially available. CITE Productivo Madre de Dios provided buffer solutions.
WiFi connection problems during tests. The available network was unstable. The mobile phone hotspot was used.
Aeration did not distribute bubbles uniformly. The initial diffuser had a large diameter and small perforations. Three versions were developed until uniform distribution was achieved.
Interference between I2C devices. LCD and BH1750 shared the same I2C bus. Programming and addressing tests were adjusted.
Failed first thermoforming tests. Incorrect heating temperature and time. Several attempts were made until a uniform acrylic cylinder was obtained.
First PCB versions had errors. Design and soldering adjustments were needed. Connections were corrected and new tests were performed.
Initial wiring organization was difficult. Many sensors and actuators were integrated in a small space. The internal distribution was redesigned.

How was it evaluated?

  • ✅ Temperature measurement.
  • ✅ pH measurement.
  • ✅ TDS measurement.
  • ✅ Light intensity measurement.
  • ✅ Local visualization on LCD.
  • ✅ Remote monitoring through Firebase.
  • ✅ Remote lighting control.
  • ✅ Remote aeration control.
  • ✅ Operation without leaks.
  • ✅ Complete hardware and software integration.
  • ✅ Appearance close to a finished product.

What are the implications?

SpiruSense demonstrates that it is possible to develop accessible tools for intelligent monitoring of microalgae cultivation using digital fabrication and IoT technologies.

The main implications of the project are:

  • Educational applications in Fab Labs and technical institutions.
  • Support for research in spirulina cultivation.
  • Development of low-cost systems for small producers.
  • Foundation for future agricultural automation projects.
  • Potential scaling toward commercial applications.
Img 4

Img. 4: Final presentation.

Video 2: Final presentation.

Final Deliverables

  • ✅ presentation.png (1920 × 1080)
  • ✅ presentation.mp4 (1080p, less than 25 MB)
  • ✅ Independent final project page
  • ✅ Bill of Materials (BOM)
  • ✅ Original CAD files
  • ✅ Original PCB files
  • ✅ Source code
  • ✅ Documented system integration
  • ✅ Selected license (CC BY-NC-SA 4.0)
  • ✅ Links to the weekly assignments related to project development
🚀 Explore My Final Project: SpiruSense

Reflection

The development of SpiruSense required multiple iterations in both mechanical and electronic design. Each problem encountered helped improve the final design and understand the importance of progressively validating each subsystem before integrating it into the complete project.

The main difficulties were related to component availability, sensor calibration, communication between devices, and optimization of the aeration system. However, solving these problems made it possible to obtain a functional, stable, and fully integrated system.

Project Development Through Weekly Assignments

Week Contribution to SpiruSense Link
Week 2 3D design of structural components using Fusion 360. Open
Week 6 Electronic schematic design and circuit planning. Open
Week 8 PCB fabrication and electronic assembly. Open
Week 9 Integration of temperature, TDS, pH and light sensors. Open
Week 10 LCD display and actuator implementation. Open
Week 11 Firebase communication and IoT monitoring. Open
Week 13 Project planning and development review. Open
Week 15 Development of the web application and user interface. Open
Week 16 Complete hardware and software integration. Open
Week 17 Thermoforming process for the acrylic bioreactor. Open
Week 18 Applications, impact analysis and future opportunities. Open
Week 19 Dissemination plan, intellectual property and project sustainability. Open

Files & Downloads

This section contains the main files developed for the SpiruSense project, including the source code, web monitoring platform, PCB design files, 3D models, and project presentation.