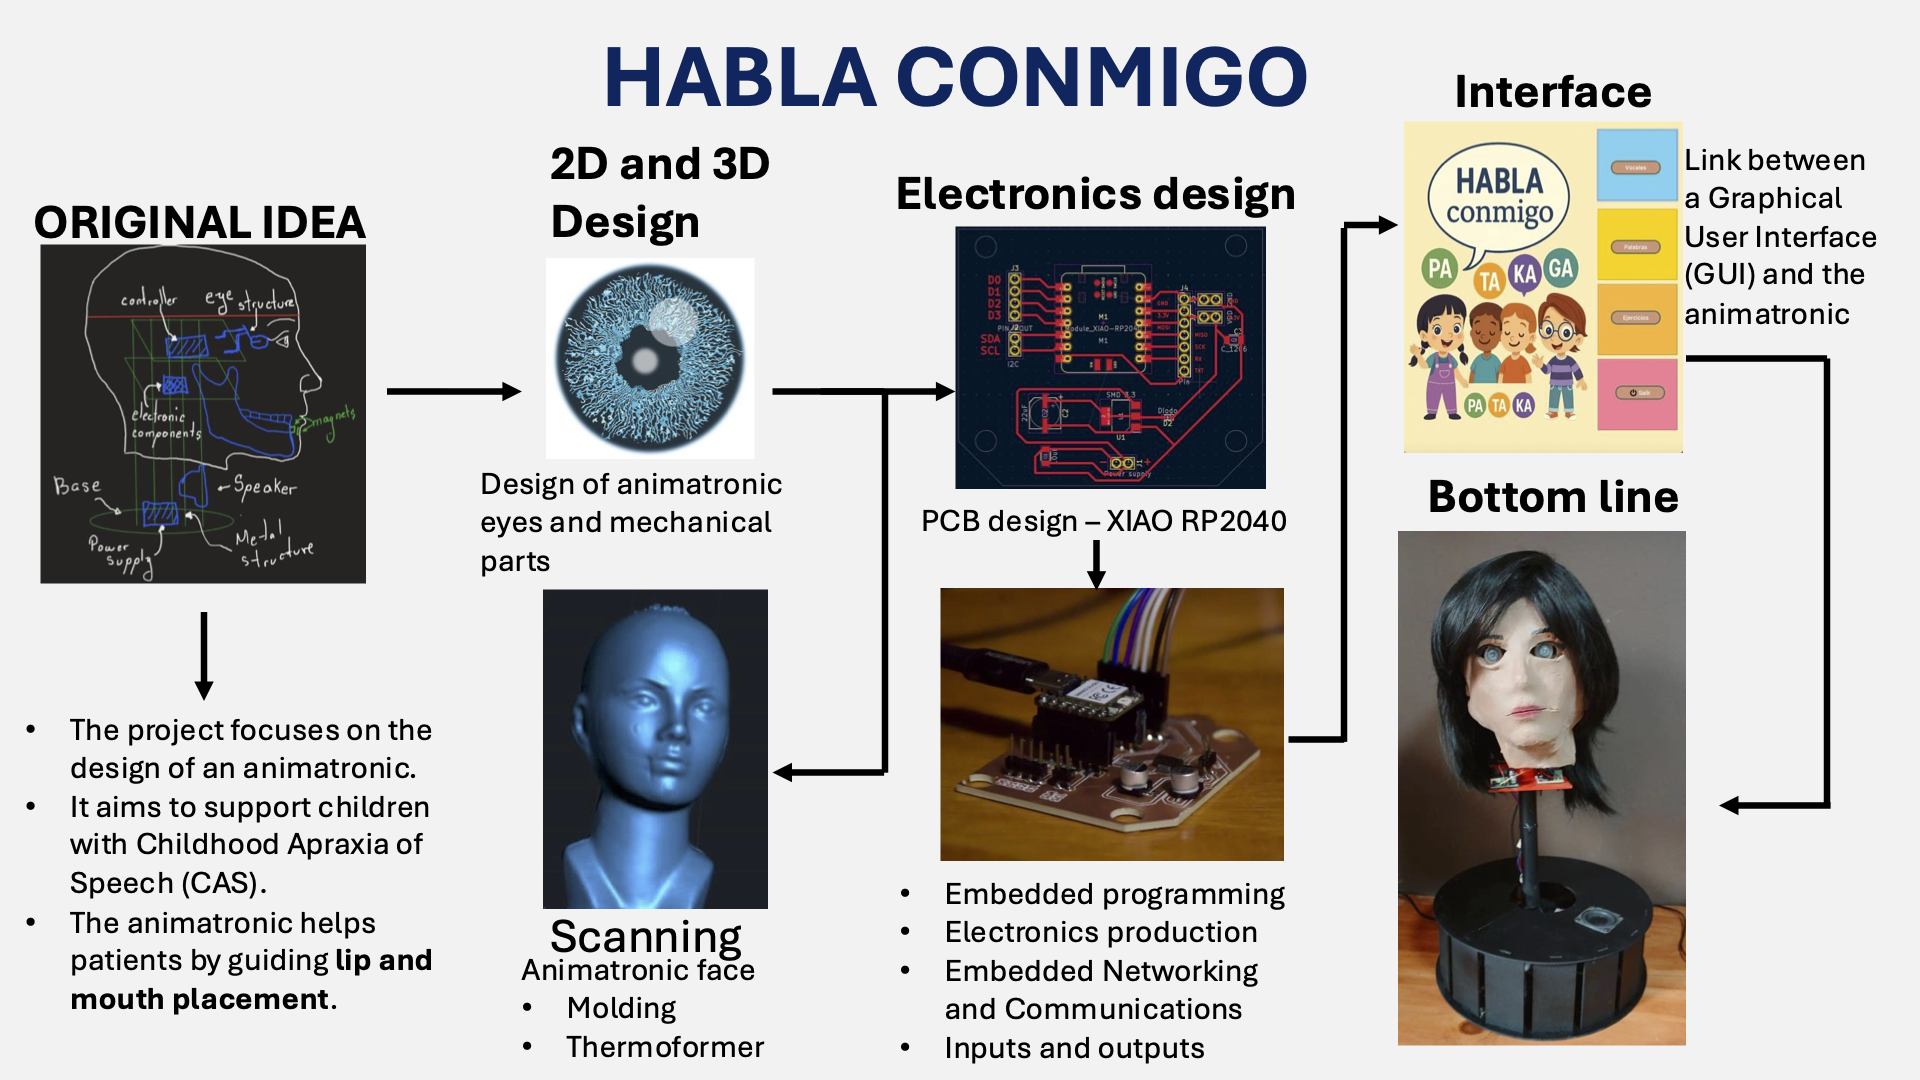
My Final Project
Slide
First approach
The project is based on designing an animatronic that helps with
" childhood apraxia of speech (CAS). "
The goal is for patients to imitate the facial movements of the animatronic
when speaking, helping them with the placement of lips and mouth.
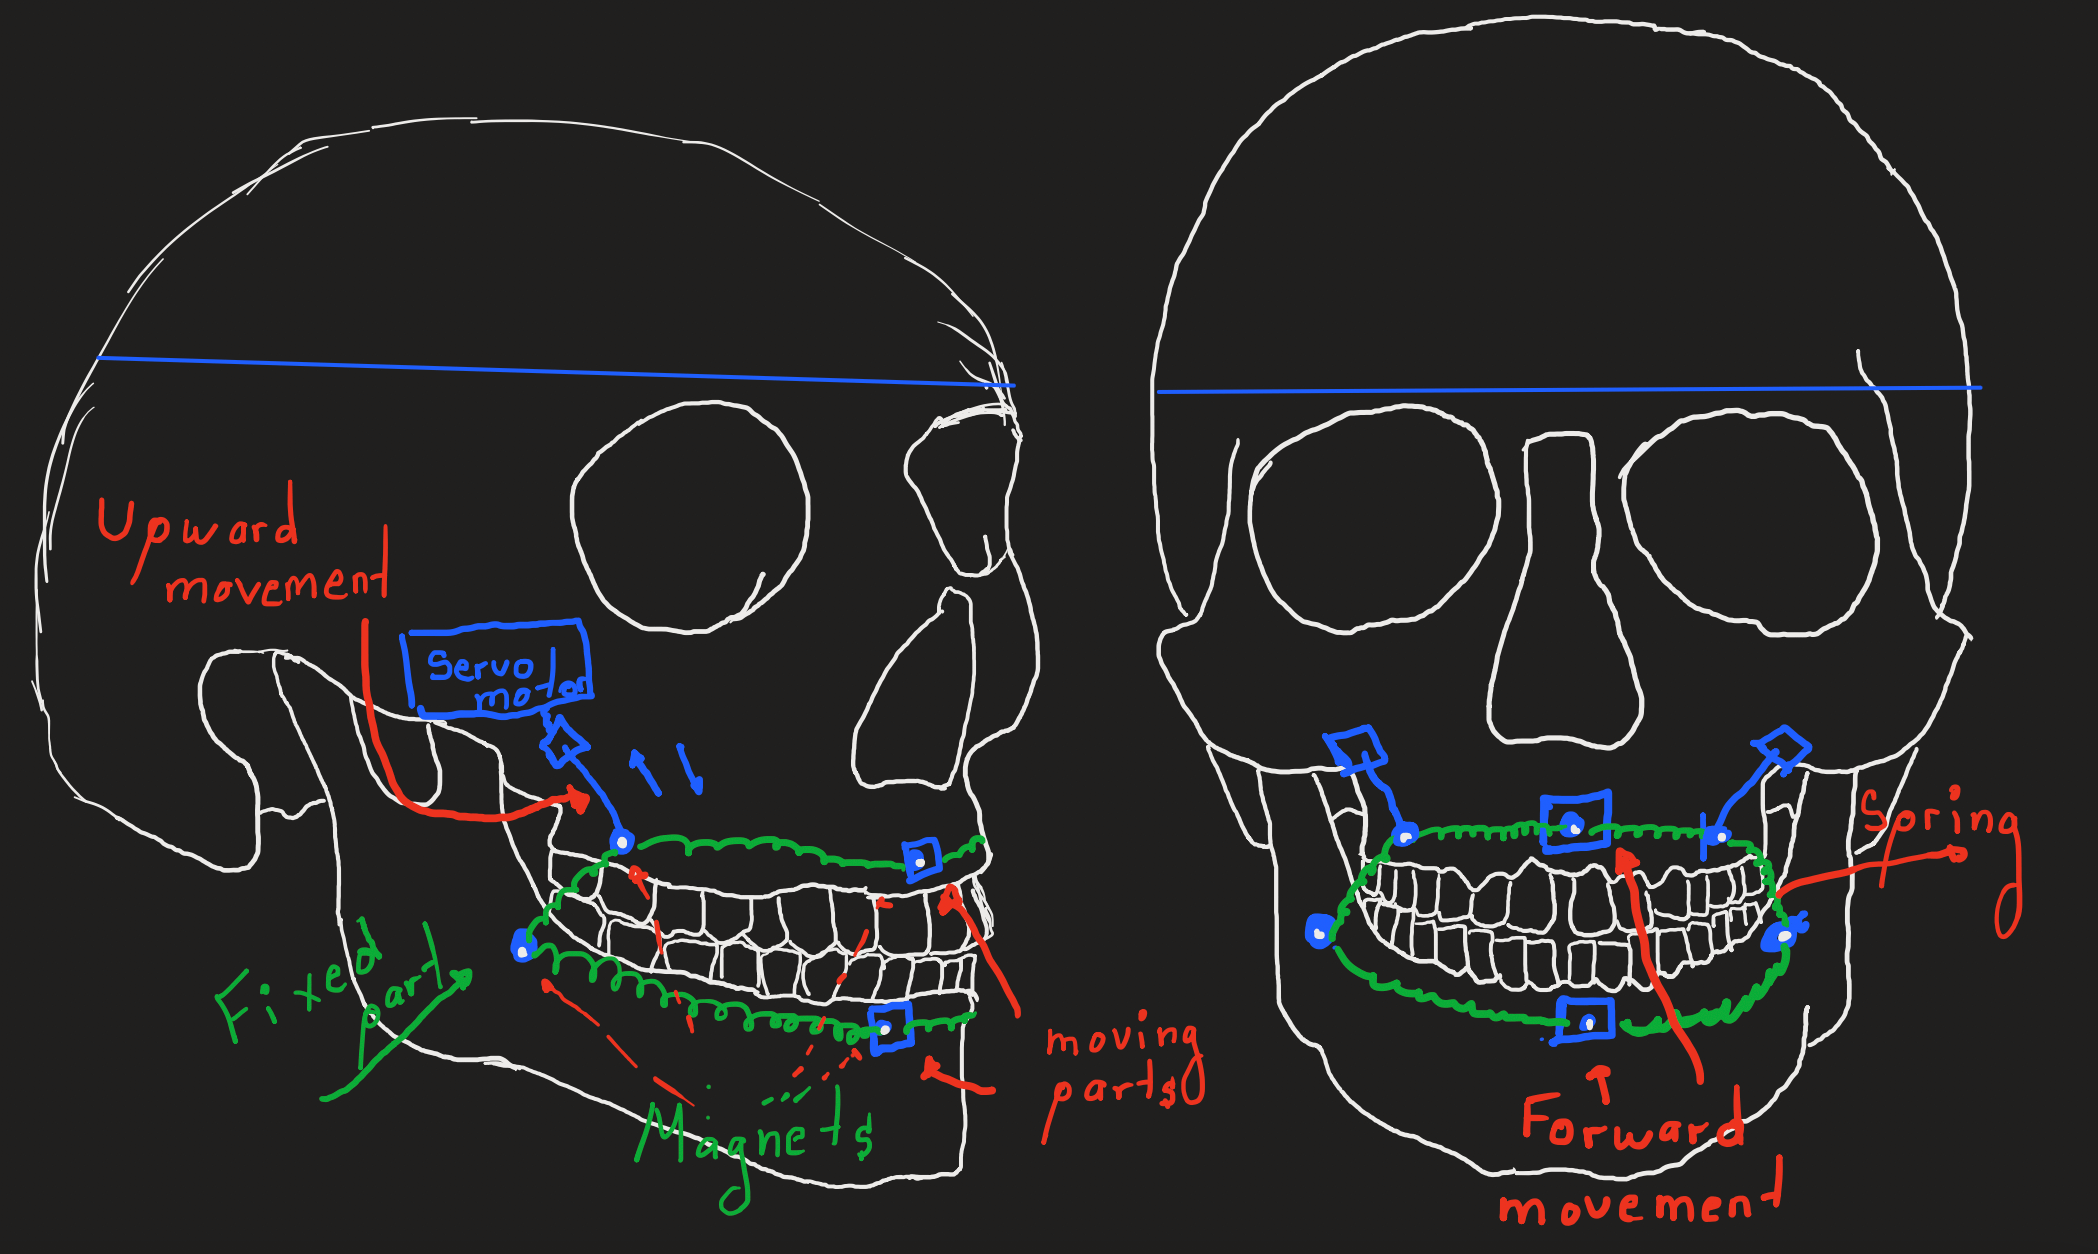
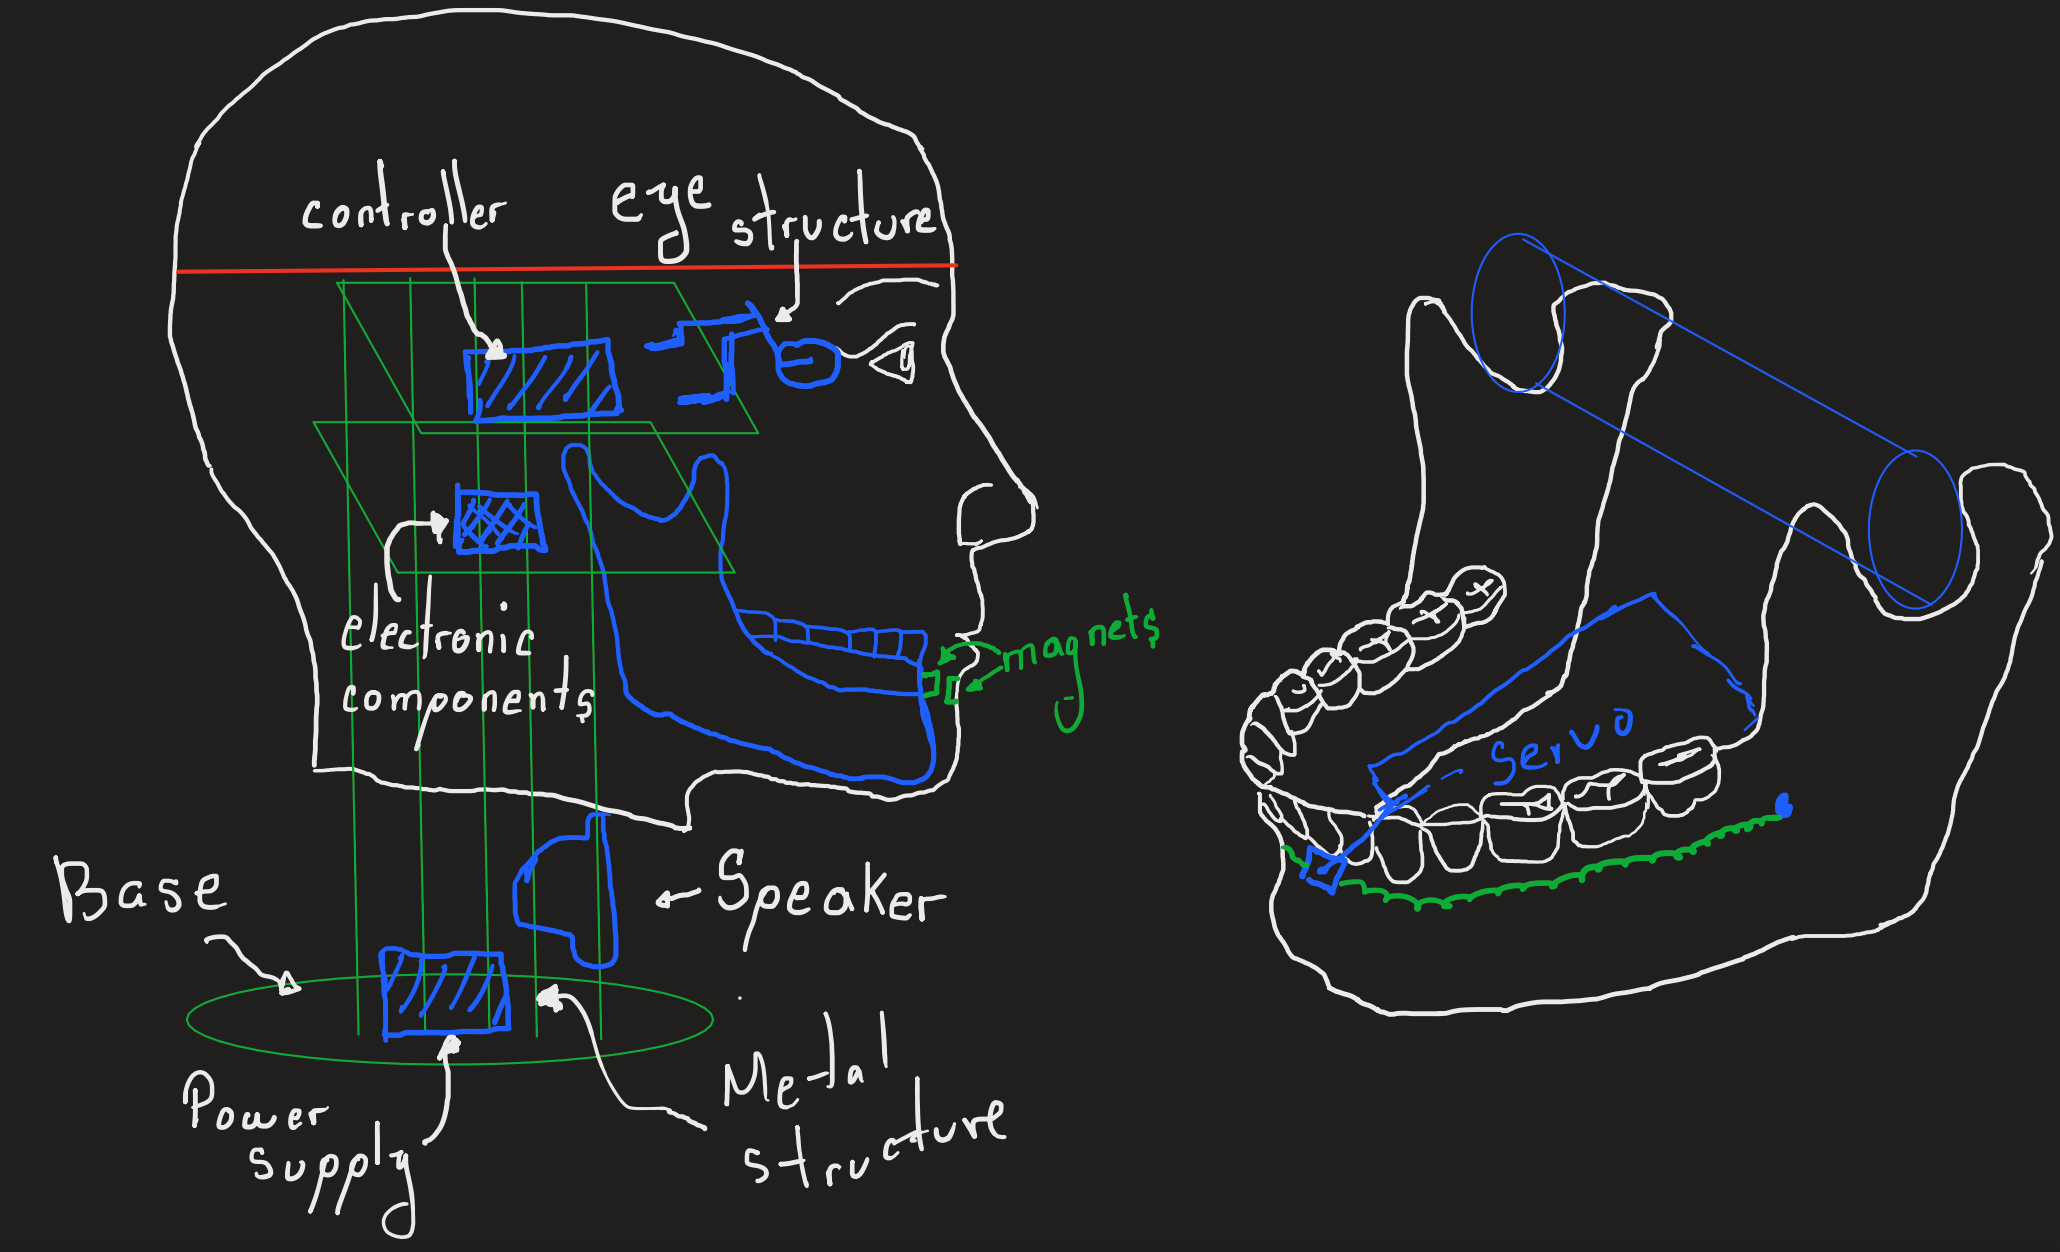
Below are the first sketches of the project.
Weeks
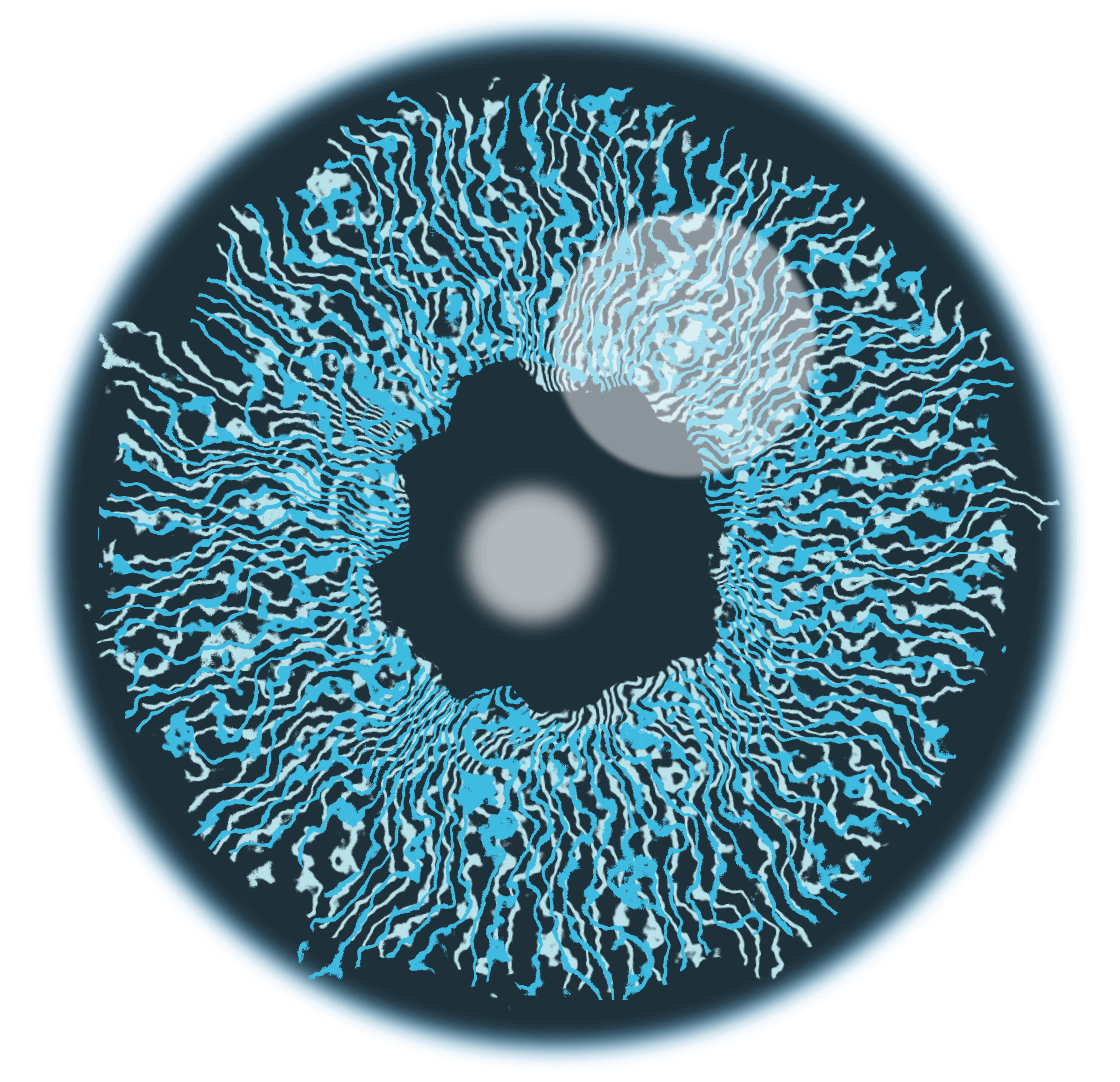
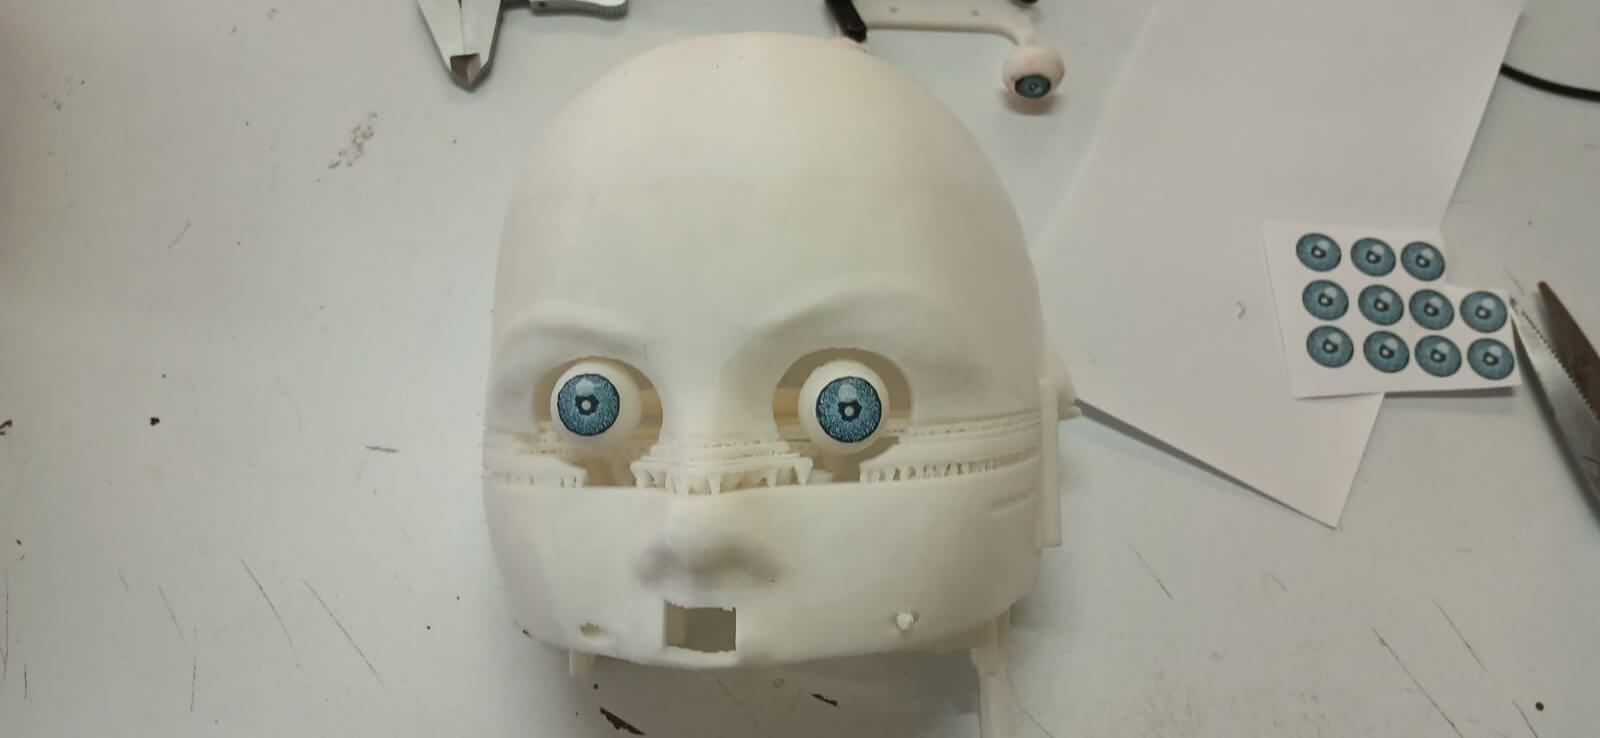
Week 2.- Computer-Aided DesignThis week, the 2D design of the eye—comprising the iris and retina—was completed and will be incorporated into the final model. It is worth noting that this design will be attached to a PLA base, over which resin will be poured using a mold to achieve the eye’s characteristic shape.
Blender
SolidWorks
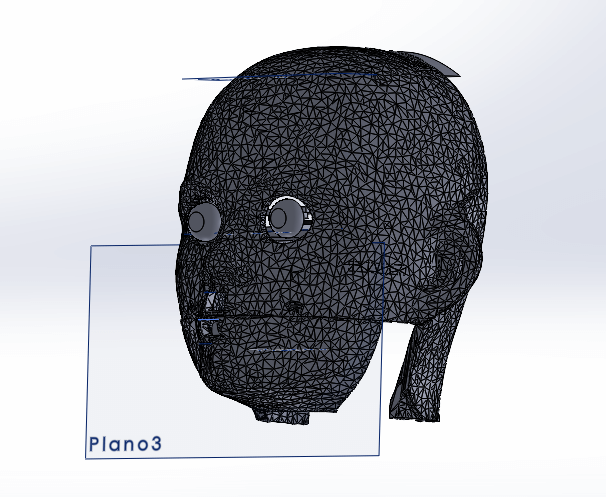
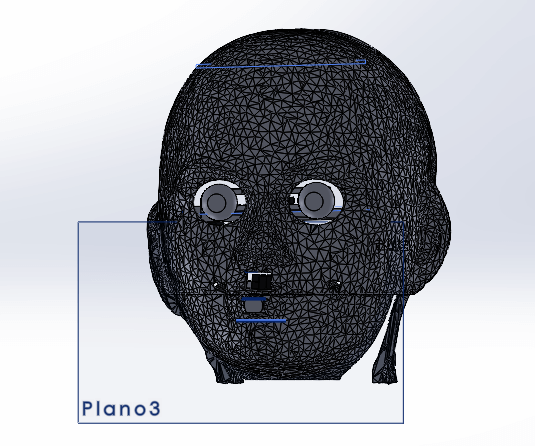
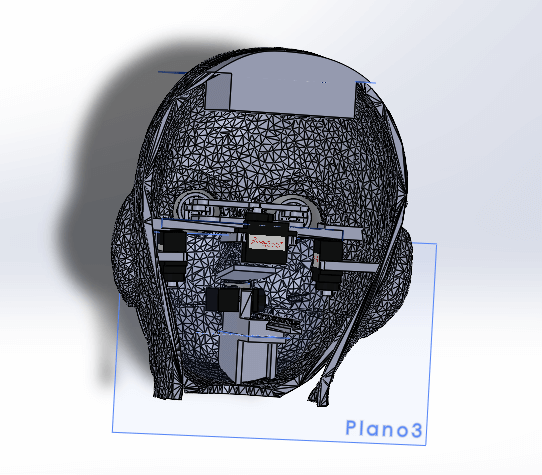
On the other hand, SolidWorks was used as a 3D design tool to model the structure of the eyes. The file can be found at the bottom of this page.
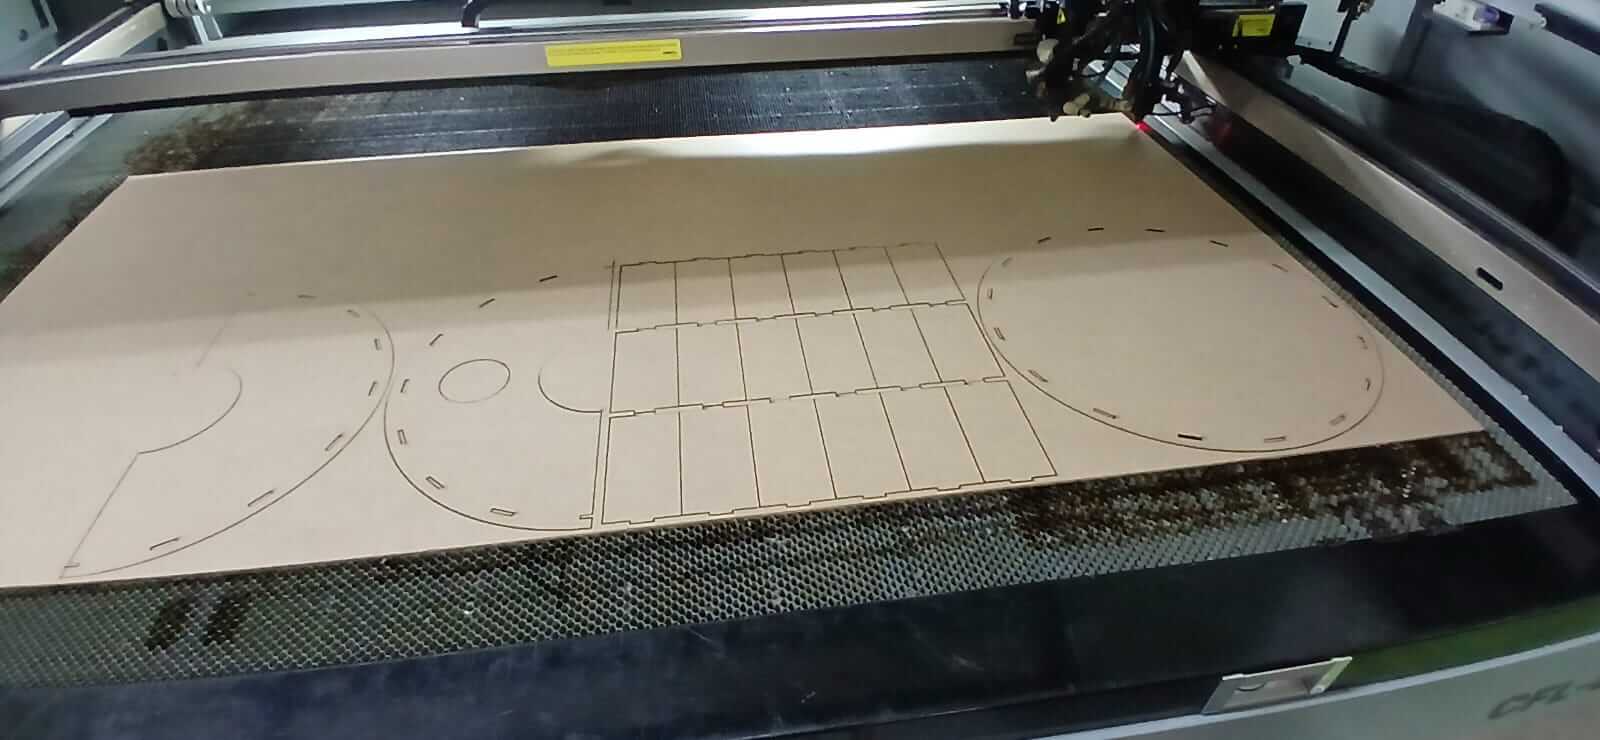
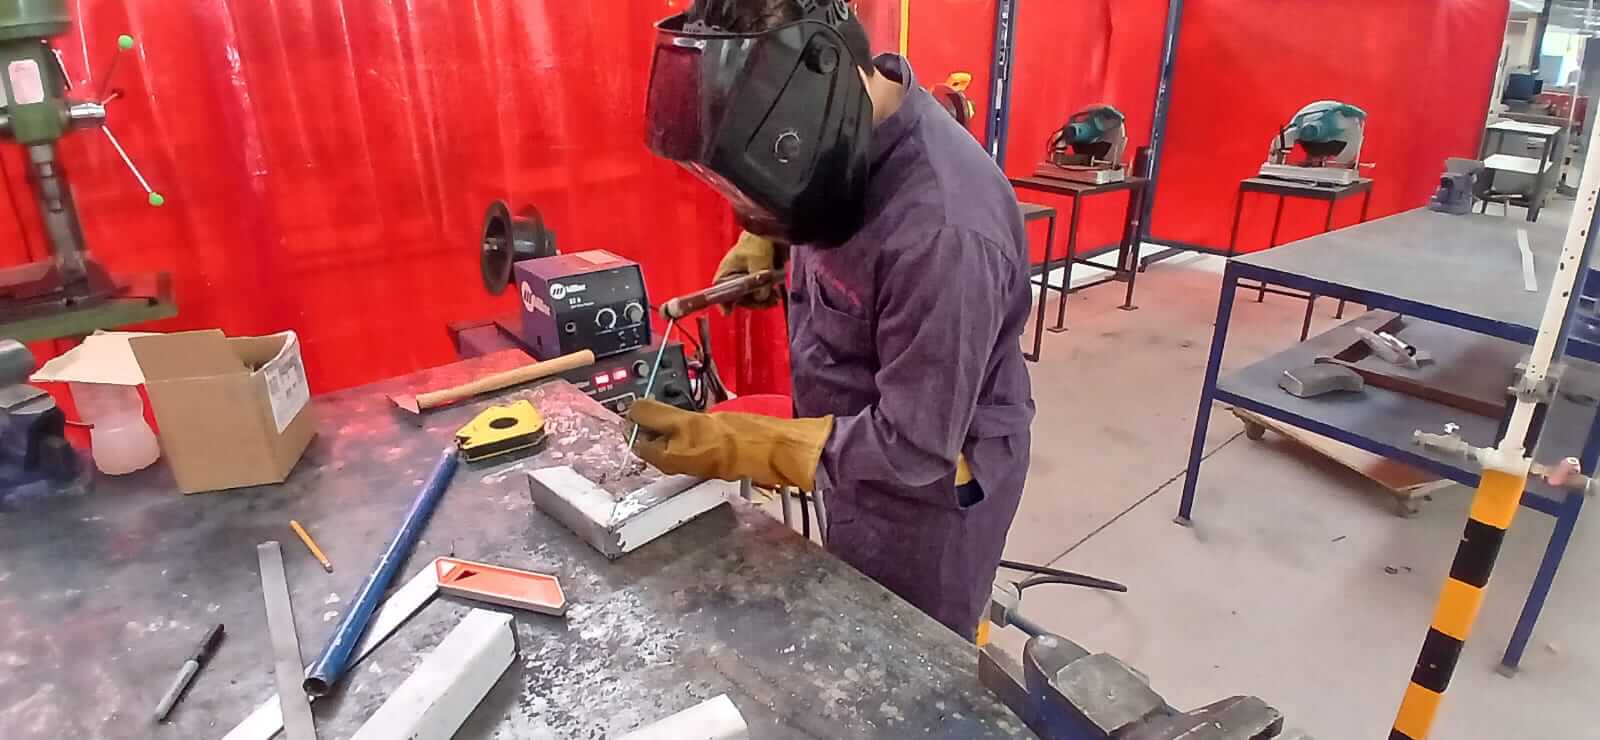
To support the animatronic, a custom base had to be designed. A laser cutter was used for this purpose. Below are the cutting process steps and the final result after painting.
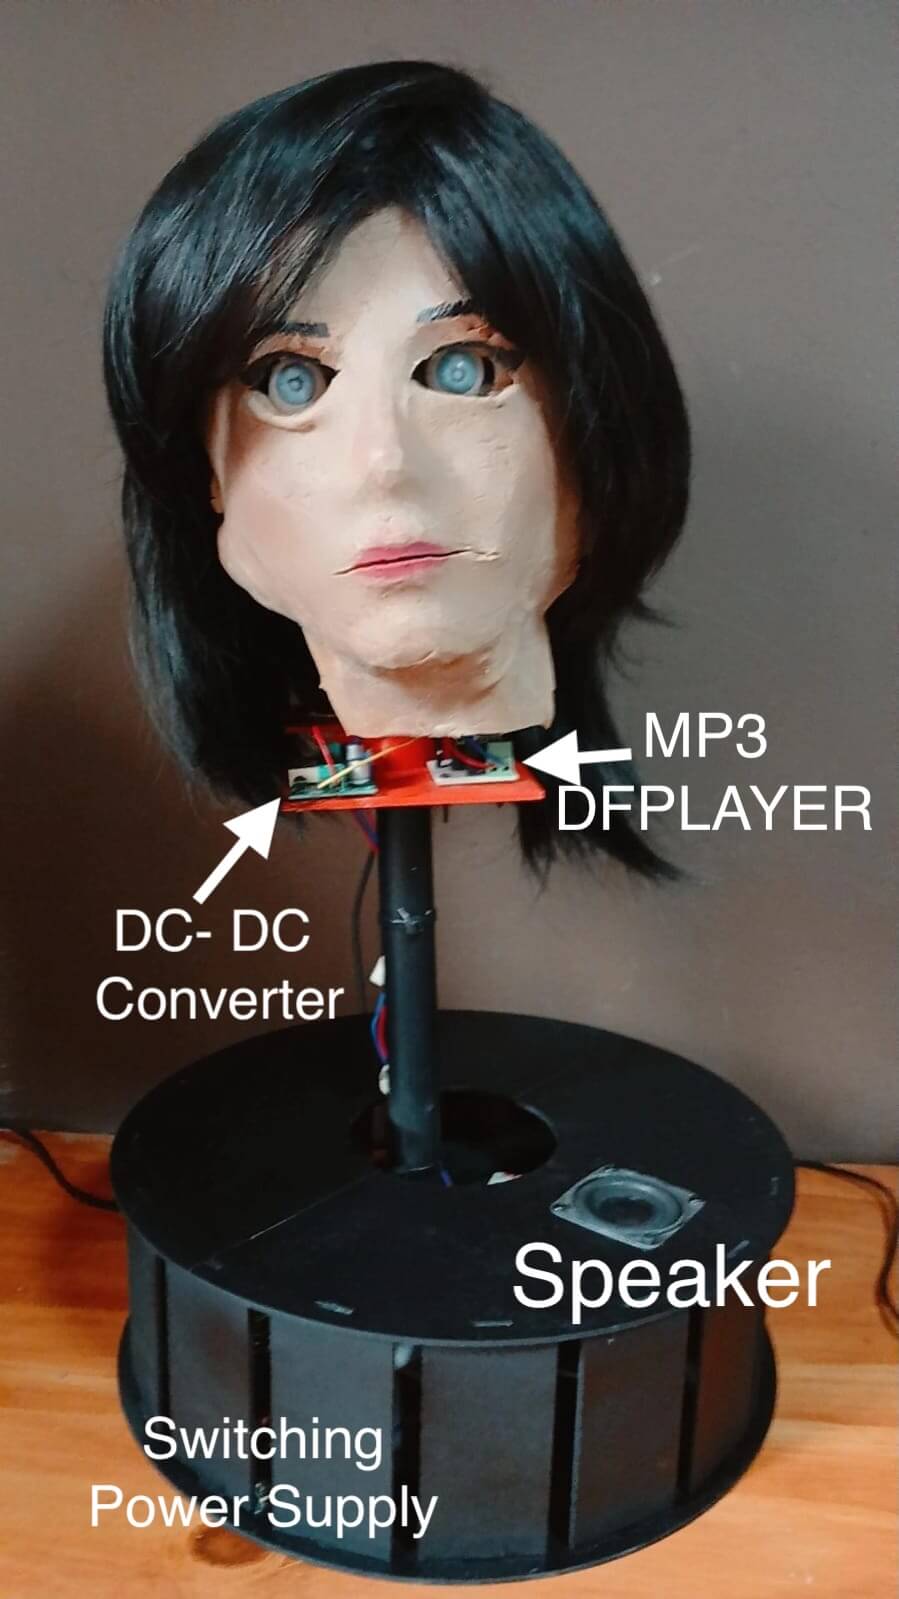
The following image shows that the top cover is divided into two halves. This design allows easy access to the power supplies and enables maintenance of the speaker when needed.
Week 4 - Embedded programming
In this section, the first tests were carried out to evaluate the movement of the servomotors, aiming to simulate jaw motion according to the corresponding vowel sound.
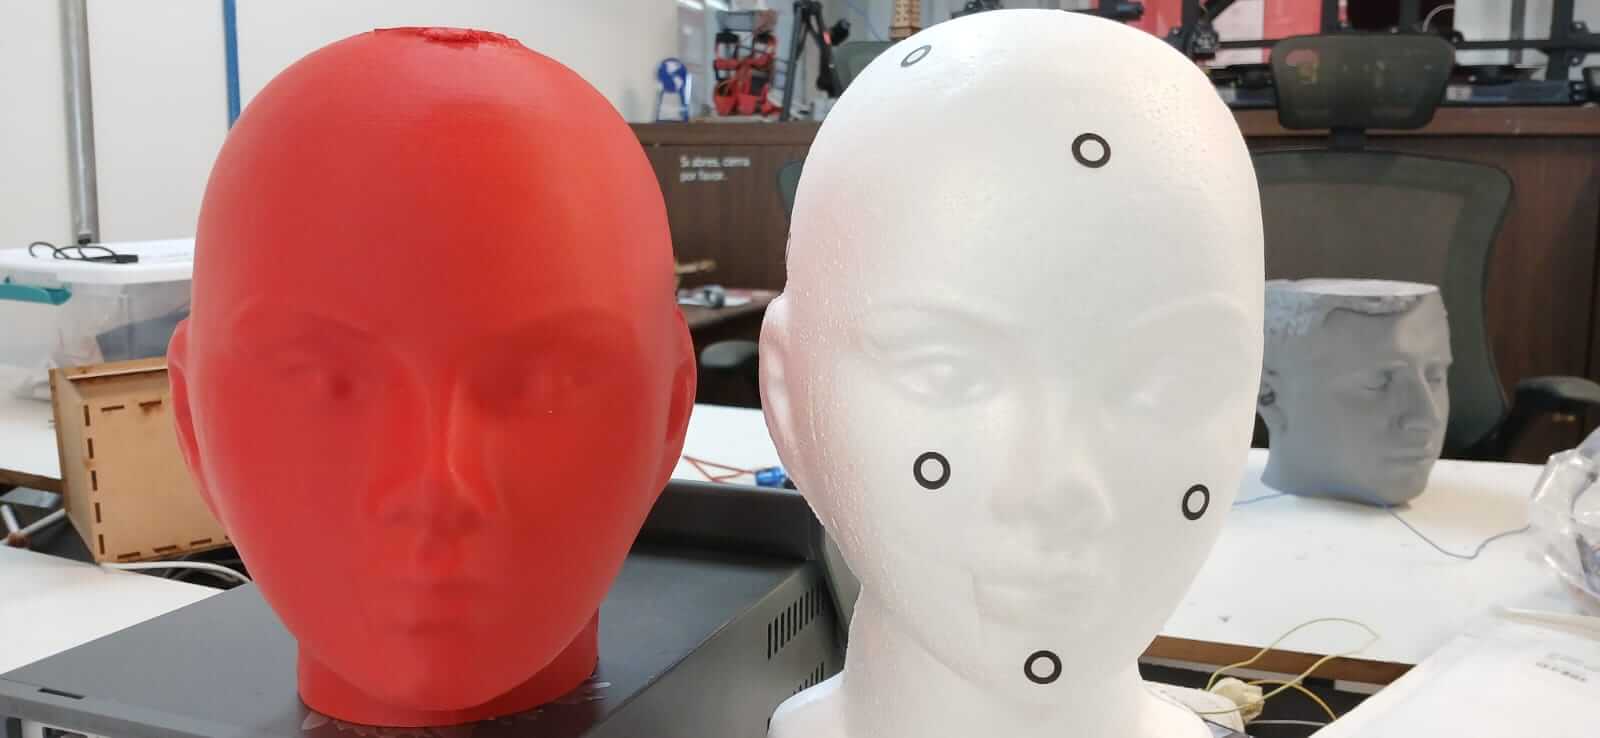
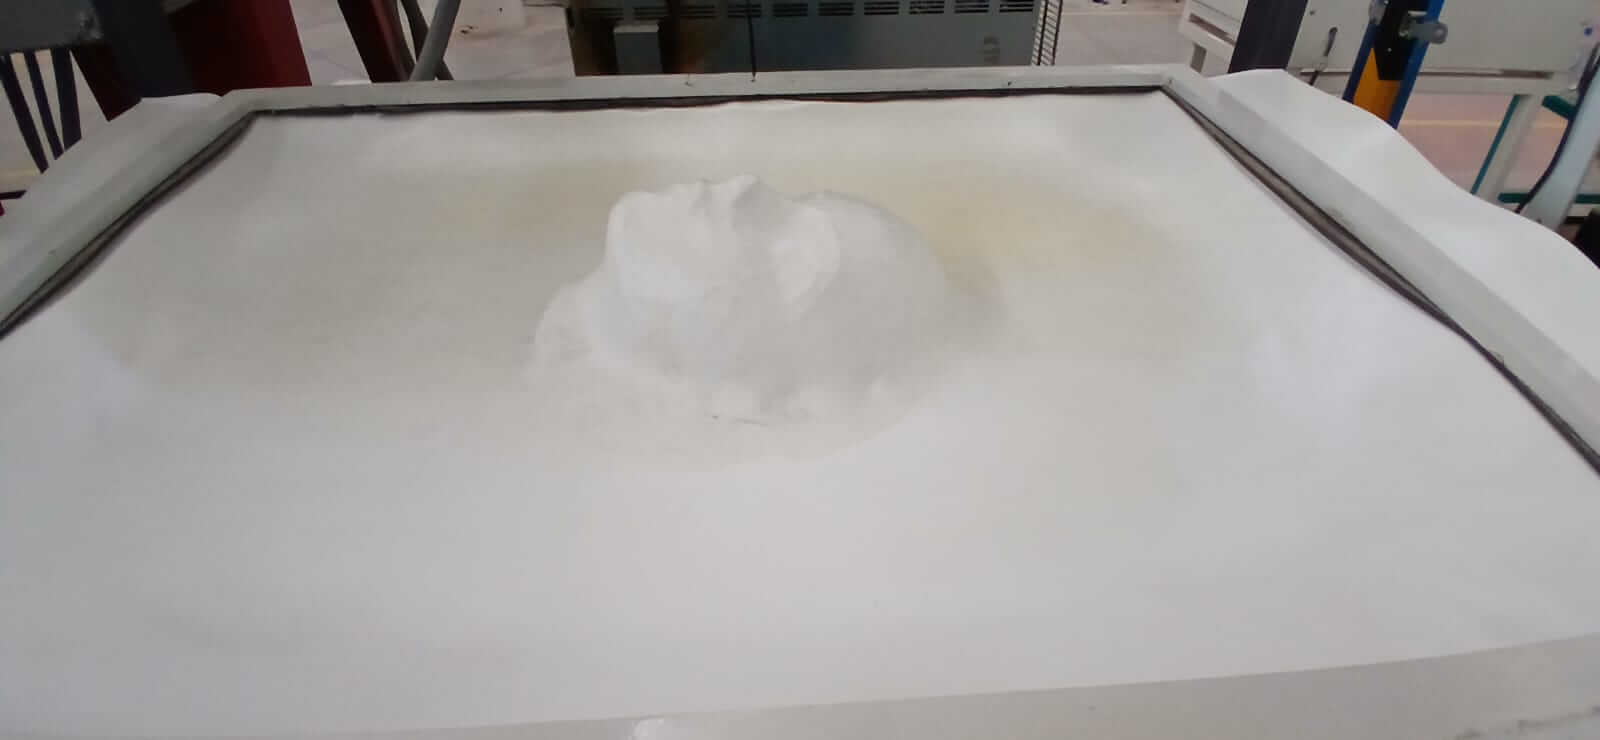
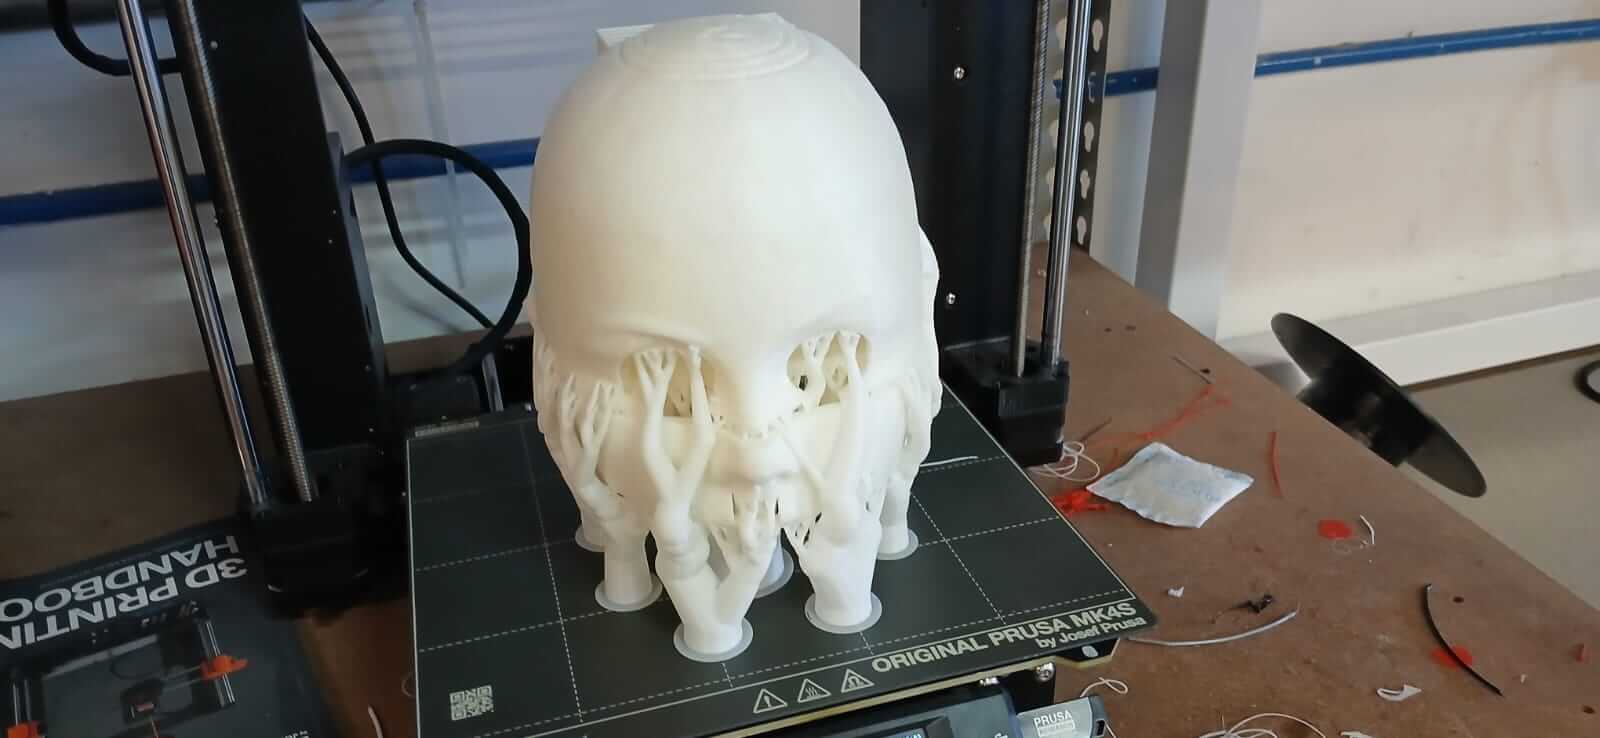
Week 5 - 3D Scaning and printing
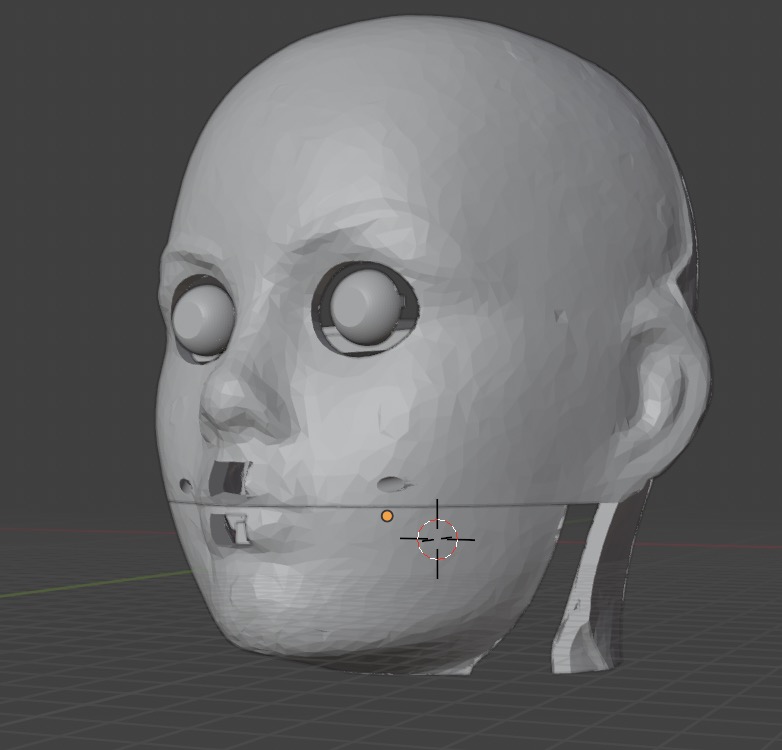
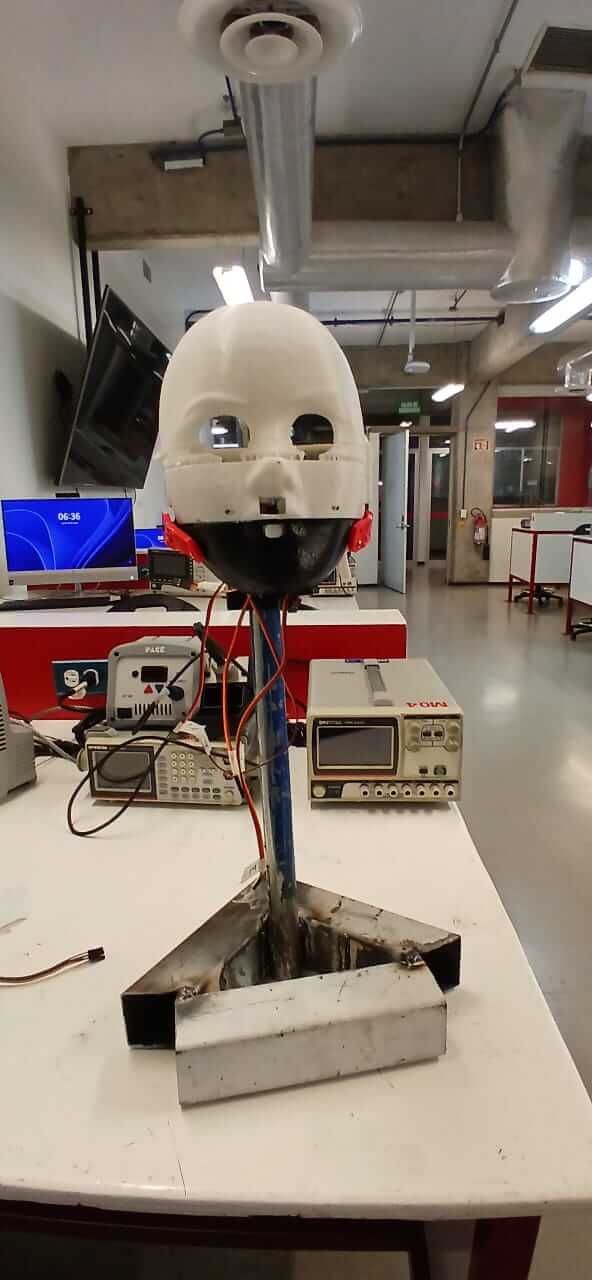
A fundamental part of the project is having a model of the intended face. To achieve this, a Styrofoam head was scanned and subsequently 3D printed. The following images show both the process and the final result.
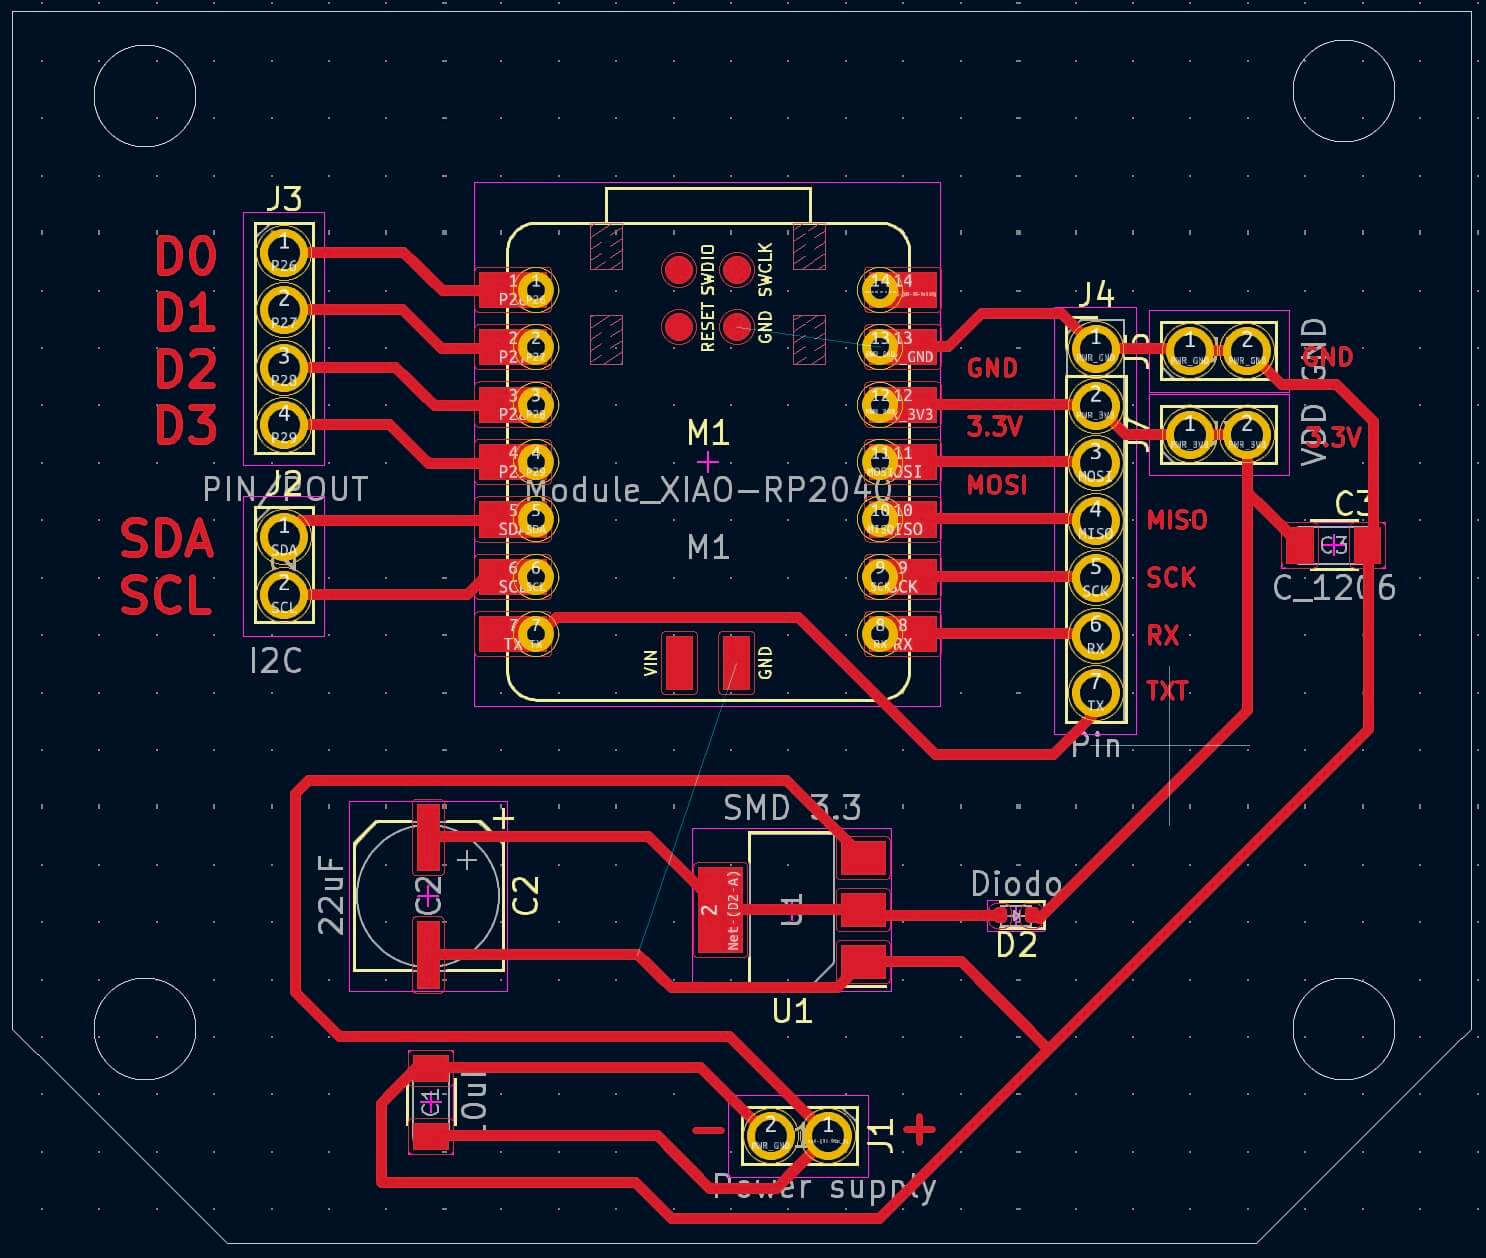
Week 6 - Electronics design
This week, the design of the circuit board to be used in the animatronic was completed. It is important to note that the controller is the RP2040. All downloadable files are available at the end of the document.
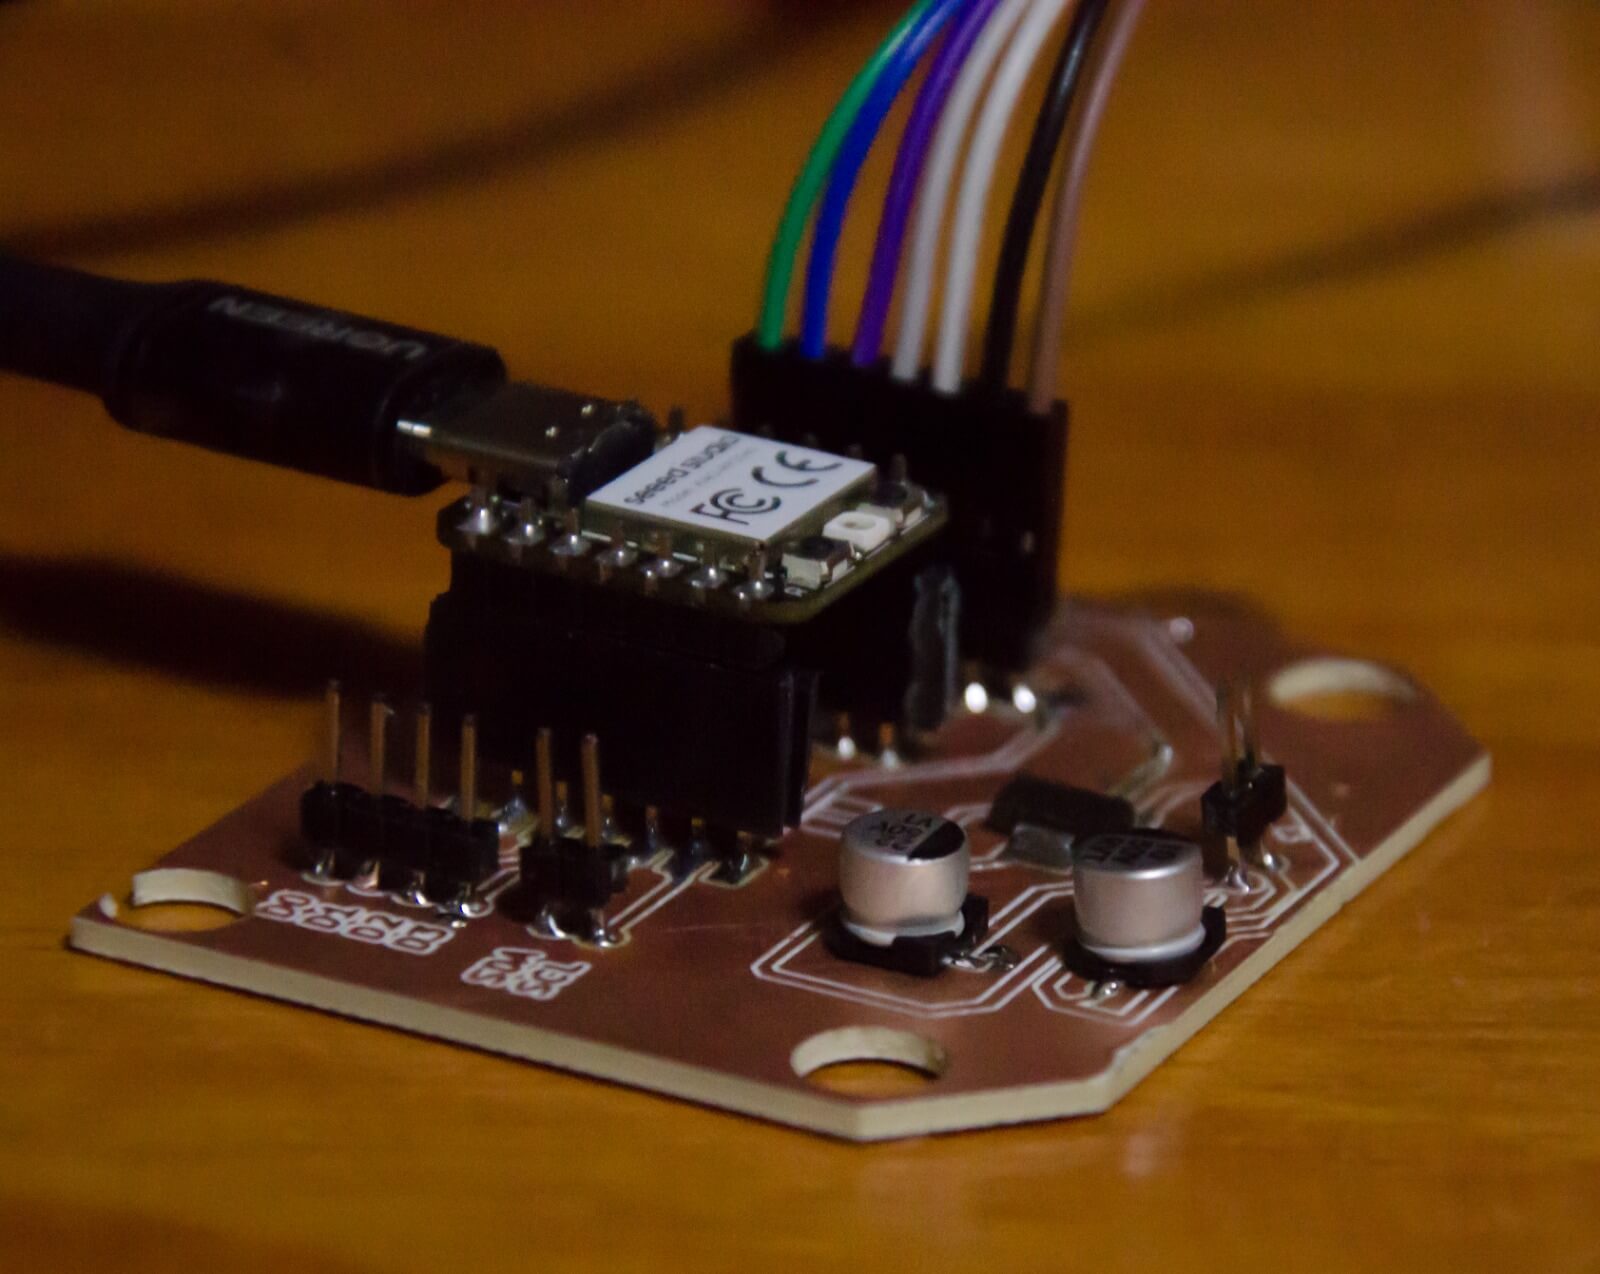
Week 8 - Electronics Production
This week, the PCB was manufactured using the "monoFab" milling machine and the "Mods CE" software. After fabrication, all electronic components were soldered onto the board
Taking advantage of the completed master board, communication with the servo driver (PCA9685) was established via the I2C protocol to test the correct functionality of the work developed in " Week 4 - Embedded programming "
Week 10 - Output Devices
Although servomotors were already tested during Week 8 - Electronics Production , this time a servomotor was used to actuate a small piston that simulates lip movement. This setup was mounted onto the final structure of the animatronic for realistic motion testing.
Week 11 - Embedded Networking and Communications
This project implemented two communication protocols.
- I2C. It was used to establish communication between the XIAO RP2040 and the PCA9685 servo driver.
- UART. It was used to establish communication between the XIAO RP2040 and the MP3 TF-16P module, operating at 9600 baud.
- UART. It was used for communication between the XIAO RP2040 and the interface, operating at 115200 baud.
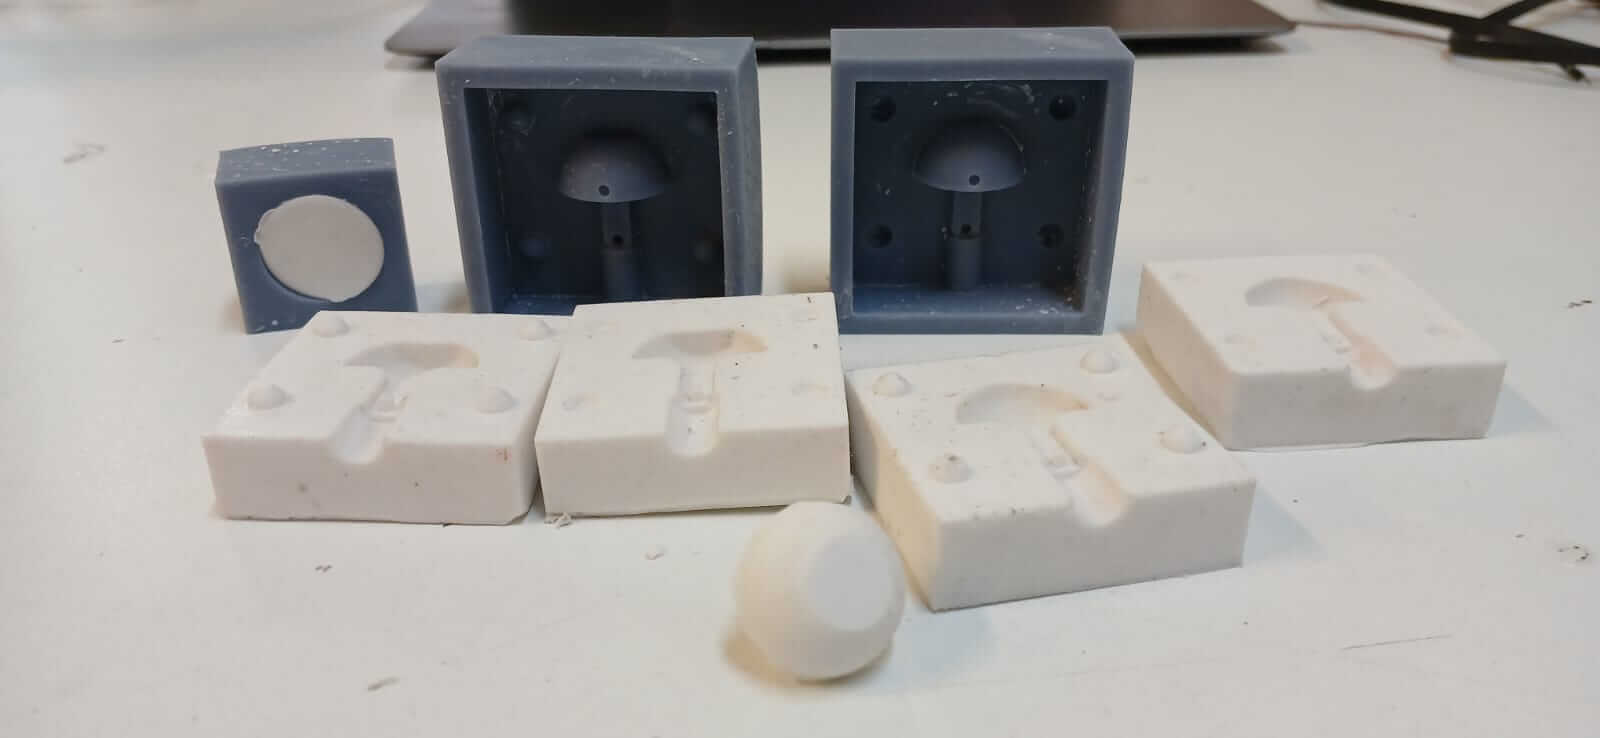
Week 13 - Moulding and Casting
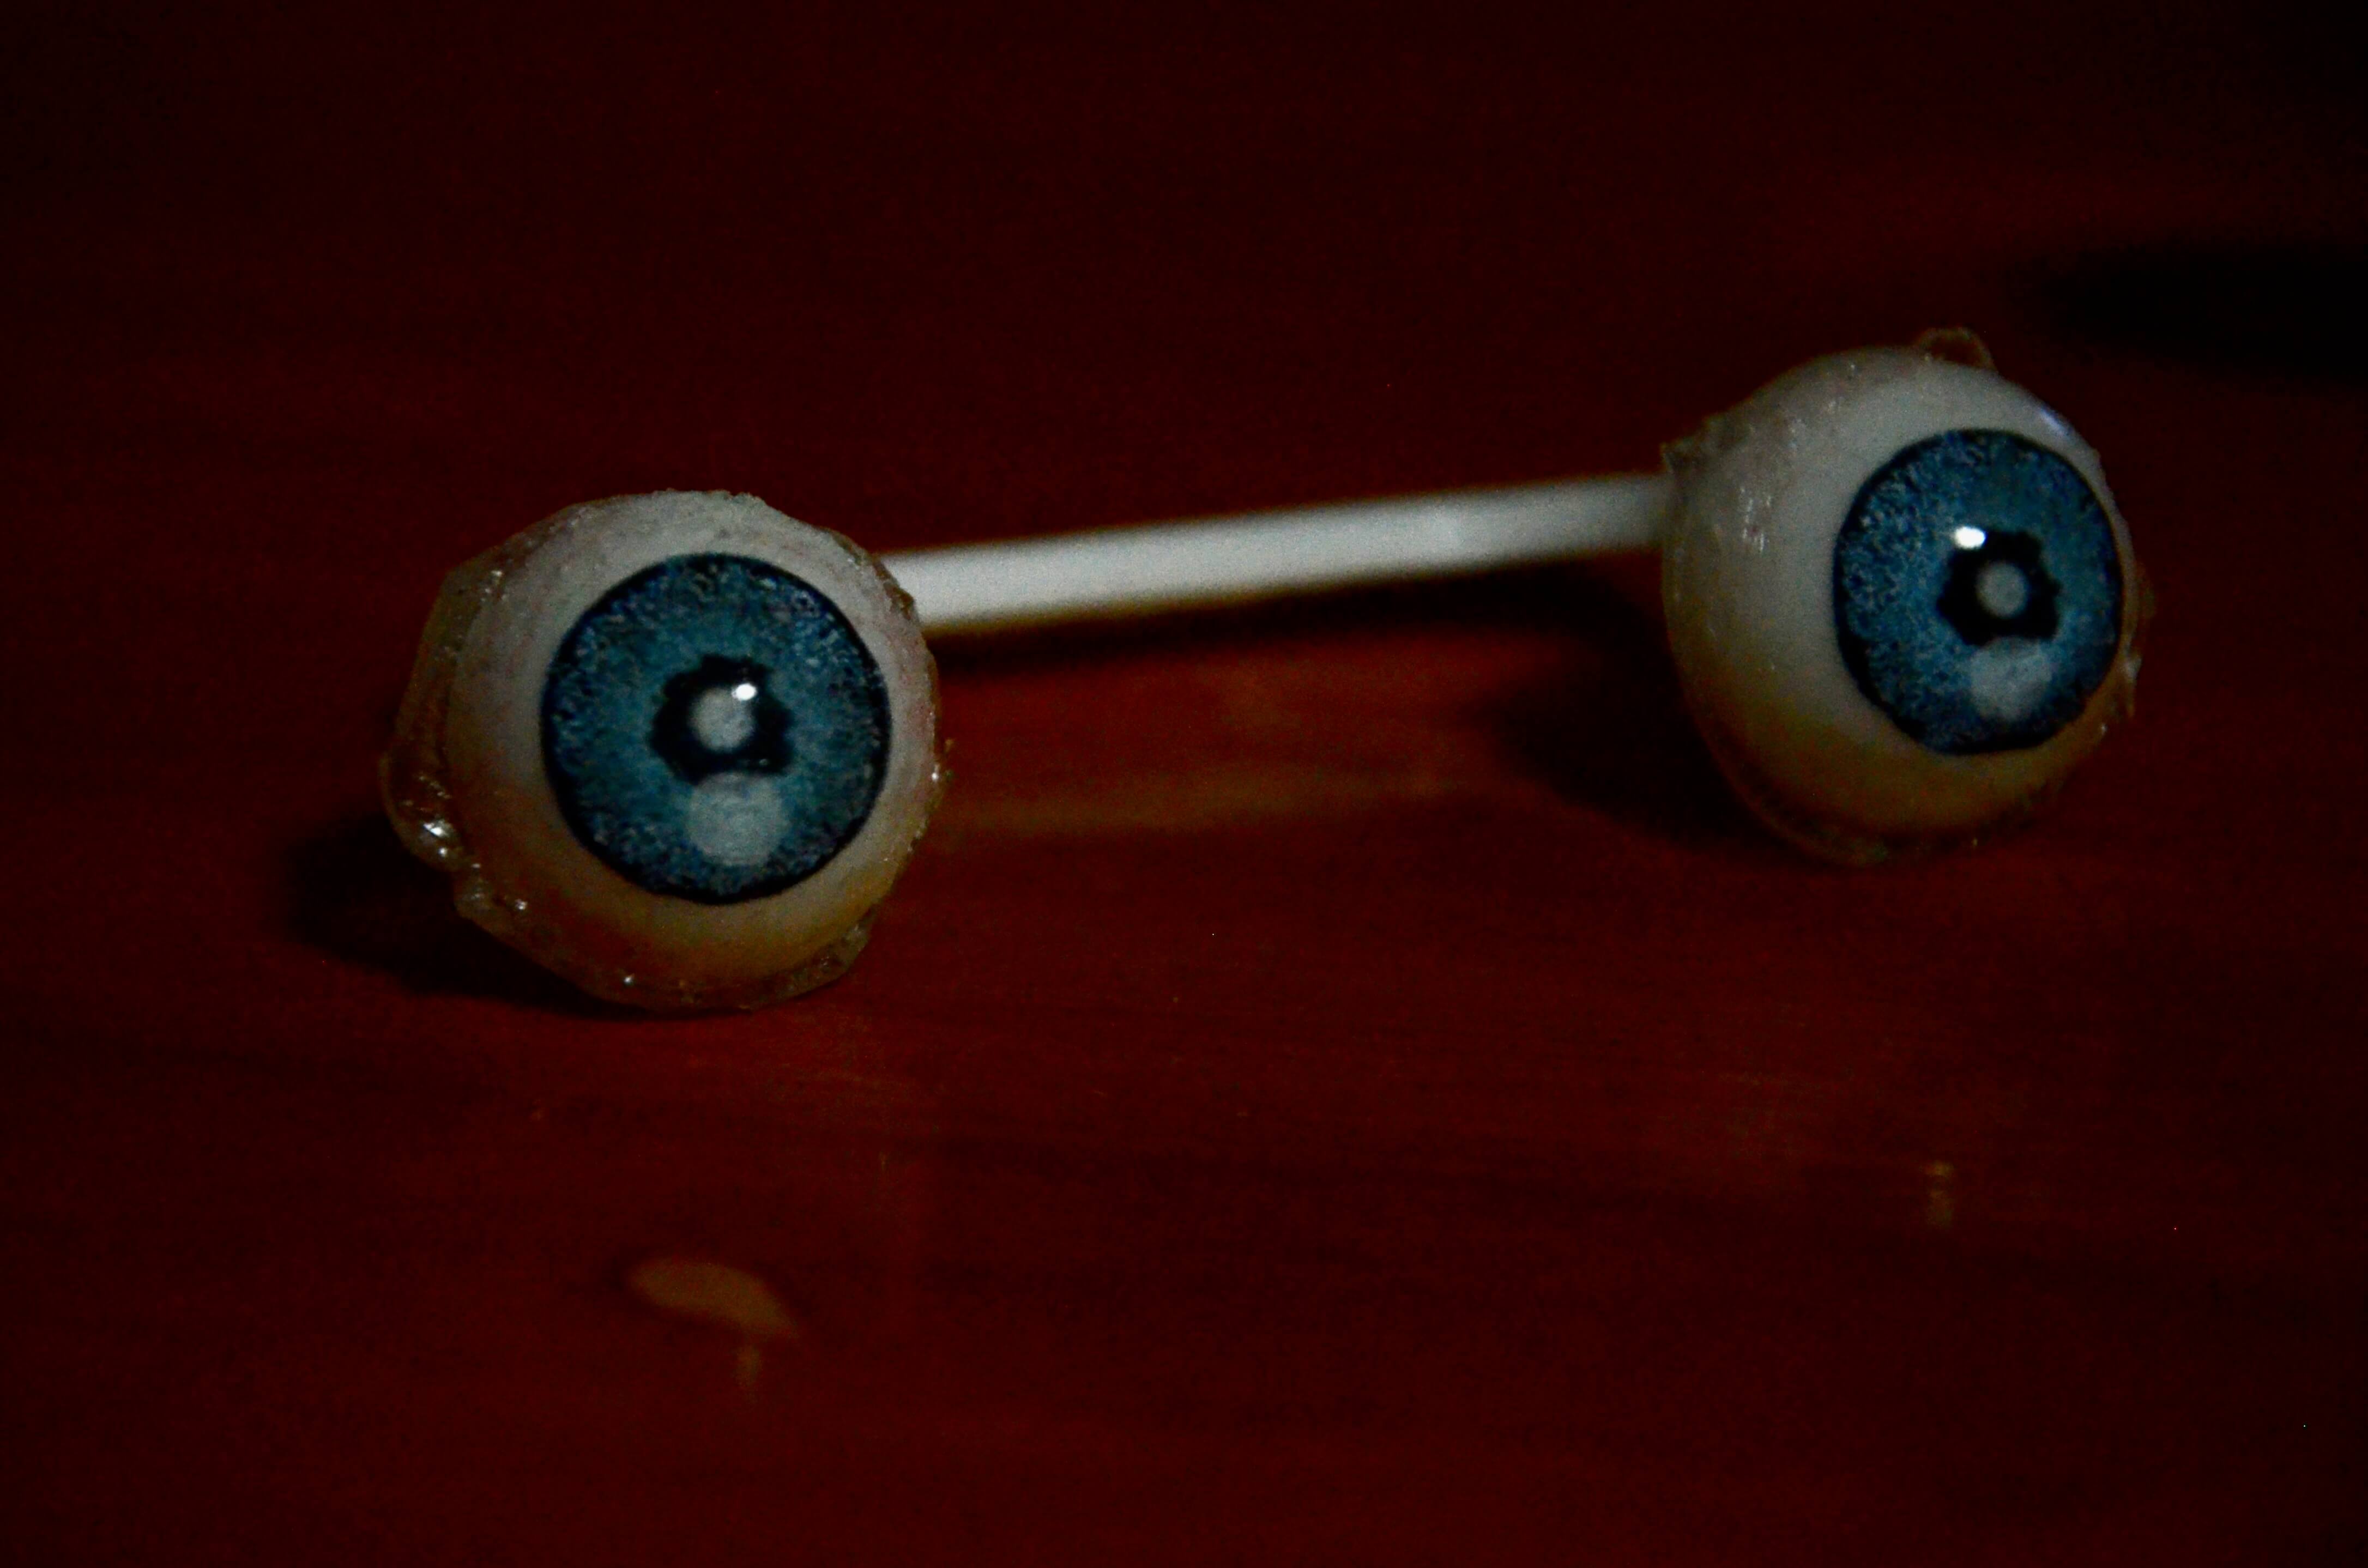
One of the key aspects of the animatronic is achieving realistic-looking eyes. The original idea was to 3D print the eyes using PLA, attach a 2D design of the iris and retina, and then use a mold to pour resin over them in order to create a realistic, three-dimensional eye effect.
The image below shows the eyes after being removed from the mold. Excess resin is still visible around the edges due to overflow during the molding process, and it needs to be trimmed for a clean finish.
Week 14 - Interface and Application Programming
This week, the application was designed using Python and Qt Designer. Below is the interface layout created with Qt Designer.

On the other hand, the code written in C is shown below.
The following video demonstrates how audio is played when a letter is selected from the interface.
Finally, the following video showcases the integration of jaw movement when a vowel is selected.
Week 15 - System Integration
The following table presents how the different components used in the final project are related and communicate with each other.
| Component | Type | Input From | Output To | Communication |
|---|---|---|---|---|
| XIAO RP2040 | MCU | Qt Interface | MP3-TF-16P PCA9685 |
Serial |
| S-25-12 Switching Power Supply AC/DC |
Power Supply | AC | PCA9685 | - |
| MP3-TF-16P | Actuator | XIAO RP2040 | Speaker | UART |
| PCA9685 | Controller | XIAO RP2040 | Servomotors | I2C |
| Servomotors | Actuator | PCA9685 | Physical Movement | PWM |
The following table presents the materials used in the project, along with their quantities and associated costs.
| Product | Features | Quantity | Cost | Link |
|---|---|---|---|---|
| XIAO RP2040 | Dual-core ARM Cortex M0+ processor, flexible clock running up to 133 MHz. Support Micropython/Arduino/CircuitPython |
1 | $8.49 | Amazon |
| Servomotor Mg995 | Torque at 6V 12kg/cm, 7.2V 13kg/cm. | 2 | $13.99 | Amazon |
| Micro servomotor mg90s | Stall Torque: 2.0kg/cm(4.8V) | 4 | $13.99 | Amazon |
| Servo driver - pca9685 | I2C communication control 16 free-running PWM |
4 | $12.99 | Amazon |
| Micro SD Card Module Storage | SPI communication Regulator output 3.3V |
1 | $12.99 | Amazon |
| MAX98357 I2S Amplifier Module Audio | Amplifier Board Class D Power Supply:2.5V-5.5V 35 different clocks and 128 digital audio formats can be automatically configured with a single power supply |
1 | $5.99 | Amazon |
| Smooth-On Dragon Skin | Very strong Shore 20A silicone rubber 1:1 mix ratio Cures in 6 hours to a soft, strong, stretchy rubber |
1 | $38.12 | Amazon |
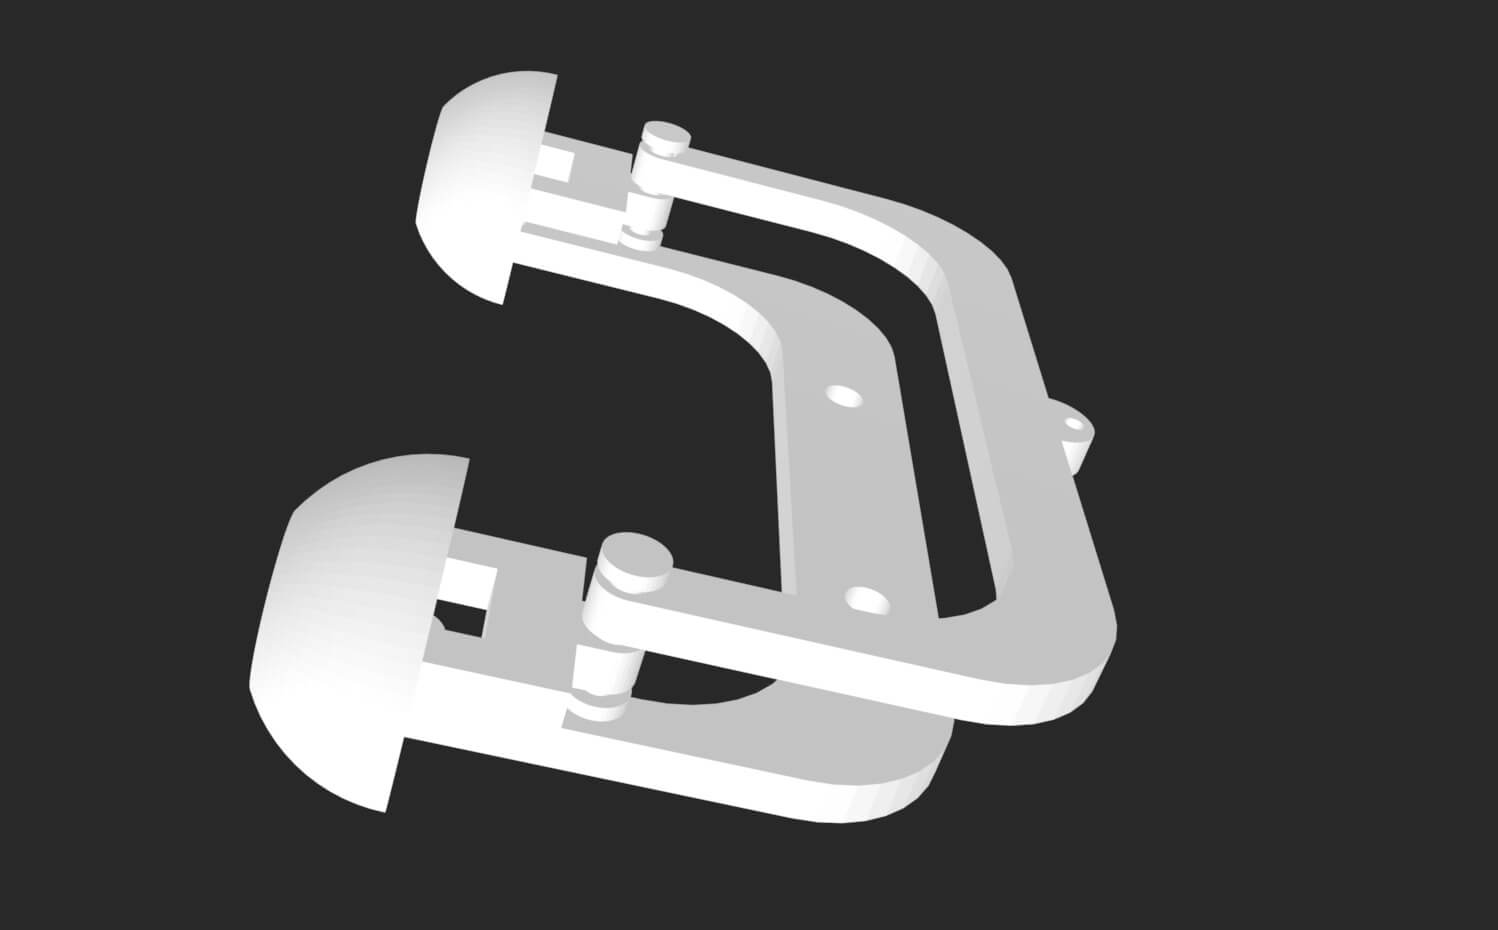
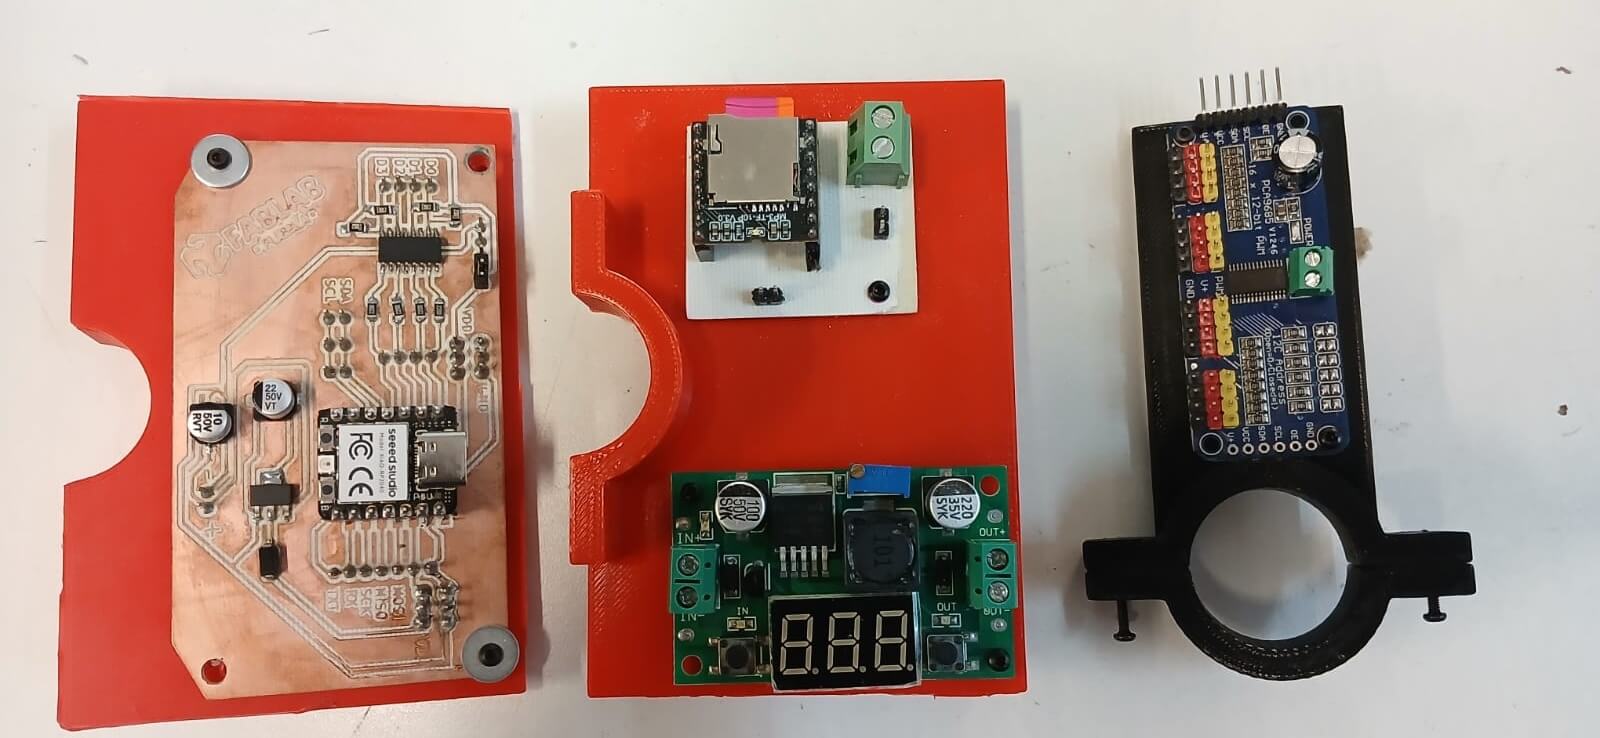
The following image shows all the modules, boards, and drivers used throughout the development of this project.
Note that all components are mounted on bases designed to function as clamps, which will be attached to the main support tube that holds the structure in place.
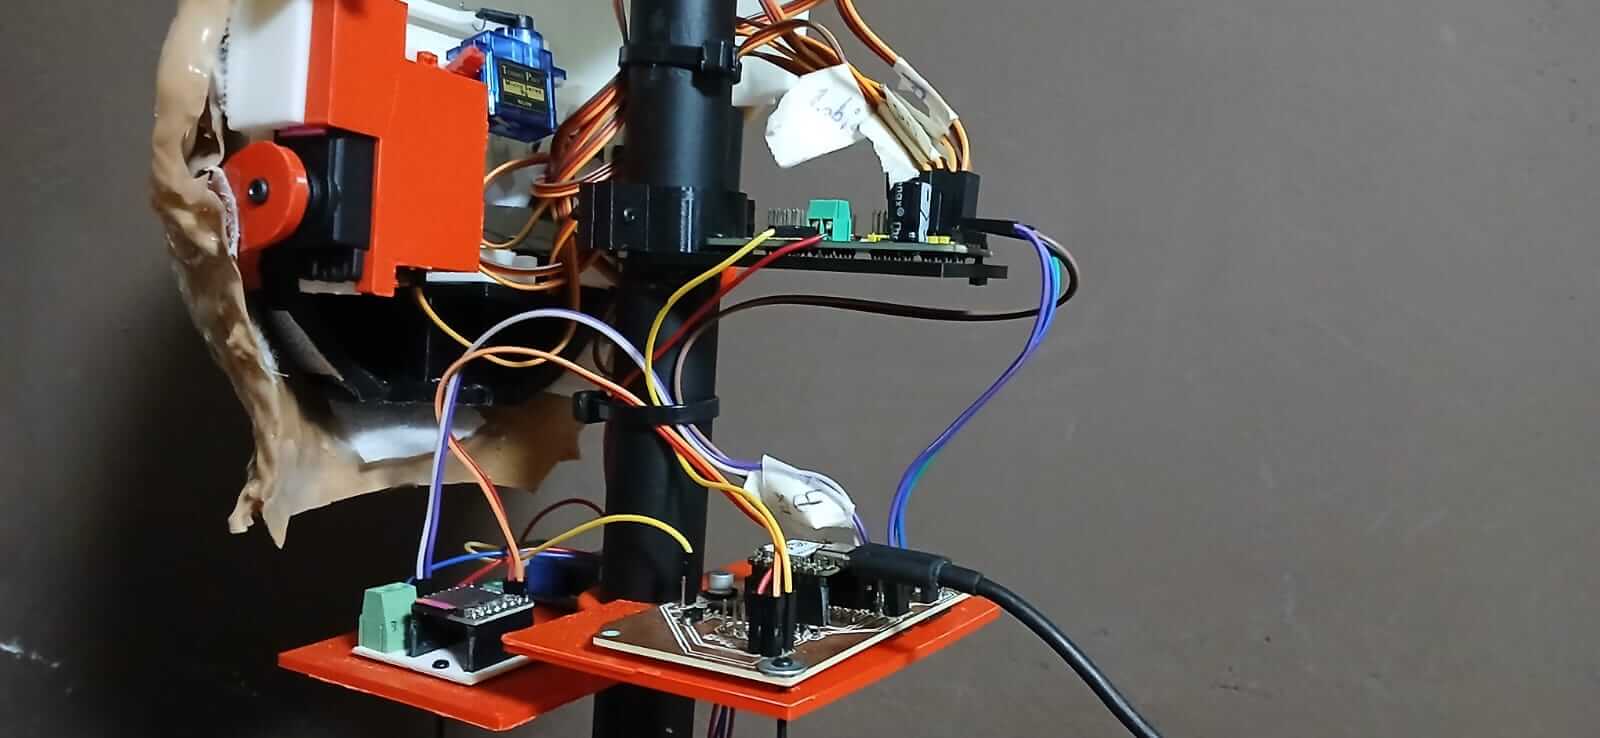
The following image illustrates how all modules are interconnected. Note that direct access was provided to the XIAO controller (for communication with the computer) and the MP3-TF-16P audio module (in case audio files need to be updated).
Additionally, all cables are labeled to ensure easy and accurate connections.
Similarly, the following videos demonstrate how the mechanical, electrical, and control components are integrated to perform coordinated movements.
It is worth noting that most of the components are hidden when the animatronic wears a wig.
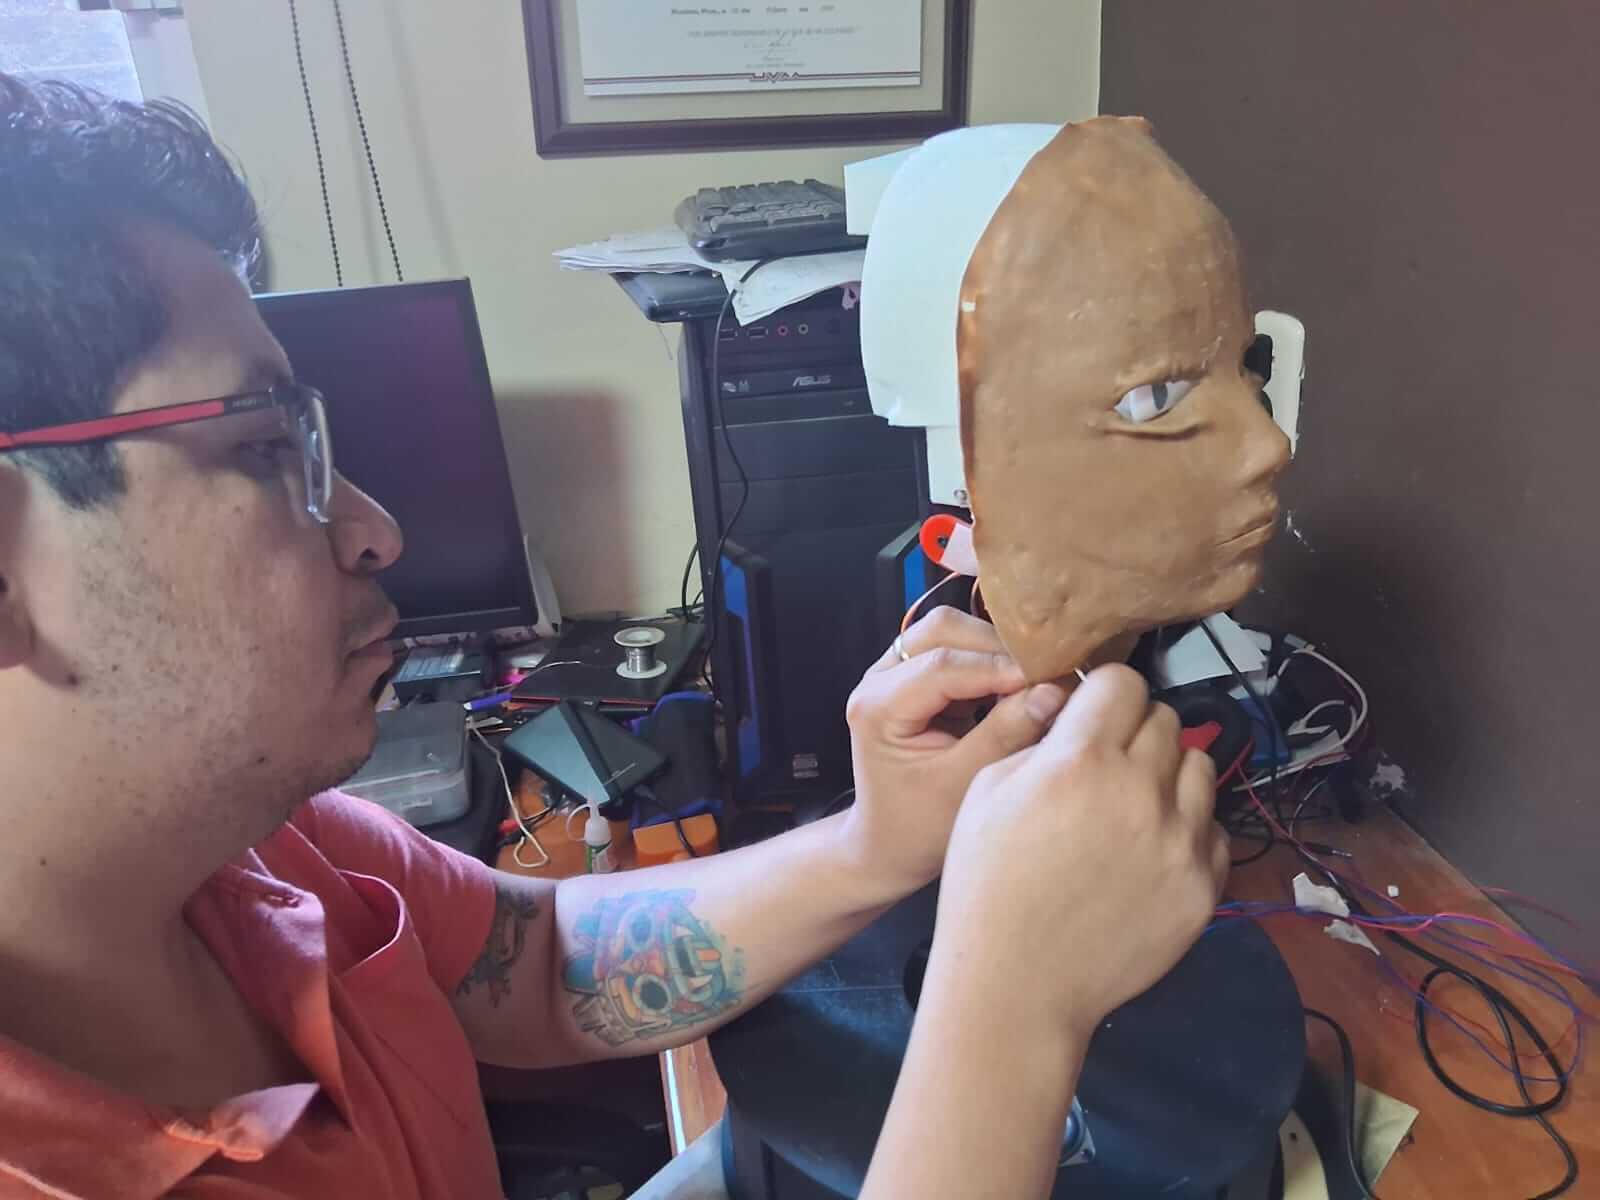
Week 16 - Wildcard - thermoformerThe "Wildcard Week" was used to explore thermoforming techniques in order to create a mold for forming the skin of our animatronic.
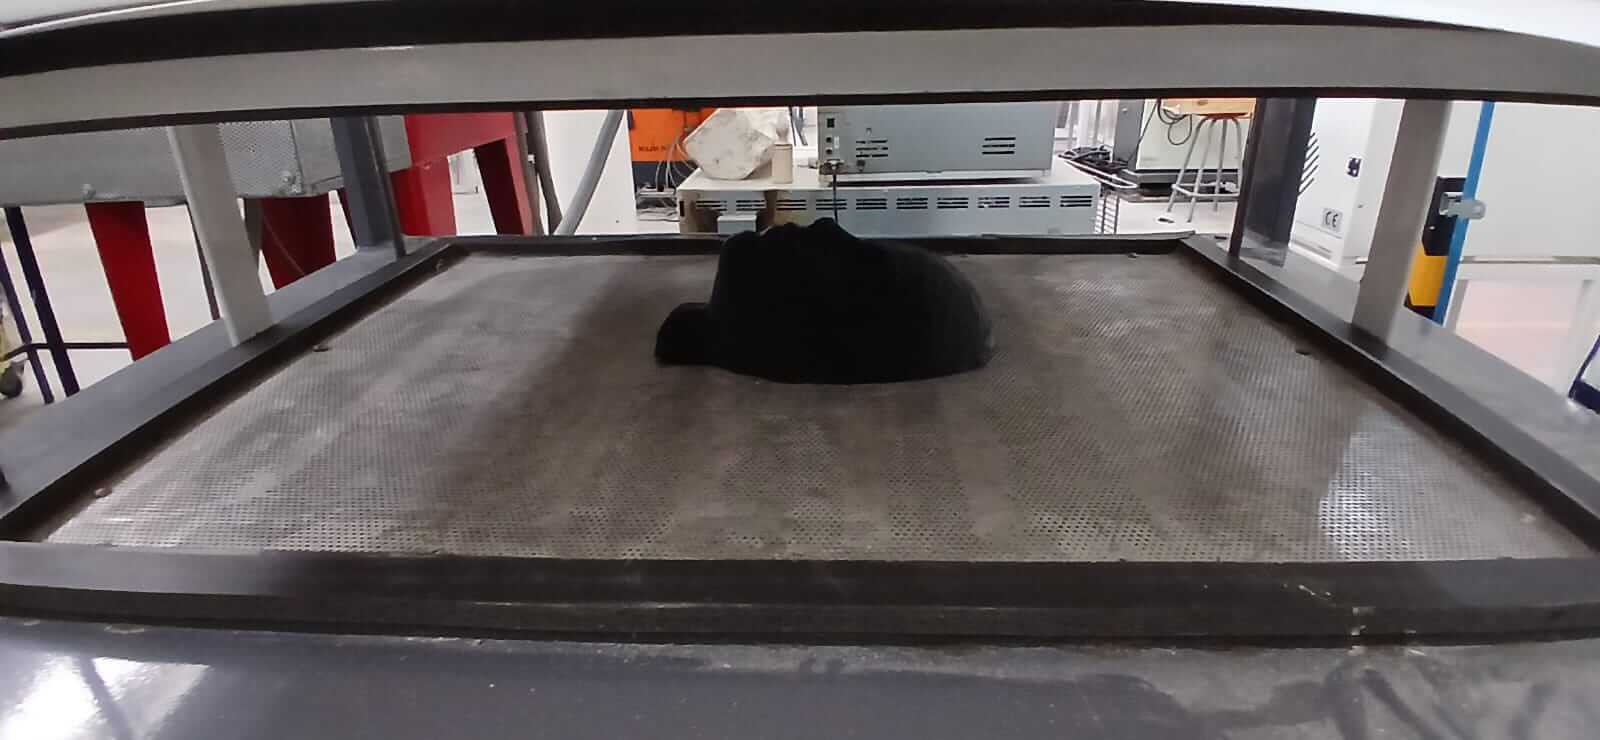
The final outcome of the skin, created using a thermoformed mold, is presented below, showcasing the texture and fit achieved through this fabrication method.

What does it do?
To develop an interactive animatronic that supports children with apraxia through voice output and gesture imitation, promoting verbal and non-verbal communication in a playful and therapeutic way.
Who's done what beforehand?
Currently, most animatronic applications focus on entertainment. However, new trends are emerging that explore their potential in fields such as education and healthcare, where they can become innovative tools for learning and therapy. Some notable examples include:
What did you design?
In this project, the electronic systems, user interface, and mechanical components responsible for the animatronic’s movement were fully designed. For the design of the movement mechanisms, inspiration was drawn from several online sources, especially from creators and projects recognized in the field of animatronic design.
What sources did you use?
For the design of the animatronic, several online creators and projects were used as sources of inspiration and reference, such as:
What materials and components were used?
| Product | Features | Quantity | Cost | Link |
|---|---|---|---|---|
| XIAO RP2040 | Dual-core ARM Cortex M0+ processor, flexible clock running up to 133 MHz. Support Micropython/Arduino/CircuitPython |
1 | $8.49 | Amazon |
| Servomotor Mg995 | Torque at 6V 12kg/cm, 7.2V 13kg/cm. | 2 | $13.99 | Amazon |
| Micro servomotor mg90s | Stall Torque: 2.0kg/cm(4.8V) | 7 | $13.99 | Amazon |
| Servo driver - pca9685 | I2C communication control 16 free-running PWM |
1 | $12.99 | Amazon |
| DFPlayer Mini MP3 | Serial port | 1 | $7.96 | Amazon |
| S-25-12 Switching Power Supply AC/DC | Single Output 12V 2.1A |
1 | $39.20 | Amazon |
| Silicone Rubber - Dragon Skin | Mix ratio of 1A:1B by Volume Pot life of 25 minutes Cures to Soft, Super-Strong, and Stretchy Shore |
1 | $38.12 | Amazon |
| PLA Filament | Creality 3D Printer Filament, PLA Filament 1.75mm Bundle 2Kg for 3D Printing | 1 | $29.99 | Amazon |
| Screws | Metric M1 M1.2 M1.4 M1.6 M2 M2.5 304 Stainless Steel | 1 | $18.99 | Amazon |
| Speaker | 3W 4 Ohm | 1 | $5.32 | Amazon |
Where did they come from?
All the components used come from the " Amazon " store.
How much did they cost?
| Product | Cost | Quantity | Total |
|---|---|---|---|
| XIAO RP2040 | $8.49 | 1 | $8.49 |
| Servomotor Mg995 | $13.99 | 2 | $13.99 |
| Micro servomotor mg90s | $13.99 | 2 | $27.98 |
| Servo driver - pca9685 | $12.99 | 1 | $12.99 |
| DFPlayer Mini MP3 | $7.96 | 1 | $7.96 |
| S-25-12 Switching Power Supply AC/DC | $39.20 | 1 | $39.20 |
| Silicone Rubber - Dragon Skin | $38.12 | 1 | $38.12 |
| PLA Filament | $29.99 | 1 | $29.99 |
| Screws | $18.99 | 1 | $18.99 |
| Speaker | $5.32 | 1 | $5.32 |
| Total | $203.03 |
What parts and systems were made?
The project is composed of four fundamental areas:
- Mechanics
- Electronics
- Control
- Interface
What processes were used?
For the development of the animatronic, the following processes were carried out in each of the key areas:
MECHANICS
- CAD design of structural parts and joints.
- 3D printing of components using PLA filament.
- Assembly of mechanisms with servomotors.
- Laser cutting
ELECTRONICS
- Design of electrical schematics and PCBs using KiCad.
- Soldering of electronic components.
- Continuity testing and functionality verification.
Control
- Programming of the XIAO RP2040
- Testing and programming adjustments related to outputs
INTERFACE
- Graphic interface design.
- Communication between the interface and the XIAO RP2040.
- Usability testing and adjustments based on user interaction.
What questions were answered?
During the development of the project, the following key questions were addressed and answered:
- What electronic and mechanical components are necessary to achieve smooth and safe interaction?.
Servomotors, sensors, and a custom PCB were selected to ensure proper operation. The use of these components does not suppose any risk to the user. - What materials are most suitable for prototype fabrication?.
PLA was chosen for 3D printing due to its ease of use, safety, and compatibility with the Prusa printer. - What types of movements and expressions are the simplest for working with a child with apraxia?.
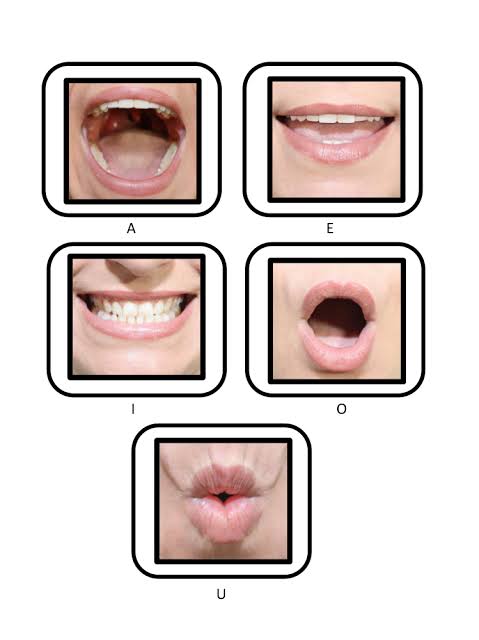
According to speech therapy specialists, the simplest and most effective movements and expressions to work with children with apraxia include "smiling, opening and closing the mouth, making faces, inflating cheeks," among others.
What worked? What didn't?
WHAT WORKED
- Communication between the electronics, control system, and interface was successful, enabling smooth interaction.
- The PLA-printed parts were assembled correctly.
- A simple interface was developed, which facilitated communication with the animatronic.
WHAT DIDN’T WORK
- Complex gestures could not be implemented due to mechanical or space constraints.
- Time available to develop the project.
How was it evaluated?
Although the project is not yet fully completed, the prototype is expected to be evaluated by a speech therapist. This evaluation will provide specialized feedback, identifying both strengths and areas for improvement. The goal is for this information to serve as a basis for future enhancements and developments, ensuring that the animatronic meets therapeutic requirements and is truly useful in sessions with children with apraxia.
What tasks have been completed?
- Interface
- Electronics
- Molds
What tasks remain?
- The mechanical part
- Systems integration
What will happen when?
Once the project is completed, it will serve as a starting point for improving the designs, with an emphasis on functionality and autonomous operation.
What are the implications?
The development of this animatronic has significant implications in the therapeutic, academic, and technological fields:
- This prototype aims to become a complementary tool for speech therapists, facilitating the practice of gestures and essential orofacial movements in children with apraxia.
- Although the project is still in the prototype phase, it is intended as a foundation for the development of more advanced animatronics capable of adapting to the specific needs of different patients.
- The project also has an impact within the university environment, particularly at Universidad IBERO. It seeks to inspire engineering students to apply their knowledge in the design of technological solutions with social impact, promoting the creation of animatronics focused on solving real-world problems.
What have you learned?
Throughout the development of this project, a real issue related to therapeutic support for children with apraxia was addressed. Although the developed prototype represents a basic solution, it serves as a solid starting point for future research and improvements. This work helped to understand the importance of integrating technical knowledge with a human-centered approach, and laid the foundation for designing technologies with social impact.
Schedule of activities
Lists
April 22-28:
Molding and Casting
- Creation of molds for the animatronic's eyes
- Design and creation of molds for the animatronic's face
- Silicone rubber casting
April 29 – May 9:
Construction of the structure:
- Build the animatronic's base structure.
- Design moving parts
- 3D printing.
- Assemble the main parts.
- Perform testing and debugging.
May 12- 14 :
Installation of electronic
components:
- Install motors.
- Connect the electrical system.
May 15 - 20:
Initial programming:
- Program basic movements.
- Test and adjust electronic components.
May 21 - 23:
Details and finishes:
- Add aesthetic details
- Ensure all components are securely fastened.
May 24 - 30:
Testing and adjustments:
- Perform functional tests.
- Adjust movements and correct errors.
- Perform full tests of the animatronic.
- Make final adjustments.
Jun 02 – 06
deadline
Challenges
- Planning of all the elements involved in the project.
- Design of mechanical parts.
- Integrate the skin with jaw movement.
- Time to carry out the project.
project progress
In the final section, a visual overview of the development process is provided, including key stages of fabrication and assembly, accompanied by videos showcasing the operational performance of the animatronic.