Final project

Here's a sketch and description of my final project idea:
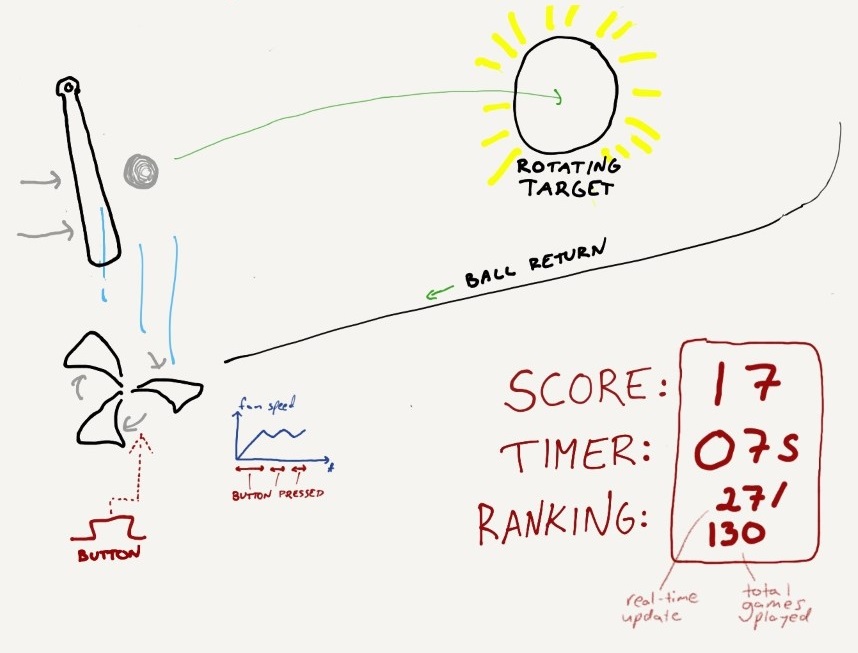
I've always enjoyed pinball games, but I want to create something a bit different, yet simple enough to complete during this course. The core concept of the game is straightforward: repeatedly shoot the ball through the hoop. This project aligns well with a spiral development cycle, allowing me to first perfect the core functionality before adding features like lasers, smoke machines, and more. Before taking the device home, I'll leave it at the Fab Lab for a while to demonstrate what can be done there.
A "simulation" of how it should work, created in Fusion 360 during week 2:
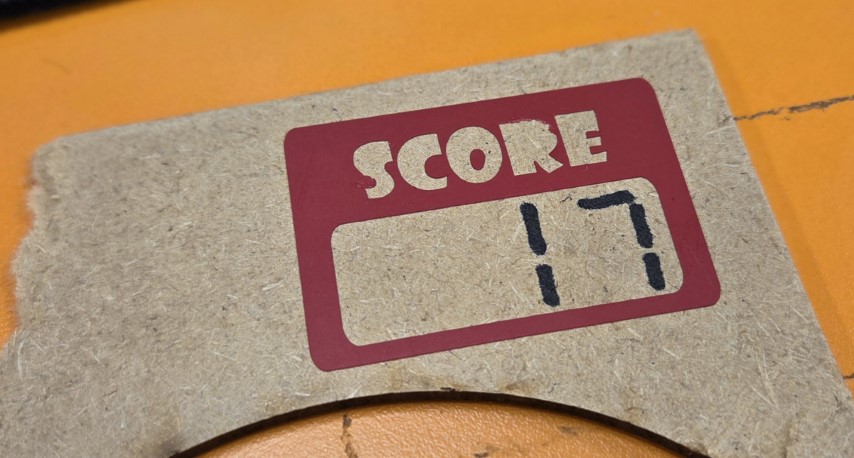
A prototype of the score display from week 3:
A rough simulation of the embedded electronics for the score display from week 4:
The final embedded code from week 4:
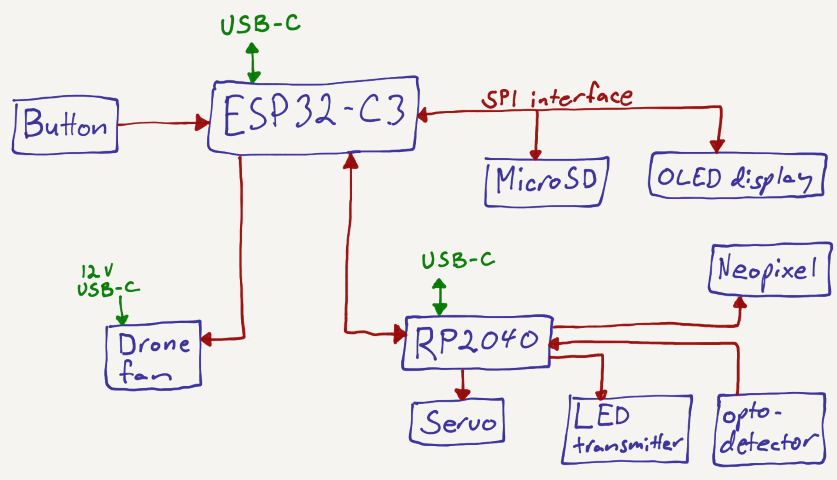
Board #1 code: button input, drone fan PWM, servo PWM, MicroSD and OLED display through SPI, input pulse from board #2.
Board #2 code: Optogate, neopixel output, pulse output to board #1.
A section of the 3D-printed net for the back of the playing field from week 5:
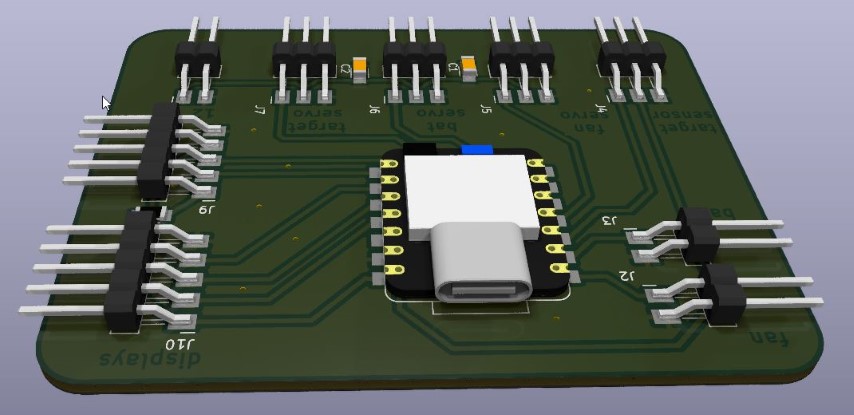
A render of PCB #2 from week 6:
Testing the game mechanics during week 7:
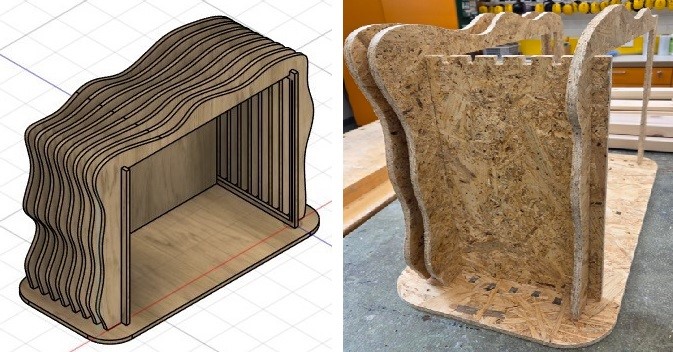
First version of partially cnc-manufactured housing for the game during week 7:
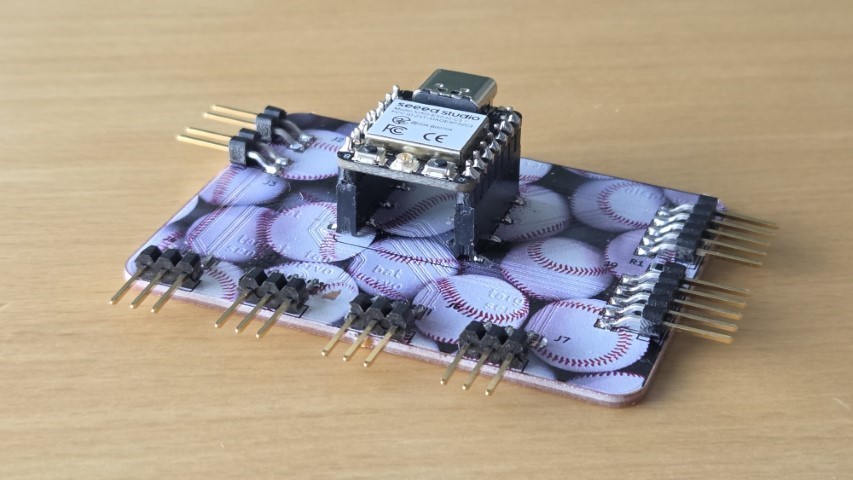
PCB made during week 8:
Infrared optical gate for ping pong ball detection from week 9:
LED strip, OLED screen, and servo testing during week 10:
Streaming real-time scores from the microcontroller to this web site. Demo during week 11:
System diagram from week 15:
Midterm schedule for doing remaining tasks:
| Week number | Main task | Remaining tasks for final project |
|---|---|---|
| 12 | Mechanical design & machine design | ✅ 3D print bigger net ✅ Choose and order bigger OLED screen and button for the fan ✅ Test drone motor and 3D printed blades for ping pong ball flotation |
| 13 | Molding and casting | ✅ Print gears and mechanism for bat ✅ 3D print target loop ✅ Make a better PCB for the optogate |
| 14 | Interface and application programming | ✅ Program display and game logic ✅ Test bigger SPI OLED screen ✅ Make and use second MCU for target loop electronics ✅ Connect MicroSD to ESP32-C3 |
| 15 | System integration | ✅ Choose and order power supply for the drone motor |
| 16 | Wildcard week |
✅ UV-printed logo on cap and graphics on gaming ball ✅ Make enclosure for the whole game ✅ Make internal structures for the game |
| 17 | Applications and implications, project development | ⬜ 3D print and paint player |
| 18 | Invention, intellectual property and income | ✅ Make video presentation of final project |
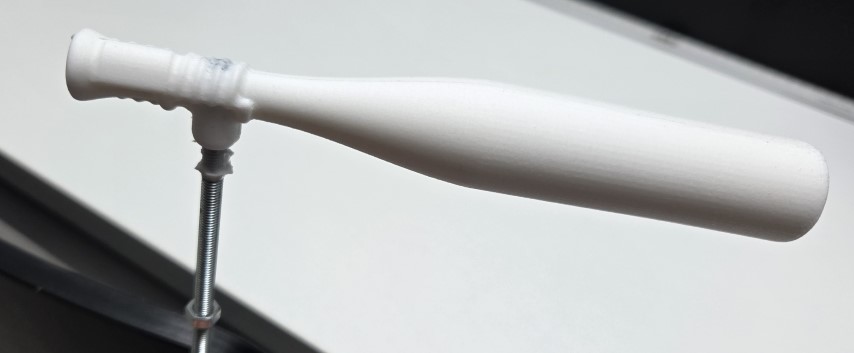
Molded and casted bat from week 13.
System integration details: week 15.
Complete, integrated 3D CAD design from Week 15:
Final Bill of Materials (with purchase links)
- Joni Rajala (2024) — especially his documentation for the molding and casting week was helpful when I was creating the bat for my game.
- ZhiRay Wang (2024) — while inspired by the idea, I pursued a different aesthetic, trying to avoid a heavy woodworking look and focusing on playability.
- Yoshihiro Asano (2021) — a clean and well-executed design.
- Zaria Smalls (2018) — shows that larger-scale projects can also be done in Fab Academy. I chose to keep my project desktop-sized for convenience.
- Cristian Loayza (2024) — this project features a strong overall appearance. I aimed to build on it by adjusting the proportions so the ball appears more balanced in scale, and by improving the ball detection sensor in the target loop.
- Is the casing designed during Week 7 good enough? - Yes, it looks good and is quite sturdy, although sanding and painting the OSB took considerable time. The back of the enclosure could not be properly closed because I ran out of space: I had forgotten to update the Fusion 360 model after adding washers to the servo.
- Do I need glue to attach the casing pieces? - Very little. The CNC-milled joints were sturdy enough without glue.
- The Week 7 casing was designed for 11 mm OSB. Are design modifications needed for 12 mm birch plywood? - Since I didn't use parametric design, I stuck with 11 mm OSB and painted it black to improve its appearance.
- Is the playing field size sufficient? - Yes. Testing the game with a mock-up playing field made from laser-cut cardboard was helpful in validating the dimensions. I then updated the layout in Fusion 360 accordingly.
- How effective can ball flotation be, and how high does the tube need to be? - I couldn't achieve the same level of flotation as with the commercial hair dryer tested in Week 7, but the final design works well and is fun to play.
- Should the fan remain in the originally designed location, or be moved to the target side with the tube? - I moved it to the target side to ensure a fast return for hitting the ball with the bat and to reduce the vertical dimension of the game.
- How should the full software be efficiently structured? - A modular design using two microcontrollers kept the software clean, manageable, and easier to debug.
| Material/component + link | Quantity | Cost |
|---|---|---|
| PLA filament | ~1 kg | ~50 € |
| Acrylic boards: transparent and black | ~3x1000x500 mm | ~30 € |
| OSB board | 11x2600x1197 mm | ~30 € |
| MG996R servo motor | 1 | 15.00 € |
| Neopixel | 30 cm | ~10 € |
| LED 850 nm | 1 | $1.09 |
| Phototransistor | 1 | $0.34 |
| BR1407 drone motor | 1 | ~$15 |
| Sitela BL20A ESC | 1 | ~15 € |
| FR2 board | 1 | 2 € |
| Xiao Seeed ESP32-C3 | 2 | 2 x $4.99 |
| 2.42" OLED display | 1 | $16.99 |
| Illuminated switch | 1 | 2.20 € |
| USB hub | 1 | $30 |
| 12 VDC 5.0 A source | 1 | $40 |
| TE Connectivity AMP Connectors | 10 | 10 x $0.43 |
| Connector headers | 10 | 10 x $0.71 |
| Resistors | 3 | 3 x $0.1 |
| Ping pong ball | 1 | 0.75€ |
| Nuts and bolts | 1 | $15 |
| 5 mm threaded rod | 1 | $15 |
| Smooth Cast 305 | ~150g | 5€ |
| Smooth Sil 940 | ~200g | 10€ |
| Total | ~325 € | |
Who's done what beforehand?
Pinball machines are perhaps the closest type of game to mine. Several have been created in Fab Academy (listed below). The most important takeaway from reviewing these projects was understanding how much can realistically be accomplished within the Fab Academy time frame.
At least one arcade-style basketball game has also been made:
What questions were answered?
The number of questions answered during this course has been extensive. Applying spiral development thinking helped avoid getting stuck searching for "perfect" solutions. Often, the outcome of the first spiral loop was already good enough, and additional iterations would have only slowed down progress. Below are some specific questions from Week 17 that were answered:
Final Reflection:
As shown in the final project video, the game is fully functional. The target rotates backward each time you score, making it progressively more challenging. The ball is detected with an optical gate as it passes through the loop, and no false detections were observed. The bat, made through molding and casting, feels great to use, which was one of my original goals. I CNC-milled the enclosure, and all the PCBs feature UV-printed solder masks. Scores are saved to a microSD card and displayed on the screen along with real-time statistics.
I'm very satisfied with how the project turned out. I had many moments where I was genuinely happy with how well parts of the design worked, and now that the entire system functions as intended, it feels great to see it all come together. I feel that my ability to design and build things has reached a whole new level after completing Fab Academy.
Design files
Full Fusion 360 file (excluding bat bevel gear holder, see below)
Bat bevel gear holder Fusion 360 file. Adapted from a design by David Kirbis.
Board #1 code: button input, drone fan PWM, servo PWM, MicroSD and OLED display through SPI, input pulse from board #2.
Board #2 code: Optogate, neopixel output, pulse output to board #1.
Laser cutting file for the plate around the OLED display
Graphics UV-printed on the plate around the OLED display
Alignment graphic for UV-printing on the plate around the OLED display
Laser cutting file for the downward-sloping plane on the playing field