6. Embedded Programming
Assignments Overview
Here is the list of individual assignments given by the instructors. As for the Group Assignment, please see the Group Assignment page on the FabLab Kannai website:
- Write a program for a microcontroller development board
  to interact (with local input &/or output devices)
  and communicate (with remote wired or wireless devices)
 [Extra Credit]: Use different languages &/or development environments
 [Extra Credit]: Connect external components to the board
Programming with Quentorres by Arduino IDE
1. Arduino IDE and C/C++ Languages: There are not many choices of programming languages when creating programs on microcontroller boards. Arduino IDE is an integrated development environment for Arduino devices, but the programming language for Arduino is also used when developing programs for microcontroller boards such as ESP32 and Xiao RP2040. Roughly speaking, the Arduino language is based on C and C++ Languages slightly customized to program Arduino more easily.
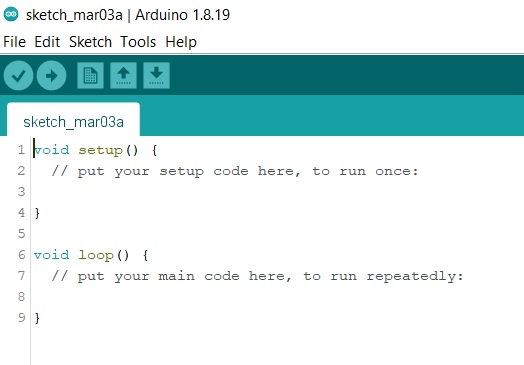
C is a programming language born in 1972 and used in a wide range of fields. C++ was introduced in 1985. In C and C++, the “main” function is executed first when program starts running. However, in Arduino programming, the main function does not appear, and the program is built around two functions: “setup” and “loop”.
2. Installation of Arduino IDE: Please see Test Programming with Arduino IDE in the individual assignment for Week 4 “Electronics Production.”
3. Before Uploading: Once we write program codes, we could connect the board to our PC with a USB cable and upload the program. Before that, however, the following steps are necessary as preparation for uploading:
-
Serial Port: Make sure that the board is connected to the serial port. In case of Windows machines, serial ports are numbered in such a way as “COM1” or “COM2”.
-
Board Manager: Next, we must select the type of microcontroller we want to write to from the “Tools” -> “Board” menu. If we use Xiao RP2040 or ESP32, we need to add the information of RP2040 or ESP32 from “Board Manager”.
4. Uploading Program: After writing the program, we could proceed to write it to the microcontroller. To do this, click the “→” icon in the upper left corner of the Arduino IDE, or select the menu “Sketch” -> “Upload”. Then, compilation will be executed first. Compiling means converting a program written in the Arduino language into a form that can be directly executed by the board’s CPU. After compilation, the program is sent to the board for flashing. During the writing process, the LEDs on the board for sending and receiving will blink. When the flashing is finished, a message will appear just below the source code in the Arduino IDE, indicating that the writing is finished. However, if the program contains syntax errors, it cannot be compiled. In such cases, the area immediately below the source code will turn orange, and the error message will appear in the field just below. After modifying the program according to the message, upload the program again.
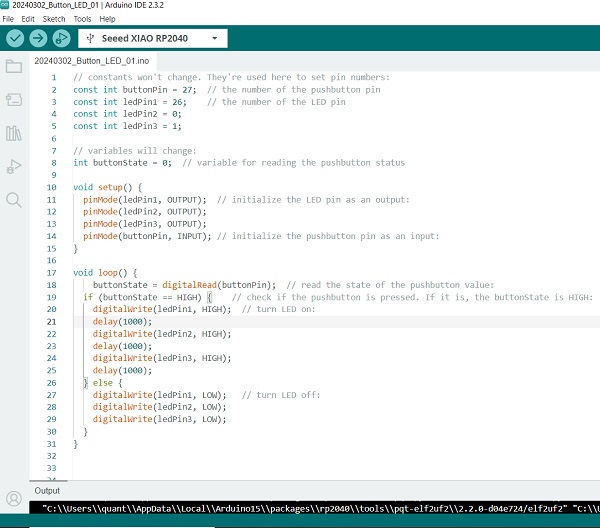
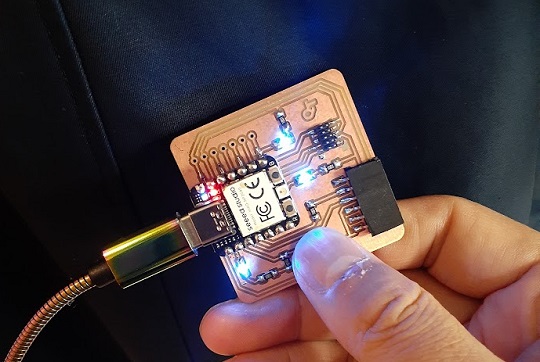
5. Program for Local Input &/or Output: For the first assignment, I will post one of the first programs I wrote: Push Button and Blink LEDs. I just called two built-in examples and combined them.
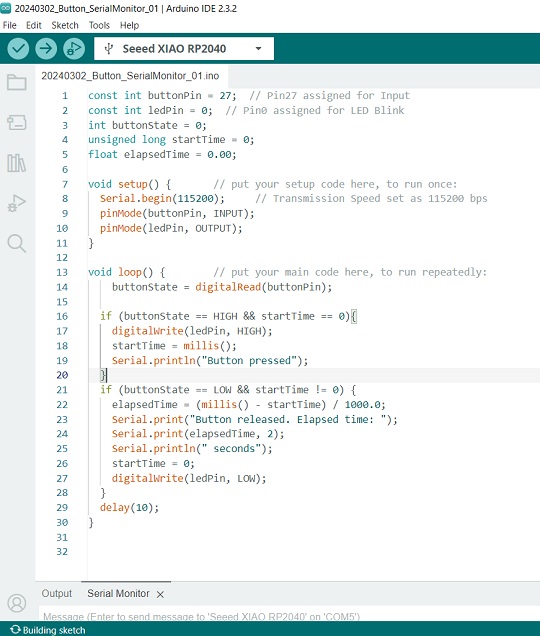
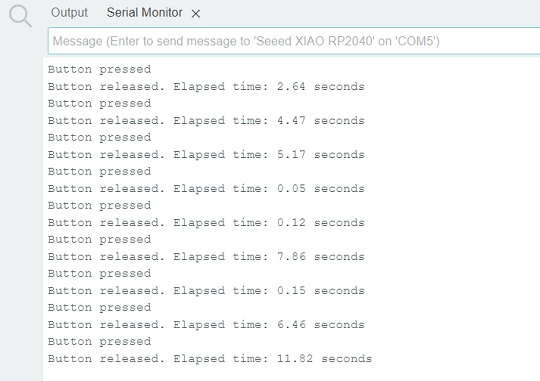
6. Program for Remote Wired or Wireless Communications: For the second assignment for extra credit, I will post one of a few programs I wrote: Showing the Push-Button Time on the Serial Monitor. This time I had ChatGPT write the program. After a few editing on the program that the ChatGPT presented, I succeeded in uploading the program.
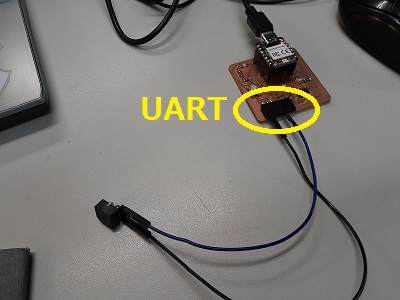
7. Implications For Final Project: I was wondering if I could add a siren to the anti-theft alarm device, which I thought would work for scaring the thief. For better understanding the microcontroller board, I connected an active buzzer to the Quentorres board at UART (Universal Asynchronous Receiver/Transmitter) connector by:
  Pin Socket GND - Active Buzzer cathode
  Pin Socket Pin28 - Active Buzzer anode
Trial at FabLab Kannai
Why could we identify Pin28 for digital output? Because we need the digital output pin that is directly connected to the active buzzer via UART. We could confirm this by watching the schematics of Quentorres board and the pinout of the Xiao RP2040.


Once all the cables were connected, we could open a new sketch. My idea for the program was:
  Always the siren is on.
  When the button is pressed, the siren stops.
For this, I referred to two examples: (i) File -> Examples -> rp2040 -> Siren; and (ii) File -> Examples -> 02. Digital -> Button. After combining the two, I wrote the if-else function.

After compile and upload, it could work.
It could work at home.
micro:bit
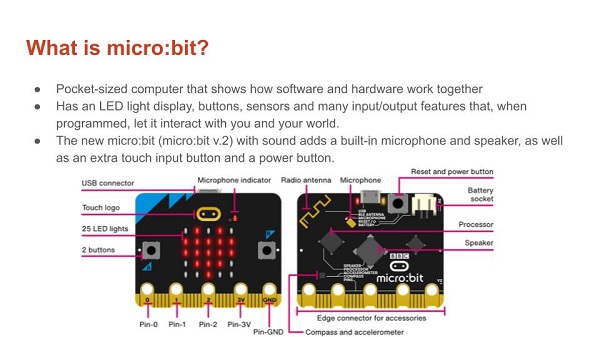
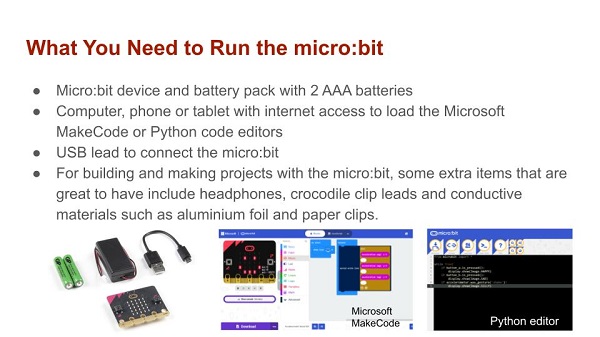
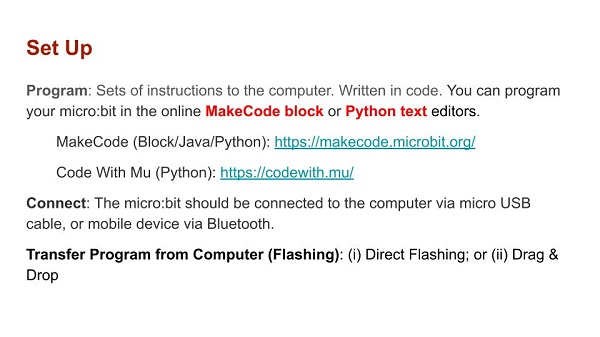
General Description: Next I tried text programming on micro:bit by MicroPython with Mu text editor. For programming on micro:bit, JavaScript or Python are the language mainly used. However, Mu could also be frequently used because BBC micro:bit MicroPython documentation recommends Mu as the editor for MicroPython programming on the micro:bit and it could also be used for programming on Raspberry Pi, Arduino, M5Stack, and so on. For writing a program with Mu, we should start with downloading the installer on its website.
I used to host micro:bit workshops during my expert assignments in Bhutan together with a former staff of the FabLab Bhutan. That time I primarily used block programming while my co-host followed up with text coding by Mu. I post herewith a few slides on the description of micro:bit devices.
micro:bit v2.1: JPY3,500 at Sengoku Densho (Tokyo) purchased on March 4, 2024
It was available at Sengoku Densho in Akihabara, Tokyo.
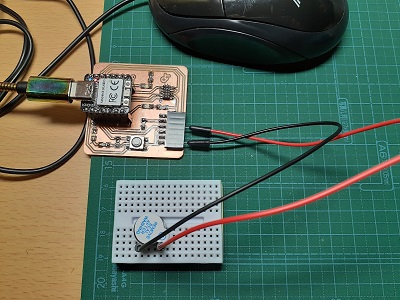
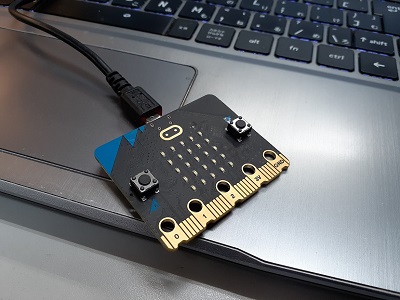
Connection: Once I took the device out of the package, I just connected it to my laptop with USB Type-B cable on the device side. Once it is connected, formatting process automatically started and then the device was ready for flashing.
Programming: In this case, I tried to replicate the program to sound a siren. It was because the micro:bit v2 has a speaker preinstalled. I had ChatGPT write the program for the siren to be turned on and turned off when the buttons A and B are pressed at the same time.
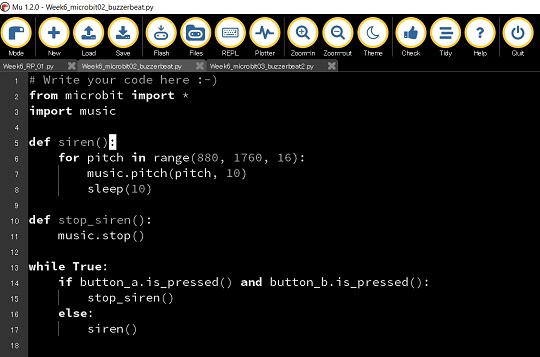
Flashing: Once I completed writing the program, I flashed it to the board by clicking the Flash icon on the Mu editor. After flashing, I pressed the reset button next to the USB connector on the back side of the board. Then siren started to sound. When I pressed the A and B buttons on the board at one time, siren stopped. Once I released the two buttons, siren started again.
Compared to the Arduino IDE, with which we could use the sample codes, in case of MicroPython, we should start write our programs from scratch. Also, for beginners, it’s difficult to imagine what kind of libraries are available and should be imported at beginning.
Raspberry Pi / Raspberry Pi Pico
General Description: As part of our group assignments, we had to try other boards. After micro:bit, I tried Raspberry Pi and Raspberry Pi Pico. Raspberry Pi is a small microcontroller board developed and released by the Raspberry Pi Foundation in the U.K. Raspberry Pi Pico was released in January 2021. Pico is very small with 51 mm x 21 mm, enough to fit on our index finger. Even so, it has a high-performing processor and a wide range of input/output terminals, and they could be connected to a wide variety of electronic components such as LEDs, motors, displays, and sensors, which can be programmed to control as we want.
In February 2012, the Raspberry Pi Foundation released the first memorable Raspberry Pi Model B. Model B was an inexpensive single-board computer with the size of a business card and could be connected to a PC monitor and a mouse to create a small PC. It comes with an official OS called “Raspberry Pi OS,” which allows users to install the OS and use web browsers and Office applications in a desktop environment similar to a Windows PC.
Background for Pico and RP2040: Raspberry Pi had several challenges when considered as a computer for electronics circuit construction. First, Raspberry Pi consumes a lot of power due to its high performance. If it is battery-powered, the more power it consumes, the less time it can operate. Second, there is a delay when controlling electronic components. Raspberry Pi activates OS first and executes programs on the OS. Therefore, in addition to the programs used to control the electronic components, the OS itself and other apps frequently interrupt. This could cause a slight delay in the timing of controlling electronic parts.
Some users are using Raspberry Pi combining it with other microcontroller boards. They assign advanced data processing to Raspberry Pi, while the precise control of electronic parts is handled by an external microcontroller board. Under these circumstances, Pico was developed to meet the demand for such microcontroller development boards. The microcontroller mounted for Pico is called RP2040.
One of the unique features of RP2040 is that it has eight small processors called Programmable I/Os (PIOs) inside, and they can execute simple instructions independently of the main processor. This allows RP2040 to execute electronic commands while the main processor is doing something else. This feature makes RP2040 very useful when we want electronic parts to operate without being affected by other processing in the program.
Pico vs Raspberry Pi: Since Pico is specializing in controlled electronic parts, it cannot run GUI applications like a PC. On the other hand, Raspberry Pi, on the other hand, starts a desktop environment like Windows and can be controlled using a mouse and keyboard. There is a wide variety of applications that can be used in the desktop environment.
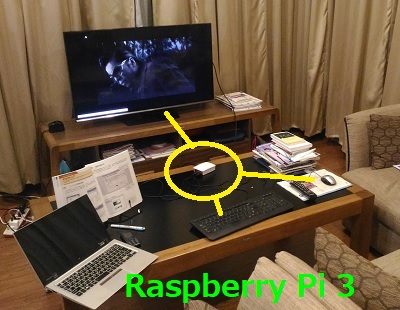
I have tried connecting Rasberry Pi to an LCD monitor, a keyboard and a mouse to use it as a PC.
Raspberry Pi is also comparable to Windows PCs in terms of the program development environment, allowing development in many programming languages such as Java, Python, and Perl. On the other hand, with Pico, we need to prepare a separate PC for the development and then write the program to Pico. The languages that can be used for development are also limited to C and MicroPython.
Pico is more suitable if we want to control electronic parts only. When we create good-looking electronic gadgets, it is necessary to mount a Pico or Raspberry Pi in a box case. Since Pico is compact, its size rarely becomes an issue when we mount it in a box. Pico is also more advantageous in terms of power consumption.
Both Pico and Raspberry Pi have their advantages and disadvantages, and strengths and weaknesses. We had better choose the one that best suits our objectives and operating environment. For example, if we aim at making a gadget that could recognize a person in a camera, Raspberry Pi can process the images much faster. If we want to make a small gadget that runs on batteries, we should opt for Pico, which is easy to store in a small box and saves power.
Pinouts: Here I will post the pinouts for Raspberry Pi and Pico. The detailed descriptions are available in the technical documents for Raspberry Pi and Raspberry Pi Pico in the Raspberry Pi Foundation website.
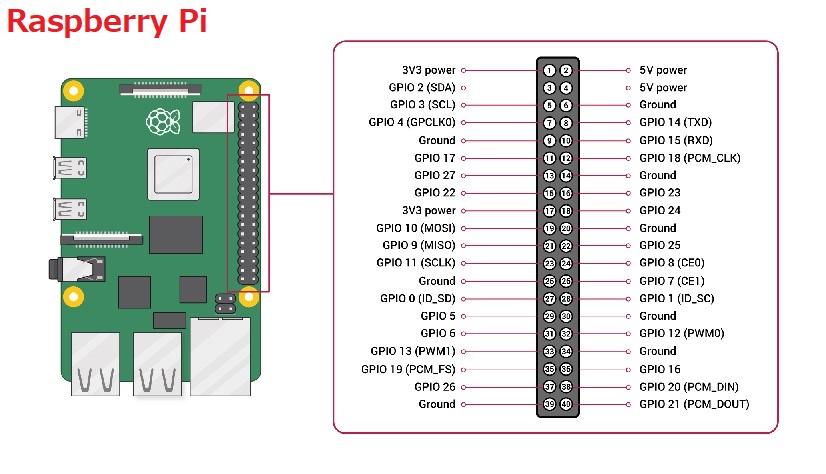

Both Raspberry Pi series and Pico have 26 GPIO pins for digital input/output. Besides, Pico has 3 GPIO pins for analogue input. There are a number of microcontroller development boards with RP2040, other than Pico, and they have different numbers of GPIO pins. For example, Xiao RP2040 has 11 pins out of which 4 pins are for analogue input. Perhaps the number of GPIO pins will be one of the points to note when we read the data sheet of the microcontroller.
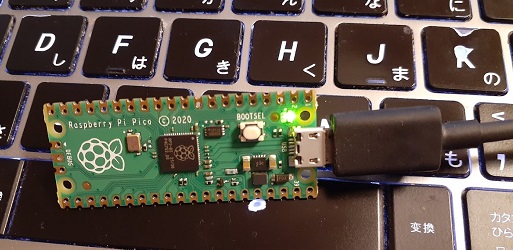
Pico and Accessories: I purchased one unit of Pico at Sengoku Densho in Akihabara, Tokyo, Japan.
Raspberry Pi Pico: JPY880 at Sengoku Densho (Tokyo) purchased on March 4, 2024
They are offering a volume discount for the purchase of 5 units at JPY4,200. For connection to our laptop, we need USB Type-B cable. Also, if we want to connect the board to the external input/output devices, we need probes or pin headers and a breadboard so that we could place the Pico device on the breadboard and try connecting different parts with jump wires.
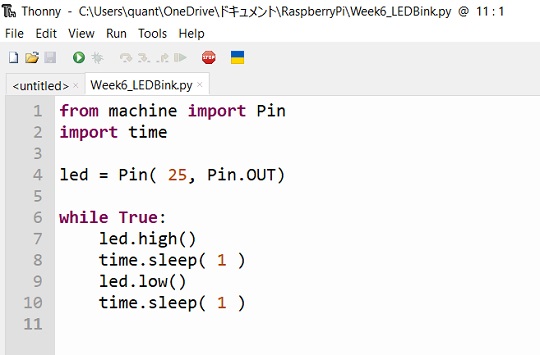
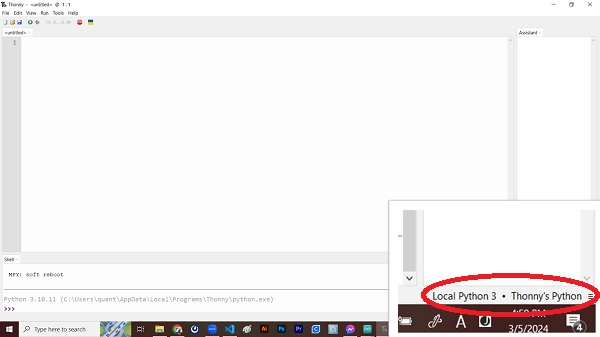
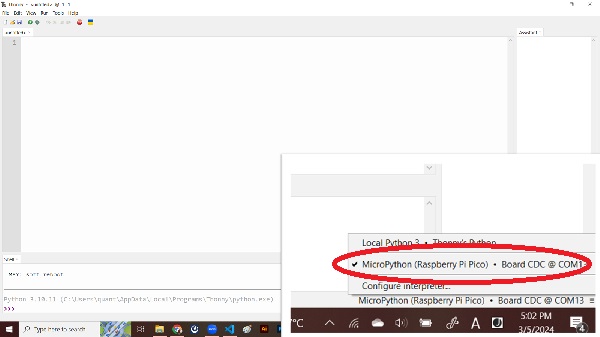
Text Editor “Thonny”: In order to write codes on Pico, Thonny is probably the most popular Python IDE. After downloading and installing the program, we open the Thonny app. First, we have to point the mouse cursor at the bottom right corner of the editor, which is called “Interpreter” and install MicroPython by selecting “RPI-RP2 (E:)” for target volume and “Raspberry Pi・Pico/Pico H” as MicroPython variant. Then we can switch the interpreter beteen local Thonny and MicroPython (Raspberry Pi Pico).
Write the First Program “LED Blink”: Then I wrote the program for blinking the LED pre-installed on the Pico board. I decided to do this because I could do without connecting any other parts to Pico on the breadboard. After writing the program, I flashed it by clicking the Run icon on the menu bar.