1. Principles and Practices, Project Management
Individual Assignments Overview
Here is the list of individual assignments given by the instructors:
- Plan and sketch a potential final project;
- Work through a git tutorial;
- Build a personal site in the class archive describing you and your final project.
Plan and Sketch a Potential Final Project
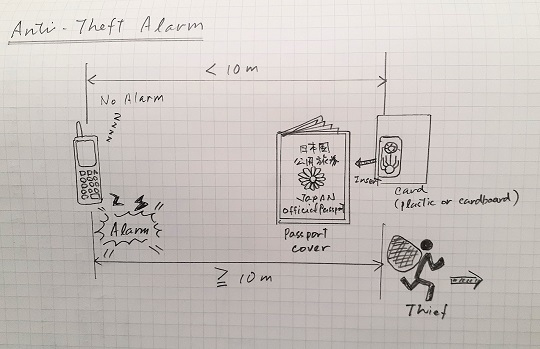
Initial Idea: “Official Passport Anti-Theft Alarm”
As of Week 1, I am thinking of making an anti-theft alarm system for official passports. The sketch image is attached herewith.
General Description
It consists of two components:
-
A small thin tag embedded in a thin cardboard-like paper card: Equipped with a bluetooth device powered by a button battery.
-
Mobile interface: Installed in the mobile phone.
The tag is inserted into the vinyl cover for the passport. As long as the passport and the mobile phone stay in a close distance, within 10 meters for example, nothing happens. But the passport is brought away from the mobile phone, the mobile phone sounds the sirens.
Target Users
The primary target is those who are residing in foreign countries with a official passport issued by the Ministry of Foreign Affairs of their home country.

Background
-
When I was engaged in the foreign service as the head of the mission of the Japan International Cooperation Agency (JICA), I had always been facing the risk of the incidents that the JICA officials working in the same country, as the expert, the volunteer or the administrative staff, have their official passport lost or stolen while they are traveling the third countries. Most of the incidents happen in the transit airports or cities before they reach the final destination. Once they lose their official passport, the head of the mission has to submit the first incident report to the JICA headquarters in Tokyo. The headquarters is blamed by the Ministry due to their mismanagement of the government asset, and that may affect my own performance assessment as the head of the mission.
-
I once took this issue so seriously and insisted that it’s useless for us to rely only on the self human efforts of the passport holder so that they should always stay alert and keep an eye on their passport. It’s impossible to minimize the risk only by the human efforts and I thought that there could be some room for technology to complement the human capacity. Therefore, I drafted a project proposal to prototype the theft alarm system locally with the FabLab in the same country and requested the JICA headquarters to allocate the extra budget to my office. Unfortunately my proposal was rejected by the headquarters saying that it’s not the matter for one country office alone to work on the solution for all the country missions around the world. Five years after this battle with the headquarters, JICA has not initiated any prototyping project and still been relying on the human efforts.
-
Another issue with regards to my relationship with JICA was that only a few officials were aware of the potential of decentralized production and open source. Although there were already FabLabs near them, most of the officials did not pay attention to the FabLab and never thought of connecting their development cooperation programs to the FabLabs. I really wanted them to feel that it’s not that difficult to work on machine operations, soldering and assembly. Through this practice of local production of the open-source device at the local lab, I want them to learn more about FabLabs.
Past Projects
After sharing my ideas with my instructors, I was advised to study the following two projects below. Both of them are aiming at tracking the personal belongings so that they could minimize the risk of loss. The difference of my project is to prevent the users from going away from the item or to scare the theif and have him/her give up stealing the item.
Also, during the Regional Review Session for Asia earlier this week, I came to know about the following project by the Fab Academy participants in 2020. The downsizing the components as thin and small as possible is a challenge for me. I will further research on the past projects.
Project Management
I. Learning about Git
“Git is a free and open source distributed version control system designed to handle everything from small to very large projects with speed and efficiency.” Git official website
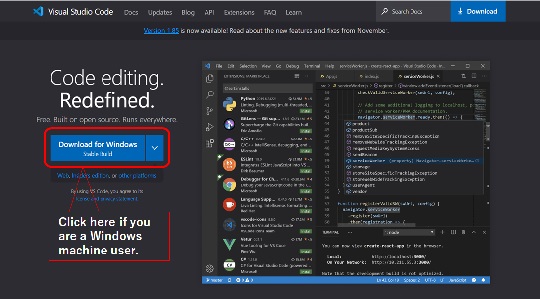
a. Selection of the Terminal App: I started with the selection of the terminal app. I have decided to use Visual Studio Code (VS Code) as it could also be used as a text editor. I downloaded the exe file for WindowsX64 on the VS Code website. Then I proceeded to the installation.
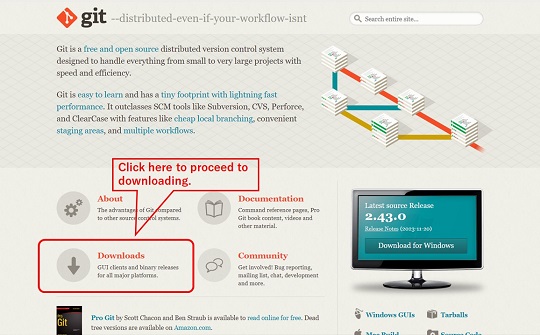
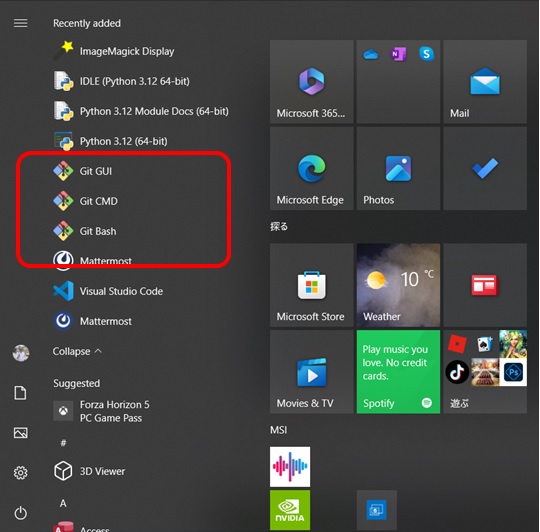
b. Git Setup: Then I opened the Git official website for downloading it onto my Windows10 machine. Once I proceeded to installation, a series of pop-up windows came up. I kept clicking “NEXT” to complete the Git Setup Wizard. Once completed, I saw three new apps (Git GUI, Git CMD, Git Bash) appearing in the app list.
After completing the Git Setup Wizard, I opened the command prompt on VS Code. I opened a new terminal on VS Code by selecting “New Terminal” from the “Terminal” menu bar. I typed the following command and got the result as shown in the folloing image. We can check the Git version.
> PS C:\Users\quant\repos\koji-yamada> git --version

c. Git Configuration: When we use Git, we need to register user name and email ID we use for logging in to Gitlab to configure Git on my computer. Although only I myself use Git in my current laptop, I still need to keep the log record on who made commit.
> PS C:\users\quant\repos\koji-yamada> git config --global user.name "myname"
> PS C:\users\quant\repos\koji-yamada> git config --global user.email "my@email.com"
By doing this, whenever I made a commit, I could see my attribution by “git log”.

d. Generating SSH Key for Local Git: SSH (Secure Shell Protocol) is a “cryptographic network protocol for operating network services securely over an unsecured network” (wikipedia). Git uses this protocol to establish secure communication between my computer and the GIT server which is hosting my repository. Thus it ensures that only I myself could update my repository. For setting up the communication protocol for my laptop, I followed the web instruction at “Add an SSH key to your GitLab account” on Gitlab Docs, and had my laptop added for a new SSH Key.
Step 1: Open the terminal and run ssh-keygen -t followed by the key type. In our case, the key type was ed25519.
 PS C:\Users\quant> cd .ssh
 PS C:\Users\quant\.ssh> ssh-keygen -t ed25519
Step 2: Once you press ENTER, you will get the following output display.
 Generating public/private ed25519 key pair.
 Enter file in which to save the key (C:\Users\quant/.ssh/id_ed25519):
Step 3: Once you press ENTER for the above display, you will get the following new display:
 Enter passphrase (empty for no passphrase):
 Enter same passphrase again:
Step 4: You can type a passphrase or you can just press ENTER twice. Then you will get the following message:
 Your identification has been saved in C:\Users\quant/.ssh/id_ed25519.
 Your public key has been saved in C:\Users\quant/.ssh/id_ed25519.pub.
 The key fingerprint is:
 SHA256: xxxxxxxxxxxxxxxxxxxxxxxxxxxxxx(Depends on your PC)
Step 5: Run ls and you could see what have been saved in the directory:
 PS C:\Users\quant\.ssh> ls
 Mode                 LastWriteTime         Length Name
 ----                 -------------         ------ ----
 -a----         1/27/2024  11:39 AM            399 id_ed25519
 -a----         1/27/2024  11:39 AM             92 id_ed25519.pub
 -a----         1/27/2024  11:48 AM            282 known_hosts
 -a----         1/27/2024  11:48 AM            101 known_hosts.old
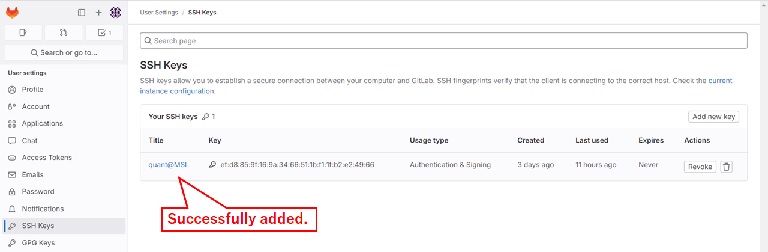
Step 6: Then proceed to Gitlab. From your profile, proceed to “SSH Keys” and click “Add New Key”. For the input items information, you can get them by running the following command:
 PS C:\Users\quant\.ssh> cat id_ed25519.pub
 ssh-ed25519 AAAAC3NzaC1lZDI1NTE5AAAAIKW/1y0ssa7b76VyEmqpXiIjwVUUxambn9n5rPMvo6xp quant@MSI
After taking all the above steps, you can get your SSH added.
d. Clone My Project with SSH: I continued to remain in my student page in Gitlab. There was a blue “Code” button.
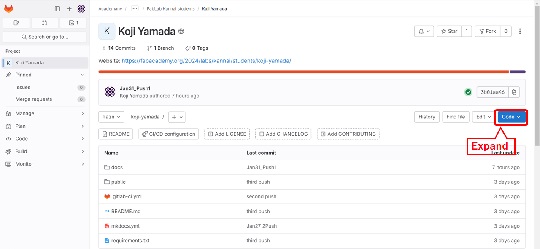
Once I expanded blue button, I found my SSH URL and copied it.
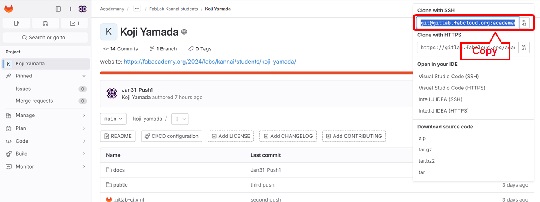
Next I opened the VS Code and opened a new terminal from the menu “Terminal”. Entering the command “git clone” and one space, I pasted the SSH URL. In my case, it looked like this:
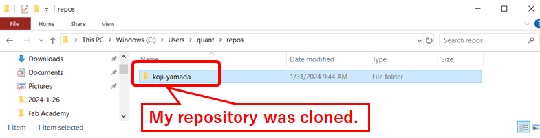
PS C:\users\quant\repos\ git clone git@gitlab.fabcloud.org:academany/fabacademy/2024/labs/kannai/students/koji-yamada.git

As a result, my repository was cloned in the local folder.
II. Build a Personal Website
Now I am ready for building my personal website. As this site already shows, I could build this web platform for my documentation. Our first assignments for this headline are: (i) To describe myself, and (ii) To describe my initial thoughts about final project.
In our case, we are benefiting from the Fab Academy Gitlab docs folder. We can build and publish our personal website by using GitLab CI. Once we edit the files locally and push them to the Gitlab docs folder, the files are automatically edited. Also, all the sample html files in the “Public” holder and mkdocs.yml file are all prepared.
a. Selection of the Text Editor: Now that I used the VS Code for terminal app, I decided to use the VS Code as a text editor.
b. Selection of the Markup Language: I was presented two options: Markdown or HTML. Markdown is a lightweight markup language for creating formatted text using a plain-text editor, while HTML is the standard markup language for documents designed to be displayed in a web browser. Although HTML was familiar to me for two decades, I decided to go for Markdown. Our instructor reminded me that once I choose Markdown, I should stick to it until the end of the Academy.
c. Installation of Markdown Editor: Next I went to the markdown content generator MkDocs and Python for downloading.
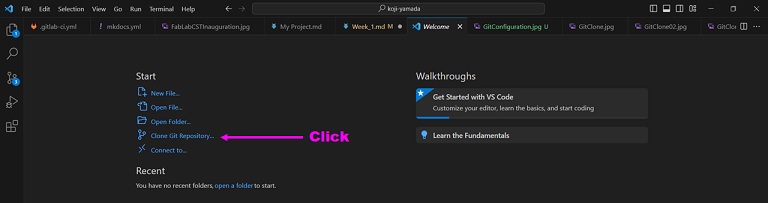
d. Clone Git Repo to Local Repo: After the installation, I opened the VS Code. The Welcome page shows the Start options and I selected “Clone Git Repository…” Then I copied the SSH URL in the Gitlab. The location of the SSH URL is the same as the one shown in the “Clone My Project with SSH” in the Section II above.
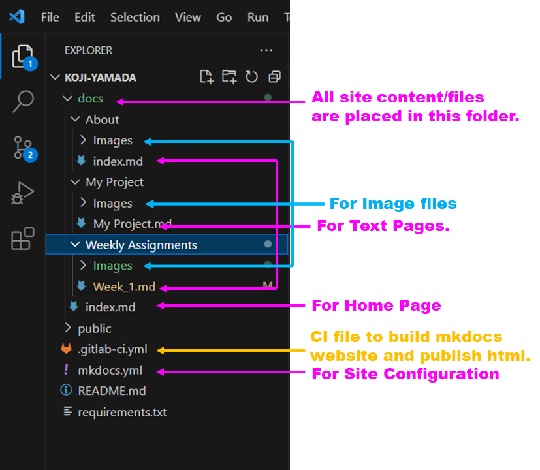
Once completing the clone, all the files were ready for editing. I forgot to take the screenshot of the page layout immediately after the cloning. Instead here I post the layout of my webpage as of January 31, 2024.
e. Theme Options and Adding Features: The instructors told me that there were many options on the themes of the website and we could customize it by changing the theme name and other options including palette, font and icon on the mkdocs.yml file. However, my initial efforts didn’t go well and I decided to remain in the default theme at this point of time. Adding plugins and extensions were yet to be explored.
f. Local Changes: Now I made new folders “About”, “My Project” and “Weekly Assignments” in the docs folder and started writing texts. For the image files, I have created an image folder for each of the file folders. Everytime I completed editing on the md files, I saved them in the local repository. For preview of my website, I use the following prompt:
PS C:\Users\quant\repos\koji-yamada> mkdocs serve

We can see if our edits are well reflected locally on the browser by ctrl & clicking the browser URL. While it keeps running, you can check the changes on the browser everytime you save the change.
For the cancellation, press [ctrl]+c
Also, these are the frequently used commands for mkdocs:
* `mkdocs new [dir-name]` - Create a new project.
* `mkdocs serve` - Start the live-reloading docs server.
* `mkdocs build` - Build the documentation site.
* `mkdocs -h` - Print help message and exit.
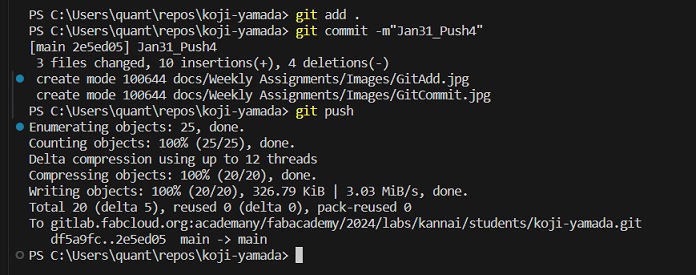
g. Push Local Changes to Gitlab for Publishing: Once I completed editing local files, I could run the following command for publishing the website.
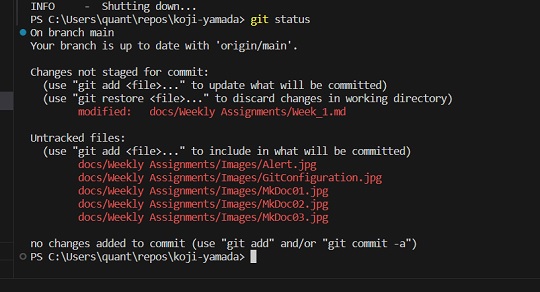
- git status: Could be used to display the status of my working directory and staging area. This helps me to see what action is required.
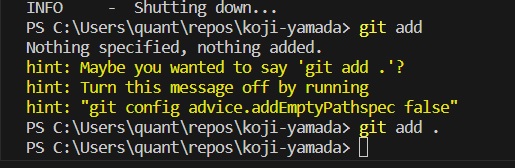
- git add: Could be used to move the changed file contents to the staging area. If I want to move all the contents, use “git add .” (Do not forget about putting a space and a dot.) We could also specify the files to be moved by adding path after “git add “.
- git commit -m”push name”: Could be used to commit the changes in the staging area and record changes in the repository.
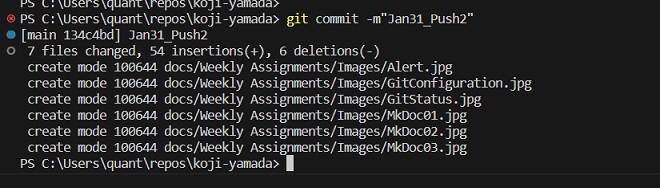
- git push: Could be used to push my new commits to the remote repository in Gitlab.
Student Agreement
As part of our individual assignment for the Week 1, we were supposed to read, sign the student agreements, and commit to my repo. As Neil reminded in the second global session, I did it accordingly. You could see it on the TOP Page