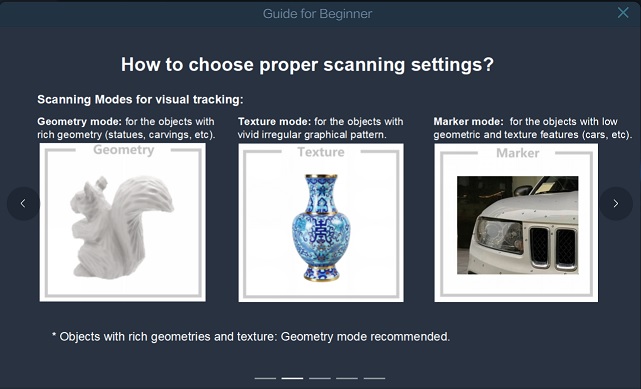
5. 3D Scanning and Printing
Assignments Overview
Here is the list of individual assignments given by the instructors. As for the Group Assignment, please see the Group Assignment page on the FabLab Kannai website:
- Design and 3D print an object (small, few cm3, limited by printer time)
  that could not be made subtractively
- 3D scan an object (and optionally print it)
1. 3D Design and Printing
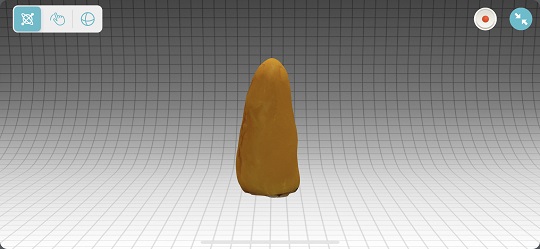
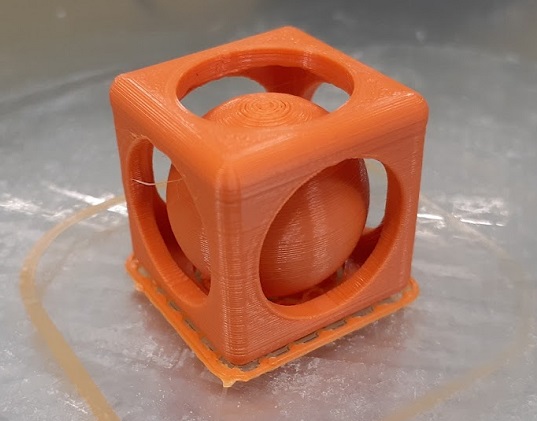
For this assignment, I decided to start with designing a “Ball-in-a-Cube”, because the cube has the hollow structure where there is another shape inside. It cannot be made subtractively.
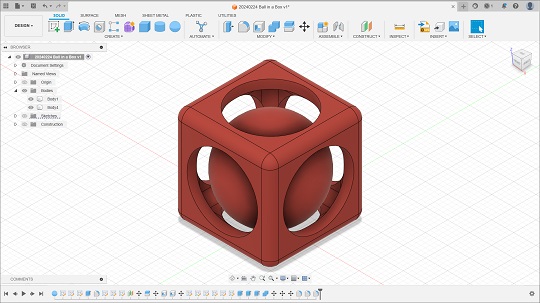
Here are the dimensions of the design:
Diameter of the Ball: 20mm
Cube (Exterior): 22mm x 22mm x 22mm
Shelling on the Cube: 2mm
Fillets: 2mm
Diameter of the Circle Window on the Cube: 16mm
1-1. Modeling with Fusion360
The design process is documented in the following video. I designed it with Fusion360. In order to see if the sphere does not interfare with the interior wall of the cube, I did section analysis by going to Inspect > Section Analysis.
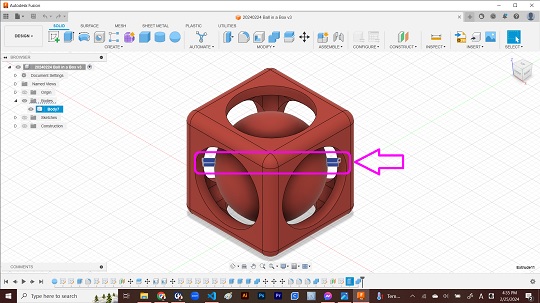
However, I noticed at the last moment that the sphere and the cube were separated and could not be combined into a single body. Therefore, I did a small patchwork, adding one horizontal flat bar to connect the two shapes, and then combined all the bodies. This time they became a single body to export mesh data.
1-2. Exporting STL File
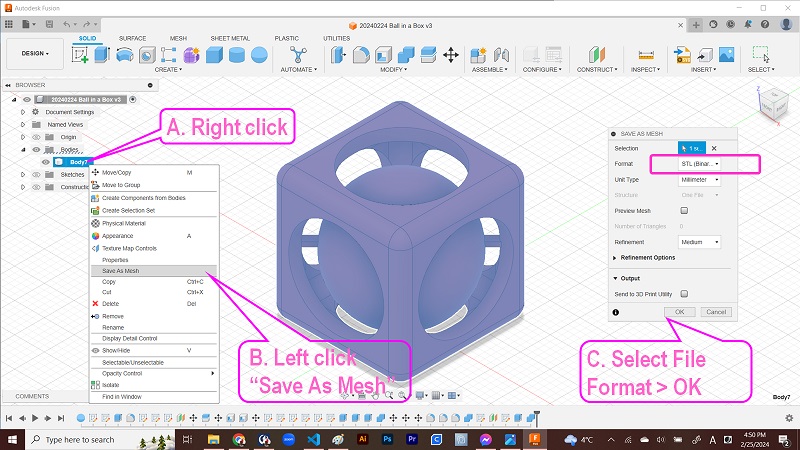
(A) Select the body in the browser and right click it. > (B) Point the cursor to “Save As Mesh” and left click. > (C) Select the file format, as STL (binary), and left click “OK”. > (D) Select the folder to save the STL file, set the file name, and save: STL file
1-3. Slicing
Since we had Creality Ender3 V2 and Ender3 Pro in our lab, I decided to slice the 3D data with Cura. (Since I have been using Cura for the last few years, I skipped the description on how I downloaded the program.) I decided to use Ender3 V2 as a 3D printer and selected PLA filament as a material.
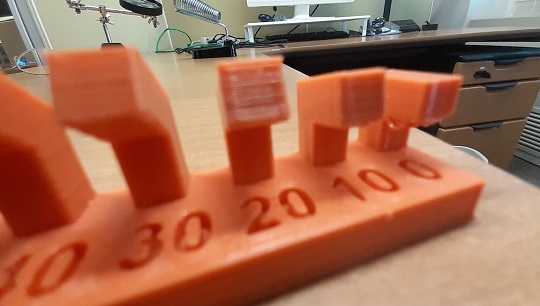
Here, let me take time to review my design. Based on our analysis on the characteristics of the 3D printers in our lab as our group assignment work, we have concluded that:
-
Overhang: Although many say that there is a 45-degree rule, we found that we could get good results even if the overhang is up to 70 degrees. If the overhang length is just 10mm, we can go without adding any support underneath.
-
Bridge: In our group assignment, we checked the print results according to the length of the bridges. We found that even if the bridge was 30 to 40mm, we could do without adding any support underneath.
My cube is 22mm x 22mm x 22mm. Therefore, I presumed that I could do without adding support. I also have to mention herewith that I tried to reduce the 90 degree overhang by adding fillets in most of the corners of the interior of the cube. However, I expected that the sphere inside the cube could not be printed well without support because in the first few layers, it has overhangs more than 70 degrees. Therefore, in this assignment, I selected “Touching Buildplate” for Support Placement option.
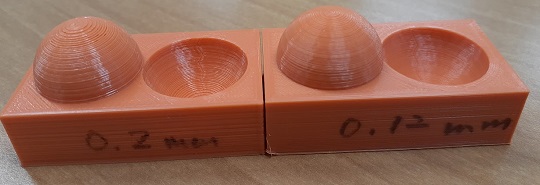
Then I proceeded to slicing and found that it would take 50 minutes. However, watching the Preview of the printing process, I wondered what if I change the resolution of the slicing from standard 0.2mm thickness to 0.12mm. So I changed the resolution and reculcurated the printing time. I found that it would take 1 hour 28 minutes. I decided to go with 0.12mm Super Quality.
1-4. Print
Once I sliced it, I saved the g-code file in the microSD card media and then inserted it to the Ender3 printer. (I will skip the description on the preparation for printing. I am writing this on the preconditions that the PLA filament of 0.4mm diameter is already loaded into the printer.) I pressed the “Print” icon on the control panel and selected the file I wanted to print:
1-5. Observations
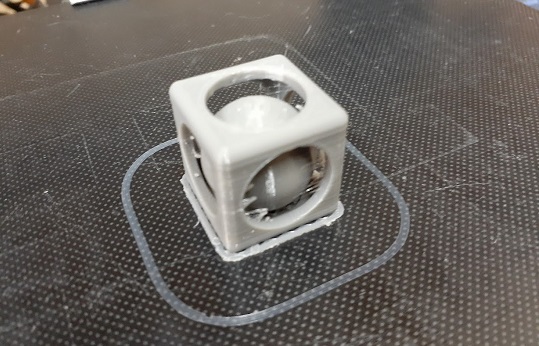
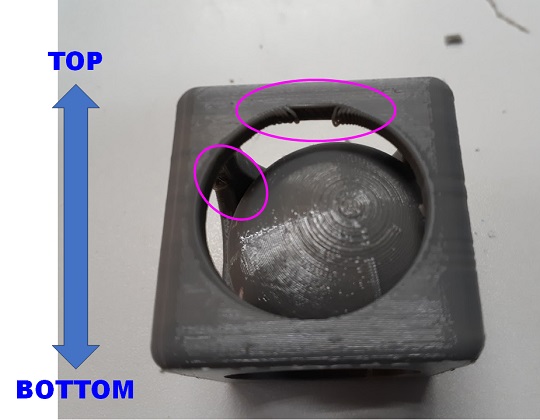
The above photo is the result of the first 3D-printing. No critical failure was detected underneath the bridges. The support under the sphere was easy to peel off. And the flat bar connecting the sphere and the cube could be easily broken and the sphere was released inside the cube. However, at this point of time, I had two questions:
- Stringing: You could easily see the first issue with this printing trial was about the oozing strings between two sides of the wall windows. Actually this happened many times when I printed small but complicated stuff. In this assignment, I could consult with our instructor on this issue and was advised to change the retraction parameter. At this point of time, I hadn’t implemented this retraction testing. I will add the result later.
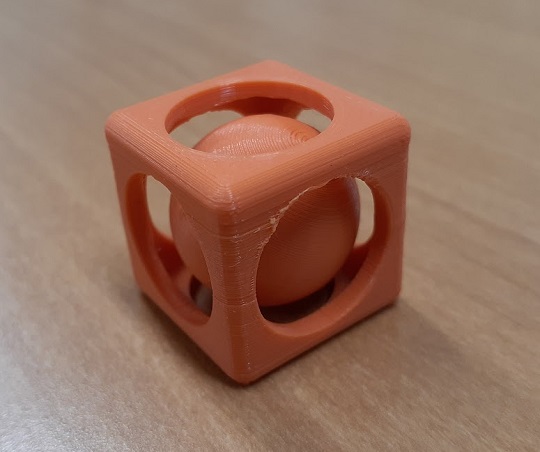
- Scaling Up: Because I could easily expect that the overhangs and bridges of my design would not affect the print result if it’s small enough, I didn’t place support under the overhangs and bridges. However, I wondered if I could get the same result if the overhangs and bridges get longer as I scale up the design. Therefore, I resized the design by 180 percent and tried printing. This time, due to my time constraints to stay in our lab, I selected the 0.20mm Standard Quality for slicing. This time, I changed the retraction parameters (Distance: 5mm => 6.5mm, Speed: 60mm/sec. => 45mm/sec.). The following three photos show the results.

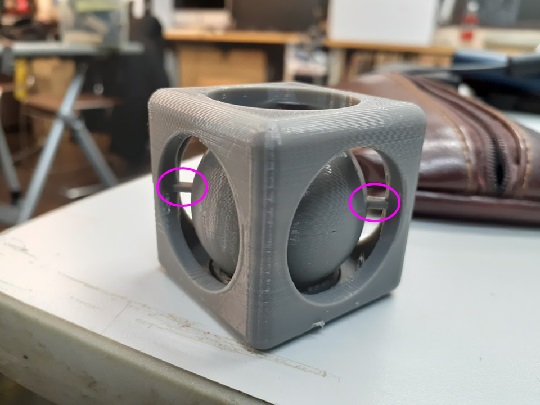
Looks like stringing is somehow controlled. However, I observed that the bridges of the cube walls collapsed a bit. Also, although it’s not so clearly visible, I found the ceiling of the cube also collapsed a bit. If you print the similar shape which has 40mm x 40mm x 40mm, you had better place support which could be easily removed. Also, since I scaled up the original design on the slicer, the bridge bar connecting the sphere and the cube also became thicker and that made it difficult to remove them after printing. The support under the sphere also became thicker and it was difficult to peel off. That made me feel I should have worked on the parameter settings for support as well.
1-6. Data Created
Finally, I hereby post the Fusion360 data file.
2. 3D Scanning and Printing
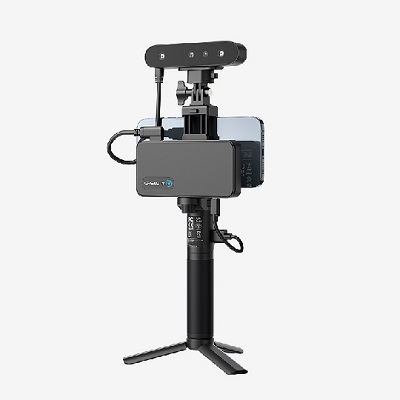
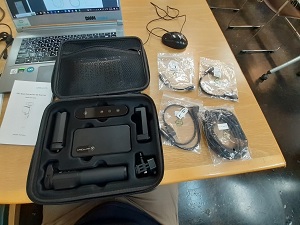
Another way to prepare the data for 3D printing is scanning the target object. FabLab Kannai was equipped with Creality CR-Scan Ferret Pro which could be attached to your PC or your mobile phone. CR-Scan Ferret Pro was the model featured by Prof. Neil in the Global Session and I felt so proud of taking access to this latest model.
I have used EinScan Pro HD, EinScan SE, and Qlone before, but I couldn’t get a good result with any one of them except the case when I scanned a cray model of the horn of the stuffed animal with EinScan SE and 3D-printed it with an SLA printer. Please see the Project Gallery.
I was excited to try a new scanning app in the Fab Academy. I skipped the description of how to assemble all the scanner components. You could check the setup process in the operations manual.
2-1. CR-Scan Ferret Pro with Windows PC - Failed
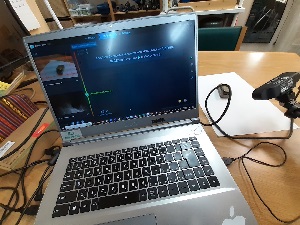
I decided to try the Creality website and downloaded the latest PC app for Windows. After installing it, I opened the Creality Scan app.
Once you open the Crality Scan app, it automatically detects the connection to the scanner. Once it’s connected, you will first see the setup dialogue windows.
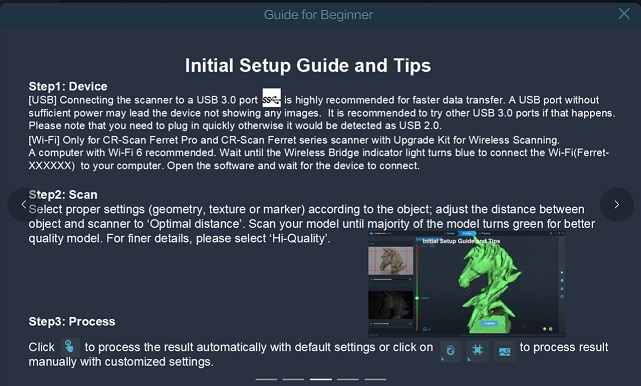
After going through those instructions, close the dialogues and you will see the message that the scanner is detected. Click the Scan button to go to the Configuration dialogue for setup. When you finish the configuration, click “New Scan” to start scanning. While you are scanning a small object, you had better use the turntable to turn the target object, while setting up the scanner with the tripod attachment.
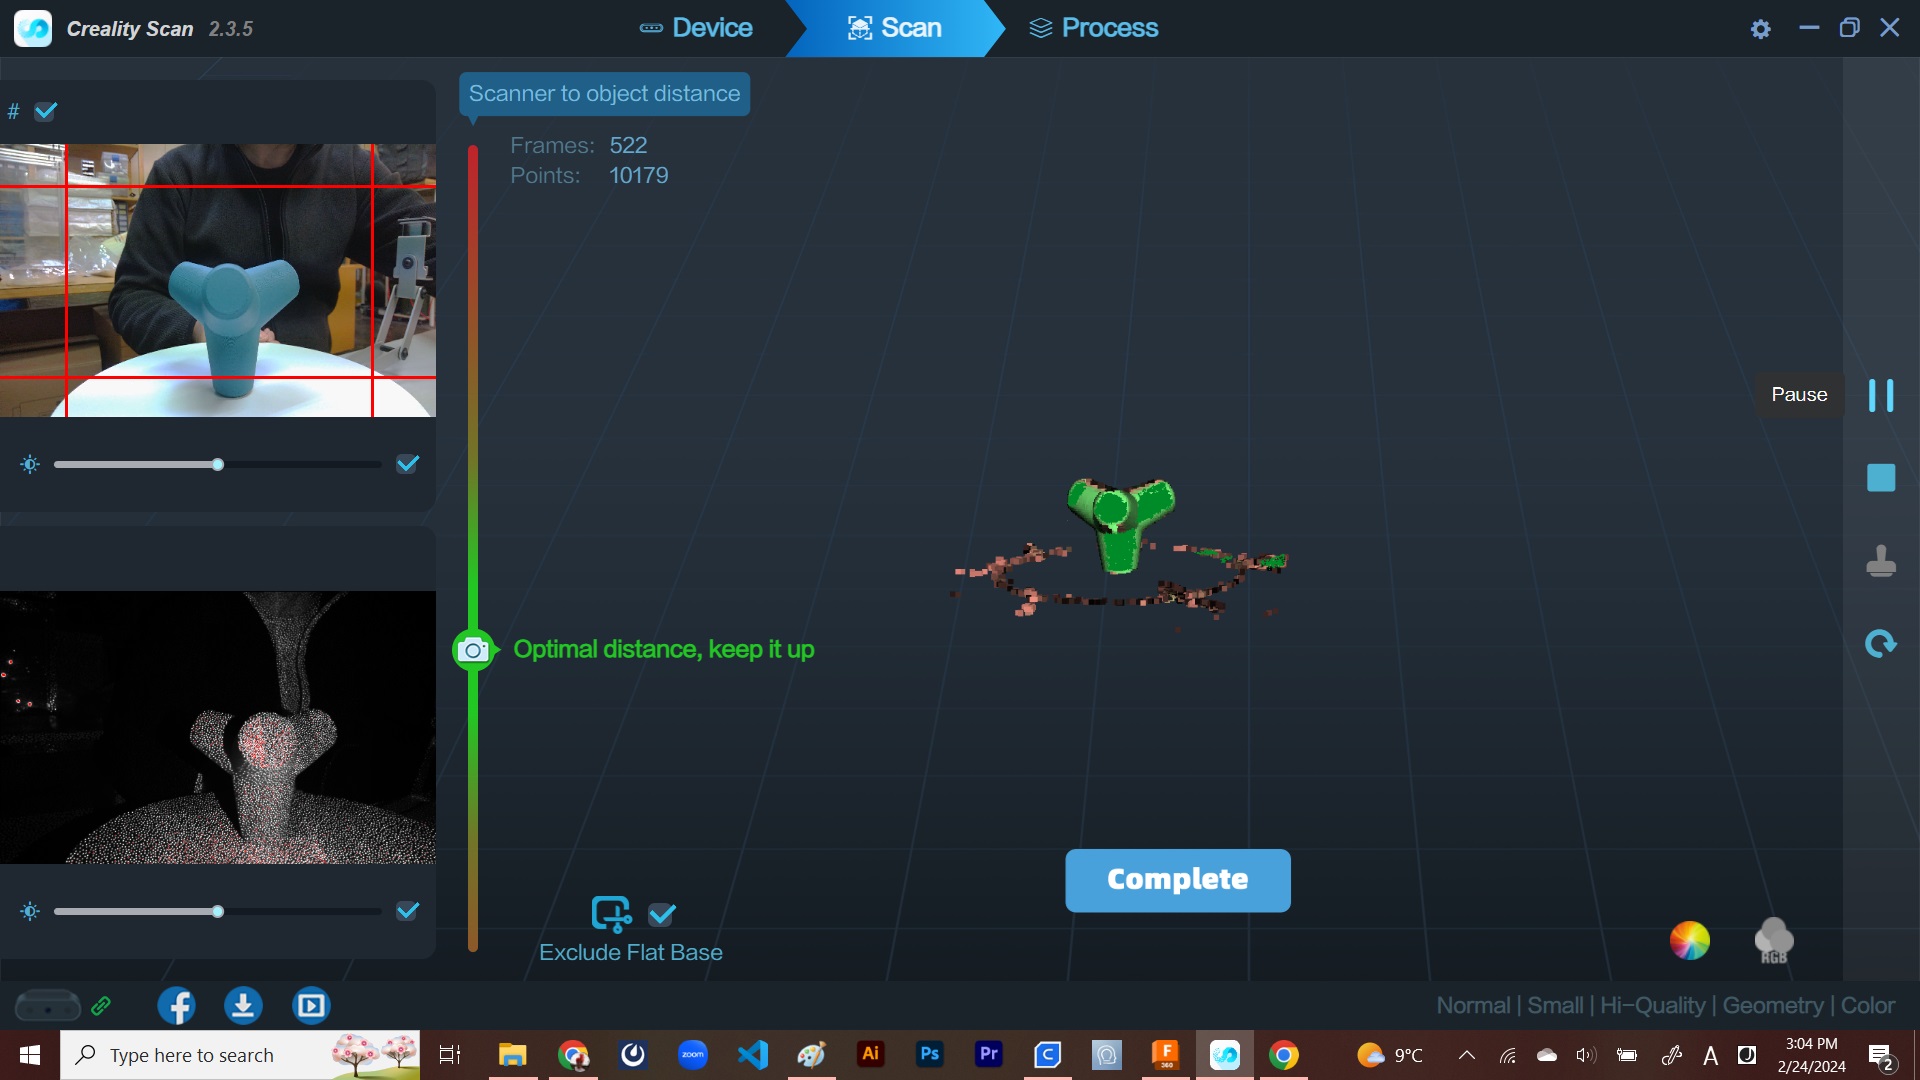
However, when I tried to export the data after the processing, I faced repeated failure in exporting the data. Although I tried many times, changing the file formats to export, none of them succeeded. I searched for the solution on the Internet, but it has not been successful so far. I decided to retreat.
2-2. CR-Scan Ferret Pro with Android App - Failed
Then I changed my mind and tried to install the Creality Scan app on my mobile. However, according to the Operations Manual, it only covers Android version 10, 11 and 12. It doesn’t cover Android version 9, the Operating System for my mobile. As a result, I couldn’t install the app in my mobile. I first watched other students scan objects.
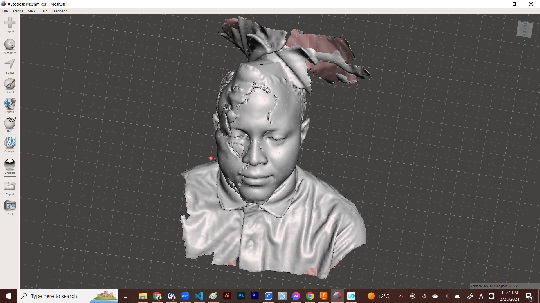
Borrowing other’s mobile phone, I also tried to scan the face of my classmate. Although I heard that CR-Scan Ferret Pro was lighter than any other handy scanner, it was difficult to hold it to remain in the right distance as I went around him for scanning from different angles. I failed in scanning at the final step. Based on this scanning, somehow I got a scan data of my classmate. It looked so wierd. Now I have been trying to make some corrections on the mesh data with Meshmixer, but I am still learning.
2-3. Polycam Pro with Android App - Failed
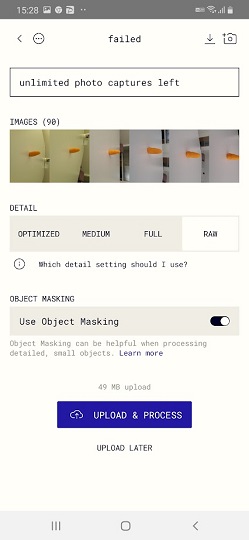
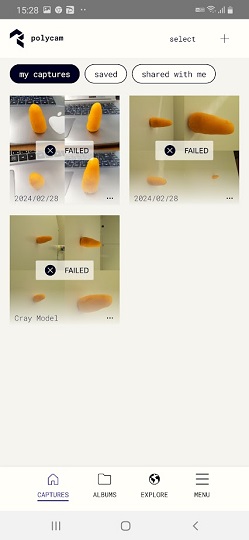
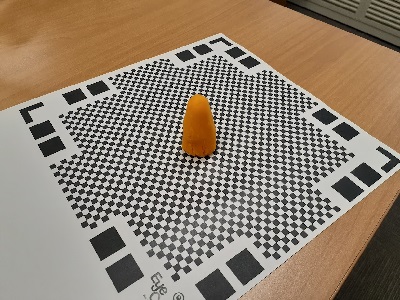
Then I tried another possibility: Polycam Pro app on my mobile. I made a clay model of a knee. My plan was to make a prosthetic knee socket with Meshmixer, by offseting the outline of the scanned knee. Installation successful. Polycam applies photogrametry and I took 100 snapshots of the clay model. Uploading fine. But once the app proceeded to the processing, then I faced the error message of uploading failure. I changed the settings a number of times for one set of snapshots, then I took another two sets of snapshots and did the same. None of them went well. I ended up with failed upload.
2-4. Qlone with iOS - Successful so far
Further, I tried scanning the clay model with Qlone app on my iPhone, which I have been borrowing from my office. That causes some restrictions on the usage. App downloading was free and it was successful. There was no problem in scanning, it went quite smoothly. Then I found that I had to enroll at the Premium Plan if I wanted to export OBJ, PLY or STL files for 3D printing. JPY5,000 for Premium Plan was expensive for scanning two or three times on trial basis. Therefore, I decided not to proceed.
2-5. CR-Scan Ferret Pro with PC, Again
Thus, compared to 3D design, I spent more time struggling with 3D scanning. The best possible option left to me was I get back to CR-Scan Ferret Pro in the FabLab and try again with my iPhone. However, I left my organization in late March and returned the iPhone. Therefore, I had nothing but going back to CR-Scan Ferret Pro with PC once again.
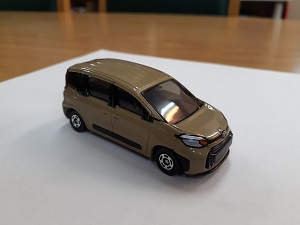
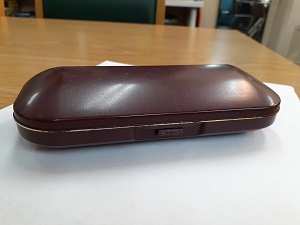
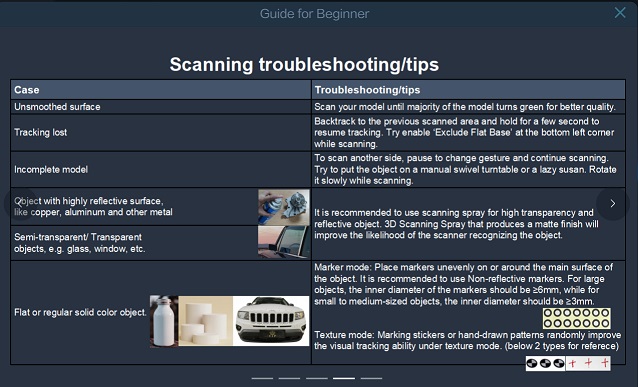
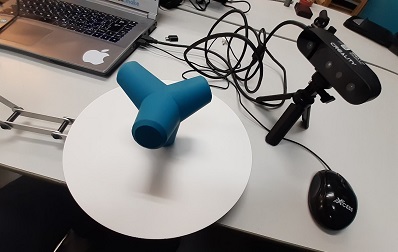
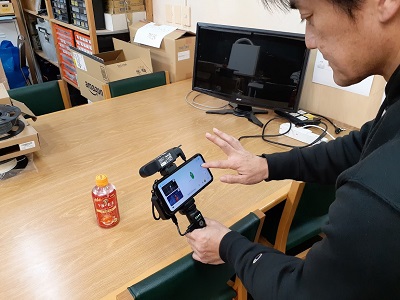
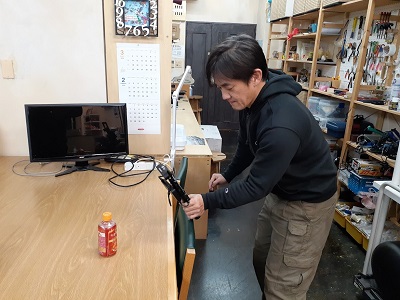
On Thursday, April 18, I went to FabLab Kannai and tried to scan a miniature toy car first. Because I had hard time getting good scan images with the toy car, I tried an eyeglass case. Although I spent almost three hours, I couldn’t get a good result. Here are my observations:
-
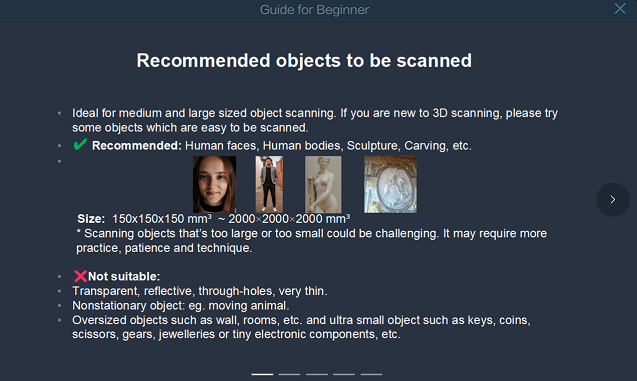
CR-Scan Ferret Pro is not suitable for scanning a small object. The instruction manual says that the minimum size of the scanner is 15cm x 15cm X 15cm. The miniature toy car was smaller than this limit. And that’s the reason I tried the eyeglass case.
-
The operations manual didn’t clearly mention about the way to scan objects which have overhangs on the bottom. I tried to scan it by turning the object upside down. But that affected the stability of the scanning process, holding the optimal distance between the scanner and the object. (Perhaps the best solution would be scanning it in two phases: First scan the upper half and then scan the second half. Then we could combine the two scan images into one.)
-
The most difficult part of the scanning process was to keep the optimal distance. If the scanner is cabled to the laptop, it was so difficult to aim at the object from different angles. And if you move the scanner, you will often miss the object and the scanner loses connection. According to the operation manual, you have to return the the last angle before you lose the connection, which I thought was so difficult. The best solution would be using the turntable. (Please see the following video of the 3D-scanning exercise I made a year ago at FabLab CST, Bhutan, with EinScan Pro HD.)
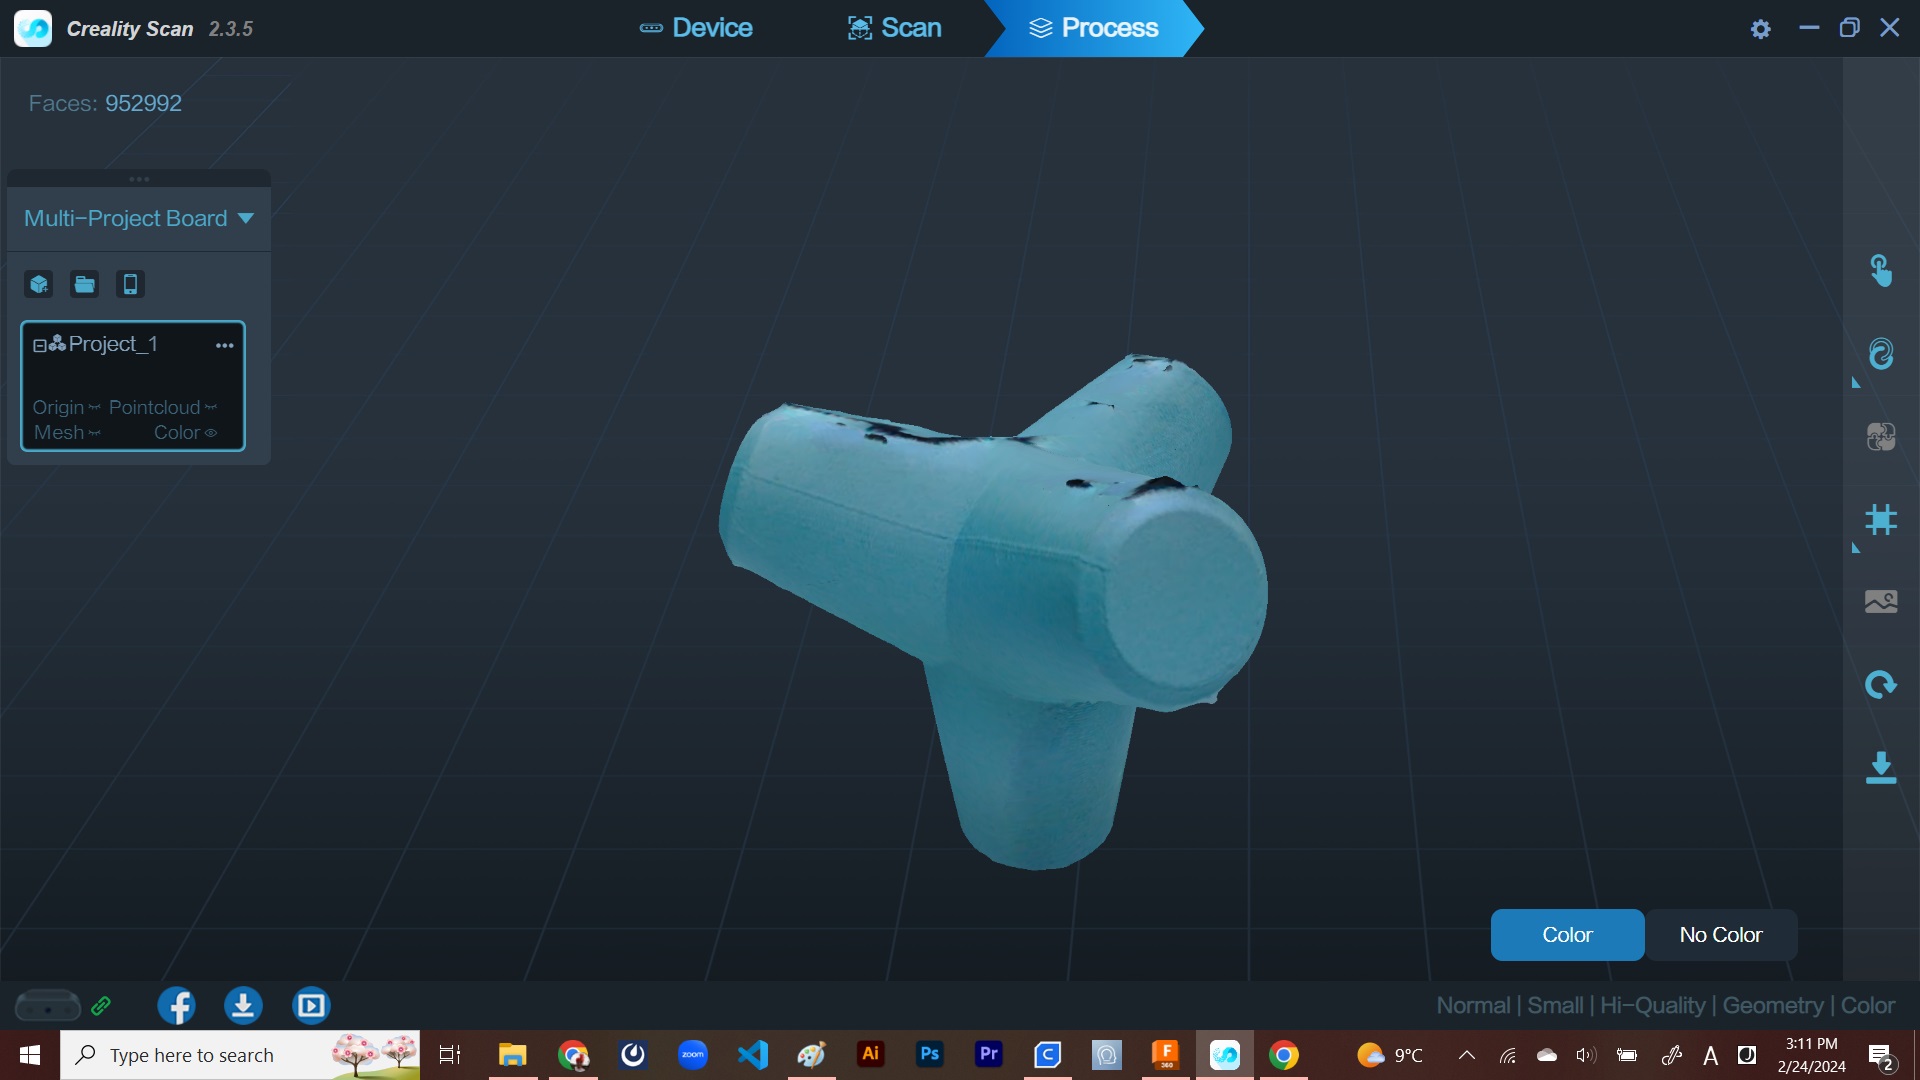
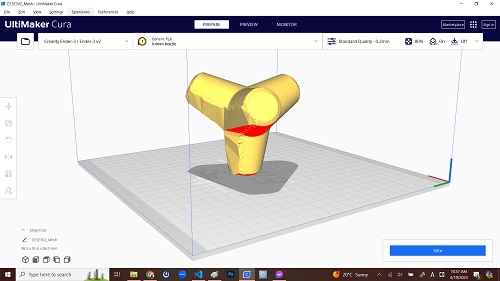
- After all, I couldn’t get a good result on 3D scanning. However, the good news is it turned out that I exported the first scan data described in 2-1 above. I found this just recently. Based on the STL file created with the exported data, I imported it to the Cura slicer, although I didn’t proceed to 3D printing.
3. Other Notes
3-1. Understanding the Characteristics of Another 3D Printer
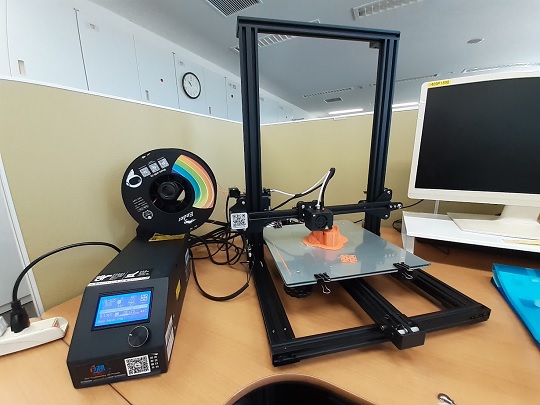
Besides the ones available at FabLab Kannai, I have another 3D printer, Creality CR-10S, in my office, JICA Ichigaya Building. It has a better print capacity of 300mm x 300mm x 300mm than Ender3. It was bought in 2019 by the JICA Global Plaza together with the advisory services provided by the Musashino Art University. However, after it was displayed in their exhibition on technology and development in 2019, no one has been using this 3D printer in the JICA Ichigaya Building. Since I started working here in mid December 2023, I decided to involve a few colleagues of my office to reactivate the machine usage in the next three months until I retire. I have placed the machine behind my desk and kept it moving as long as I was at office. Since I spent longer time in my office than at my lab this week, I tried similar 3D printing tests with CR-10S.
Besides the machine, I applied the same slicer settings. Of course the following results might have been affected by the quality of the filament and print speed setting. I also have to note that the PLA filament here was bought just recently. Compared to the PLA filament we used for our group and individual assignments, it has not been affected by the room temperature and humidity.
 Slicer: Cura
 Filament: Generic PLA 0.4mm (Purchased recently)
 Pitch: Standard Quality 0.2mm
 Support: No
 Adhesion: Skirt only
- Overhang: It turned out that the bottom of the overhangs would start collapsing even with 2mm overhang.
- Angle: It turned out that the overhang wouldn’t collapse even if the taper angle of the overhang is 20 degrees.

- Thickness: I found that the wall would not be created if the thickness was less than 0.4mm. I presume that the maximum thickness is constrained by the diameter of the nozzle. In other words, 3D printers cannot print it if the wall is thinner than nozzle diameter.
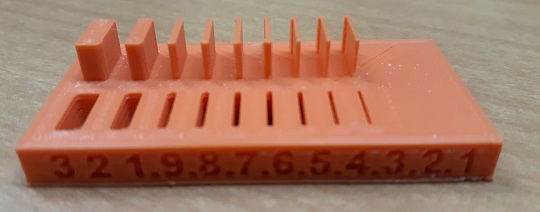
- Bridge: It seemed that any critical deformation was not observed even if the bridge was 20mm.
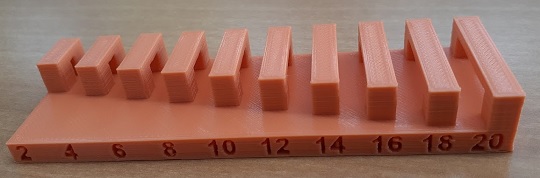
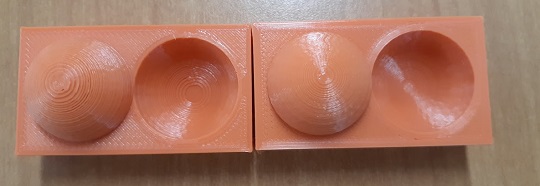
- Surface Finish: I compared the print results with two different level of fineness: Standard Quality 0.2mm and Super Quality 0.12mm. It may be difficult to compare the results in the attached photos. But I observed that the surface was smoother with 0.12mm and that the circle layers were clearly formed on the top and the bottom of the spheres with 0.2mm.
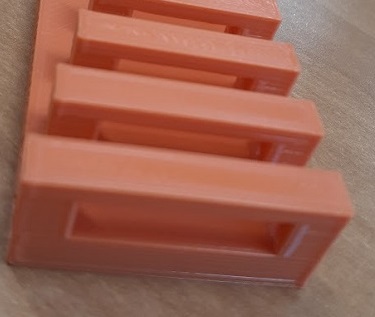
- A Ball in a Cube: Finally, I printed the same shape, A Ball-in-a-Cube, with CR-10S. Layer traces look better than the first one I made above. However, the I saw a slight deformation of the bridges of the four walls. Even so, it looked good enough to justify not placing support under those bridges.
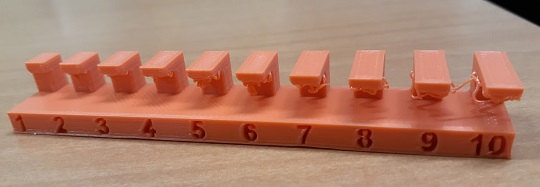
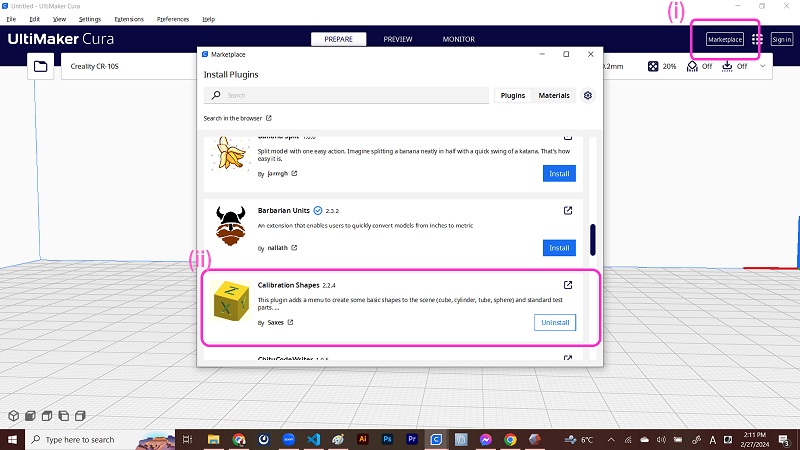
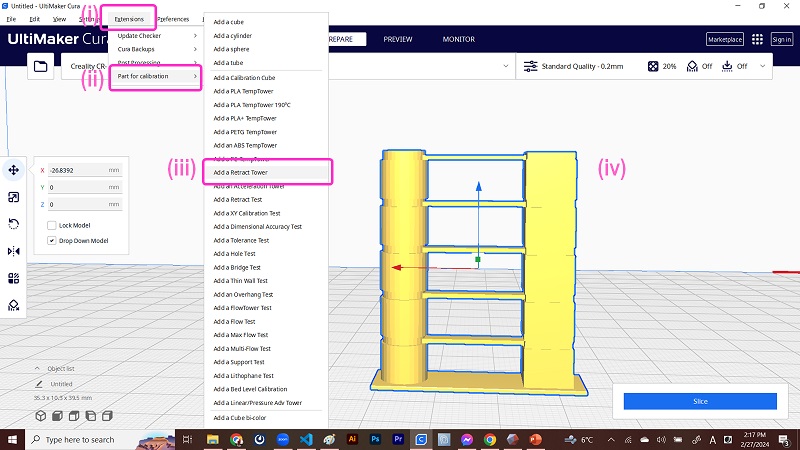
- Retraction Test: Also, I did the retraction test with CR-10S. Following the YouTube video mentioned above, I installed a plugin Calibration Shapers in Cura and then imported the retraction tower to be printed. G-code could also be customized. All the processes I have taken were described in the following snapshots.

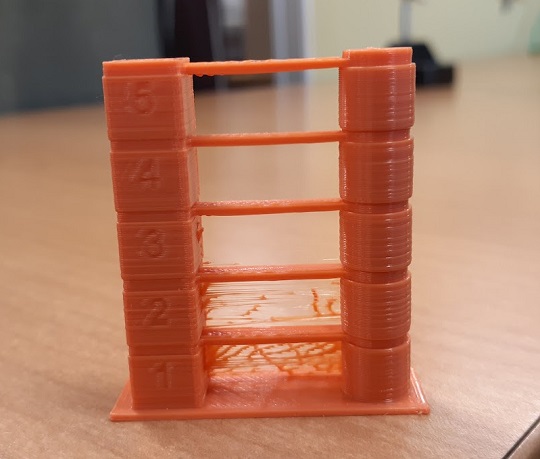
This is the result. I set the initial retraction speed as 45mm/sec, but with this speed I saw strings. May I understand that I should set the speed a bit faster?
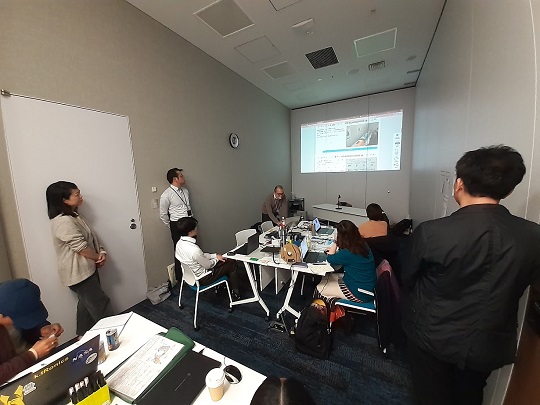
3-2. JICA Inclusive Makeathon (February 29 - March 1, 2024)
Following the week on 3D scanning and printing, I participated in the makeathon to prototype assistive devices for the JICA staff who had been blind for the last 10 years. She had been working at the headquarters of the Japan International Cooperation Agency (JICA) in Tokyo. We invited her to the event and interviewed her about the measures to enhance the better working environment for her. The event was participated by Kencho Wangdi, Fab Academy 2022 graduate from Bhutan, and Muhammed Jidda, Fab Acadey 2024 student from Nigeria, together with the other 10 JICA staff including myself.
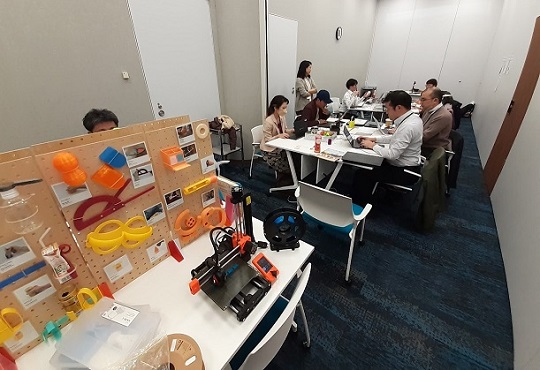
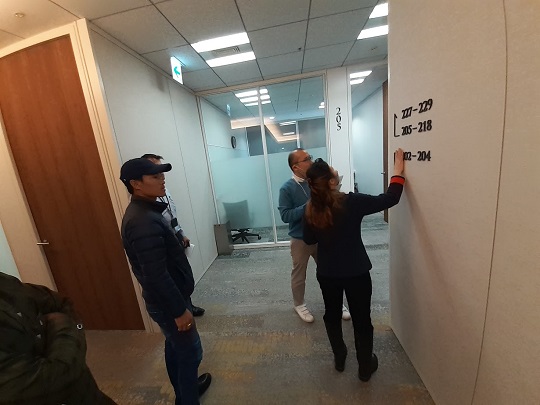
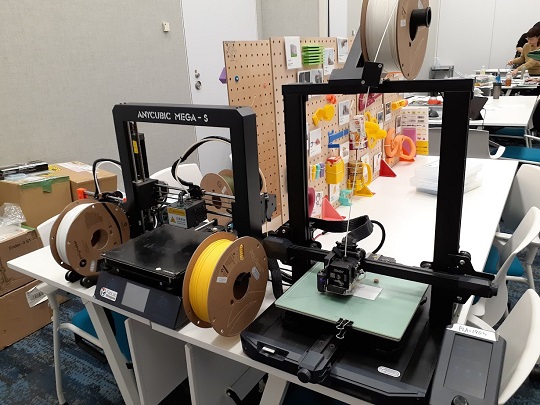
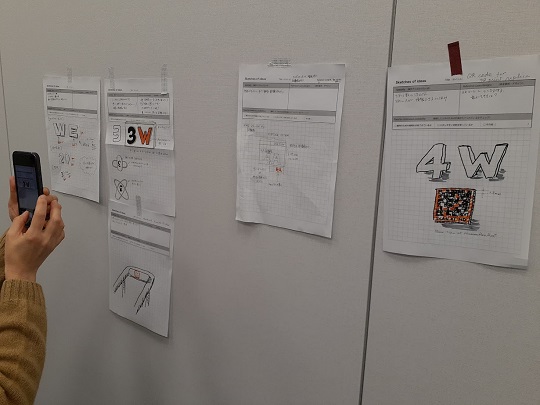
After the in-house observation tour inside the JICA building, we sketched our ideas on the assistive devices to help her to locate her place and to identify the correct waste bin. After the two groups discussed the ideas for joint work and proceeded to rapid-prototyping stage. We used four 3D printer: Prusa mini, Anycubic i3 Mega Pro, Creality Ender-3 S1, and Bambu Lab A1 mini. Especially, it was worth noting that we were amazed at the print speed of the Bambu Lab A1 mini.
The makeathon was facilitated by the FabLab Shinagawa. Many apologies for posting all the websites and documentation platforms written in Japanese language.
Report at the FabLab Shinagawa website | Documentation (Group1) | Documentation (Group2)