Week 6. Embedded programming
Individual assignment
I tried to upload the hello.button-blink programm for RP2040 by Neil. It is supposted to blink when we type a text and print button up and button down in case of interracting with button.
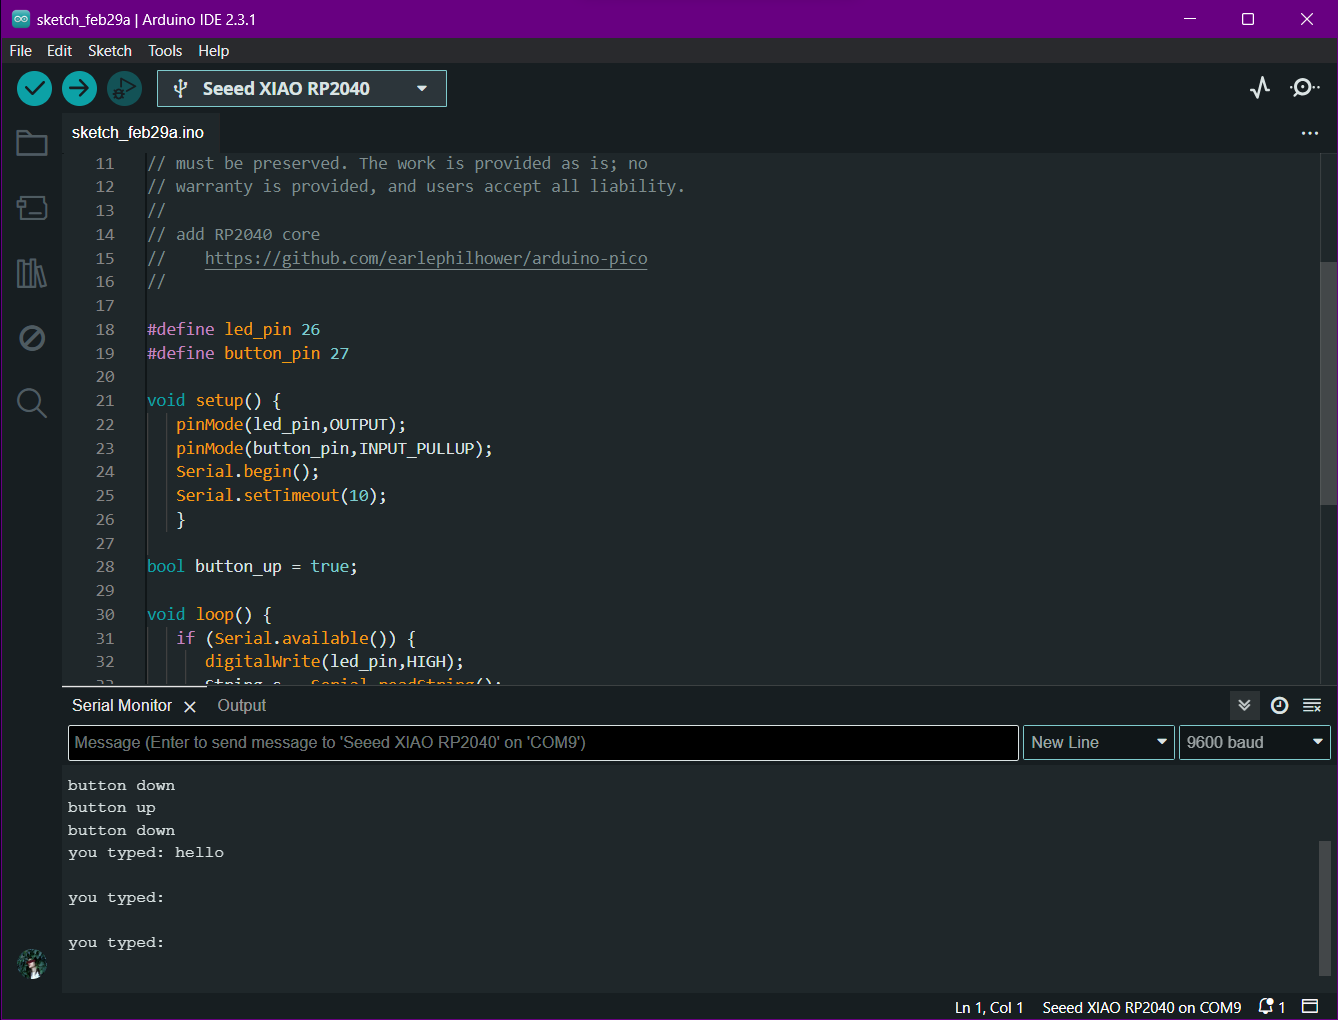
I changed the definitions of the LED for 26. by default it was 1 in the code. Both of them worked. And for button I changed 0 to 27, according to the Quentorres board pins.
Warning
But actually the light blinks in any case of pressing the Enter buton, even if there’s no text.
the button also works wrong I suppose. When it’s pushed down, the monitor types button up, and when realised it writes button down.
New proogram
Starting with this code as a base I tried to change few things. I initialized nd used all led pins, made an ordered blink for all, and changed button typing text.
int led_pin = 26; // integrated name for pin 26, 27, 0 and 1
int led_pin2 = 0;
int led_pin3 = 1;

int button_pin = 27;

void setup() {
   pinMode(led_pin,OUTPUT); // set pins as an outputs
   pinMode(led_pin2,OUTPUT);
   pinMode(led_pin3,OUTPUT);
   pinMode(button_pin,INPUT_PULLUP); // add an integrated resistance to pin 27
   Serial.begin(); // set serial communication
   Serial.setTimeout(10); // set interval for serial reading data in miliseconds
   digitalWrite(led_pin,1);   // leds HIGH or ON
   digitalWrite(led_pin2,1);
   digitalWrite(led_pin3,1);
   }

bool button_up = true;  // static condition of button is up

void loop() {
   if (Serial.available()) {
      String s = Serial.readString(); // s is data from serial received
      Serial.print(":) "); // type in serial monitor
      Serial.println(s); // type in serial monitor from new line
      delay(10); // wait 10 miliseconds
      digitalWrite(led_pin,0);  // blink led 27
      delay(80);
      digitalWrite(led_pin, 1);

      digitalWrite(led_pin2,0); // blink led 0
      delay(80);
      digitalWrite(led_pin2, 1);

      digitalWrite(led_pin3,0); // blink 1
      delay(80);
      digitalWrite(led_pin3, 1);
      }

    if ((digitalRead(button_pin) == HIGH) && button_up) {
      digitalWrite(led_pin,HIGH);
      Serial.println("on");
      button_up = false;
      }
    else if ((digitalRead(button_pin) == LOW) && !button_up) {
      digitalWrite(led_pin,LOW);
      Serial.println("off");
      button_up = true;
      }
}
While exploring the seeed studio board, I discovered a led that is called any color light. Maxime suggested to search how to use neopixel, and there I find this code source
#include <Adafruit_NeoPixel.h>

int Power = 11;
int PIN  = 12;
#define NUMPIXELS 1

Adafruit_NeoPixel pixels(NUMPIXELS, PIN, NEO_GRB + NEO_KHZ800);

void setup()
{
  pixels.begin();
  pinMode(Power,OUTPUT);
  digitalWrite(Power, HIGH);

}

void loop() {
  pixels.clear();
  pixels.setPixelColor(0, pixels.Color(15, 25, 205));
  delay(400);
  pixels.show();
  pixels.clear();
  pixels.setPixelColor(0, pixels.Color(103, 25, 205));
  delay(400);
  pixels.show();
  pixels.clear();
  pixels.setPixelColor(0, pixels.Color(233, 242, 205));
  delay(400);
  pixels.show();
  pixels.clear();
  pixels.setPixelColor(0, pixels.Color(233, 23, 23));
  delay(400);
  pixels.show();
  pixels.clear();
  pixels.setPixelColor(0, pixels.Color(12, 66, 101));
  delay(400);
  pixels.show();
  delay(500);
}
I explored the code and tried to change it to light only a given color. I picked up an rgb code for some random color and put it in the code.
#include <Adafruit_NeoPixel.h>

int Power = 11;
int PIN  = 12;
#define NUMPIXELS 1

Adafruit_NeoPixel pixels(NUMPIXELS, PIN, NEO_GRB + NEO_KHZ800);

void setup()
{
  pixels.begin();
  pinMode(Power,OUTPUT);
  digitalWrite(Power, HIGH);

}

void loop() {
  pixels.clear();
  pixels.setPixelColor(0, pixels.Color(94, 255, 159));
  delay(400);
  pixels.show();
}
Group assignment
For group assignment we’ve been getting introduced to embedded programming. As always Babken has made a historical overview for current week’s related things, which are PWM, Nikola Tesla, alternating current and direct current, wi-fi antennas, wireless connection, circuit boards, transistors, machine languages, binary bits, first machine and bug, etc.
We tried Scratch for simple programming. it’s mostly used for educating kids but as we were absolutely new to programming it was good point to start. Moreover, as Babken mentioned Scratch is the main programming language that is used in first week in Harward’s computer science program.

After many questons and researches we started group assignment in which we have been comparing ATtiny and RP2040 microcontrollers and also languages.
Introduction to the programming basic terms.
cicle for
cicle while

serial connect

int str boolean utf_8

logic operations

void setup
void loop
Loops
for loop: Executes a block of code repeatedly for a fixed number of iterations, determined by a counter variable.
while loop: Repeats a block of code until a specified condition becomes false.
    for (int i = 0; i < 10; i++) {
    // Code to be executed in each iteration
    }

    int age = 20;
    while (age < 25) {
        // Code to be executed as long as age is less than 25
    }
My first approach with using loops:
terms
Serial Communication: Enables communication between a microcontroller and a computers over a serial port. Requires libraries and specific functions depending on the microcontroller and programming language.
Data Types: int: Integer, used for whole numbers (positive, negative, or zero). str: String, represents sequences of characters (text). boolean (or equivalent): Boolean, holds logical true or false values (often represented as true and false or 1 and 0). utf-8: Encoding standard for representing text in various languages, commonly used for character sets.
Logic Operators:
- && (AND): Returns true if both operands are true, false otherwise.
- || (OR): Returns true if at least one operand is true, false if both are false.
- ! (NOT): Inverts the logical value of the operand (true becomes false, and vice versa).
Operations:
- Arithmetic operations (e.g., addition, subtraction, multiplication, division) work on numerical data.
- Boolean operations (e.g., comparison operators like <, >, ==, !=) compare values and return true/false.
- String operations (e.g., concatenation, slicing) manipulate text data.
- void setup and void loop (Arduino-specific): void setup: Runs once at the beginning of the program, typically used for initialization (e.g., setting up pins, libraries). void loop: Runs repeatedly in an infinite loop, forming the main program code.
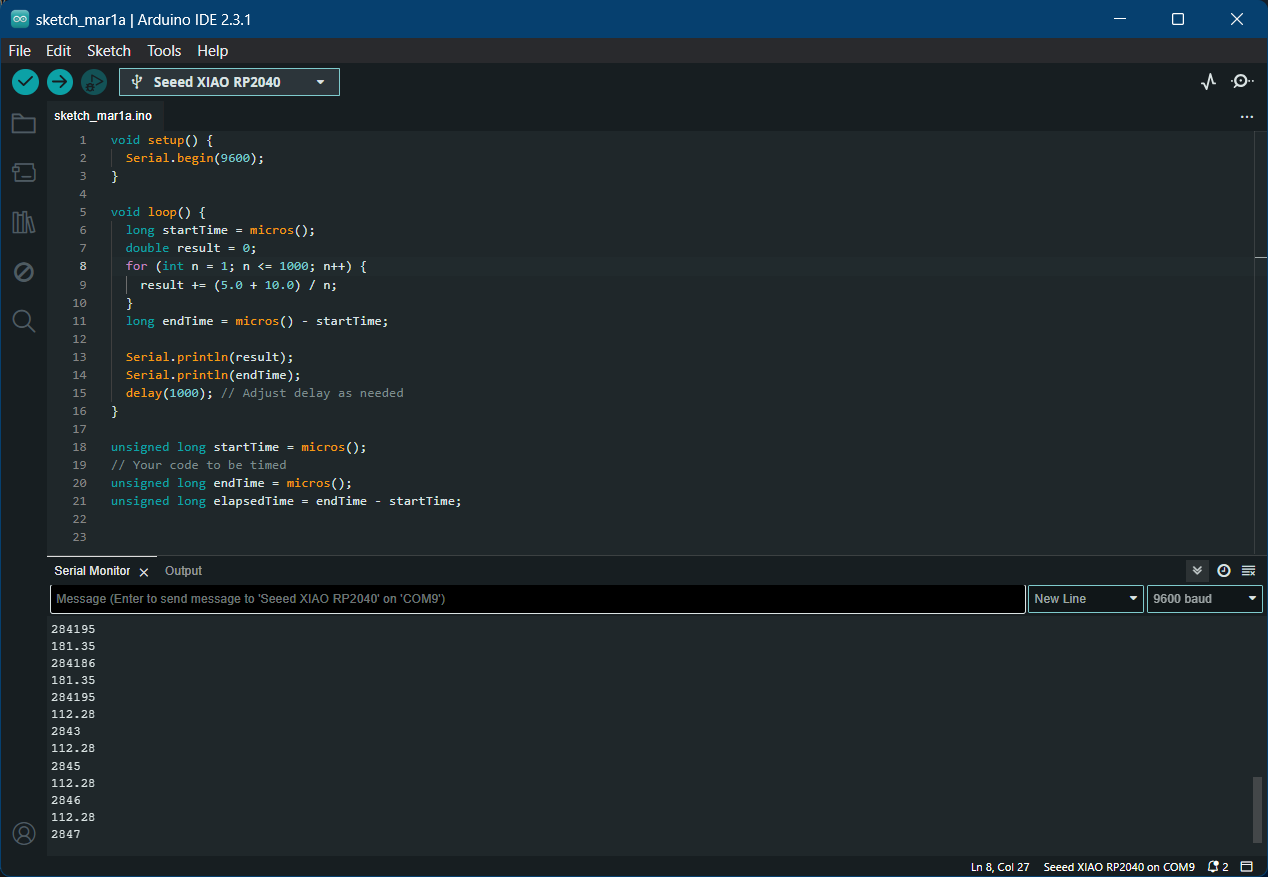
Comparison of RP2040 for C++ and Micropython
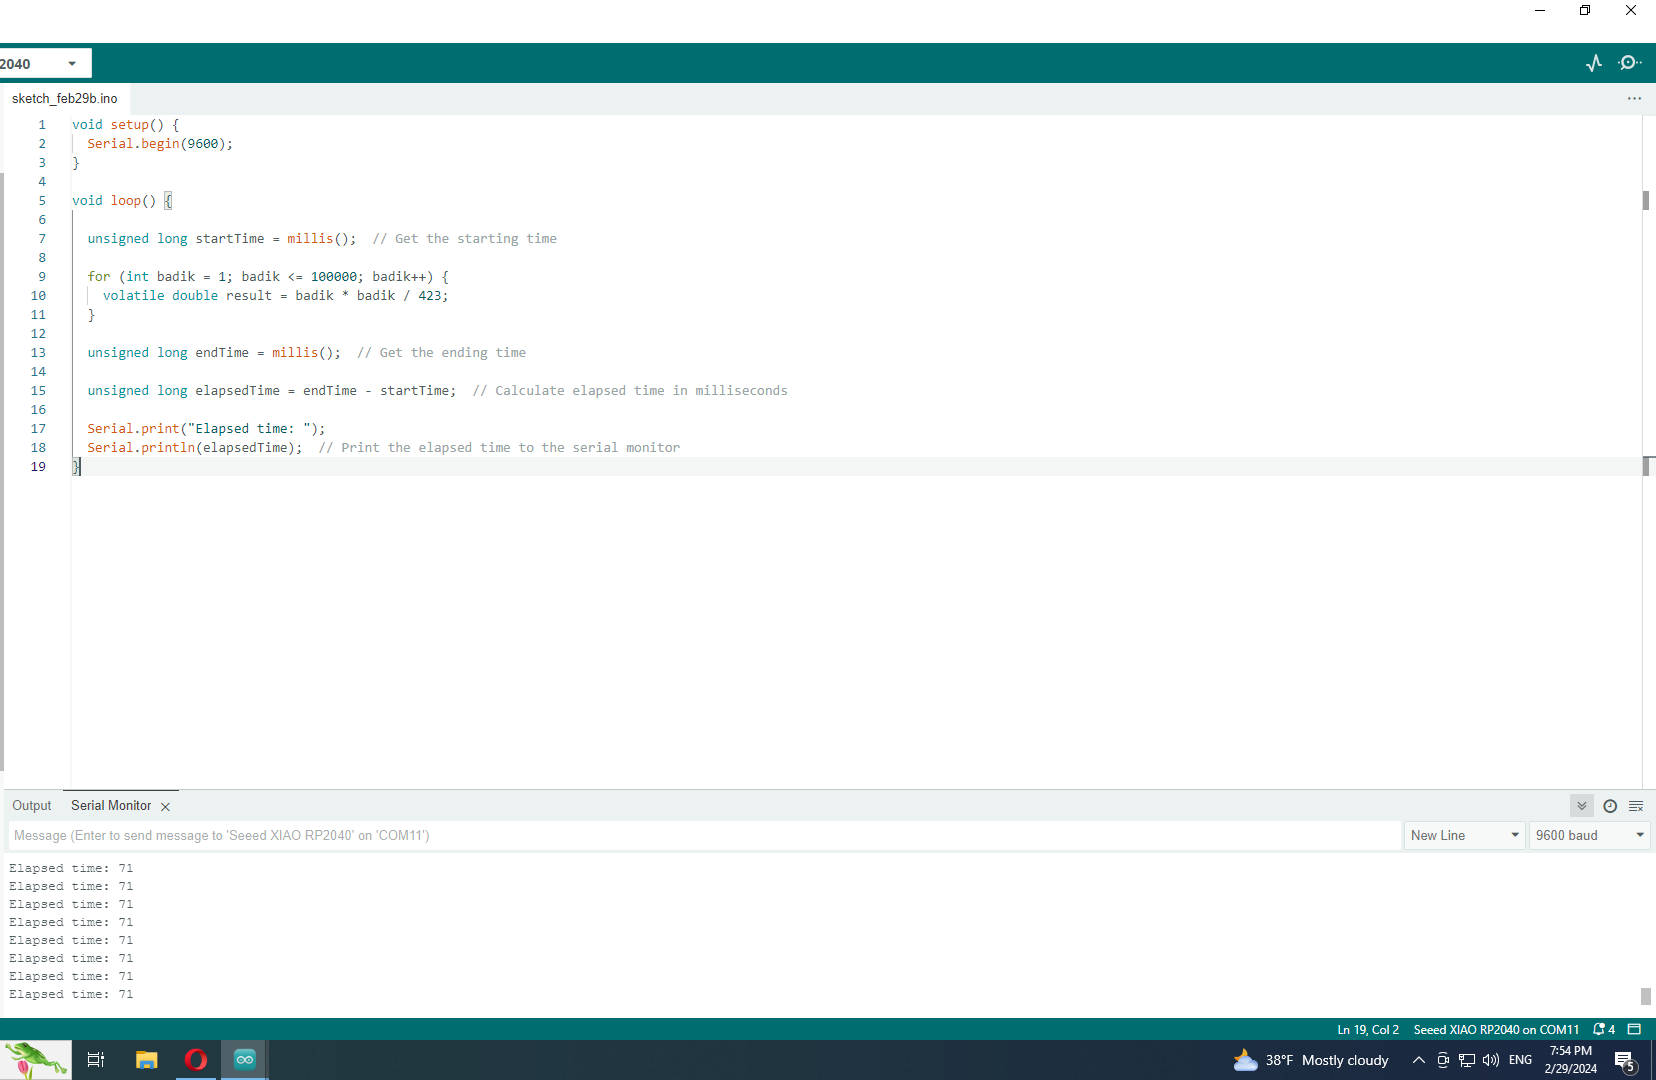
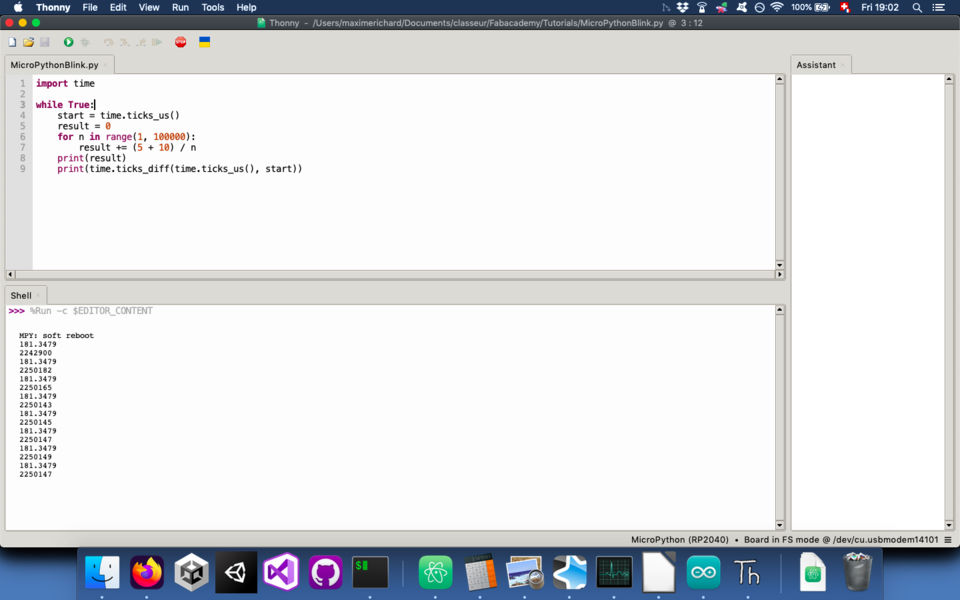
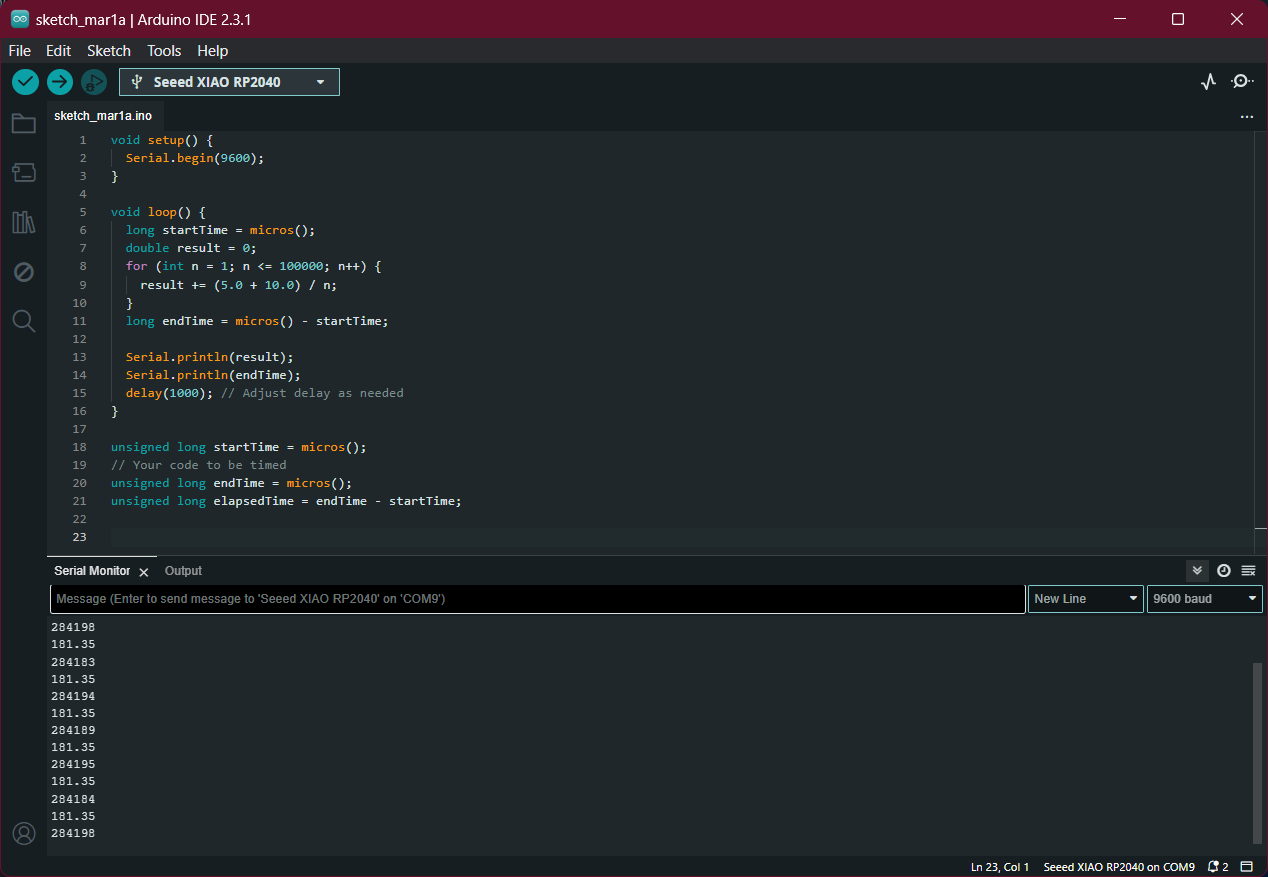
This comparison is on performance for equation calculation 5 + 10 / n for 100000 times. Same equation is given to the same microcontroller but on c++ and micropython languages. As the second option is more higher level language it is predictable that machine needs more time for processing the code. That was accepted in the results.
MicroPython
C++
void setup() {
  Serial.begin(9600);
}

void loop() {
  long startTime = micros();
  double result = 0;
  for (int n = 1; n <= 100000; n++) {
    result += (5.0 + 10.0) / n;
  }
  long endTime = micros() - startTime;

  Serial.println(result);
  Serial.println(endTime);
  delay(1000); // Adjust delay as needed
}

unsigned long startTime = micros();
// Your code to be timed
unsigned long endTime = micros();
unsigned long elapsedTime = endTime - startTime;
| 1 | microcontroller | language | calculation time |
|---|---|---|---|
| RP2040 | c++ | 0.028416 second | |
| RP2040 | micropython | 2.250147 seconds |
Result: C++ is faster for processing about 100 times.
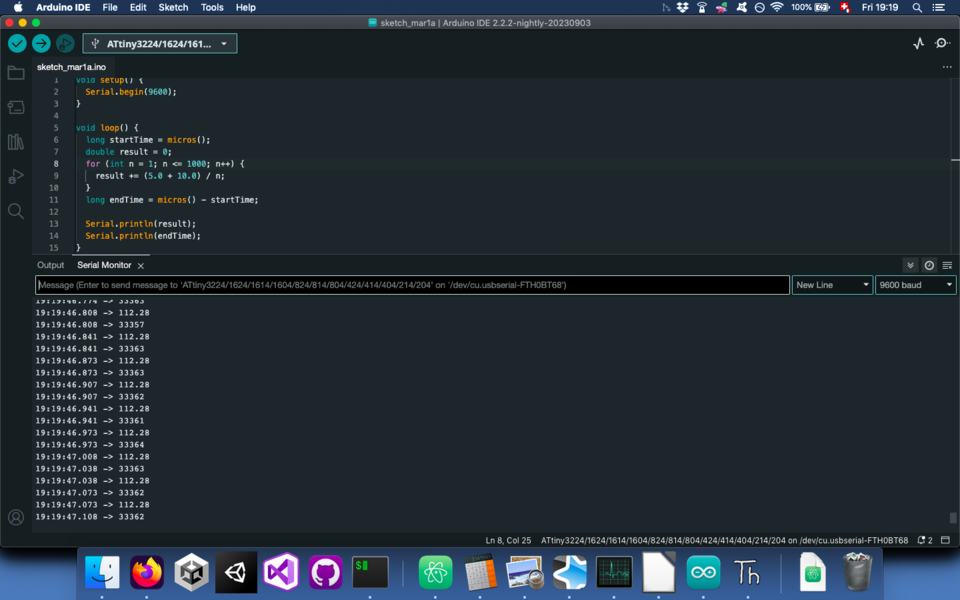
Comparison of RP2040 and ATtiny1614
This comparison is on performance for equation calculation 5 + 10 / n for 1000 times.
ATtiny1614
RP2040
void setup() {
  Serial.begin(9600);
}

void loop() {
  long startTime = micros();
  double result = 0;
  for (int n = 1; n <= 1000; n++) {
    result += (5.0 + 10.0) / n;
  }
  long endTime = micros() - startTime;

  Serial.println(result);
  Serial.println(endTime);
  delay(1000); // Adjust delay as needed
}

unsigned long startTime = micros();
// Your code to be timed
unsigned long endTime = micros();
unsigned long elapsedTime = endTime - startTime;
| 2 | microcontroller | language | calculation time |
|---|---|---|---|
| RP2040 | c++ | 0.002856 second | |
| ATtiny | c++ | 0.033362 seconds |
Result: RP2040 is 10 times more powerfull than ATtiny1614.
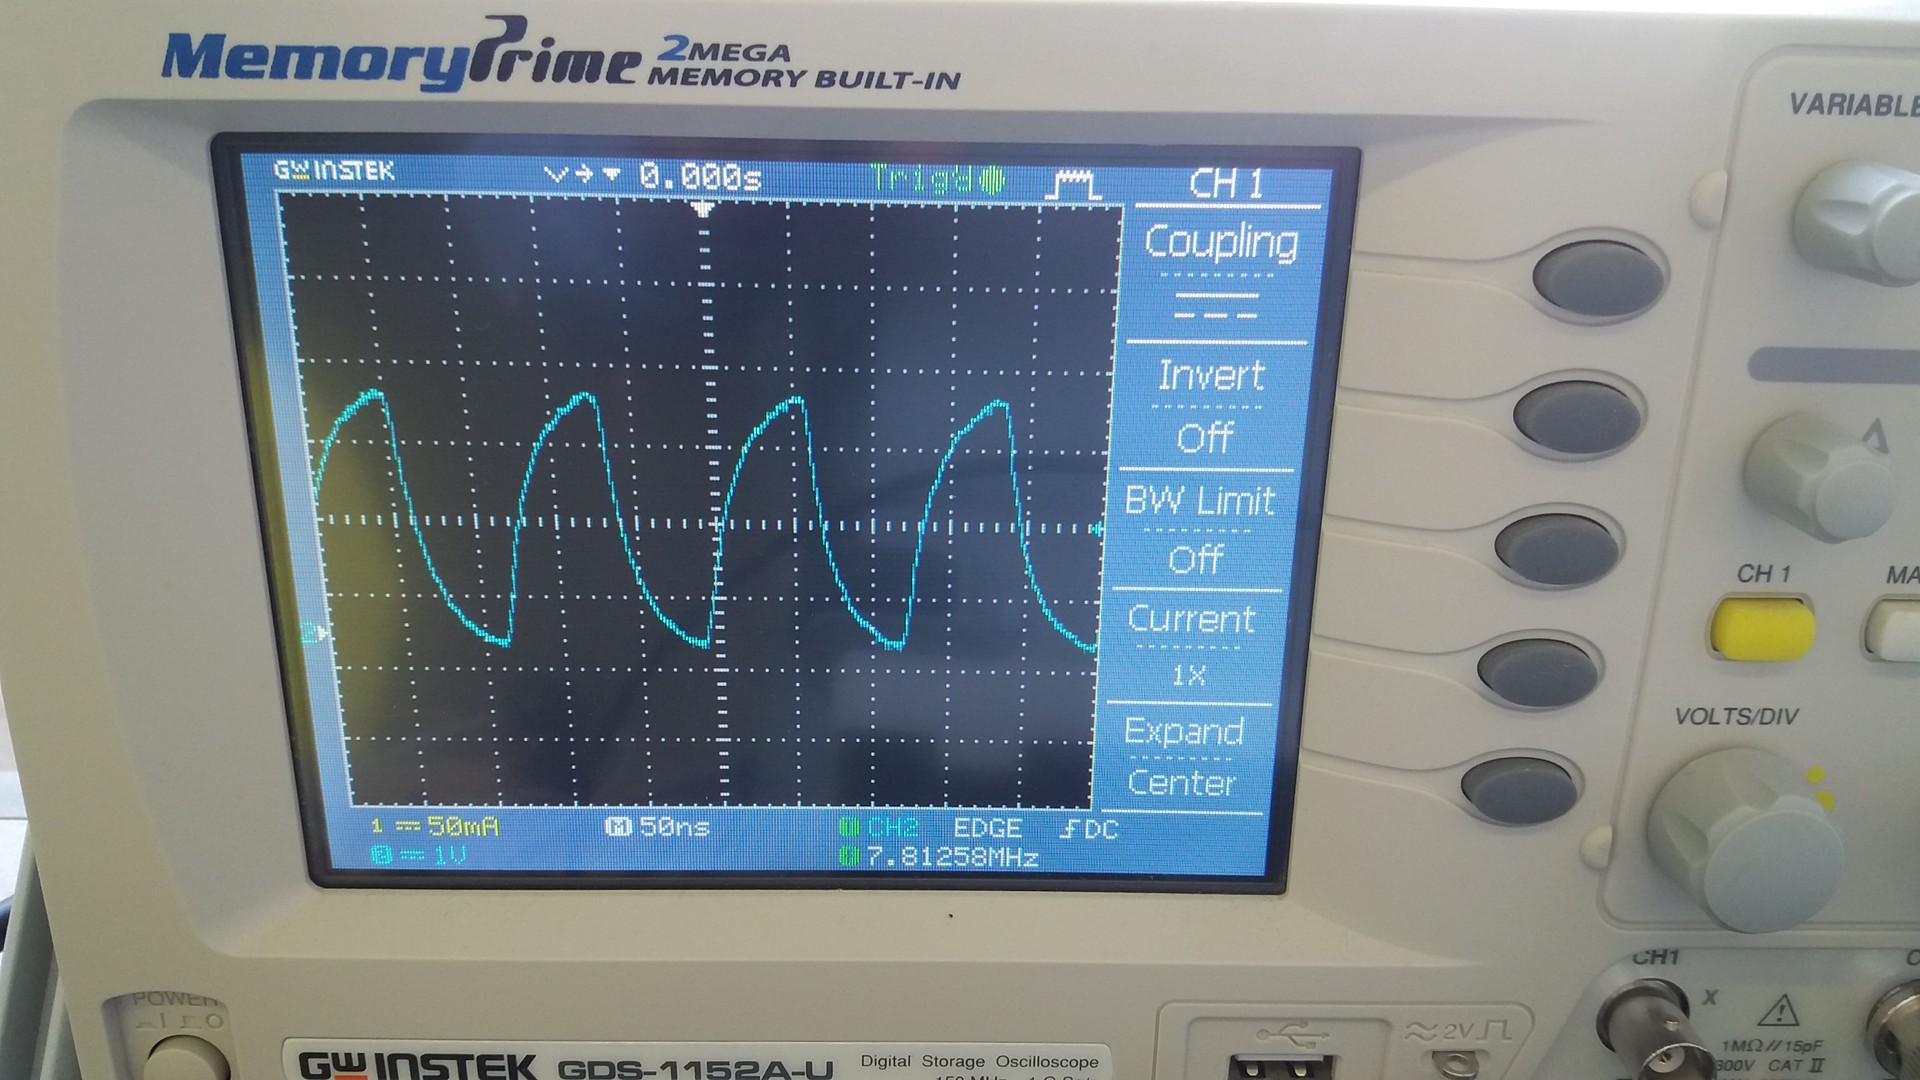
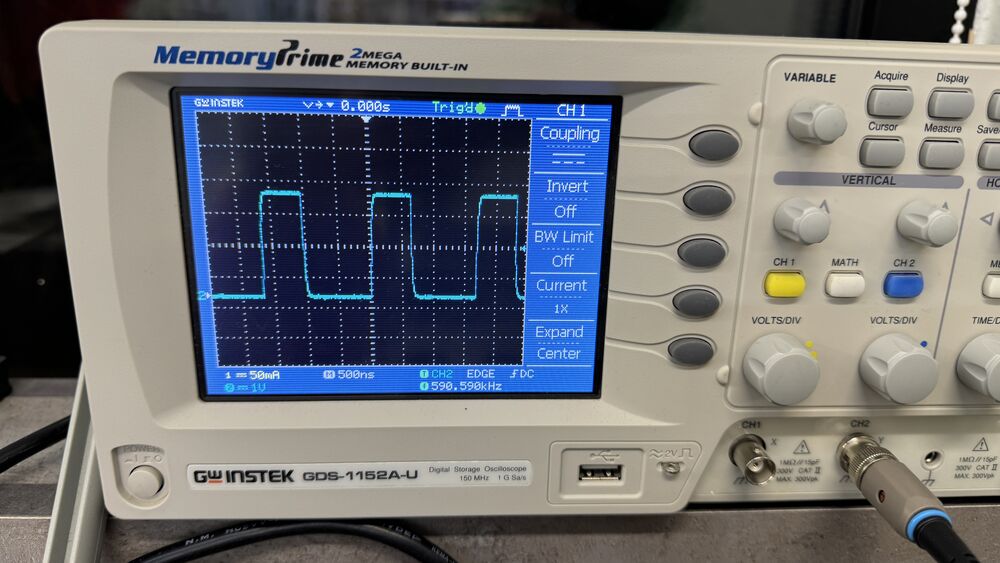
Comparison of high level language and low level language for programming.
This time we tested different level of the same language both on RP2040. The test aimed at understanding the speed difference between a program using the Arduino environment (pinMode(), digitalWrite(), etc) and a program written “bare metal”, “talking” directly to the registers.
Here is the code for the “bare metal” version:
int main() {
        /*
        0x400140d4: GPIO26_CTRL: GPIO 26 control including function select and overrides.
        0x05: from "2.19.2. Function Select": selects function SIO (Single-Cycle IO)
        */

        // same for GPIO26_CTRL
        *((volatile unsigned int*) 0x400140d4) = 0x05;

        /*
        Output enable registers, GPIO_OE and GPIO_HI_OE, are used to enable the output driver. 0 for high-impedance, 1
        for drive high/low based on GPIO_OUT and GPIO_HI_OUT.
        sets the 27th bit of this register to 1 in order to enable output
        */
        *((volatile unsigned int*) 0xd0000020) = (1 << 26);  // GPIO_OE


        while( 1 )
        {
          //toggles the pin 26 high and low
          *((volatile unsigned int*) 0xd000001c) ^= ( 1 << 26);
        }

        return 0;
}
and Arduino environment version
results
| 3 | microcontroller | language | pwm |
|---|---|---|---|
| RP2040 | arduino | 590.590 kHz | |
| RP2040 | “bare metal” | 7.81258 MHz |
Conclusion
This week I tried for first time programming a microcontroller. A lot of information was new for me, I’ve find out a lot about programming languages so I can choose one and start programming on it. Thanks to our instructors for explaining such a complicated sphere so we can understand.