xiao esp32c3 sending data through wifi
Write something at the front
Wrote on 4.29th, I am able to send the data from XIAO ESP32C3 to my computing device(reComputer), for the purpose of enabling the device to deal with it. I also find a way using one device to control two.
After studying Neil's class, I suddently realized that how I can design my module, regarding the data sending part. - I want to design a portable module and when I put it on my personal-assistant reComputer(LLM-powered), it will wirelessly send the data to my reComputer and let it deal with it.
By applying the example code from Neil's class and the help by GPT, I have found some workable steps:
- A module powered by XIAO ESP32C3 will attach to the reComputer and the reComputer will wireless charge the module, to let it run the burned MicroPython program.
- The module will automtically connect to a Wi-Fi router and send some data to one IP that the router assigned to it.
- My local LLM-powered reComputer will continuously(10s period) check what information provided under the specific IP and transmit the data to the LLM, beginning my calendar setup(This step has been done previously).
Do a little change about Neil's code
I do a little change about Neil's example code: hello.Web-blink.C3.py. For reading the code and watch the exhibition, I understand it is a AP(Access Point) mode for Wi-Fi usage. It enables the Web interface and hardware interaction(pressing button and lighting up the led).
I first need to test it whether is functional on my XIAO ESP32C3. Following the XIAO ESP32C3 MicroPython wikifrom Seeed Studio:
- I downloaded the related software - Thonny IDE and after the installation I connect it with my PC(MAC OS). The error info shows below:
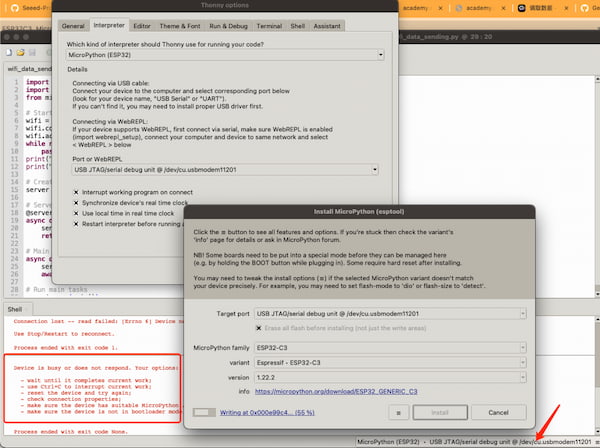
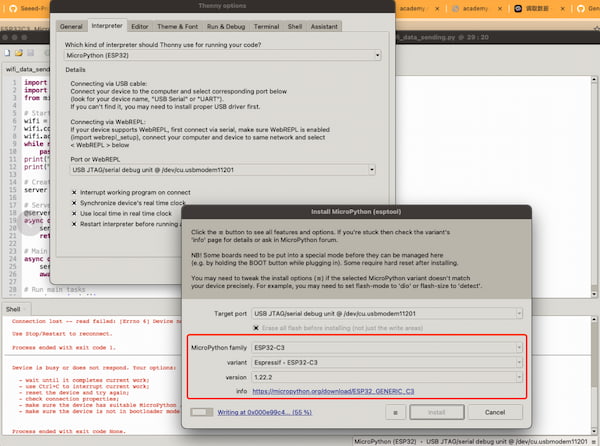
And this is because my XIAO board is new and haven't flashed the MicroPython supported firmeare yet. And that's the reason that there is another block shown like above. I navigate "Configure Interpreter" -> Install or update MicroPython (esptool) and try to flash the firmware:
There are some parameters that can select, it supports ESP32S3-powered MCU as well.
After done flashing, I unplug and replug, the connection just be fine.
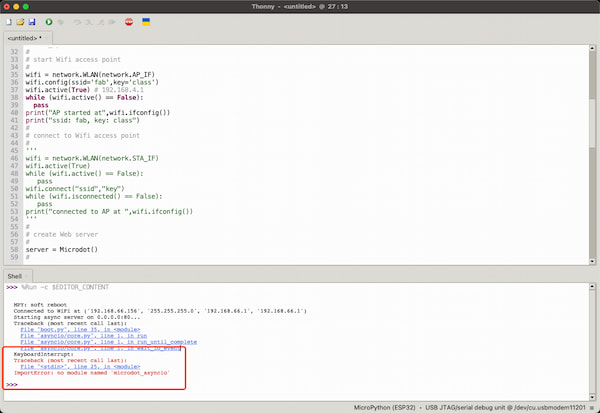
- I then uploaded the code to my board and founded out that it can't find the module named
microdot_asyncio. I looked for the wiki from Seeed Studio and relized that I might need to add an additional library. I learnt from the classs that it is three-party GitHub repo called Microdot
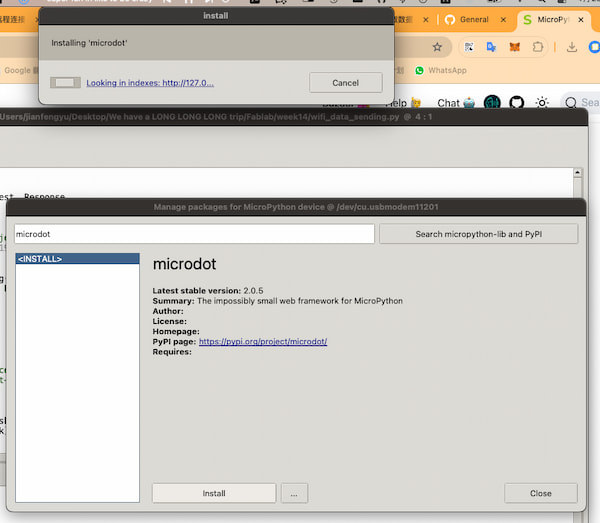
So I navigate "Tools" -> Click "Management Packages" -> Enter Microdot the library's name -> Click "Search micropython-lib and PyPl". And then I click the install.
It should work fine but I still get the error about missing microdot_asyncio. I then checked and discovered Microdot's documentation and learnt that there are no more synchronous web server. Hence the line of the code from microdot_asyncio import Microdot,Request,Response should be:
from microdot import Microdot,Request,Response
I changed it and all works great!
- I then want to make it more simpler, so I ask GPT about how I can change the code, just sending the some information to the IP address, as I want my reComputer can use it, wirelessly.
import network
import uasyncio as asyncio
from microdot import Microdot, Request, Response

# Start WiFi access point
wifi = network.WLAN(network.AP_IF)
wifi.config(ssid='matthew_final_project', key='123321')
wifi.active(True)  # IP address is 192.168.4.1
while not wifi.active():
    pass
print("AP started at", wifi.ifconfig())
print("ssid: matthew_final_project, key: 123321")

# Create Web server
server = Microdot()

# Server routes
@server.get('/')
async def send_sentences(request):
    sentences = "sentence 1/ sentence 2/ sentence 3/"
    return sentences, 200, {'Content-Type': 'text/plain'}

# Main tasks
async def main():
    server_task = asyncio.create_task(server.start_server(port=80, debug=True))
    await asyncio.gather(server_task)

# Run main tasks
asyncio.run(main())
After I uploaded the code to my XIAO, I then use my PC to connect the matthew_final_project and input the password. Finally, I went to the IP address: http://192.168.4.1 and see the information provided: sentence 1/ sentence 2/ sentence 3/.
All looks fine, but when I want to use my reComputer to do the rest, I found that I don't have the Wi-Fi module on my reComputer.
ESP32 client mode setup and Router setup
My reComputer is wired connectting my router and not supporting Wi-Fi right now... I have to buy one. Then I thought maybe I can make my information from XIAO ESP32C3 can be recoginzed under the network of my router - This will enable my reComputer read the information.
Later I studied that I can set up my XIAO ESP32C3 as client mode and connect the XIAO itself to my router. And from the XIAO ESP32C3 Wi-Fi usage wiki I learnt that XIAO is capable of doing that.
Once the XIAO ESP32C3 connected to the router, the router will "give" the IP address to the XIAO and all I need to do is checking in the background of my router. So I can do that:
- I first change the code, asking GPT, with the Seeed Studio Wiki and the example code previously. And here is the functional one:
import network
import uasyncio as asyncio
from microdot import Microdot, Request, Response

# Configure your WiFi settings
SSID = 'YourWiFiSSID'  # Your WiFi network name
PASSWORD = 'YourWiFiPassword'  # Your WiFi network password

# Connect to WiFi
wifi = network.WLAN(network.STA_IF)
wifi.active(True)
wifi.connect(SSID, PASSWORD)

# Wait for connection
while not wifi.isconnected():
    pass

print("Connected to WiFi at", wifi.ifconfig())

# Create Web server
server = Microdot()

# Server routes
@server.get('/')
async def send_sentences(request):
    sentences = "sentence 1/ sentence 2/ sentence 3/"
    return sentences, 200, {'Content-Type': 'text/plain'}

# Main tasks
async def main():
    server_task = asyncio.create_task(server.start_server(port=80, debug=True))
    await asyncio.gather(server_task)

# Run main tasks
asyncio.run(main())
- Since XIAO ESP32C3 and reComputer are all under the same network. I run
curl http://xiao_ip_addressand get the information. But at the same time, I found out that the IP address changed every time I connected. So I went to the background of my router and seltectSet this parameter to a static IP address:
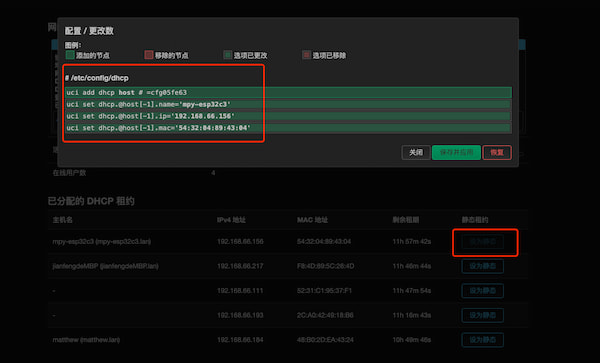
I got the static one(http://192.168.66.156), which means everytime my XIAO is powered up, at the same address I can get the information.
Sending Audio Frame Data to the reComputer
I am using Wi-Fi to apply this function. These parts should be under the same network and here is one reference for connecting XIAO ESP32C3 to Wi-Fi and one reference from above.
Some parameters changable:
bufferLen: Buffer to store audio data read from the microphone, here is 64.sample rate44100 Hz, which is the default value in pyaudio.bits per sample16, which corresponds to the paInt16 format in pyaudio.
Conecting Wi-Fi and Sending data to its IP
For integrating these two reference, I do some changes about the code(powered by GPT of course):
-
The connection is still the same:
#define I2S_WS 9
#define I2S_SD 10
#define I2S_SCK 8 -
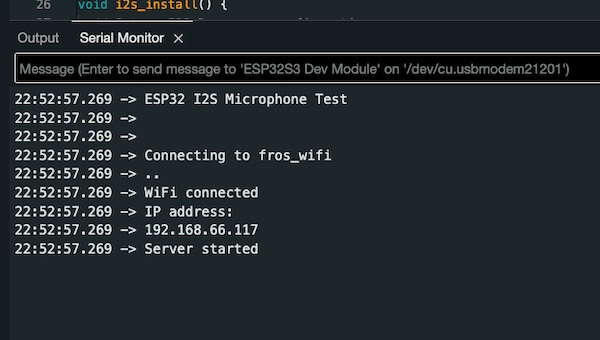
After successfully connecting to Wi-Fi, the IP address of the ESP32C3 MCU board is printed using:
Serial.println(WiFi.localIP()); -
A
WiFiServerobject namedserveris created, specifying the port number (12345in this example) on which the server will listen for incoming connections. -
In the
setup()function, the server is started using:server.begin();And a message is printed to indicate that the server has started.
-
In the
loop()function, the code checks if a client has connected using:server.available();If a client is connected, it prints a message indicating that a client has connected.
-
The I2S audio data is read and stored in the
sBufferas before. -
If audio samples are successfully read, they are sent to the connected client using:
client.write((uint8_t*)sBuffer, bytesIn); -
After sending the data, the client connection is closed using:
client.stop();And a message is printed to indicate that the client has disconnected.
The full code:
#include <WiFi.h>
#include <driver/i2s.h>

const char* ssid     = "fros_wifi";
const char* password = "66668888";

// Connections to INMP441 I2S microphone
#define I2S_WS 9
#define I2S_SD 10
#define I2S_SCK 8

// Use I2S Processor 0
#define I2S_PORT I2S_NUM_0

// Define input buffer length
#define bufferLen 64
int16_t sBuffer[bufferLen];

// Server configuration
WiFiServer server(12345);

void i2s_install() {
  // Set up I2S Processor configuration
  const i2s_config_t i2s_config = {
    .mode = i2s_mode_t(I2S_MODE_MASTER | I2S_MODE_RX),
    .sample_rate = 44100,
    .bits_per_sample = i2s_bits_per_sample_t(16),
    .channel_format = I2S_CHANNEL_FMT_ONLY_LEFT,
    .communication_format = i2s_comm_format_t(I2S_COMM_FORMAT_STAND_I2S),
    .intr_alloc_flags = 0,
    .dma_buf_count = 8,
    .dma_buf_len = bufferLen,
    .use_apll = false
  };

  i2s_driver_install(I2S_PORT, &i2s_config, 0, NULL);
}

void i2s_setpin() {
  // Set I2S pin configuration
  const i2s_pin_config_t pin_config = {
    .bck_io_num = I2S_SCK,
    .ws_io_num = I2S_WS,
    .data_out_num = -1,
    .data_in_num = I2S_SD
  };

  i2s_set_pin(I2S_PORT, &pin_config);
}

void setup() {
  // Set up Serial Monitor
  Serial.begin(115200);
  Serial.println("ESP32 I2S Microphone Test");

  delay(1000);

  // Set up I2S
  i2s_install();
  i2s_setpin();
  i2s_start(I2S_PORT);

  delay(500);

  // Connect to Wi-Fi
  Serial.println();
  Serial.println();
  Serial.print("Connecting to ");
  Serial.println(ssid);

  WiFi.begin(ssid, password);

  while (WiFi.status() != WL_CONNECTED) {
    delay(500);
    Serial.print(".");
  }

  Serial.println("");
  Serial.println("WiFi connected");

  // Print the IP address of the ESP32C3 MCU board
  Serial.println("IP address: ");
  Serial.println(WiFi.localIP());

  // Start the server
  server.begin();
  Serial.println("Server started");
}

void loop() {
  // Check if a client has connected
  WiFiClient client = server.available();
  if (client) {
    Serial.println("Client connected");

    // Get I2S data and place in data buffer
    size_t bytesIn = 0;
    esp_err_t result = i2s_read(I2S_PORT, &sBuffer, bufferLen, &bytesIn, portMAX_DELAY);

    if (result == ESP_OK) {
      // Read I2S data buffer
      int16_t samples_read = bytesIn / 8;
      if (samples_read > 0) {
        // Send the audio data to the connected client
        client.write((uint8_t*)sBuffer, bytesIn);
      }
    }

    // Close the connection
    client.stop();
    Serial.println("Client disconnected");
  }
}
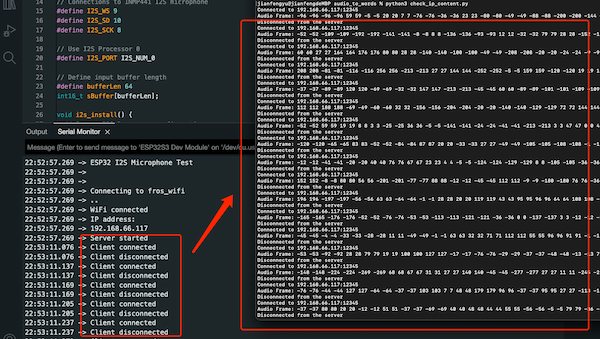
Connecting and checking its IP:
Reading the data from its IP
Now I need to write a script to read the data from 192.168.66.117, continuously.
- I create a new server socket and establish a connection to the ESP32C3 MCU board using server_socket.connect((SERVER_IP, SERVER_PORT)), which is
192.168.66.117, and12345. - Once connected, the script enters an inner while True loop where it continuously receives data from the ESP32C3 MCU board using server_socket.recv(1024).
- The received data is printed as hexadecimal values using data.hex().
It is powered by GPT and it helps me consider all the conditions.
Here is the full code:
import socket

# Set up the server socket
SERVER_IP = '192.168.66.117'  # IP address of the ESP32C3 MCU board
SERVER_PORT = 12345  # Choose a port number

while True:
    try:
        server_socket = socket.socket(socket.AF_INET, socket.SOCK_STREAM)
        server_socket.connect((SERVER_IP, SERVER_PORT))
        print(f"Connected to {SERVER_IP}:{SERVER_PORT}")

        while True:
            # Receive data from the ESP32C3 MCU board
            data = server_socket.recv(1024)
            if not data:
                break

            # Process the received data
            # Here, we print the raw data as hexadecimal values
            print("Received data:", data.hex())

        # Close the server socket
        server_socket.close()
        print("Disconnected from the server")

    except ConnectionRefusedError:
        print("Connection refused. Retrying...")
    except ConnectionResetError:
        print("Connection reset. Retrying...")
    except KeyboardInterrupt:
        print("Keyboard interrupt received. Exiting...")
        break

    # Wait for a short interval before retrying
    socket.timeout(1)
and the output formate like(customized frame):
import socket

# Set up the server socket
SERVER_IP = '192.168.66.117'  # IP address of the ESP32C3 MCU board
SERVER_PORT = 12345  # Choose a port number

while True:
    try:
        server_socket = socket.socket(socket.AF_INET, socket.SOCK_STREAM)
        server_socket.connect((SERVER_IP, SERVER_PORT))
        print(f"Connected to {SERVER_IP}:{SERVER_PORT}")

        while True:
            # Receive data from the ESP32C3 MCU board
            data = server_socket.recv(1024)
            if not data:
                break

            # Process the received data
            samples_read = len(data) // 2  # Each sample is 2 bytes (16-bit)
            audio_frame = [int.from_bytes(data[i:i+2], byteorder='little', signed=True) for i in range(0, len(data), 2)]

            # Print audio frame data
            print("Audio Frame:", end=" ")
            for sample in audio_frame:
                print(sample, end=" ")
            print()

        # Close the server socket
        server_socket.close()
        print("Disconnected from the server")

    except ConnectionRefusedError:
        print("Connection refused. Retrying...")
    except ConnectionResetError:
        print("Connection reset. Retrying...")
    except KeyboardInterrupt:
        print("Keyboard interrupt received. Exiting...")
        break

    # Wait for a short interval before retrying
    socket.timeout(1)
The final output is:
My Design Board and Outcome
The PCB design I am using is from week 12, connecting with INMP441, actually it is one of my final board.
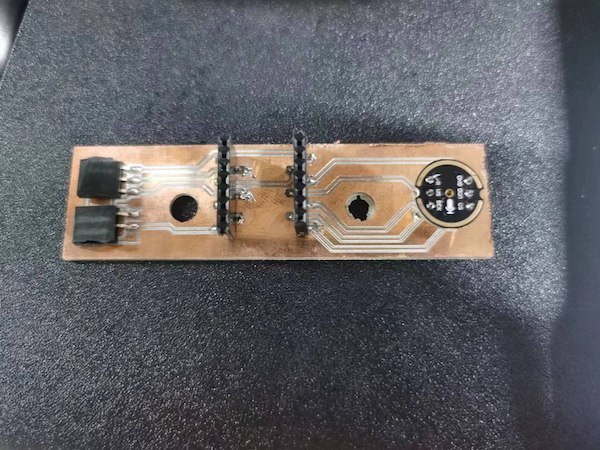
From above, I am checking my board's IP and change it and upload the code and here is the outcome:
This is the code I am using:
#include <WiFi.h>
#include <driver/i2s.h>

const char* ssid     = "fros_wifi";
const char* password = "66668888";

// Connections to INMP441 I2S microphone
#define I2S_WS 9
#define I2S_SD 20
#define I2S_SCK 8

// Use I2S Processor 0
#define I2S_PORT I2S_NUM_0

// Define input buffer length
#define bufferLen 64
int16_t sBuffer[bufferLen];

// Server configuration
WiFiServer server(12345);

void i2s_install() {
  // Set up I2S Processor configuration
  const i2s_config_t i2s_config = {
    .mode = i2s_mode_t(I2S_MODE_MASTER | I2S_MODE_RX),
    .sample_rate = 44100,
    .bits_per_sample = i2s_bits_per_sample_t(16),
    .channel_format = I2S_CHANNEL_FMT_ONLY_LEFT,
    .communication_format = i2s_comm_format_t(I2S_COMM_FORMAT_STAND_I2S),
    .intr_alloc_flags = 0,
    .dma_buf_count = 8,
    .dma_buf_len = bufferLen,
    .use_apll = false
  };

  i2s_driver_install(I2S_PORT, &i2s_config, 0, NULL);
}

void i2s_setpin() {
  // Set I2S pin configuration
  const i2s_pin_config_t pin_config = {
    .bck_io_num = I2S_SCK,
    .ws_io_num = I2S_WS,
    .data_out_num = -1,
    .data_in_num = I2S_SD
  };

  i2s_set_pin(I2S_PORT, &pin_config);
}

void setup() {
  // Set up Serial Monitor
  Serial.begin(115200);
  Serial.println("ESP32 I2S Microphone Test");

  delay(1000);

  // Set up I2S
  i2s_install();
  i2s_setpin();
  i2s_start(I2S_PORT);

  delay(500);

  // Connect to Wi-Fi
  Serial.println();
  Serial.println();
  Serial.print("Connecting to ");
  Serial.println(ssid);

  WiFi.begin(ssid, password);

  while (WiFi.status() != WL_CONNECTED) {
    delay(500);
    Serial.print(".");
  }

  Serial.println("");
  Serial.println("WiFi connected");

  // Print the IP address of the ESP32C3 MCU board
  Serial.println("IP address: ");
  Serial.println(WiFi.localIP());

  // Start the server
  server.begin();
  Serial.println("Server started");
}

void loop() {
  // Check if a client has connected
  WiFiClient client = server.available();
  if (client) {
    Serial.println("Client connected");

    // Get I2S data and place in data buffer
    size_t bytesIn = 0;
    esp_err_t result = i2s_read(I2S_PORT, &sBuffer, bufferLen, &bytesIn, portMAX_DELAY);

    if (result == ESP_OK) {
      // Read I2S data buffer
      int16_t samples_read = bytesIn / 8;
      if (samples_read > 0) {
        // Send the audio data to the connected client
        client.write((uint8_t*)sBuffer, bytesIn);
      }
    }

    // Close the connection
    client.stop();
    Serial.println("Client disconnected");
  }
}
Interreacting on computing devices(computer and reComputer) - Bonus✨
The next step will be integrated with reComputer. Since I set up the reComputer ready on "Local LLM and Auto-generation tsx file" and the only thing that needs to do is letting the reComputer automatically get the input information, from my XIAO-powered modules.
Wrote on 5.8th, I finished the SSH connection between MAC and reComputer on my week 14 assignment.
And it is very hard for me doing the commends on two devices(my Mac and my reComputer) so I find a way(asking GPT), using SSH to connect both devices - I then can use one device to control two. Here is the way:
It requires SSH service supporting on both devices. Since 'OpenSSH' is pre-installed on both devices then I don't have to do it. For using SSH, the ip addresses are required, I check my router and the related ones are:
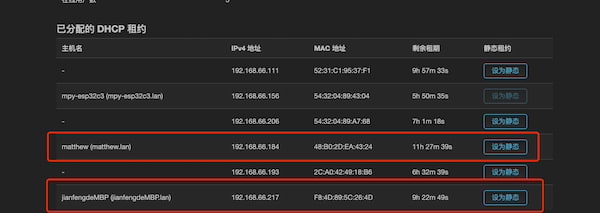
Then I need to know my username - for this I take quite a time to know what exactly is the username. Because I change the name for logging in, it turns out that is not the one. The right one should be on the top of my Terminal on the reComputer.
After knowing my username(mattgew) and I can run this commend on my Mac:
ssh mattgew@192.168.66.184
to ask the connect to my reComputer, after putting password I can get it connected.
XIAO ESP32 data to Local LLM, with Wi-Fi communication
The thing I want to do is that I want to use the data transmitted from Wi-Fi and do something with my local LLM.
I then first change my transmitted sentence:

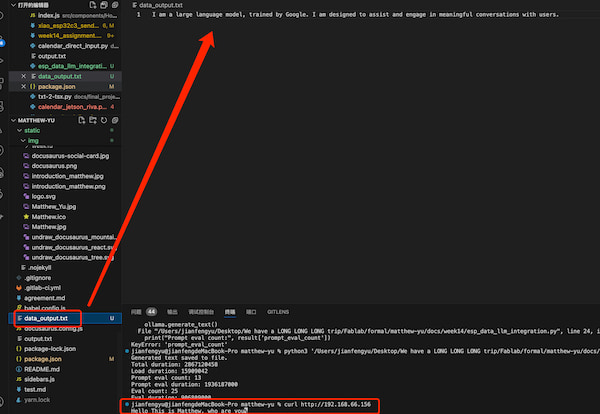
And I use to the curl http://192.168.66.156 to check if the data has been submitted:

Then I can use the code of integrating with local LLM I did before, and change the variate prompt as my http sentence, by using HTTP GET.
More professionally said is: This code gets the content from the address I specify and uses it as input to the prompt variable:
import requests
import time

class Ollama:
    def __init__(self, prompt, output_file):
        self.prompt = prompt
        self.output_file = output_file

    def generate_text(self):
        url = "http://localhost:11434/api/generate"
        data = {
            "model": "gemma",
            "prompt": self.prompt,
            "stream": False
        }
        response = requests.post(url, json=data)
        if response.status_code == 200:
            result = response.json()
            generated_text = result['response']
            self.save_to_file(generated_text)
            print("Generated text saved to file.")
            print("Total duration:", result['total_duration'])
            print("Load duration:", result['load_duration'])
            print("Prompt eval count:", result['prompt_eval_count'])
            print("Prompt eval duration:", result['prompt_eval_duration'])
            print("Eval count:", result['eval_count'])
            print("Eval duration:", result['eval_duration'])
        else:
            print("Error calling ollama API:", response.status_code)

    def save_to_file(self, text):
        with open(self.output_file, 'w') as file:
            file.write(text)

def fetch_prompt_from_server(server_address):
    try:
        response = requests.get(server_address)
        response.raise_for_status()  # Raises an HTTPError for bad responses
        return response.text
    except requests.RequestException as e:
        print("Failed to fetch prompt from server:", e)
        return None

if __name__ == '__main__':
    server_address = "http://192.168.66.156"
    prompt = fetch_prompt_from_server(server_address)
    if prompt is not None:
        output_file = "data_output.txt"
        ollama = Ollama(prompt, output_file)
        ollama.generate_text()
    else:
        print("No prompt received, exiting.")
Later it will output a text file called "data_output.txt":
Locall LLM generated data back to XIAO ESP32
I am hoping I can send back the sentences generated. I am adding requests function at my XIAO ESP32C3 part, for receiving my text. This requires both side code editting.
Actually I am not very good at coding, everything I did is using GPT. For making it easier, I am just using generated text file to do the text reading:
Hence, for my computer side, I ran this command:
import requests

# 服务器的 IP 地址,确保替换为你的 Microdot 服务器的实际 IP 地址
server_ip = '192.168.66.156'

def send_file_content():
    # 读取文本文件内容
    with open('data_output.txt', 'r') as file:
        file_content = file.read()

    # 构建请求 URL
    url = f'http://{server_ip}/'

    # 发送 POST 请求到服务器
    response = requests.post(url, data={'text': file_content})

    # 打印服务器响应
    print('Response from server:', response.text)

if __name__ == '__main__':
    send_file_content()
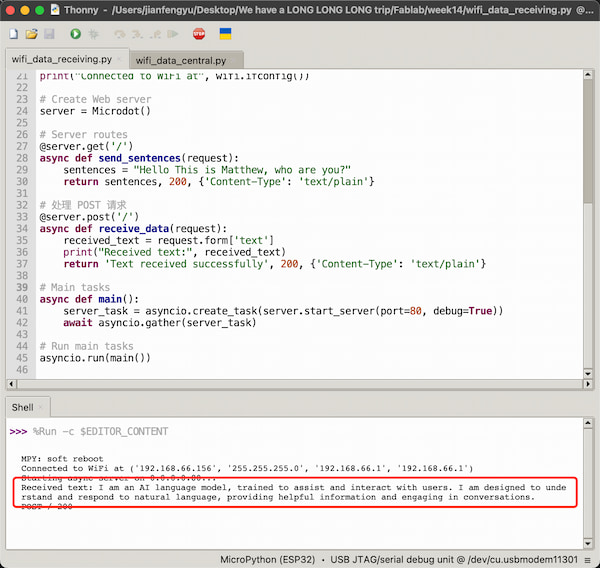
Then at the XIAO ESP32C3 part:
import network
import uasyncio as asyncio
from microdot import Microdot, Request, Response
# 创建 Web 服务器
server = Microdot()


# Configure your WiFi settings
SSID = 'fros_wifi'  # Your WiFi network name
PASSWORD = '66668888'  # Your WiFi network password

# Connect to WiFi
wifi = network.WLAN(network.STA_IF)
wifi.active(True)
wifi.connect(SSID, PASSWORD)

# Wait for connection
while not wifi.isconnected():
    pass

print("Connected to WiFi at", wifi.ifconfig())

# Create Web server
server = Microdot()

# Server routes
@server.get('/')
async def send_sentences(request):
    sentences = "Hello This is Matthew, who are you?"
    return sentences, 200, {'Content-Type': 'text/plain'}

# 处理 POST 请求
@server.post('/')
async def receive_data(request):
    received_text = request.form['text']
    print("Received text:", received_text)
    return 'Text received successfully', 200, {'Content-Type': 'text/plain'}

# Main tasks
async def main():
    server_task = asyncio.create_task(server.start_server(port=80, debug=True))
    await asyncio.gather(server_task)

# Run main tasks
asyncio.run(main())
At the last I got my final output:
Finding
Like I said, I am not very good at coding. So I am having trouble when I did the data sending back part. But it is also fun that I learnt more about it:
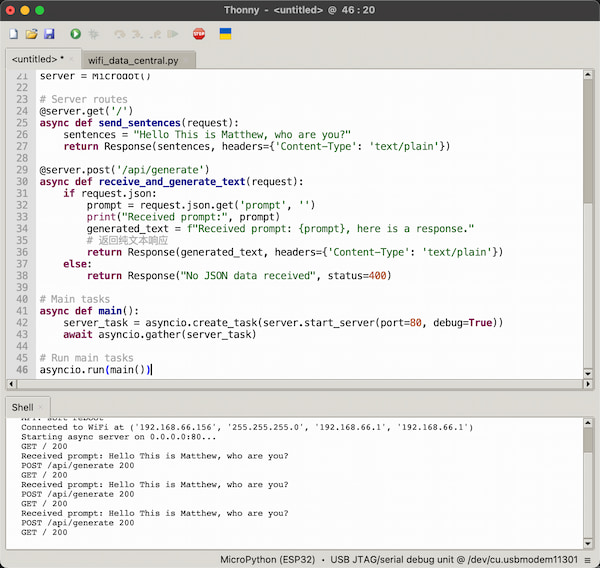
If I want he debugging information of a remote device is displayed, I can use this function:
@server.post('/api/generate')
async def receive_and_generate_text(request):
    if request.json:
        prompt = request.json.get('prompt', '')
        print("Received prompt:", prompt)
        generated_text = f"Received prompt: {prompt}, here is a response."
        return Response({'response': generated_text}, headers={'Content-Type': 'application/json'})
    else:
        return Response("No JSON data received", status=400)
The corresponding Python code is this.
And the text only(full) is
import network
import uasyncio as asyncio
from microdot import Microdot, Request, Response

# Configure your WiFi settings
SSID = 'fros_wifi'  # Your WiFi network name
PASSWORD = '66668888'  # Your WiFi network password

# Connect to WiFi
wifi = network.WLAN(network.STA_IF)
wifi.active(True)
wifi.connect(SSID, PASSWORD)

# Wait for connection
while not wifi.isconnected():
    pass

print("Connected to WiFi at", wifi.ifconfig())

# Create Web server
server = Microdot()

# Server routes
@server.get('/')
async def send_sentences(request):
    sentences = "Hello This is Matthew, who are you?"
    return Response(sentences, headers={'Content-Type': 'text/plain'})

@server.post('/api/generate')
async def receive_and_generate_text(request):
    if request.json:
        prompt = request.json.get('prompt', '')
        print("Received prompt:", prompt)
        generated_text = f"Received prompt: {prompt}, here is a response."
        # 返回纯文本响应
        return Response(generated_text, headers={'Content-Type': 'text/plain'})
    else:
        return Response("No JSON data received", status=400)

# Main tasks
async def main():
    server_task = asyncio.create_task(server.start_server(port=80, debug=True))
    await asyncio.gather(server_task)

# Run main tasks
asyncio.run(main())
The corresponding Python code is this.
Both output are like:
Let the whole thing automatically
I can't run a lot of Python code manually, because I will have a lot of processes to do. So I need to make this "sending - generating - backing" process automatically.
Here is the code
The prompt_eval_count error is fine that I am not applying it. The more important is that I can have the output file.
It takes about 11 seconds and the video is big. So I separate it into two:
- Power XIAO ESP32C3
- File Generation