Mechanical Design, Machine Design
Group Assignment:
- Design a machine that includes mechanism + actuation + automation + application.
- Build the mechanical parts and operate it manually.
- Actuate and automate your machine.
- Document the group project.
My Learning
-
Team work is very important and work distribution depending on individual skills was very the key to our success. I was assinged the work to program the Modular Hbridge board using modular things.
-
Assembling CoreXY machine or any machine take a lot of time and as we were building the machine we had to stop and make changes to the parts and print again. It was a team effort to assemble the machines.
My Contribution
-
I also learned iMovies to make the video for the week and made the poster slide in Canva.
-
I took the lead on programming for Modular things and it challanged me to learn javascript.
-
Also assembled the machine with Sangay
Electronics & Programming
- We decided to incorporate the same electronics from the FAB23 Bhutan workshop on Modular Axis: How to Build Minimal Cost Machines for Education by Quentin Bolsée as he had left a lot of boards here after fab23.
By using these HBridge Stepper motors, we ensured that our machine was equipped with reliable and cost-effective components. 
- For programming, I relied on the codes provided by Yuichi Tamiya as our main reference. Additionally, we integrated the OSAP for Arduino Library and the Stepper moduler for Xiao into our system. These resources helped us streamline the programming process and ensure compatibility with our machine’s electronics.
To gain a deeper understanding of Modular Thing, please refer to this link.
After reading though all the documentation and properly understanding modular thing, I rewrote and modified the code for our machines. The modular things run on local host and after following the instructions and installing the prerequisites, I ran the local host.

On the any webserver, perfered chrome as it was desinged for chrome run the loack host. This is what pops up for the first time. Need to connect to the stepper modules to get the interface running.
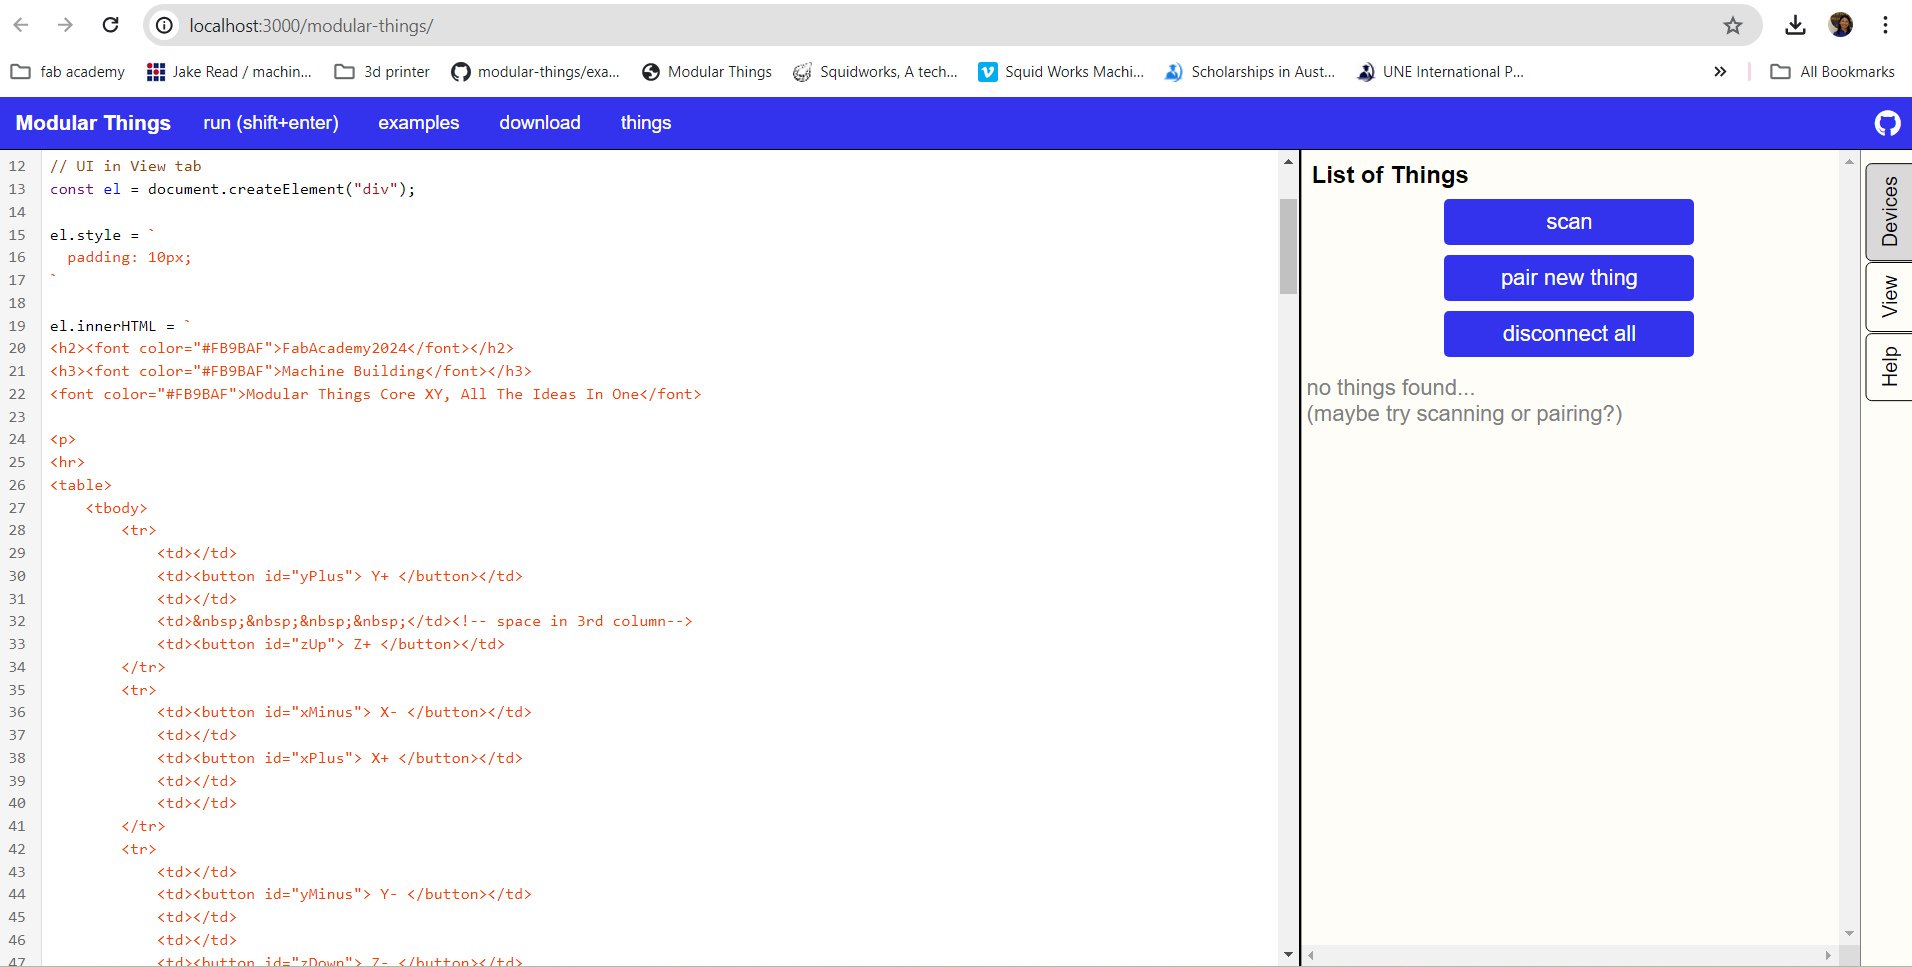
After connecting the motor drivers and scanning the modules appear on the list of things, which you can rename after connecting.
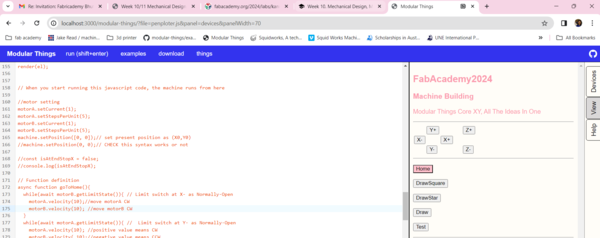
Below is the code for written in javascript to make the interface for modular things. When you click on view the interface apperas as shown in picture below.
// UI in View tab
const el = document.createElement("div");
el.style = `
padding: 10px;
`
el.innerHTML = `
<h2><font color="#5B9BAF">FabAcademy2024</font></h2>
<h3><font color="#5B9BAF">Machine Building</font></h3>
<font color="#5B9BAF">Modular Things Core XY ALL-IN-ONE </font>
<p>
<hr>
<table>
<tbody>
<tr>
<td></td>
<td><button id="yPlus"> Y+ </button></td>
<td></td>
<td> </td><!-- space in 3rd column-->
<td><button id="zUp"> Z+ </button></td>
</tr>
<tr>
<td><button id="xMinus"> X- </button></td>
<td></td>
<td><button id="xPlus"> X+ </button></td>
<td></td>
<td></td>
</tr>
<tr>
<td></td>
<td><button id="yMinus"> Y- </button></td>
<td></td>
<td></td>
<td><button id="zDown"> Z- </button></td>
</tr>
<tr>
<td></td>
<td><button id="CW"> BladeCW </button></td>
<td></td>
<td></td>
<td><button id="ACW"> BladeACW </button></td>
</tr>
</tbody>
</table>
<hr>
<p>
<button id="Home" style="background-color:pink;"> Home</button>
<button id="DrawStar"> DrawStar</button>
<p>
<button id="Draw/cut"> Draw</button>
<p>
<button id="Test"> Test</button>
<hr>
<p>
Open browser’s DevTools console with<br>
cmd + shift + j (Linux)<br>
ctrl + shift + j (win)<br>
command + option + j (mac)
</p>
`;
//pen up initially
//zUp();
//test button
//================================
el
.querySelector("#Test")
.addEventListener("click", () => {
delay(100);
test();
//drawPolugon();
})
function test() {
machine.setPosition([0, 0]);
goTo(10, 10);
}
//================================
//Synchronizer of two motors
const machine = createSynchronizer([motorA, motorB]);
//Definition of CoreXY Motion
async function goTo(x, y) {
console.log(`Moving to (${x}, ${y})`);
await machine.absolute([-1 * (x + y), -1 * (x - y)]); // The reason why "-1" is multiplied may be due to the wiring and origin position.
}
// Set button ID and click_event
el
.querySelector("#xPlus")
.addEventListener("click", () => {
xPlus();
})
el
.querySelector("#xMinus")
.addEventListener("click", () => {
xMinus();
})
el
.querySelector("#yPlus")
.addEventListener("click", () => {
yPlus();
})
el
.querySelector("#yMinus")
.addEventListener("click", () => {
yMinus();
})
el
.querySelector("#zUp")
.addEventListener("click", () => {
zUp();
})
el
.querySelector("#zDown")
.addEventListener("click", () => {
zDown();
})
el
.querySelector("#CW")
.addEventListener("click", () => {
moveBladeClockwise();
});
el
.querySelector("#ACW")
.addEventListener("click", () => {
moveBladeCounterclockwise();
});
el
.querySelector("#Home")
.addEventListener("click", () => {
goToHome();
})
el
.querySelector("#DrawStar")
.addEventListener("click", () => {
delay(100);
drawStar();
})
el
.querySelector("#Draw")
.addEventListener("click", () => {
delay(100);
draw();
})
render(el);
This is the setting for setting up the machine and motors, the SPU, Current seeting and also position. There are also pre identified funtions defined in Modular things that can be used.
// When you start running this javascript code, the machine runs from here
//motor setting
motorA.setCurrent(1);
motorA.setStepsPerUnit(6.4);
motorB.setCurrent(1);
motorB.setStepsPerUnit(6.4);
machine.setPosition([0, 0]);// set present position as (X0,Y0)
//machine.setPosition(0, 0);
bladeMotor.setCurrent(0.5);
bladeMotor.setStepsPerUnit(5);

//zMotor.setCurrent(1);
//zMotor.setStepsPerUnit(40);
//zMotor.setAccel(1800);
//zMotor.velocity(10);

// Function definition
async function goToHome() {
    while (await motorB.getLimitState()) { // Limit switch at X- as Normally-Open
        motorA.velocity(10);//move motorA CW
        motorB.velocity(10); //move motorB CW
    }
    while (await motorA.getLimitState()) { //  Limit switch at Y- as Normally-Open
        motorA.velocity(10); //positive value means CW
        motorB.velocity(-10);//negative value means CCW
    }
    motorA.velocity(0);
    motorB.velocity(0);
    machine.setPosition([0, 0]);
    await delay(1000);
    goTo(10, 10);
    machine.setPosition([0, 0]);
    await delay(1000);
}//end of goToHome


// Function to move the blade clockwise
async function moveBladeClockwise() {
    //Implement the logic to move the blade in the clockwise direction
    await bladeMotor.relative(20); // Move the blade 10 steps clockwise
}

// Function to move the blade counterclockwise
async function moveBladeCounterclockwise() {
    // Implement the logic to move the blade in the counterclockwise direction
    await bladeMotor.relative(-20); // Move the blade 10 steps counterclockwise
}

let currentX = await motorA.getState();
let currentY = await motorB.getState();

// Function to move the blade
async function moveBlade(targetX, targetY) {
    // Calculate the direction to move the blade based on the current position and the target coordinate
    //let [currentX, currentY] = await getMotionState()
    console.log(targetX);
    console.log(currentX);
    // Calculate the direction to move the blade based on the current position and the target coordinate
    const deltaX = targetX - currentX; // Calculate the change in x-coordinate
    const deltaY = targetY - currentY; // Calculate the change in y-coordinate
     const stepsPerRadian = 180 / (2 * Math.PI);/// still need to calculate the angle here.
    // Calculate the angle to move the blade
    const angle = Math.atan2(deltaY, deltaX); // Calculate the angle between the current position and the target coordinate

    // Convert the angle to steps for the stepper motor
    const steps = Math.round(angle * stepsPerRadian); // Assuming stepsPerRadian is a constant representing steps per radian


    ///ashim you have to call the function which controls the angle for the servo motor

    // Move the blade to the calculated angle
    await bladeMotor.relative(steps);
    // Update the current position of the blade
    currentX = targetX;
    currentY = targetY;
}

function xPlus() {
    //zUp();
    machine.setPosition([0, 0]);
    for (i = 0; i < 10; i++) {
        goTo(i, 0);
    }
}

function xMinus() {
    //zUp();
    machine.setPosition([0, 0]);
    for (i = 0; i < 10; i++) {
        goTo(-i, 0);
    }
}

function yPlus() {
    //zUp();
    machine.setPosition([0, 0]);
    for (i = 0; i < 10; i++) {
       goTo(0, i);

    }

}

function yMinus() {
    //zUp();
    machine.setPosition([0, 0]);
    for (i = 0; i < 10; i++) {
        goTo(0, -i);

    }
}

 function zUp() {
    // Code for the function goes here
    //zUp();
   zMotor.relative(-20);
}

function zDown() {
  zMotor.relative(20);
}


async function drawStar() {
    //down();
    for (let i = 0; i < ptsStar.length; i++) {
        //to cut a square with the blade.
        //await moveBlade(ptsStar[i][0], ptsStar[i][1]);
        //await delay(1000);
        await goTo(ptsStar[i][0], ptsStar[i][1]);
        await delay(1000);

    }
    //zUp();
}
Here is the function writtent to move the machine in the desired direction to make different shapes.
async function draw() {


    //down();
    for (let i = 0; i <pts; i++) {
        await goTo(pts[i][0], pts[0][i]);
        await delay(200);
    }
    //zUp();
}


// Array of [x,y] positions of drawing desin
//var ptsSquare = [[10,0],[10,10],[0,10],[0,0]]; //doesnot work
//Star
var ptsStar = [[20, 10], [30, 50], [40, 10], [10, 40], [50, 40], [20, 10]];
///hexagon
//var pts= [
    // [10, 0],
    // [5, 8.66],
    // [-5, 8.66],
    // [-10, 0],
    // [-5, -8.66],
    // [5, -8.66],
    // [10, 0]
// //];


//TestDraw
// Original Pikachu coordinates
// var pts = [
//     [0, 10], [5, 10], [7, 15], [10, 20], [15, 20], [20, 15], [25, 10], [30, 10], // Top of the head
//     [30, 0], [20, 0], [20, -10], [10, -10], [10, 0], [0, 0], // Face and cheeks
//     [0, -5], [2, -10], [5, -15], [10, -17], [15, -15], [18, -10], [20, -5], // Body outline
//     [15, -5], [13, -8], [10, -6], [7, -8], [5, -5] // Facial features
// ];

// Scaling factor for 50 by 50 cm size
const scaleFactor = 10; // 1 cm = 10 mm

// Scaled Pikachu coordinates
var scaledPikachuCoordinates = pikachuCoordinates.map(coord => [coord[0] * scaleFactor, coord[1] * scaleFactor]);

// Output the scaled coordinates
console.log(scaledPikachuCoordinates);
//SVG -> ChatGPT -> vertex coordinates of the shape//This is NOT tested yet
var polygon1 = [[10, 10], [10, 20], [20, 20], [20, 10], [10, 10]];

var polygon2 = [[30, 30], [30, 40], [40, 40], [40, 30], [30, 30]];
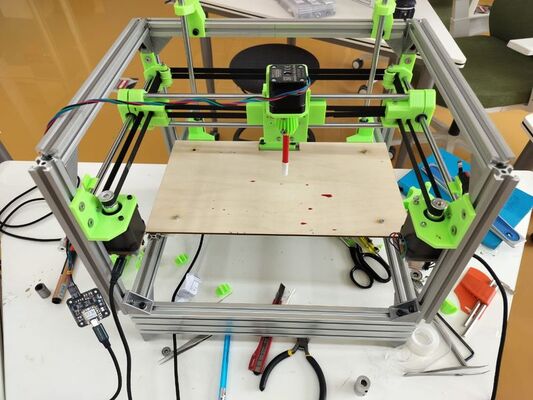
The machine was controlled using the Modular things Instruction and web interface.
Mechanical Design
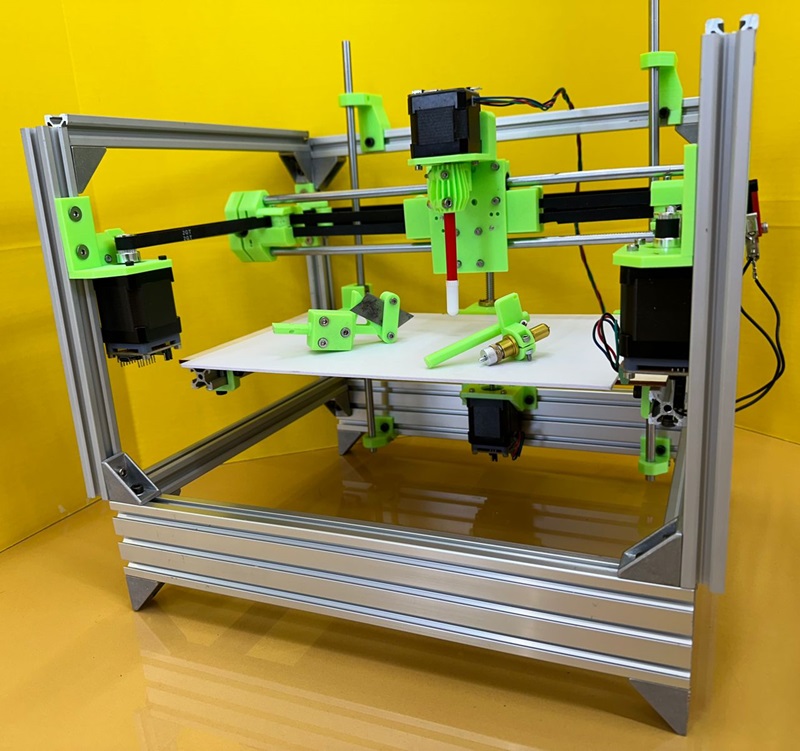
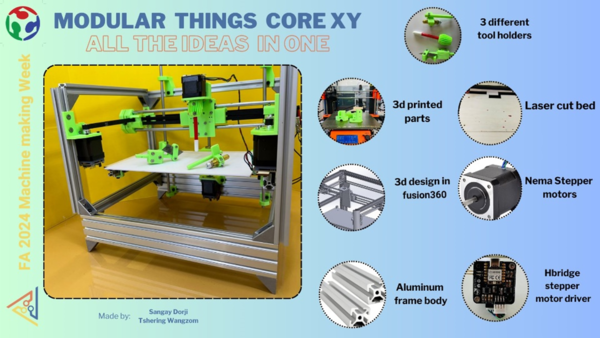
- During our discussions, we chose to build a machine that does many things by incorporating various suggestions. We settled on the Modular Things Core XY mechanism machine.

Got the above image from instructor boot camp 2024
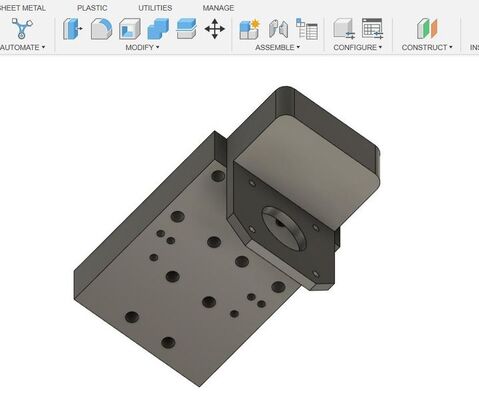
- During our deliberations, we opted to utilize STL files from the Anet Evolution model. However, we had to tweak certain components such as the tool holder to better suit our needs and also upon inventorying the necessary parts, we realized that some adjustments were required, particularly for parts that holds bearing like pulleys. In addition to the modifications, we also drew inspiration from the MPCNC Tangential Knife design files to further enhance the functionality of our machine. 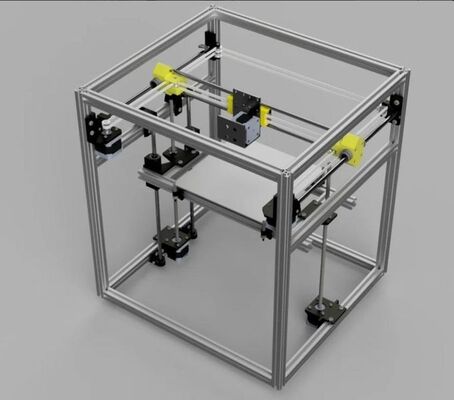
Fabrication and Assembly
- The machine requires several components including guide rails, shafts, bearings, pulleys, stepper motors, threaded rods, screws&bolts, a bed, belts, PLA or PETG filament, a pen, blades, and so on.
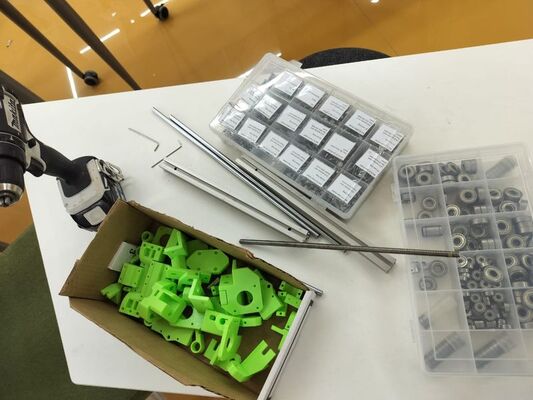
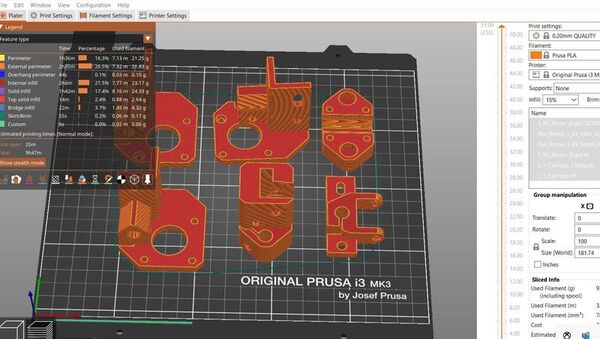
- To kickstart the project, we began by downloading the necessary STL files of the Anet Evolution and used Prusa Slicer to 3D print all the necessary parts.

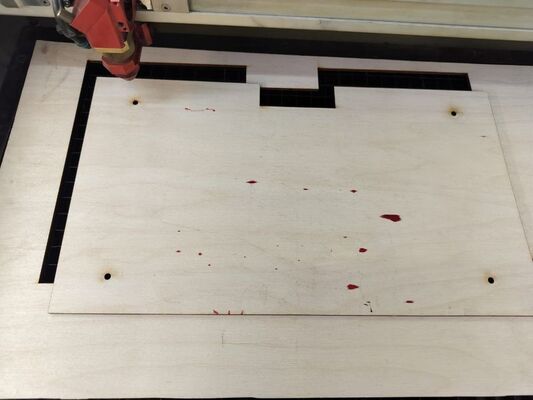
- Additionally, we utilized a laser cutter to create the bed.

- Then, we proceeded to assemble the parts using guide rails, rods, screws, and various other components. We carefully fitted the printed parts together, ensuring everything aligned correctly. By securing the frame with rods and fastening it with screws, we established a sturdy structure. Each component was meticulously attached to its designated place, creating a cohesive unit.
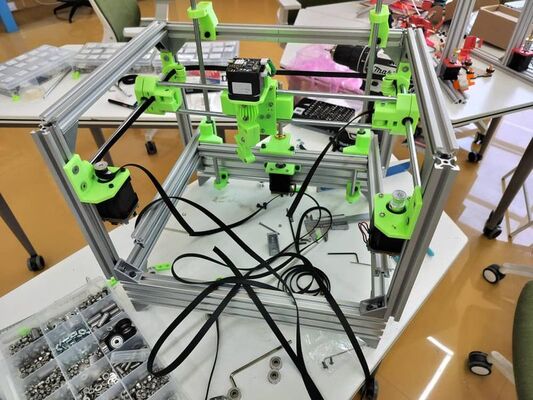
- Through this meticulous assembly process, we ensured that the machine was robust and ready for further refinement and customization.

Mechanical Movement
- Once all components were assembled, we conducted a thorough check of the mechanical movement. We manually moved the axes by hand to ensure smooth operation and to verify the presence of the Core XY mechanism. After thorough testing, we confirmed that the machine was in good working order. This validation process assured us that our assembly was successful and that the machine was ready for further testing and use.
Conclusion
- Building the machine was a fantastic experience, seeing our ideas come to life was really rewarding, and we’re grateful for all the open-source support. If we had more time, we would prioritize making the machine sturdier and improving the tool holders. Strengthening the machine’s structure and enhancing the tool holders would make it even better for future projects. We will also be exploring adding more tools to the machine and refining the code.
My main learning was in coding with JavaScript and assembling the machine never goes as planned and it is much more harder than it looks.