Embedded programming
| Task | progress |
|---|---|
| Write a program for a microcontroller development board to interact (with local input &/or output devices) and communicate (with remote wired or wireless devices) | done |
Group Assignment
Here is the link to our this weeks group assignment Link
Key takeaways from this week:
-
You cannot read though all the datasheet at once and best way is to look for what you want then read about that.
-
Microcontroller chips don’t follow Von Nuemen Archetecture but it is being used is systems and computer archetectures.
-
Must knows for a microcontroller are the GPIO pins, Processor speed, type of chip and memory.
Embedded Programming
“Embedded programming refers to writing code specifically tailored for embedded systems, which are specialized computing devices designed to perform specific functions within larger systems.”
While we are doing embedded Programming here are few things to consider:
-
We need to consider hardware constraints
-
Real-time requirements
-
Interactions with hardware
-
Specilized toolchains compilers, debugging tools required.
-
Application domains like in electronics, automotive and industrial system, medical devices, etc.
Programming Xiao-RP2040
Using C++ using Arduino IDE
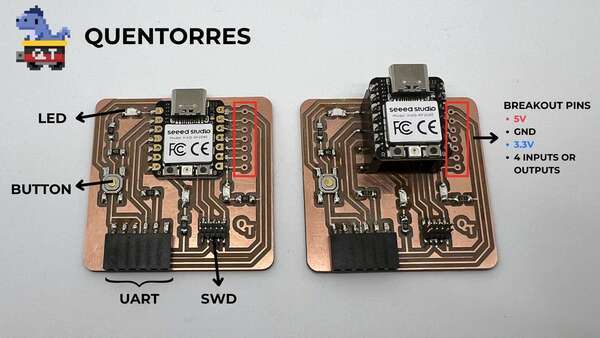
I had already explored the Xiao-RP2040 in our electronics production week and for this week I went back to the Quentorres board page to get GPIO pin for arduino.
Here is the images I refered from the Quentorres page

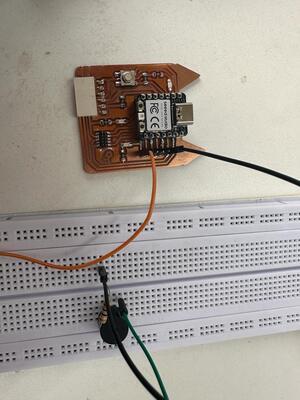
I used breadboard to connect buzzer to the board and used the Breakout pins shown below.
Given is the code written in Arduino. Got the code for the buzzer from Arduino page and also TinkerCad and modified for my need..
The code below is written to do the following things:
-
Read frequency input in a particular range for the buzzer from Serial Monitor.
-
If the frequency is not in range it will ask for the input agian in the accepted range.
-
The buzzer will only make sound when the button is press, else a prompt in serial monitor will ask you to press the button and then give input frequnecy again.
-
LED will also glow when the button is pressed.
const int buttonPin = 27; // Pin connected to the button
const int buzzerPin = 1; // Pin connected to the buzzer
const int ledPin = 26; // Pin connected to the LED

int buzzerRange = 0; // Variable to store the buzzer activation range
int buttonState = 0; // Variable to store the button state

void setup() {
  Serial.begin(9600); // Start serial communication at 9600 baud rate
  pinMode(buttonPin, INPUT_PULLUP); // Set the button pin as input with pull-up resistor
  pinMode(buzzerPin, OUTPUT); // Set the buzzer pin as output
  pinMode(ledPin, OUTPUT); // Set the LED pin as output
}

void loop() {
  Serial.println("Enter the buzzer activation range (0-1023): ");
  while (Serial.available() == 0); // Wait until data is received
  buzzerRange = Serial.parseInt(); // Read the input from serial monitor
  Serial.println("Press the button to activate the buzzer.");
  buttonState = digitalRead(buttonPin);// Check if the button is pressed

  if (buttonState == HIGH) { // Button is pressed
    if (buzzerRange >= 0 && buzzerRange <= 1023) {
      Serial.println("Buzzer activated!");
      tone(buzzerPin,buzzerRange,500); // Activate the buzzer
      digitalWrite(ledPin, HIGH); // Turn on the LEDS
    } else {
      Serial.println("Invalid buzzer activation range. Please enter a value between 0 and 1023.");
    }
  } else { // Button is not pressed
    digitalWrite(buzzerPin, LOW); // Deactivate the buzzer
    digitalWrite(ledPin, LOW); // Turn off the LED
  }
  }
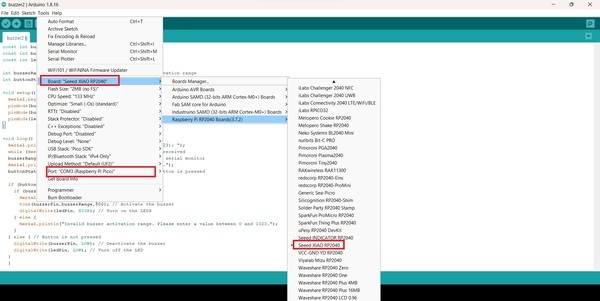
Here is the setting up of Arduino Boards.
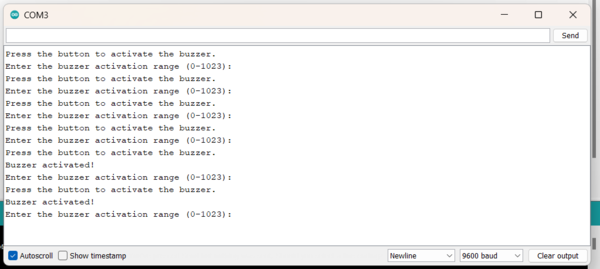
This is the screenshot showing my communication with the board with my computers IDE.
Programming with MicroPython
I learned python before but never used it practically so I wanted to try MicroPython. I followed the complete tutorial from Seed Studio given in this Link. It was very helpful and easy to follow.
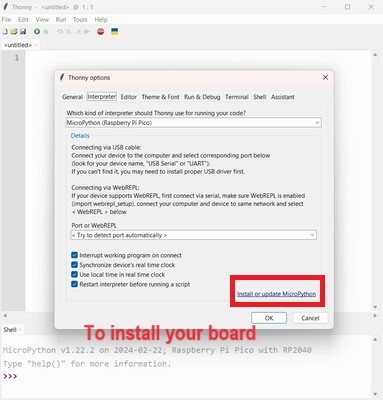
Followed the instructions troughly, starting from downloading Thonny Editor and installing. The instruction also tells you how you can connect to XIAO-RP2040. In my case, in the newer version of Thonny, the options showing up like this.
I am not sharing the screenshots of my Thonny installation process as it is same as the SeedStudio tutorial.
I first tried the codes given in the tutorial in the above link to blink the RBG LED. Just to check if the connection is made with Thonny as suggested by the tutorial. And it worked.
from machine import Pin, Timer

led = Pin(25, Pin.OUT)
Counter = 0
Fun_Num = 0

def fun(tim):
    global Counter
    Counter = Counter + 1
    print(Counter)
    led.value(Counter%2)

tim = Timer(-1)
tim.init(period=1000, mode=Timer.PERIODIC, callback=fun)
Next, I tried the RGB light tutorial as I wanted to see the LED ligh up. For this I had to download the library ws2812.py given in the tutorial and saving it in the the PR2040. AGAIN I followed the tutorial by seed studio
Copied the code from the tutorial.
from ws2812 import WS2812
import utime
import machine
power = machine.Pin(11,machine.Pin.OUT)
power.value(1)
BLACK = (0, 0, 0)
RED = (255, 0, 0)
YELLOW = (255, 150, 0)
GREEN = (0, 255, 0)
CYAN = (0, 255, 255)
BLUE = (0, 0, 255)
PURPLE = (180, 0, 255)
WHITE = (255, 255, 255)
COLORS = (BLACK, RED, YELLOW, GREEN, CYAN, BLUE, PURPLE, WHITE)

led = WS2812(12,1)#WS2812(pin_num,led_count)

while True:
    print("Beautiful color")
    for color in COLORS:
        led.pixels_fill(color)
        led.pixels_show()
        utime.sleep(0.2)
and it worked.
** As I was learning from the tutorial, I was also trying to learning MicroPython**
Communicating with XIAO RP2040 through shell
Blinking LED
I was trying the do the same thing as I did in c++ in Arduino IDE and blink an LED. I created a new file and with the help from Chatgpt and few modifications to the code it worked.
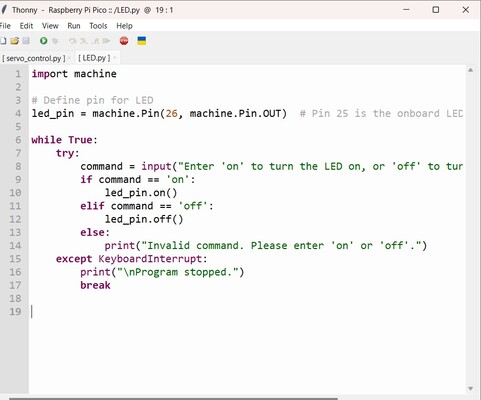
import machine

# Define pin for LED
led_pin = machine.Pin(26, machine.Pin.OUT)  # Pin 26 is the onboard LED on Raspberry Pi Pico

# input from shell to turn ON/OFF LED
while True:
    try:
        command = input("Enter 'on' to turn the LED on, or 'off' to turn it off: ").strip().lower()
        if command == 'on':
            led_pin.on()
        elif command == 'off':
            led_pin.off()
        else:
            print("Invalid command. Please enter 'on' or 'off'.")
    except KeyboardInterrupt:
        print("\nProgram stopped.")
        break
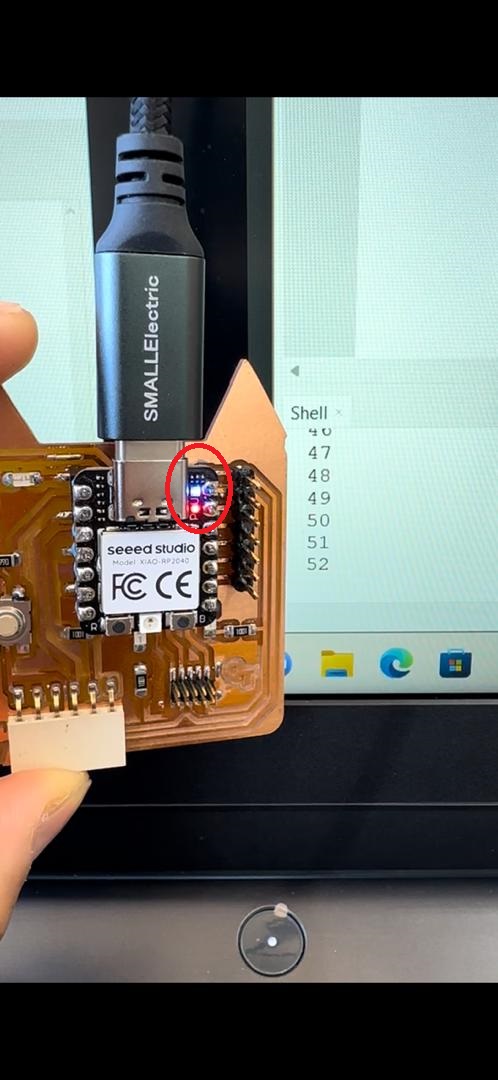
As seen in the video below the code worked as, I was able to control the LED on pin 26 from the shell of Thonny installed on my computer by using ON and OFF, thereby setting up the communication.
Communicating with OLED
As the first time user it was learning from scratch the Thonny IDE and also Micropython.
-
I made the connection to the OLED display taking reference from Seedstudio tutorial.
-
Downloaded and installed ssd1306.py library on to RP2040.
-
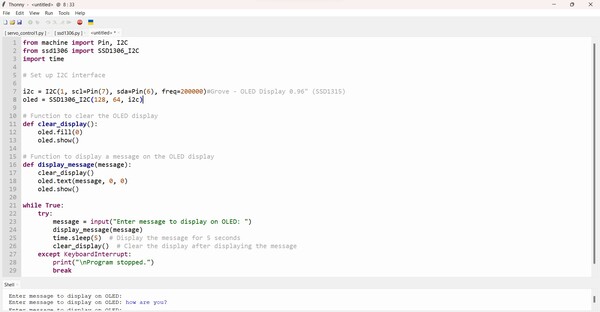
I aked ChatGPT for a “MicroPython Code for OLED display to communicate with shell”.
-
Had to make few changes to the code I got from the ChatGPT like importing the right library, setting up i2c connection code and also user input code.
from machine import Pin, I2C
from ssd1306 import SSD1306_I2C
import time

# Set up I2C interface

i2c = I2C(1, scl=Pin(7), sda=Pin(6), freq=200000)#Grove - OLED Display 0.96" (SSD1315)
oled = SSD1306_I2C(128, 64, i2c)

# Function to clear the OLED display
def clear_display():
    oled.fill(0)
    oled.show()

# Function to display a message on the OLED display
def display_message(message):
    clear_display()
    oled.text(message, 0, 0)
    oled.show()

while True:
    try:
        message = input("Enter message to display on OLED: ")
        display_message(message)
        time.sleep(5)  # Display the message for 5 seconds
        clear_display()  # Clear the display after displaying the message
    except KeyboardInterrupt:
        print("\nProgram stopped.")
        break
The following code in the picture was modified to ask the user for a message for OLED from the shell and display on the OLED. It was a success!!!
Over all I think I will stick to C programming and Arduino IDE for fabacademy as I find it more comfortable. But I am definitly going to use and learn MicroPython more in future.