Computer-Aided Design
Things to do this week:
| Task | progress |
|---|---|
| Modelled experimental objects/part of a possible project in 2D and 3D software | done |
| Shown how you did it with words/images/screenshots | done |
| Photo compression | done |
Software Used this week
- GIMP
- InkScape
- Fusion360
- Blender
- FreeCAD
- TinkerCAD
- Xnconvert
- ImageMagick
- ffmpeg
- Handbrake
2D design
GIMP
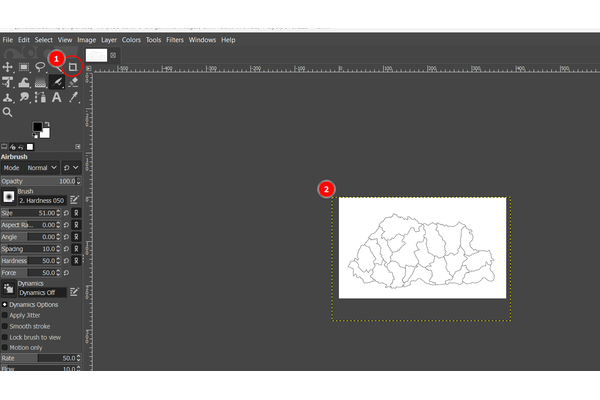
I already had GIMP installed in my laptop but here is the LINK from where you can do it. I downloaded from Microsoft store. For my final project I didn’t know what to use the GIMP for but I wanted to modify the our labs logo for laser engraving.
I wanted to maintain the Raster image and get the detail of the image so what I did is decided to use the Distrots filter in the GIMP.
Raster Image
Raster Images are Images with pixels and are not scalable. There is an example picture below. eg. png, jpg,webp etc
- For Laser cutting, the images needs to convert you image into blac&white and for that I went into Image–>mode–> Gray Scale.
-
As shown in the image below, I went into 1. Filters –> 2. Distrots–> 3. NewsPrint
-
A new window pops up where you can select the pattern for me I used 4. Lines –> then adjusted the 5. periods to get the desired look of the LOGO.

- I saved the above image as a PNG file and in attached at the end of this page.
I also used the GIMP for croping an image that I used in Inkscape and imported the Bhutan map as a PNG image.
Inkscape
For my 2d desiging software I used INKSCAPE. As one of my final project idea Geography for all learning tool. So I decided to edit a Bhutan Map. I downloaded a bhutan map from internet.
Open a new document in Inkscape and from files, I imported the map I downloaded from Internet.

The Image that Imported was a PNG image that was converted from webp image in GIMP.
DID not work
Could not open WEBP image in inkscaper directly and had to convert to PNG using GIMP
 Above Image is a Raster Image which is blurry because of Pixels.
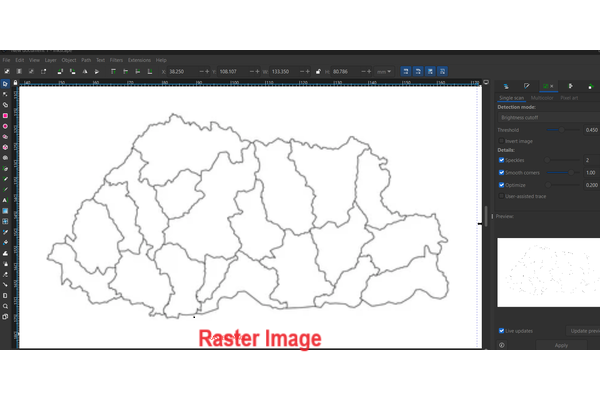
Inkscape can convert raster into Vector Image using the Trace Bitmap featur avaliable in Inkscape.
Vector Image
Vetor Images are made up of lines and they are scalable. An example in given below. eg. svg, pdf, etc
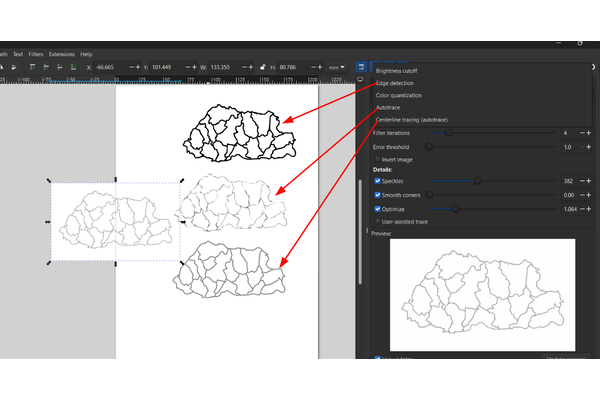
As shown in the images below , here are the steps that I took:
- Select path–> Trace Bitmap and a new window opens at the right side of the screen
- Click on the image to modify and then selected the single scan option as the map was Black and white.

- Tried different Detcetion Mode and played with different options to get the desired outcome. Three differnt Modes gave thress different outcome as shown below.
keep Live preview on for visibility of changes
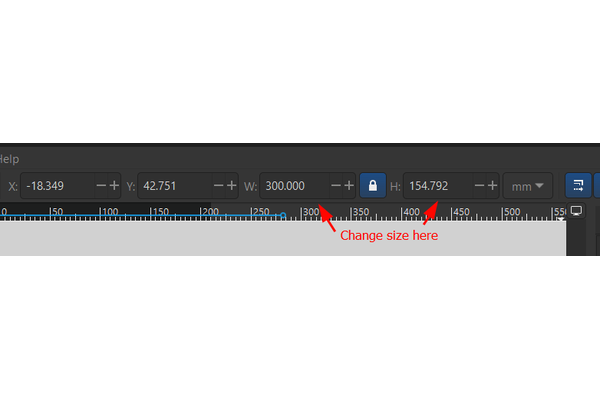
You can change the size of the image as below.
I decided to keep the vector Image I got from Edge Detection mode.
I also noticed that the image was flawed, as there was a line that was not traced properly. I used the nodes feature to edit the individual nodes. I Selected the individual nodes I didn’t want, break them, deleated them and again joined then together.
 I saved the Bhutanmap as an SVG file on my computer.
3D design
Fusion 360
I enjoyed at the same time it was difficult and took a lot of time to figure out Fusion 360. I wanted to edit the Bhutan map I earlier made in Inkscape. As the learning tool I am thinking of is for blinds, I wanted to give some texture to the maps outer line so I tried putting in some spears on the suface using the Pattern on path feature in Create. I played around with the numbers and quantiy of the pattern but my laptop was not coorperating so I left it at that for now.

Instead I decided to create a new design file and start with making the casing/base of my project which will later hold my Electronics.
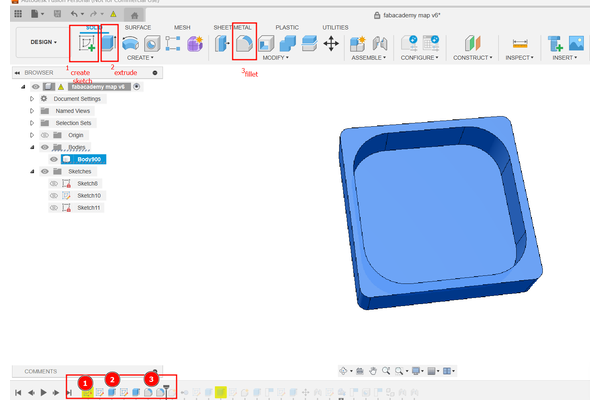
- Firstly, I started by creating a sketch a 2d design of the box.
- Then I used the Extrusion on the sketch I created to give height to the rectangle and convert it into a 3d object.
- Another sketch was needed on top of the above 3d design and used extrusion again to make the hollow design of the inside box.
- Used the fillet feature on the inner corners of the box to make the inner design curved.
-
By drawing Lines on the side of the box, I created a slot for the box lid.
-
Taking the dimensions of the slot, I made a lid with 1mm clearance.
-
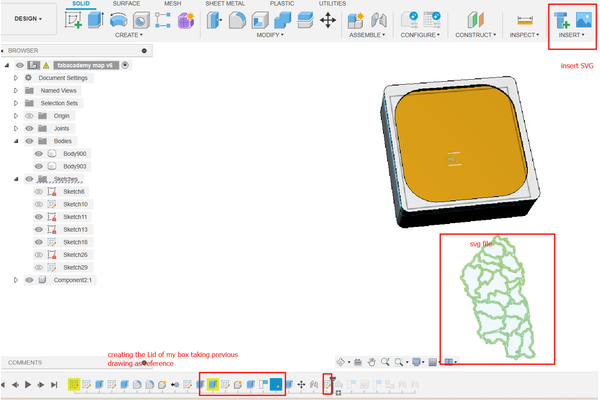
Imported the SVG file that I had created using Inkscape.
-
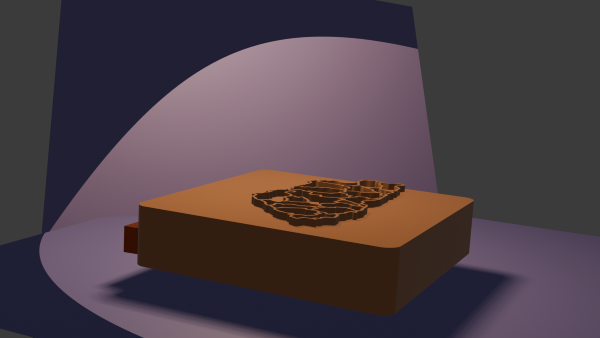
Used the extrusion on the map to make it into 3d and then placed it on the TOP of my casing as this is were I thinking Bhutan Map will go later on.
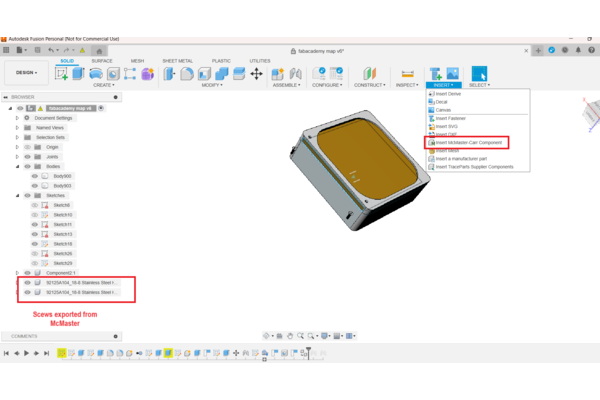
- Imported screws from Mcmaster from the Insert option by downloading the component. The compnents appear at the left hand side once downloaded. I copied the same screw again as I needed 2 numbers.
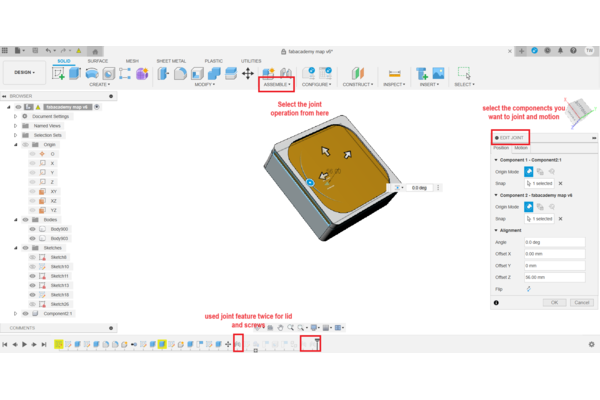
Next, I wanted to try the Joint opetation in the Assemble.
- For this feature, a side bar with edit joint feature come up, where you can select the components1 and component2 you want to join.
- After selecting the components you select the motion you want to give. I created the Joints for screws and also for Lid and gave them both slide motion.

Animation using Fusion 360
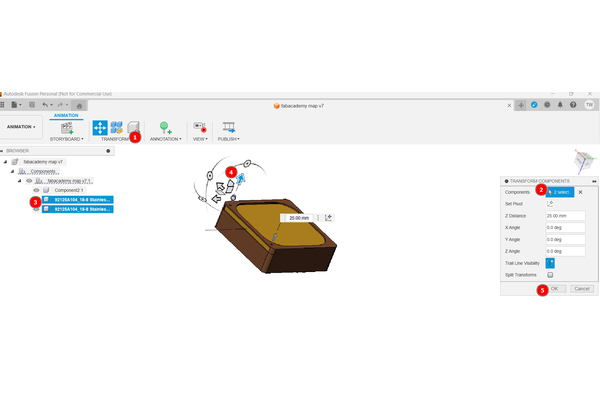
I also created an animation for the design I created. I refered several Youtube Videos to do this but I liked this one the best link.

- You need to select the timeframe before every movement you want to capture.
- I also used the Transfrom Component feature to capture the movement of screws and lid. I basically followed the above tutorial.
- As seen in the picture below, to use the transfrom feature, you need to have the components you want to move.
- Move them in the direction you want to move and then select ok. The animation bar below caputures the movement.
Blender for 3d Rendering
I refered to youtube tutorial for Blender in this link and also refered the detailed cheat sheet here.
I found it really difficult and complicated to use the Blender. I wanted to try rendering using Blender.
Some of the HOT KEYS for Blender are: - Toolbar: T - Properties:N - Add Object/Node: Shift + A - Delete: X or Delete - Search:F3 - Move:G - Scale:S - Rotate:R - Properties: N
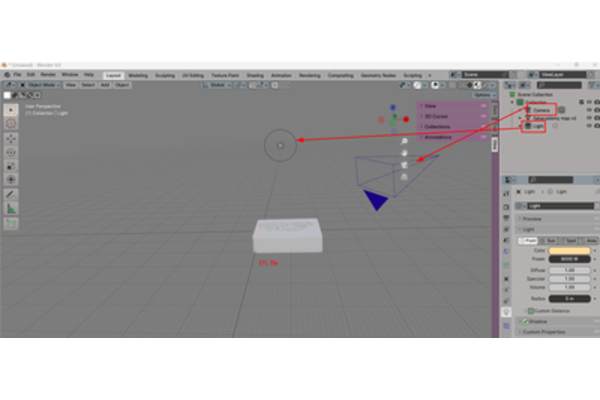
First, I import the casing.stl that was reated from Fusion and then set up the sceen of my layout with Camera setting and also light setting. It took a while for me to adjust the camera and light setting.

Note: When you click 0 in the Num in keyboard, it takes you to the camera view mode. When you click 1 to the front view.
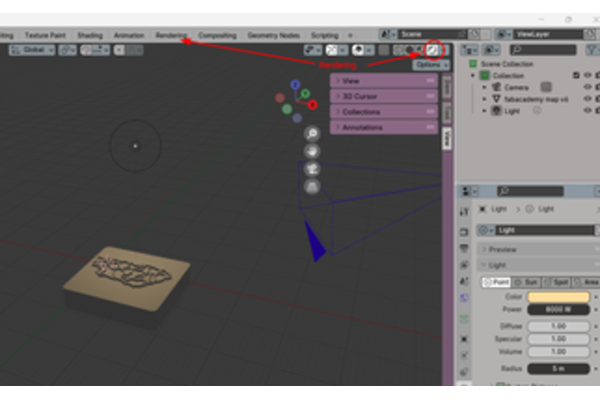
I went into the Material Properties at the right hand side of blender and changed the base color of my material. I clicked on the Render tab to check how my design looked.
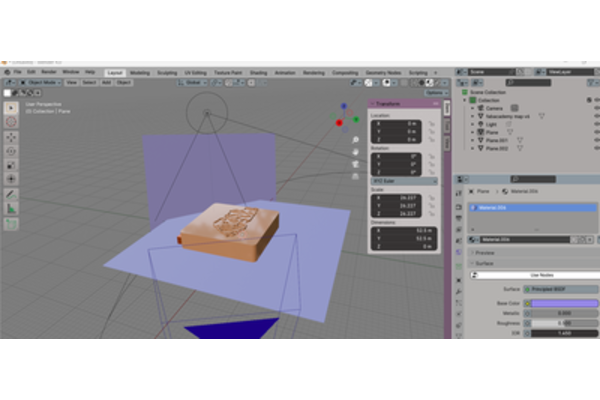
I decided to add a plane at the bottom of my design. To add a plane, Click SHIFT A and select mesh and then Plane.
-
I moved the plane just by clicking G and by clicking S, I scaled the plane to be little bigger than the design. By toggling between the object mode to edit mode, you can extrude and make increase the width height of then plane .

-
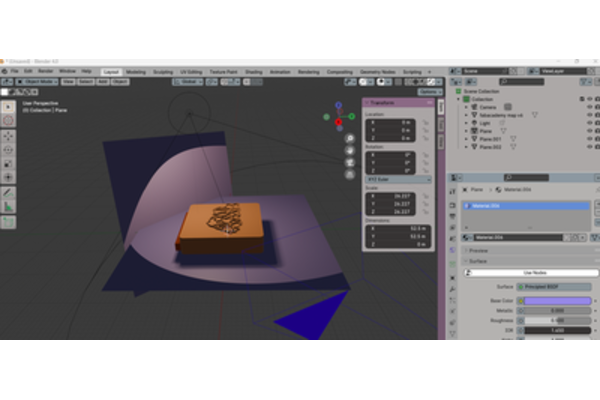
I added another Plane and rotated that to be wall for the design. The Image below is in the layout mode.
When switched to the Render mode, my design looks like this.
FreeCAD
I tried usinf TinkerCad and wanted to do parametric design but it was very difficult and time consuming learning it. Maybe because I am more used to using Fusion360, I found it the interface very unfriendly.
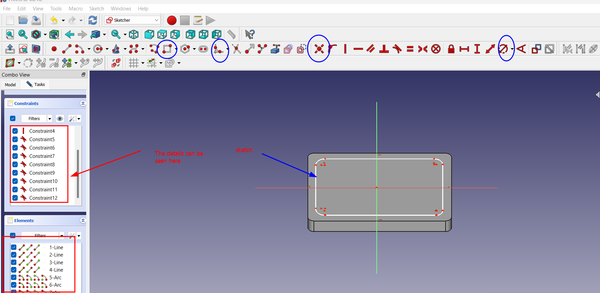
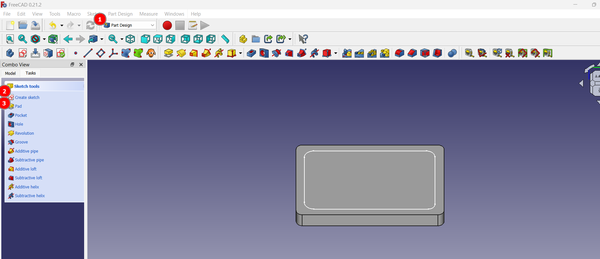
Unlike the fusion there is no timeline but a task bar shows all the funictions used previously. AS shown below in the two pictures, I made a box and tried and to make that I tried few features.
-
Started by making a sketch in the 1.part design section. Used square, Fillet, Constraints and also dimension
-
I also used pad function to give the design a thickness.
But I came across a lot a problems using the application mainly because I had not learned the software throughly. I dont think I will be using FreeCad for fabacademy and stick to Fusion360.
TinkerCAD
I also tried using TinkerCad as I thought it would be good tool to teach kids. It was very easy to use for simple designs but to make complex shapes I dont think using TinkerCad is advisable.
To make the box shown in the picture below, I dragged the few boxes on to the workplane and then used the hollow function and grouping to make the box.
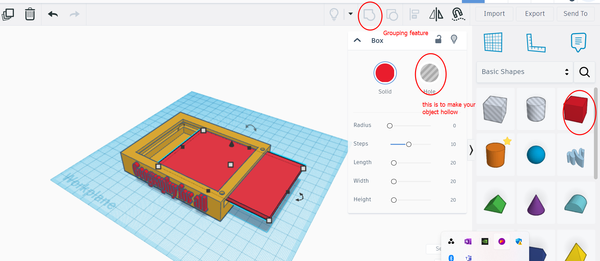
Image Compression
ImageMagick
ImageMagick
“It is an open-source suit of command line tools for manipulation of digital images. It can be used for batch processing a large number of images to quickly perform precise image modification tasks”
-
Download the imagemagick for windows from this link
-
Ran the instller and it told me to run few commands on the command-promt to check its installation.
- An app also gets installed, which can be used for editing the image.

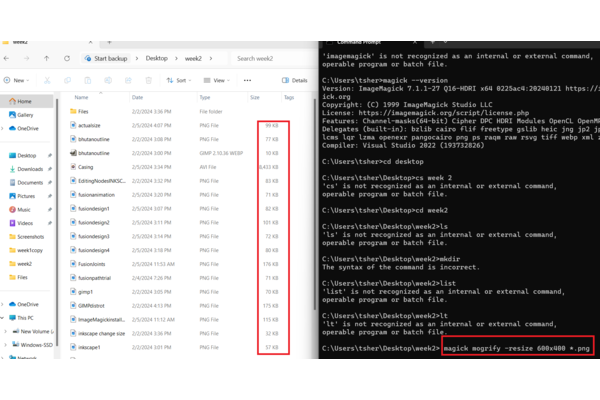
- I refered the Link to learn how to use it. You can find many codes you could use in imagemagick to edit the images. I ran the code
magick mogrify -resize 600x400 *.png
Also used the code below to make all the images of the same size by using canvas.
magick mogrify -resize 600x400^ -gravity center -extent 600x400 *.png
and before I knew it, it had resized my files.
Xncontert
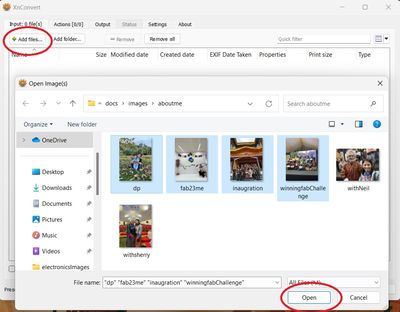
I used the Xnconvert which is an Open source software for image compression. You can see the images below for the steps carried out:
-
Firstly select Add file* to choose muitilpe/single file
-
Next from the action tab select Add Action, in our case it was to resize
-
Go to output and select your final file location and then press Convert

Video Compression
FFMPEG
I downloaded the ffmpeg from this Link
I also refered this youtube tutorial. You need to specify the enviroment path to be able to use ffmpeg from command-prompt.
I used the Fabacademy Cheatsheet for ffmpeg command. You can find them in this Link. The video does got compressed alot but it was still coming out to be 2MB. Command:
ffmpeg -i input_video -vcodec libx264 -b:v 1000k -vf scale=-2:1080 -an output_video.mp4

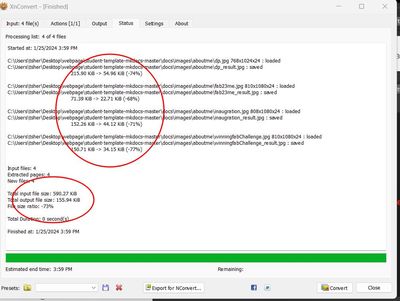
Above image shows the comprasionof images compressed and size reduced.
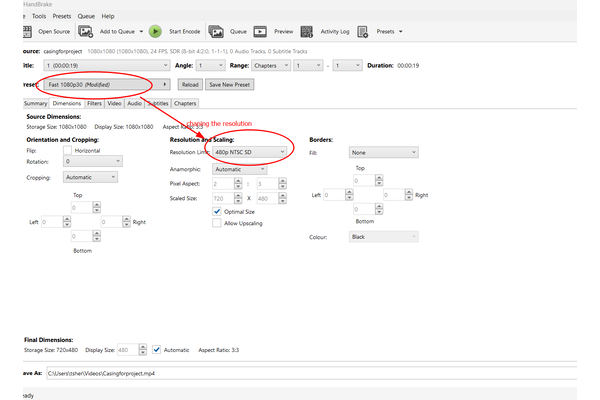
Handbrake
For video compression I also tried handbrake and I downloaded from this Link. I also had to install .NET 6.0 Desktop Runtime along to use handbrake.
- you upload the video you want to compress from files.
2.After uploading my video on to the handbrake app, I scaled the image into 480p
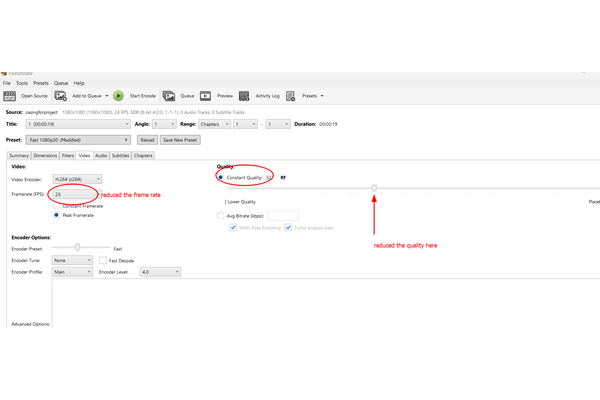
- Changed the FPS and played around with Content quality.
4.To finish, you press the start encoder and my Video got compressed to 341kb.