1. Principles and Practices - Project management
Assignment :
-
plan and sketch a potential final project
-
work through a git tutorial
-
build a personal site in the class archive describing you and your final project
First Step
After the wednesday lecture, i tried to explore my Gitlab page, but I had no clue how it works… So I explored the lecture’s documentation then I looked at the personal site examples ReaIizing how much i have to do, I decided to prioritize on organization. Inspired by Elena Cardiel’s page, I prepared a diary and a task manager on my Google Drive.

Getting Git
My first look at GitLab was a bit complicated so I read the official documentation. Not quite understanding anything, i find myself searching for a more basic tutorial typing in google what is push pull merge”. As a result,this site made me realize i need something to enter command. This leads me to gitlab tutorial. And finally : Eureka ! I need to install Git from here !
Learning in the local review how to use Git Gui, I manage to clone the repository from my GitLab space using HTTPS. I could start working on my personal site (see below) After a while, it was time for my first repository. I use git gui interface to add, commit then pull. But as always, there is prerequisites. First, “add” and “commit” worked, but i wanted to sign off the commit. I figured out that i had to register my IDs in the Options through the Edit menu.

Before making a pull, i was made aware from my coworkers that i need to generate a SSH key. I followed this Github tutorial and register my key on my GitLab profile. Besides that, i couldn’t make a pull.
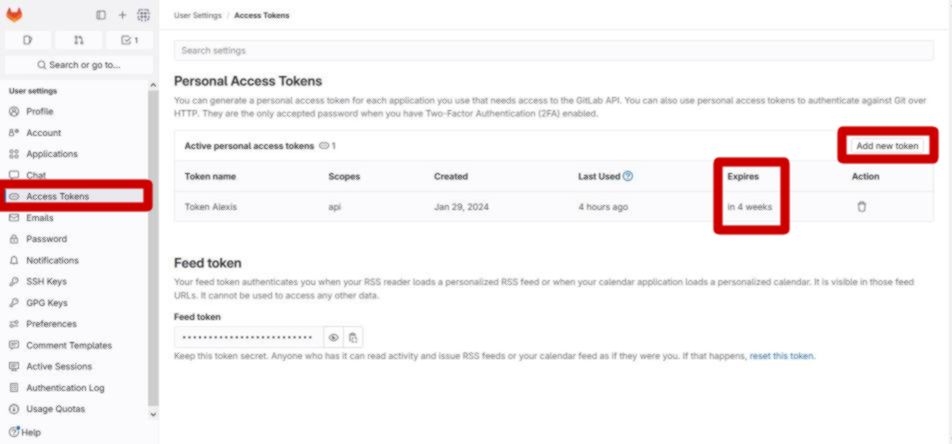
My co-student Jean-Côme had the same difficulty and could get it right by creating an access token on his profile. It worked the same for me. For doing it, I had to click to Edit my profile>Access tokens>Add new tokens. I take note that the token has an expiration date.

 After the Monday Recitation about Git and Version Control, I think the primary mistake comes from cloning the repository by HTTPS instead of SSH key.
Working from the fablabs and sometimes from home, I might have used the IDE provided on Gitlab to edit code. Doing so, i needed to be careful keeping up my working version to the latest. For that, i precautionausly made a push after working localy for being able to work online. Then I need the command git fetch and git pull to have my complete version to work localy.
I also had an issue with case in the pictures names. Windows add automaticaly a capital when saving a capture with the snipping tool and i couldn’t change just this letter as Windows saving it in capital even if I type it in lowercase. I had to rename the entire image file.
Creating Personal Site
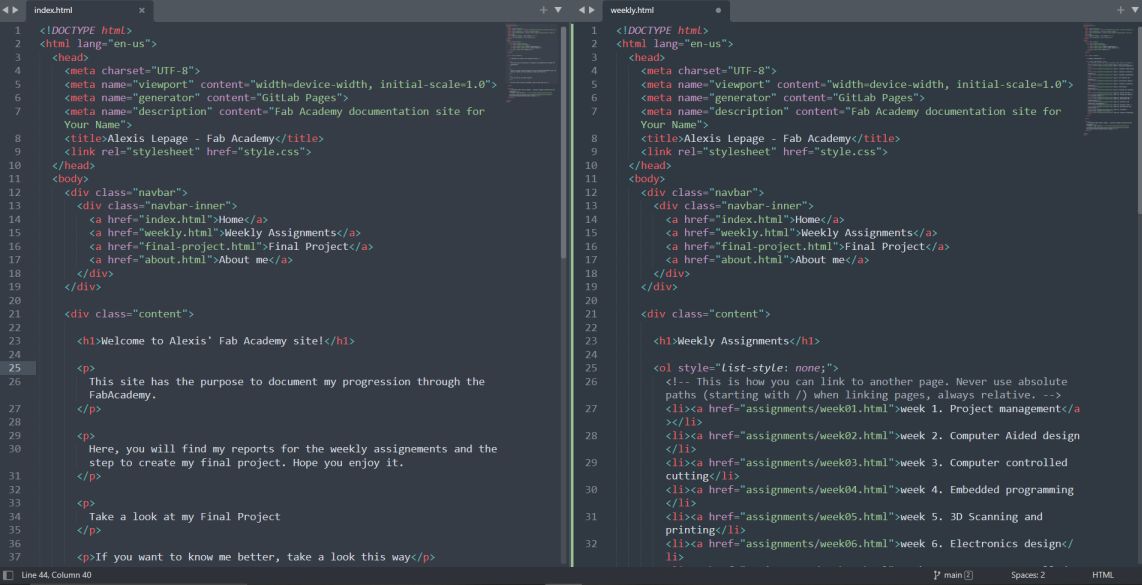
After cloning my Gitlab repository, I added a page for Weekly Assignement, wishing to keep the Main page as a Welcome Page.
Having some theoretical knowledge about html and css, i managed myself editing content directly in the HTML and copy/pasting blocks of code. To facilitate it, I used Sublime text with a 2 columns layout.
Then, I used chatGPT 3.5 to add functionalities and style to my page. First, i wished to make my page more accessible so i ask : could you modify it to add an option to change the font for an accessible one for dyslexia
so it made me code for the html :
<button onclick="toggleDyslexicFont()">Toggle Dyslexic Font</button>

<script>
  function toggleDyslexicFont() {
    document.body.classList.toggle('dyslexic');
 The font needs to be placed in the right folder.
And here is the code,for the CSS stylesheet defining the OpenDyslexic font with the different text format:
@font-face {
  font-family: 'OpenDyslexic';
  src: url('fonts/OpenDyslexic-Regular.otf') format('otf');
}

@font-face {
  font-family: 'OpenDyslexic-Bold';
  src: url('fonts/OpenDyslexic-Bold.otf') format('otf');
}

@font-face {
  font-family: 'OpenDyslexic-BoldItalic';
  src: url('fonts/OpenDyslexic-BoldItalic.otf') format('otf');
}

@font-face {
  font-family: 'OpenDyslexic-Italic';
  src: url('fonts/OpenDyslexic-Italic.otf') format('otf');
}
body.dyslexic {
  font-family: 'OpenDyslexic', sans-serif; /* Dyslexic-friendly font */
As I tried to modify the style of the site using chatGPT, all work done before for accessibility broke. After a few tries to resolve it and spending too much time on it, i decided to report that part for later. So I ask chatGPT to work first on the standard version.
I asked chatGPT for a palette inspired by Ghibli’s Mononoke Hime Movie.
I, then, decided to work on it part by part. Starting from the header. I ask first for round corner for the link boxes and buttons, and capitalizing the navigation text. I also wanted same size boxes but the text overtook it. So i had to choose a fixed size. The header links and button were not really aligned after that.
header with all boxes with the same size but not aligned

I take a few tries to get it right, finally asking to align the boxes vertically with wider boxes. I’m not completely satisfied with it, but i need to progress further on the webpage
I wanted on each week pages a sidebar to improve navigation. I used the code provided in the Gitlab and ask chatGPT to put it in a sidebar. It gives me the code for HTML but it overlapping the header.

I struggled finding a solution. ChatGPT proposed to fix its position, adjusting box-sizing, add container, etc. without success. I finally asking it to work it through the CSS Stylesheet. It continued with the same proposition without more results. I suggested using relative position and it kinda make it better but I still have issue with it, the content going under the footer. Being late on content edition, I decided to defer it.
Before the review, I had a bit of debbugging to do because my header overlapped my content, and my footer was in the middle of it. ChatGPT dodn’t help very well and i figured out myself that i need to choose a fixed position for the header and that i had some tags misplacements. I finally added pages for the next weeks assignements. After the regional review and the instructors observations, i decided to change everything and start a MKDocs page that seems way less time consuming. The first version of the site is still visible this way.
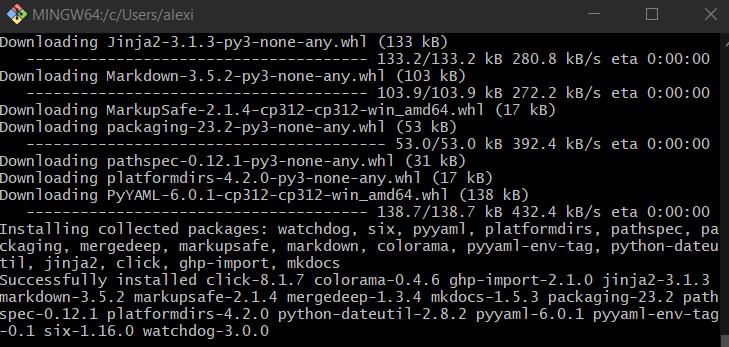
I had some difficulties getting hugo or mkdocs running. I finally opted for Mkdocs using the template provided by Julian and the Mkdocs tutorial.
I also decided to use Visual Studio Code because it provides a terminal useful for running the local site with the mkdocs serve command. This command
I made a mistake pushing the new site on my gitlab as I hadn’t renamed my local branch main instead of master.
The design offers less possibilities (maybe i sould explore more) but i could change the certain colors. I found the palettes here and change it in the mkdocs.yml

Documenting
As suggested during bootcamp and lecture, I tried to document as I go. I started with a Google Docs with text and pictures, planning adding them to my code later. I use the Windows snipping tool to make screenshot. I chose to make a file for each week, anticipating the amount of documents coming. Our local instructor animated a workshop about documentation and I decided to adopt certain tools he used such as IrfanView and Krita. I used Krita to redimension and compress my images and Krita for retouching them (essentially framed details for now). I placed them on my page directly by the html code. 
As for the text, I wrote it directly in the HTML using the right tag :
For paragraphs<p>Your text here</p>
for titles <h1>Your title here</h1> to <h6>Your title here</h6>
for links <a href="url"></a>
for lists
<ul>
        <li>First line of your list</li>
        <li>Second line of your list</li>
    </ul>
for breaking lines <br>
I didn’t really struggle for this part except for the case problem with images i talked about , and for describing the code for which i used this reference.
With my new version of the site running under Mkdocs, it’s really easier and faster to update content.
Exploring Project Ideas
At first I had a few ideas, among which i chose to focus two in particuliar.
Interaction Acceptance Device
This idea came to me thinking about people with autistic syndrom for whom socialization is a big difficulty just like the hability to express their mindset. A lot of them have the will to meet and bond with people but they don’t always have the social skill to do so. At first, I thought on made it appear as a message on a t-shirt to be seen by everyone. A less difficult choice would be on a wearable small screen maybe on a bracer or as badges.
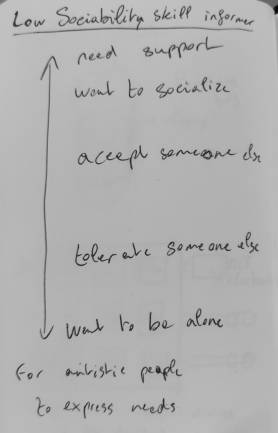
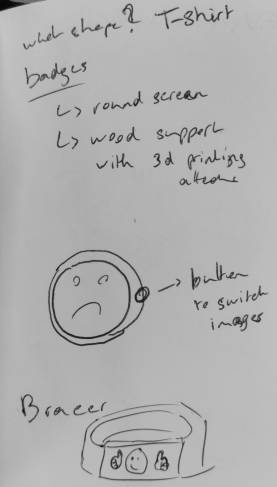
I imagined a fidget as an input device. Fidgets are often used with persons with autism for regulating themselves, through manipulating, massaging or chewing.

The person could use to express its mindset, through a mood gauge and socialbility acceptance. With a potentiometer, they could share their mood from angry, sad, neutral, good, or happy. With a bunch of switches, they could share their level of acceptance of socialization from “I need to be alone” to “I need support”. Designing it made me re-think with a dual-scale “mood/interaction acceptance”

Interactive Punching Mat
For fun training, I imagined it made of fabrics who could pe attached to a punching bag or training dummy. The user should punch or kick the right illuminated input. Electronics on the back randomizes the illuminated input, and recording contact on input. The wiring to the electronics could be embroided for more flexibility and resistance. The type of input needs to be thinking further.

Impressions of the week
Throughout the week, I remembered little by little how to right in html. I wanted to try chatGPT to simplify CSS coding but that was not as facilitating as I thought. ChatGPT propose block of code that sometimes doesn’t match with the rest of the code and when you tell him to carrect its mistakes he often overwrites other blocks of code. If I had to do it again, i think i choose a template that fits my desires and ask small changes to ChatGPT if i couldn’t do it myself. Or maybe I would ask ChatGPT to explain me the code to modify it myself.
Finally, my personnal site is functionnal, but not as smooth as I hoped. It works quite fine on PC but is completely messed up on phone. Concerning Git, I struggled for the first part of the week but i think i finally figured it out with the help of my instructor, co-students and the recitation.
About documentations, I need to develop reflexes of screenshotting more often to illustrate my problems before resolving them. For the project management, i find it difficult to choose one among others not knowing how much I will improve during the FabAcademy. For now, I had chosen the ones that made themselves the biggest places in my mind.