Week 17: Invention, Intellectual property and income
assignment
develop a plan for dissemination of your final project
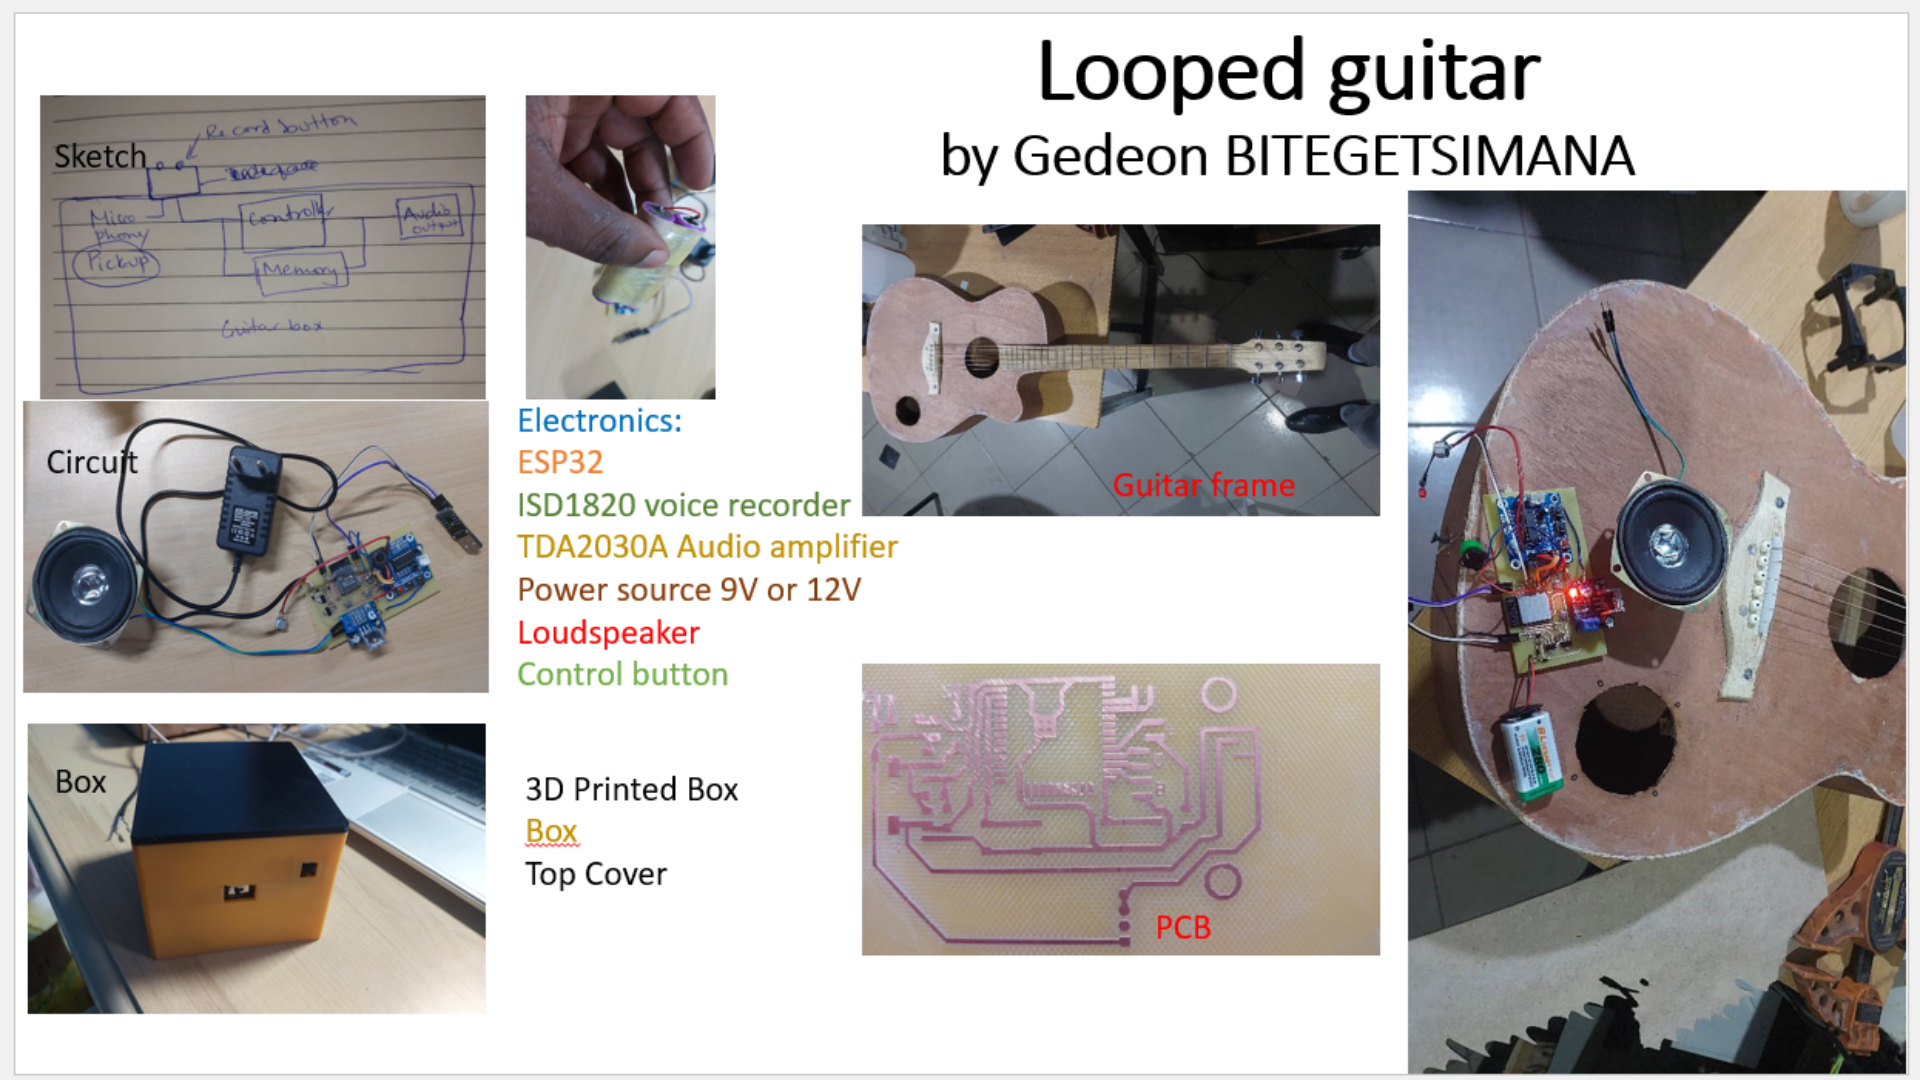
prepare drafts of your summary slide (presentation.png, 1920x1080)
and video clip (presentation.mp4, 1080p HTML5, < ~minute, < ~10 MB)
and put them in your root directory
License i will use for my project
There are various open-source licenses available, each with its own terms and conditions.
For software designs and products
also different ones for Hardware
Definition:
Open hardware licenses are legal tools to promote collaboration and sharing of hardware designs and products.
There are different types of open hardware licenses, such as the TAPR Open Hardware License (TAPR OHL), the CERN Open Hardware License (CERN OHL), and the Open Source Hardware Certification (OSHW).
Some open hardware projects may use a combination of licenses to cover both the hardware and the software aspects
Some of the popular open-source licenses include:
MIT License: This is a permissive license that allows users to use, modify, and distribute the software for any purpose,
as long as the original copyright notice and license are included.
It is a popular choice for small projects as it has a minimalistic approach.
Apache License 2.0: This is a permissive license that allows users to use, modify, and distribute the software for any purpose,
including commercial purposes. It also includes patent protection for contributors, making it a popular choice for large projects with multiple contributors.
GNU General Public License (GPL): This is a copyleft license that requires any derivative work to be licensed under the same license.
This means that any modifications or additions made to the software must also be made available under the GPL.
It is a popular choice for projects that aim to promote the sharing and collaboration of software.
Creative Commons: Creative Commons licenses are used for creative works like images, audio, and video.
It allows creators to share their works with certain conditions such as attribution, non-commercial use, and share-alike.
Since my project was done under fabacademy and from class we learnt that we can even use FAB licence,
I am inclined to adhere to the FAB license.
When choosing a license for your software project, it's important to consider your goals, the type of project, and the level of collaboration you want to encourage.
(c) holder date
This work may be reproduced, modified, distributed, performed, and displayed for any purpose, but must acknowledge "project name".
Copyright is retained and must be preserved. The work is provided as is;
no warranty is provided, and users accept all liability.
REASON:
1. My project is simple and i want people to develop it further (if they can)
2. Since i used open source code, like arduino code ,there is no reason to conseal this again
3. The notice of the original copyright and licence remains important since this work is mine.
Income
I welcome any partnerships to turn this project into a commercial product.
So far, my income generation plan is contingent on partnerships that may come in.
Week's work
Plan for dissemination of my project:
Here is a notepad of the tasks i had at one point during my journey!
1. finish the embedded system part by Monday the 29th of May
2. Buy wood and cut the guitar by Saturday the 3rd June
3. Assembly and testing by sunday the 4th June
4. Make a video for final presentation before the 6th of June
5. Document everything about my final project before the 7th of June.
So far i have started working on the electronics part
I also sent in the request for material from the fablab
These are the shapes i cut on acrylic using a laser cutter to be able to visualize the project.
Thinking about my Summary slides
The day before the presentation date, this is how my project schedule:
things to do
1. Finish PCB Done
2. SOlder components Done
3. Get the control program
4. Load the program in the board
5. Print the box. Both parts Done
6. Cut the guitar to put the working device inside
7. Put the components in
8. Close the guitar and test.
9. Make a video
10. Make a slide
11. Upload to the site.
After a sleepless night and a
 These are the shapes i cut on acrylic using a laser cutter to be able to visualize the project.
Thinking about my Summary slides
The day before the presentation date, this is how my project schedule:
things to do
1. Finish PCB Done
2. SOlder components Done
3. Get the control program
4. Load the program in the board
5. Print the box. Both parts Done
6. Cut the guitar to put the working device inside
7. Put the components in
8. Close the guitar and test.
9. Make a video
10. Make a slide
11. Upload to the site.
After a sleepless night and a
These are the shapes i cut on acrylic using a laser cutter to be able to visualize the project.
Thinking about my Summary slides
The day before the presentation date, this is how my project schedule:
things to do
1. Finish PCB Done
2. SOlder components Done
3. Get the control program
4. Load the program in the board
5. Print the box. Both parts Done
6. Cut the guitar to put the working device inside
7. Put the components in
8. Close the guitar and test.
9. Make a video
10. Make a slide
11. Upload to the site.
After a sleepless night and a
 This is the video for i used in the presentation