Interface & Application Programming
Group assignment:
- Compare as many tool options as possible.
- Document your work on the group work page and reflect on your individual page what you learned.
Individual assignment
- Write an application that interfaces a user with input and/or output device(s) on a board that you made.
Tkinter and pyserial
As I restarted my final project from scratch, I won't have too much time this week to try a lot of APIs. I don't need them for my final project. Even, as a former web developer, it's a topic that interests me a lot and can be really fun.
I already discover Processing in the Input devices' week, so I thought trying something else will be cool. With the help of Marcello and Ahmed, I discovered the Python Library Tkinter.
I'm not a real Python developer, but I know a bit. I used Jupyter to compile the Python code.
Windows with label

So first let's create an instance of Tkinter and add a Label.
Here is the code:
from tkinter import *

root = Tk()

# Creating a Label Widget
myLabel = Label(root, text="Hello World!")

# Showing it onto the screen
myLabel.pack()

root.mainloop()

Then we can play with the grid function and add a Title to the window.
from tkinter import *

root = Tk()
root.title("fab Lab Kamp-lintfort")

# creating a label widget

myLabel1 = Label(root, text="Hello Word1")
myLabel2 = Label(root, text="Hello Word2")

myLabel1.grid(row=0, column=0)
myLabel2.grid(row=1, column=0)

root.mainloop()
Buttons and interaction
Now we can create a Button, and add a function to it. It just shows a label once it has been clicked.
from tkinter import *

root = Tk()
root.title("fab Lab Kamp-lintfort")

def myClick():
    myLabel= Label(root, text="look I clicked")
    myLabel.pack()

# creating a label widget

myButton = Button(root, text="Click me", command=myClick, padx=50, pady=50)

myButton.pack()
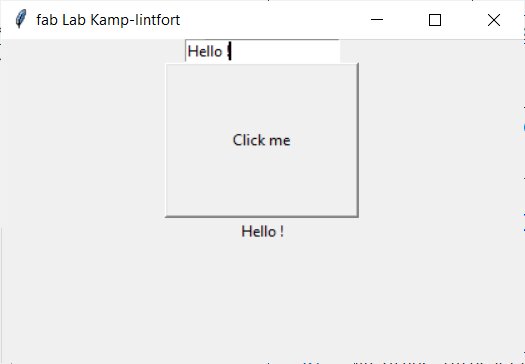
Another interaction can be with input fields.
from tkinter import *

root = Tk()
root.title("fab Lab Kamp-lintfort")

def myClick():
    myLabel= Label(root, text=e.get()) # Get the value of the input and show it
    myLabel.pack()

# creating a label widget

myButton = Button(root, text="Click me", command=myClick, padx=50, pady=50)

# Create an input field

e = Entry(root)
e.pack()

myButton.pack()
root.mainloop()
Canvas

The tkinter library is useful to draw some "structures" in the window with the help of the Canvas class. We can then create rectangles, lines, etc.
from tkinter import *

window = 200 #window size

root = Tk()
myCanvas = Canvas(root, width=2*window, height=window, background='white')
myCanvas.create_rectangle(window, 0, 2*window, window, tags='rest', fill='#b00000')
myCanvas.pack()

root.mainloop()
So now We can make the canvas interactive. When I click on the button, it changes the color of the rectangle.
from tkinter import *

window = 200 #window size

root = Tk()
color_state = 0

# Function that changes the color of the rectangle between red and blue

def myClick():
    global color_state
    if(color_state == 0):
        myCanvas.itemconfig('rect', fill="#b00000")
        color_state = 1
    else:
        myCanvas.itemconfig('rect', fill="#0000b0")
        color_state = 0
    myCanvas.pack

myCanvas = Canvas(root, width=window, height=window, background='white')
myCanvas.create_rectangle(0, 0, window, window, tags='rect', fill='#b00000')
myCanvas.pack()

# creating a Button that call *myClick* function

myButton = Button(root, text="Click me", command=myClick, padx=50, pady=50)

myButton.pack()
root.mainloop()
Read and write on an MCU
It's nice to be able to create a quick and nice interface, but we are at the Fab Academy, so we need to talk to an MCU. I have an XIAO SAMD21 with a built-in LED and a touch sensor. So let's talk to it.
First, I need to initiate a Serial communication. For that, there is the pyserial library. I want to write but also read the serial communication with a loop. But I did some first tries, and the loop had some conflicts with the interface loop of tkinter. So I decided to use a separate thread for the serial.
I create a SerialThread class, that I'll instantiate later. So first I need to create the constructor that will connect to my SAMD21. I ask to ChatGPT for some help here.
import threading
import serial

# Serial port settings
PORT = 'COM10'  # The port of my SAMD21
BAUDRATE = 9600

# A Class for serial communication
class SerialThread(threading.Thread):
    """Thread to read data from the serial port"""

    def __init__(self):
        super().__init__()
        self.running = True
        self.ser = serial.Serial(PORT, BAUDRATE, timeout=1)
        self.ser.bytesize = 8   # Number of data bits = 8
        self.ser.parity  ='N'   # No parity
        self.ser.stopbits = 1   # Number of Stop bits = 1ser.setDTR()
        self.ser.flush
I then added a run function to read and change the color of the canvas (see later), a stop function to close the serial and a sednState function to send the state to the SAMD21.
    def run(self):
        global color_state
        while self.running:
            # Read data from the serial port
            state = self.ser.readline().decode().strip()
            if ((state == '0' or state == '1') and color_state != int(state)):
                color_state = int(state)
                changeColor()
                print(color_state)

    def stop(self):
        self.running = False
        self.ser.close()

    def sendState(self):
        global color_state
        self.ser.write(str(color_state).encode())
I then create a simple canvas with a rectangle that will change color and a button.
from tkinter import *
import time

# Create a tkinter window and some buttons to control the variable state
root = Tk()
color_state = 0
window = 200 #window size

myCanvas = Canvas(root, width=window, height=window, background='white')
myCanvas.create_rectangle(0, 0, window, window, tags='rect', fill='#b00000')
myCanvas.pack()

myButton = Button(root, text="Click me", command=myClick, padx=50, pady=50)

myButton.pack()
I then create 3 functions to sendState, changeColor and myClick (to handle a click).
# Define a function to send the variable state to the Arduino
def sendState():
    serial_com.sendState()

# Define a function to change the color of the canvas
def changeColor():
    global color_state
    if(color_state == 0):
        myCanvas.itemconfig('rect', fill="#b00000")
    else:
        myCanvas.itemconfig('rect', fill="#0000b0")
    myCanvas.pack()

# A function to handle a click
def myClick():
    global color_state
    if (color_state == 0):
        color_state = 1
    else:
        color_state = 0
    changeColor()
    sendState()
    print(color_state)
    time.sleep(0.1)
So I'm almost done. I only need to initialize a serial communication, handle the closing of the windows and launch tkinter.
# Create the serial reader thread and start it
serial_com = SerialThread()
serial_com.start()

def on_closing():
    # Stop the serial reader thread and close the serial port
    serial_com.stop()
    root.destroy()


# Bind the close event to stop the serial reader thread and close the serial port
root.protocol('WM_DELETE_WINDOW', on_closing)

# Start GUI main loop
root.mainloop()
Handle the serial on Arduino IDE
Ok, I have a Python program to write and read on the serial port of the SAMD21. But I need to push some code on the board to handle this communication and push some information too in the serial port.
So here I work with colorState variable of 0 or 1. The idea is to be able to both change the color in the canvas and also to light the built-in LED on the board. Either by clicking on the button in the interface or by touching the touch sensor.
So first I need to include the Bounce library to handle the noise that a touch sensor can have, so I can properly read it. Then I instantiate the colorState, set the pins for the touch button and the built-in LED and start the Serial communication.
#include <Bounce2.h>

const int button_pin = 0;
int colorState = 0; //red serial button
Bounce button_debouncer = Bounce();

void setup()
{
    Serial.begin(9600);
    pinMode(button_pin, INPUT);
    pinMode(LED_BUILTIN, OUTPUT);
    button_debouncer.attach(button_pin);
    button_debouncer.interval(5);
}
Then I create a simple function to toggle the built-in LED state.
void toggleLED() {
    switch(colorState)
    {
      case 1:
        digitalWrite(LED_BUILTIN,HIGH);
        colorState = 0;
        break;
      case 0: //your code
        digitalWrite(LED_BUILTIN,LOW);
        colorState = 1;
        break;
      default:
        digitalWrite(LED_BUILTIN,LOW);
        break;
    }//end of switch()
}
Finally, I can set the loop function to read the serial when the button is clicked and write on the serial when the touch sensor when it's touched.
void loop()
{

    if (Serial.available())
    {
      str state = Serial.read();
      colorState = = state.toInt();
      toggleLED();
    }

    button_debouncer.update();
    if (button_debouncer.rose() == true)
    {
      toggleLED();
      Serial.println(colorState);
    }
}
Here is the result, we can see both the built-in LED turning on and off and the rectangle changing color by clicking or touching the sensor.
I also retry to do the exact same exercise on my board made during Week 8, it's an based on an XIAO ESP32-C3. The only thing that change is that ESP32 doesn't have a built-in LED. But I added an addressable LED on the board, so I just had to change LED_BUILTIN fo D3 in the Arduino code and chose the correct port in the Python programme. And here is a video of the result:
Files
Here are the files of the week: