WEEK14 - Networking and Communications
WEEK FOURTEEN ASSIGNMENT
| Assignments | Completed |
|---|---|
| GROUP | |
| - send a message between two projects | GROUP ASSIGNMENT PAGE |
| INDIVIDUAL | |
| - design, build, and connect wired or wireless node(s) with network or bus addresses | - done |
HERO-SHOTS
GROUP ASSIGNMENT
forthcoming
Spiral 1: I2C Display
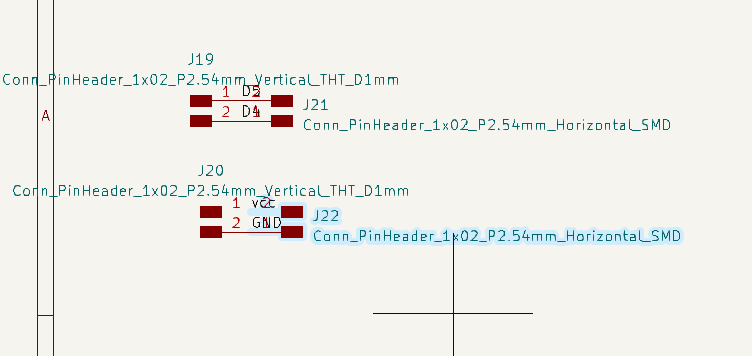
Designing The Connection Board
To fullfil the assignment I just made a very simply connection board between the display and my existing Neko-Min board.
This time I just did a little schematic in KiCAD for myself. But for the sake of speed I 'designed' a board in Illustrator. It really did not require designing. I simply made some through pins to my original board and some holes that i could solder cables to which led to the display board.
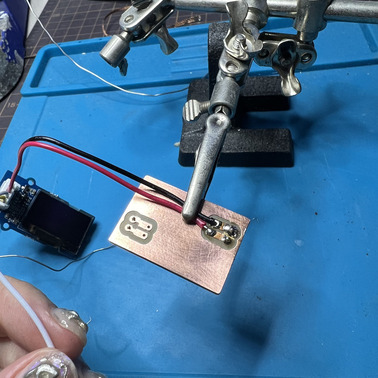
Soldering
Then I soldered this fun thing. Again simple and straight.
coding: Find the I2C address
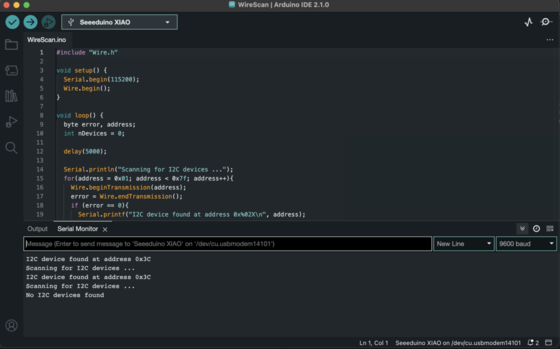
before starting the code, I had to first find the I2C address for the Oled. I did this by using the example code in arduino IDE called "Wire scan"
#include "Wire.h"

void setup() {
  Serial.begin(115200);
  Wire.begin();
}

void loop() {
  byte error, address;
  int nDevices = 0;

  delay(5000);

  Serial.println("Scanning for I2C devices ...");
  for(address = 0x01; address < 0x7f; address++){
    Wire.beginTransmission(address);
    error = Wire.endTransmission();
    if (error == 0){
      Serial.printf("I2C device found at address 0x%02X\n", address);
      nDevices++;
    } else if(error != 2){
      Serial.printf("Error %d at address 0x%02X\n", error, address);
    }
  }
  if (nDevices == 0){
    Serial.println("No I2C devices found");
  }
}
Based on this code I came to the conclusion that my I2C address is 0x3c. This is the address I ended up using in the follow-up code.
coding: connecting the display to the light-sensor
In my spiral 1 development I simply aimed to adapt my existing code from the output/input weeks.
Due to some silliness on my part unfortunately one of my I2C pins is also the pin i used for my speaker output, I didn't have time to completely remake my output board. So for now I simply made a code which output the information from the light transistor to the OLED.
#include <Wire.h>
#include <Adafruit_GFX.h>
#include <Adafruit_SSD1306.h>

#define SCREEN_WIDTH 128 // OLED display width, in pixels
#define SCREEN_HEIGHT 64 // OLED display height, in pixels

// Declaration for an SSD1306 display connected to I2C (SDA, SCL pins)
#define OLED_RESET     -1 // Reset pin # (or -1 if sharing Arduino reset pin)
Adafruit_SSD1306 display(SCREEN_WIDTH, SCREEN_HEIGHT, &Wire, OLED_RESET);

int light_sensor = 8;

int F_value; // LDR sensor final value

void setup() {
  // put your setup code here, to run once:
  Serial.begin(9600); //begin Serial Communication
  pinMode(light_sensor,INPUT);
  display.begin(SSD1306_SWITCHCAPVCC, 0x3C);
  delay(100);
  display.clearDisplay();
  display.setTextColor(WHITE);
}

void loop() {
  // put your main code here, to run repeatedly:

  //int raw_light = analogRead(light_sensor); // read the raw value from light_sensor pin (A3)
  //int light = map(raw_light, 0, 1023, 100, 0); // map the value from 0, 1023 to 0, 100

    //display?
  F_value = readSensor();


  Serial.print("Light level: ");
  Serial.println(F_value); // print the light value in Serial Monitor


  display.clearDisplay();

    // display R G B Values
  display.setTextSize(1);
  display.setCursor(0,0);
  display.print("hello light");


  display.setTextSize(2);
  display.setCursor(0, 28);
  display.print(F_value);


  display.display();
}

int readSensor() {
  int raw_light = analogRead(light_sensor); // read the raw value from light_sensor pin (A3)
  int light = map(raw_light, 0, 1023, 100, 0); // map the value from 0, 1023 to 0, 100
  return light;

}
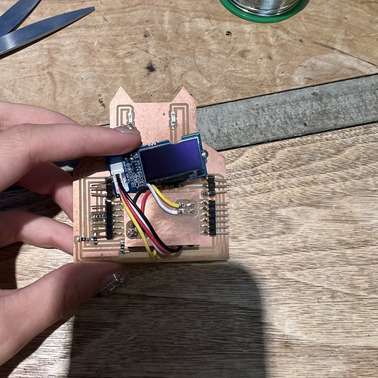
this successfully output the light-transistor information to the screen:

Spiral 2
For spiral two I want to replace the screen to be properly build into the board. Again this board is not really my final project but sort off. It's like a tamagochi musical instrument which I try to complete as the weeks go by, implementing every week.
FP thoughts
I need to start updating my final project page:
What about this week do I need to consider for my FP: it will definitely feature a display, and I also need to figure out how to display a proper interactive menu on the FP project.
READING
As we are moving towards final project week, I'm staring to regret I didn't approach this week with a bit more academic discipline. Considering I'm still a researcher at heart and also considering what I'm trying to develop is a method rather than an object- I decided to maybe start working on a refrence and bibliography/reading list related to the weeks.
So for this week I was intrigued by the reading that Georg had listed in his documentation (: https://fabacademy.org/2021/labs/kamakura/students/georg-tremmel/weekly/w14/).. so I want to read into it a little bit.
Watzlawick, Paul. Pragmatics of Human Communication. A Study of Interactional Patterns, Pathologies, and Paradoxes. W. W. Norton & Company, New York 1967