9. Embedded programming
Objectives :
Group assignment :
- Compare the performance and development workflows for other architectures
Individual assignment :
- Compare the performance and development workflows for other architectures
- Compare the performance and development workflows for other architectures
- Extra credit: try other programming languages and development environments
Group assignment
Link to ULB Group : link
For keeping things simple, we decided to compare the speed of GPIO change with:
- Arduino
digitalWrite() - Port manipulation
This way, we can estimate the overhead of using the Arduino abstraction layer. To measure pulses with high accuracy, we hook up our oscilloscope on Quentin’s bezier board:
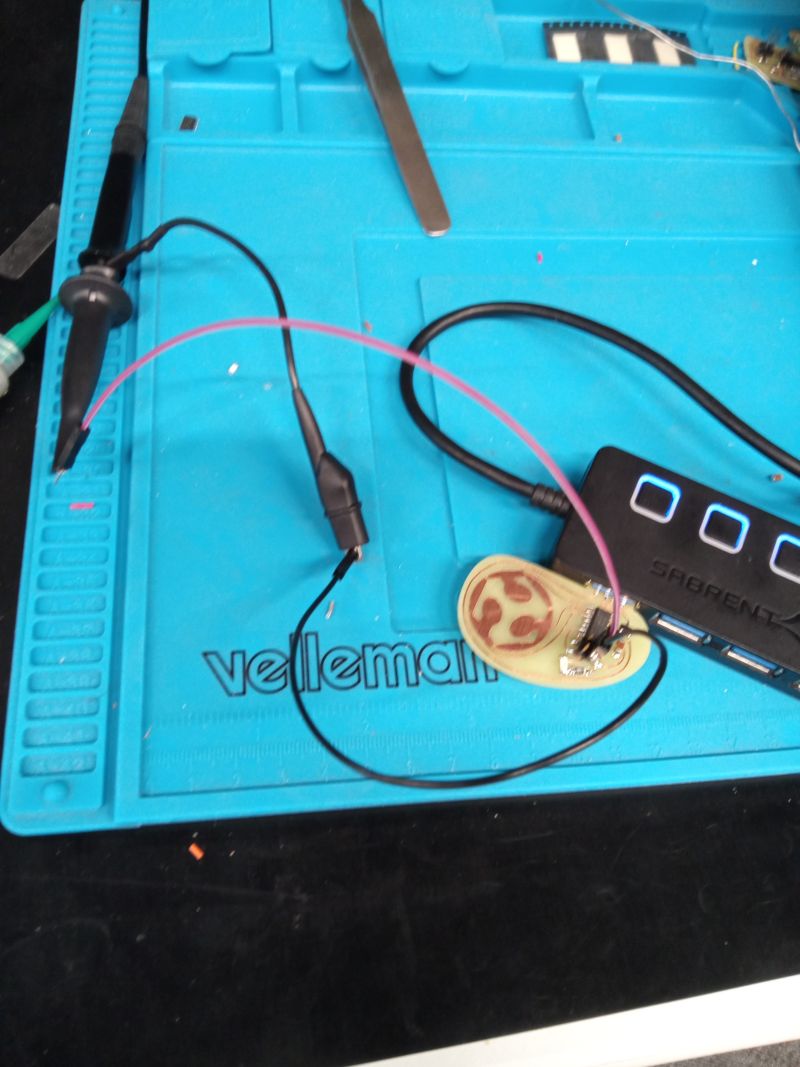
Using the SWDIO pin as an output is safe. The ground next to it is connected to the ground of the oscilloscope. To measure the efficiency of digitalWrite(), we simply call it twice in a row:
#define PIN_OUT 31
void setup() {
pinMode(PIN_OUT, OUTPUT);<iframe src="https://player.vimeo.com/video/691352003?h=214c317edd&badge=0&autopause=0&player_id=0&app_id=58479" width="700" height="394" frameborder="0" allow="autoplay; fullscreen; picture-in-picture" allowfullscreen title="minijoystick1"></iframe>
}
void loop() {
digitalWrite(PIN_OUT, HIGH);
digitalWrite(PIN_OUT, LOW);
delay(500);
}
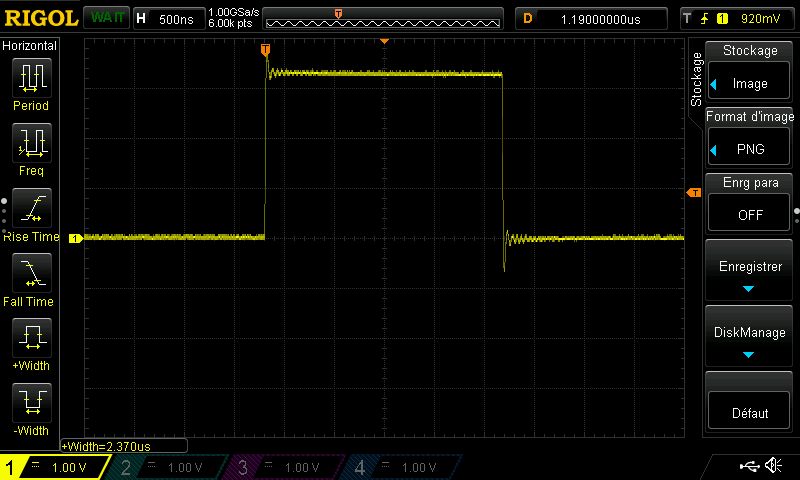
This results in a pulse of 2.37 µs:
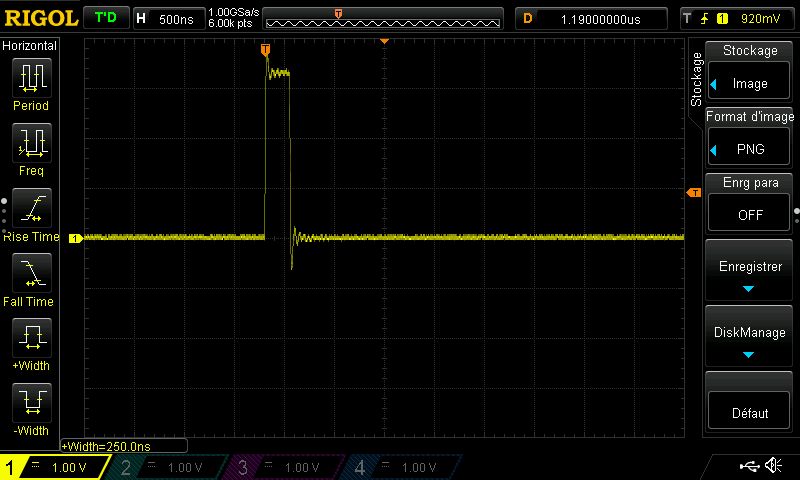
Next, we toggle the pin with direct port manipulation. This should result in a pulse in the ballpark of the clock of the SAMD11, i.e. 48 MHz -> 0.021 µs. Here is a modified code that uses either port manipulation or digitalWrite(), depending on a define:
#define USE_PORT

#define PORTA_OUT PORT->Group[PORTA].OUT

#define SET_HIGH(pin) PORTA_OUT.reg |= (1 << pin)
#define SET_LOW(pin) PORTA_OUT.reg &= ~(1 << pin)

#define PIN_OUT 31

void setup() {
  pinMode(PIN_OUT, OUTPUT);
}

void loop() {
  #ifdef USE_PORT
  SET_HIGH(PIN_OUT);
  SET_LOW(PIN_OUT);
  #else
  digitalWrite(PIN_OUT, HIGH);
  digitalWrite(PIN_OUT, LOW);
  #endif
  delay(500);
}
This results in a pulse of 0.25 µs, showing that it takes roughly 10 cycles to read+write the port register:
Individual assignment
Read the data sheet for your microcontroller
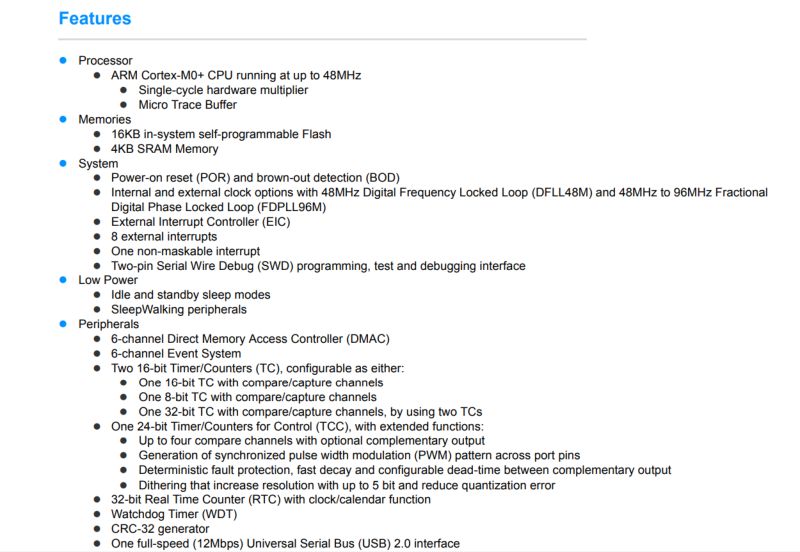
For the reading of a datasheet, I took the one of the microcontroller used for my minijoystick, the SAMD11 (https://ww1.microchip.com/downloads/en/DeviceDoc/Atmel-42363-SAM-D11_Datasheet.pdf )
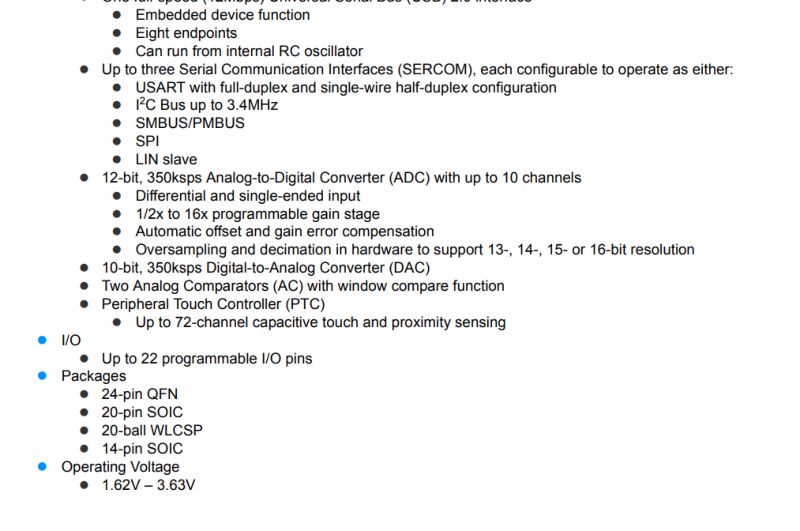
Here are some interesting facts.
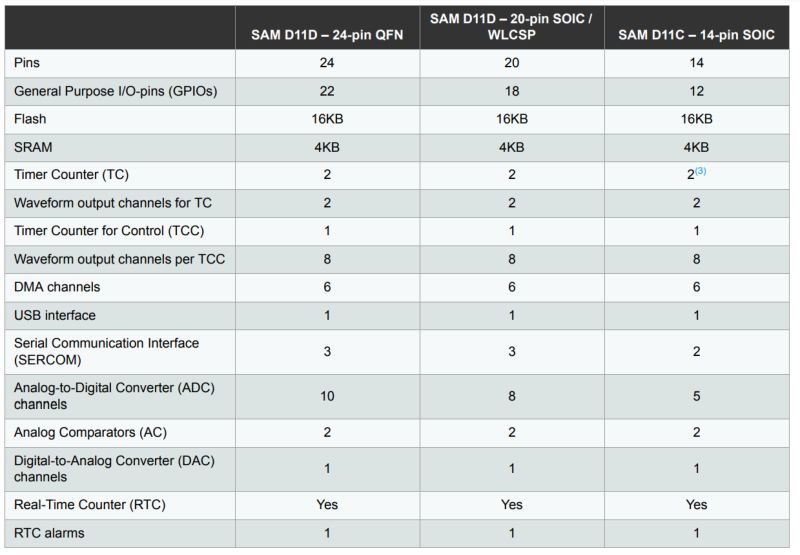
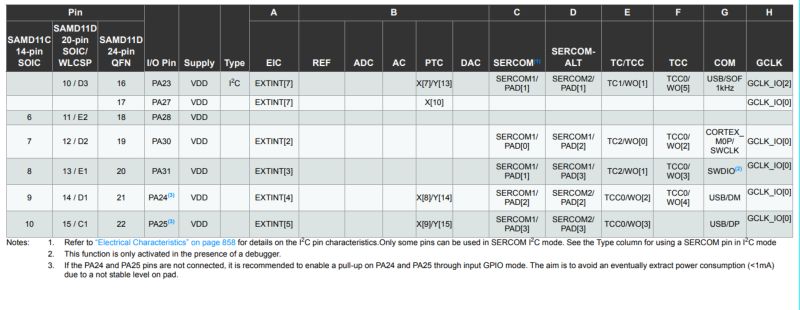
In this table, we have the number of pins used but also the amount of usable memory depending on the model used
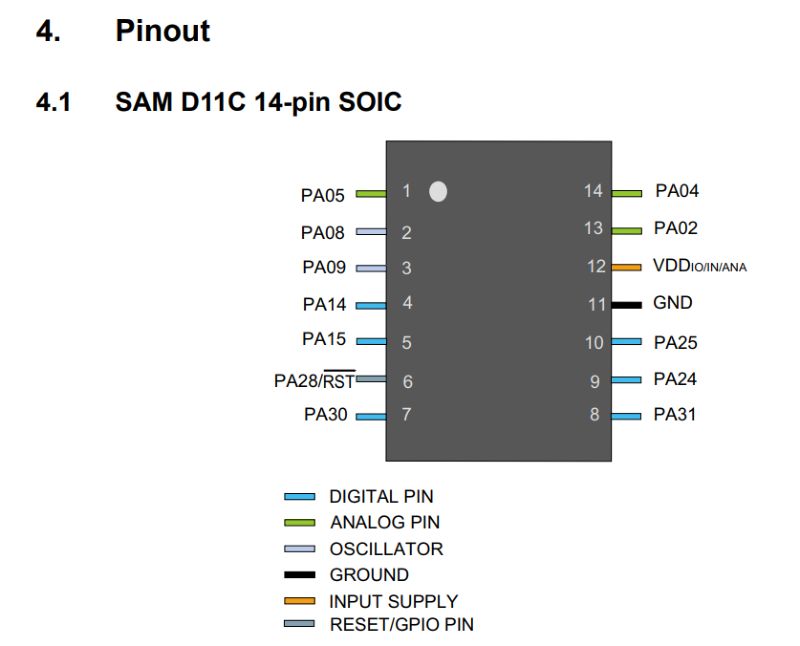
The PinOut is important, it will help us to create our PCB to know where the different connections go. It is also very useful for the code that will be operational.
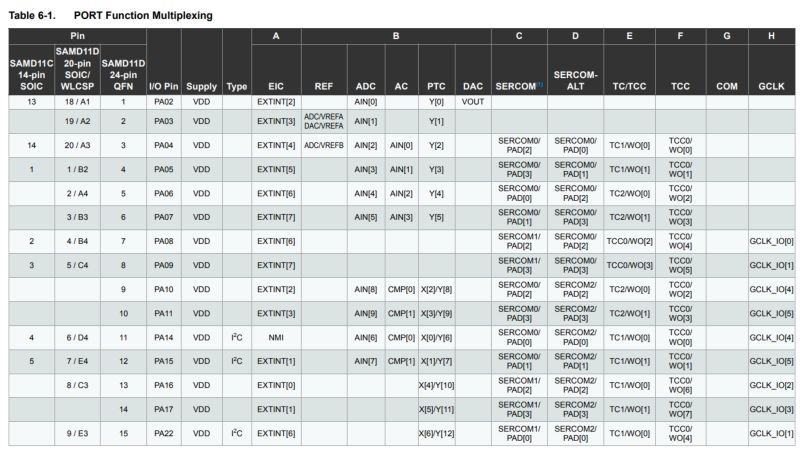
In the table below, you can see the different possible functions of each pin
Programming the circuit
For my individual work, I continue to work on my final project. This involves programming my joystick to be recognised as a keyboard with up, down, left, right and SPACE keys so that I can play games directly. An LED will also light up each time a key is pressed.
The SAMD11 has native USB support. It can act as any class of USB device (keyboard, mouse). You need to enable HID in Arduino IDE . You must also add the Keyboard.h library

To add the library, type at the beginning of the code
#include "Keyboard.h"
We define the location of the elements connected to the sam11
#define PIN_LED 15
#define PIN_BTN_1 5
#define PIN_BTN_2 8
#define PIN_BTN_3 14
#define PIN_BTN_4 4
#define PIN_BTN_5 31

#define N_BTN 5
We create tables of values to have the positions of the buttons and also their “function”.
int pin_btns[] = {PIN_BTN_1, PIN_BTN_2, PIN_BTN_3, PIN_BTN_4, PIN_BTN_5}; byte key_btns[] = {KEY_UP_ARROW,KEY_LEFT_ARROW,KEY_DOWN_ARROW,KEY_RIGHT_ARROW,’ ‘};
To get the right values for the functions, the page https://www.arduino.cc/reference/en/language/functions/usb/keyboard/keyboardmodifiers/ is very useful. Here is some of the content that is useful for us:
| KEY | HEXADECIMAL VALUE | DECIMAL VALUE |
|---|---|---|
| KEY_UP_ARROW | 0xDA | 218 |
| KEY_DOWN_ARROW | 0xD9 | 217 |
| KEY_LEFT_ARROW | 0xD8 | 216 |
| KEY_RIGHT_ARROW | 0xD7 | 215 |
For space touch, juste assigne ’ ’ .
We also define two values that will be used for comparison: state_btns and sate_btns_new
    int state_btns[] = {false,false,false,false,false};
    int state_btns_new[] = {false,false,false,false,false};
We enter the void setup
void setup() {
  // put your setup code here, to run once:
  pinMode(PIN_LED, OUTPUT);

  for (int i=0; i < N_BTN; i++) {
    pinMode(pin_btns[i], INPUT_PULLUP);
  }
  Keyboard.begin();
  SerialUSB.begin(0);

}
here is the void loop
We declare a variable val (int) and a boolean variable state, and finally a variabHere is the complete code with commentsle led (in position false) which will light up when we press a button
void loop() {
    // put your main code here, to run repeatedly:
  int val;
  bool state;
  bool led=false;
  for (int i = 0; i < N_BTN; i++) {
    val = digitalRead(pin_btns[i]);
    state_btns_new[i] = !val;
  }
we will test the button to find its number and then say that it is on and turn on the LED
  for (int i = 0; i < N_BTN; i++) {
    if (state_btns_new[i] && !state_btns[i]){
        Keyboard.press(key_btns[i]);
    }
    if (!state_btns_new[i] && state_btns[i]){
      Keyboard.release(key_btns[i]);
    }

    led |= state_btns_new[i]; //if true LED ON else OFF

    state_btns[i] = state_btns_new[i];
    /*if (val){
      state_ bt ns[i]=false;
    }
    else {
      state_btns[i]=true;
    }*/
  }
  digitalWrite(PIN_LED, led);
  delay(1);
Here is the finished but uncommented code.
#include "Keyboard.h"

#define PIN_LED 15
#define PIN_BTN_1 5
#define PIN_BTN_2 8
#define PIN_BTN_3 14
#define PIN_BTN_4 4
#define PIN_BTN_5 31

#define N_BTN 5


int pin_btns[] = {PIN_BTN_1, PIN_BTN_2, PIN_BTN_3, PIN_BTN_4, PIN_BTN_5};
byte key_btns[] = {KEY_UP_ARROW,KEY_LEFT_ARROW,KEY_DOWN_ARROW,KEY_RIGHT_ARROW,' '};
int state_btns[] = {false,false,false,false,false};
int state_btns_new[] = {false,false,false,false,false};

void setup() {
  // put your setup code here, to run once:
  pinMode(PIN_LED, OUTPUT);

  for (int i=0; i < N_BTN; i++) {
    pinMode(pin_btns[i], INPUT_PULLUP);
  }
  Keyboard.begin();
  SerialUSB.begin(0);

}

void loop() {
    // put your main code here, to run repeatedly:
  int val;
  bool state;
  bool led=false;
  for (int i = 0; i < N_BTN; i++) {
    val = digitalRead(pin_btns[i]);
    state_btns_new[i] = !val;
  }

  for (int i = 0; i < N_BTN; i++) {
    if (state_btns_new[i] && !state_btns[i]){
        Keyboard.press(key_btns[i]);
    }
    if (!state_btns_new[i] && state_btns[i]){
      Keyboard.release(key_btns[i]);
    }

    led |= state_btns_new[i]; //if true LED ON else OFF

    state_btns[i] = state_btns_new[i];
    /*if (val){
      state_ bt ns[i]=false;
    }
    else {
      state_btns[i]=true;
    }*/
  }
  digitalWrite(PIN_LED, led);
  delay(1);


}
Here is the complete code with comments
#include "Keyboard.h" // library Keyboard.h

#define PIN_LED 15 //Declare LED on pin 15
#define PIN_BTN_1 5 //Declare BTN UP on pin 5
#define PIN_BTN_2 8 //Declare BTN LEFT on pin 8
#define PIN_BTN_3 14 // Declare BTN DOWN on pin 14
#define PIN_BTN_4 4 // Declare BTN RIGHT on pin 4
#define PIN_BTN_5 31 // Declare BTN SPACEBAR on pin 31

#define N_BTN 5 // Declare Num BTN


int pin_btns[] = {PIN_BTN_1, PIN_BTN_2, PIN_BTN_3,  PIN_BTN_4, PIN_BTN_5}; //ARRAY OF PIN_BTN
byte key_btns[] = {KEY_UP_ARROW,KEY_LEFT_ARROW,KEY_DOWN_ARROW,KEY_RIGHT_ARROW,' '}; //declare function of buttons
int state_btns[] = {false,false,false,false,false}; //Button status creation in the down position
int state_btns_new[] = {false,false,false,false,false}; //Creation of a 2nd state of the buttons in the down position for comparison

void setup() {
  pinMode(PIN_LED, OUTPUT);

  for (int i=0; i < N_BTN; i++) {
      pinMode(pin_btns[i], INPUT_PULLUP);
     }
    Keyboard.begin();
    SerialUSB.begin(0);

}

void loop() {
 int val; //Creation of a "val" to insert the number of the activated button
 bool state; //Creation of "state" with boolean type 0/1
bool led=false; //Creation of a boolean value to set the led to false
for (int i = 0; i < N_BTN; i++) {
    val = digitalRead(pin_btns[i]); //In 'val' we will put read the position of the engaged button
state_btns_new[i] = !val;The inverse of 'val' is assigned in 'state_btns_new'.
     }

     for (int i = 0; i < N_BTN; i++) {
       if (state_btns_new[i] && !state_btns[i]){
           Keyboard.press(key_btns[i]);
       }
       if (!state_btns_new[i] && state_btns[i]){
         Keyboard.release(key_btns[i]);
       }

       led |= state_btns_new[i]; //if true LED ON else OFF

       state_btns[i] = state_btns_new[i];
     }
     digitalWrite(PIN_LED, led);
     delay(1);
}
Download
Videos Results
The operators
It is important to understand the operators in a language such as C . Here are some presentations with examples
Arithmetic operators
Suppose that variable A is 10 and variable B is 20.
| Operator’s name | Operator | Description | Example |
|---|---|---|---|
| Assignment | = | The value to the left of the equal is assigned to the value to the right of the equal. Here the value B takes the value A. | A = B |
| Addition | + | Add the two operands. | A + B gives 30 |
| Subtraction | - | Subtract the second operand from the first. | A - B gives -10 |
| Multiplication | * | Multiply the two operands. | A * B gives 200 |
| Division | / | Divide the numerator by the denominator. | B / A gives 2 |
Comparison of operators
Suppose that variable A is 10 and variable B is 20.
| Operator’s name | Operator | Description | Example |
|---|---|---|---|
| Equal | == | Checks whether the value of the two operands is equal or not, if yes then the condition becomes true. | (A == B) this is not true |
| Not equal | != | Checks whether the value of the two operands is equal or not, if the values are not equal then it becomes true. | (A != B) is true |
| Less than | < | Checks if the value of the left operand is less than the right one, if yes then the condition becomes true. | (A < B) is true |
| Greater than | > | Checks if the value of the left operand is greater than the right operand, if so then the condition becomes true. | (A > B) is not true |
| Less than or equal | <= | Checks if the value of the left operand is less than or equal to the right operand, if so then the condition becomes true. | (A <= B) is true |
| Greater than or equal to | >= | Checks that the value of the operand on the left is greater than or equal to that on the right, if so then the condition becomes true. | (A >= B) this is not true |
Boolean operators
Suppose that variable A is 10 and variable B is 20.
| Operator’s name | Operator | Description | Example |
|---|---|---|---|
| AND | && | Called logical AND operator or logical AND gate. If both operands are not zero then the condition becomes true. Otherwise, the condition is false. | (A && B) is true |
| OR | || | Called logical OR operator or logical OR gate. If both operands are not zero then the condition becomes true. | (A || B) is true |
| NO | ! | Called the logical NOT operator or logical NOT gate. Allows you to invert the logical state of an operand. If the condition of the operand is true then the logical NOT operator placed in front of it will invert the result: it will be false. | !(A && B) it is false |
Binary operators
Assume that variable A is 60 and variable B is 13.
| Operator’s name | Operator | Description | Example |
|---|---|---|---|
| AND | & | The binary AND operator performs a bitwise logical AND action on the value of the two operands. | (A & B) gives 12 which is 0000 1100 |
| NOT | ~ | The binary operator NOT performs a bitwise logical NOT action on the value of an operand. This has the effect of reversing the value bit by bit. | (~A ) gives -60 which is 1100 0011 |
| Shift left | << | This has the effect of shifting the bits to the left by the number of positions indicated. | 11 << 2 becomes 1100. A << 2 gives 240 which is 1111 0000 |
| Shift right | >> | This has the effect of shifting the bits to the left by the number of positions indicated. | 1100 >> 2 becomes 11. A >> 2 becomes 15 which is 0000 1111 |
Operator combinations
Suppose that variable A is 10 and variable B is 20.
| Operator’s name | Operator | Description | Example |
|---|---|---|---|
| Increment | ++ | Increase a value by 1. | A++ gives 11 |
| Decrement | - | Decrease a value by 1. | A- gives 9 |
| Compound addition | += | Allows you to increment a value by another desired value while storing the result in the first operand. | B += A equals B = B+ A |