19. Project development
Task: Final project requirements
Congratulations, you have reached the point of working on your Final Project. This is your opportunity to demonstrate synthesis of skills you developed in the previous weeks.
Document a final project masterpiece that integrates the range of units covered, answering:
- What does it do?
- Who’s done what beforehand?
- What did you design?
- What materials and components were used?
- Where did they come from?
- How much did they cost?
- What parts and systems were made?
- What processes were used?
- What questions were answered?
- What worked? What didn’t?
- How was it evaluated?
- What are the implications?
Prepare a summary slide and a one minute video showing its conception, construction, and operation. Your project should incorporate 2D and 3D design, additive and subtractive fabrication processes, electronics design and production, embedded microcontroller interfacing and programming, system integration and packaging.
Where possible, you should make rather than buy the parts of your project. Projects can be separate or joint, but need to show individual mastery of the skills, and be independently operable. Present your final project, weekly and group assignments, and documentation.
What does it do?
It is an automatic spice dispensing machine. We can add a number of different spices. and when the user chooses a spice and amount using a mobile phone, the machine will dispense the amount.
Who has done what beforehand?
I studied some previous spice dispensing machines.
The TasteTro Spice System
It is a rotating machine in which we can add a number of spices. We can choose different spices and their amount with the help of a touchscreen or with a mobile phone.
Richard Gurberg’s Automated Spice Dispenser
It is a boxy look automatic spice dispenser. We can select spices and their amounts, then the machine will dispense the spices.
My plan
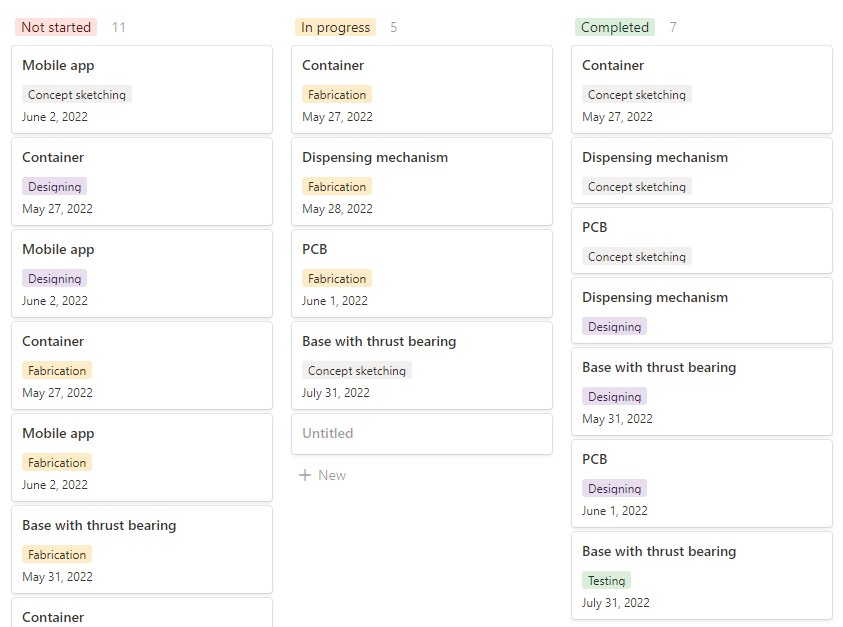
Make a automatic spice dispenser with a good mechanism included. I had a lot of tasks to complete. I made a Kanban board in My notion page for final project.
I added 3 columns in Kanban board
- Not started
- In progress
- Completed
Then I categorized my tasks into 5.
- Dispensing mechanism
- Base with thrust bearing
- Container
- PCB
- Mobile application
In the category section I added,
- Concept sketching
- Design
- Fabrication
- Testing
What I designed?
I have a number of design tasks for my project. Because it include different mechanism. In the first time I was very confused. But I could solve each problems. Each parts and mechanism of the device is given below.
I used Fusion 360 for designing
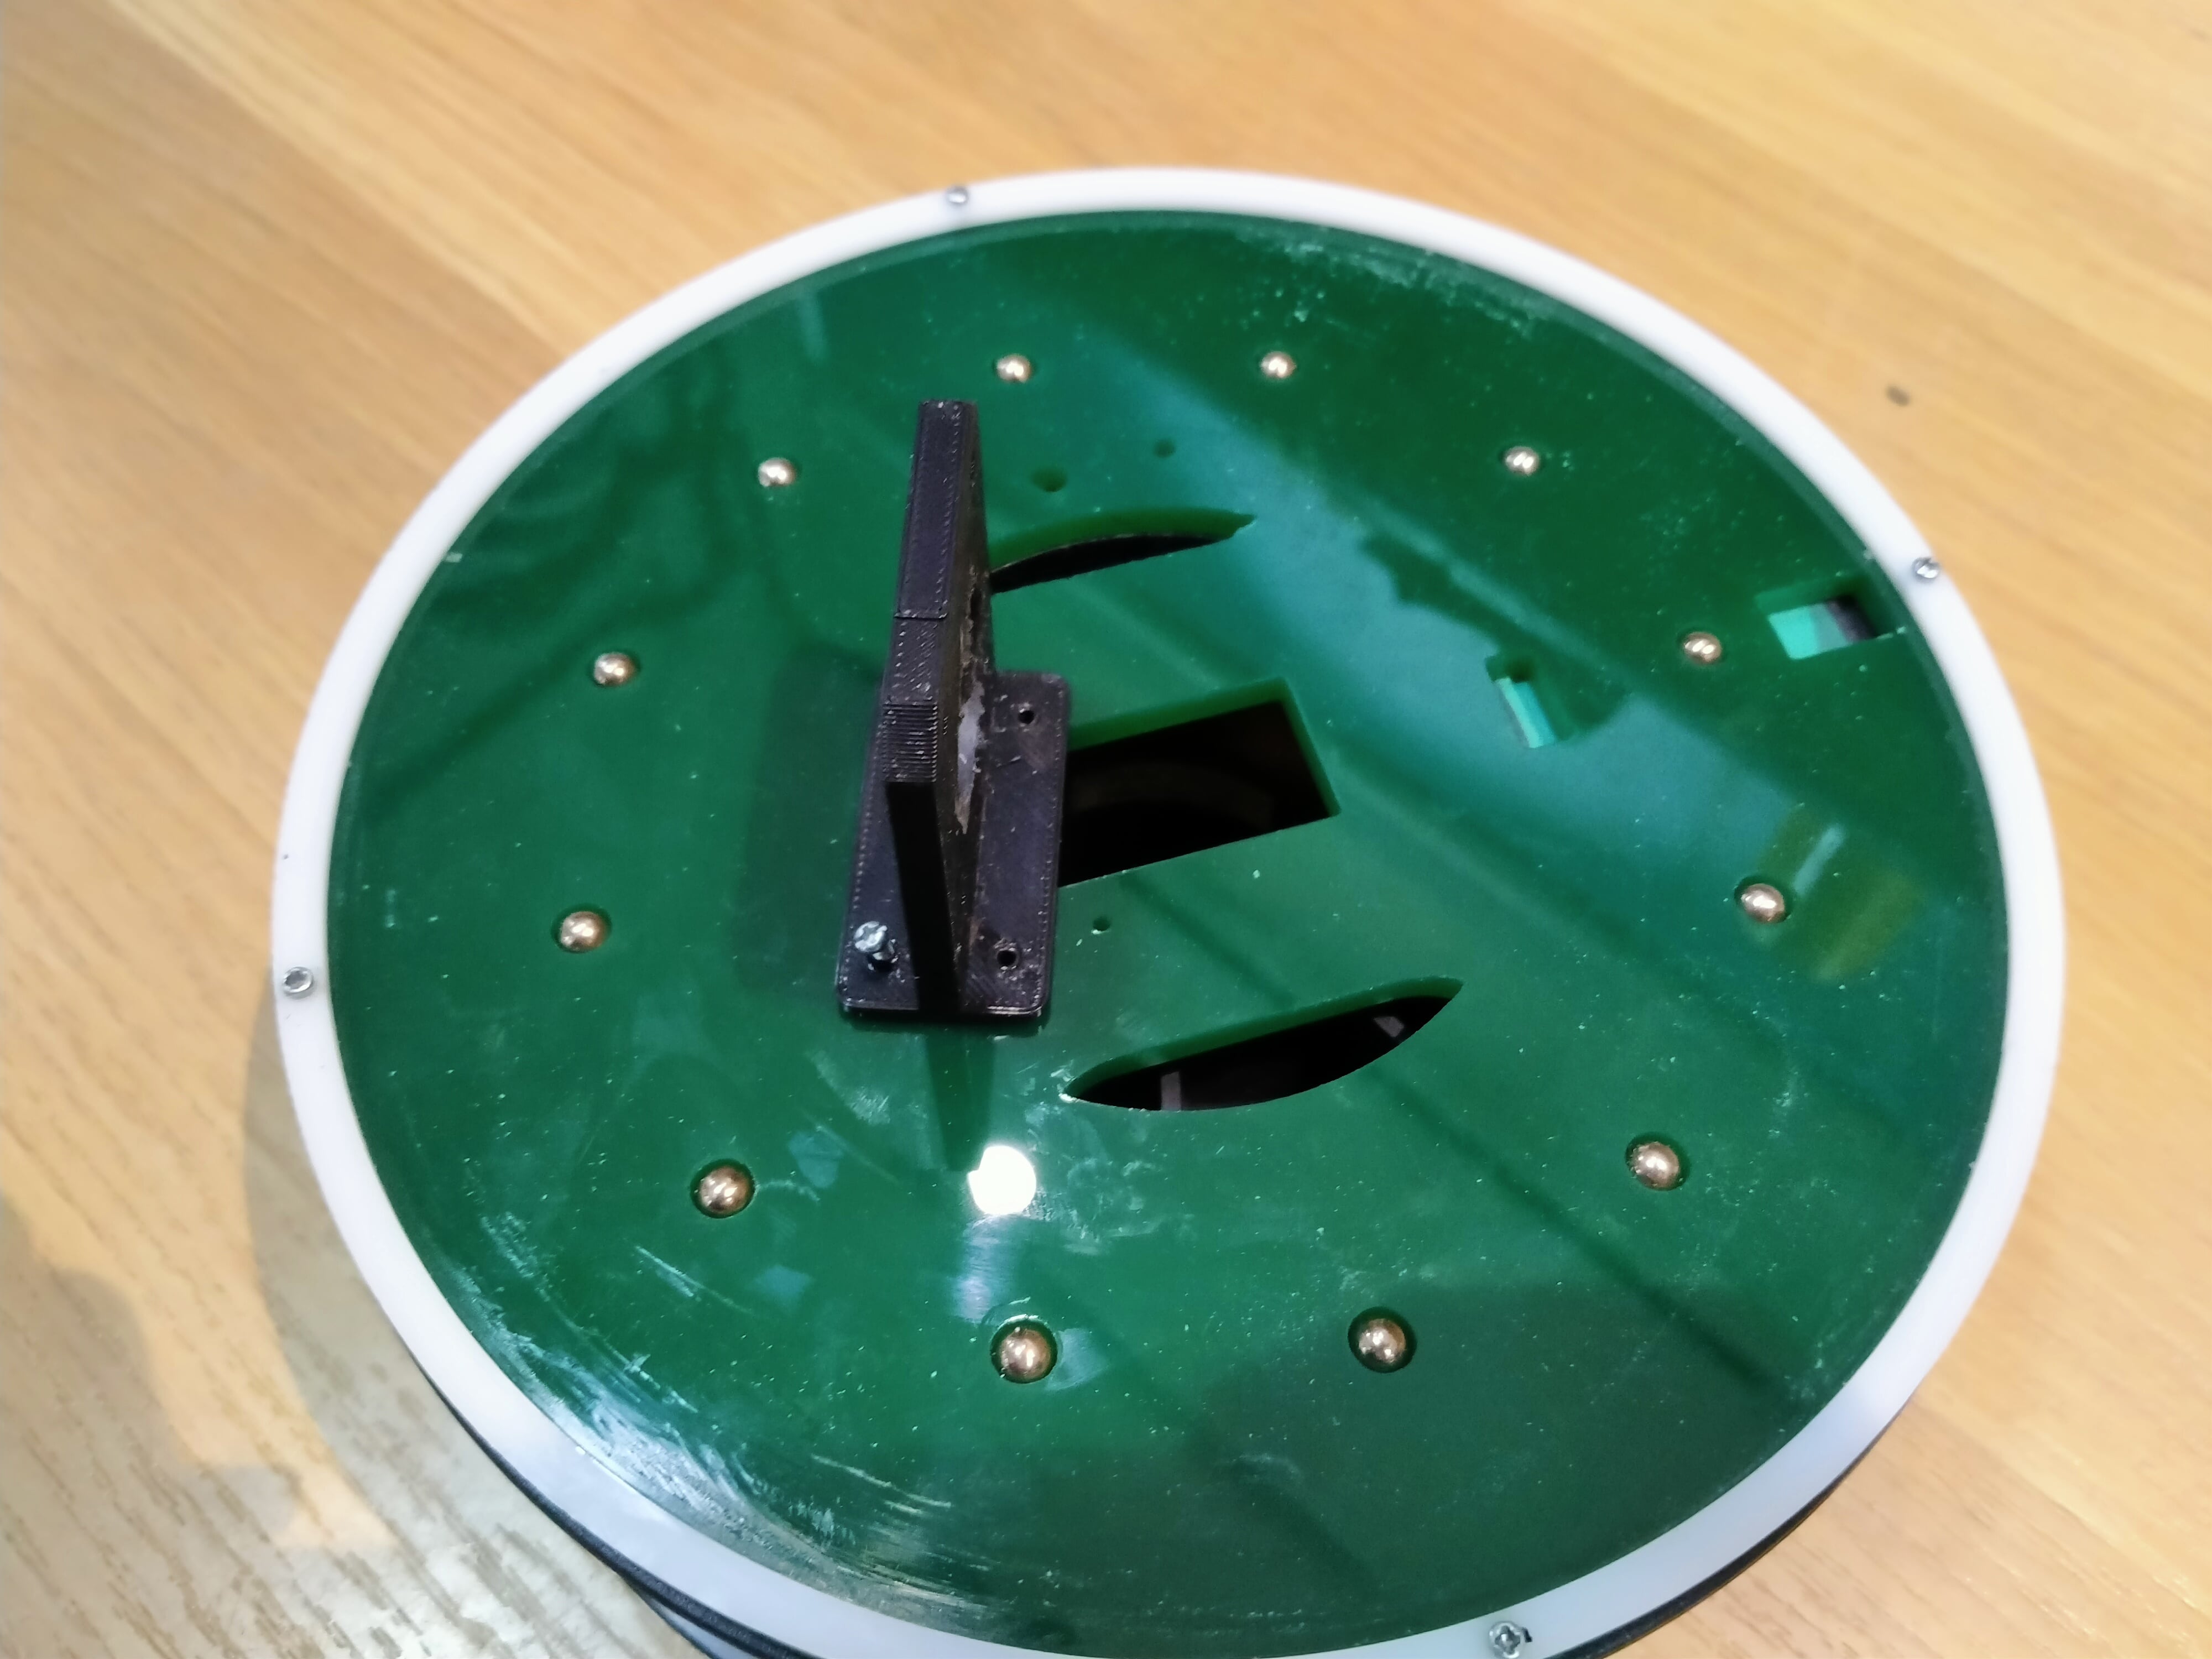
Base of the device
My plan was to make a base frame with plywood or acrylic sheet. In that time I noticed the old 3d printing filament reels. So I decided to use filament reel as base.
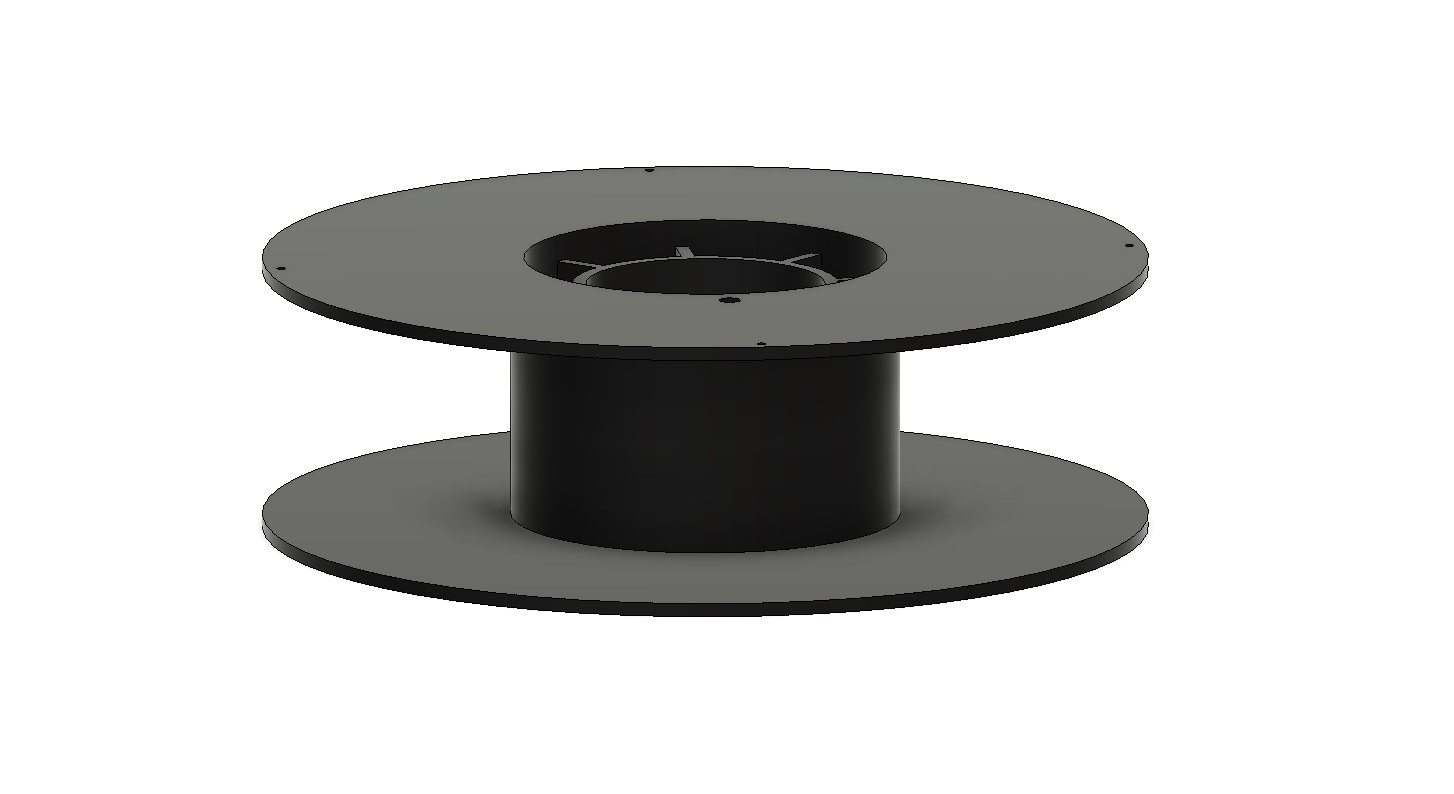
Because,
- It have enough strength.
- Size is correct for a spice dispenser.
- It have space for placing circuit board.
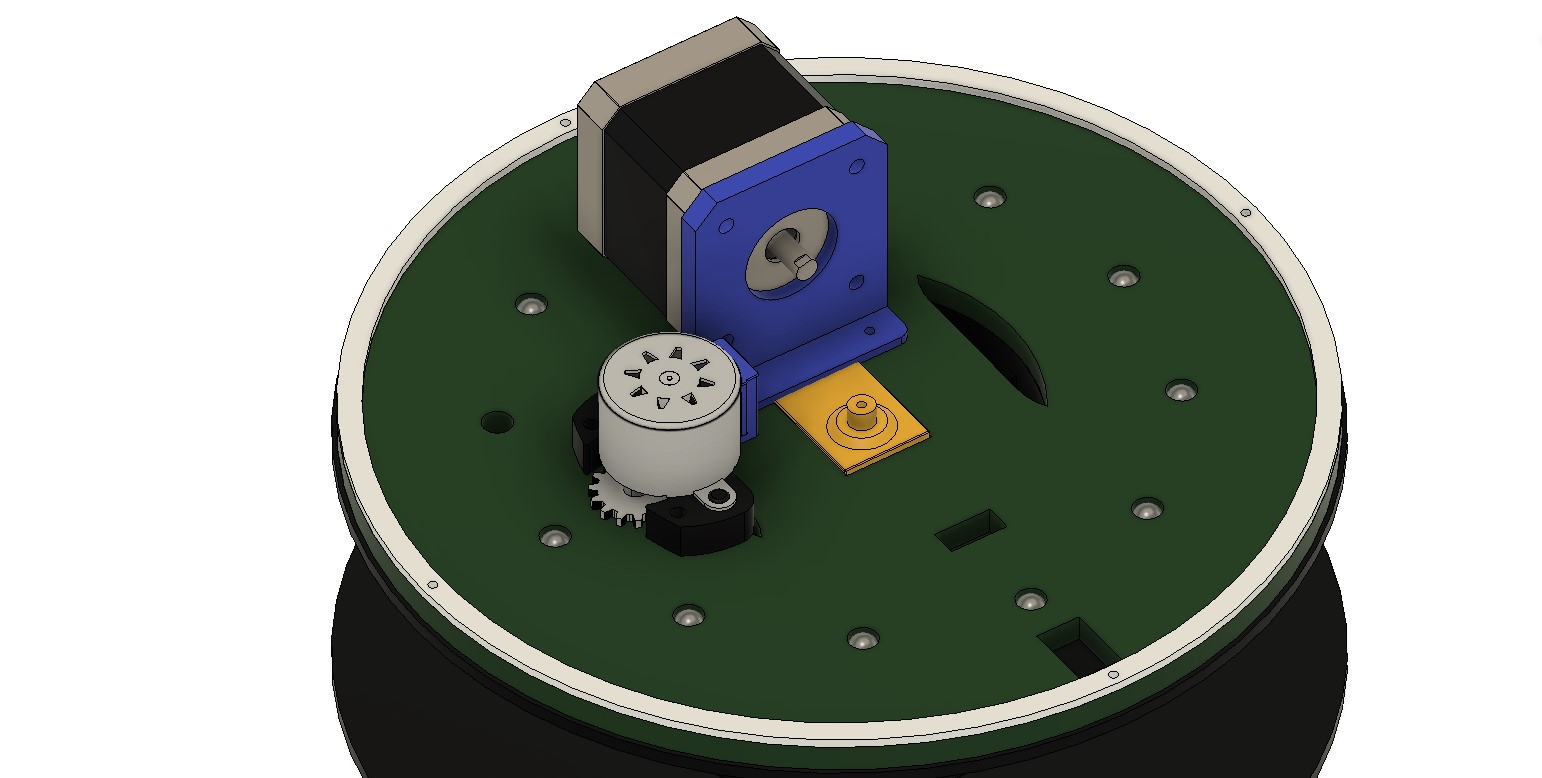
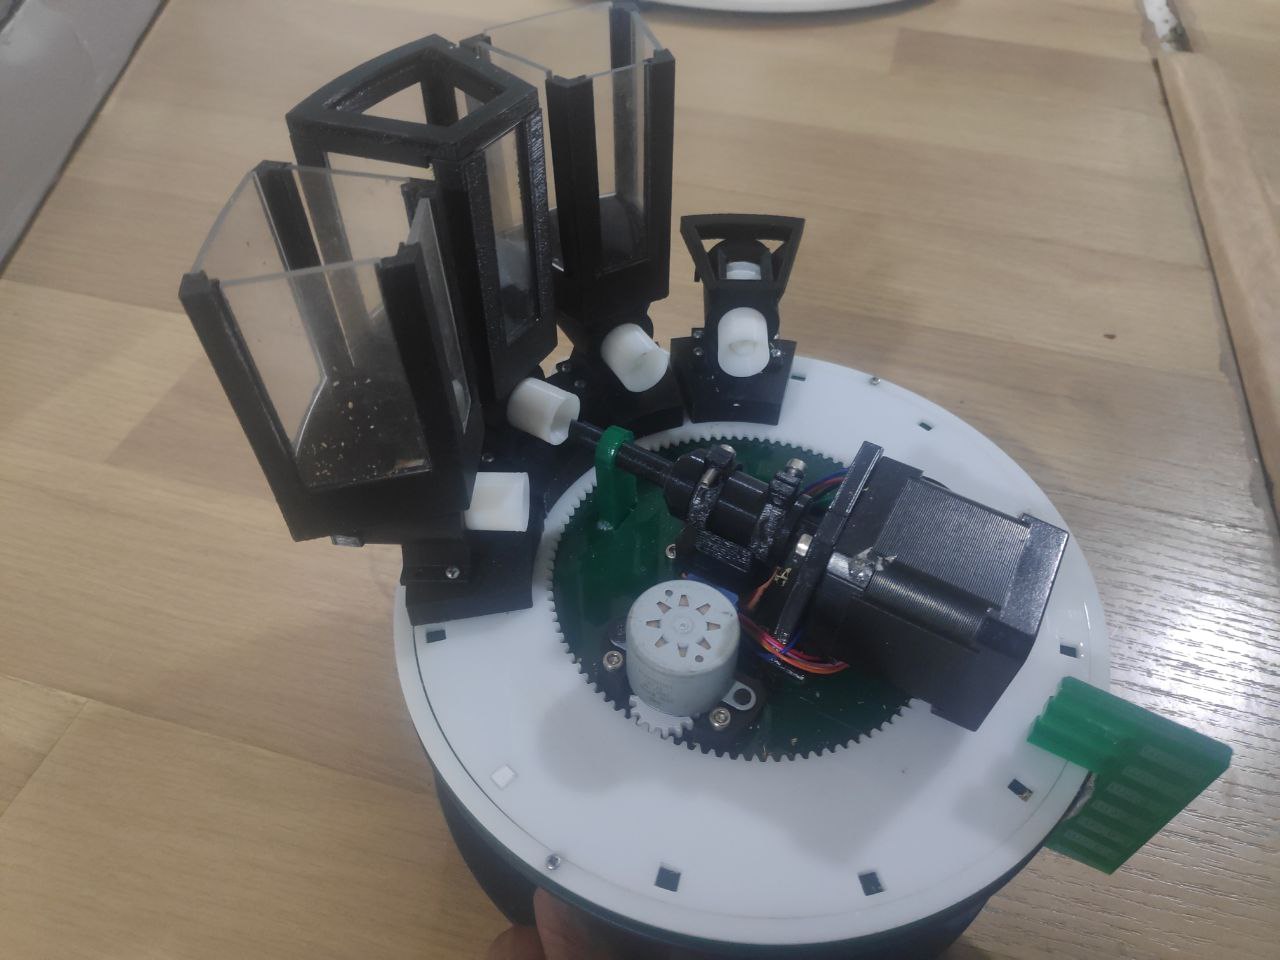
Container selecting mechanism
A number of spice containers will distributed in the device. My plan is to include 12 containers. All of the containers will fix on a disc plate. Inner edge of the disc plate will transformed into an inner gear. and it will rotate with the help of a stepper motor(I will use 28byj-48 stepper motor).
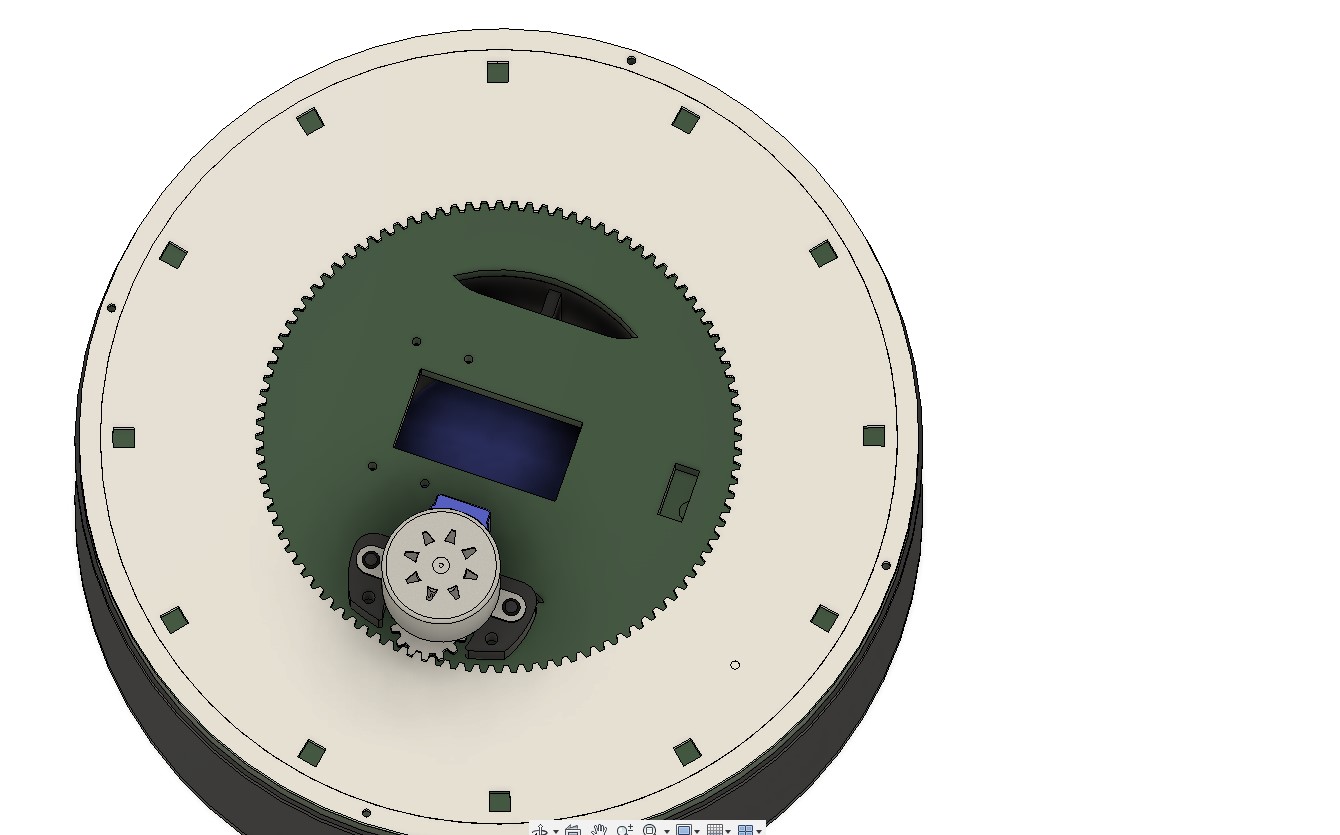
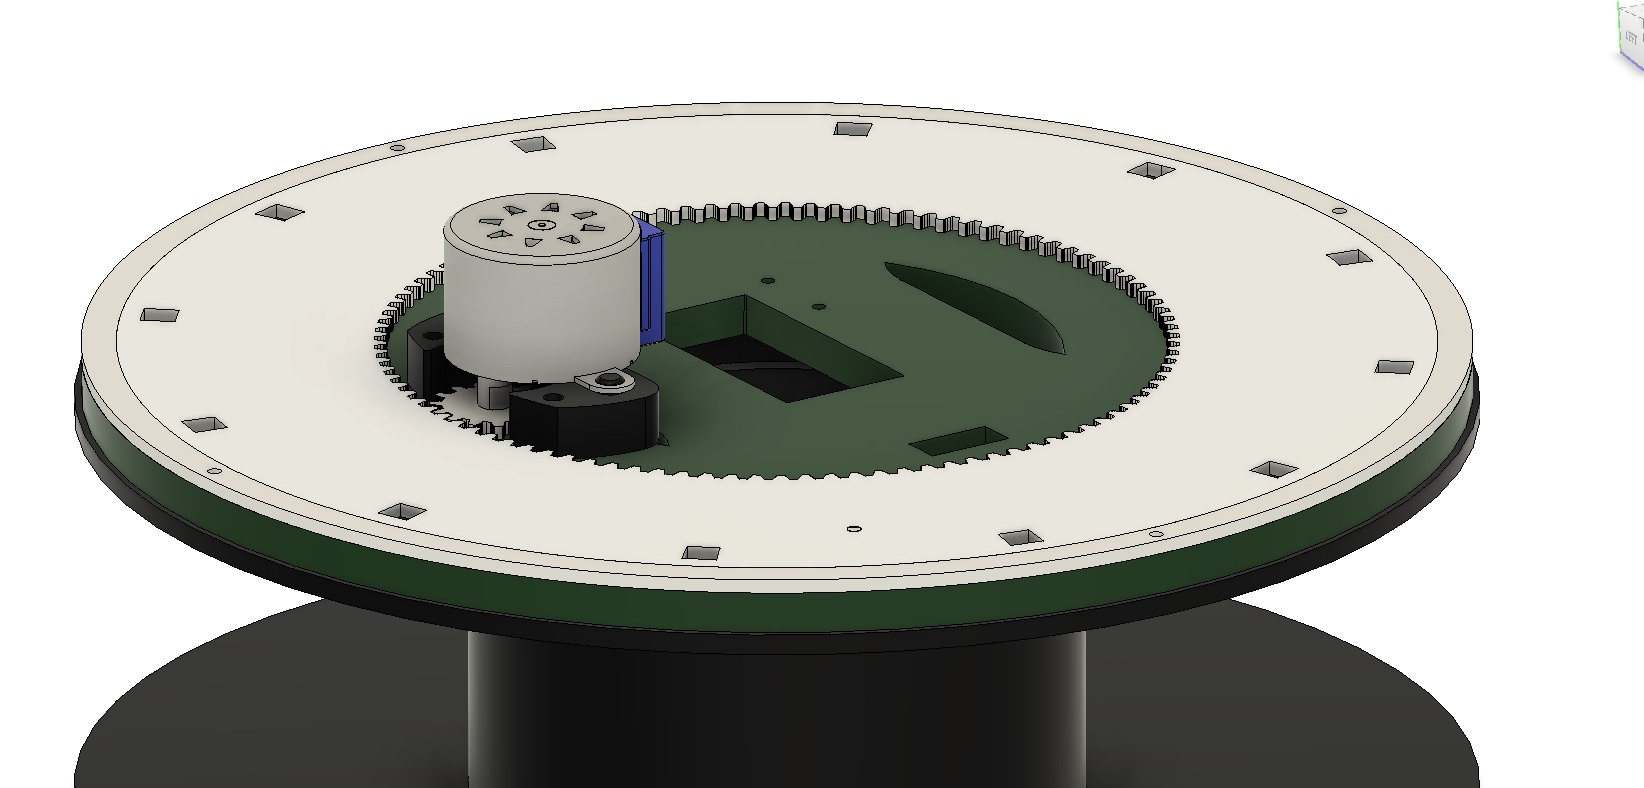
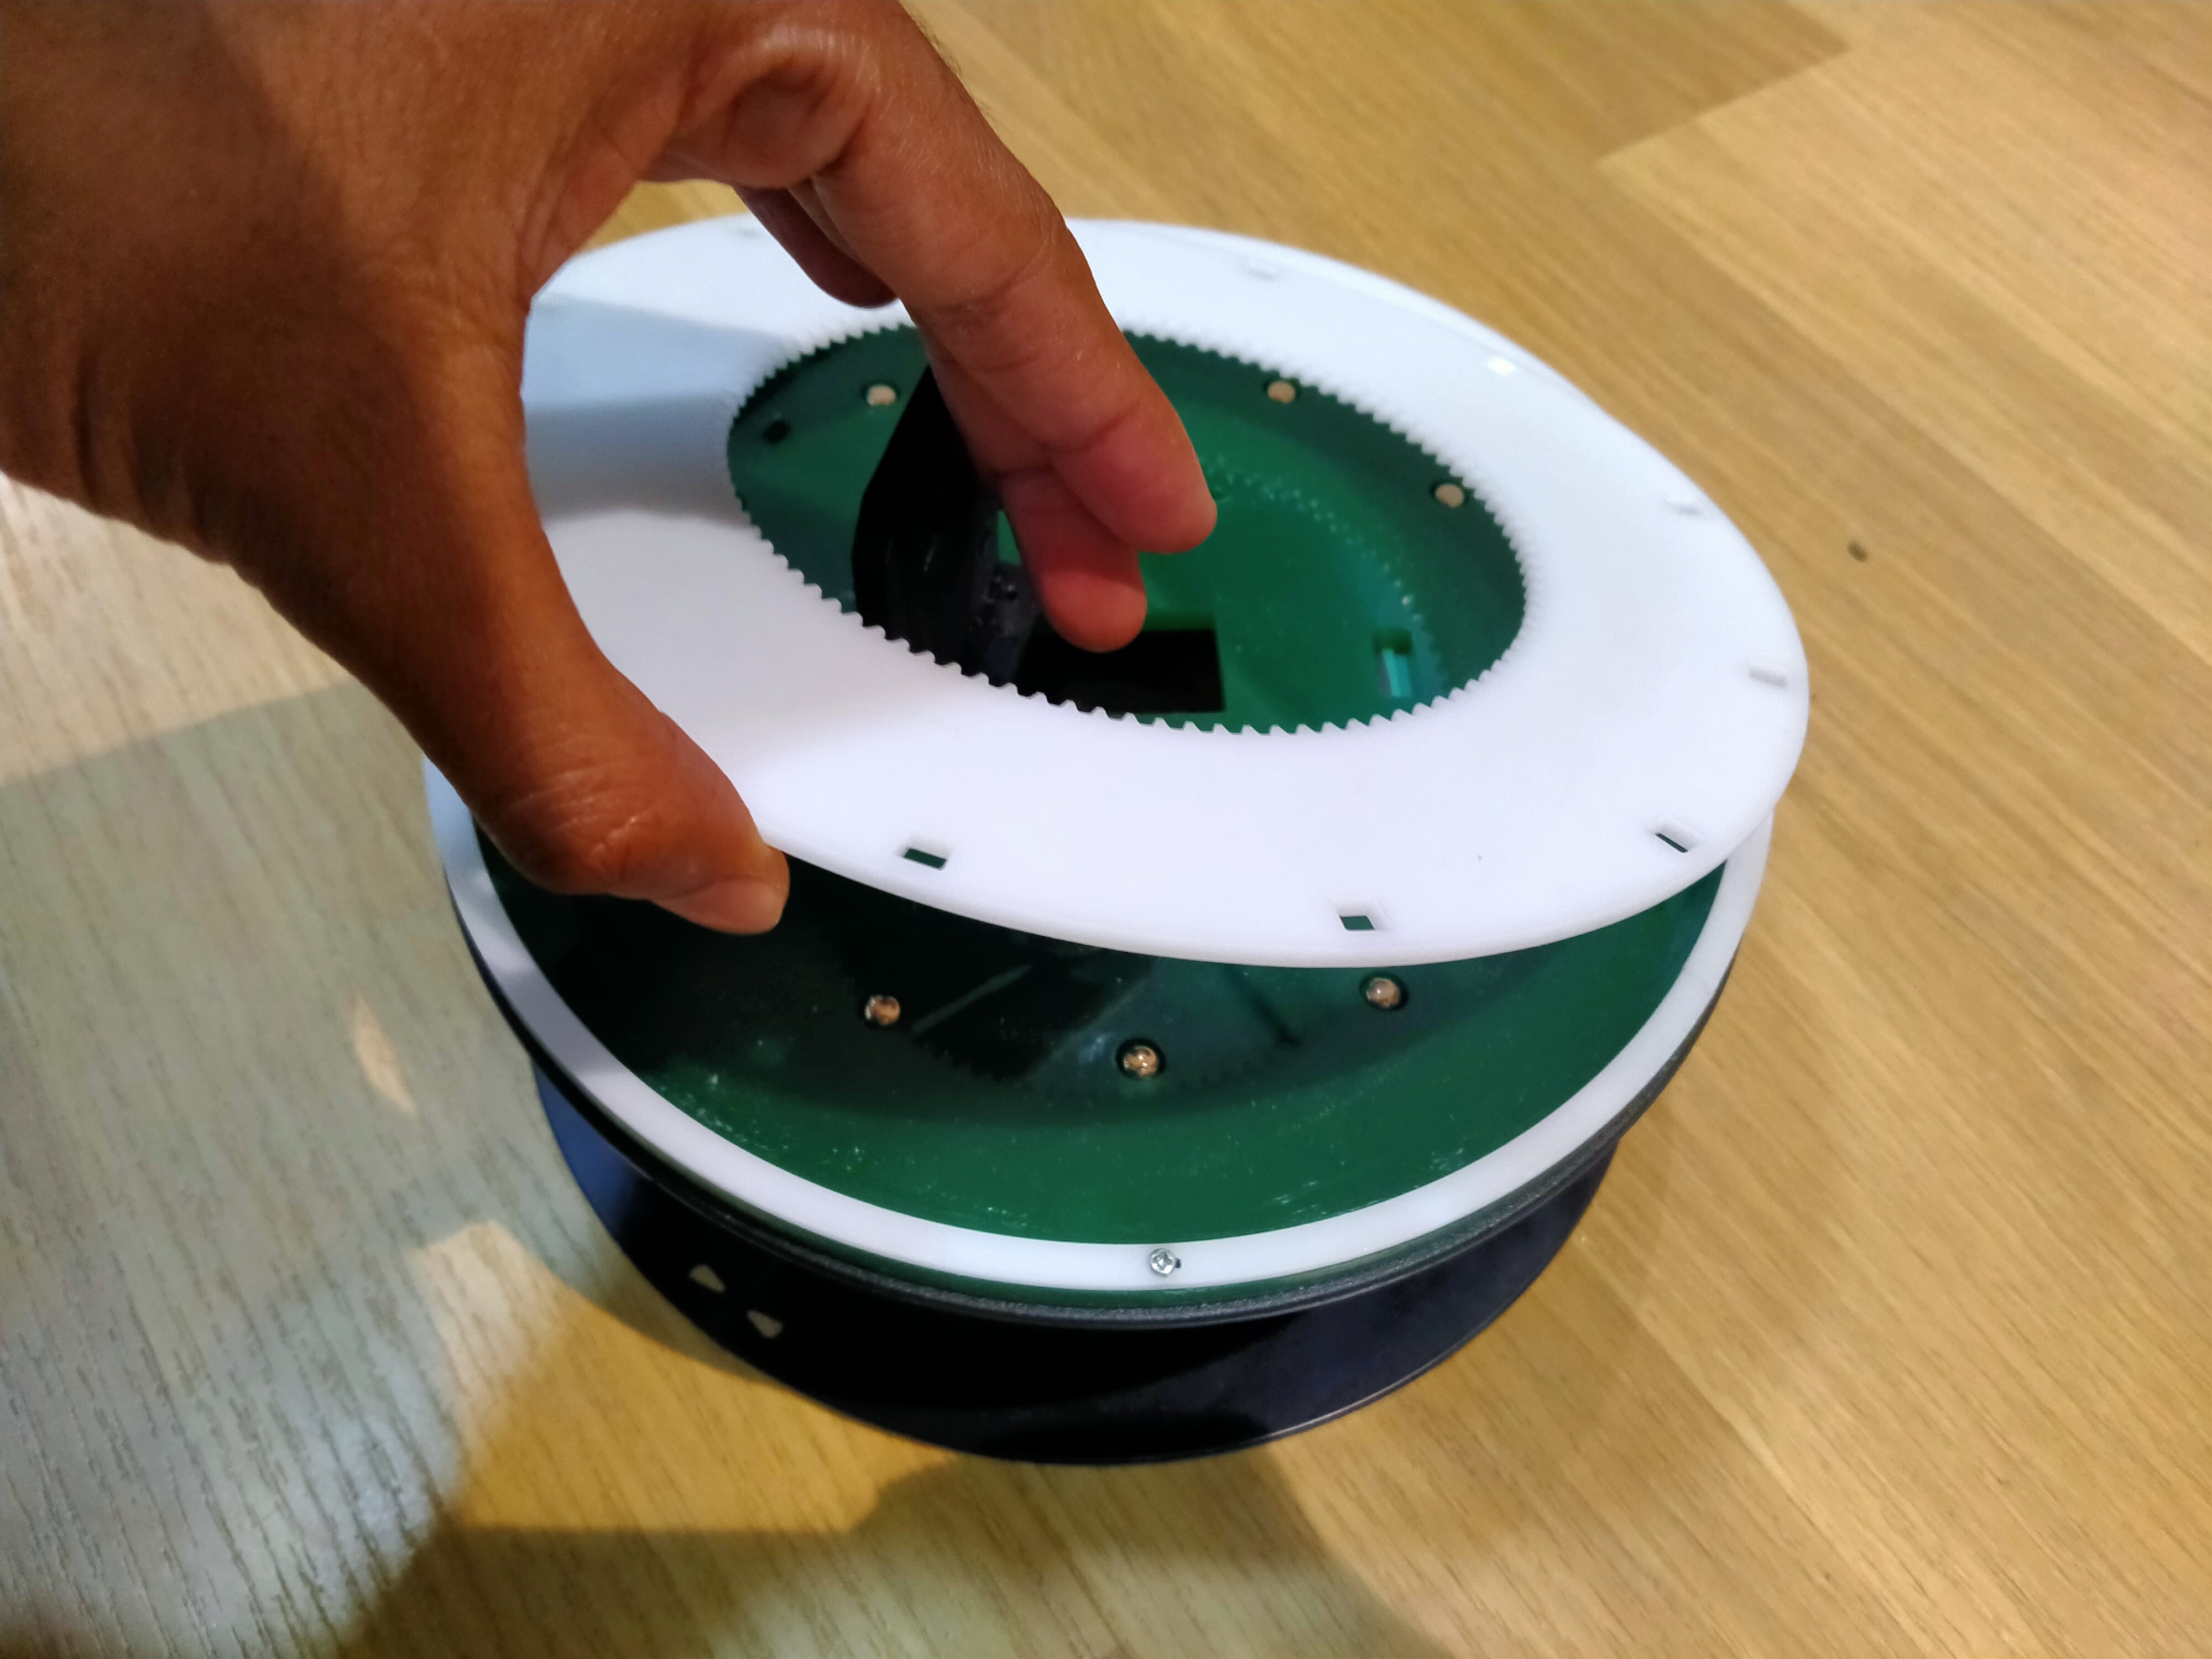
Design a thrust bearing
In my device, the disc plate should be like a thrust bearing. But in my device has no more load. It only need to just rotate.
So I just freely place the disc plate on the reel with a small edge locking and add some lubricant between that. But it dosen’t work when I add some weight above disc plate.
Then I decided to add a acrylic sheet between them which have some pockets where some metal balls will insert. then I got a best result.
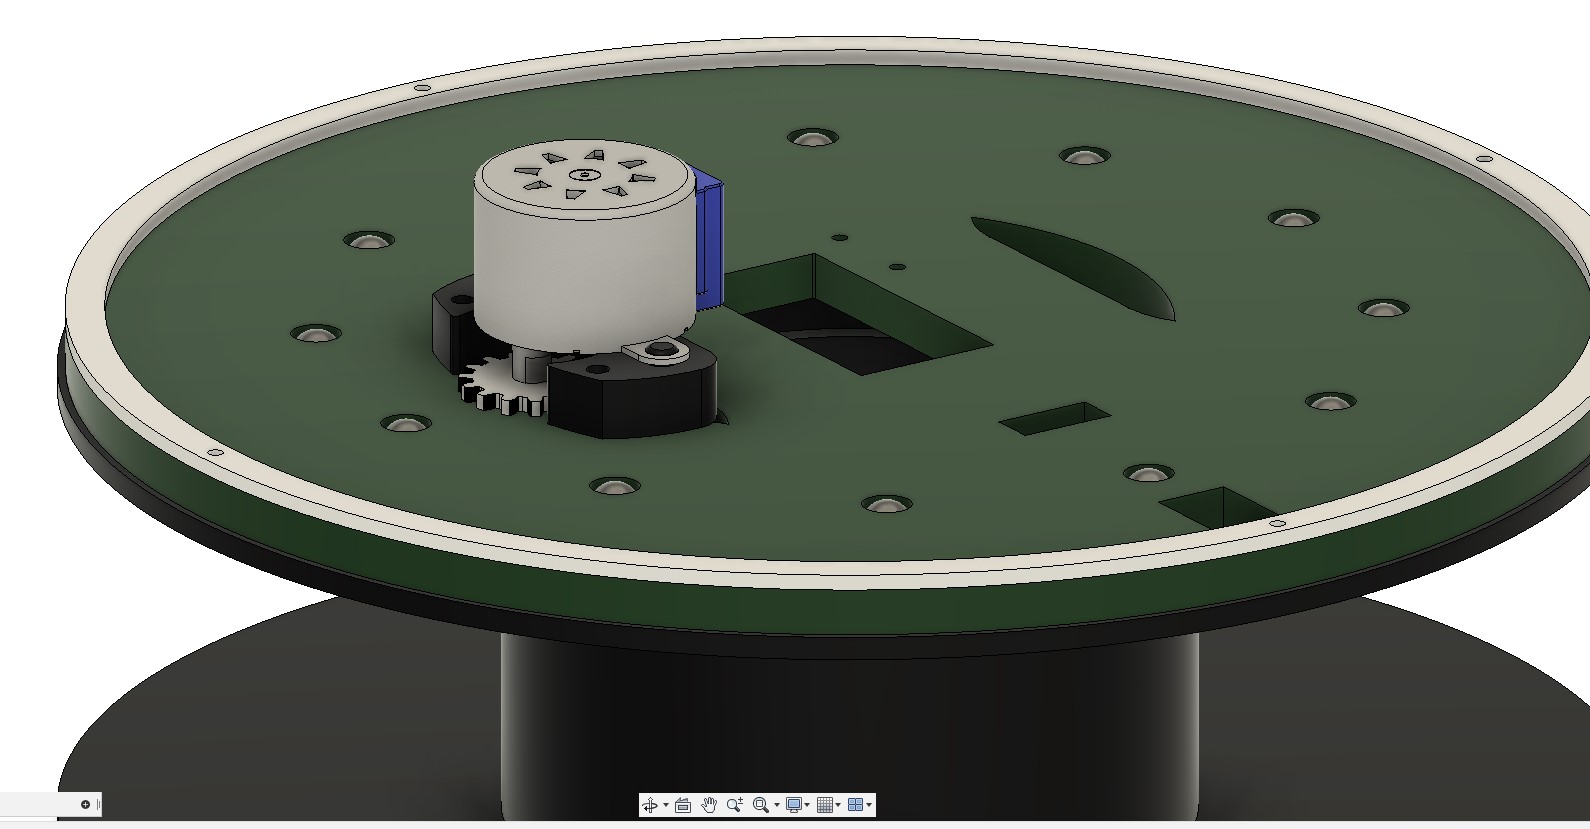
Then I added a stepper motor with 15 teeth to rotate the disc.
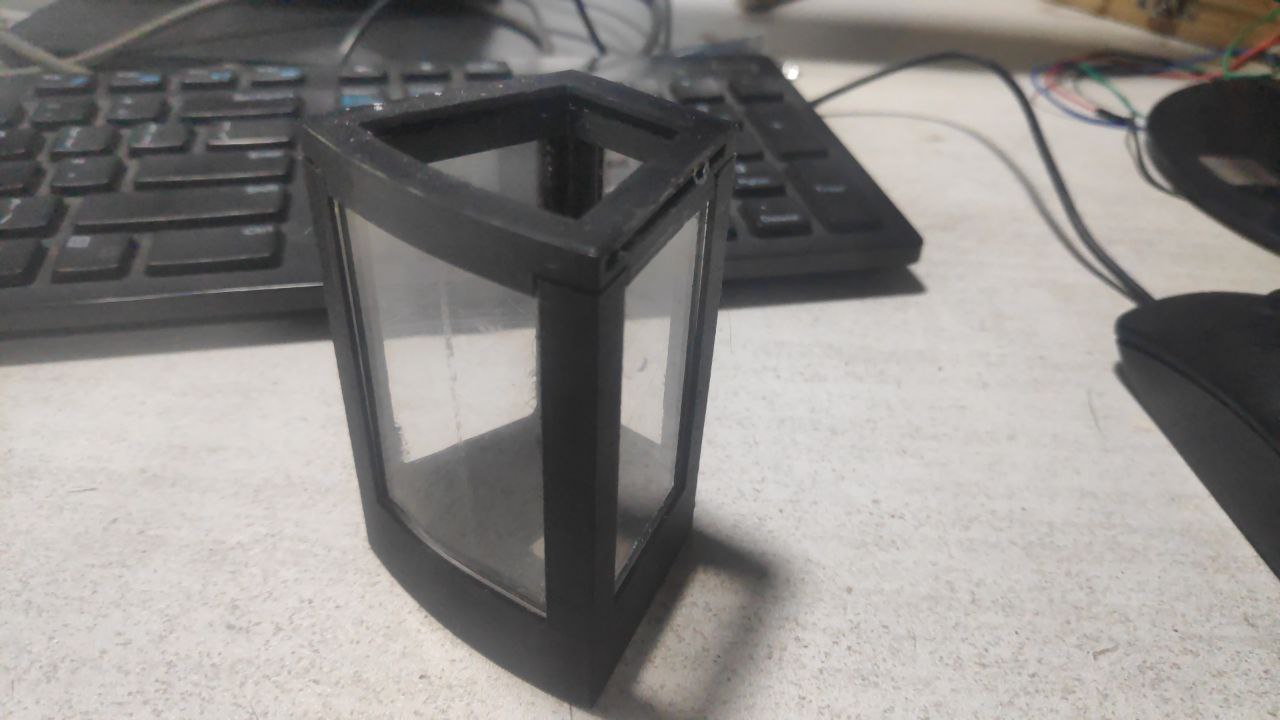
Design a spice container and auger screw
I decided to add a auger screw mechanism for dispensing spices. I designed a small auger screw and place it inside a shell and made a replicable container to attach to it.

I will 3d print the main frame of the container and transparent acrylic will place in between them.
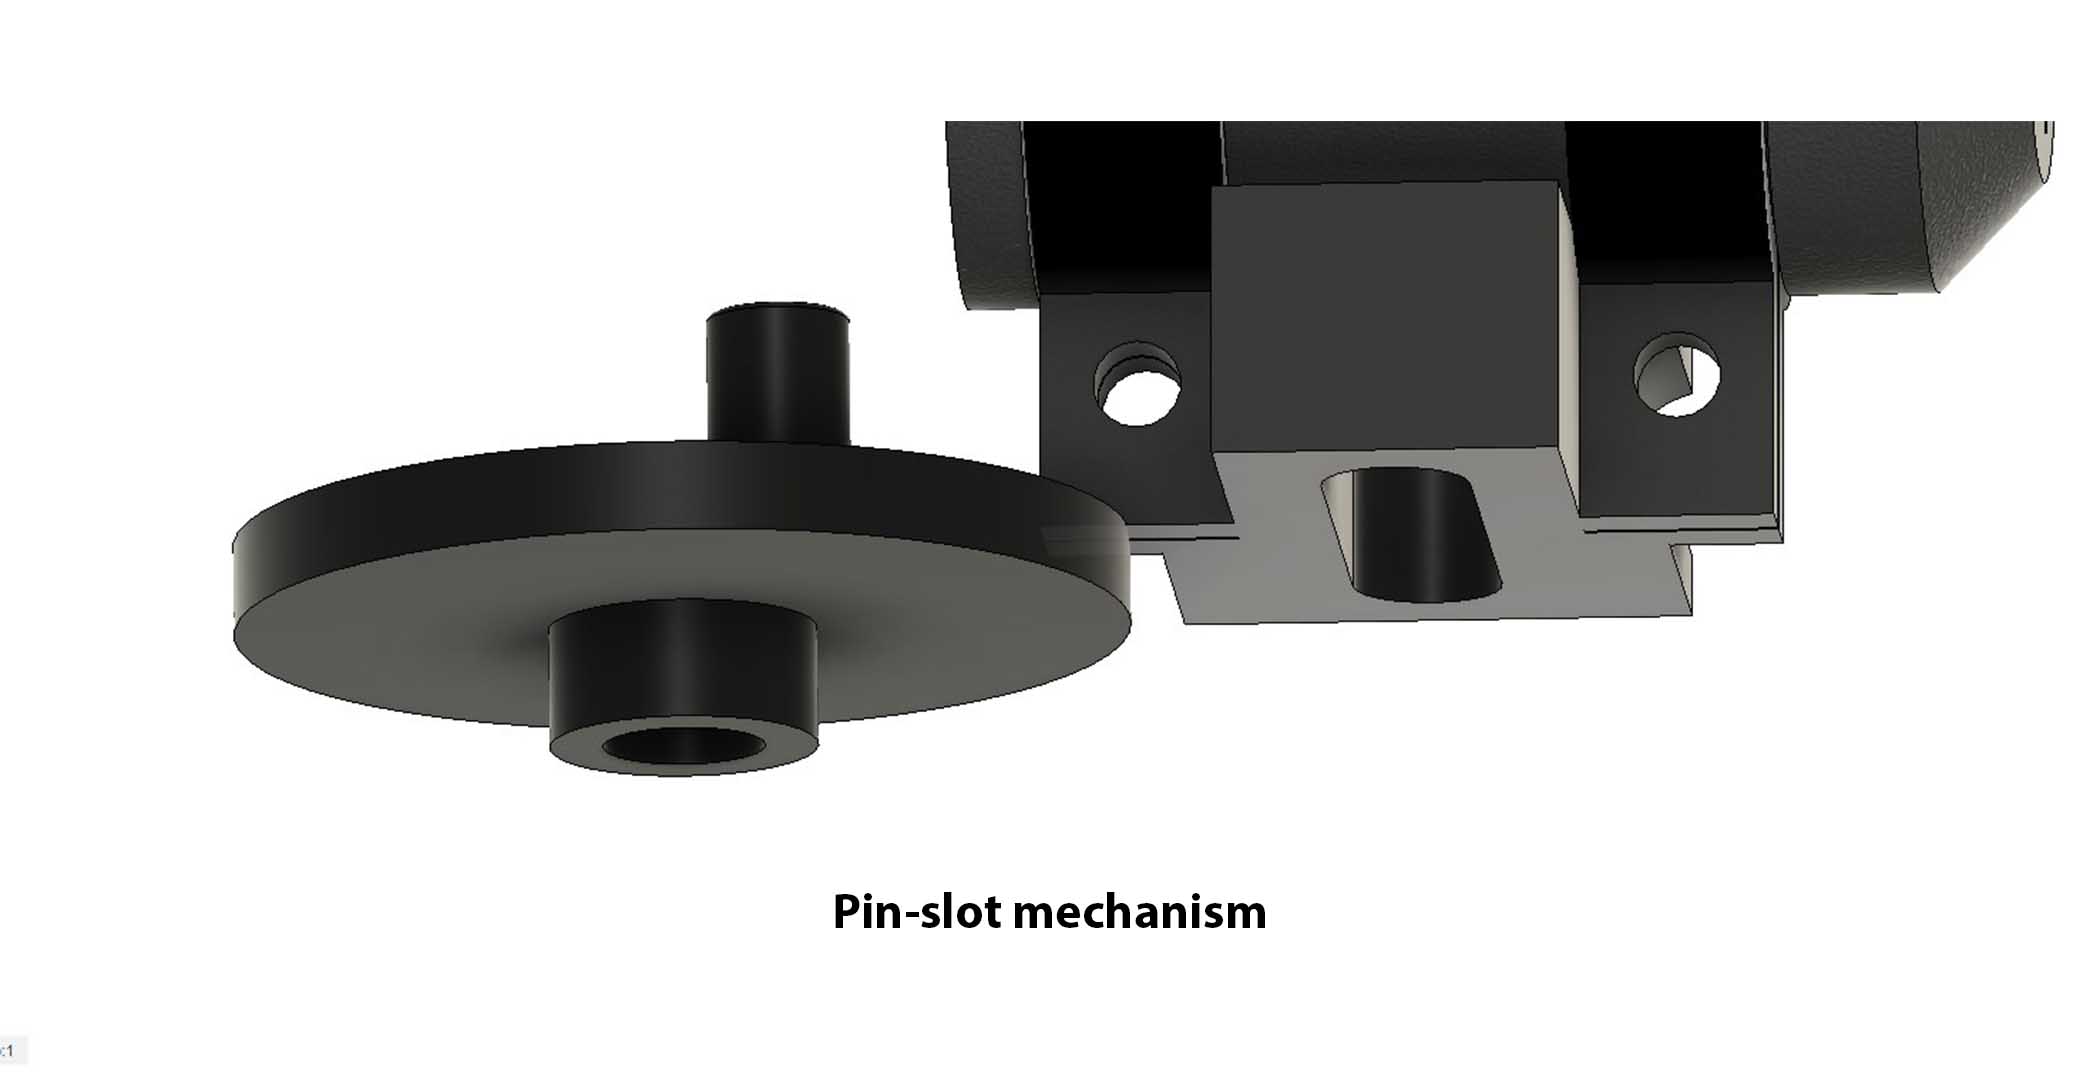
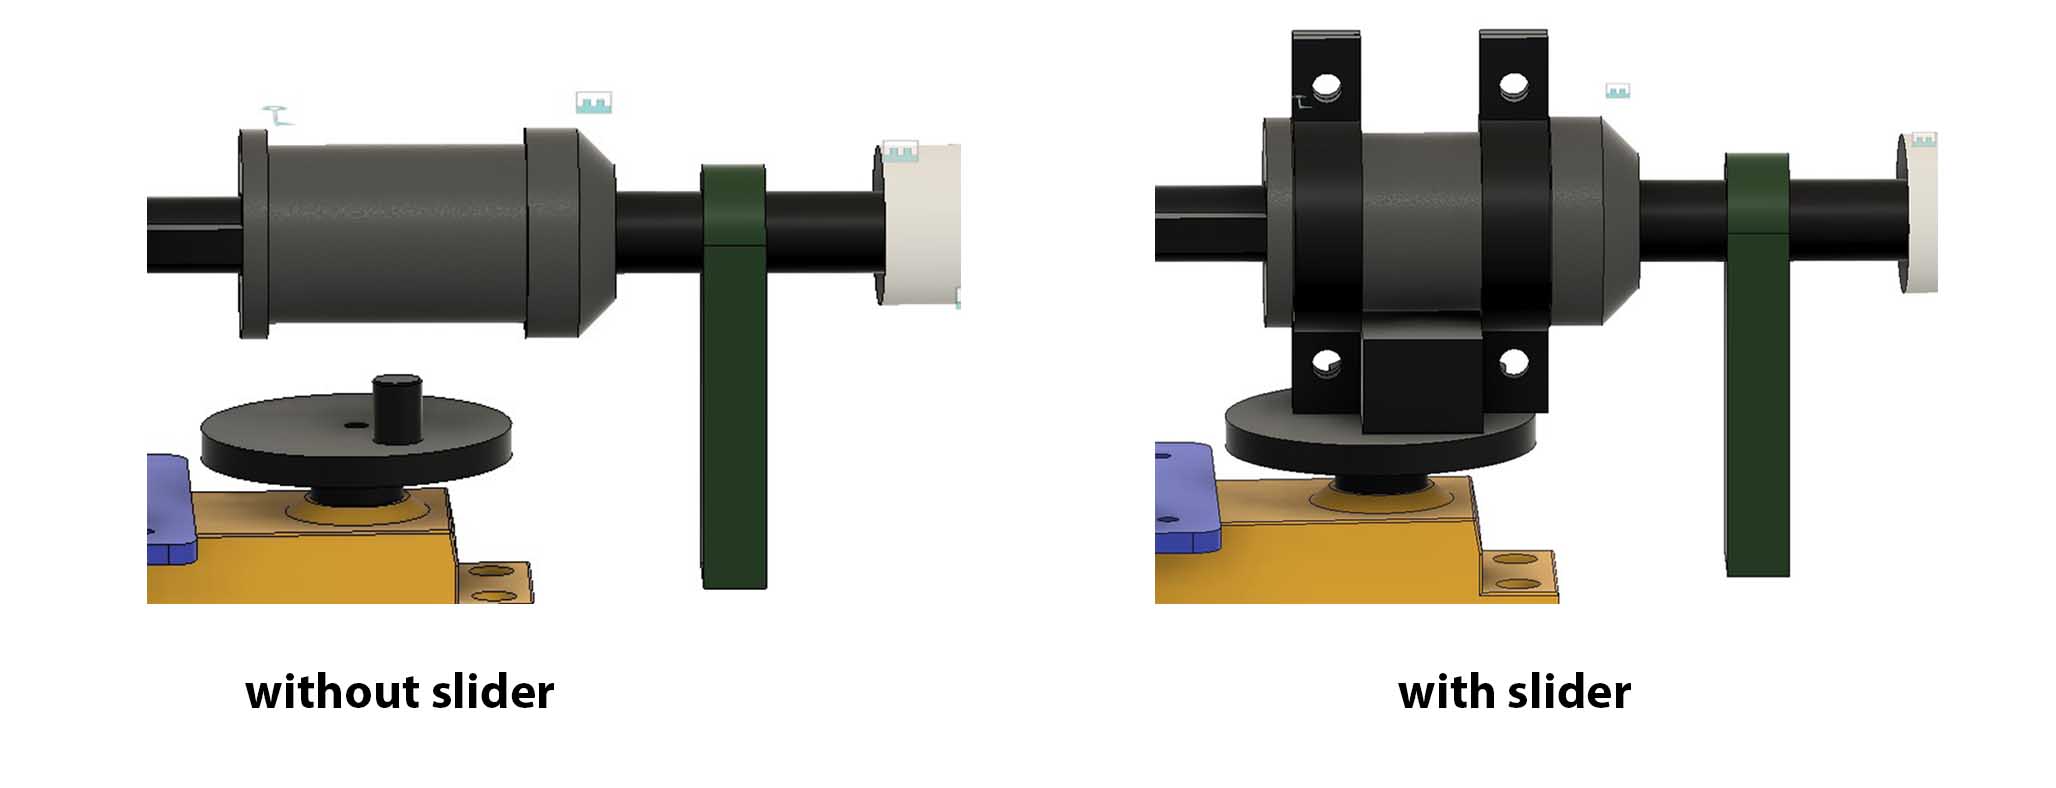
Sliding mechanism
When the spice container reach in the correct position, a shaft will couple to the auger screw.
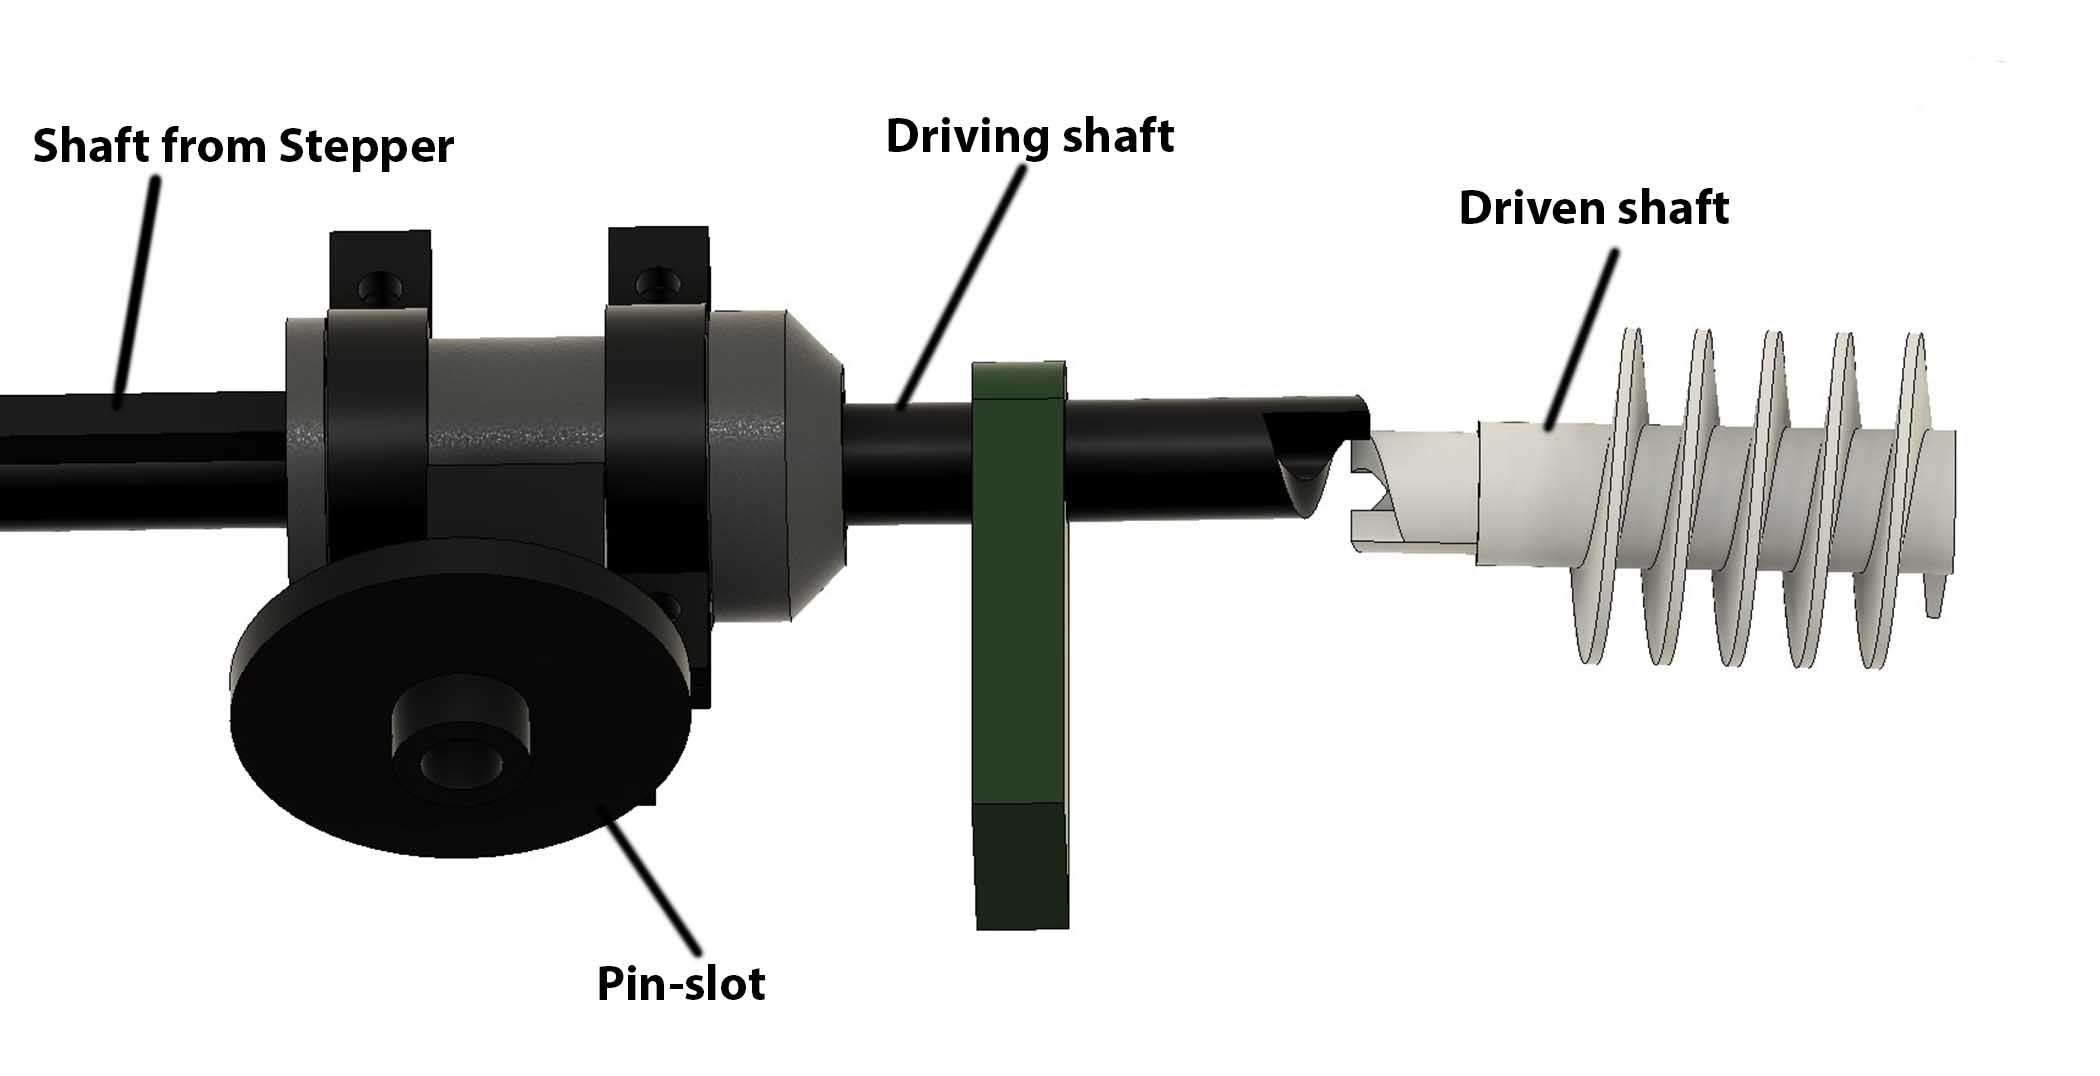
For that I will use a pin slot mechanism with a servo motor. It will push the Driving shaft into Driven shaft.
I calculated the slot length with the distance to move.
Shaft of stepper motor
In my device, shaft of the stepper motor is attached to driving shaft coupling with a rotation locking. The stepper will rotate after only when the auger screw is coupled.

Base for 2 stepper motors and servo motor.
I fixed stepper motors on 3d printed parts and they screwed on acrylic sheet. And the servo fixed on the acrylic sheet with screws.
Coupling for auger screw
Coupling between auger screw and driving shaft was a big task. I spend some time for deciding the coupling joint.
In first time I designed a plus shape coupling, and I 3d printed parts and tested. But it didn’t work. The reason was area of contact for locking was very low in that design.

Then I used a special type of coupling.
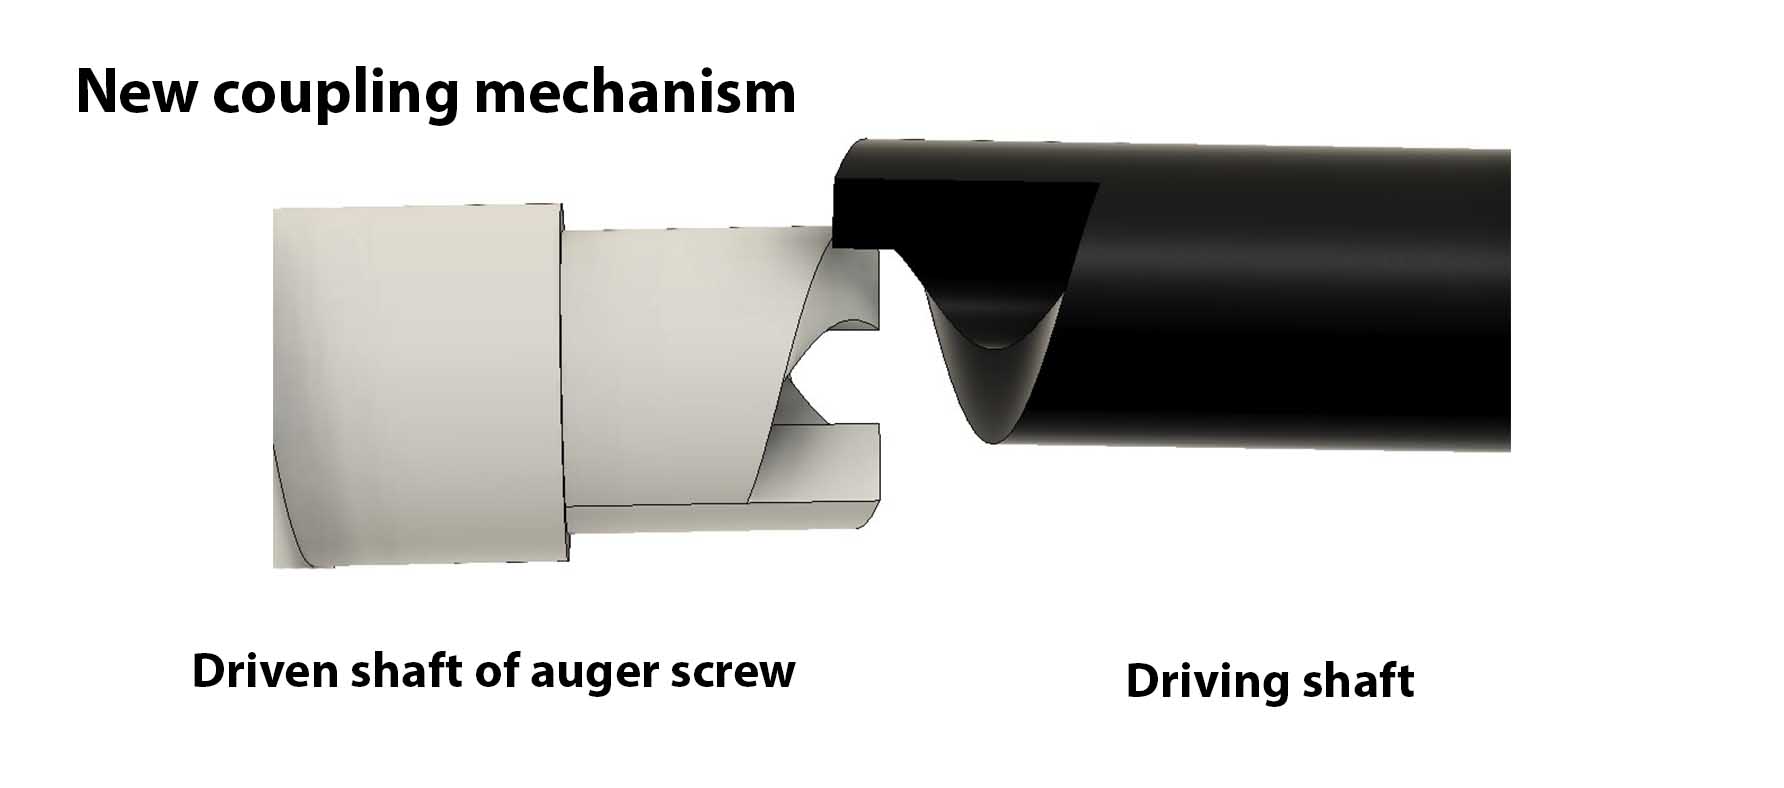
I solved the problem this way.
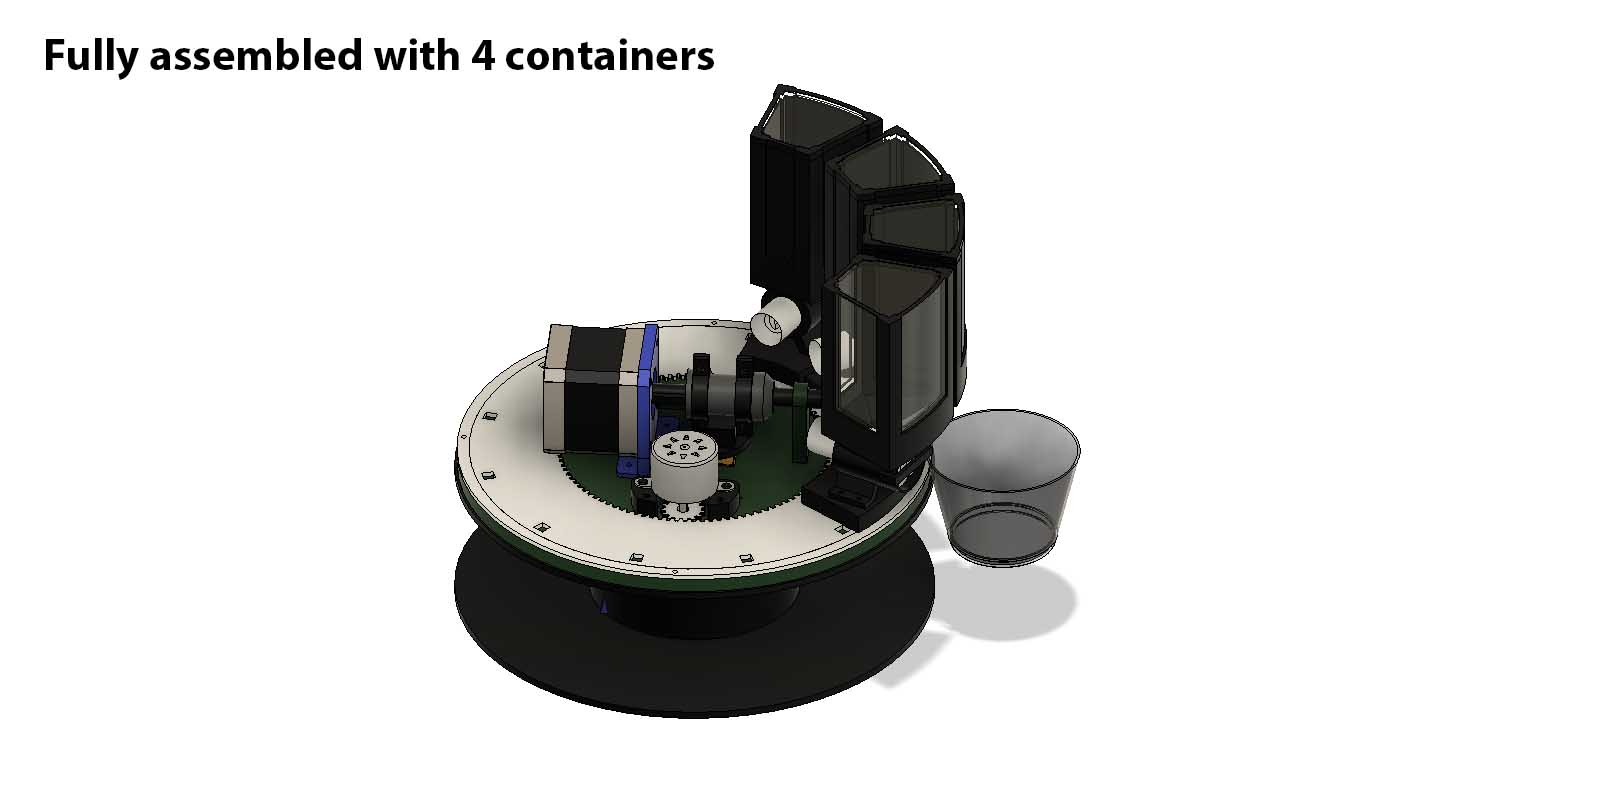
Then I assembled each components together in Fusion 360.
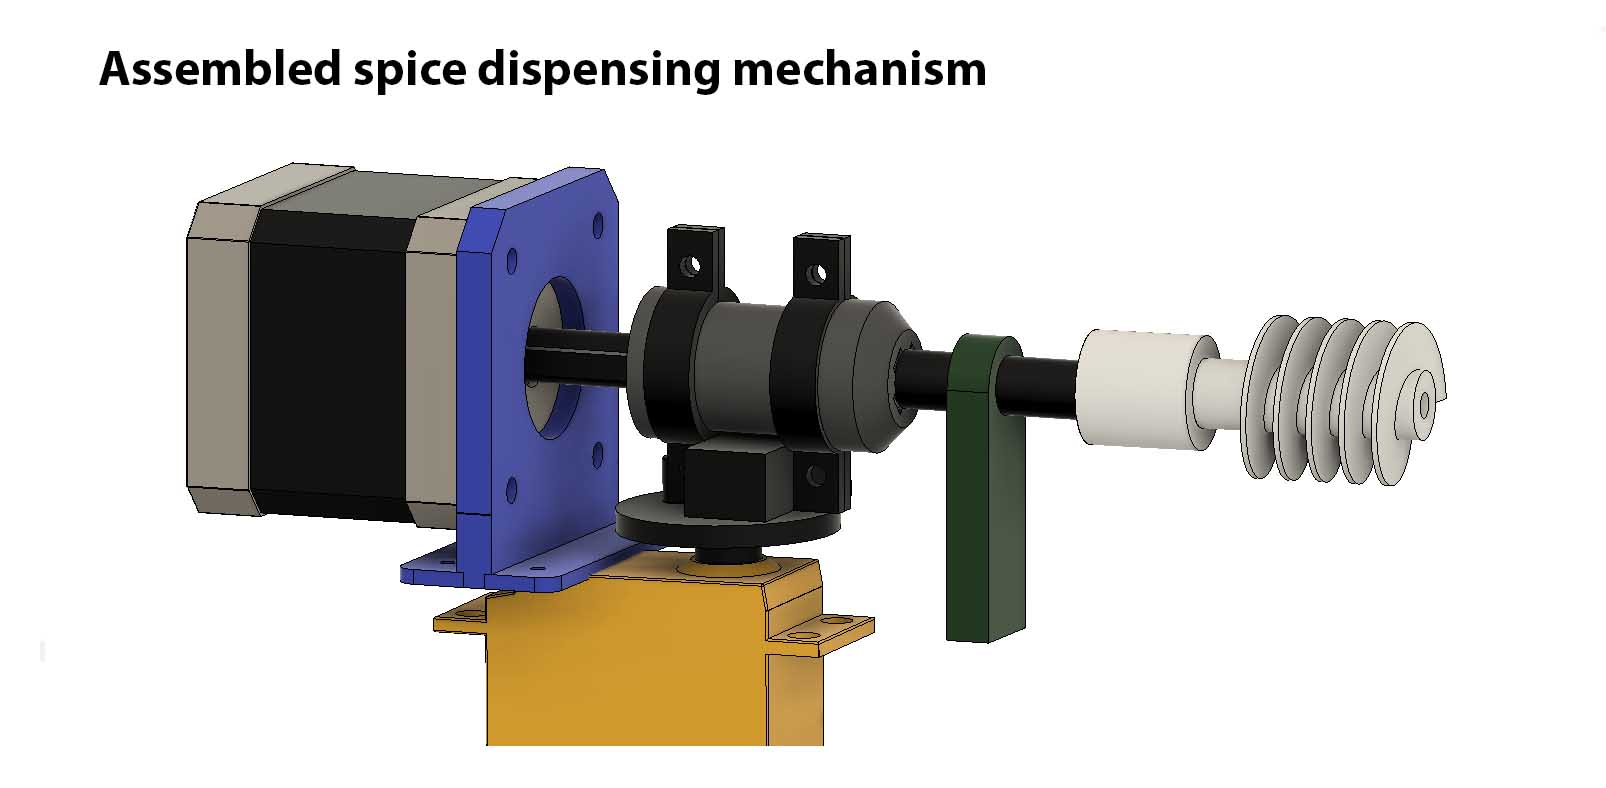
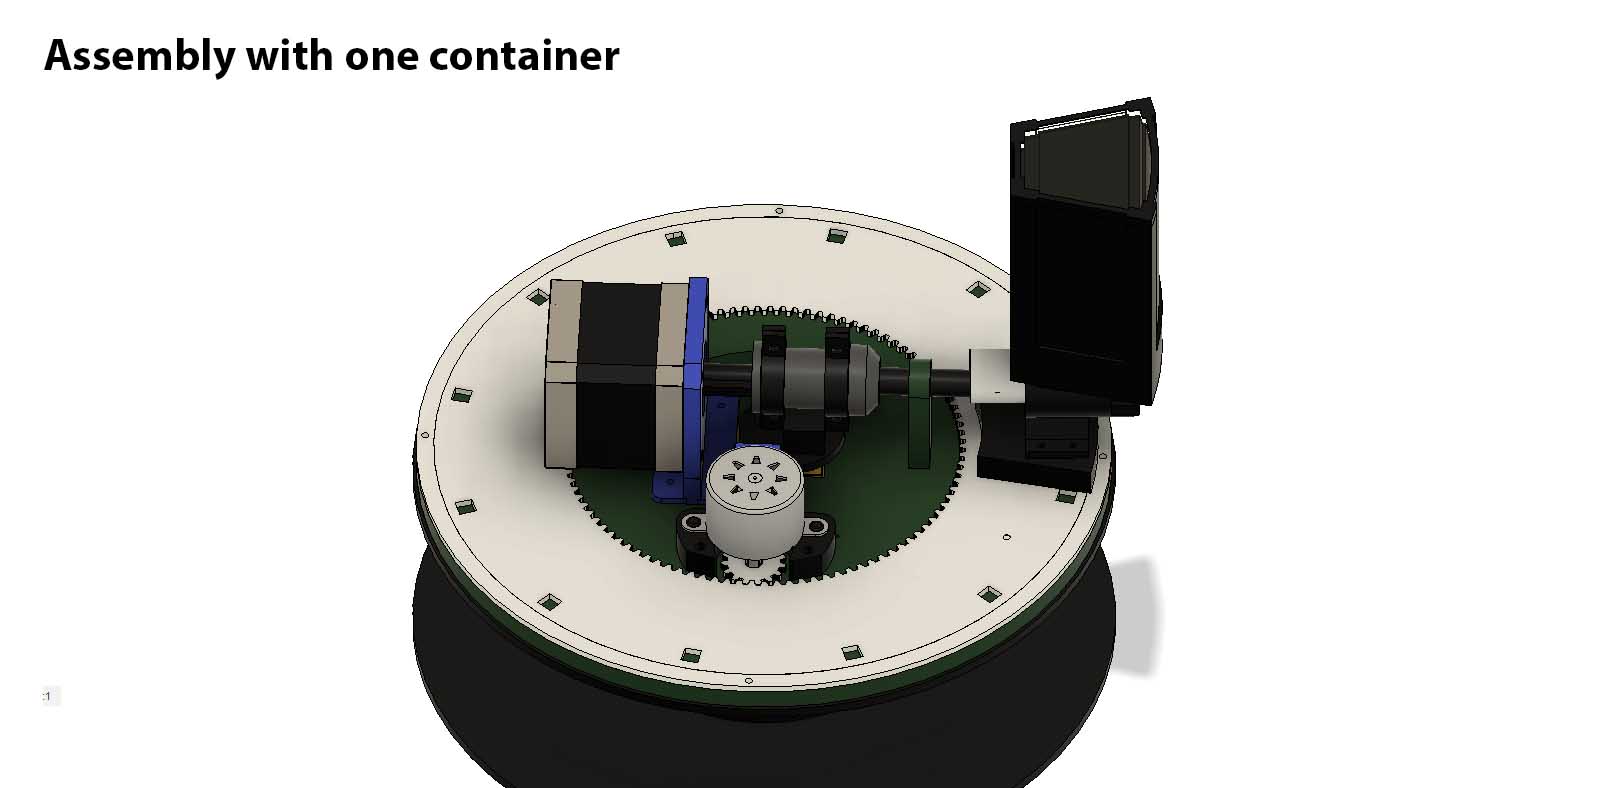
Small NEMA-17 was not available in our inventory. So I used a big NEMA-17. So I cannot add 12 container in my device. The stepper will touch on the container. So I decided to add 4 containers now.
What materials and components were used?
Pcb board
| Part | Value | Device | Package | Description | AVAILABILITY | CATEGORY | DESCRIPTION | MANUFACTURER | MF | MP | MPN | OPERATING_TEMP | PACKAGE | PART_STATUS | PRICE | PURCHASE-URL | ROHS_COMPLIANT | SERIES | SUB-CATEGORY | THERMALLOSS | TYPE | VOLTAGE_RATING |
| C1 | 100 mF | C-POL-US_RADIAL-11MM-DIA | CAPPRD508W65D1000H1100B | Capacitor Polarised - ANSI | Capacitor | |||||||||||||||||
| C2 | 100 mF | C-POL-US_RADIAL-11MM-DIA | CAPPRD508W65D1000H1100B | Capacitor Polarised - ANSI | Capacitor | |||||||||||||||||
| C4 | 10 mF | CAP_UNPOLARIZEDFAB | C1206FAB | |||||||||||||||||||
| D1 | DIODE_SCHOTTKY_CDBM1100-G 1A | DIODE_SCHOTTKY_CDBM1100-G | MINI-SMA | Diode schottky 100V 1A mini-SMA as found in the fablab inventory | ||||||||||||||||||
| J2 | CONN_JACK.65MM | CONN_JACK.65MM | JACK_.65MM | |||||||||||||||||||
| R1 | 499 mF | R1206FAB | R1206FAB | Resistor (US Symbol) | ||||||||||||||||||
| U$1 | CONN_01X12_PRGRMR | CONN_01X12_PRGRMR | 1X12(2_ROW) | |||||||||||||||||||
| U$2 | LEDFAB1206 red | LEDFAB1206 | LED1206FAB | LED | ||||||||||||||||||
| U$4 | CONN_01X12_PRGRMR | CONN_01X12_PRGRMR | 1X12(2_ROW) | |||||||||||||||||||
| U$5 | CONN_01X12_PRGRMR | CONN_01X12_PRGRMR | 1X12(2_ROW) | |||||||||||||||||||
| U$6 | CONN_01X12_PRGRMR | CONN_01X12_PRGRMR | 1X12(2_ROW) | |||||||||||||||||||
| U$7 | CONN_01X12_PRGRMR | CONN_01X12_PRGRMR | 1X12(2_ROW) | |||||||||||||||||||
| U$8 | CONN_06_FTDI-SMD-HEADER | CONN_06_FTDI-SMD-HEADER | 1X06SMD | |||||||||||||||||||
| U$11 | 3-PIN-SP | 3-PIN-SP | 1X12(2_ROW) | |||||||||||||||||||
| U$12 | CONN_01X12_PRGRMR | CONN_01X12_PRGRMR | 1X12(2_ROW) | |||||||||||||||||||
| U2 | UC_ATTINY1614-SSNR | UC_ATTINY1614-SSNR | SOIC127P600X175-14N | 20MHz, SOIC, 85C, Green, 14 SOIC .150in T/R Check prices | In Stock | AVR tinyAVR™ 1, Functional Safety (FuSa) Microcontroller IC 8-Bit 20MHz 16KB (16K x 8) FLASH 14-SOIC | Microchip Technology | ATTINY1614-SSNR | None | None | https://pricing.snapeda.com/search/part/ATTINY1614-SSNR/?ref=eda | |||||||||||
| U3 | VR_REGULATOR 5V | VR_REGULATOR_SOT223 | SOT223 |
Other parts
| SI.NO | DEVICE | VALUE | QTY |
| 1 | Stepper motor | NEMA-17 | 1 |
| 2 | Stepper motor | 28BYJ | 1 |
| 3 | Bluetooth module | HC-05 | 1 |
| 4 | Stepper drivers | A4988 | 2 |
Where will they come from?
All components and material for my final project were available in Repository of Fablab Kochi.I took servo motor from a previous project.
How much will they cost?
| SI.NO | DEVICE | VALUE | QTY | PRICE($) |
| 1 | Stepper motor | NEMA-17 | 1 | 10 |
| 2 | Stepper motor | 28BYJ | 1 | 3 |
| 3 | Bluetooth module | HC-05 | 1 | 5 |
| 4 | Stepper drivers | A4988 | 2 | 3 |
| 5 | Acrylic sheet | 4 mm | 2 Sq.ft | 7 |
| 5 | Acrylic sheet | 2 mm clear | 2 Sq.ft | 3.5 |
Assembly
After designing each parts, I assembled alongside. After each testing I modified the design sometime.

Testing Mechanisms
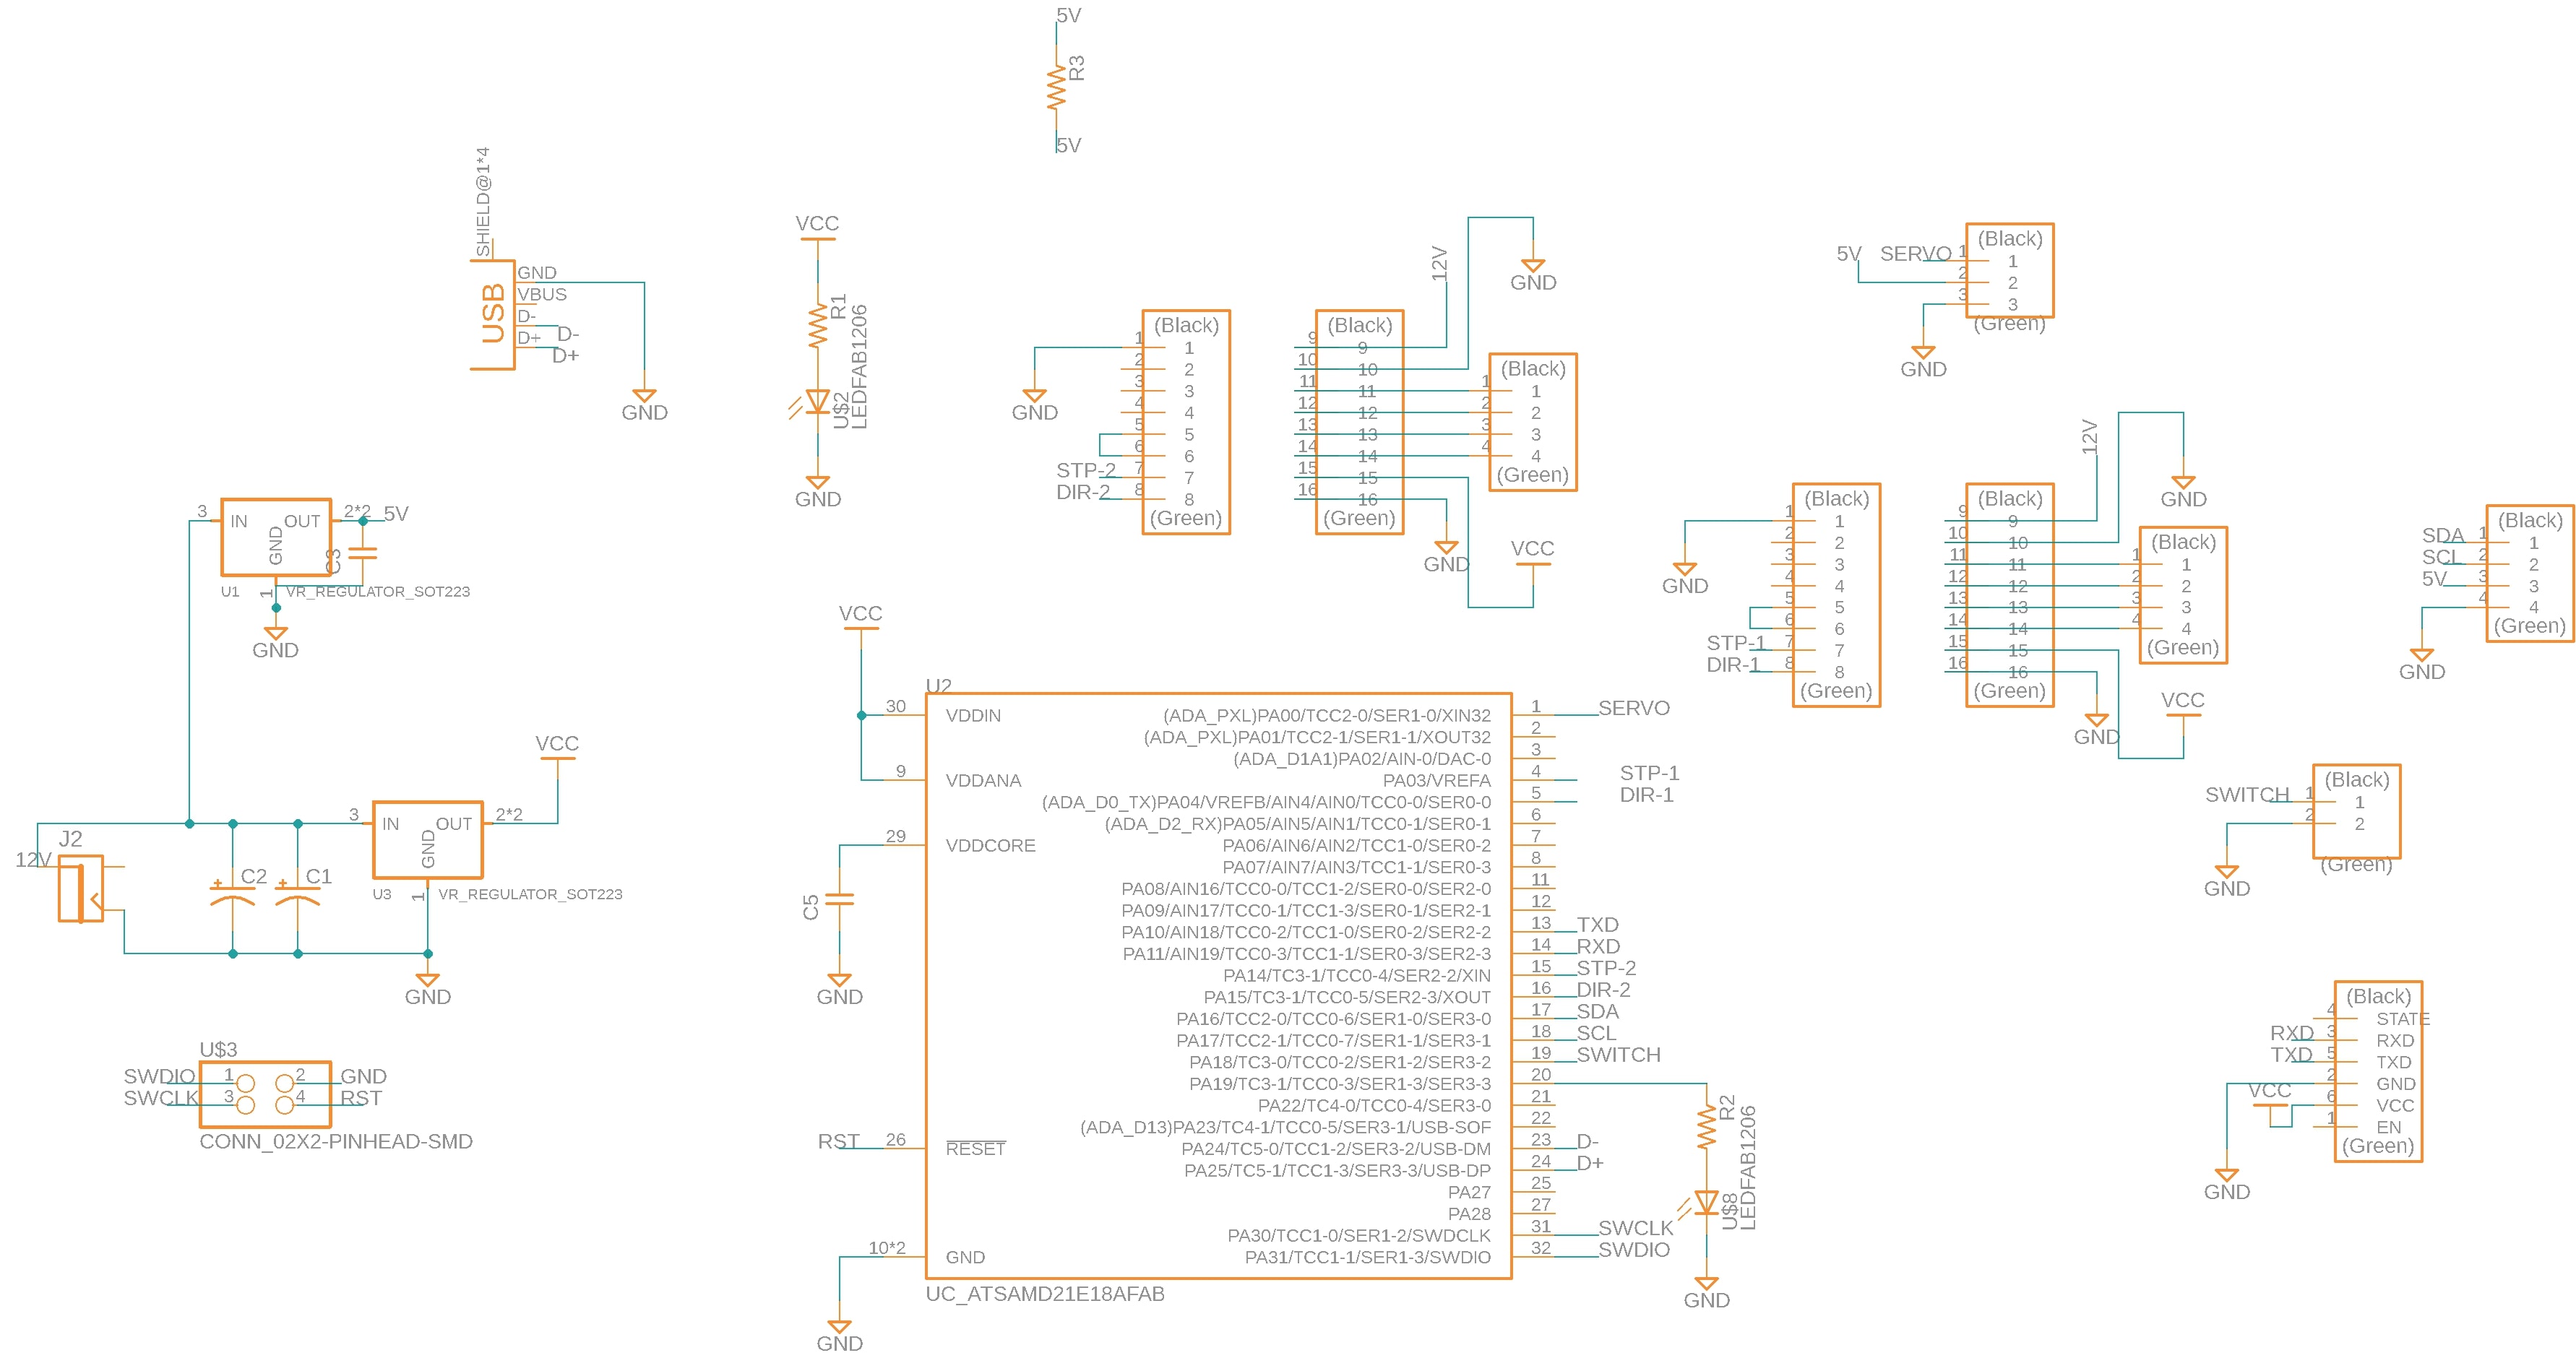
Electronics
In my device, there are 2 stepper motors, one servo motor and a Bluetooth module. So I decided to use a SAMD21E17A.
But I couldn’t program the board. I spend a lot of time for that.
-
After burning bootloader, The board didn’t support USB. I checked all connections and our instructors also tried. Completing the project at the time is important. So I made another board with ATTINY 1614. In that time
-
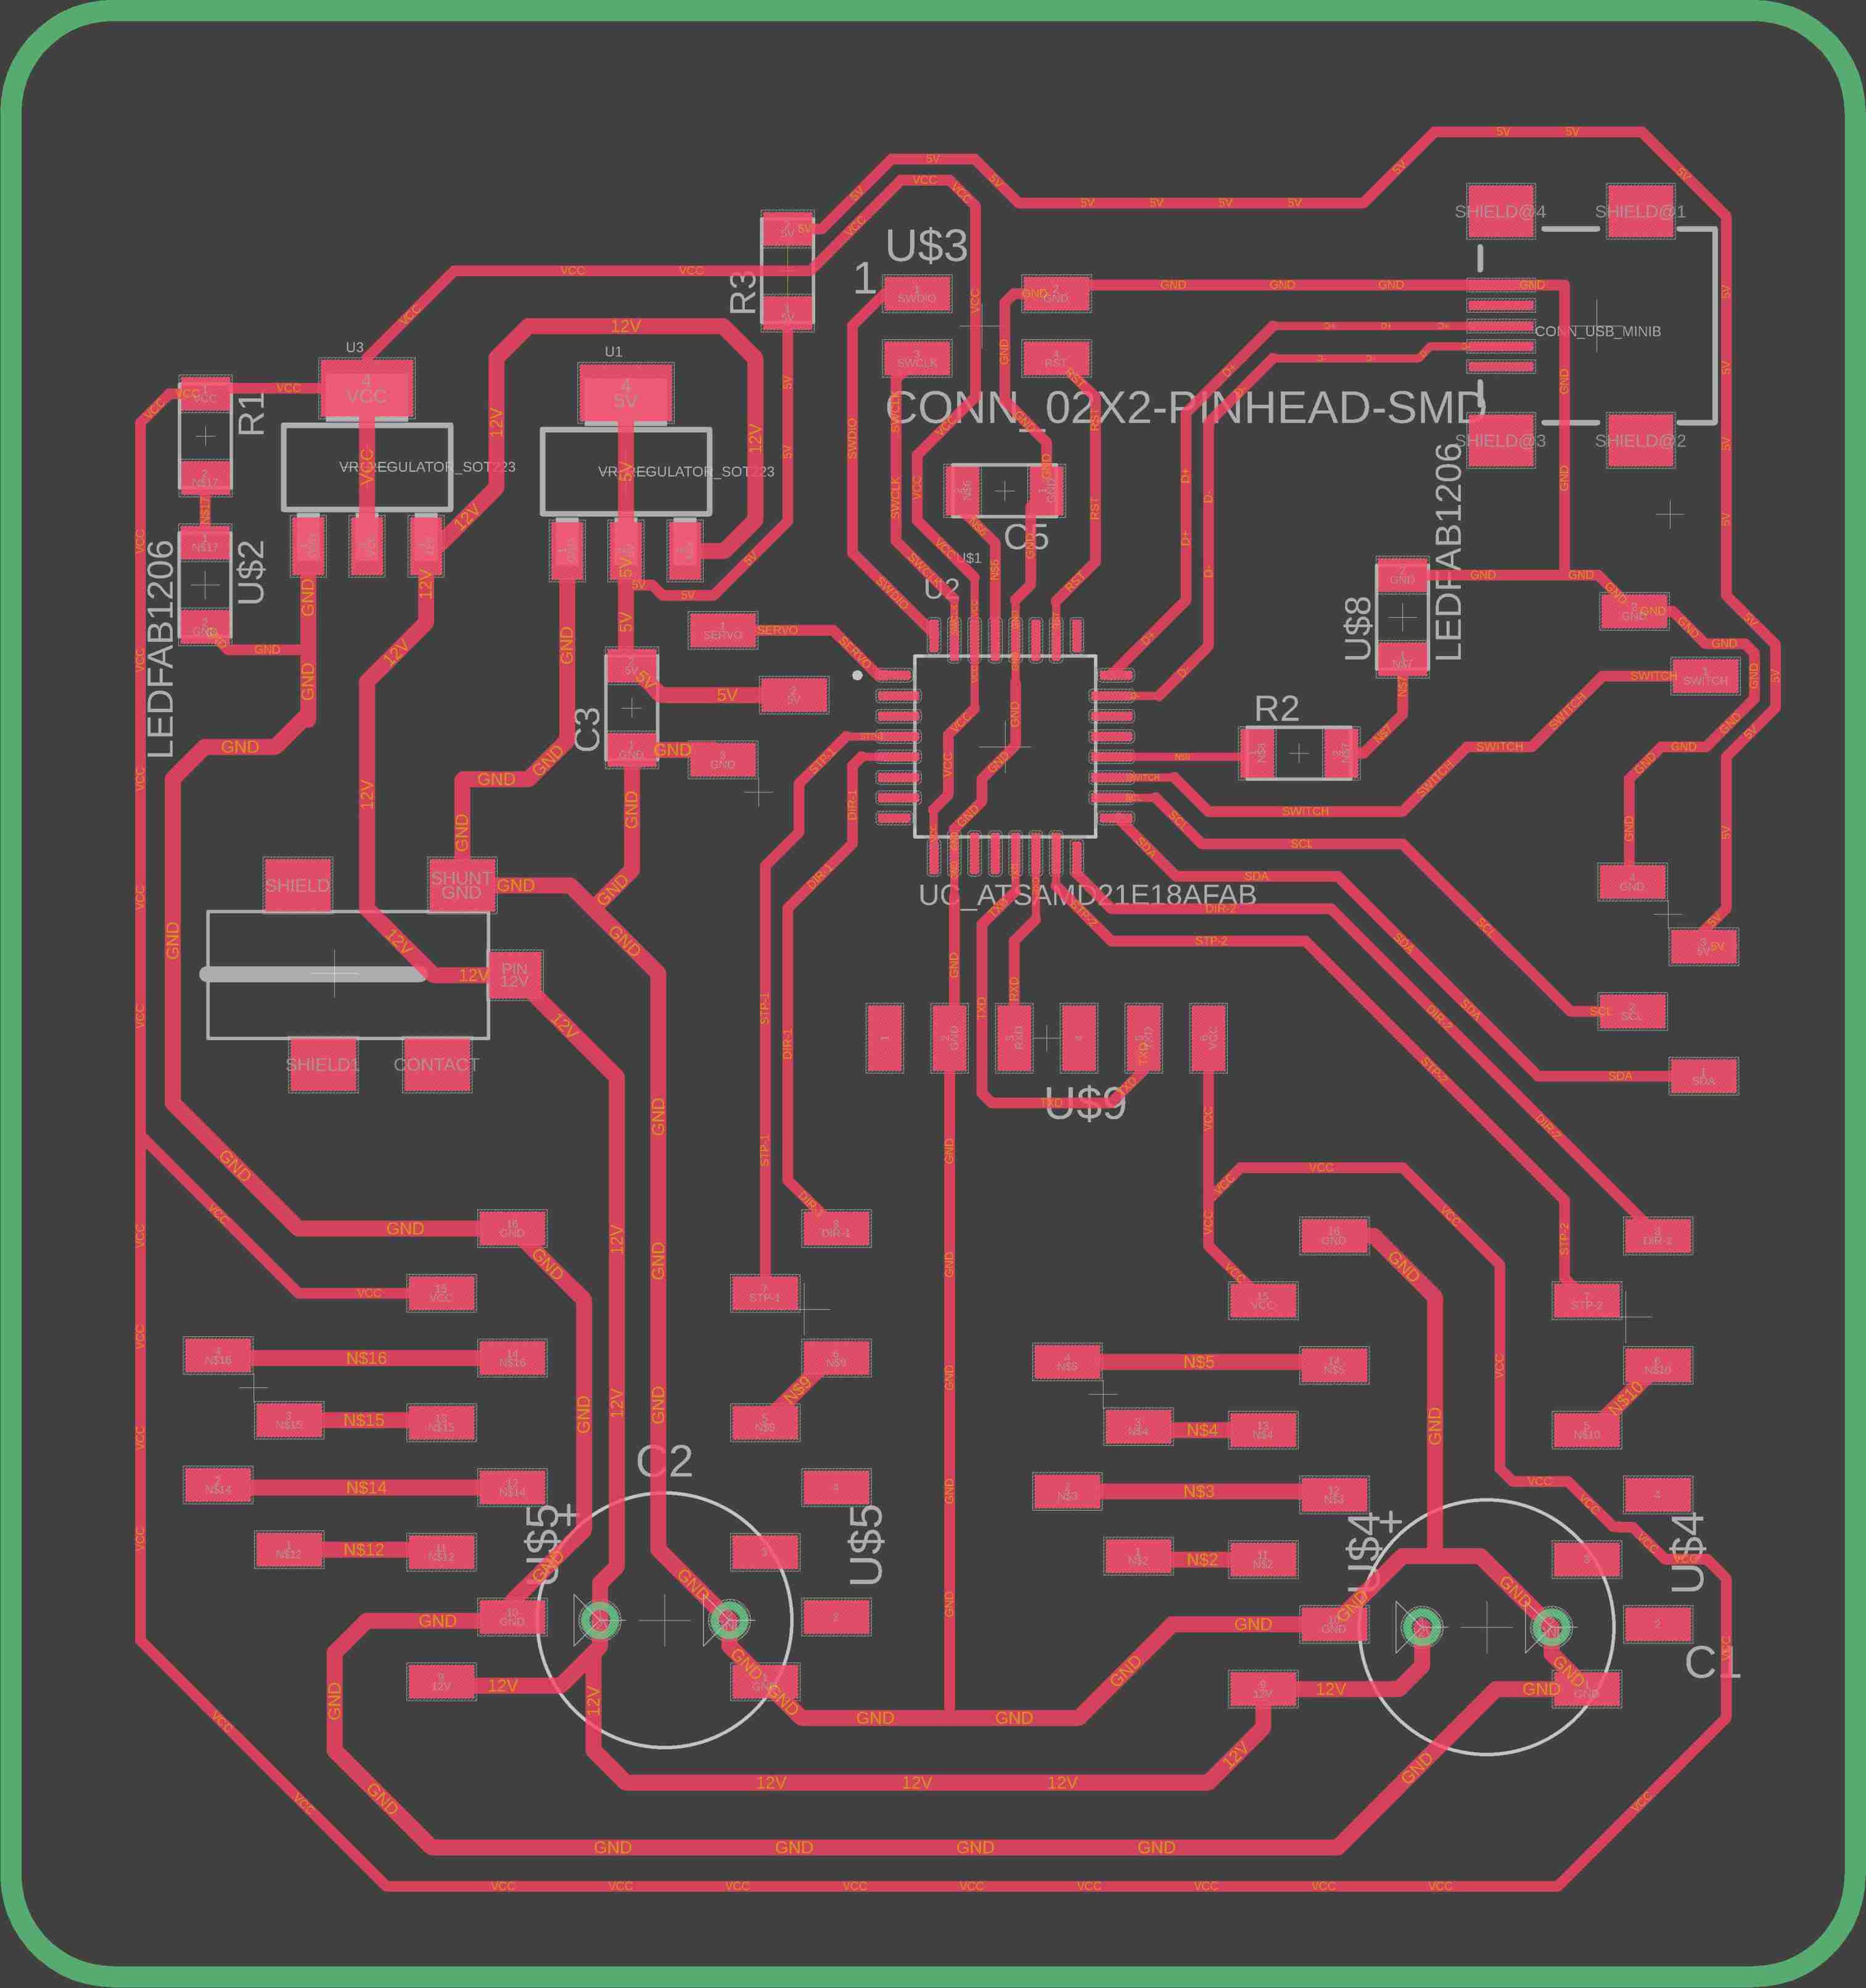
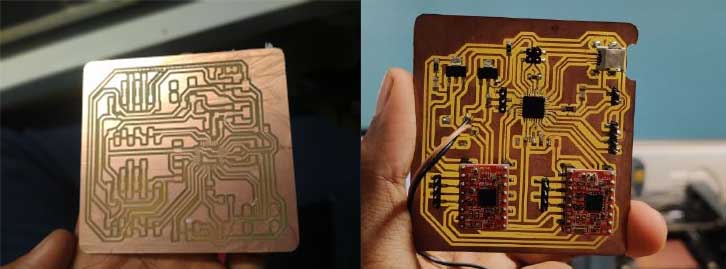
I improved shape of my board according to my design.
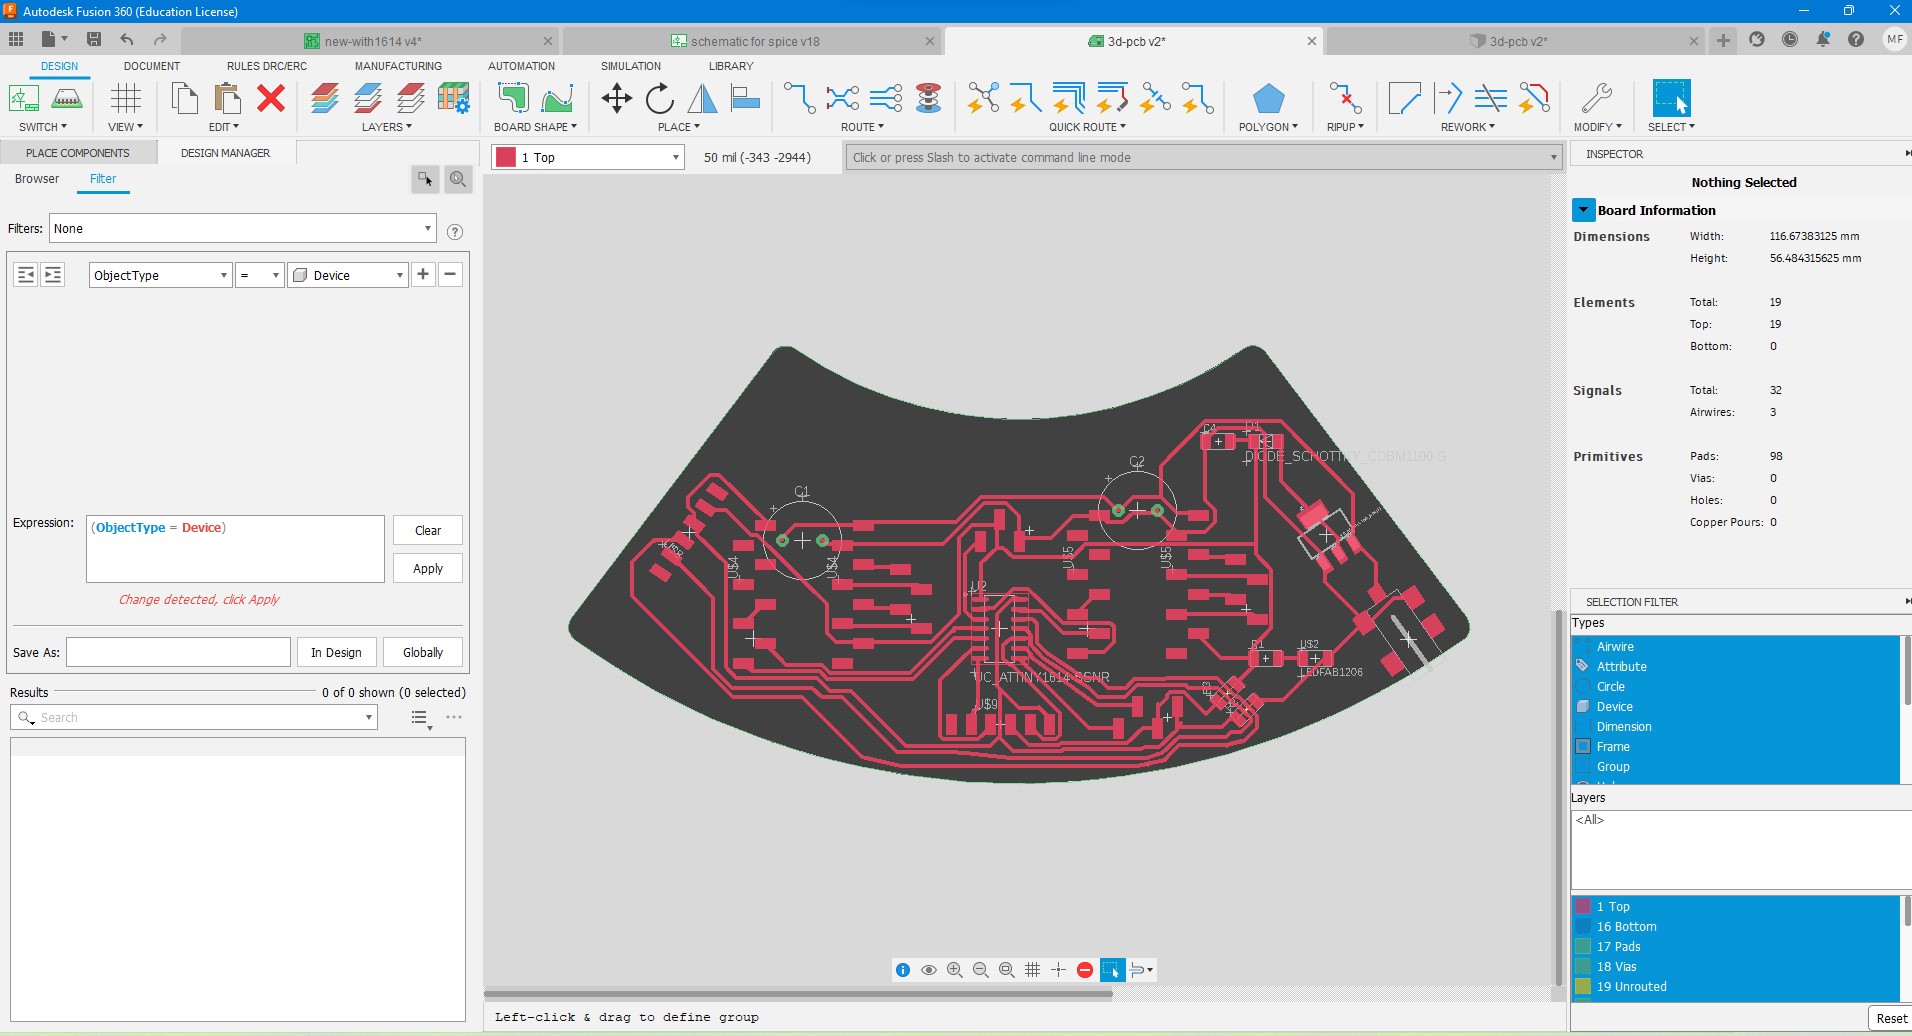
-
I placed plugs, and Serial connector, Connector for Bluetooth and power LED in correct place.
- I could easily did the design, milling and stuffing.
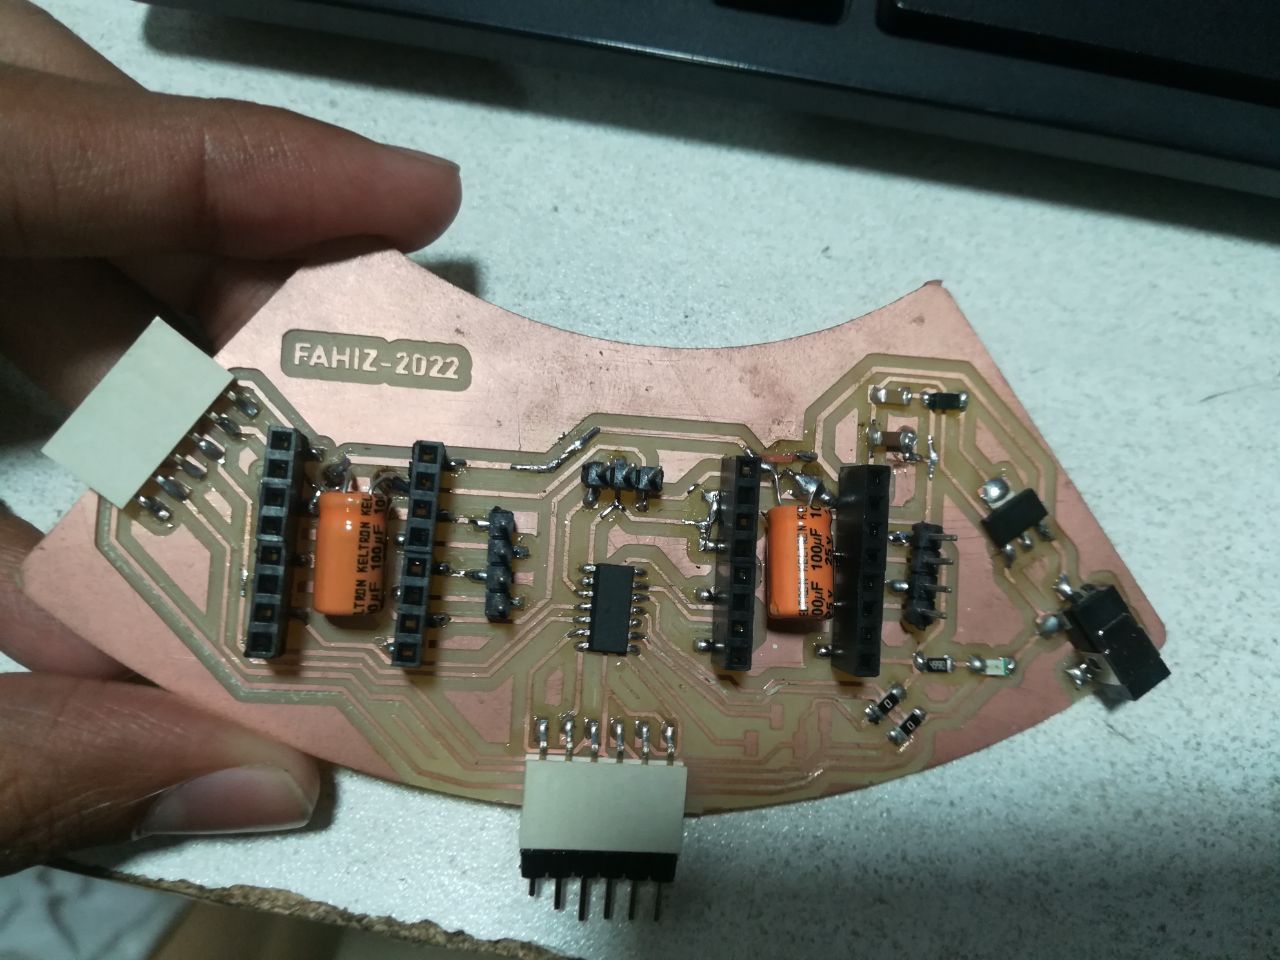
-
And it fixed very nicely on my device.

Then I tested it with stepper motors, servo and Bluetooth module.
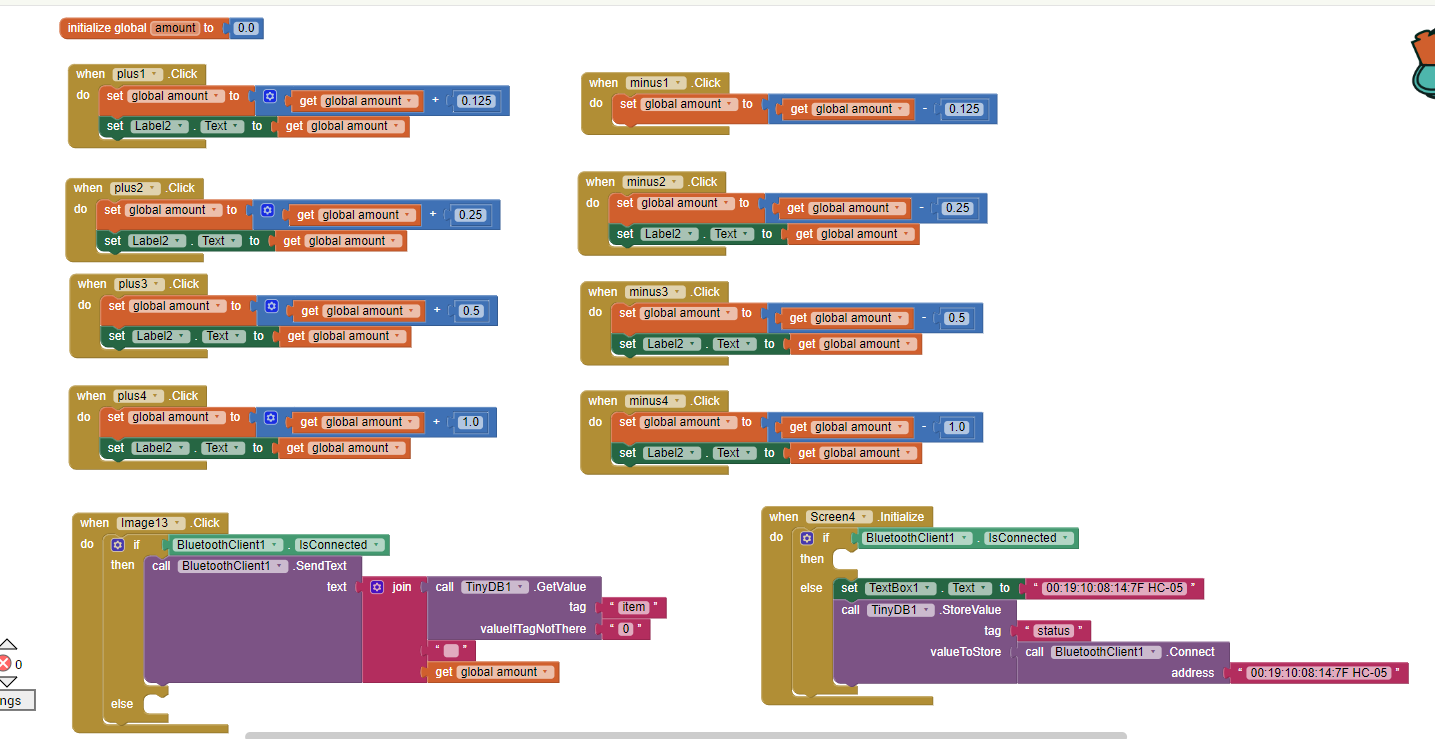
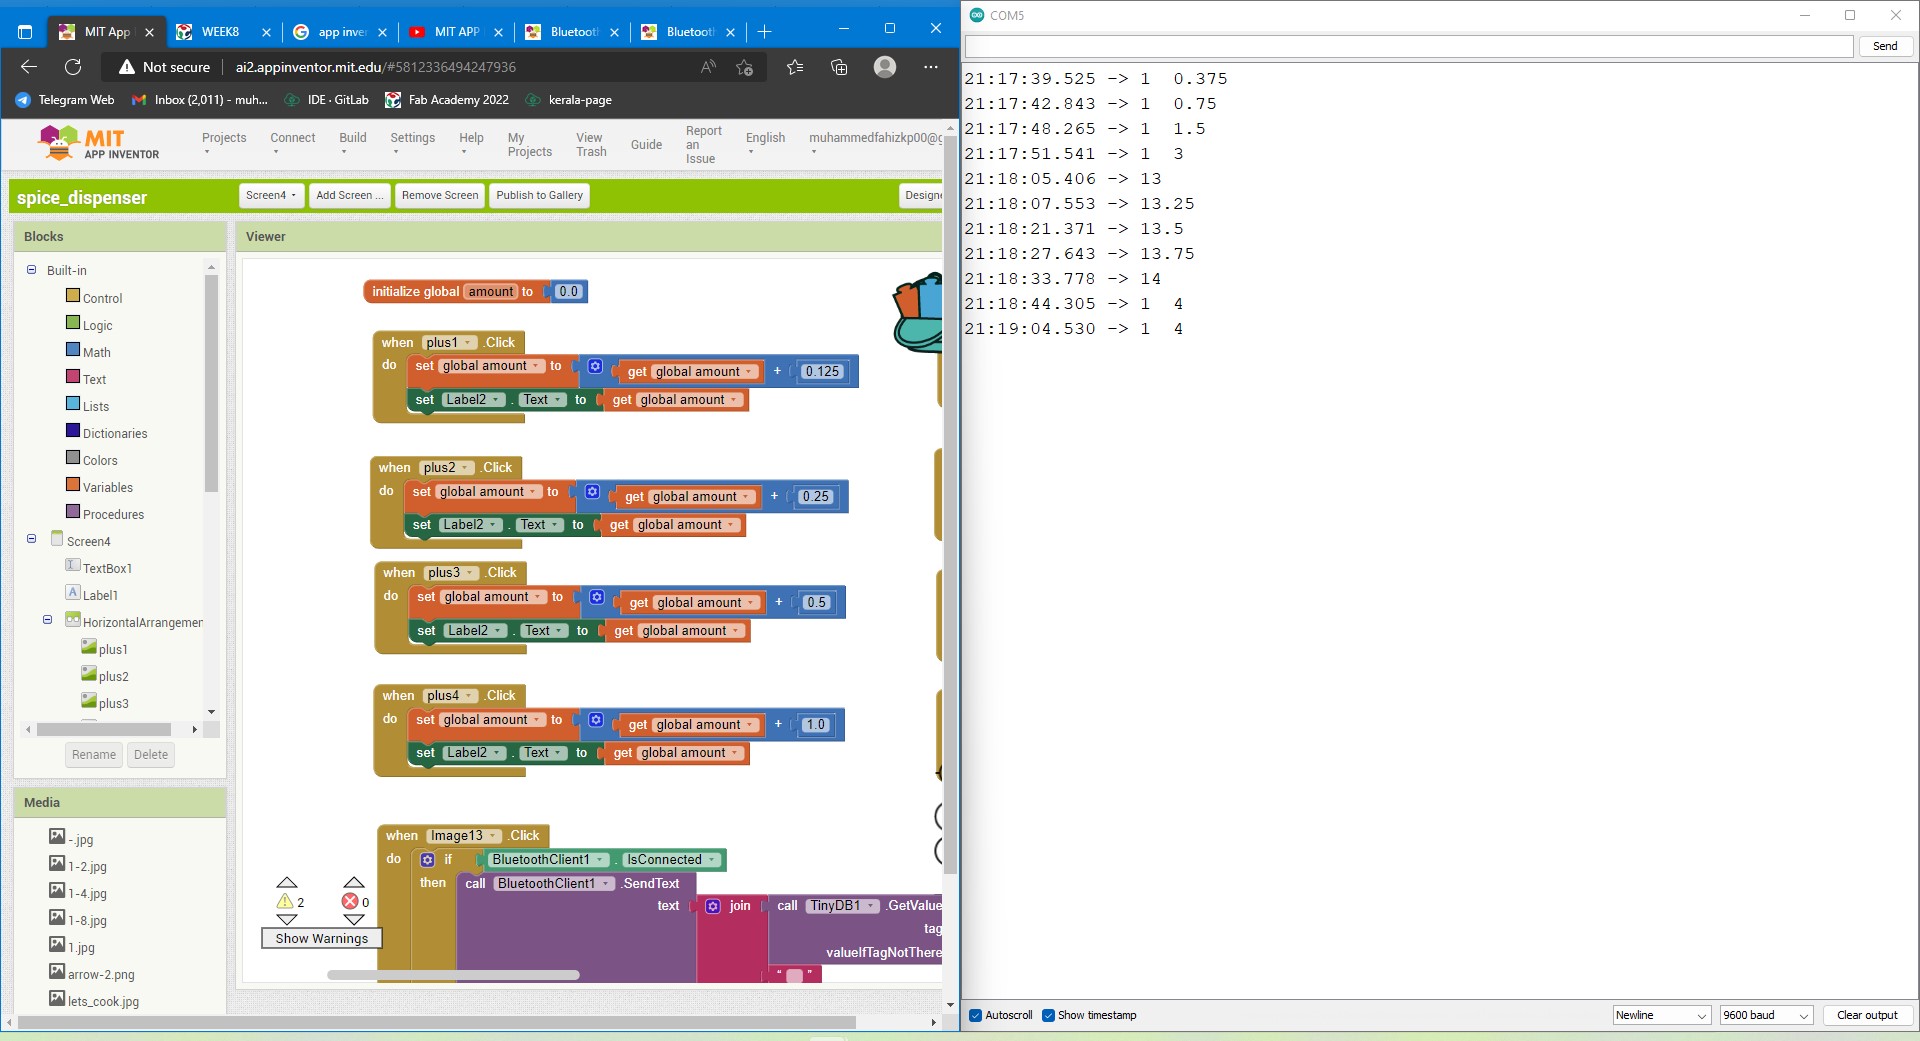
Making an app for my device
I used MIT app inventor for making application. It was new for me. I watched some videos in internet, and started making.
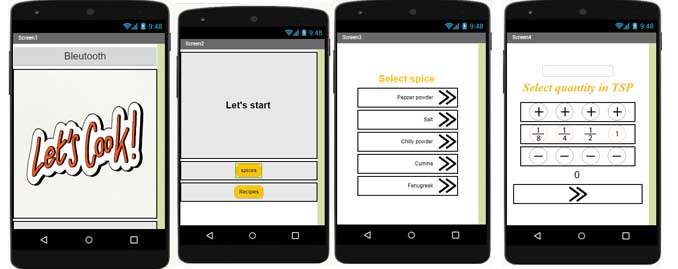
I made 5 screens.
In the first screen, we can select Bluetooth connection.
In the second screen, which types of mode we want
Spices and Recipes.
In the 3rd screen, we can select spice.
Then we can select quantity of spice with four buttons. I gave minimum quantity as 1/8 teaspoon.
After selecting the amount, click on the arrow.
I used tinyDB for storing 2 values(which type of spice, and quantity)
After making the software I tested it with a simple Bluetooth code.(for check spice type and amount is send).
for testing I used the AI companion in Mobile phone.
Then All things became ready.
Code
const int dirPin = 0;
const int stepPin = 10;
const int posn_dirPin = 1;
const int stepPin = 3;

#include <Servo.h>
Servo myservo;
int pos = 0;
#define A 2
#define B 3
#define C 4
#define D 5

#define NUMBER_OF_STEPS_PER_REV 512
int Delay = 5;
long int X_now = 0;


long int X_now = 0;
int stepDelay = 1000;

float amount;

void setup() {
  Serial.begin(9600);

  myservo.attach(9);

  pinMode(posn_stepPin, OUTPUT);
  pinMode(posn_dirPin, OUTPUT);
  pinMode(stepPin, OUTPUT);
  pinMode(dirPin, OUTPUT);
  myservo.write(0);
}

void loop() {
  serial();

}

void serial() {
  while (Serial.available() !=  0)
  {
    char data = Serial.read();
    //                                   long int x = data.toInt();
    switch (data) {

      case 'a':

        move_addr(290);

        for (pos = 0; pos <= 90; pos += 1) {
        myservo.write(pos);
        delay(15);
        }

        digitalWrite(dirPin, LOW);
        for (int x = 0; x < powder_A; x++)
        {
          digitalWrite(stepPin, HIGH);
          delayMicroseconds(1000);
          digitalWrite(stepPin, LOW);
          delayMicroseconds(1000);
        }

        myservo.write(0);
        delay(1000);

        break;

      case 'b':

        move_addr(580);

        break;

      case 'c':

        move_addr(870);

        break;

      default:                                     //                                  move_addr(x);
        break;                                                                            //  if (data=='A')
        //  {
        //    move_addr(290);
        //  }
        //  if (data=='B')
        //  {
        //    move_addr(580);
        //  }
    }
  }
}

void move_addr(long int container_posn) {
  long int steps_to_go = container_posn*290;
  long int step_error = steps_to_go - X_now;

  if (step_error > 0) {
    step_error = abs(step_error);
   digitalWrite(posn_dirPin, LOW);
    for (long int i = 0; i < step_error; i++) {
      position_stepper();
    }
    X_now += step_error;
  }
  else if (step_error < 0) {
    step_error = abs(step_error);
    digitalWrite(posn_dirPin, HIGH);

    for (long int i = 0; i < step_error; i++) {
      position_stepper();
    }
    X_now -= step_error;
  }
}


void position_stepper()
{
          digitalWrite(posn_stepPin, HIGH);
          delayMicroseconds(1000);
          digitalWrite(posn_stepPin, LOW);
          delayMicroseconds(1000);
}

void dispensing(float amount)
{     long int Step_for_dispense= amount*300;
      digitalWrite(dirPin, LOW);
      for (int y = 0; y < Step_for_dispense; y++)
      {
        digitalWrite(stepPin, HIGH);
        delayMicroseconds(1000);
        digitalWrite(stepPin, LOW);
        delayMicroseconds(1000);
      }
}
What parts and systems were made?
- 5 containers with 3d printing and acrylic sheet.
- Auger screw by 3d printing.
- I made a thrust bearing using metal balls and acrylic sheet. The top plate of the thrust bearing modified to an internal gear.
- I made a dispensing mechanism with a slider mechanism with servo and a stepper motor.
- I made a good coupling for dispensing mechanism
- I made a circuit board by using ATTINY1614 and it includes connections to Servo motor, NEMA-17 stepper motor, and Bluetooth module.
- A casing with acrylic sheet.
Programming
- I made an application in MIT app inventor.
What processes were used?
3D printing
I used 3D printing for making parts for spice dispensing mechanism(Sliding, rotating and coupling) I made auger screws with 3d printing
Laser cutting
I made container selecting mechanism using acrylic sheet. I used laser engraver for making big internal gear with thrust bearing and small gear. I made plates for spice container with 2mm clear acrylic.
Milling
I made my PCB with Roland milling machine.
What questions were answered?
Will the Sliding mechanism work properly? - I could seccesfully make a sliding mechanism with a servo motor. Will the coupling mechanism work properly? - I could find and make a best coupling mechanism and it worked properly. Will the auger screw can dispense spices in different sizes? - In my project I used same size auger screws. So it have a problem for dispensing thick spices like pepper. I can solve that problem by increasing pitch of auger screw for those containers. Can I make a good container with 3d printing and laser cutting? - I could make a better container which includes tranparent plates of acrylic. And these containers are replaceble for filling spices.
How was it evaluated?
- Spice container selecting mechanism I could make a good thrust bearing with a big internal gear using acrylic sheets. It worked very nicely.
- Dispensing mechanism Mechanism of dispensing was very good. coupling, sliding and rolling mechanisms worked properly. My stepper motor was little bigger, So I could not add more containers in my device.
- Spice container I could design and make better containers with 3d printing and laser cutting. It was better than I think.
- Mobile application I could make a application in MIT app inventor and it worked good. Image rations and text sizes have to change.
- Electronics I could make a board suitable for placing in the device. I could place each components(Bleutooth module, power plug etc.) in suitable places.
What are the implications?
- I can develop a better version of this device in future, that can use in any kitchens and hotels.
Download spice dispenser application