11. Networking
This week i decided to make the FPV camera system that would be mounted on my final project. A FPV or First Person View system is a camera that would be mounted on the front of the aircraft allowing the operator to view the aircraft as if they were flying it in the cockpit. My general plan for this week was to make wirless camera that coulf be connected to via a I-Phone or any electronic device capable of connecting to Internet.
Preparations
I decided to use a ESP32-CAM for this project because it is a reliable 2.4ghz wificard with a good bit of range due to its soldered antenna. additionally it was specifically created to hold a camera so I would not need to hack anything together. Additionally The camera fir the two traits that I was looking for. -Not Extremly Power Dependent -Not Ultra Quality But Still Good Enough To Fly With -Compack And Lightweight -Hard AP Is A Possibility Here is a photo of the ESP32-CAM moduel with the Camera plugged into it.

After that I began doing some digging on how to make this cmera work as i have had very little experience with this form of networking. After around an hour or two i found This Guide that walked you through how to set it up as a Soft AP Camera. Before i could do any programming I needed to install the required ESP libraires. I found this guide that explained in great detail what libraries and links to install/pull from. Here are some images of the libraries and link.


Programming:
Now that I had all of the Libraries Installed and the board manager all set up, I began working on the programming aspect of the camera. Luckuly the guide i had mentioned earlier already had a basic program on it. Unfortunatly do to security reasons relating to the IP, I will not be putting my altered version on this site. I will however, put the origional version. Here is the base of the program I used.
#include "esp_camera.h"
#include <WiFi.h>

//
// WARNING!!! PSRAM IC required for UXGA resolution and high JPEG quality
//            Ensure ESP32 Wrover Module or other board with PSRAM is selected
//            Partial images will be transmitted if image exceeds buffer size
//
//            You must select partition scheme from the board menu that has at least 3MB APP space.
//            Face Recognition is DISABLED for ESP32 and ESP32-S2, because it takes up from 15
//            seconds to process single frame. Face Detection is ENABLED if PSRAM is enabled as well

// ===================
// Select camera model
// ===================
//#define CAMERA_MODEL_WROVER_KIT // Has PSRAM
//#define CAMERA_MODEL_ESP_EYE // Has PSRAM
//#define CAMERA_MODEL_ESP32S3_EYE // Has PSRAM
//#define CAMERA_MODEL_M5STACK_PSRAM // Has PSRAM
//#define CAMERA_MODEL_M5STACK_V2_PSRAM // M5Camera version B Has PSRAM
//#define CAMERA_MODEL_M5STACK_WIDE // Has PSRAM
//#define CAMERA_MODEL_M5STACK_ESP32CAM // No PSRAM
//#define CAMERA_MODEL_M5STACK_UNITCAM // No PSRAM
#define CAMERA_MODEL_AI_THINKER // Has PSRAM
//#define CAMERA_MODEL_TTGO_T_JOURNAL // No PSRAM
// ** Espressif Internal Boards **
//#define CAMERA_MODEL_ESP32_CAM_BOARD
//#define CAMERA_MODEL_ESP32S2_CAM_BOARD
//#define CAMERA_MODEL_ESP32S3_CAM_LCD

#include "camera_pins.h"

// ===========================
// Enter your WiFi credentials
// ===========================
const char* ssid = "ENTER UR SSID";
const char* password = "ENTER CORROSPONDING PASSWORD";

void startCameraServer();

void setup() {
  Serial.begin(115200);
  Serial.setDebugOutput(true);
  Serial.println();

  camera_config_t config;
  config.ledc_channel = LEDC_CHANNEL_0;
  config.ledc_timer = LEDC_TIMER_0;
  config.pin_d0 = Y2_GPIO_NUM;
  config.pin_d1 = Y3_GPIO_NUM;
  config.pin_d2 = Y4_GPIO_NUM;
  config.pin_d3 = Y5_GPIO_NUM;
  config.pin_d4 = Y6_GPIO_NUM;
  config.pin_d5 = Y7_GPIO_NUM;
  config.pin_d6 = Y8_GPIO_NUM;
  config.pin_d7 = Y9_GPIO_NUM;
  config.pin_xclk = XCLK_GPIO_NUM;
  config.pin_pclk = PCLK_GPIO_NUM;
  config.pin_vsync = VSYNC_GPIO_NUM;
  config.pin_href = HREF_GPIO_NUM;
  config.pin_sscb_sda = SIOD_GPIO_NUM;
  config.pin_sscb_scl = SIOC_GPIO_NUM;
  config.pin_pwdn = PWDN_GPIO_NUM;
  config.pin_reset = RESET_GPIO_NUM;
  config.xclk_freq_hz = 20000000;
  config.frame_size = FRAMESIZE_UXGA;
  config.pixel_format = PIXFORMAT_JPEG; // for streaming
  //config.pixel_format = PIXFORMAT_RGB565; // for face detection/recognition
  config.grab_mode = CAMERA_GRAB_WHEN_EMPTY;
  config.fb_location = CAMERA_FB_IN_PSRAM;
  config.jpeg_quality = 12;
  config.fb_count = 1;

  // if PSRAM IC present, init with UXGA resolution and higher JPEG quality
  //                      for larger pre-allocated frame buffer.
  if(config.pixel_format == PIXFORMAT_JPEG){
    if(psramFound()){
      config.jpeg_quality = 10;
      config.fb_count = 2;
      config.grab_mode = CAMERA_GRAB_LATEST;
    } else {
      // Limit the frame size when PSRAM is not available
      config.frame_size = FRAMESIZE_SVGA;
      config.fb_location = CAMERA_FB_IN_DRAM;
    }
  } else {
    // Best option for face detection/recognition
    config.frame_size = FRAMESIZE_240X240;
#if CONFIG_IDF_TARGET_ESP32S3
    config.fb_count = 2;
#endif
  }

#if defined(CAMERA_MODEL_ESP_EYE)
  pinMode(13, INPUT_PULLUP);
  pinMode(14, INPUT_PULLUP);
#endif

  // camera init
  esp_err_t err = esp_camera_init(&config);
  if (err != ESP_OK) {
    Serial.printf("Camera init failed with error 0x%x", err);
    return;
  }

  sensor_t * s = esp_camera_sensor_get();
  // initial sensors are flipped vertically and colors are a bit saturated
  if (s->id.PID == OV3660_PID) {
    s->set_vflip(s, 1); // flip it back
    s->set_brightness(s, 1); // up the brightness just a bit
    s->set_saturation(s, -2); // lower the saturation
  }
  // drop down frame size for higher initial frame rate
  if(config.pixel_format == PIXFORMAT_JPEG){
    s->set_framesize(s, FRAMESIZE_QVGA);
  }

#if defined(CAMERA_MODEL_M5STACK_WIDE) || defined(CAMERA_MODEL_M5STACK_ESP32CAM)
  s->set_vflip(s, 1);
  s->set_hmirror(s, 1);
#endif

#if defined(CAMERA_MODEL_ESP32S3_EYE)
  s->set_vflip(s, 1);
#endif

  WiFi.softAP(ssid, password);

  startCameraServer();

  Serial.print("Camera Ready! Use 'http://");
  Serial.print(WiFi.localIP());
  Serial.println("' to connect");
}

void loop() {
  // Do nothing. Everything is done in another task by the web server
  delay(10000);
}
I ended up taking a big risk with this code as due to crcumstances out of my control, it was impossible to achive a soft AP with the WIFI I had avaliable. However, Despite this being a risk, itwasant actually a setback towards my final goal. Basically The wifi channles at school and at home were both 5gz channles. The ESP32 Is only compatible with 2.4ghz cahnnles. To counter this I compleatly skipped the Testing phase of this project and jumped right to the final phase. I know a decent amount about the Wi-FI side of networking from my history of hosting servers so I was easly able to identify and omit the section of code where it would search for the Host IP and link itself to it. Intern this made the ESP 32 host its on (No Internet) Wifi.
Uploading:
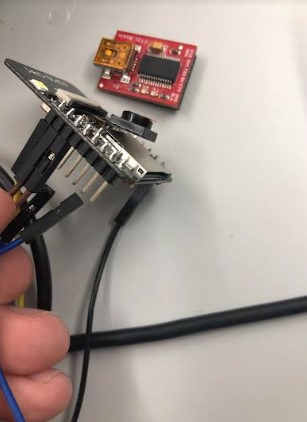
With my modified program finished and the workaround, I Wired my Esp32 to a FTDI 5V Programmer and began uploading the program to it. To my relife and supprise it worked first try and before i knew it the Wifi Que Es Joe poped up as availible on my Phone. The SSID and Password can be whatever you would like wher the wifi is a HARD AP so the only reason I named it Que Es Joe is because of a recurring joke between me and my friend. As with the SSID, the password can be whatever you want as long as the ESP32 is a HARD AP. Here are some Images of the Uploading Process.


Testing:
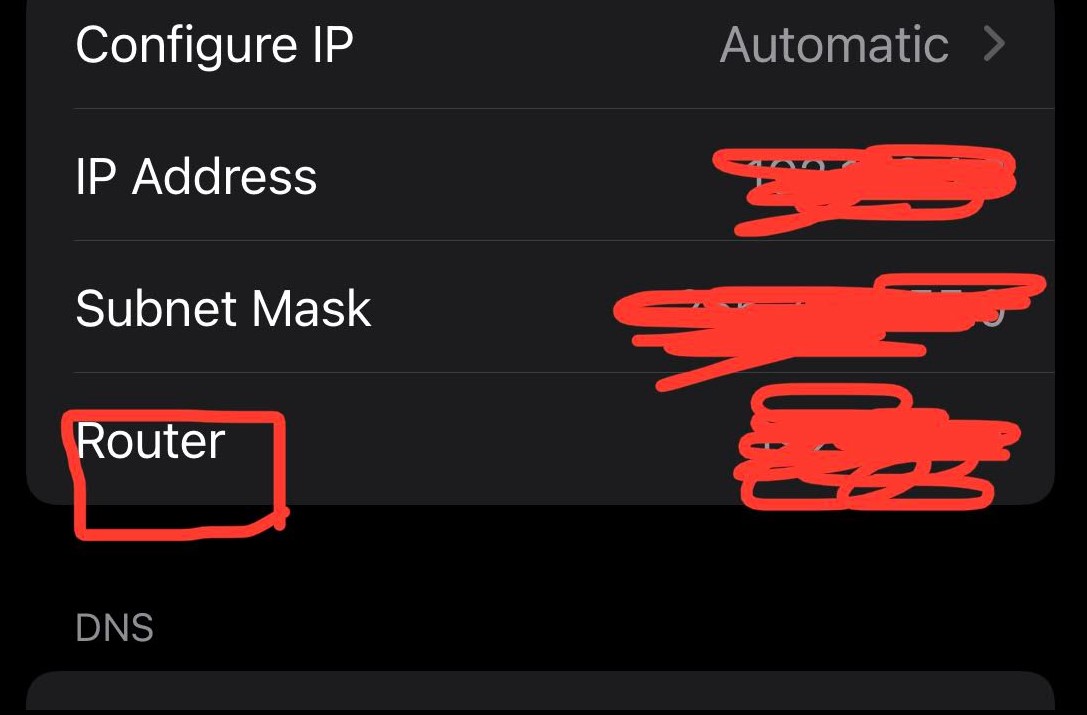
With the ability to connect to the WIFI signal of te ESP32 I opened up settings and looked for the IP that i would google. The IP i was looking for was the router. As every IP will be diffrent I have blured it out of the following image for privacy reasons. After locating the IP, I asted it into my browser which immideatly briught me to a screen that was displaying the camera. I was supprised at how smooth it was. Here are some photos of the Camera working.

Takeaways:
Overall i really enjoyed this week as i have always been interested in networking and was able to expand my understanding of networking to a new aera. I learned alot about Soft and Hard AP’s and felt like i got alot accomplished in terms of my final project.