1. Principales and Pratices and Project Managment:
Principales and Pratices:
My final project is a VTOL Quadplane/Drone. This page will contain everything from progress updates and changes to concept sketches.
Reasons For Creation/Inspiration:
Letʼs start of by saying I love anything that flys. Doesnʼt matter if its a quadcopter, plane, or even helicopter you give me one and ill fly it. After I bought my first drone I discovered how cool drone photography actually was. As I began to fly drones more commonly I realized how annoying the poor battery life could actually be. Additionally a bigger battery and better camera would exceed the drones payload cap. Well cut to about a year and a half later I was flying one of my sailplanes when the battery decided to eject from the aircraft. I lost all forms of control over it and ended up just recording it as it glided into the forest. I charged up my drone but due to it being a budget drone I was limited by the range and couldnʼt get anywhere near where (I think) the plane crashed. When driving home from the field I put the pieces together and came up with the idea of making a VTOL drone. Iʼm not kidding when I say this, the logic behind the idea was “One engine uses less power then four.” Additionally a bigger battery could be mounted because it can launch like a normal plane if it has more weight (for mapping flights) while launching like a drone for smooth drone photography. Additionally it can hover if it needs a still video or shot. I ended up doing several google searches on VTOL drones and formed up an idea pf what it should look like and its basic functions. This is still a WIP and it may turn into a triplane instead of a quad plane later on.
The Point/End Goal:
The end goal of this project it to have a type of aircraft that can fill the role of a quadcopter while being more efficent with fuel and having a greater top speed and range. If I have the time I will add a onboard flight computer allowint fully automated flight. The aircraft will contain a gps moduel to allow a type of position hold and return to home feature.
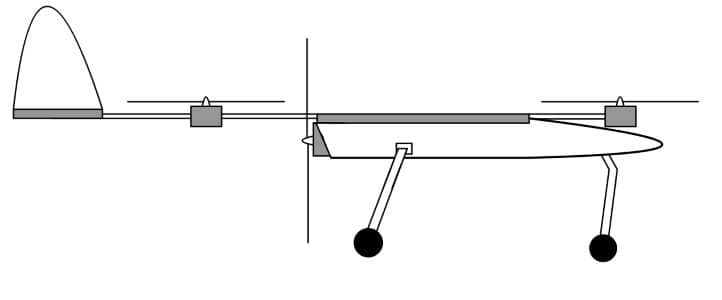
Design A:
This was my first idea of how the aircraft would generally look. It was basically your slandered twin boom pusher UAV with the only differences being the extended booms, the 4 additional vertical motors, and the sailplane wing shape. The main pusher propeller was positioned at the rear of the fuselage facing towards the tail of the aircraft. It seemed like a good idea until I had to draw it. I came to the realization that the large pusher propeller would strike the ground upon landing and the gear would need to be incredibly long. Here is a sketch depicting Design A.
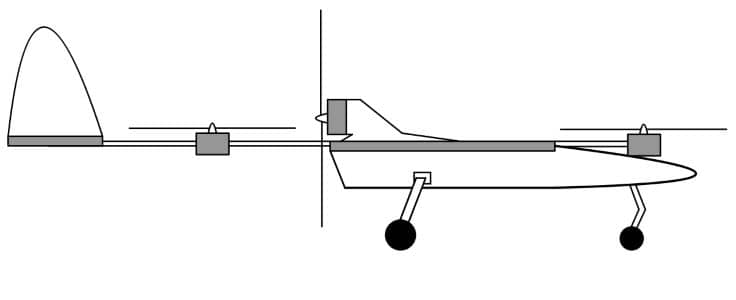
Design B:
This brings me to Design B. To fix the issue of the large propeller I added a sort of extension to the top of the aircraft This extension allows the motor to be mounted to the top of the fuselage and fixes the ground striking issue. This probably wont look to strange as several remote control airplanes have a similar design for their pusher motors. To counter the urge to dive due to the higher mounted motor the train will be slightly angled to increase the alt and help maintain level flight. Here is a sketch depicting Design B.
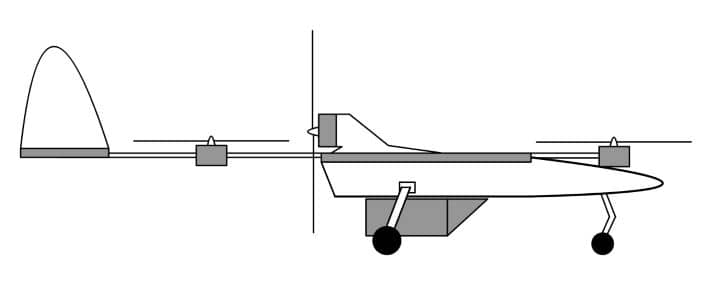
Interchangable Pod System:
Due to this aircraft being built to hold a small payload while still maintaining a basic fuselage shape and structure I decided to make a type of pod attachment in place of a cargo bay. This way each pod can be different sizes depending on the task and have special properties. For example if i wanted to add a pod containing a GoPro, I could create a pod with a hole in to bottom just pig enough for the camera itself to see through. Additionally the pod could be just big enough so the GoPro fits snugly inside removing the need for mounting straps. If thatʼs not enough due to the pod being the perfect size there wont be any unused space that adds more weight. These pods will be mounted in a similar fashion to how attachments are mounted onto firearms. There will be a nano T-Rail built into the bottom of the fuselage. Here is a sketch depicting the bottom of the fuselage with the T-Rail. It is important to note that this is still a WIP and may be replaced later on.

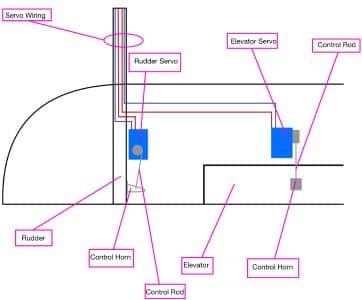
Cross Section Of Main Compartment:

Cross Section Of Main Wing:
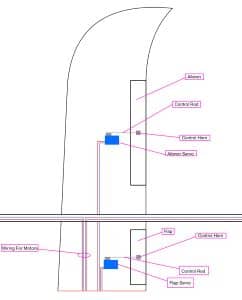
Cross Section Of Rear Wing:
Assignment 2: Project Managment:
The next assignment for this week was to create this sight that you are currently reading. Huge thanks to teddywarner.org as the steps i followed to make this are from his site.
Step Zero: Installing Softwares
First I needed to install the programs that I would need in order to create this site. these programs were, Gitbash, VsCode, Python IDE, and MKDocs. This step was easy as it just involved downloading and runing .exe files.
Step One: SSH Key:
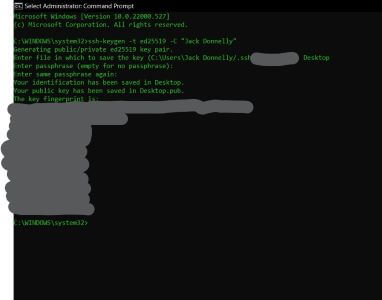
Next i needed to get my SSH key. This would allow my computer to connect to my get bash and allow me to updite my site whenever. When you get your SSH key DONT SHARE IT WITH ANYONE. Treat is like a password as it is crucial to your computers security. I followed this guide on git hub to help me with this. In the windows cmd running as administrator paste this command. ssh-keygen -t ed25519 -C “
Step Two: Cloning My REPO
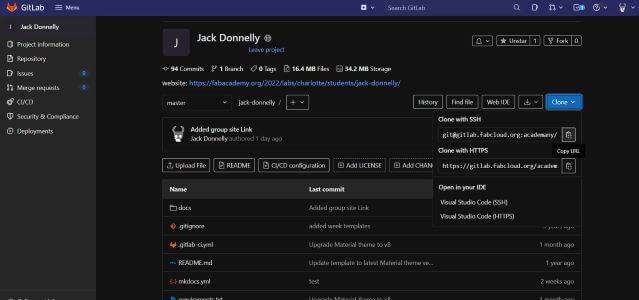
For the Second part of this process I needed to clone my git lab to my computer. What cloning does is it copys all of the files that are on your gitlab and adds them to your computer allowing you to edit them. This was done using the command [git clone] in the gitbash command prompt. It is important to make sure you are running git bash as administrator or some of these commands will not work.
Step Three: Linking MKdocs:
Next I needed to link Mkdocs to make programming my site alot easier. This would allow me to type in normal english insted of HTML. In your windows administrator terminal type this command . “pip install mkdocs-material.”
Step Four: Pull, Push, and Committing:
With my site now cloned and connected to gitlab all that was left was to test if it worked. To start I made a edited on one page and then typed the command Git pull in the MKdocs terminal. Upon refreshing my page the edit was gone meaning that my the pull command worked. Whenever you pull your site it will basically clone it again but instead of making a new file, it will overwrite the ones on your device and replace them with the ones on your git lab. Now that I knew the pull worked i needed to test if it would push. This was not as simple as I needed to type three commands insted of just one. I made another small edit and typed these three commands in order. “Git add .”, “Git commit -m “Test””, “Git push”. After waiting a bit for it to update I could see my small edit on my site.

Thoughts:
This Was not to hard and i actually found it interesting how so few commands could link my computer with a website. Also I don’t get a prompt for a ssh password while my fellow classmates do so I’m not concerned for my computers safety. Overall i actually enjoyed this despite not usually being that much into programming.