16. Interface and application programming
Assignment
- Write an application that interfaces with an input &/or output device that you made
4xiDraw interface
For the mechanical/machine design assignments, we made a syringe pump that will be used as an extruder for the 4xiDraw (open-source Axidraw drawing machine) that we built.
Now, we need an interface that allows to push the syringe while plotting.
Programming language
I would have liked to try programming in javascript, I found two examples of CNC controllers that runs in a web browser :
And also jscut that does SVG to g-code conversion.
But I don’t have time to learn a new language, so I will use Python 2.7. It is convenient because the existing Inkscape plugin for the 4xiDraw is written in Python.
Grbl firmware
The firmware for Arduino Uno is basically the original Grbl v0.9 modified to control the Z-axis servo on Arduino’s pin 11, using a dedicated g-code command. It can be downloaded from GitHub.
Here we come to something tricky. As the 4xiDraw uses only one belt to control two axis, it has an an unusual way to drive the motors. It is explained on the coreXY website.
When controlling the machine with a simple g-code sender, all the axis were moving as expected. But when using the Inkscape plugin and trying to move a single axis, both X and Y axes would move. If I try to send a drawing, it will be plotted with a 45 degree angle.
In the Grbl library folder, you can find a file named config.h. This file allows you to set most the of the machine’s configuration that has to be done before uploading the firmware. In config.h, I tried to comment the line #define COREXY because I expected that it would help the Inkscape plugin to control XY axes. In fact, it did no change with the Inkscape plugin, and I could not control it correctly with a simple g-code sender anymore.
Then I uncommented the line #define COREXY, uploaded the firmware to the Arduino, and everything started to work pefectly. Now I can control a single axis, from a simple g-code sender and from the Inkscape plugin (but I don’t understand why it didn’t work before).
Z-axis as an extruder
I don’t want to use an additional microcontroller for the syringe pump so I tried to use the Z-axis driver (it was unused because we have a servo to control the Z-axis, and it doesn’t need no stepper motor driver).
It worked fine with a simple g-code sender. Now I have to hack the Inkscape plugin in order to make it push the syringe while plotting.
Inkscape plugin
The plugin is made of seven files, two .inx files for the graphical user interface et five .py Python scripts for data processing and serial communication with the Arduino :
- 4xidraw.inx
- 4xidraw_hatch.inx
- fourxidraw.py
- fourxidraw_conf.py
- grbl_motion.py
- grbl_serial.py
- plot_utils.py
It also uses the script plot_utils.py that should be downloaded separately from plotink library on GitHub.
All these files must be copied in the folder Inkscape\share\extensions.
I started editing the plugin interface in 4xidraw.inx to allow testing the extrusion and setup it’s lenght.
In the setup tab :
<page name='setup' _gui-text='Setup'>

<_param name="instructions_setup" type="description" appearance="header">4xiDraw: Basic Setup</_param>
<param indent="1" name="penUpPosition" type="int" min="0" max="255" appearance="full"
_gui-text="Pen height: UP:">60</param>
<param indent="1" name="penDownPosition" type="int" min="0" max="255" appearance="full"
_gui-text="Pen height: DOWN:">40</param>
<param indent="1" name="toPump" type="int" min="0" max="100" appearance="full"
_gui-text="Extrusion lenght:">1</param>

<param name="setupType" type="optiongroup" _gui-text="Action on 'Apply':">
<_option value="align-mode">Raise pen</_option>
<_option value="toggle-pen">Raise and lower pen</_option>
<_option value="extrude">Push syringe</_option>
</param>
<_param indent="1" name="instructions_setup3" type="description" xml:space="preserve">
- Raise pen to manually
move carriage to the Home Corner (upper left).

- Raise and lower pen to check the vertical positions
of the pen for writing and drawing.

</_param>
</page>
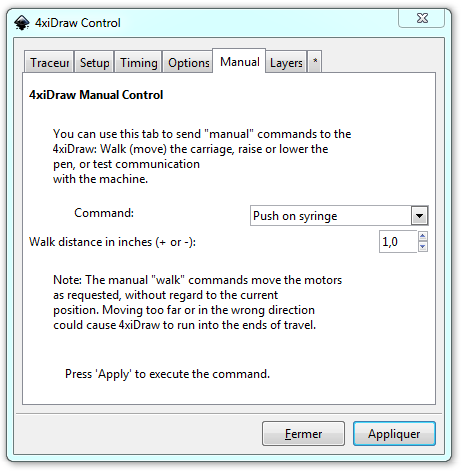
And in the Manual tab :
<param name="manualType" type="optiongroup" appearance="minimal"
_gui-text="               Command: ">
<_option value="none"           >- Select -</_option>
<_option value="raise-pen"      >Raise the Pen</_option>
<_option value="lower-pen"      >Lower the Pen</_option>
<_option value="extrude"        >Push on syringe</_option>
<_option value="walk-x-motor"   >Walk Carriage (X)</_option>
<_option value="walk-y-motor"   >Walk Carriage (Y)</_option>
<_option value="version-check"  >Check GRBL Version</_option>
<_option value="strip-data"     >Strip plotter data from file</_option>
</param>

<param name="WalkDistance" type="float" min="-11" max="11"
_gui-text="Walk distance in inches (+ or -):">1.00</param>
This is how the user interface looks like once edited :


In fourxidraw_conf.py, I just added a variable named toPush that represents the lenght to push on the syringe :
PenUpPos = 40           # Default pen-up position
PenDownPos = 0      # Default pen-down position
toPump = 1        # Default extrusion lenght
Then I started editing fourxidraw.py, this is where things are getting complicated…
In def init(self):, I added an option parser to get the extrusion lenght from the plugin :
self.OptionParser.add_option("--toPump",
  action="store", type="int",
  dest="toPump", default=fourxidraw_conf.toPump,
  help="Distance to push on syringe")
In the function createMotion, I added a parameter named toPump :
def createMotion(self):
  self.motion = GrblMotion(self.serialPort, fourxidraw_conf.DPI_16X, self.options.penUpPosition, self.options.penDownPosition, self.options.toPump)
The function setupCommand is called from the Setup tab in the plugin, I added the extrude option :
def setupCommand(self):
  """Execute commands from the "setup" mode"""

  self.createMotion()

  if self.options.setupType == "align-mode":
    self.penUp()

  elif self.options.setupType == "toggle-pen":
    self.penUp()
    time.sleep(1)
    self.penDown()

  elif self.options.setupType == "extrude":
    self.extrude(self.options.toPump)
The function manualCommand is called from the Manual tab in the plugin, I also added the extrude option :
def manualCommand(self):
  """Execute commands in the "manual" mode/tab"""

  if self.options.manualType == "none":
    return

  self.createMotion()

  if self.serialPort is None:
    return

  if self.options.manualType == "raise-pen":
    self.penUp()

  elif self.options.manualType == "lower-pen":
    self.penDown()

  elif self.options.manualType == "extrude":
    self.extrude(self.options.WalkDistance)

  elif self.options.manualType == "version-check":
    strVersion = self.serialPort.query('$I\r')
    inkex.errormsg('I asked GRBL for its version info, and it replied:\n ' + strVersion)

  else:  # self.options.manualType is walk motor:
    if self.options.manualType == "walk-y-motor":
      nDeltaX = 0
      nDeltaY = self.options.WalkDistance
    elif self.options.manualType == "walk-x-motor":
      nDeltaY = 0
      nDeltaX = self.options.WalkDistance
    else:
      return

    self.fSpeed = self.PenDownSpeed

    self.EnableMotors()
    self.fCurrX = self.svgLastKnownPosX_Old + fourxidraw_conf.StartPosX
    self.fCurrY = self.svgLastKnownPosY_Old + fourxidraw_conf.StartPosY
    self.ignoreLimits = True
    fX = self.fCurrX + nDeltaX   # Note: Walking motors is STRICTLY RELATIVE TO INITIAL POSITION.
    fY = self.fCurrY + nDeltaY
    self.plotSegment(fX, fY)
And finally, I added a extrude function, that will be executed through grbl_motion.py :
def extrude(self, z):
  self.motion.extrude(z)
In grbl_motion.py (where the g-code commands are sent), I added the extrude function :
def extrude(self, z):
  if (self.port is not None):
    strOutput = 'G91 G0 Z' + str(z) + '\r'
    self.port.command(strOutput)
I tried to use G1 Z … but I got asked to give a feedrate.
Then I watched how a simple g-code sender would control the Z-axis and I figured out that I had to add G91 to make a incremental move (in relative coordinates).
This work is still under construction as the Grbl shield does execute this g-code command, but not when it is send recursively. I may need to use another g-code command, or to add a delay…
To do…
In order to complete the Machine Design assignment, I will have to :
- Find a proper g-code command to move the Z-axis
- Find how to move the Z-axis to make droplets when plotting.
Simple serial interfaces
In order to complete the individual assignment, I wrote a simple serial interface using Python2.7 and it’s graphical library named Tkinter.
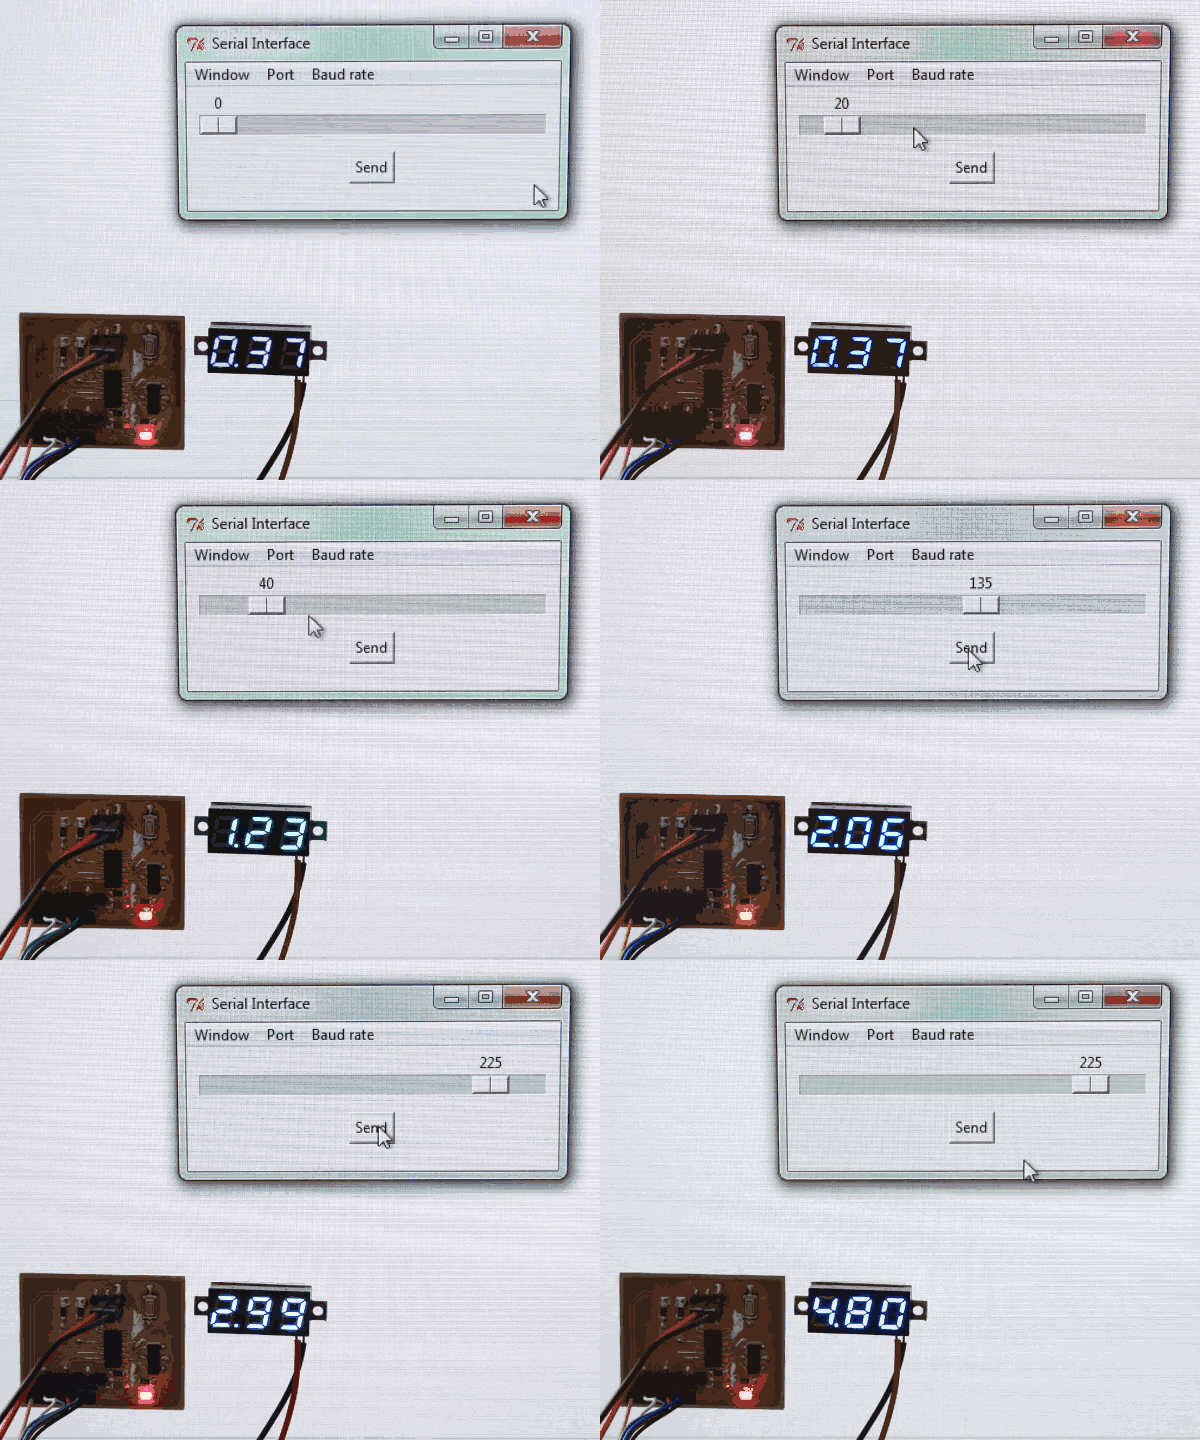
It use a scale bar to choose the value (of a single byte) that you want to send to the microcontroller :

In the menu, you can select the serial port and it’s baudrate. Here is the complete script :
from Tkinter import *
import serial
import struct

# --- functions ---

def serial_ports():
    ports = ['COM%s' % (i + 1) for i in range(256)]
    result = []
    for port in ports:
        try:
            s = serial.Serial(port)
            s.close()
            result.append(port)
        except (OSError, serial.SerialException):
            pass
    return result

def on_select(event=None):
    # get selection from event
    print("event.widget:", event.widget.get())

    # or get selection directly from combobox
    print("comboboxes: ", cb.get())

def run():
    com = v.get()
    print "Port " + com + " selected"
    s.port = com
    try:
        s.open()
    except:
        print "Could not connect"
    if s.is_open:
        print "Port " + com + " connected"
    else:
        print "Port " + com + " not connected"

def disconnect():
    try:
        s.close()
        print "Port " + com + " disconnected"
    except:
        print "Could not disconnect"

def setSpeed():
    baudrate = w.get()
    s.baudrate = baudrate
    print "Terminal set to " + str(baudrate) + " bps"

def close():
    s.close()
    root.destroy()

def send_value():
    val = struct.pack("B", sc.get())
    if(s.is_open):
        s.write(val)

# --- main ---

s = serial.Serial()
rateList = [110, 300, 600, 1200, 2400, 4800, 9600, 14400, 19200, 38400, 57600, 115200]

root = Tk()
root.title("Serial Interface")
root.minsize(width=300, height=100)
root.maxsize(width=800, height=600)

menubar = Menu(root)
menu0 = Menu(menubar, tearoff=0)
menu1 = Menu(menubar, tearoff=0)
menu2 = Menu(menubar, tearoff=0)

menu0.add_command(label="Close", command=close)
menubar.add_cascade(label="Window", menu=menu0)

v = StringVar()
w = StringVar()

portList=serial_ports()
for item in portList:
    menu1.add_radiobutton(label=item, variable=v, value=item,  command=run)
menu1.add_separator()
menu1.add_command(label="Disconnect", command=disconnect)
menubar.add_cascade(label="Port", menu=menu1)

for bps in rateList:
    menu2.add_radiobutton(label=bps, variable=w, value=bps, command=setSpeed)
menubar.add_cascade(label="Baud rate", menu=menu2)
menu2.invoke(6)

root.config(menu=menubar)

sc = Scale(root, from_=0, to=255, length=280, resolution=5, orient=HORIZONTAL)
sc.pack()
Button(root, text='Send', command=send_value).pack(pady=10)

root.mainloop()
It is meant to run on Windows because serial ports names are starting with COM, I will have to find a way to make it cross-platform.
The code that runs on my HelloBoard is the same that I used for the week 12 assignment to control my output device.
It was tested successfully with a bar-graph module and a servo.
Here, I tested it with a digital volt-meter :
