16. Wildcard Week
Assignments
Design and produce something with a digital fabrication process (incorporating computer-aided design and manufacturing) not covered in another assignment, documenting the requirements that your assignment meets, and including everything necessary to reproduce it. Possibilities include but are not limited to wildcard week examples.
Machine Vision
In this Week I’ll work in Machine Vision and use machine learning to do Facial recognition
For this project I’ll use Nvidia Jetson TX2 whish is a fast, most power-efficient embedded AI computing device. This 7.5-watt supercomputer on a module brings true AI computing at the edge. It’s built around an NVIDIA Pascal™-family GPU and loaded with 8GB of memory and 59.7GB/s of memory bandwidth. It features a variety of standard hardware interfaces that make it easy to integrate it into a wide range of products and form factors.

Facial Recognition
I follow this tutorial Facial Recognition with Python and the face_recognition library for this project.
also I read this documentation Python Real-Time Facial Recognition/Identification with CUDA Enabled
Open the terminal in Nvidia Jetson TX2 and run the followig commands
- $ sudo apt-get update
- $ sudo apt-get install python3-dev
- $ sudo apt-get upgrade
- $ sudo apt-get install build-dep python3
- $ sudo apt-get update
- $ sudo apt-get install libblas-dev liblapack-dev libatlas-base-dev
- $ sudo apt-get update
Now Clone dlib code
$ git clone https://github.com/davisking/dlib.git
Dlib is a modern C++ toolkit containing machine learning algorithms and tools for creating complex software in C++ to solve real world problems. It is used in both industry and academia in a wide range of domains including robotics, embedded devices, mobile phones, and large high performance computing environments. dlib.net
After cloning the project we need to Compile and Install it to setup the environment by running the following commands
$ cd dlib/
$ gedit setup.py
Add the following line
os.environ["CC"] = "gcc-6"
it should look like this
from setuptools.command.build_ext import build_ext
from distutils.version import LooseVersion

os.environ["CC"] = "gcc-6" # HERE!

def get_extra_cmake_options():
    """read --clean, --no, --set, --compiler-flags, and -G options from the command line and add them as cmake switches.
    """
Then run this
$ cd dlib
$ mkdir build && cd build
$ cmake .. -DCUDA_HOST_COMPILER=/usr/bin/gcc-6
-DCMAKE_PREFIX_PATH=/usr/lib/x86_64-linux-gnu/ -DDLIB_USE_CUDA=1
-DUSE_AVX_INSTRUCTIONS=1 -DUSE_F16C=1
$ cmake --build . --config Release
$ sudo ldconfig

$ python3 setup.py install
$ ls
$ sudo python3 setup.py install
$ pip3 install face_recognition
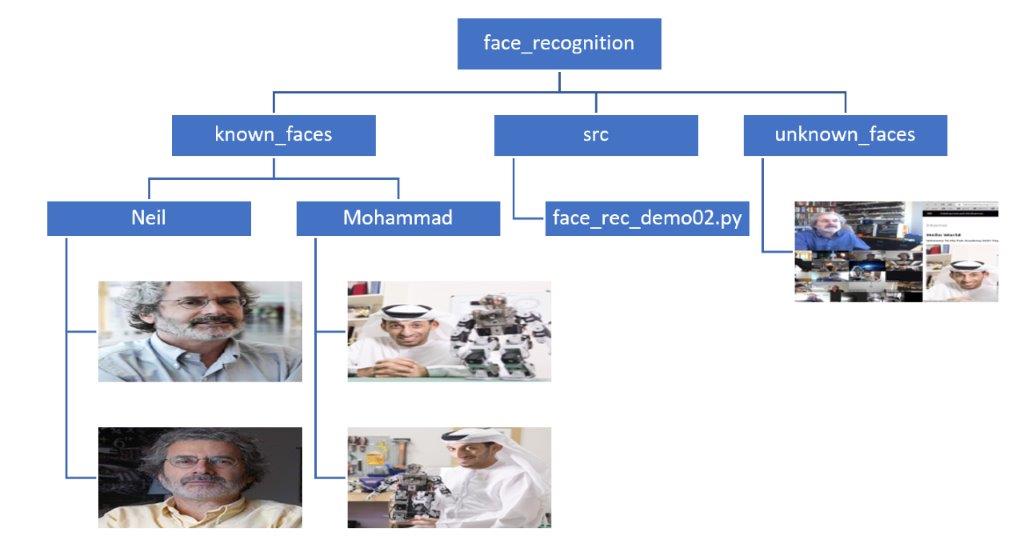
The folder structure of the code is the following
Python Code
#face_recognition #face_id #face_identification #dlib
import dlib
import face_recognition
import os
import cv2
KNOWN_FACES_DIR = "../known_faces" # training data
UNKNOWN_FACES_DIR = "../unknown_faces"
TOLERANCE = 0.6
FRAME_THICKNESS = 3 # rectangle thickness
FONT_THICKNESS = 2 # font thickness
MODEL = "cnn" # convolutional
#video = cv2.VideoCapture(1) # use webcan as input (source of test images)
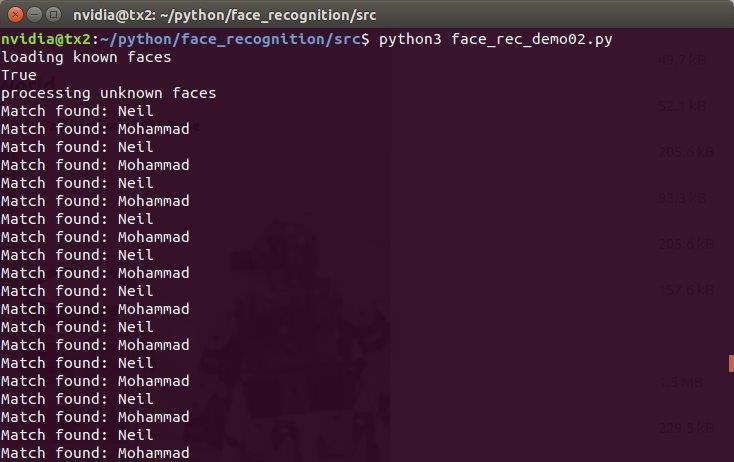
print("loading known faces")
known_faces = [] # store known faces here
known_names = [] # store name of them here
print(dlib.DLIB_USE_CUDA) # ture, if cuda is enabled.
### TRAIN THE CNN MODEL ON KNOWN FACES #############################
for name in os.listdir(KNOWN_FACES_DIR):
for filename in os.listdir(f"{KNOWN_FACES_DIR}/{name}"):
image = face_recognition.load_image_file(f"{KNOWN_FACES_DIR}/{name}/{filename}")
encoding = face_recognition.face_encodings(image)[0]
known_faces.append(encoding)
known_names.append(name)
####################################################################
print("processing unknown faces")
while True:
#ret, image = video.read() # obtain new image from webcam
#image = cv2.imread("../unknown_faces/1.jpg",cv2.IMREAD_COLOR)
image = face_recognition.load_image_file(f"{UNKNOWN_FACES_DIR}/{filename}")
#cv2.imshow("uknown", image)
locations = face_recognition.face_locations(image, model=MODEL) # find face
encodings = face_recognition.face_encodings(image, locations) # extrac face features
for face_encoding, face_location in zip(encodings, locations):
results = face_recognition.compare_faces(known_faces, face_encoding, TOLERANCE)
match = None
if True in results: # if there is a known face
match = known_names[results.index(True)] # who that person is
print(f"Match found: {match}")
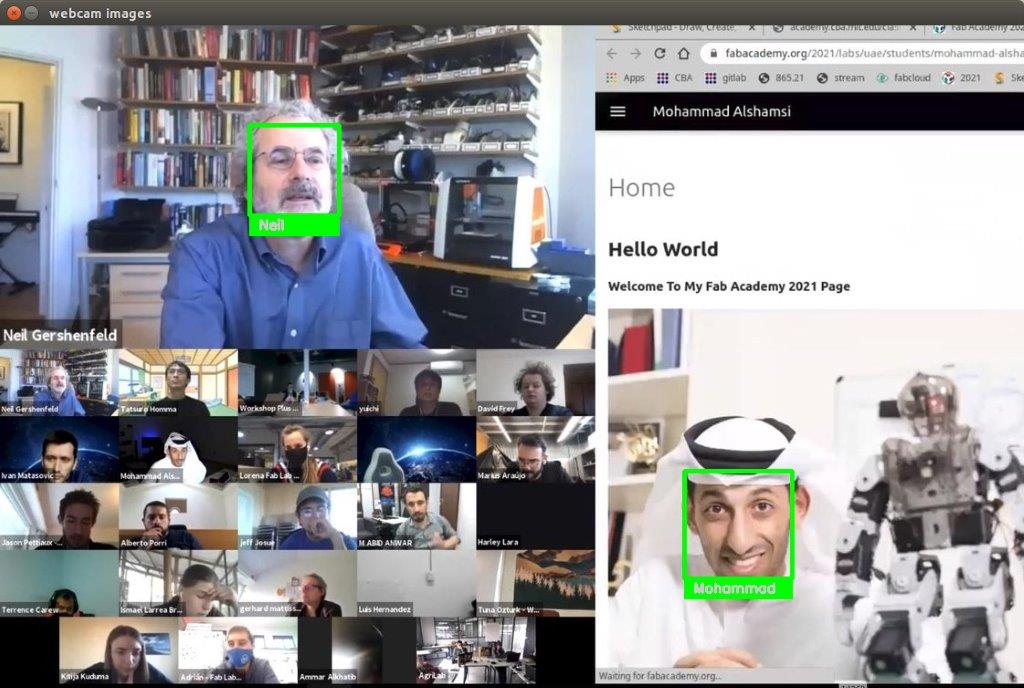
### DRAW RECTANGLE AND #####################################
top_left = (face_location[3], face_location[0])
bottom_right = (face_location[1], face_location[2])
color = [0, 255, 0] # green
cv2.rectangle(image, top_left, bottom_right, color, FRAME_THICKNESS)
top_left = (face_location[3], face_location[2])
bottom_right = (face_location[1], face_location[2]+22)
cv2.rectangle(image, top_left, bottom_right, color, cv2.FILLED)
cv2.putText(image, match, (face_location[3]+10, face_location[2]+15), cv2.FONT_HERSHEY_SIMPLEX, 0.5, (200, 200, 200), FONT_THICKNESS)
#############################################################
cv2.imshow("webcam images", image) # make window
if cv2.waitKey(1) & 0xFF == ord("q"):
break
video_capture.release()
cv2.destroyAllWindows()
To run the code run the following command
Cd ~/python/face_recognition/src

$ python3 face_rec_demo02.py
I got a Error: Failed to load module “canberra-gtk-module”
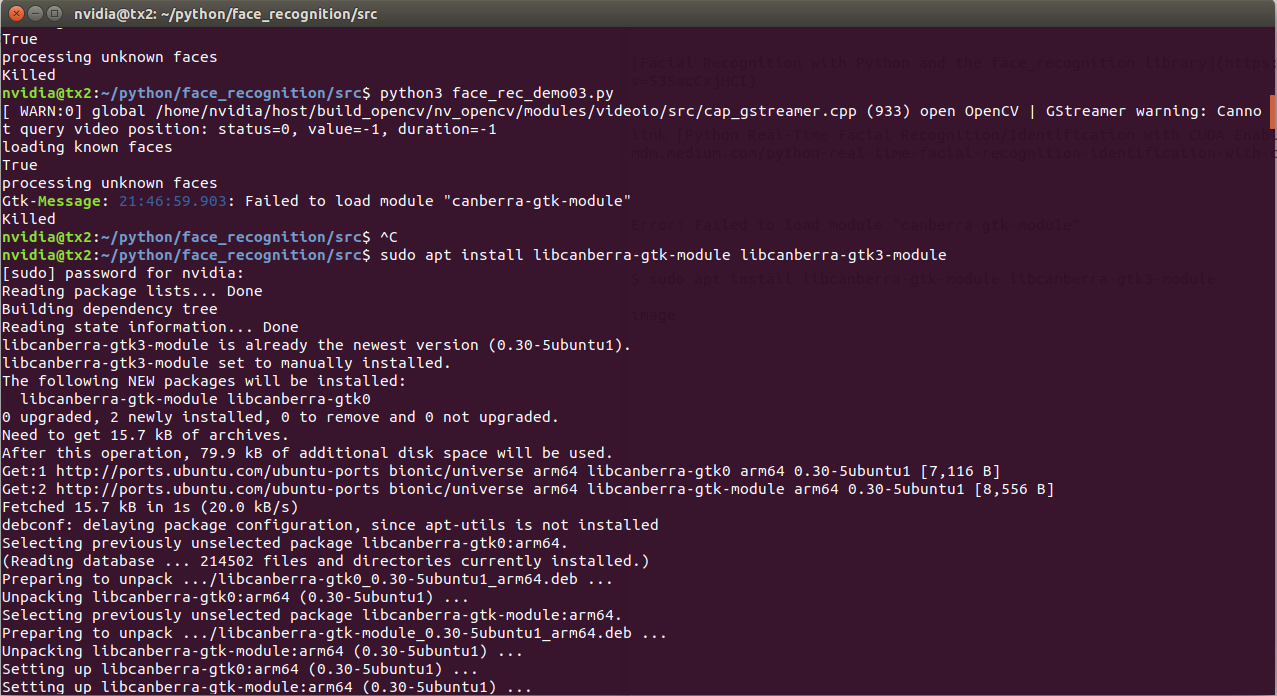
To fix this issue run the following command
$ sudo apt install libcanberra-gtk-module libcanberra-gtk3-module
Trying to run the code again and it works :)
The Full code can be downloaded from here
I’m very happy for this result as it’s my fist time doing face recognition