19. Project development
1. Weekly Assignment Requirement
In this week I need to answer quetions like…
- what tasks have been completed, and what tasks remain?
- what has worked? what hasn’t?
- what questions need to be resolved?
- what will happen when?
- what have you learned?
2. Previous Weekly Development
As I work on weekdays, it is not easy to go FabLab Kamakura and use machines. I have a limited amount of time on weekends to use the equipment and make things. So from 1st week, I tried to test/handle the items used in the final project or made actual parts to be used in weekly assignments.
Also I wrote Final Project Development Diary and uploaded texts and photos. Its record is a bit half-hearted, but please refer to that as well.
Assignment 1 : Principles and practices
I did initial research for making pinball machines. I thought about what should I focuse on…
-
3D printing, laser cutting and CNC milling will work for making its body.
- Wood looks pretty.
- It’s possible to make score counting system based on Arduino.
-
Zaria Smalls’ Pinball tell me “Trying to make all of its parts will makes you too busy.”
-
Too large is not good for me, in this time. I don’t have driving license.
-
It will be better to make small, portable, and focusing on raising its quality, program and mechanism.
Assignment 8 : Computer-Controlled Machining
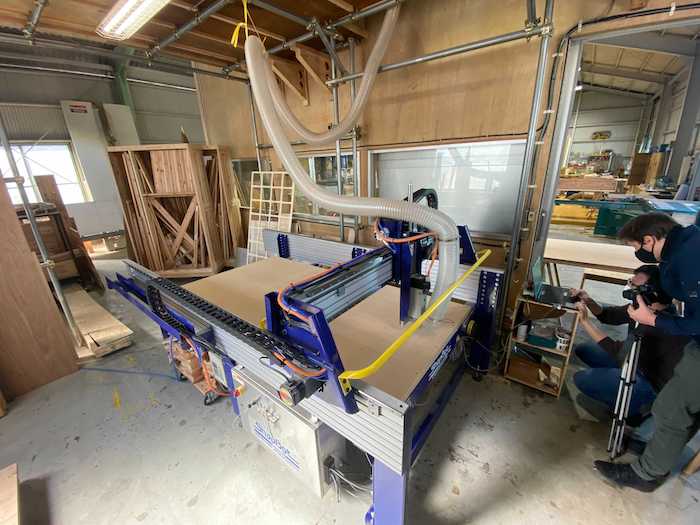
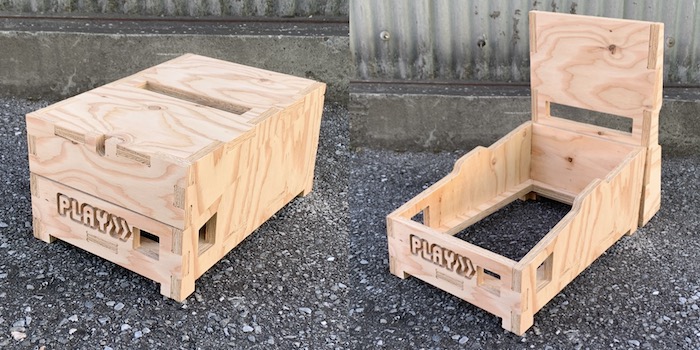
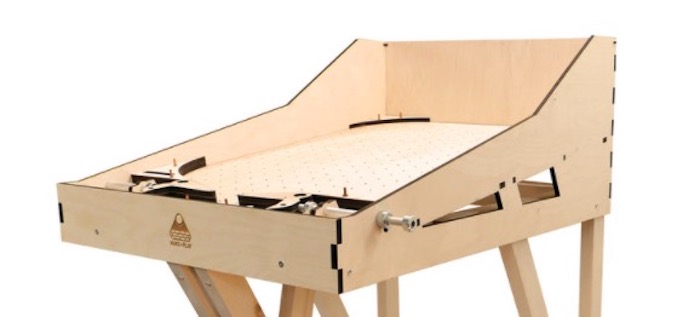
FabLab Kamakura doesn’t have large CNC like Shopbot(of course, we will ask for help with other labs). This week is almost the only time I/We can use ShopBot. So I finished designing outer enclosure of my pinball machine and fabricated it. I thought I would design detailed inner structure later and making it with equipment available in the FabLab Kamakura, such as a laser cutter.
Assignment 11 : Input Devices
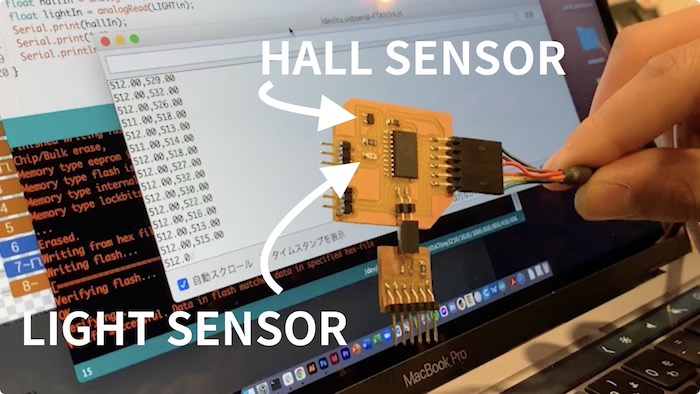
I learned how to make/design boards in Electronics production and Electronics Design, I tried to use some sensors for detecting ball in Input Devices week. I thought Hall sensor would detect metal ball passing throgh (I was wrong, but it’s OK), light sensor would know the brightness change of mainboard’s hole.
Assignment : Molding & Casting
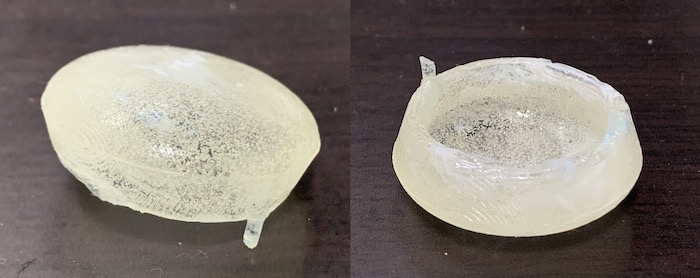
I learned how to make clear parts, for example, pop bumper cover by molding & casting week. Finally I didn’t get much time to remake, improve and apply for my final project, but it was very fun and useful experiecne.
Assingment 13 : Output Devices
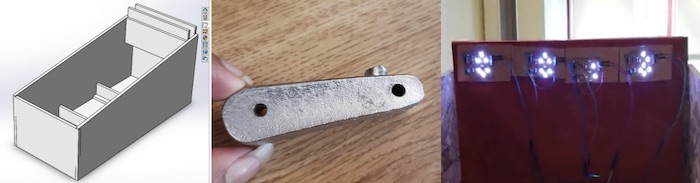
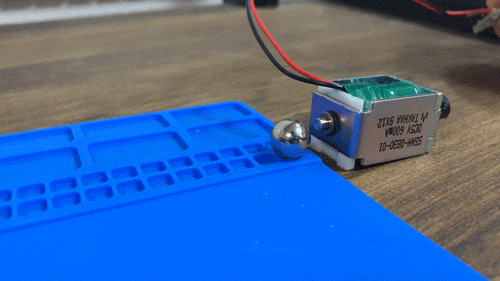
I must learn how to use solenoid for my final project, because many components on pinball machine are moved by it. It was a first time to use solenoid, to calculate resistor/power supply values for it. Also I checked thrusting strength of 3 types of commercial solenoids, they were not enough to push balls back.
Assingment 16 : Wildcard Week
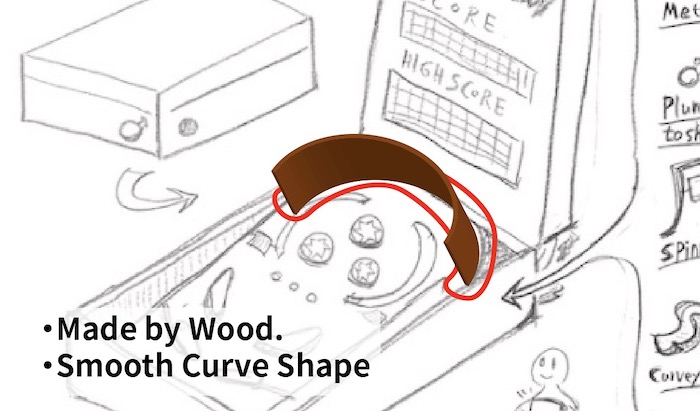
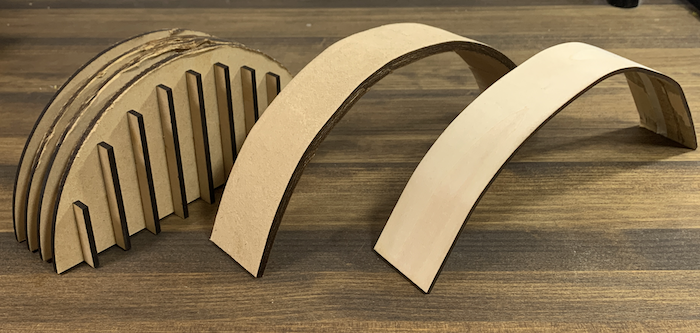
There should be curved wall on my pinball gameboard. I didn’t decided how to make it, so I tried homebrew woodbending. I succeeded in bending wood with steam iron, but it was difficult to control precision. Finally, I decided to use laser cutter and kerf bending for making curved wall.
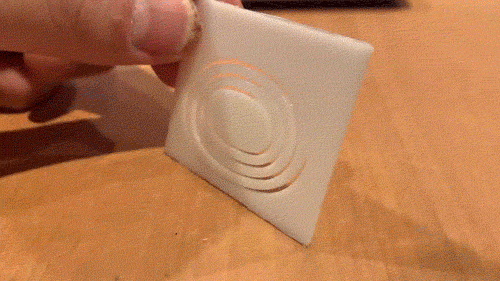
Also I tried to make 3D printed plunger. I made 3 patterns of plunger with spiral shape. It needs enoguh sitffness and space without adherence to other place. It also needs knob to grab and release.
3. Development for final project
Solenoid Selection (5/14 - 5/22)
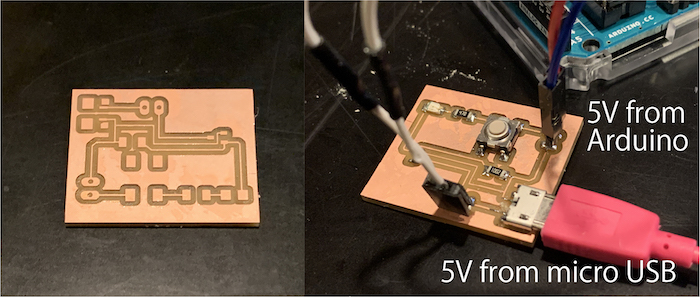
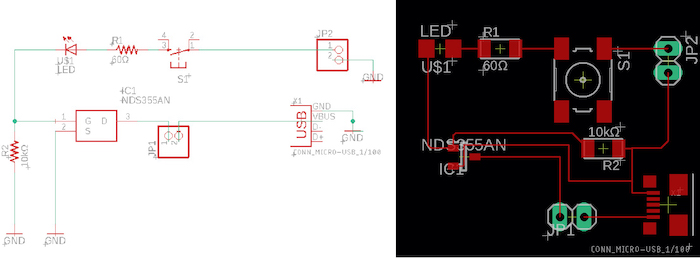
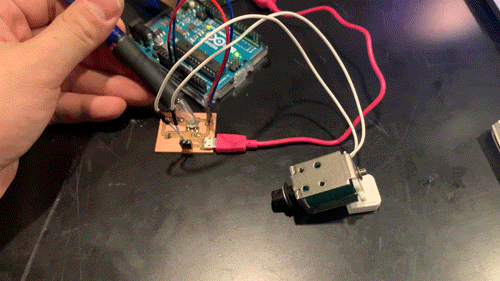
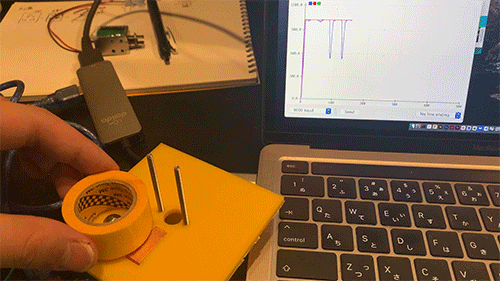
I bought new solenoid, 5V solenoid(SSAH-0830(7.5Ω), and check the power of it. Also did a math for control solenoid and chip LED by 5V power supply, only by changing act swicth state. Design and make testing board, finally it worked !
Struggle with detecting ball (5/21 - 5/30)
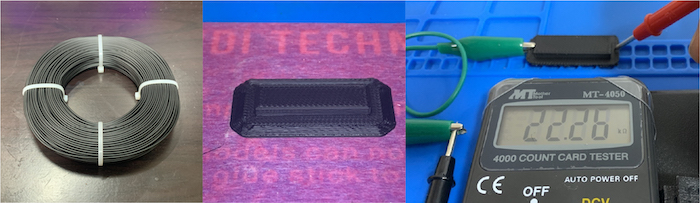
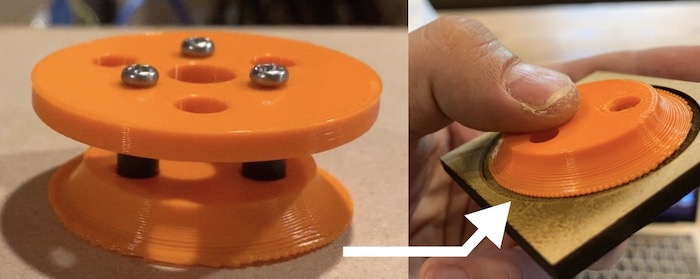
I’d like to detect metal ball by electronic methods. In my first plan,when the metal ball touches the copper foil or conductive one, it acts as a switch, and solenoid would move.
At first, I bought conductive filament and printed it. I scaled its resistor value, the number shows around 22.26kΩ. It was too high and hard to control with precision because the resistance value changes greatly depending on where you touch it.
Next, I tested conductivity of copper seat and metal ball. Making arched shape of objects, and paste copper seat, then hit the metal ball. It can conduct electricity, but was very limited location and not stable.
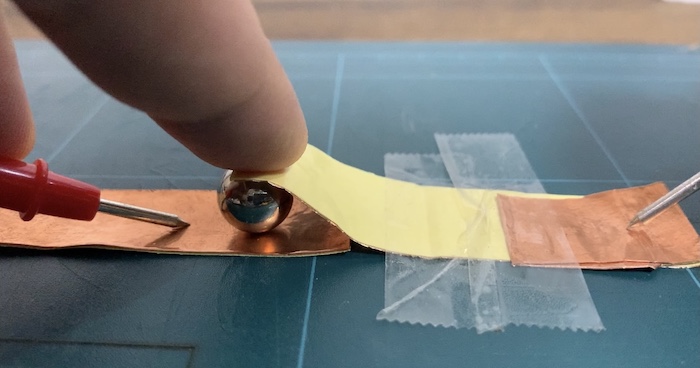

I showed this trial in Global Review on 5/26, Neil recommended that I take an analog threshold instead of a digital one. He introduced Step Response sample which we can see in Input Devices’ class page. Also he wrote sketch for me :-).
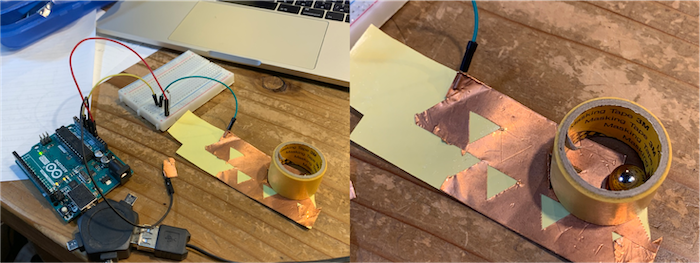
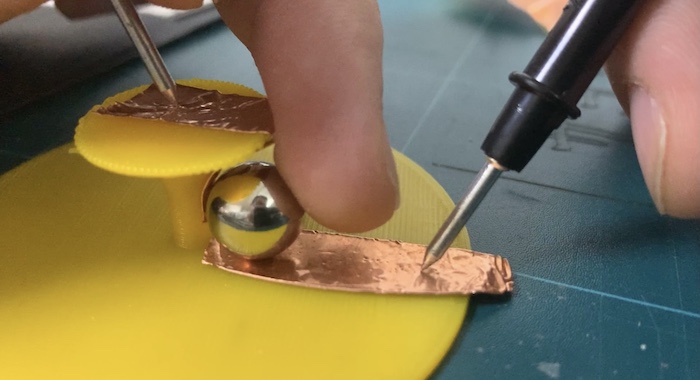
I talked with Nagano-san, one of Kamakura instructor, she showed me a sample with arduino. By moving metal ball on copper foil, input value will change. I searched some other samples like this page, and tried myself.
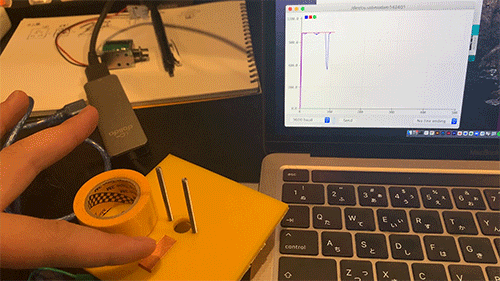
I succeeded in detecting hand-touching and ball-placing on copper foil. However, input value won’t clearly change by ball rather than by hand. It depends on electrostatic capacity of each object, my body has fluent one, but metal ball’s is very few. It also depends on the place objects touch, in my plan, it is hard to expand copper foil behind pop bumper. Finally, I decided to change the way of detecting ball, using NOT copper foil.
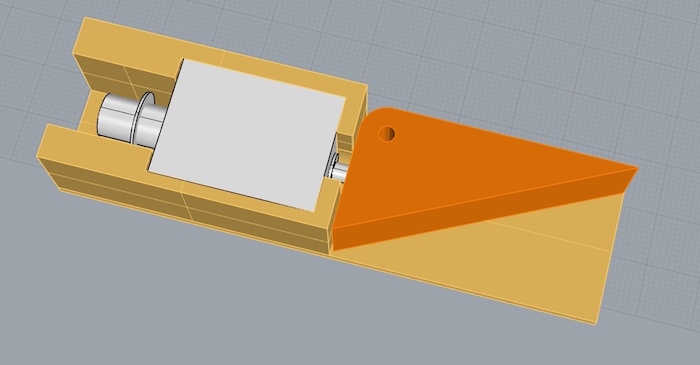
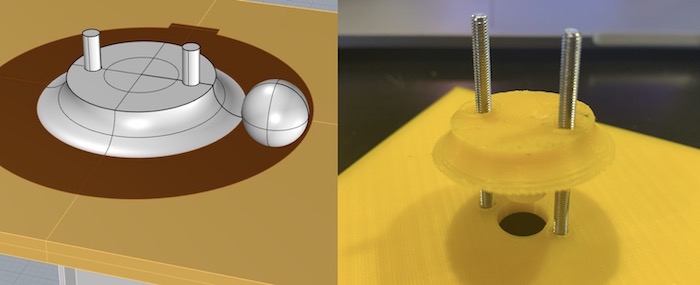
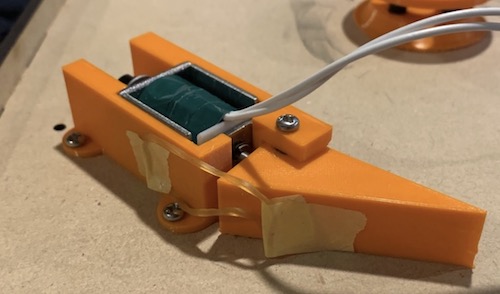
Flipper and Pop Bumper Prototyping (5/29 - )
I had finished discussing which parts to use and what mechanism to use, I moved on to the actual fabrication of the components. Flippers, made by 3D printing, were able to launch the thing (but I’m worried about the its power…). I also designed pop bumper’s construction. The size is OK, but I need to re-think/change the way of detecting the ball…
4. Plan Reduction / Triage
One of my motivation for Fab Academy is to eliminate my dislike of electronic circuit design. To complete it, rather than designing many board with multiple functions, it was important to create something that would work stably with less.
So, one week before the final presentation, I decided to reduce my plan, because of time constraint. I already bought items for score and sound, but I decided I didn’t have enough time to make boards for them. If I try to make, there was a high risk that the behavior of the main gameboard would go wrong.
Luckily or unluckily, main gameboard already has input/output functions, so I thought it meet the final project’s evaluation criteria. So I decided focus on it, and send score and sounds function to the future spiral. I learned it is important to achieve the required requirements within a limited time frame in previous week, and it is a kind of “triage” strategy I think.
5. Answers for weekly assignment
What tasks have been completed, and what tasks remain?
Completed Tasks:
- Made shopbot-milled enclosure
- Made 3D printed plunger
- Principle tests for flippers and pop bumpers.
Remained Tasks:
- Design and make gameboard, where the ball run around.
- Design and integrate cicuit boards for game/flipper control.
- Write program for each board.
- Taking photo and movie for final presentation.
- Edit slide and movie for final presentation.
What has worked? what hasn’t?
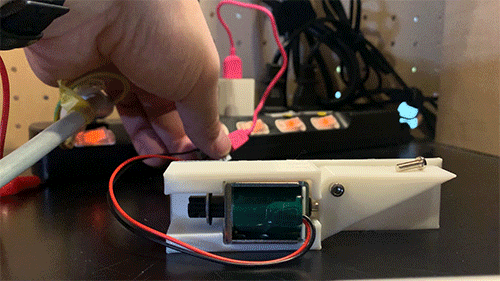
Flipper could move, but it won’t return to its original position. So I need to re-design it for attaching by rubber band to solenoid socket.
Pop bumper moved too, but the ball didn’t ride on it. So I added raster engraving by laser cutter to create a gap on playfield.
what questions need to be resolved?
How to detect ball hit?
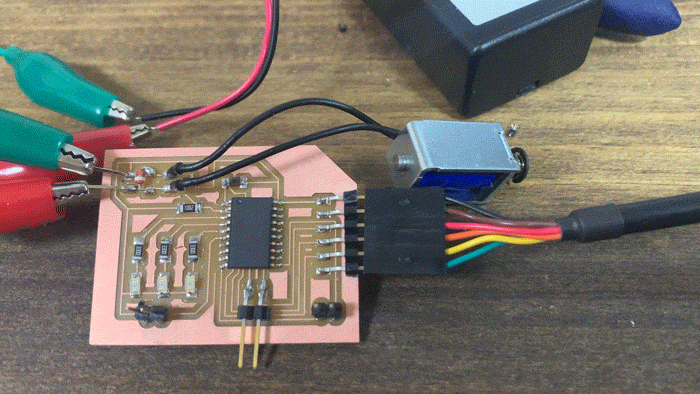
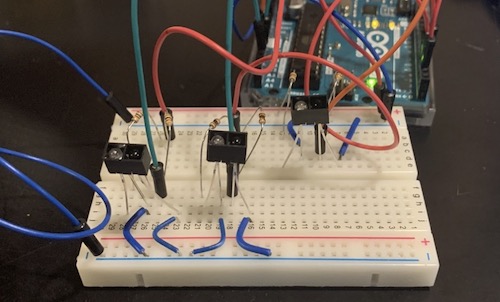
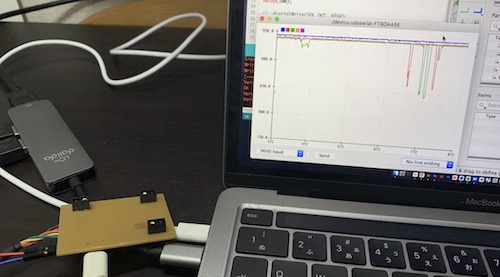
→ I tried to use a metal ball and a copper foil sheet for electrical detection, but it didn’t work well(It looks very sensitive).
Finally, I decided to use a styrofoam ball with a photoreflector to detect it. I tried to make testing board for detection, and saw how it works.
What will happen when?
- 6/3(Thu) - 6/4(Fri): Design Circuit boards.
- 6/4(Sat),6/5(Sun) : Make and test circuit boards by SRM-20 in Lab.
- 6/7(Mon) - 6/11(Fri) : Test and write program for circuit board. Design and print 3D printed components by 3D printer in my home. Also design gameboard.
- 6/12(Sat) : Making gameboard with laser cutter in Lab’s Laser Cutter. If I need, fix design and re-make circuit board by SRM-20.
- 6/13(Sun) : Continue making stuff, take photos and movie, edit draft slides and movies for final presentation. We have presentation rehearsal with Kamakura-members 14:00 PM.
- 6/14(Mon) 18:00 PM : Finish editing and upload final presentation materials.
- 6/14(Mon) 10:00 PM : Final Presentation.
- 6/14(Tue) - 6/20(Sun) : Fill in the missing descriptions on my weekly documentation.
- 6/21(Mon) : Local Evaluation Deadline.
- 6/22(Tue) - 7/10(Sat) : Rewrite/Add documentation for Global Evaluation
- 7/12(Mon) : Global Evaluation Deadline.
What have you learned?
Fab Academy is not just a place to learn technology, especially true for students who are working while taking the course. With my unstable schedule, the major key was how to complete the preparation and work in the lab over the weekend without any problems.
It was also important to decipher what was required in each week’s assignment. If you read it wrong or miss it, you’ll have a very hard time correcting it later (which is exactly what I’m feeling right now).
It’s almost impossible to make everything happen exactly as you envisioned it from the beginning. You have to understand that the first time you tackle something, it will take two or three times as long as you imagine.
This is where it becomes important to prioritize. Separate what you want to do from what you need to do, and in a sense, give up altogether in order to fulfill each week’s tasks. I gave up on the scoreboard and audio, otherwise I wouldn’t have been able to accomplish the final project.
However, giving up something is not in vain. You just have to accomplish it in small steps first, and then continue on to the next spiral. This idea of spiral development is one of the important points I learned in this course.