14. Networking and communications
1. Weekly Brief Summary
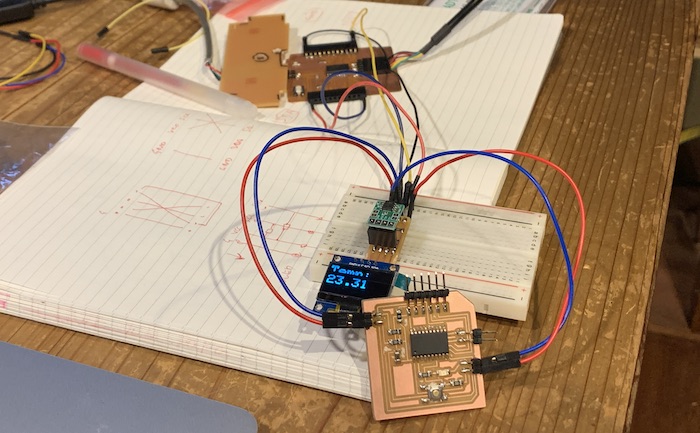
I learned I2C communication protocol, made 1 main board and 2 secondary boards.
2. Weekly Assignment Requirement
Group assignment:
- Send a message between two projects
Individual assignment:
- design, build, and connect wired or wireless node(s) with network or bus addresses
3. Group Assignment
FabLab KAMAKURA 2021 Lab site / Networking and Communications
4. Practice
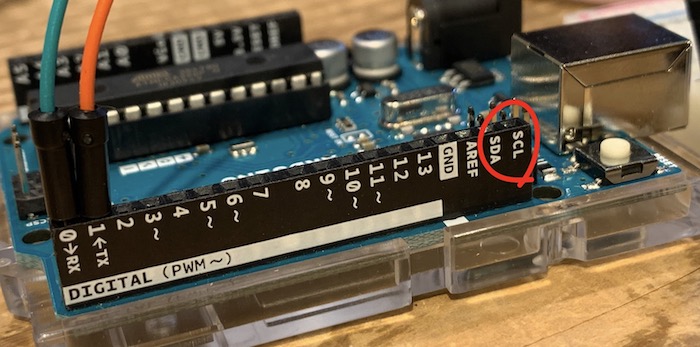
For pracrtice, I use Arduino UNO and the board for output devices I made in week13(Instructor recommended to make 2pins breakout for this week :-) ) . I try to I2C communication. It’s first time to use and see SDA and SCL pins on Arduino.
I refer to this page, just copy the program below, and try to communicate Arduino UNO and the output board.
#Include <Wire.h>makes possible to use arduino I2C library.Wire.begin()with no value in brackets, define its board is main.Wire.begin(num)define its board’s address. I2C sensors basically have thier address, but if you want to use microcontroller or other devices with no address definition, you can define it by this function.Wire.requestFrom(addrss, bytes);send request bytes from Secondary devices.Wire.available()turned bytes number. It can use as T/F(0 or other).Wire.read()read data from secondary devices.Wire.onRequest(function);define function when secondary devices get request from main device.
Main ( Arduino Board )
#include <Wire.h>

void setup() {
  Wire.begin();
  Serial.begin(9600);
}

void loop() {
  Wire.requestFrom(8, 1);// request 1 bytes from Secondary ID #8

  while (Wire.available()) {
    byte b = Wire.read();
    Serial.println(b);
  }

  delay(500);
}
Secondary ( Output Board )
#include <Wire.h>

byte b=0;

void setup() {
  Wire.begin(8);// Secondary ID #8
  Wire.onRequest(requestEvent);
}

void loop() {
}

void requestEvent() {
  Wire.write(b++);
}
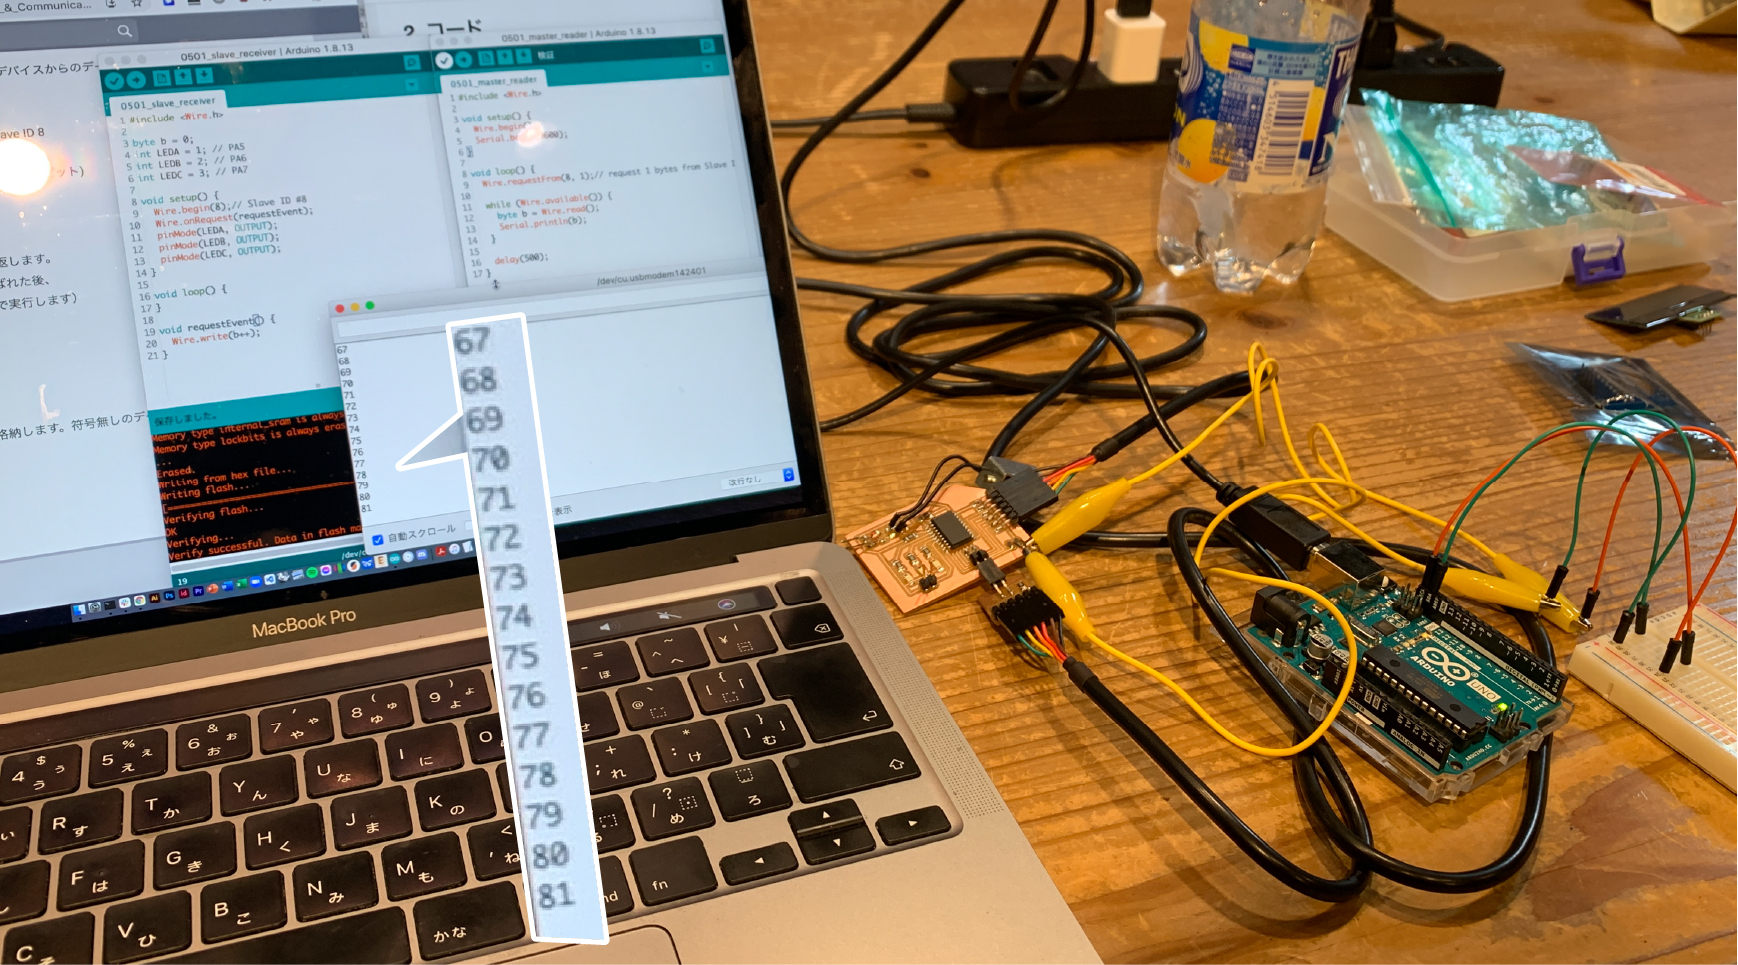
I can see bytes from secondary board on Arduino’s serial monitor. After testing some program, I found delay function cannnot use in secondary, function defined byt onRequest. Because these 2 are interrupt proces. More than 2 interrupt process run, Arduino stops its program. If you want to use delay, you can replace by dalayMicroseconds or move them to main loop.
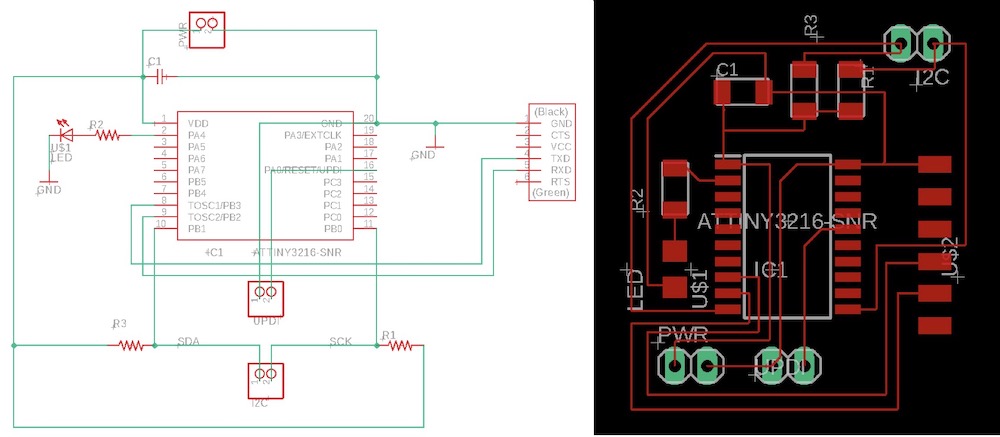
5. Board Design
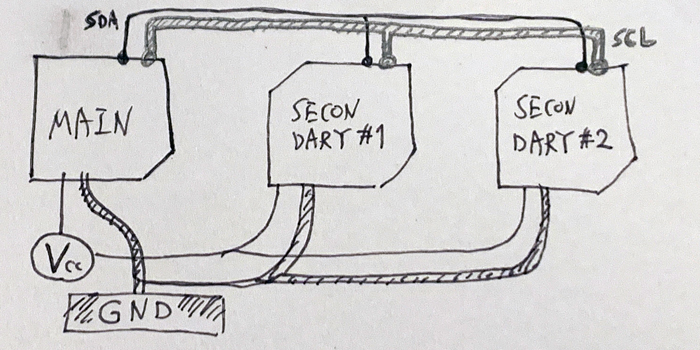
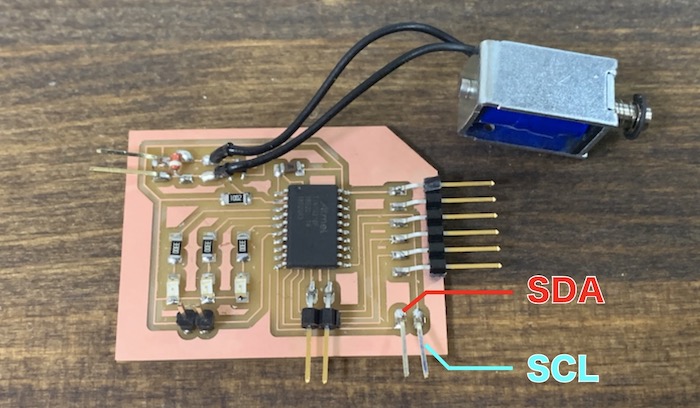
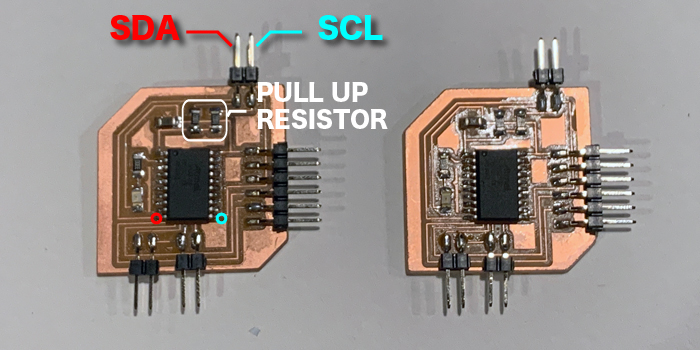
For I2C networking, SDA(Data Send/Receive) and SCL(Synchronoize Clock) need to connected. Also they need to be connected to pull-up resistors. It should be nice to share power supply and GND too.
Main Board - For starting communication, I attach tactile switch.
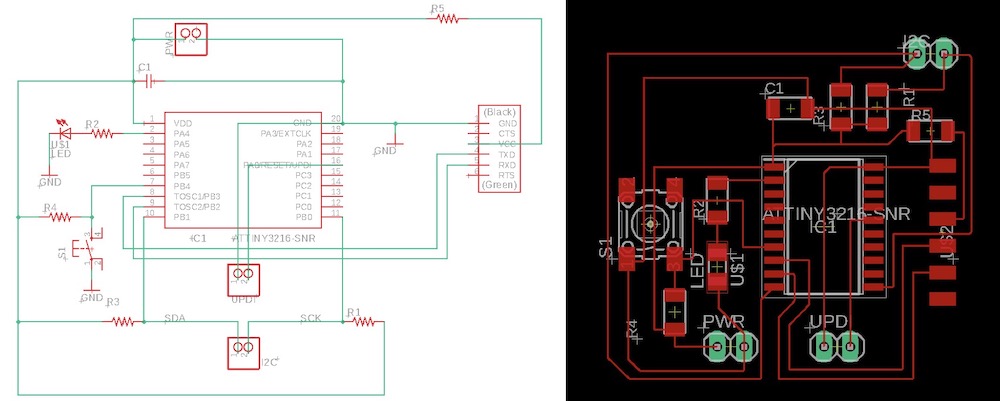
| Parts Name | Quantity |
|---|---|
| ATtiny3216 | 1 |
| Taktile Switch | 1 |
| Chip LED | 1 |
| 1uF Capasitor | 1 |
| 0Ω Resistor/Jumper | 1 |
| 330Ω Resistor/forLED | 1 |
| 10kΩ Resistor/Pull Up | 3 |
| 6 pin connector/FTDI | 1 |
| 2 pin conncetor/UPDI, Power Source | 2 |
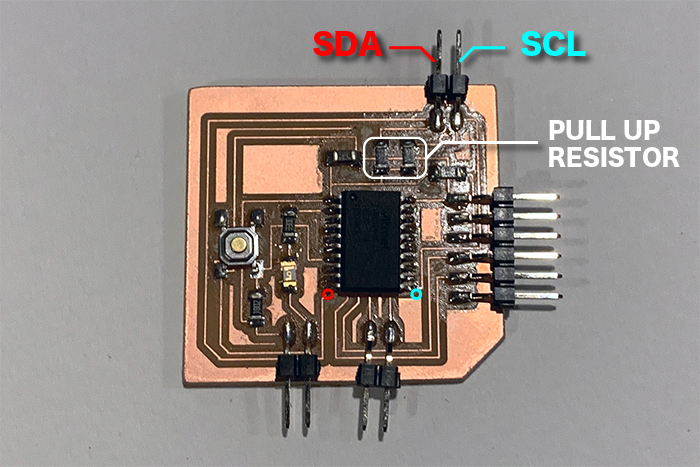
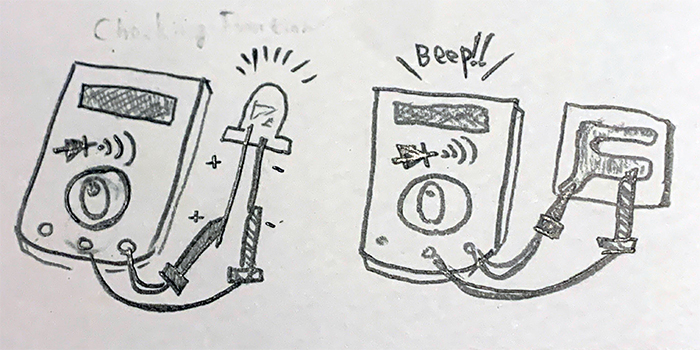
Secondary Boards - I forget to connect Vcc on ATtiny3216 and FTDI! It has no problem with writing program, but cannnot turn on LED with no power supply. Also I found too narrow spaces to milling (after making board…). For physical debugging on the board, digital multimeter’s continuity check function is useful. It can also check LED direction.
| Parts Name | Quantity |
|---|---|
| ATtiny3216 | 1 |
| Chip LED | 1 |
| 1uF Capasitor | 1 |
| 330Ω Resistor/forLED | 1 |
| 10kΩ Resistor/Pull Up | 2 |
| 6 pin connector/FTDI | 1 |
| 2 pin conncetor/UPDI, Power Source | 2 |
6. Programming
My idea is a combination of 3 boards LED. When I turn main borad’s switch, main LED turn on, then secondary one is on, finally the left one is on. In this program, secondary boards control LED by numbers from main board. If secondary boards read 1, turn on LED. If it is 0, turn off LED.

#Include <Wire.h>makes possible to use arduino I2C library.Wire.begin()with no value in brackets, define its board is main.Wire.begin(num)define its board’s address. I2C sensors basically have thier address, but if you want to use microcontroller or other devices with no address definition, you can define it by this function.Wire.beginTransimission(address)selects secondary devices ID to send data.Wire.write(data);define data to send, in this time, 1 or 0.Wire.endTransmission();finished sending data. As varible, it shows networking results.Wire.onReceive(function);defines function when secondary devices receive data from main one.Wire.available()turned bytes number. It can use as T/F(0 or other).Wire.read()read data from main device.
Main Board
#include <Wire.h>
byte val = 0;
int BUTTON = 5; // PB4
int mainLED = 0; // PA4
int state = 0;

void setup() {
  pinMode(mainLED, OUTPUT);
  pinMode(BUTTON, INPUT);
  Wire.begin(); // define main board itself
  Serial.begin(9600);
}

void loop() {

  state = digitalRead(BUTTON);

  if (state == 0) {
    digitalWrite(mainLED, HIGH);
    delay(1000);

    Wire.beginTransmission(9); // Turn on secondary #9
    Wire.write(1);
    Wire.endTransmission();

    delay(1000);

    Wire.beginTransmission(10); // Turn on secondary #10
    Wire.write(1);
    Wire.endTransmission();

    delay(1000);

    Wire.beginTransmission(10); // Turn off secondary #10
    Wire.write(0);
    Wire.endTransmission();

    delay(1000);

    Wire.beginTransmission(9); // Turn off secondary #9
    Wire.write(0);
    Wire.endTransmission();

    delay(1000);

    digitalWrite(mainLED, LOW);

    delay(1000);
  }

}
Secondary Boards
I defined seconday boards I2C address as below.
- secondary #1 -> I2C address 0x09 (Hexadecimal of 9)
- secondary #2 -> I2C address 0x10 (Hexadecimal of 10)
#include <Wire.h>

int LEDA = 0; // PA4
int receivedValue = 1;

void setup() {
  pinMode(LEDA, OUTPUT);
  Serial.begin(9600);
  Wire.begin(9); // secondary ID #9
  //Wire.begin(10); // secondary ID #10
  Wire.onReceive(dataReceive);
}

void loop() {
  Serial.println(receivedValue);
}

void dataReceive(int num) {
  if (Wire.available()) {
    receivedValue = Wire.read();
    if (receivedValue == 1) {
      digitalWrite(LEDA, HIGH);
    } else if (receivedValue == 0) {
      digitalWrite(LEDA, LOW);
    }
  }
}
7. Learning Outcome
- I learned I2C communication protocol, SDA and SCL must be connected for each devices.
- I2C devices have address, if not, should define in program.
- I felt I2C communication is not complicated with Arduino language, I2C Wire libraries.
- It is important terminology of 2 boards. We should avoid Master/Slave, and replace it as Main/Secondary, Main/Subordinate, Requester/Responder, Primary/Secondary, Sender/Receiver, Controller/Device, Leader/Follower, Host/Worker as well.
8. Links to Files and Code
I2C main
I2C secondary
- EAGLE schematic
-
EAGLE board
- Holes png, rml
- Program #2