5. Electronics production
This week is an interesting week were, I had a chance to build a programmer of our own, moreover, in this week I had also designned my own FabISP “MASK-ISP”in kicad.
This is the design of MASK_ISP


This is the schematic of MASK_ISP

Working of MASK_ISP
For Making Your PCB…
Due to Covid, I was unable to go my lab, hence, from home I have started to make pcb, If your interested to to known about home made PCB’s Watch this video, below>.
Process of flashing program to the programmer
Before starting this process.. please include these files.. and this process is only for mac so, update your “homebrew”..
- avrdude
- avr-gcc
- avr - libc
Follow these steps to install above files to run “make”…
- open terminal
- copy paste the below command and run it in the terminal..
sudo apt-get install gcc-avr avr-libc uisp avrdude.
Download Firmware click here, to download
Follow these steps to run make the file.
- open terminal.
- cd into the firmware file.
- type “make” and press enter.
video to explain execution of “make”....
if the results is like this… you can go ahead for flashing..
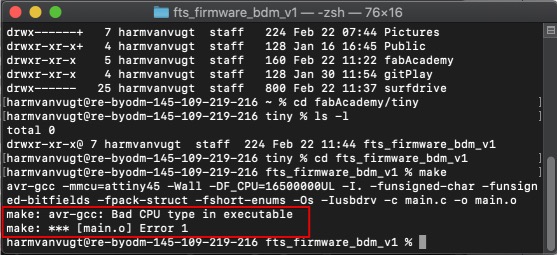
if you ended up like this, ” Bad CPU error “,hences you need to install “avr-gcc”
Flashing
After successfully running make, It is time to flash the memory. for this you need these hardwares…
- Mother FabISP
- arduino
- commercial usbtiny
From here there are multiple process to flash the your-ISP..
so you can program your ISP programmer via Mother FabISP, arduino, commercial usbtiny, etc…
Here I have used “Arduino as a programer to program my ISP”…
To setup arduino as a progarmmer.. things to be done…
- open Arduino IDE.
- In left conner, click of files > examples > ArduinoISP> ArduinoISP.. open this programe and upload to your arduino before you run make flash.
After uploading, connect ISP pins of arduino to ISP pins of ISP Programmer(MASK-ISP)
ISP pin connections from arduino to ISP programmer.. Arduino pin - ISP programmer pins * PIN 13 - SCK * PIN 12 - MISO * PIN 11 - MOSI * PIN10 - RST * 5V - 5V * GND - GND
See this picture for better understanding..Please don’t change the orientations of the ISP pins…

Please check the pins are connected properly..
This is How you need to connect

Note
- before running “flash”, make sure you edit the makefile with corresponding programmer..
- before running “flash”, connect a 10uf eletrolytic capacitor between “Reset and GND” of arduino board.
For example: If you are using, arduino as a programmer, you need to set the programmer in the Makefile to arduino
For better understanding see this picture…

If your are not interested in editing makefile… please download this firmware.. This is only applicable when your programmer is Ardiuno Click here to download, arduino based Firmware “SreeDiuno_firmware”
After setting the makefile it is time to run “make flash”, “make fuses”, “make rstdisbl”
Here is the video of execution of “make flash”, “make fuses”, “make rstdisbl”…
Note
Before executing these commands, you have to make a solder bridge in the “solder-jumpers” After executing you have to remove the solder brigde… Like this …
After removing the solder bridge, if you want to see detection of ISP-Programmer.. Just type
“lsusb”
If you get some error after running “lsusb”, just type this command.
brew install lsusb
This will install the “lsusb package” and after this, you will be able detect your ISP-programmer… like this..

Now MASK-ISP is ready to program any microcontroller…
Here is the video of programming arduino via MASK-ISP.....
Difficult times…
- In running make.. after downloading the firmware.. (solved by:reading of error message, and previous knownledge of making .c to .hex with avr-gcc in linux).
- executation of make flash, make fuses, make rstdisbl.. when it is connected to arduino…
(solved by: reading makefile and previous knownledge of executing codes with avrdude)- burning of program in the microcontroller via MASK_ISP… (solved by : connecting wire +5v from usb to ISP header, which was a design issue…)
