16. Interface and application programming
Assignments :
- Write an application that interfaces with an input and/or output device that you made, comparing as many tool options as possible.
Learning outcomes
- Interpret and implement design and programming protocols to create a Graphic User Interface (GUI).
Have you?
- Described your process using words/images/screenshots
- Explained the the GUI that you made and how you did it
- Outlined problems and how you fixed them
- Included original code (or a screenshot of the app code if that’s not possible)
Project :
For this assignment, I decided to work on the interface I will need for my final project. This interface should be able to :
- Read the informations from my beacon such as :
- Distance of detection
- Angle of detection
- Beacon speed
- error
- Send informations to the beacon such as :
- New speed for the Motor
- Modifications of parameters
- Print the informations on the screen
- Optional :
- Log the informations into a text file
- Be able to read the log and simulate them
To make this interface, I will use the Processing language which is close to Java. You can see more informations about Processing following this link.
Designing the GUI
MockUp
Before going into Processing, I choose to try to design my GUI on a drawing software and make a quick and clean prototype of my idea.
To do that, I firstly choose à GUI library call ControlP5 that allow designing quickly a GUI into Processing. All the control are already designed and you can use them or modify them if you want to use your own design. You can find more informations about Control P5 library for Processing here.
As I have now a set of controller for my GUI, I decided to use an online software call Draw.IO and which is linked to Google Drive. This software allow me to work on graphical representation of a large number of different theme such as electrical diagram, flowcharts, Engineering and Software layout. This last case is interesting for me because I will be able to design a GUI very easily.
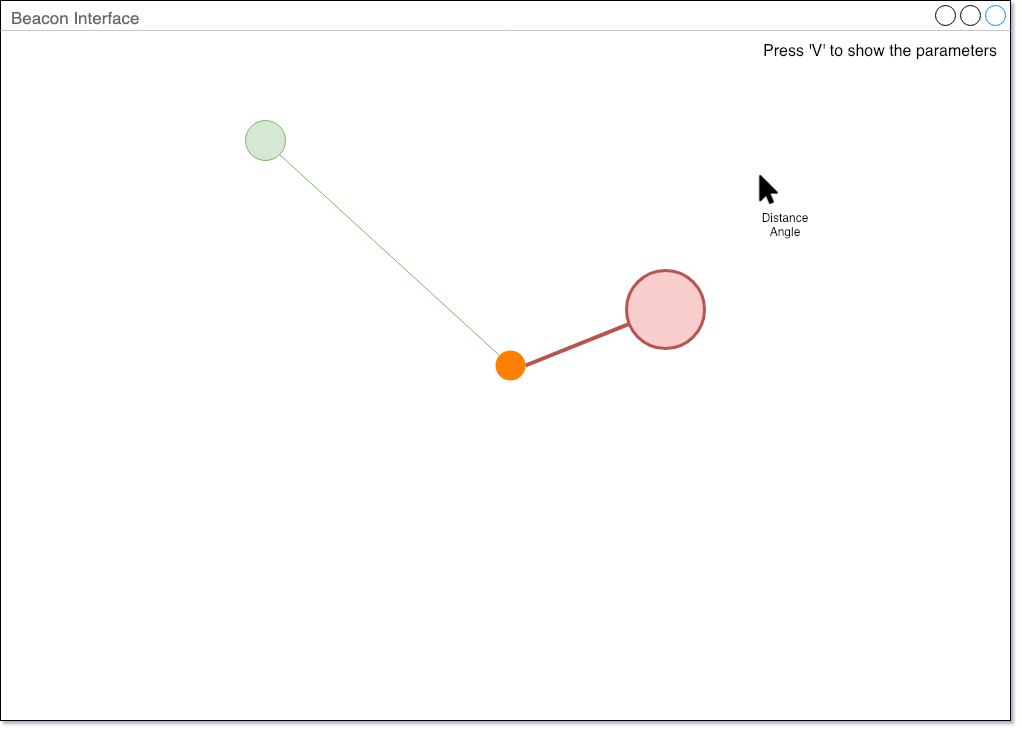
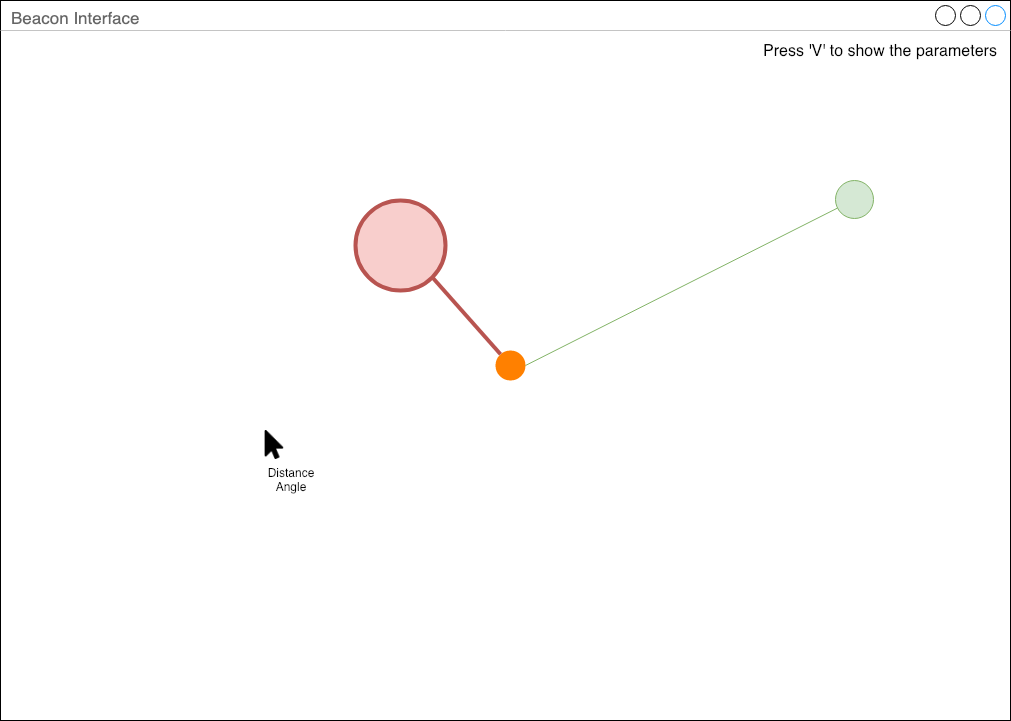
The idea is to have a simple GUI when you open the interface. Just your robot in the center of the screen and the position of the other robots if detected. The robots are represented by circles. When the robot is far from your robot, it is colored in green. When it is near it is colored in red. Near the cursor, you can see the distance from the robot and the cursor and also the angle. So you can have an estimation of the distance of the other robots.
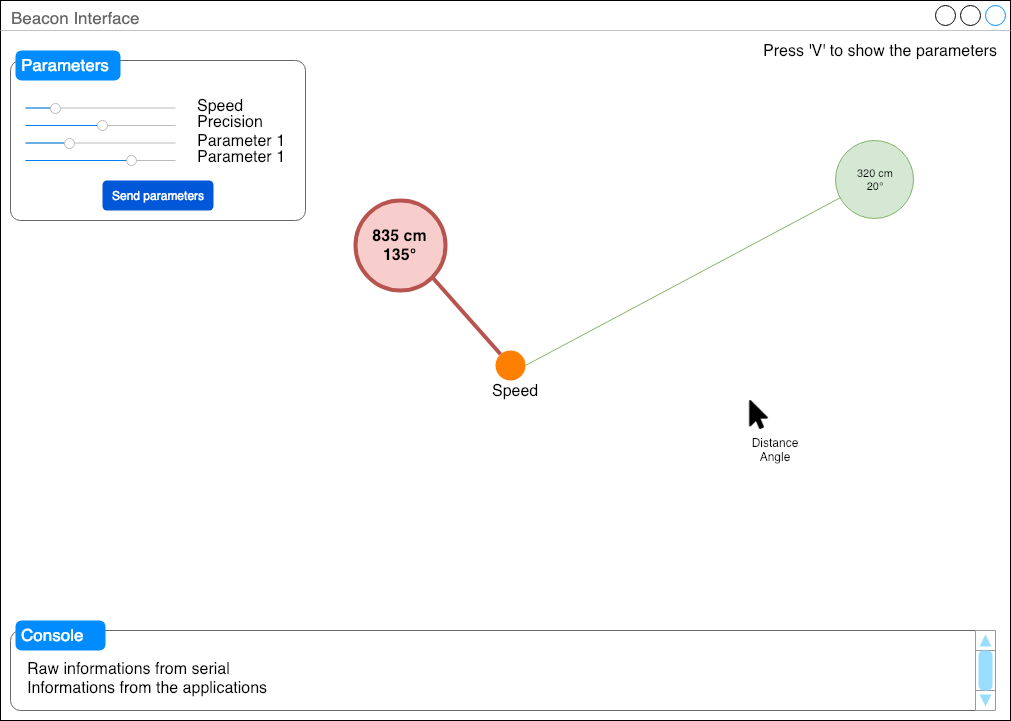
When you press the ‘V’ key of your keyboard, You can see all the parameters and the rest of the GUI. The mockup I made is below :
| Interface simple | one robot is going away and the other is now nearer | The rest of the GUI |
|---|---|---|
 |
 |
 |
From the design to the code
So now let’s code this idea into Processing.
Import the CP5 Library Create a new tab for the GUI Create the button
When thinking about my GUI, I didn’t think about the serial connection with the beacon. So, in order to select the serial port and to open a connection with it, I add a droplist with all the serial port and a button to make a connection to the beacon.
I first create a function with all the elements of the GUI (too long to paste here. It will be in the sources). And after I created two functions call by the draw() loop : robotDisplay() and mouseDisplay().
mouseDisplay() will print the informations around the mouse arrow on the interface :
void mouseDisplay()
{
  //create two vector to calculate the angle between them
  PVector v1 = new PVector(1, 0);    // Vector for the origin
  PVector v2 = new PVector(mouseX-(displayWidth/2), mouseY-(displayHeight/2));
  fill(0, 102, 153);
  textSize(11);
  text(dist(displayWidth/2, displayHeight/2, mouseX, mouseY)+" cm", mouseX+7, mouseY-5);       // the distance
  text(degrees(PVector.angleBetween(v1, v2))+" °", mouseX+7, mouseY-16);       // the angle
  circle(mouseX, mouseY, 5);
}
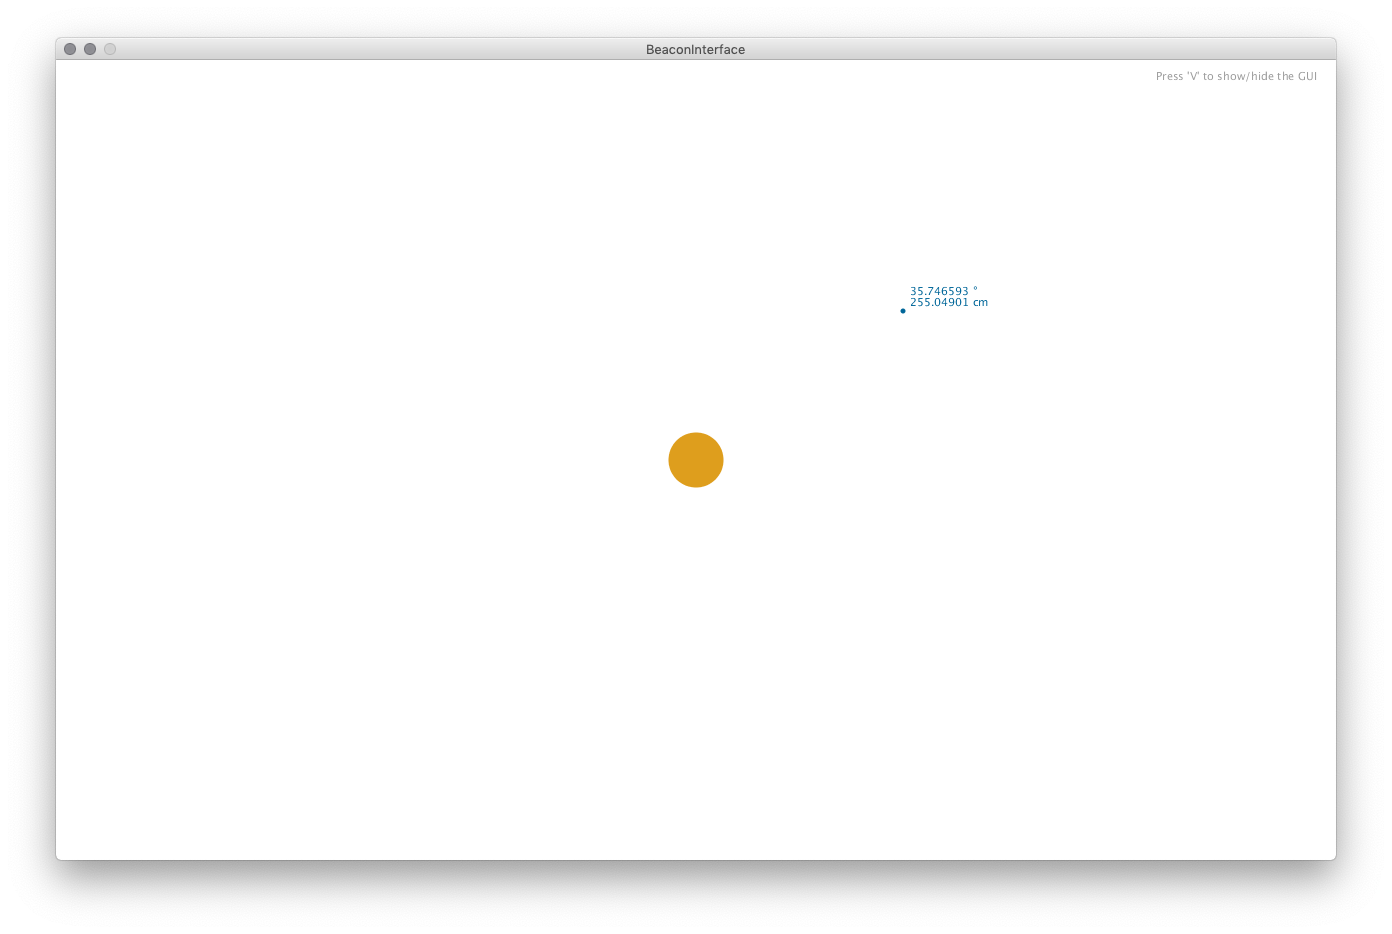
robotDisplay() will print the position of the robots on the screen. For the moment, I just print the main robot at the center of the screen.
void robotDisplay()
{
  // Print the help text at the top right of the interface
  fill(157, 157, 157);
  textSize(11);
  text("Press 'V' to show/hide the GUI",displayWidth-180, 20);
  //----------------------------------------------------
   // Create the robot at the center of the interface
   fill(222, 158, 29);
   circle(displayWidth/2, displayHeight/2, 55);
}
And obviously, a function when a key is pressed :
void keyPressed()
{
  if ( key == 'v' ) GUIVisible = !GUIVisible;
  if ( key == 'h' )
  {
    println("Help for the beacon interface");
    println("'h' - Help");
    println("'v' - Visibility of the GUI");
  }

  cp5.get(Textarea.class, "Console").setVisible(GUIVisible);
  cp5.get(Button.class, "serialBegin").setVisible(GUIVisible);
  cp5.get(Button.class, "serialSend").setVisible(GUIVisible);
  cp5.get(ScrollableList.class, "dropdown").setVisible(GUIVisible);
  cp5.get(Slider.class,"speed").setVisible(GUIVisible);
}
For the moment the interface look like this :
| The simple GUI | When you press ‘v’ | The list of serial port |
|---|---|---|
 |
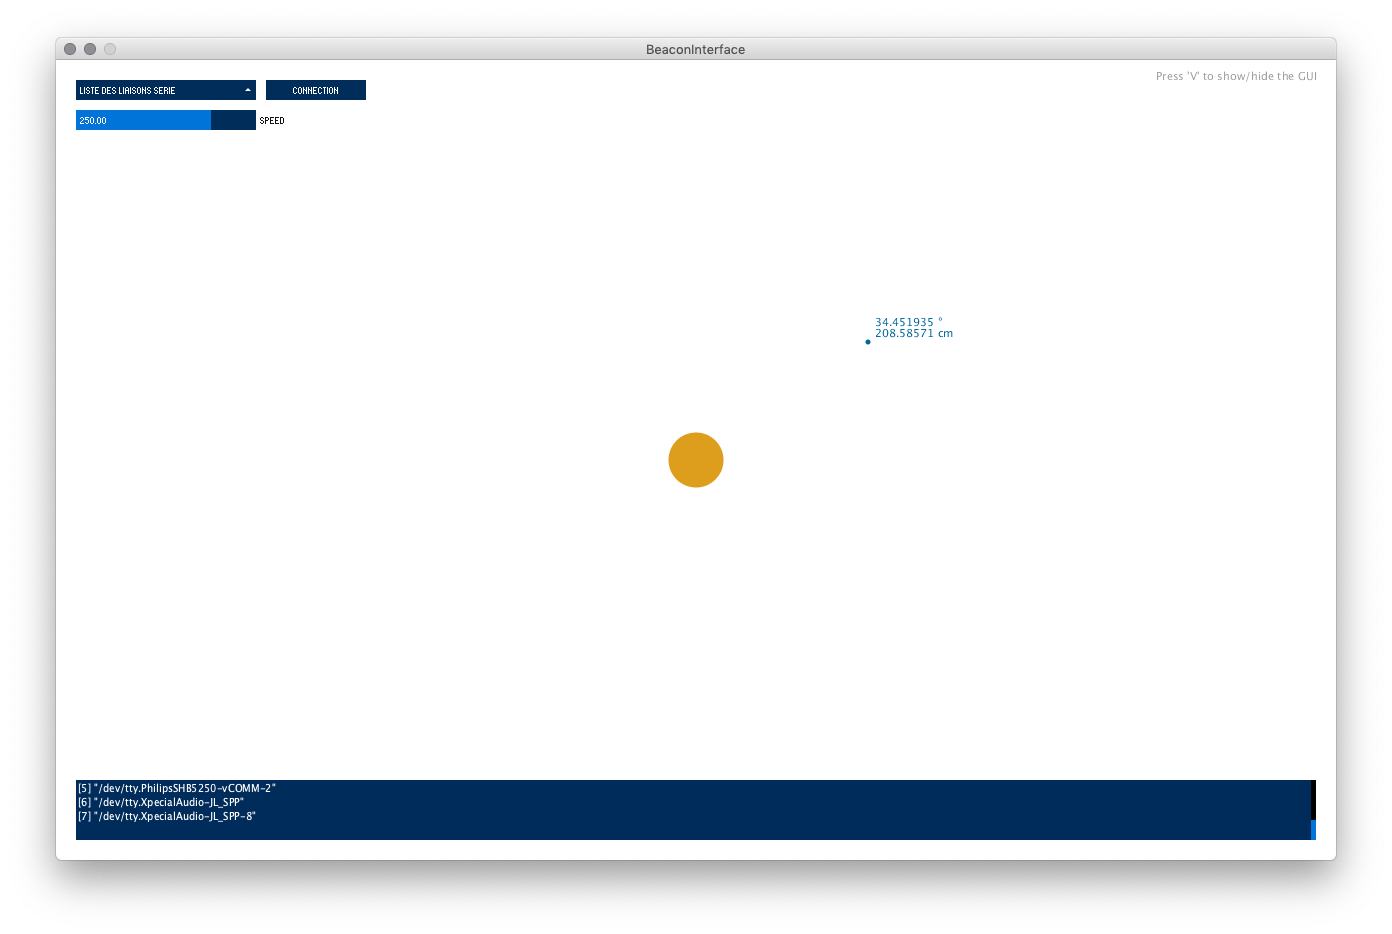 |
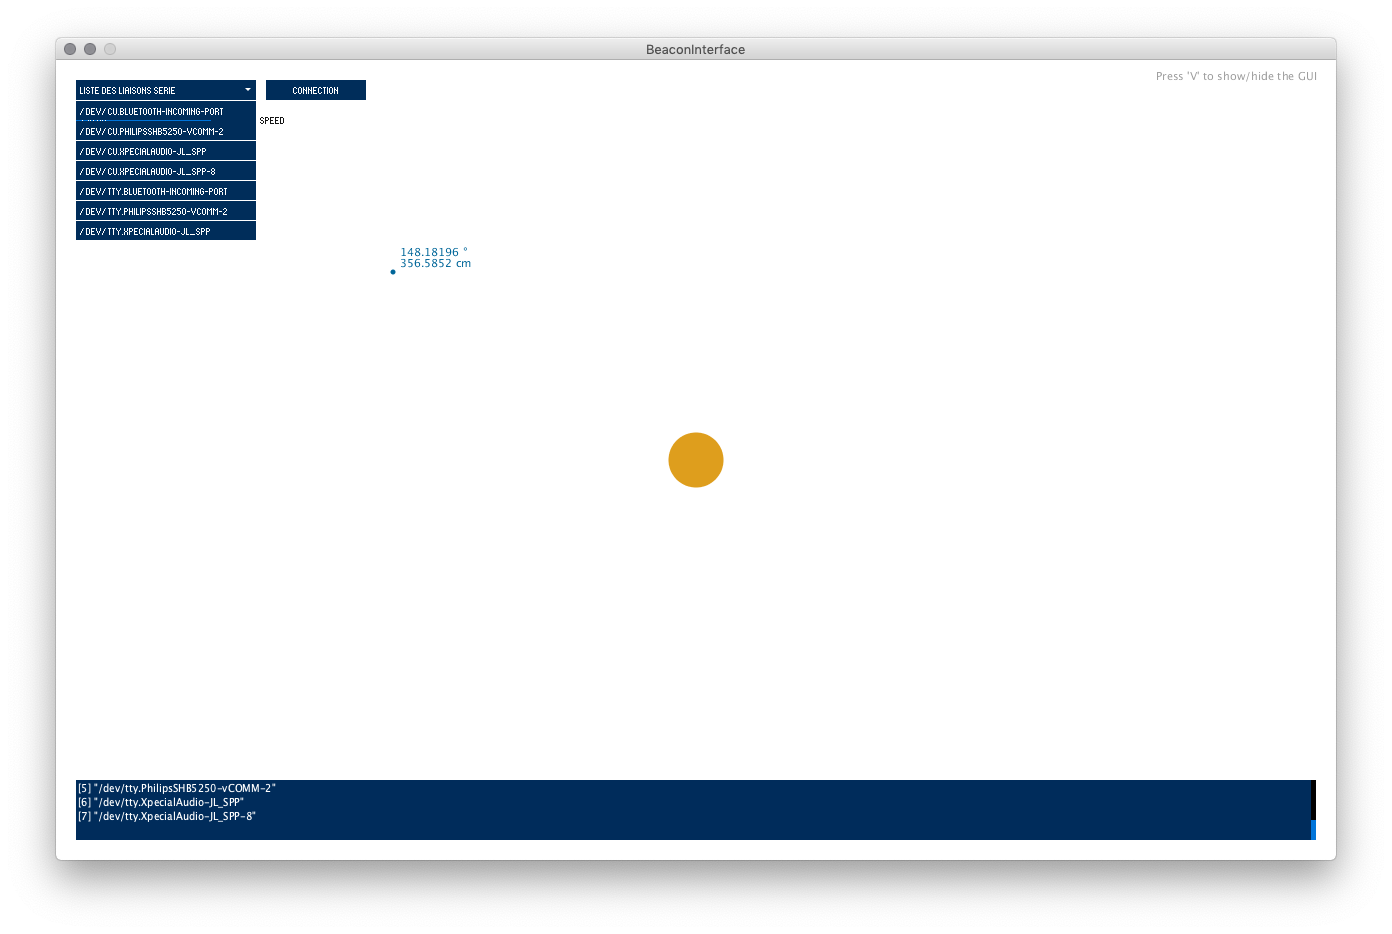 |
I also add a button for the sending of the new parameters and a visual effect back to the robot like it is searching something. Very cool to implement 
// Search circle
final int searchRadiusMax = 400; // Max radius of the "searching circle"
int searchRadius = searchRadiusMax; // Radius of the "searching circle"
int searchTime = 0;
int searchTimeLast = 0 ;
float boucle = 3000.0 ; // Duration of a loop in milliseconds

void searchCircle()
{
  searchTime = millis()- searchTimeLast; // Take the elapsed time
  float nbr = map(searchTime,boucle,0,searchRadiusMax,0);

  searchRadius=searchRadius-int(nbr);
  if(searchRadius<=0) searchRadius = searchRadiusMax;
  searchTimeLast = millis();

  pushMatrix();
  // Transparency evolution
  fill(0,44,91,map(searchRadius,searchRadiusMax,searchRadiusMax/2,40,0));
  noStroke();
  ellipse(displayWidth/2, displayHeight/2, searchRadius, searchRadius);

  fill(255,0);
  strokeWeight(abs(map(searchRadius,searchRadiusMax,searchRadiusMax/2,8,0)));
  // Transparency evolution
  stroke(0,44,91,map(searchRadius,searchRadiusMax,searchRadiusMax/2,40,0));
  float radiusExtern = map(searchRadius,searchRadiusMax,0,searchRadiusMax,searchRadiusMax+200);
  ellipse(displayWidth/2, displayHeight/2, radiusExtern, radiusExtern);
  popMatrix();
}
Here you can see a demo of the interface at this state of the development :
Improving the GUI
Now it’s time to improve my GUI. After testing the interface and reading the controlP5 library, I decide to change some little things :
Adding a “refresh” button : use to refresh the serial list when connecting and disconnecting devices while the application is running.
Adding a “stop” button : use to stop the serial link So I can check the datas and try some improvements.
Adding a toggle “Show coordinates” : use to show/hide the coordinates on the screen.
To do this last feature, I used the previous function mouseDisplay() and change it to this function :
void showCoordinates(int pX, int pY)
{
  //create two vector to calculate the angle between them
  PVector v1 = new PVector(1, 0);    // Vector for the origin
  PVector v2 = new PVector(pX-(displayWidth/2), pY-(displayHeight/2));
  fill(0, 102, 153);
  textSize(11);
  text(int(dist(displayWidth/2, displayHeight/2, pX, pY))+" cm", pX+7, pY-5);       // the distance
  text(int(degrees(PVector.angleBetween(v1, v2)))+" °", pX+7, pY-16);       // the angle
  circle(pX, pY, 5);
}

void mouseDisplay()
{
  if (toggleValue)showCoordinates(mouseX, mouseY);
}
So it’s used also for displaying the coordinates of the robots while moving.
Improvements : I also improve the button and GUI response by cleaning my code, and also send informations on the below terminal such as :
println("Serial connection has been stopped");
println("Serial connection has begin on port " + int(serialList.getValue()));
println("Serial connection has been stopped");
Creating a Class robotCircle()
As I would like to draw multiple robot position, I decided to create a class that draw the position of the robots on the screen, with some circle and color effects.
First, into the constructor, we will give the radius max of the circle effect and the timing of the effect.
robotCircle(int setRadiusMax, float setBoucle)
{
  radiusMax = setRadiusMax ;
  radius = radiusMax ;
  boucle = setBoucle ;
  searchTimeLast = millis();
}
After that, we have a function that take polar coordinates and transform them to cartesian coordinates so I can draw the circle on the screen.
void updateDA(int distanceCircle, int angleCircle)
{
  float px = width/2 + cos(radians(angleCircle))*distanceCircle;
  float py = height/2 + sin(radians(angleCircle))*distanceCircle;
  updateXY((int)px, (int)py, distanceCircle);
}
And the core of the Class is the updateXY(int xCircle, int yCircle ,int distance) function that will take the coordinates and the distance of the robot and make multiple things :
- Draw a circle with a variable radius which if function of the distance.
- Change the color of the circle in function of the distance ( red -> near | green -> far)
- Draw the “circle effect”
- Draw the coordinates if the visibility is activate.
void updateXY(int xCircle, int yCircle ,int distance)
{
  searchTime = millis()- searchTimeLast; // Take the elapsed time
  float nbr = map(searchTime,boucle,0,radiusMax,0);

  radius=radius-int(nbr);
  if(radius<=0) radius = radiusMax;
  searchTimeLast = millis();

  float transparency = map(radius,radiusMax,radiusMax/2,40,0);
  float red = map(distance,0,300,255,0);
  float green = 44 + map(distance,0,300,0,255);

  pushMatrix();
  // Transparency evolution
  fill(red,green,91,transparency);
  noStroke();
  ellipse(xCircle, yCircle, radius, radius);

  fill(255,0);
  strokeWeight(abs(map(radius,radiusMax,radiusMax/2,8,0)));
  // Transparency evolution
  stroke(red,green,91,transparency);
  float radiusExtern = map(radius,radiusMax,0,radiusMax,radiusMax+100);
  ellipse(xCircle, yCircle, radiusExtern, radiusExtern);

  // Create the robot circle
  fill(red, green, 0, 125);
  circle(xCircle, yCircle, map(distance,0,300,70,20));

  // Create and show the coordinates if visibility checked
  if (toggleValue) showCoordinates(xCircle, yCircle);

  popMatrix();
}
Make the serial communication
Now it’s time to make the serial communication between my application and my board. To do that, I’ll use the new board created during week14. This board will also be the one that will be integrated into my final project.
Communication Board -> Application
I need to send the following informations from my board to my application :
- byte - a char to signify the begin of the communication. It will be ‘b’
- unsigned integer - Distance of the robot
- unsigned integer - Angle of the robot
- byte - a char to signify the end of the communication. It will be ‘\n’
As I cannot send int value with my serial communication, I will parse each unsigned integers into two bytes.
To do that I will use the following to parse an integer into two bytes :
byte1=distance >> 8;
byte2=distance & 255;
And then implement it on the ATTtiny sending side :
void sendPosition(int distance,int angle)
{
  digitalWrite(led,HIGH);
  sendBuffer[0]='b';              // Byte that begin the communication
    sendBuffer[1]=distance >> 8;
    sendBuffer[2]=distance & 255;
    sendBuffer[3]=angle >> 8;
    sendBuffer[4]=angle & 255;
  sendBuffer[5]='\n';             // Byte that end the communication

  for(int i=0;i<=5;i++)
    {
        Serial.write(sendBuffer[i]);
    }
  digitalWrite(led,LOW);
}
It was the easy part . Now let’s do the receiving part on the Application side.
All will be done into the function serialEvent(Serial p) which is called when something is received through the serial port.
Warning
I’ve got a lot of issues on this side. Specially because the use of byte. On arduino, a byte is from 0 to 255. But in Processing, a byte is signed and vary from -128 to 127. So it need to be changed before doing some communication. To do that, I made a function that transform a signed byte to an unsigned int :
Java
// Convert a signed Byte ( 127 to - 128 ) to an Int between 0 and 255
int unsignedByte(byte value)
{
  if(value < 0) return value + 256 ;
  else return value;
}
After lot of issue like this one, I finally find a good method to read my value and get my communication working. So my function do the following steps :
- Read the buffer until the character ‘\n’ which i the end of my communication
- Clear the buffer
- Check if the first byte received is a ‘b’.
- If not, print the error and ignored the informations received
- Print the raw datas ( for debug )
- Transform the signed byte into unsigned int
- Compile the parsed data into integers
- Print the polar coordinates received ( for debug )
So, here is the function :
void serialEvent(Serial p)
{
  p.readBytesUntil(10,receivedBuf);
  p.clear();
  if(receivedBuf[0]=='b')
  {
    print("Raw datas : ");
    for(int i=0;i<=5;i++)
    {
      print(receivedBuf[i] + " ");
    }
    println();

    for(int i =0;i<=3;i++)
       {
         transformBuf[i] = unsignedByte(receivedBuf[i+1]);
       }
    distance = transformBuf[0] << 8 | transformBuf[1];
    angle = transformBuf[2] << 8 | transformBuf[3];
    print(distance);
    print(" ; ");
    println(angle);
    newPosition = true;
  }
  else
  {
    println("Serial corruption - informations ignored");
    newPosition = false;
  }
}
And it’s working like a charm ! As I don’t have my final project right now, I wrote two function on the ATTiny so it simulate a robot that turn around the beacon and another one that simulate a robot that is approaching and then going away :
// Simulation of a robot approching and going away
void approchingSimulation()
{
  int iDistance = 300;
  while(iDistance>=50)
  {
    sendPosition(iDistance,0);
    iDistance-=5;
    delay(100);
  }
  while(iDistance<=300)
  {
    sendPosition(iDistance,0);
    iDistance+=5;
    delay(100);
  }
}

// Simulation of a robot turning around our robot
void circleSimulation()
{
  int iAngle = 0;
  while(iAngle<=360)
  {
    sendPosition(300,iAngle);
    iAngle+=5;
    delay(100);
  }
}
Results
And here is the result after hours of development
I’m quite proud of the result ! Next step : sending parameters from processing to the attiny. But I would like to be a little bit more advanced on the development of my Final project to exactly now my needs.
Sending values
For the sending part, I just test to send a speed parameter to my board. So, on the application side, I added this function when the SerialSend button is pressed:
public void serialSend()
{
 int speedValue = int(speed.getValue());
 myPort.write(byte(speedValue));
 //myPort.write('\n');
 println("Parameters sent : speed set to " + speedValue);
}
And for the Attiny side, I created a function that will be called into as often as possible :
void updateParameters()
{
  if (Serial.available()>0)
  {
    byte c = Serial.read();
    analogWrite(motor,c);
  }
}
And here is the result :
I will now work on several parameters that could be sent to the beacon.