INTERFACE AND APPLICATION PROGRAMMING| WEEK 15
A0 Link to group assignment.
You can see the group assignment hereIn my new pantheon of technological gods Daniel Shiffman will have a place close to Neil. For this week I tried processing because our amazing tutor, Marta, gave us a small class about the program. Then I watcht the videos from the the youtube chanel The code train and the tutorials from Processing web page to make some basic programs. I now they are basic, but I'm very proud because programming is not really my thing.

Even, when the first circle appeared in the screen I thought It was magic. After understand (more or less) how the program works and which were the basic commands I started with some examples without communications with a electronic device.
Using the mouse.
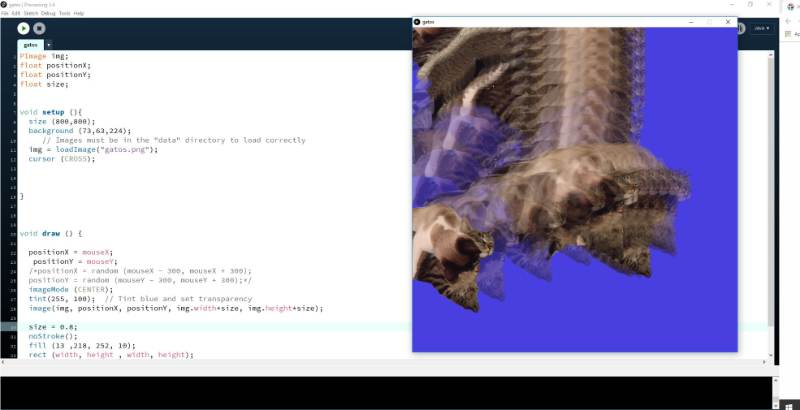
I did this little animation to understand how a variable works. With the variables mouseX or mouse Y it's possible to control an animation using the mouse to control speed/ move or others. I use it with an image of my cats and start to move them around.
Here is the code
PImage img;
                float positionX;
                float positionY;
                float size;


                void setup (){
                  size (800,800);
                  background (73,63,224);
                     // Images must be in the "data" directory to load correctly
                  img = loadImage("gatos.png");
                  cursor (CROSS);


                }


                void draw () {

                  positionX = mouseX;
                   positionY = mouseY;
                  /*positionX = random (mouseX - 300, mouseX + 300);
                  positionY = random (mouseY - 300, mouseY + 300);*/
                  imageMode (CENTER);
                  tint(255, 100);  // Tint blue and set transparency
                  image(img, positionX, positionY, img.width*size, img.height*size);

                  size = 0.8;
                  noStroke();
                  fill (13 ,218, 252, 10);
                  rect (width, height , width, height);

                }
And here is a video with the result.
Ball Moving and keypressed
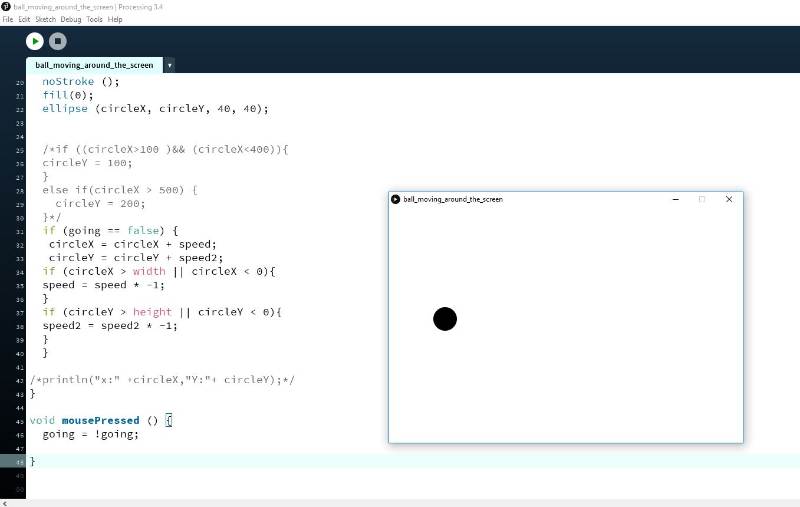
My next experiment was with key pressed I did to learn about variables, conditionals and boleans. I gave me some headeaches but It worked fine at the end.
Here is the code that I used:
//Code for a ball moving around the screen that can be stop with the mouse.
                float circleX;
                    float circleY;
                    boolean going = true;
                    float speed;
                    float speed2;

                    void setup (){

                      size (600,400);
                      background(255);
                      circleX = 0;
                      speed = 5;
                      speed2 = 10;
                    }

                    void draw (){

                      // Drawing stuff
                      background(255);
                      noStroke ();
                      fill(0);
                      ellipse (circleX, circleY, 40, 40);


                      /*if ((circleX>100 )&& (circleX<400)){
                      }
                      else if(circleX > 500) {
                        circleY = 200;
                      }*/
                      if (going == false) {
                       circleX = circleX + speed;
                       circleY = circleY + speed2;
                      if (circleX > width || circleX < 0){
                      speed = speed * -1;
                      }
                      if (circleY > height || circleY < 0){
                      speed2 = speed2 * -1;
                      }
                      }

                    /*println("x:" +circleX,"Y:"+ circleY);*/
                    }
                // start or stops the movement when you push the mouse.
                    void mousePressed () {
                      going = !going;

                    }
and here is the video showing the movement (if the ball is stopped it means that mouse button it's been pressed.
Video
I wanted to try something with video but I found problems even with the tutorial. The example code from the processing webpage didn't work but I could find the reason why.

The command video.start; did not work with the resolution of my camera. As you can see in the picture, I have a warning message explaining that the resolution was "64 x 48", the result of dividing 640x480 by 10.
I look for an answer on internet, and I found a code to see the kind of cameras that I have in my computer, the minimal is 320x240.

I read in google that something estrange happens in windows with the cameras. I changed the values for lowest ones accepted by one of my cameras (320x240). And then I got something.

// Step 1. Import the video library.
                    import processing.video.*;

                    //Step 2. Declare a capture object.
                    Capture video;
                    // variables for 2d array
                    float[][] distances;
                    float maxDistance;
                    int spacer;
                    // Step 5. Read from the camera when a new image is available!
                    void captureEvent(Capture video) {
                      video.read();
                    }

                    void setup() {
                      size(640, 480);

                      // Step 3. Initialize Capture object.
                      video = new Capture(this, 640, 480);

                      // Step 4. Start the capturing process.
                      video.start();

                      //setup for array 2d
                    maxDistance = dist(width/2, height/2, width, height);
                      distances = new float[width][height];
                      for (int y = 0; y < height; y++) {
                        for (int x = 0; x < width; x++) {
                          float distance = dist(width/2, height/2, x, y);
                          distances[x][y] = distance/maxDistance * 255;
                        }
                      }
                      spacer = 10;
                      strokeWeight(6);
                      noLoop();  // Run once and stop
                    }

                    // Step 6. Display the image.
                    void draw() {
                    image(video, 0, 0);

                      // This embedded loop skips over values in the arrays based on
                      // the spacer variable, so there are more values in the array
                      // than are drawn here. Change the value of the spacer variable
                      // to change the density of the points
                      for (int y = 0; y < height; y += spacer) {
                        for (int x = 0; x < width; x += spacer) {
                          stroke(distances[x][y]);
                          point(x + spacer/2, y + spacer/2);
                        }
                      }
                    }
After the examples I prepared a code to show the values o the sonar in my computer. First thing to do is prepare the serial comunnication of the Attiny. I had uploaded a serial code from other assignments but it prints "distance: xx" and I need only the values. So the first thing to do is change the code with arduino ide and the programmer.

After changing this line and program my board again, I checked that everything was right and then I started to prepare the code in processing. First I import the processing.serial
import processing.serial.*;
Then print serial helps to know the port of your sensor.
 println(Serial.list());
            myPort = new Serial(this, Serial.list()[2], 9600);
            myPort.bufferUntil('\n');
And the last thing related to code. a void to read the values from the sensor.
            void serialEvent(Serial myPort) {
                String inString = myPort.readStringUntil('\n');
                if (inString != null) {
                  inString = trim(inString);
                  float[] values = float(split(inString, ","));
                  if (values.length >=1) {
                    val = values[0];
                  }
                }
              }
The rest of the code is just a loop with lines with the same x value and a maximum I value based on my sonar. I also Map the values to control the animation.
Here you can see a video using the sonar with the processing interface.
And here is the full code
            import processing.serial.*;

            float val;
            Serial myPort;
            float altura;
            String texto;
            float x;
            float grosor;
            float colores;

            void setup() {
              size(1000, 500,P3D);
              println(Serial.list());
              myPort = new Serial(this, Serial.list()[2], 9600);
              myPort.bufferUntil('\n');
              background(0);
              grosor = 0.5;
              x = 0;
            }

            void draw() {
              altura = map(val, 0, 20, 0, 400);
              altura = constrain (altura, 0, 400);
              colores = map(val, 0, 10, 0, 255);
              x= x + (grosor + 1);
              strokeWeight (grosor);
              stroke (255,colores,0);
              line (x,0,x,altura);
              x= x + grosor;
              if (x > width){
              background(0);
              x=0;
              }
              text (int (val), x, altura + 4);
              if (val > 400){
              val = 500;
              }
            println(val);

            }

            void serialEvent(Serial myPort) {
              String inString = myPort.readStringUntil('\n');
              if (inString != null) {
                inString = trim(inString);
                float[] values = float(split(inString, ","));
                if (values.length >=1) {
                  val = values[0];
                }
              }
            }

            void keyPressed (){
             saveFrame ();
            }
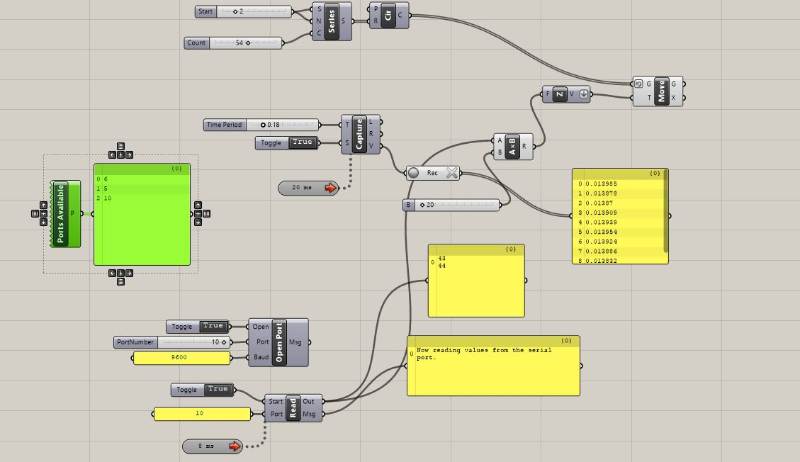
Time to use a different program. As an architect I've used grasshopper many times and I'm very curious of connect and controls outputs and inputs using grasshopper. At the end is the most similar thing that I know how to do well that looks like programming. It was difficult to understand how it works because it's prepare for arduino and not for the attinys so I need to make it work with serial. I use the same input, my sonar, so it's the same code.

This are steps to follow:
- Download Firefly from Firefly experiments. they have a good manual but it's focus in arduino, so be careful. I repeat the attiny it's too small for Firmdata.
- We will use the serial library. It can be uploaded with arduino UNO
- Open grasshopper and search for this elements. (In arduino you can search by double clicking with the mouse on the screen)
-
- Ports available In mac maybe this is not necessary but in windows the ports are crazy so this command will help you to know where your board is connected.
- Open port. To open the port were the sensor is. It needs an independent toogle (it's the first to turn on) and the bauds of communications.
- Read This is to read the values of the sensor. Here you define the port again with a different toogle. Also --and this is IMPORTANT-- add a timer. If you don't add a timer the program will only give you one value.
- Panel This yellow boxes will be very helpful to know whats happening in your code.
After all this your code should work and it should be possible to you to read data from the sensor. Here is my video with the sensor working and firefly reading values.
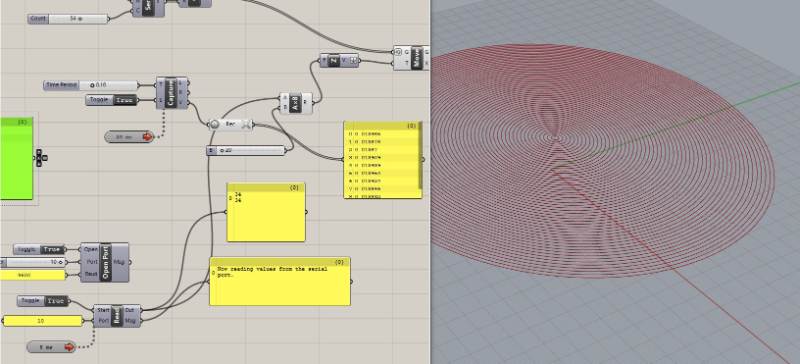
After I ensured that firefly was reading data I tried some components of firefly, like sound
Firefly with my computer microphone as sensor.
I tried to create some animation using my microphone but the values were very similar, I think that there is some problem with my computer microphone. Then I tried with the sensor but again I need to map everything and there is no time now...