
Embedded programming
Link to class: Embedded programming
This week's assignment is: Read a microcontroller data sheet and program your board to do something, with as many different programming languages and programming environments as possible.
First problem I had here was to mill the board. I'm still trying to get familiar with the Modela, but I'll keep trying to get it better. Thanks to the help of Ricardo, I finally made a board I could use. The Hello Echo Board I used on my previous assignment didn't connect properly and I decided to made another one. Also, my FabIsp was not working, I had to make another one too. So, finally, after many tries, I did it. Also got through the programming.
The hardest part of this assignment is making the board to actually work with the environment you've chosen for programming. I choose Arduino, following the tutorial by Ana Kaziunas. I didn't had much time to try another one because I had a lot of trouble with the Modela, as I've explain that before. The programming is really quite simple, once you have a good board to work with and have managed the soldering part well.
To program the Hello Echo Board you need to:
Download Arduino (I used version 1.0.4, latest version in the arduino page) Download the Attiny libraries (to program the microcontroller) Download the FTDI drivers and install them (cables have to be pluged in when installing)The Arduino environment is very simple and easy to use. The .zip file you download at the web page needs to be unzipped at the Program files folder. It comes with an arduino.exe file that is the program itself. Inside this package you need to find the HARDWARE folder and copy the Attiny libraries inside here.
In the TOOLS meny you need to check three things:
Choose the attiny microcontrollerTools>Board>ATtiny44 (external 20 mhz clock)
Check the port you're using to connect the Hello Echo board
Tools>Serial Port> COM... (depends on where you've installed your controller)
Check the programmer
Tools>Programmer>USBtinyISP
After making this changes, you're ready to program it. Clic on BURN BOARD.
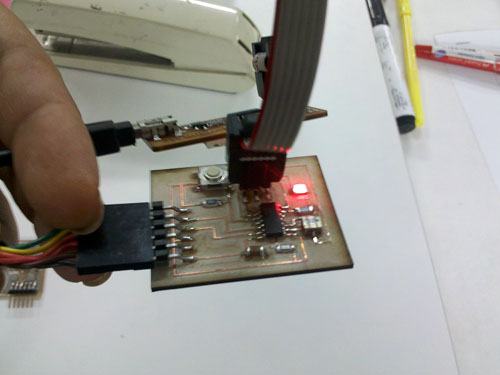
If everything is correct, you're ready to program a function on the microcontroller. In this case I used port 7 for the Led and port 3 for the button. I used the button example available on Files>Examples>Digital. First I didn't change anything and just programmed the button only changing the pin numbers.
Button
Turns on and off a light emitting diode(LED) connected to digital pin 13, when pressing a pushbutton attached to pin 2.
The circuit:
* LED attached from pin 13 to ground
* pushbutton attached to pin 2 from +5V
* 10K resistor attached to pin 2 from ground
* Note: on most Arduinos there is already an LED on the board attached to pin 13.
created 2005
This example code is in the public domain.
http://www.arduino.cc/en/Tutorial/Button
*/
// constants won't change. They're used here to
by DojoDave
modified 30 Aug 2011
by Tom Igoe
// set pin numbers:
const int buttonPin = 3; // the number of the pushbutton pin
const int ledPin = 7; // the number of the LED pin
// variables will change:
int buttonState = 0; // variable for reading the pushbutton status
void setup() {
// initialize the LED pin as an output:
pinMode(ledPin, OUTPUT);
// initialize the pushbutton pin as an input:
pinMode(buttonPin, INPUT);
}
void loop(){
// read the state of the pushbutton value:
buttonState = digitalRead(buttonPin);
// check if the pushbutton is pressed.
// if it is, the buttonState is HIGH:
if (buttonState == HIGH) {
// turn LED on:
digitalWrite(ledPin, HIGH);
}
else {
// turn LED off:
digitalWrite(ledPin, LOW);
}
}
With this example the light stays on and turns off when you clic the button. But this was a little boring so I wanted to make some changes for the light. Then I checked the BLINK example (Files>Examples>Basics). I took this portion of the blink example and integrated it into the button example.
// the loop routine runs over and over again forever:
void loop() {
digitalWrite(led, HIGH); // turn the LED on (HIGH is the voltage level)
delay(1000); // wait for a second
digitalWrite(led, LOW); // turn the LED off by making the voltage LOW
delay(1000); // wait for a second
I wanted my light to blink a lot of times, but I only got it to delay the light on for 1 second. Also I got it to turn off and then turn on when pressing the button. Although this seems really simple and naive, I was excited when the light turned on. I would like to try the light sensors now and experiment a lot with the Arduino, since my last project revolves around the idea of integrating design with led lightning programming.