
Project Development
Link to class: Project Development
THIS IS IT!
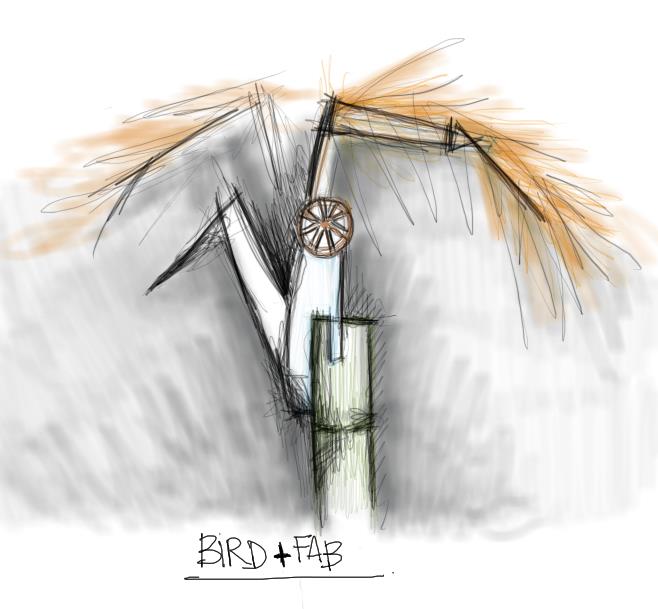
So for the past few weeks the project has been the final goal and its been hectic and chaotic, but rewarding. My idea for the bird changed a lot but finally became real.
Things that needed to be done:
1. Make the structure and get it to move.
2. Hack a servo motor and build a board to control it and the lights
3. Make the bird.
4. Test it and hope for the best.
Machines used:
- Laser Epilog Legend EXT for mechanism and body of the bird
- Roland Modela for circuits.
Processes:
- Computer controlled cutting (for the structure)
- Input (light sensor)
- Output (servo motor, led board)
LET'S BEGIN...
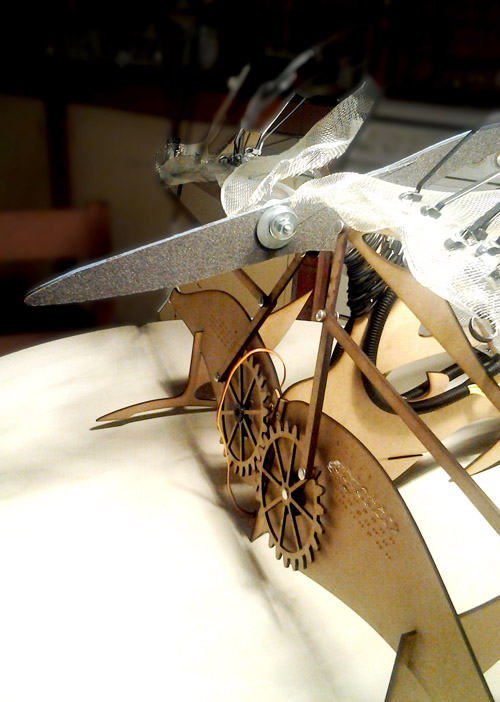
Step ONE: Make the structure and get it to move.
Right from the start I thought about using the Laser Machine. My experience with it was great and its very versatile. Also, the material I wanted to cut was 3mm MDF with very precise and delicate angles, that the shopbot couldn't do.
I began to research about the movement of a bird wings and I found some images to begin with. But I don't know how to use a program like Solid Works that would have helped me a lot by making a simulation. Although, I did it by aproximation, and it worked on the first two tries, with some modifications.
This is the first model ever. I began making the single structure to try to mimicate the movement of the wings. At his point I made this just to test the motion.
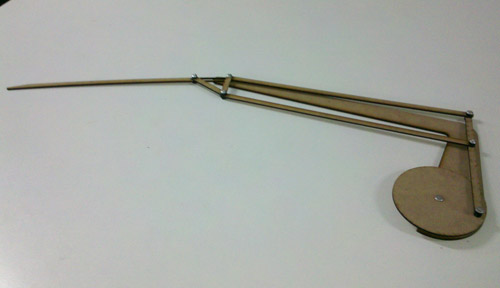
At the beggining I tried to use screws on the joints, but I quickly realized they where to heavy and to chunky to let the movement flow.
Step TWO: Hack a servo motor
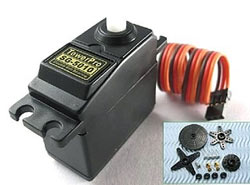
I bought a servo motor because the tutors here at Fab Lab Lima recommended me to use one and hack it to have continuous movement. This, as they said, is easier to control than a DC or stepper, according to what I wanted to make. This are the specification for my motor:
TowerPro SG-5010 Standard Servo
Modulation: Analog
Torque: 4.8v - 8.00 kg-cm / 6.0v - 11 kg-cm
Speed: 4.8v - 0.17 sec/60° / 6.0v - 0.14 sec/60°
Weight: 1.34 oz.
Dimensions: 40.1 x 20.3 x 1.70 mm
Motor Type: 3-pole
Gear Type: Plastic
Rotation/Support: Dual Bearings
How to Hack a Servo Motor
Two things needed to be done:
1. Remove Potentiometer Stop (located in the gears)
2. Remove Potentiometer from circuit and replace with resistors (located in the circuit board)
I found a lot of awesome tutorials on the web for hacking servos. The easiest thing is to cut off the pontiometer stop. This can be done with a cutter and twezzers. The hardest thing is to remove the potentiometer itself, because you can completely destroy a motor (since I've never ever modified a motor in my life). Thinking ahead, I bought two motor, just in case...
Some advices from my experience:
- When I opened the motor by removing the 4 screws on the back I opened it and all the gears when flying. ********Open it carefully and look at it. Might want to take a picture.
And finally, here are some tutorials I've found that explain step by step how to do it. http://www.cornerstonerobotics.org/curriculum/lessons_year2/erii17_hacking_servos.pdf >> This one comes with a lot of photos of each step.
Down this page you can see the board I made to connect the FabDuino, servo and lights.
Step Three: Make the bird.
I though that since this bird is a fusion of the things I've learned and with what I came with, I wanted to make a design that could embrace all this and open new opportunities to architects that might want to take on the Fab Academy as a really good experience to complement what we do.
This is my first attempt of making a fusion between arts, science, technology and digital fabrication.
Making the FabDuino!
I decided to make the FabDuino. There's a lot of variations of the main design idea made by
http://fab.cba.mit.edu/content/projects/fabkit/ Ed Baafi
I had trouble finding:
- Microcontroller Atmega 168 or 328p – because they were not in the Fab Lab Inventory, nor in the stores available in Lima. I also checked in the newly opened Fab Lab at Tecsup, and they didn't had it either. So I decided to go for the Atmega 328 available.
- 8 mhz resonator – Wasn't available either in any Fab Lab nor in the stores. According to Ed Baafi tutorial this is neccesary to use servos with Fabduino. I use a 20mhz resonator instead, since it was the only resonator available at Fab Lab.
Tutorials that helped me figure out the fabduino:
- http://academy.cba.mit.edu/2011/labs/detroit_Incite_focus/Embedded%20Programming/embedded_programming.html by Blair Evans
- http://www.as220.org/fabacademy/tutorials/embedded_programming_arduinoIDE.php By Ana Kaziunas
- http://fab.cba.mit.edu/classes/863.12/people/pip/WK12/wk12.html by Pip
- http://fab.cba.mit.edu/classes/863.11/people/tiffany.tseng/fabduino/index.html by Tiffany Tseng
- http://www.watanabe.arch.waseda.ac.jp/tutorials/ArKou.html by Kosiuke Kikuchi
And of course, the valuable help of different communities, like the nice people at Arduino Google+ Community.
In case you want to open a discussion or showcase your work with any product from Arduino, this is the place.
Another trouble along the way was the mills available at Fab Lab Uni. I had to ask for help from the Fab Lab Tecsup, since they have finest mills. When reading the tutorials I had to use a 1/64” mill, which wasn't available at Fab Lab UNI. I finally made the board with the help of Roberto Delgado, from Fab Lab Tecsup and former student at Fab Academy 2012.
Trying to make the board with AtMega 328 Microcontroller.
I stuffed the board with all the components.
- 8 pin female headers (3)
- 6 pin female header (1)
- 10k resistor
- 0,1 uF capacitor 10uF capacitor
- 499 ohm resistor
- 1uF capacitor
- 20 mhz resonator
- LED Atmega 328 microcontroller
This is my board with the components. Everything looking good.
This is my first FabDuino. Not that great.
I downloaded Blair Evans file of the board to use the Atmega 328 microcontroller. I didn’t had any luck with the Atmega 328 which can be found on the fablab inventory. The message I got from the Arduino was specifically about the microcontroller: I had to solder the right one.
2. Trying with the AtMega 328p Microcontroller.
After this I had to wait a bit for the Atmega 328p to arrive, since I have to place an order for it. Two weeks later it arrived and I stuffed the board again. I recommend stuffing the board again always, because the first board (at least for me) has always been the “sketch” board, the one I use to test my poor abilities of soldering and logically it doesn’t work at all.
Components where basically the same:
-
8 pin female headers (3)
-
6 pin female header (1)
-
10k resistor
-
0,1 uF capacitor
-
10uF capacitor
-
499 ohm resistor
-
1uF capacitor
-
8 mhz resonator << This changed
-
LED
-
Atmega 328p microcontroller << This changed
I made the board again with the microcontroller 328p and a external 8mhz resonator (as you can see on Ed Baafi tutorial, the 8mhz resonator is needed for controlling servos.
Right click and open in a new window to see image in full size (by the way it's in HD)
3. Bootloader Part II: The Fabduino strikes back.
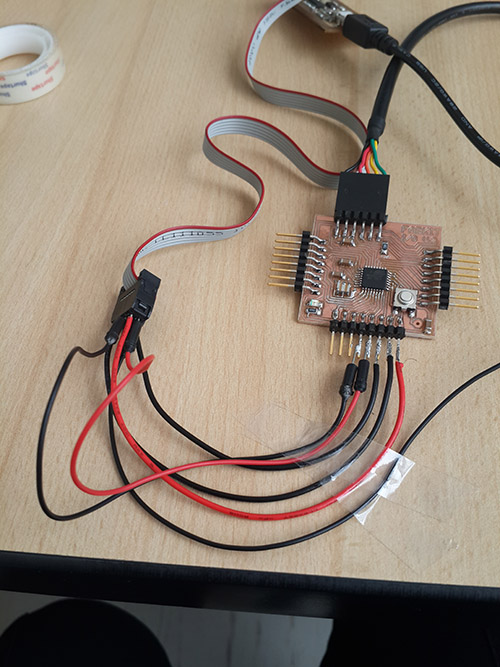
After my first experience I wanted to check for everything before jumping to run the bootloader. I tested my board using the Multimeter, so I discard all trouble related to bad soldering (it has happened to me, a lot) or wrong connections. It was all good. Now, to the programming: I used the FabISP. In case you have trouble connecting the FabISP and the FabDuino board, here’s a graphic you can use:
This is the logic (I know this is on a lot of tutorials, but I like explainig things twice):
You have your FabDuino board. You have your FabISP. You want to connect them. To do so you need to connect the pins from the FabDuino to the FabISP. VCC, MISO, MOSI, GND, RESET, SCK.
Here's how you do it: Get a ISP cable. You will see a little arrow pointing down. This arrow is going to point at the RESET pin. Connect it with the RESET pin from your FabDuino. After this, you should easily realize how to connect all of them. But, I've made a graphic to help you anyways...

As you can see in the drawing, I separated by colors the connections you need to make with the ISP cable and the pins from the botton of the FabDuino. If you want to check if you're connecting the cables ok, you can use the multimeter. Place one tip on any pin from the FabDuino, and the other tip on the corresponding pin on your FabISP.
Now off to the Arduino IDE.
I´m using Arduino 1.0.5.
Some things to check before jumping to run the bootloader:
- FabISP drivers installed: Check for them on the List of Devices on Windows.
- What port are you using? Check for this also on the List of Devices on Windows, under PORTS.
- Which board should I choose on Arduino IDE? According to Ed Baafi, it depends on what microcontroller you’ve stuffed in your board. Check his tutorial (links on top of this page) or if you’re using a AtMega 328p like me, choose Arduino Pro or Pro Mini (3.3v 8mhz) w/atMega 328.
- Which programmer should I choose? Since I´m using FabISP i choose UsbTiny.
- Connect all pins before opening Arduino IDE.
Open Arduino IDE.
>Tools >Board > Arduino Pro or Pro MIni with atmega 328 (3.3v 8mhz)
Or you can choose Arduino Pro or Pro Mini atmega 168 (3.3, 8mhz) // atmega 168 (5v, 8mhz) // atmega 328 (5v,8mhz)
>Tools > Serial Port > COM13 (In my case it was COM 13, but you need to check this on your computer. Go to Devices to check which port pops up when you connect your FabDuino)
> Tools > Programmer >USBTiny
> Tools > Burn Bootloader
Burning from UBUNTU
Needless to say, you always have to check if you have all the libraries and avrdude installed, or you're going to get an error message. Installing all things neccesary:
On terminal
apt-get update
apt-get upgrade
Install libraries and codecs
sudo apt-get install ubuntu-restricted-extras
Install DVD support
sudo apt-get install libdvdread4
sudo /usr/share/doc/libdvdread4/install-css.sh
sudo apt-get install libdvdcss2 mplayer mplayer-gui w32codecs
Install Medibuntu repository
sudo -E wget --output-document=/etc/apt/sources.list.d/medibuntu.list http://www.medibuntu.org/sources.list.d/$(lsb_release -cs).list && sudo apt-get --quiet update && sudo apt-get --yes --quiet --allow-unauthenticated install medibuntu-keyring && sudo apt-get --quiet update
Install VLC
apt-get install vlc
Install libraries for compiling
apt-get install build-essential
apt-get install linux-headers-`uname -r`
Redo apt-get update
I had trouble burning the FabDuino with in the Arduino IDE. The light blinked, but when I wanted to upload a program, it didn't recognize it. Then I tried to burn it with the terminal at UBUNTU, but I changed the programmer, and used a AVR, because FabISP was giving me trouble too. This time it worked. I used Ana Kaziunas tutorial to burn it on the terminal, so you should check it out too.
FabDuino: Working the lights and servo
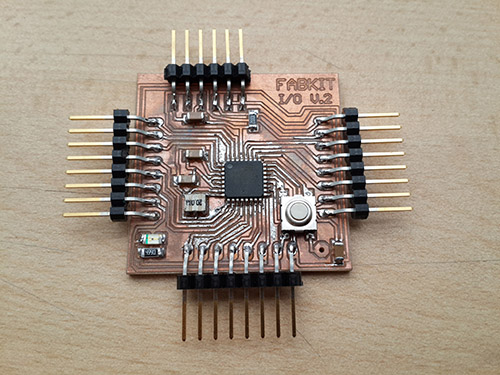
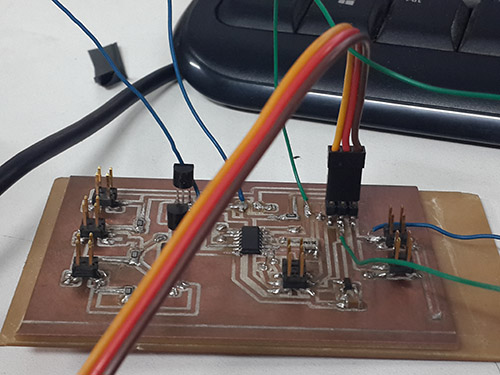
There is two aditional things I need to do to complete the work. I made a board to connect all the lights and the servo with the FabDuino. Here are all the files for the board. I first made it to work on its own, but then I realised working with FabDuino and Arduino IDE was better for me, since I already understand the code better.
So, the board was made on the basis of a Attiny44A, but after connecting the servo and the lights to the FabDuino, I didn't needed the microcontroller.
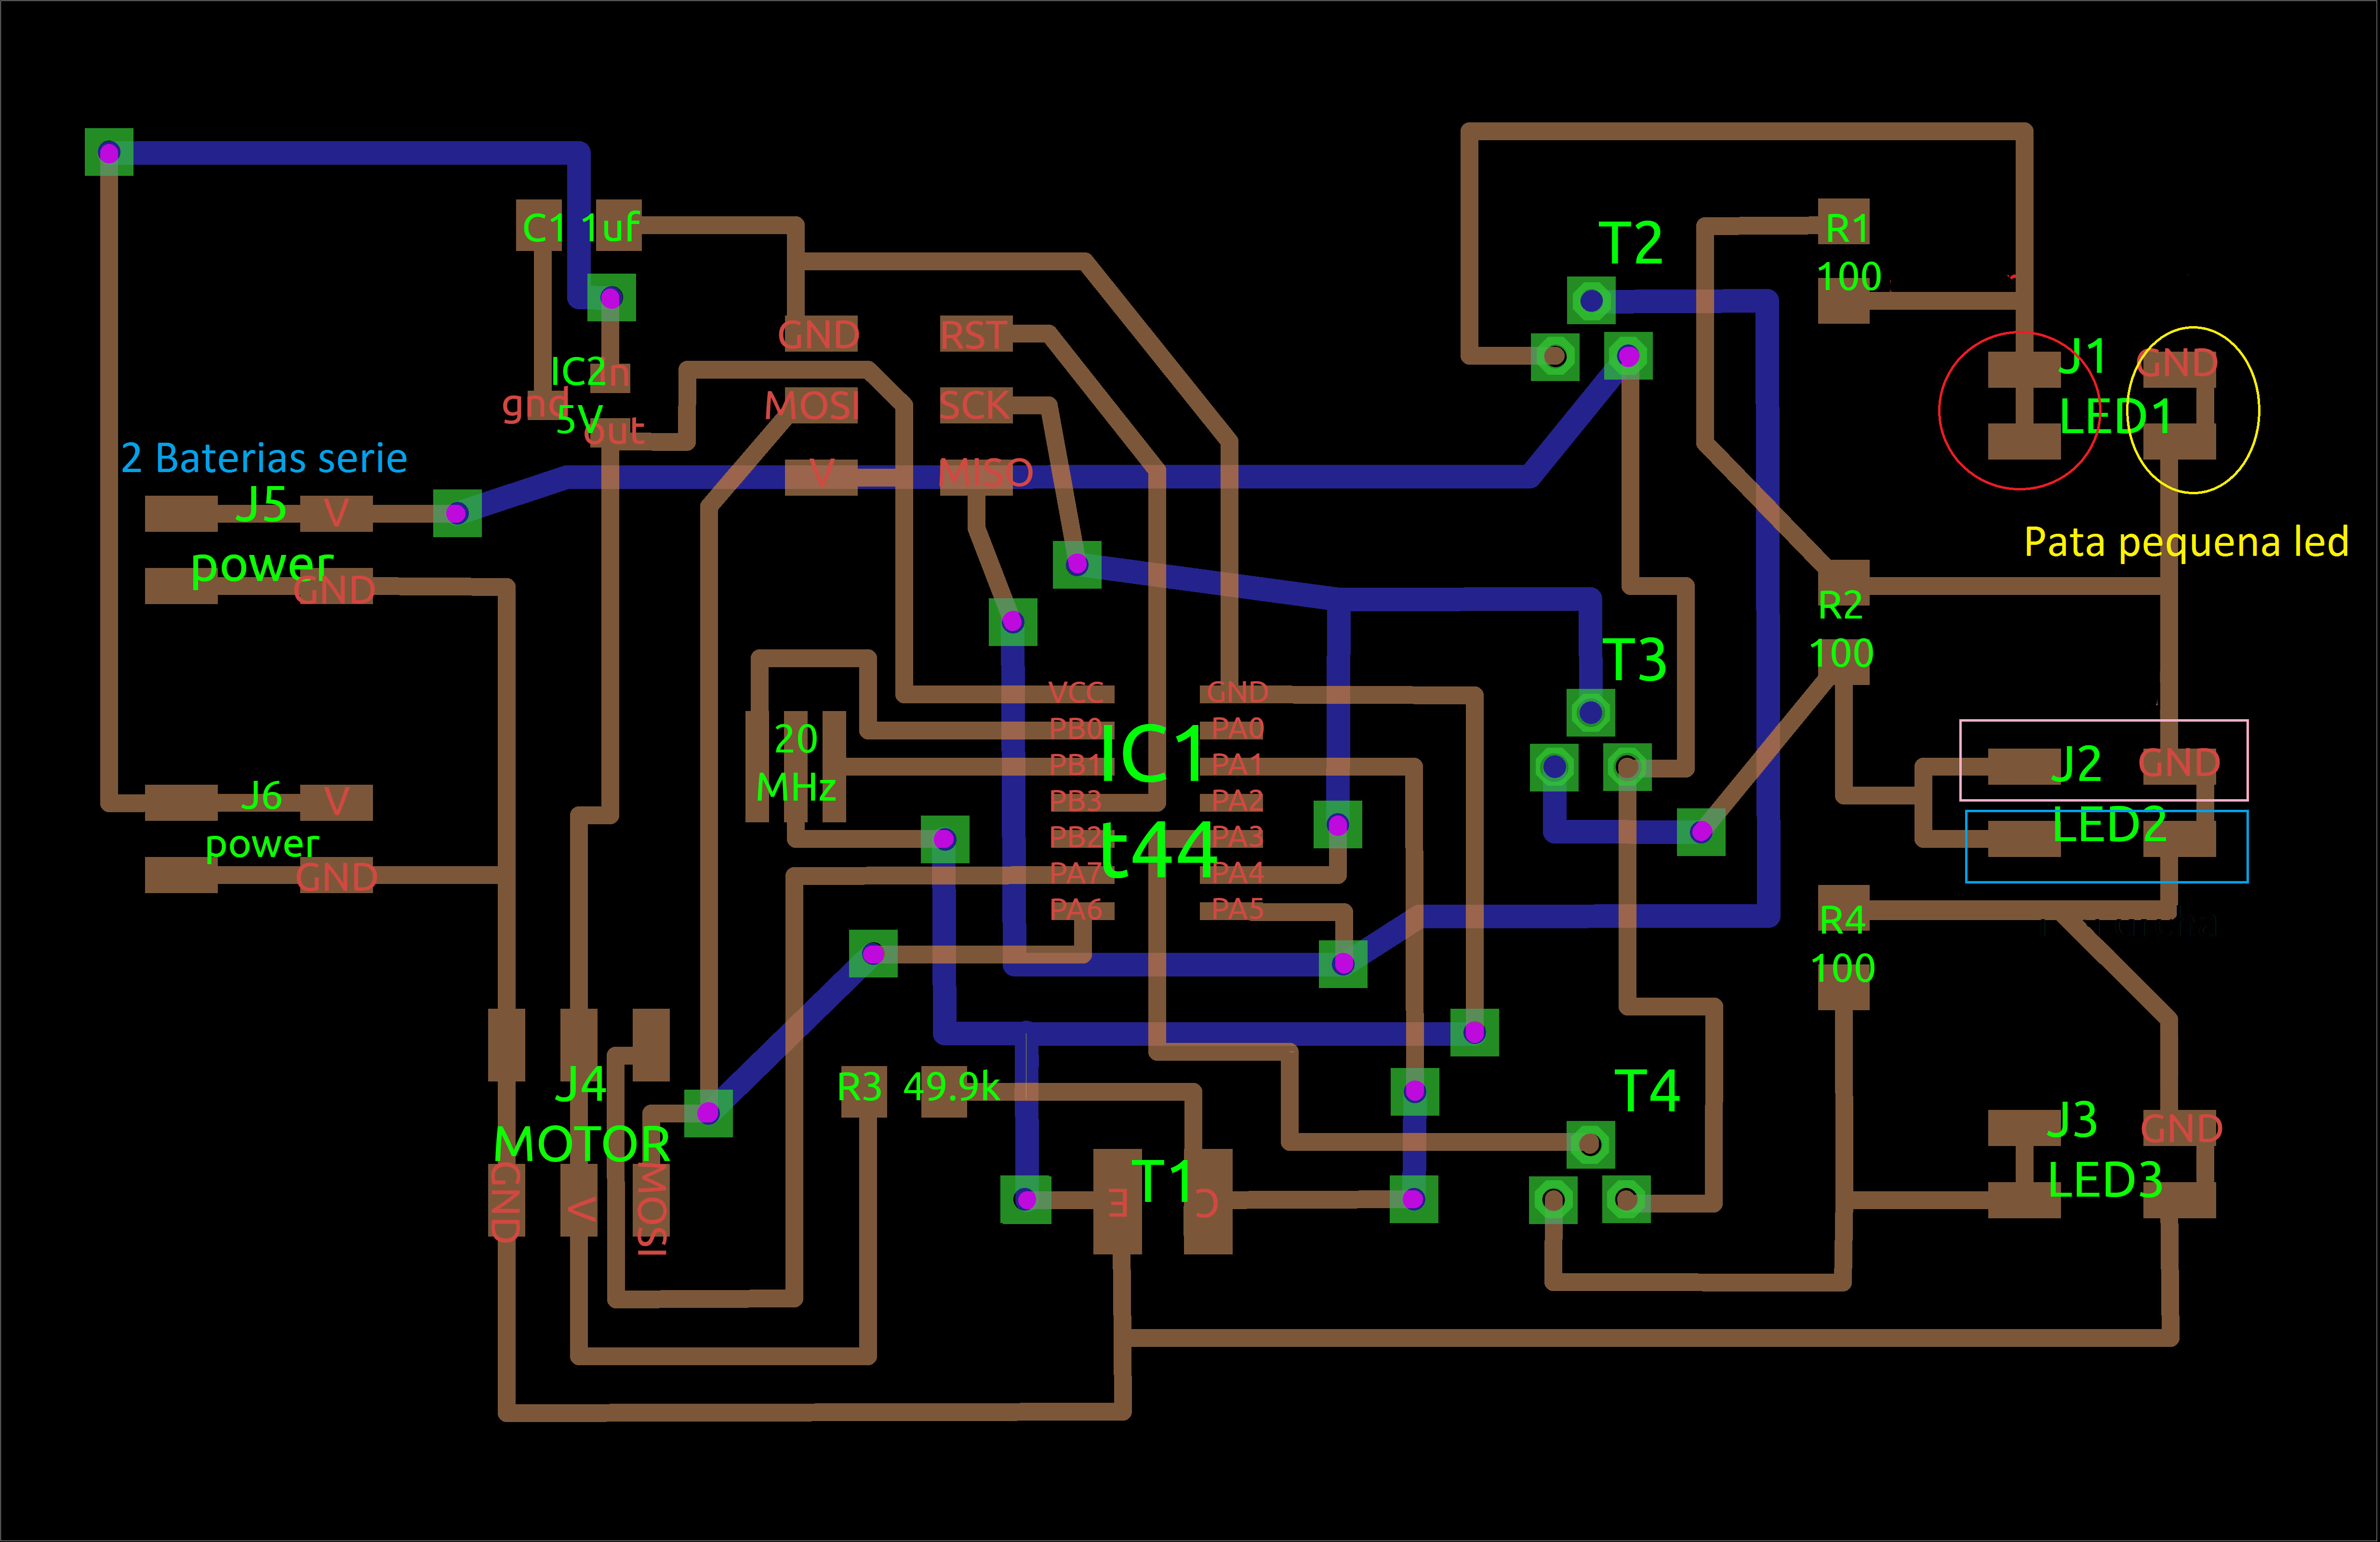
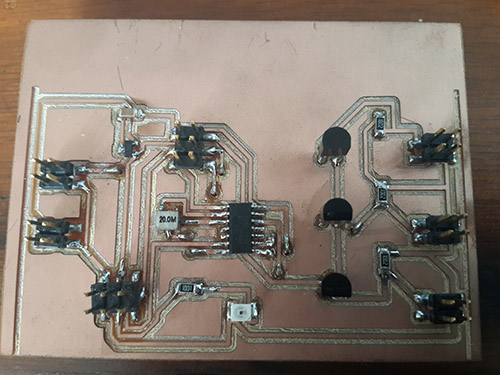
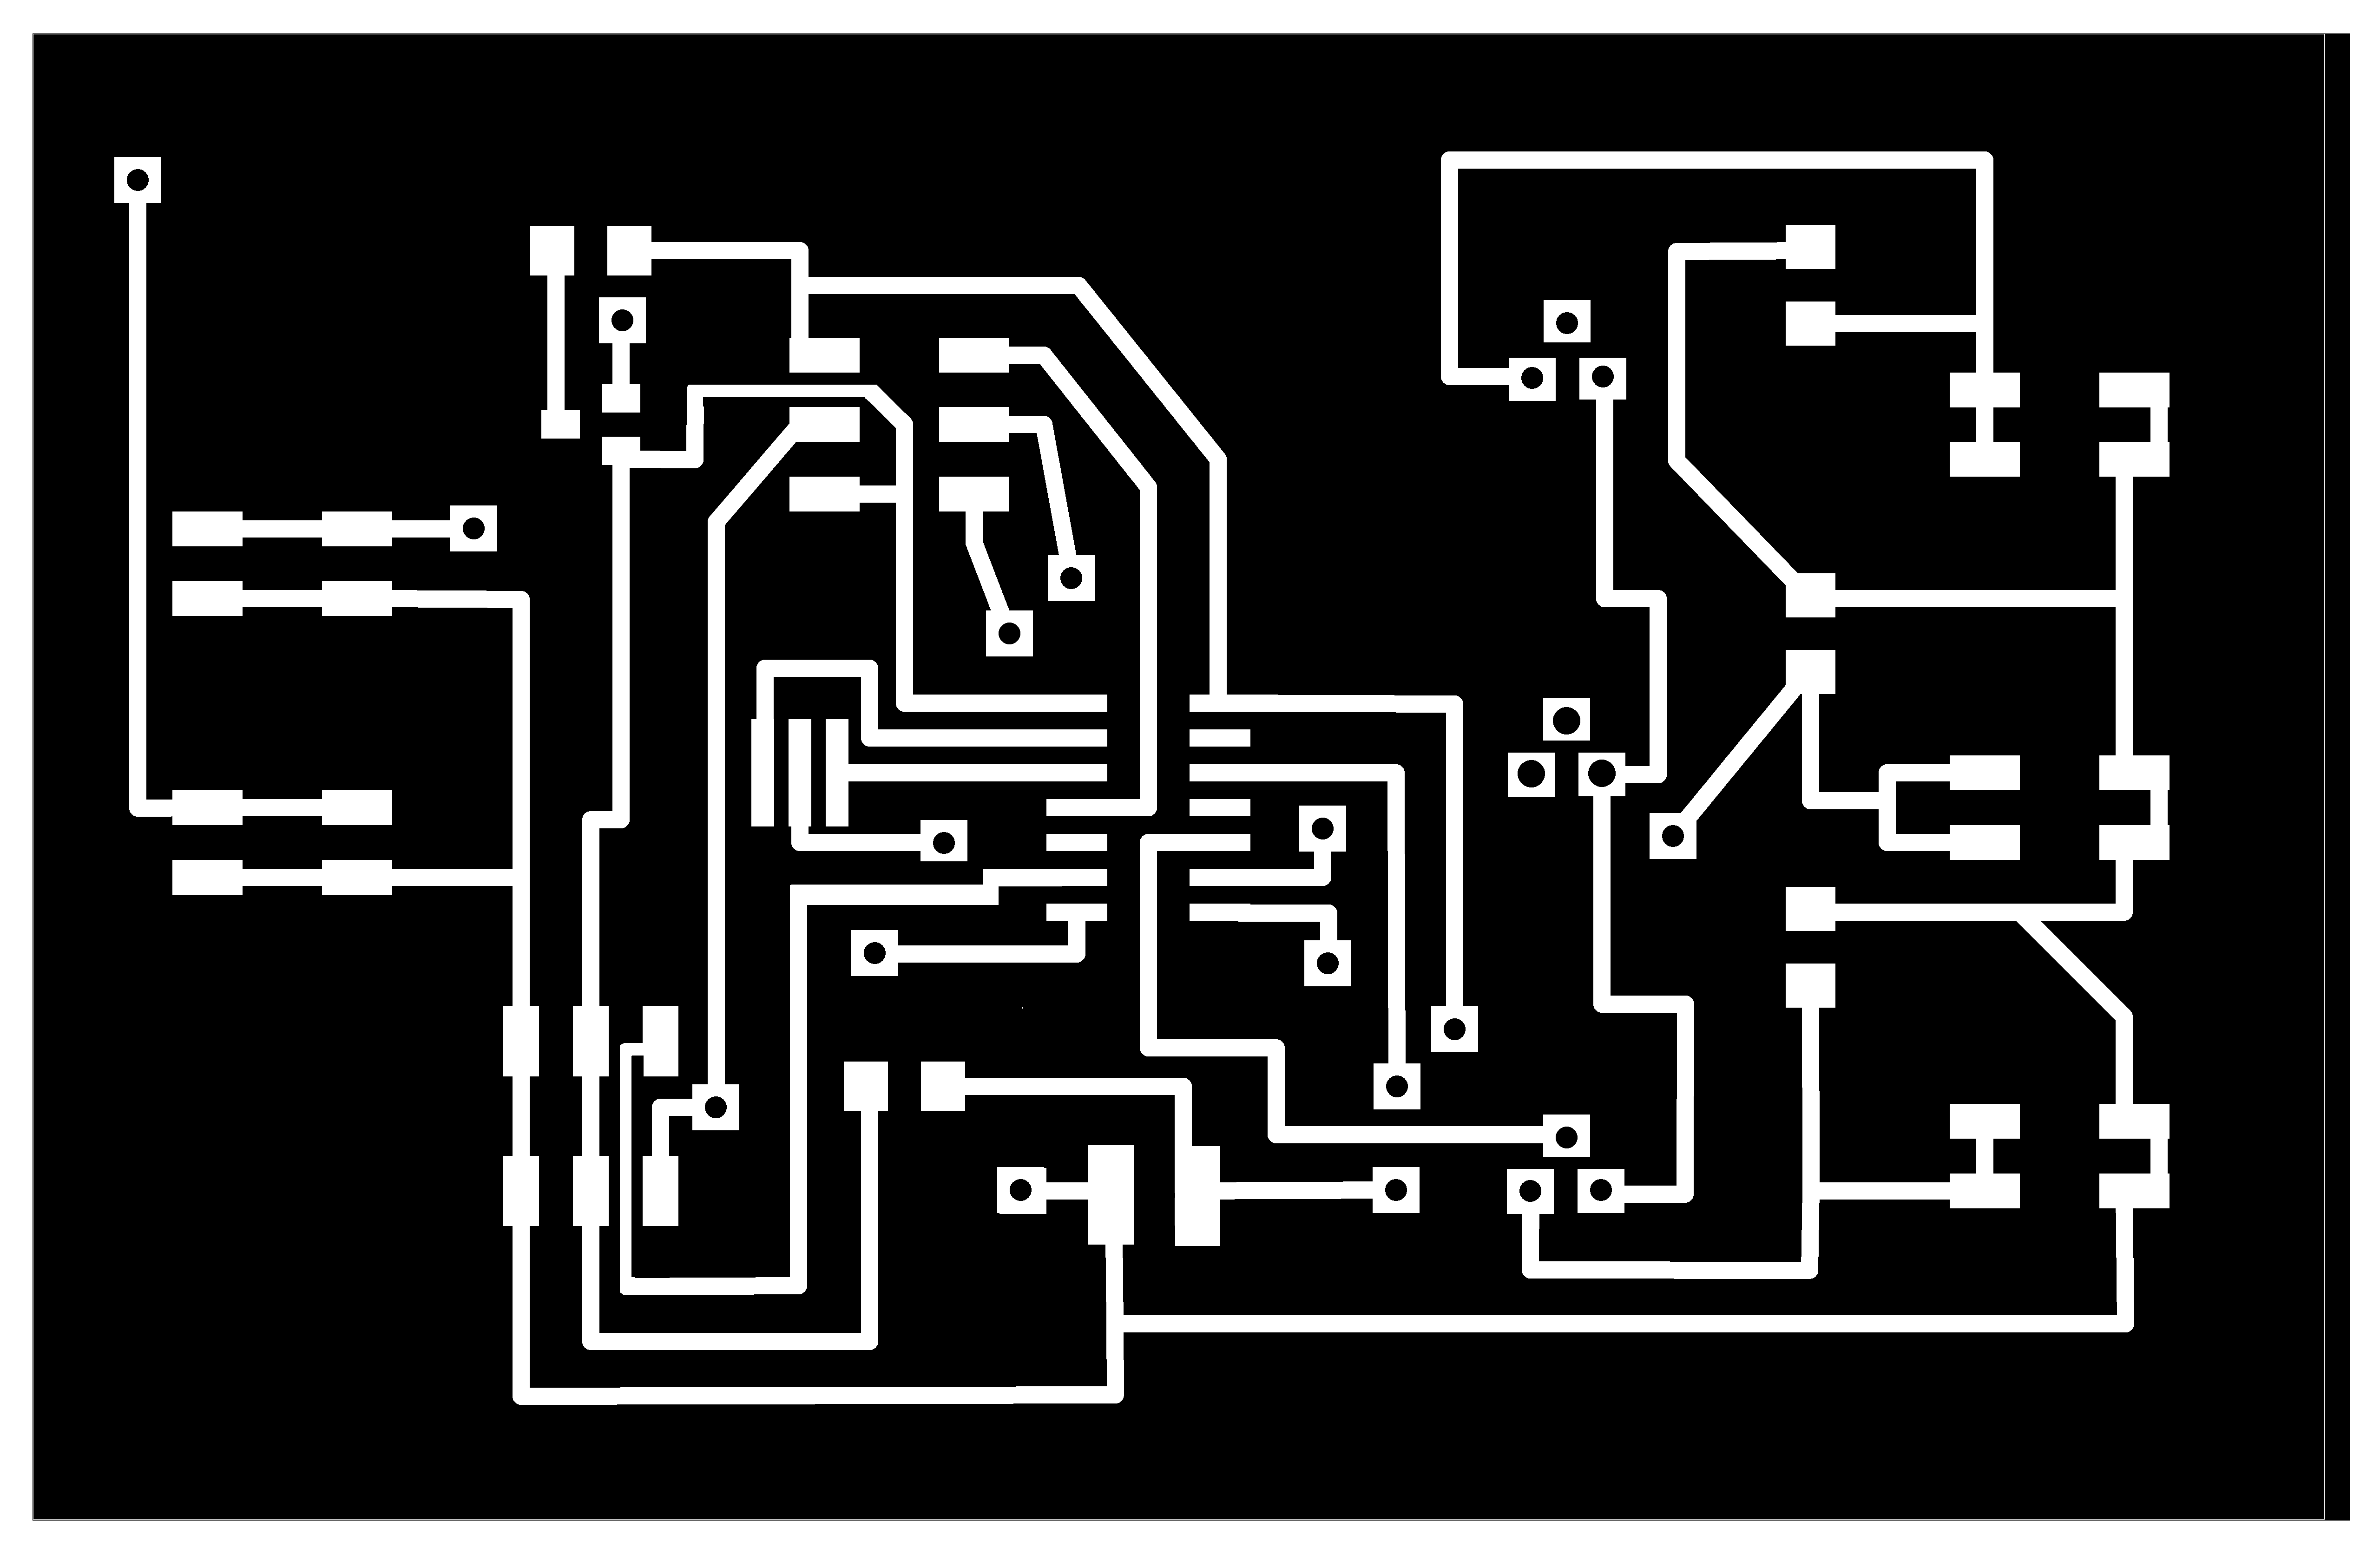

Then I connected both FabDuino with the board, cheking the pins on both of them. As you can see on the files, I put three connectors for the lights, because I wanted three sets of 12 leds, each one of 5mm. The servo only needed three connections: data, power and ground.
And finally, the code I used on the Arduino IDE.
Step four: Test it and hope for the best.
SOME ADVICE:
Definetly take the time to make a FabDuino. It's a great experience on how to understand components and logic behind them. Check all tutorials available (some of then are on this post, some of then out there in the web) before jumping to mill and solder, so you know what kind of FabDuino you want to make. I think Ana Kaziunas and Tiffany Tseng explain it the best, so you might want to check them out. I hope my tutorial help you in any way!
Here you can download the files to laser cut the artifact.
Final thoughts
On a longer basis, this assignment has led me to keep investigating about the integration of movement in objects for spaces (urban, private, public...) and the interaction between it as a form of art.
Regarding the FabDuino I most definetly agree that this should be on the Fab Academy, like the FabISP. This is a really awesome way of understanding components and the logic behind them.
Acknowledgements:
I would like to take a moment and thank the people that help me along the way through this interesting and amazing adventure that was the Fab Academy. First of all, to the instructors, Beno, Victor, Felix and Henry, for the opportunity of becoming a fabber. Also to Satoshi, that came to Peru only because he wanted to take the Fab Academy and I believe he help out a lot of us. He did help me with the problems I had with some assignments and I hope I did my part on helping him, although I believe he did more for me than the other way around. And finally to Ana Kaziunas, who I don't know personally, but I believe that withouth her tutorials I couldn't be able to finish most of the assignments.