
Computer Controlled Cutting
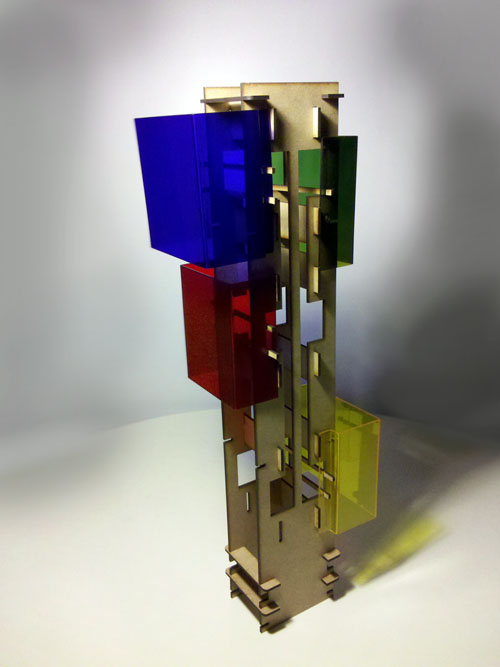
For this week's project I've decided to build a lamp with wood and acrylic. I drafted some sketches on my notepad and then transfered them to Autocad to give it the proper scale. This is a lamp I've been thinking for a while, but hadn't the tools to build. Since I was in college I've worked with acrylic, bending it with a burner for different project you can see in the images below, so I had that experience and wanted to bring it to the fab and work something useful, colorful and fun, something you could play with but It would also be an asset to decoration.
Step 1: Making the model
I made the model on autocad on DXF format, to upload it on Rhino after to make the printing. There's a very helpful tool on Rhino to differentiate double lines, which helps to save time to the machine (otherwise, the machine is going to pass twice over your lines when there's no need to). After arranging the model properly so it fits the board and saves time and space, we can hit the printing button.Specs for this printing:
Since I made only ONE layer and did no carving at all, I set this propierties only for cutting.
Step 2: Preparing the machine and Making the cut
TIPS FOR BEGGINERS: Always remember that for most of Fab Lab machines, you NEED to have some sort of vaccumm that suck all the dirt and/or smoke produced by the material being cut. Like the CNC cutter, the laser cutter has two steps before initiating any work.Now that it's all set on the laser machine, you need to know what kind of material you're going to cut or carve and set this properties on Rhino, so that you can make a more accurate job. Then you need to have the measure of the board you need for the machine and fit it to the project itself on Autocad or Rhino. Using the machine is actually pretty easy, and the mistakes you can make at this stage are more centered on the size and proportion of your model.
As you're going to see on the video at the bottom, I had a little problem with the size of the parts, that I had to fix after for the model to be correct and the acrylic cubes to fit.
Tutorial on Bending the Acrylic
There's a lot of tutorials on the internet about bending the acrylic, but as you can see on the video, I've already worked with acrylic since I was in college. But making more accurate shapes on this material is not easy, and there's barely any tutorial on doing this. What I pulled off finally was making a mold of wooden and bending the acrylic either with a home made burner or an iron (using a cloth to protect the acrylic). The fabbers have asked me to make a tutorial on this, but since time is running short, I had to give priority on the other assignments. I will be completing this tutorial soon with my method on bending acrylic.
Step 3: Press fit model
For this lamp I try two things: Making cubes with acrylic and Making cubes with wood. Both methods are explained on the video on the bottom. The trouble I faced at this project was making the acrylic fit with the wood structure, but it was easy to fix, so I could finally make my lamp as intended. What I used to put the cubes on the lamp was a fastner, which is like a metal long screw used for storing files on folders. What I need to do is replace this system with something made on the Fab Lab, so that's why I replace it with some wood pieces. Although it get the job done, it's not completely accurate and I'm testing out some other replacements.
Changes and Improvement for the future assignments:
What I've learned about this project is that the laser cutter has many options regarding the usage of materials and it would be a nice experience to keep investigating with acrylic, making the structure much more versatile and complex. This had been a really great experience for making and I hope to keep improving this lamp with the next assignments, by building different settings of lights.You can download the DXF File to cut it on the laser machine (right click and download)